如何使用 React Native、Expo 和 Back4App 制作待办事项列表应用程序
React Native 是移动开发中最流行的框架之一。它由 Facebook 基于 Javascript 创建。它可用于为 iOS 或 Android 构建具有原生平台功能的应用程序。
Expo 是一个可以帮助您加快开发时间和测试的工具。
本文将介绍如何将 React Native 应用程序与 Back4App 集成。在完成本教程的逐步讲解后,您将创建一个项目来操作待办事项列表。
这是您第一次使用 Back4App 吗?如果是,请先注册。
Contents
热身
配置Expo
根据 React Native 说明,您需要使用以下命令安装 Node 10+ 和 Expo CLI:
npm install -g expo-cli
更多详情:https://facebook.github.io/react-native/docs/getting-started.html
下载启动项目
要下载 ToDoListApp 模板项目,请在终端运行以下命令:
wget "https://github.com/templates-back4app/react-native-todoapp/archive/template.zip" -O template.zip; unzip template.zip; rm template.zip && cd react-native-todoapp && npm install
注意:请记住,您需要替换 Back4App 应用程序的密钥。打开 constans/Keys.js 文件并粘贴到以下键值中。
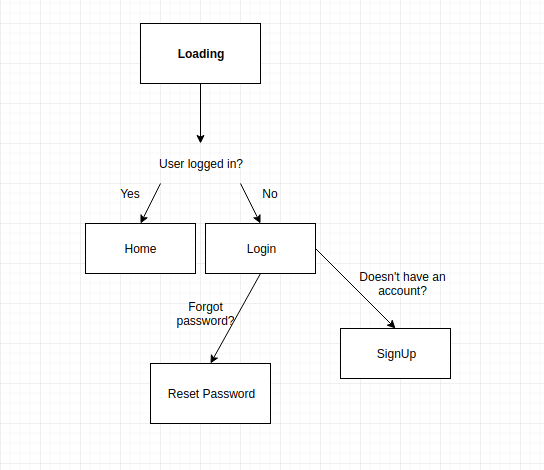
应用程序示意图
如果您按照上面链接的说明操作,应该可以看到下面的流程图:
启动 ToDo 列表应用程序
第 1 步 – 创建登录页面
要登录用户到我们的应用程序,请使用我们的方法让他们访问自己的账户:
1 2 3 4 5 6 7 8 9 10 11 12 13 14 15 16 17 18 |
onLogin=async()=>{ 让 username=(this.state.username).trim()、 password=(this.state.password).trim(); if(username=== "" ||password=== "") { this.setState(()=>({ nameError:`Fillthe fields correctly.` })); }else{ try{ await Parse.User.logIn(username.toString(), password.toString()); // this.submitAndClear(); this.props.navigation.navigate('HomeStack'); }catch(error) { this.setState(()=>({ nameError:error.message })); return(error) } } } |
在此查看完整代码: https://github.com/templates-back4app/react-native-todoapp/blob/login-page/screens/LogInScreen.js
第 2 步 – 注册页面
完成上一步后,应要求用户注册我们的应用程序。下面的代码展示了一个典型的注册页面:
1 2 3 4 5 6 7 8 9 10 11 12 13 14 15 16 17 18 19 20 21 22 23 24 25 26 27 28 29 30 |
onSignUp=async()=>{ 让 username= this.state.username、 email= this.state.email、 password= this.state.password; if(username.trim()=== "" |username === undefined ||email.trim()=== "" ||email=== undefined ||password.trim()=== "" |密码=== undefined) { this.setState(()=>({ nameError:`Fillthe fields correctly.`})); }else{ try{ Parse.User.logOut(); letuser= newParse.User(); user.set("username", 用户名); user.set("email", email); user.set("password", password); constresult=await user.signUp(); AsyncStorage.setItem('sessionToken', result.getSessionToken()); AsyncStorage.setItem('username',result.getUsername()); this.submitAndClear(); this.navigateToPage('HomeStack'); }catch(error) { console.log(error) this.setState(()=>({ nameError:error.message })); } } } |
步骤 3 – 设置重置密码页面
设想一下,只要我们有一个身份验证流程,用户就有可能忘记自己的密码。Parse Server 可以安全地重置用户密码。 配置一个询问用户电子邮件地址的功能:
1 2 3 4 5 6 7 8 9 |
resetPassword=()=>{ Parse.User.requestPasswordReset(this.state.email) .then(()=>{ this._alert('Success','An email was sent to your address.','Log In','LogInStack'); this.submitAndClear(); }).catch((error)=>{ this._alert('Error', error.message,'Log In','LogInStack'); }); } |
步骤 4 – 待办事项列表页面
配置布局和功能,以便从列表中创建、读取、更新和删除项目。
步骤 4.1 – 创建项目
使用保存功能在 Parse Cloud 中存储一个项目。这样就可以在应用程序中创建一个新对象。查看 Parse 应用程序中的数据浏览器:
1 2 3 4 5 6 7 8 9 10 11 12 13 14 15 16 17 18 |
createItem=()=>{ letitem= this.state.item; if(item=== "" ||item=== undefined){ this.setState(()=>({ nameError: ``Fillthe fields correctly.` })); }else{ constTodo=Parse.Object.extend("Todo"); consttodo= newTodo(); todo.set("task",this.state.item); todo.set("userId", ); todo.save().then(object=>{ this.readAllItems(); this.setState({item:''}) }).catch(error=>{alert(error)}) } } |
步骤 4.2 – 读取所有对象
该函数会被多次调用,因为它用于启动屏幕、更新或删除对象。可使用以下代码检索数据:
1 2 3 4 5 6 7 8 |
readAllItems=async()=>{ constidUser=await Parse.User.currentAsync(); constquery= newParse.Query("Todo"); query.exists("task"); query.equalTo('userId', idUser); constresultQuery=await query.find(); this.setState({results:resultQuery}); } |
步骤 4.3 – 更新项目
创建对象后,应该有办法在将来更新它。这很简单,您只需使用以下代码检索该项目并调用保存方法即可:
1 2 3 4 5 6 7 8 9 10 |
updateItem= () =>{ constquery= newParse.Query("Todo"); query.get(this.state.idObject).then(object=>{ object.set("task",this.state.updateValueDialog); object.save().then(objUpdate=>{ this.setState({updateValueDialog:'', dialogVisible: false}) this.readAllItems(); }); }); } |
步骤 4.4 – 删除项目
在处理项目列表时,需要允许用户自行删除对象。
1 2 3 4 5 6 7 8 9 10 |
deleteIten=async()=>{ constquery= newParse.Query("Todo"); constobject=await query.get(this.state.idObject); try{ object.destroy(); this.getAllData(); }catch(e){ alert(e) } } |
在此查看完整代码: https://github.com/templates-back4app/react-native-todoapp/blob/home-page/screens/HomeScreen.js
最后的话
ToDo 列表应用程序就介绍到这里!请注意,您可能需要对屏幕进行风格化处理。因此,建议通过下面的链接查看完整的软件仓库:
https://github.com/templates-back4app/react-native-todoapp
如果您需要任何帮助或某个功能无法使用,请通过聊天联系我们的团队!

什么是 React Native?
说到移动开发框架,React Native 是最好的移动开发框架之一。它由 Facebook 开发,能够帮助开发者构建功能与原生平台相同的 iOS 或 Android 应用。
什么是 Expo?
移动开发有时会很棘手。作为一名开发者,你可能会因为一个简单的编码错误而陷入困境,从而浪费你的时间。你还需要在构建应用程序后进行测试,然后再发布它。Expo 将为你提供提高开发和测试速度的便利。
将 React Native 应用与 Back4App 集成的第一步是什么?
第一步是配置 Expo。根据 React Native 的说明,您需要安装以下两个组件:
-Node 10+
-EXPO CLI
使用 EXPO CLI 的命令是“npm install -g expo-cli”。


