How to Build an App in React Native?

Are you looking forward to creating an app for iOS and Android platforms? Then, you should consider using React Native. It is an innovative mobile application development framework that has transformed the way developers create mobile apps.
This article summarizes my 13 years of experience while creating apps for desktop and mobile devices. You will learn several secrets I discovered from experience, so you don’t have to make the mistakes I made in the past. I shall also offer several practical tips that save time and help make React Native development a pleasant experience.
Mobile technology has taken over the world by storm. It is by far the most dominant computing device in the world today. Thanks to mobile apps that allow people to perform almost any computing task from their smartphones. Although creating apps for mobile devices is tasking and expensive, React Native and Backend services can help you develop apps faster and cost-efficiently.
Contents
- 1 Introducing React Native
- 2 The Benefits of React Native Mobile Development
- 3 Things to Note Before Creating an App
- 4 A Step-By-Step Guide for Creating a React Native Mobile App
- 4.1 Write Down the App Idea
- 4.2 Take Advantage of Business Canvas Model
- 4.3 Buy the Startup-Owner’s Handbook
- 4.4 Create a Budget
- 4.5 Do Wireframe, Mockup, and Prototype
- 4.6 Get User Feedbacks
- 4.7 Design a Landing Page for Your App
- 4.8 Create the App Backend
- 4.9 Native vs. React Native development
- 4.10 Creating a React Native App
- 4.11 Create the Analytics Dashboard
- 4.12 Do Beta-Testing
- 4.13 Do App SEO
- 4.14 Launch Your Mobile App
- 4.15 Promote your App
- 4.16 Use Customer Feedbacks to Improve Your App
- 5 Conclusion
- 6 FAQ
- 7 What is React Native?
- 8 Why use React Native?
- 9 What are the steps to create a React Native app?
Introducing React Native
React Native is a JavaScript-based mobile development framework for creating native-like mobile applications for iOS and Android devices. With React Native, a developer can use the same code to develop apps for different platforms.
React Native was born in 2015 when Facebook published it as an opensource framework. Eventually, it becomes one of the best solutions for native app development. It’s the platform that powers many successful apps such as Skype, Instagram, and Facebook.
This video from Programming with Mosh is amazing and a great way to know more about React Native.
The Benefits of React Native Mobile Development
Cross-Platform Development
The codes React Native creates is cross-platform compatible. Therefore, it is efficient for creating apps for Android and iOS. This means that an app coded for Android can be deployed for iOS, leading to substantial savings on development costs.
Saves Time and Money
The cost of creating two apps on React Native is just a little above the cost of building a single app with other methods. So, the additional costs of developing separate apps for different platforms is not necessary. Moreover, developers can deploy the same update for both Android and iOS platforms.
Hot Reload Advantage
React Native development procedure allows the developer to view live changes on the code through the hot-reload feature. The real-time feedback makes app development faster and more efficient.
High Performance
The performance of React Native apps is as good as that of Android and iOS native applications. While other cross-platform frameworks use CPU, React Native utilizes GPU for computing tasks. That is why it offers superior performance compared to other cross-platform frameworks.
OTA Updates
Over-the-Air update is an innovation that allows developers to create and administer updates when the user is active on the app. However, the updates reflect the next time the user launches the app. This means that users can update apps automatically without going through the app store. It makes the procedure for updating apps quick and hassle-free.
Enhanced flexibility
With React Native, multiple teams of developers can work on an app project sequentially and seamlessly. In essence, a team can create an app while another team updates it or add new features. Testers can also carry out their assignments with minimal interference with developers. All these features help reduce costs and expedite delivery.
Opensource Advantage
Developers do not have challenges migrating a React Native app from one platform to another. For instance, developers can export React Native apps to Android Studio or XCode. This flexibility is a significant advantage for React Native.
Want to know more about the React Native advantages? Please read a full report here.
Things to Note Before Creating an App

Here are some facts you should bear in mind before creating your next app project. It would help you save lots of time and money.
Don’t Start Coding Right Away!
The advice not to start coding right away stems from our painful experience in 2004. After two years of coding to create a product with multiple excellent features, the app eventually became a failed project. Why? It turned out there is no market need for the product. This is a vital lesson that would save you loads of cash and hundreds of wasted coding hours.
Developing codes for an app is expensive; you have to pay developers between $15-$200/hour, depending on whether you want to use offshore freelancers or Silicon Valley programmers. That is why you should do your homework to ensure your app project is viable. You don’t want to spend thousands of dollars developing an app that nobody wants to use. The first step is to articulate your app idea, then create a sketch and seek potential app users’ opinions.
Create an MVP first
Another essential lesson is to break the development cycle into stages, starting with an MVP -Minimum Viable Product. With this approach, your MVP can be ready in three months or less. The first version of your app doesn’t need all the bells and whistles. Simply create the basic app features and use it to feel the pulse of your real-life customers and gather usage data. Read the Business Model Canvas to learn more about MVP.
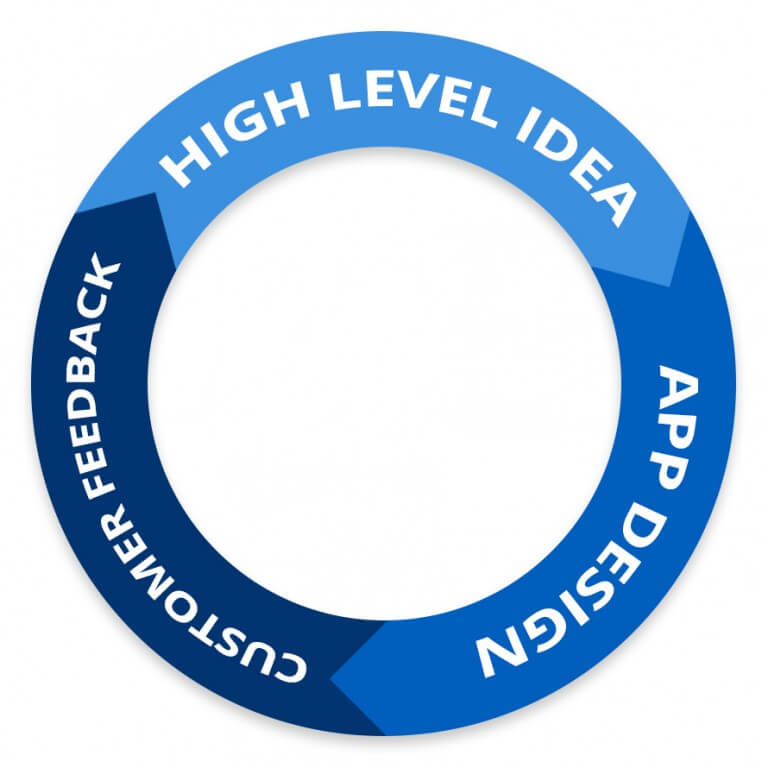
Quick Customer Feedback is Essential
You only have ideas and assumptions on your head when you start creating an app. Therefore, you must gather valuable data to validate those assumptions before diving headlong into your development project. You cannot afford to wait till your project is completed before feeling the pulse of the market. Early feedback from customers allows you to improve the app by identifying practical needs from user feedbacks. User-inspired improvements in apps is an essential factor for creating successful apps.
A Step-By-Step Guide for Creating a React Native Mobile App
Having discussed all the prerequisites for a successful app project, let’s delve into the procedures for creating a mobile app with React Native.
Write Down the App Idea
The app industry has become highly competitive because millions of mobile apps compete for mobile user’s attention nowadays. So, your app needs to be unique to stand a chance of becoming successful. That is why you should write the idea for your app and what you want it to achieve for the users. This approach will help you stay focused.
Take Advantage of Business Canvas Model
When we started out in 2004, we created a 100-paged business plan that covers multiple scenarios. Such a complicated plan is not the best approach to launching your app business because the time to the market is critical in this industry. Besides, the app industry is dynamic, a business plan will slow you down, and the projected costs are often inaccurate.
A better approach is to create quality and reliable startup with the business model canvas. It offers a template that takes care of critical business issues such as value propositions, customer segmentation, revenue projections, and many more.
Buy the Startup-Owner’s Handbook
The startup owner’s handbook is an excellent guide for creating a successful business. It’s just like a reliable reference with instructions for handling different aspects of your business. It contains over 500 pages of business-related questions and answers. It is a useful companion for any startup.
Create a Budget
It is expedient to create a budget for your app development project right from the onset. Without a budget, you stand the risk of overspending on various aspects of your app project. Even if you choose to hire offshore developers at $15/hour, a budget of $25,000 will be exhausted after four months. That is why you should have firm control over your budget. Setting a cost for various aspects of your project will help you keep the expenditure under control even if you make mistakes along the way.
Do Wireframe, Mockup, and Prototype
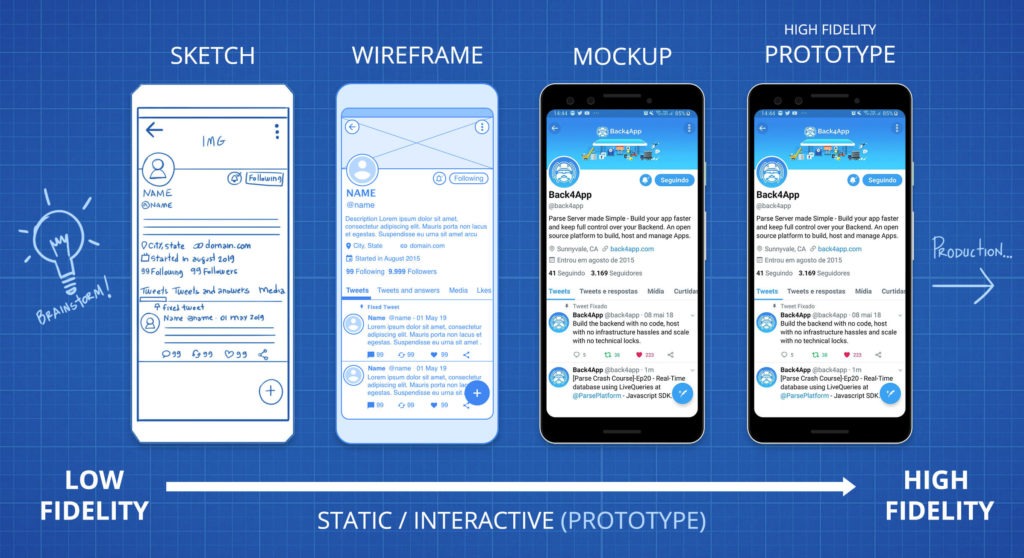
Many people confuse mockup, wireframes, and prototypes, but all these are different aspects of app development. See the explanations below:
Wireframe refers to a like sketch of the app interface, while the Mockup adds color and animated pictures of the app features. The prototype gives the user access to perform certain functions in the app.
It is essential to spend quality time creating the wireframe, mockup, and prototype; it would eventually save you time and money. This step enhances discovery and insight that helps you expedite app development and reduce the possibility of mistakes.
- This step offers the following benefits:
- It’s an inspiring and intriguing procedure.
- Allows you to modify the design easily on paper rather than adjusting codes.
- It’s more affordable to hire a designer than a developer.
- You can even handle wireframe, mockup, and prototype yourself.
Get User Feedbacks
Once your prototype is ready, you can start contacting the potential app users for feedback. Here are a couple of ways to get customer feedback:
- Share with friends, colleagues, and family members.
- Participate in pith competitions.
- Advertise on social media channels like LinkedIn, Facebook, and Twitter.
- Share with other startup owners in your co-workspace.
Design a Landing Page for Your App
The App’s landing page is a crucial aspect of your app promotion arsenal. It allows you to get the potential app’s audience’s attention, tell them about the value your app offers, and download the app. You can also use it to collect leads, which is a valuable means of connecting with your app users.
The landing page also gives your brand a corporate identity and increases the trust of your app users. You can find various tools for creating a landing page by researching online.
Create the App Backend
Finally, its time to start creating codes for your app. You must have realized that apps consist of the frontend that s visible to the app users and the invisible backend that powers the frontend functions.
The most crucial parts of the development are based on the backend because it handles API creation, business logic, data transactions, and the likes. You can either choose to code your backend manually or use a Backend as a Service that is quicker and easier.
Backend as a Series gives you access to tools that expedite development assignments. For instance, they offer easy access to authentication, social login, data backup, and many other useful functions. The main benefits of using Backend platforms are enhanced development speed, affordability, and serverless development. Read the article in this link to learn more about Backend as a Service.
Suppose you choose to create a custom backend. In that case, you will benefit from the flexibility of creating your backend precisely the way you want. However, the procedure is painfully slow compared to using a Backend as a Service.
Native vs. React Native development
The frontend of an app is one of the crucial features that determine its success. For instance, users will be drawn towards an app with a beautiful, well-organized, and functional interface. Users don’t care whether your app is Web, Native, or Mobile; they are only concerned about the user interface and its functions.
Native apps have deep interaction with the operating system and leverage features of the hardware. This type of app is fast, attractive, and works without internet connectivity. Web apps cannot access device hardware and are subject to other limitations. However, web apps are cheaper and faster to make, and they do not have special installation requirements. Hybrids apps have a WebView embedded within the native app interface.
Creating a React Native App
While it is unnecessary to have prior React, Android, or iOS development experience, basic JavaScript knowledge is necessary to code in React Native. That being said, you can start coding a React Native app by using a command-line interface tool to configure the environment.
New developers are better off using the Expo CLI, while experienced ones can use the React Native CLI. The example in this article shall use the ExpoCLI.
- Installation of Node12 LTS
- Install EXPO CLI through NPM.
- Launch the Expo CLI and run the following command:
- Install Expo Client on an Android or iOS device.
- Ensure the Mobile device and the computer are on the same network.
- Open the project with a QR Code
Although the procedure for building Android and iOS apps differ, we shall focus on the basics in both cases.
Creating a React Native App for Android
- Get the Android SDK and configure it.
- Install Android Studio and configure it
- Install all the necessary APIs
- Choose the Platforms you want React Native to Support
- Choose the required SDK build tools
- Choose the necessary Android SDK tools
- Choose Google Play Services
- Test your app on a real or virtual device.
Creating a React Native App for iOS
- Get your money ready because developing for iOS costs money.
- Get a MacOS or iPhone
- Install Xcode app
- Create an Apple Developer’s Account for $99
- Plug your device into your computer USB
- Select your project within the XCode app.
- Create your mobile app and run it.
- Connect your system to the Apple development server.
- Launch the developer’s menu
- Activate Live Reload.
The guideline above is not exhaustive; it simply lists the essential steps for creating a React Native app.
Create the Analytics Dashboard
Analytics is one of the crucial resources you need for a successful mobile app because it gives you a glimpse of what your app users are doing behind the scene. For instance, you can see the functions being used frequently and use the insight to improve your app during updates. You can also deprecate app components that customers hardly use.
App analytics allows you to know if your app is achieving its objectives or not. It gives access to data like revenue, downloads, or any other KPI you want. This real-life data is an invaluable resource for optimizing mobile apps.
Do Beta-Testing
Getting real-life users to beta-test your app allows you to fix any outstanding problems so you can increase customer satisfaction. This is necessary to have excellent app store ratings, get more referrals, and increase app download. Therefore, beta-testing is essential before launching your app.
Do App SEO
This is a vital step that many people overlook. However, app SEO is essential to gain decent exposure in the highly competitive app markets. You stand a better chance of success when you optimize your app to rank for necessary keywords and phrases. The three factors that control your app’s ranking are quality backlinks, the app title, and relevant keywords.
However, after publishing your app, additional factors such as reviews and user ratings would also influence SEO rankings. Having a satisfied userbase from the early stage gives your app a competitive advantage and better growth potential.
Launch Your Mobile App
Finally, we are approaching the final phases of creating a React Native App. Before you publish your app, it is necessary to consider some legal issues such as the Terms of Use and Privacy Policy. You have an option of purchasing a template and editing it for your business or get a lawyer to prepare one for you. Bear in mind that the latter option can be expensive.
Once you are through with the legal issues, it’s time to publish your app into the app store. It is faster and simpler to publish the app on Google Play Store than the Apple App Store.
Promote your App
You have done all the hard work of creating an app and publishing it on the app store. Great! But it is not time to relax! Now is the time to work harder to ensure your ideal customers get to know your app. So, advertise it.
Here are some ideas about promoting your app.
- Use social media channels such as Twitter, LinkedIn, and Facebook.
- Start a blog related to your app
- Create videos showcasing your app on YouTube
- Mention your app on Quora, and Reddit replies.
- Create presentations on Slideshare
Use Customer Feedbacks to Improve Your App
Improving your app is a continuous task because the technology trend and user preferences keep on changing. Therefore, you need to update your app to be on par with the latest trends and user demands.
To get more app users, you have to work hard, monitor user trends, and use their feedback to improve your app. An excellent approach is to get the customer feedbacks daily. Think about the volume of feedback you would have after a year! So, the quantitative data you get from analytics and the objective feedback from users would help you update your apps and keep them happy.
Conclusion
The procedure for converting your idea into a fully-functional app takes planning, time, and money. The best approach is to plan your app specifications and try to feel your potential market’s pulse. Once you are convinced there is a market for your app, start with an MVP.
It is crucial to get real users to test the app and give their feedback before launching the app. This approach would help you optimize your app before launching it. Once the app is launched, start advertising to get more app users. After that, establish a mechanism to receive feedback from your app users to continuously improve your app.
We hope this article has enlightened you on how to create React Native apps.
FAQ
What is React Native?
React Native is a JavaScript-based mobile app development framework. It is useful for creating apps for the Web, iOS, and Android.
Why use React Native?
Open-source development
OTA updates
Excellent performance
Inexpensive and Fast
Cross-platform development
What are the steps to create a React Native app?
Write Down the App Idea
Take Advantage of Business Canvas Model
Buy the Startup-Owner’s Handbook
Create a Budget
Do Wireframe, Mockup, and Prototype
Get User Feedbacks
Design a Landing Page for Your App
Create the App Backend
Considering Native/Hybrid Development.
Creating a React Native App
Create the Analytics Dashboard
Do Beta-Testing
Launch Your Mobile App
Promote your App
Use Customer Feedbacks to Improve Your App

