How to make a ToDo List App with React Native, Expo and Back4App
React Native is one of the most popular frameworks used in mobile development. It was created by Facebook based on Javascript. It can be used to build apps to iOS or Android with native platform capabilities.
Expo is a tool that helps you speed up development time and testing.
This article explains how you can integrate a React Native app with Back4App. After completing this step-by-step tutorial, you will have built a project to manipulate a To-Do List.
Is it your first time using Back4App? If so, you need to do the Sign-Up.
Contents
Warming Up
Configure Expo
According to the React Native instructions, you need to install Node 10+ and Expo CLI using the following command:
npm install -g expo-cli
For more details: https://facebook.github.io/react-native/docs/getting-started.html
Download the starter project
To download the ToDoListApp template project, run the following commands in your terminal:
wget "https://github.com/templates-back4app/react-native-todoapp/archive/template.zip" -O template.zip; unzip template.zip; rm template.zip && cd react-native-todoapp && npm install
Note: Remember that you need to replace the keys of your Back4App app. Open the file constans/Keys.js file and paste into the following keys.
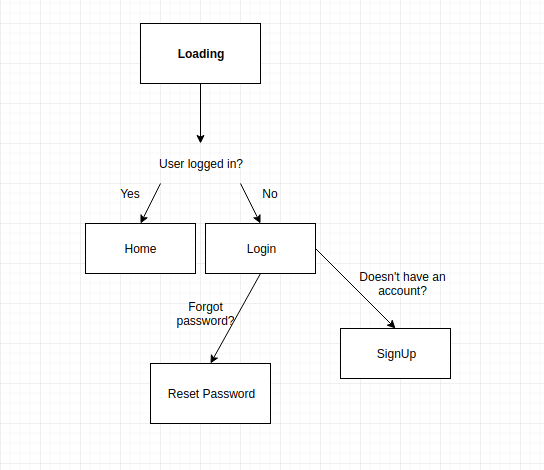
Diagram of your App
If you followed the instructions linked above, you should see this flow diagram:
Start the ToDo List App
Step 1 – Create the Login Page
To login users to our application, use our method to give them access to their account:
1 2 3 4 5 6 7 8 9 10 11 12 13 14 15 16 17 18 |
onLogin = async() =>{ let username = (this.state.username).trim(), password = (this.state.password).trim(); if (username === "" || password === "" ) { this.setState(() => ({ nameError: `Fill the fields correctly.` })); } else { try { await Parse.User.logIn(username.toString(), password.toString()); // this.submitAndClear(); this.props.navigation.navigate('HomeStack'); } catch (error) { this.setState(() => ({ nameError: error.message })); return (error) } } } |
Check the complete code here: https://github.com/templates-back4app/react-native-todoapp/blob/login-page/screens/LogInScreen.js
Step 2 – SignUp Page
After you finish the previous step, you should ask the users to sign up to our application. The following code illustrates a typical sign up:
1 2 3 4 5 6 7 8 9 10 11 12 13 14 15 16 17 18 19 20 21 22 23 24 25 26 27 28 29 30 |
onSignUp = async() => { let username = this.state.username, email = this.state.email, password = this.state.password; if (username.trim() === "" || username === undefined || email.trim() === "" || email === undefined || password.trim() === "" || password === undefined ) { this.setState(() => ({ nameError: `Fill the fields correctly.`})); } else { try { Parse.User.logOut(); let user = new Parse.User(); user.set("username", username); user.set("email", email); user.set("password", password); const result = await user.signUp(); AsyncStorage.setItem('sessionToken', result.getSessionToken()); AsyncStorage.setItem('username', result.getUsername()); this.submitAndClear(); this.navigateToPage('HomeStack'); } catch (error) { console.log(error) this.setState(() => ({ nameError: error.message })); } } } |
Check the complete code here: https://github.com/templates-back4app/react-native-todoapp/blob/signup-page/screens/SignUpScreen.js
Step 3 – Set up Reset Password Page
Imagine that as long as we have an authentication flow, users may forget their password. Parse Server enables securely resetting the user passwords. Configure a function that asks the user for their email address:
1 2 3 4 5 6 7 8 9 |
resetPassword = () => { Parse.User.requestPasswordReset(this.state.email) .then(() => { this._alert('Success', 'An email was sent to your address.', 'Log In', 'LogInStack'); this.submitAndClear(); }).catch((error) => { this._alert('Error', error.message, 'Log In', 'LogInStack'); }); } |
Check the complete code here: https://github.com/templates-back4app/react-native-todoapp/blob/resetpassword-page/screens/RestorePasswordScreen.js
Step 4 – ToDo List Page
Configure the Layout and functions to create, read, update and delete an item from a list.
Step 4.1 – Create an item
Use the save function to store an item in the Parse Cloud. This makes it possible to create a new object in your app. Look at the Data Browser in your app on Parse:
1 2 3 4 5 6 7 8 9 10 11 12 13 14 15 16 17 18 |
createItem = () => { let item = this.state.item; if (item === "" || item === undefined){ this.setState(() => ({ nameError: `Fill the fields correctly.` })); } else { const Todo = Parse.Object.extend("Todo"); const todo = new Todo(); todo.set("task", this.state.item); todo.set("userId", ); todo.save().then(object => { this.readAllItems(); this.setState({item:''}) }).catch(error=> {alert(error)}) } } |
Step 4.2 – Reading all objects
This function is invoked many times because it is used to start a screen, update or delete an object. The data can be retrieved using the following code:
1 2 3 4 5 6 7 8 |
readAllItems = async() => { const idUser = await Parse.User.currentAsync(); const query = new Parse.Query("Todo"); query.exists("task"); query.equalTo('userId', idUser); const resultQuery = await query.find(); this.setState({results:resultQuery}); } |
Step 4.3 – Update an item
After an object is created, there should be a way to update it in the future. It’s simple, you only need to retrieve that item and call the save method using this code:
1 2 3 4 5 6 7 8 9 10 |
updateItem = () => { const query = new Parse.Query("Todo"); query.get(this.state.idObject).then(object => { object.set("task", this.state.updateValueDialog); object.save().then(objUpdate => { this.setState({updateValueDialog:'', dialogVisible: false}) this.readAllItems(); }); }); } |
Step 4.4 – Delete an item
Working with a list of items necessitates allowing users to delete their objects by themselves.
1 2 3 4 5 6 7 8 9 10 |
deleteIten = async() => { const query = new Parse.Query("Todo"); const object = await query.get(this.state.idObject); try{ object.destroy(); this.getAllData(); } catch (e){ alert(e) } } |
Check the complete code here: https://github.com/templates-back4app/react-native-todoapp/blob/home-page/screens/HomeScreen.js
Final words
That’s it for the ToDo list app! Note, you might want to stylize your screens. For this reason, it is recommended to check the complete repo following the link below:
https://github.com/templates-back4app/react-native-todoapp
If you need any help or a function doesn’t work, please contact our team via chat!

What is React Native?
When it comes to the mobile development frameworks, React native is amongst the best mobile development framework. It was developed by Facebook. It helps in building Apps to iOS or android with same capabilities as native platform.
What is expo?
Mobile development can be tricky at times. As a developer you can get stuck for a simple coding error which can waste your time. You also need to test your app after building it before launching it. Expo will provide you with both facilities of increasing your development and testing speed.
What is the first step to integrate a React Native app with Back4App?
The first step is configuration of Expo. As per the instructions given by React Native, you should install the following two things.
-Node 10+
-EXPO CLI
Command to use EXPO CLI is “npm install -g expo-cli”.


