Ultimate Guide to React Firebase Authentication

Authentication is one of the most important security measures of every application.
In this article, we’ll talk about authentication, authentication types, compare authentication to authorization and demonstrate how to integrate Firebase Authentication and Back4app Authentication with a React app.
Contents
- 1 What is Authentication?
- 2 Authentication vs. Authorization
- 3 Authentication Types
- 4 How to Setup Authentication?
- 5 Conclusion
- 6 FAQ
- 7 What is authentication?
- 8 What are the authentication types?
- 9 How to set up authentication with Firebase?
- 10 How to set up authentication with Back4app?
What is Authentication?
Authentication is the process of verifying whether someone or something is what they claim to be. Almost every application uses some form of authentication to secure access to an application or its data.
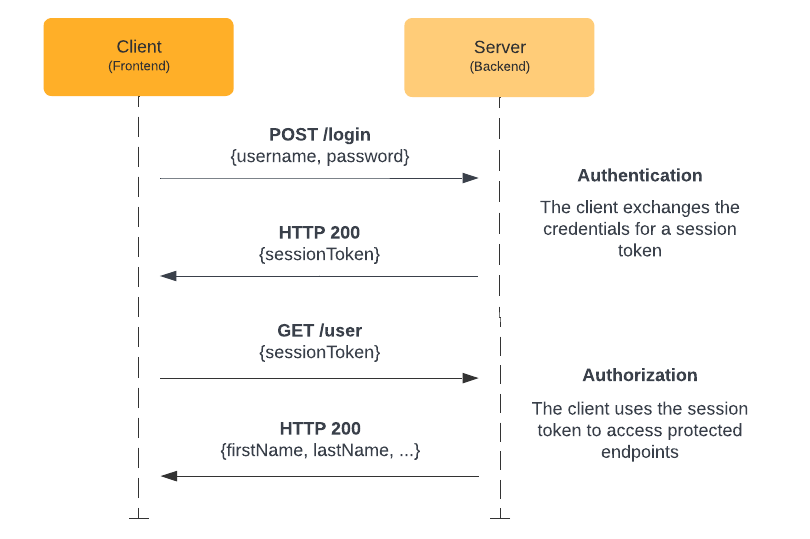
The simplest form of authentication is password-based authentication. This authentication system starts with a user entering their username and password. After they’ve entered their credentials the backend compares them to the records in the database and grants them access to the system if the credentials were correct. The access is usually granted in form of session tokens.
A modern authentication system looks something like this:
Authentication vs. Authorization
Authentication is the process of verifying who a user is, while authorization is the process of verifying what a user has access to.
For example, when you log in to an online banking system the system will first authenticate you by verifying your login credentials. Once you have been authenticated, the system will determine what actions you are authorized to take based on your account privileges, such as whether you are allowed to transfer money or view account statements.
Authentication Types
The common authentication types include:
- Password-based authentication is the most common authentication type. It involves a user providing their username and password to gain access to a system or a resource.
- Single sign-on (SSO) allows a user to log into multiple websites and services using a single set of credentials. An example would be Google Accounts. By creating a Google Account you get access to Gmail, YouTube, AdSense, Firebase, and so on.
- Social authentication is a form of single sign-on that uses existing information from a social networking service such as Google, Facebook, or Twitter to create an account.
- Token-based authentication enables users to enter their credentials once and receive a unique encrypted string of random characters in exchange.
- Biometric authentication relies on the unique biological characteristics of an individual. Types of biometric authentication include facial recognition, fingerprint scanners, speaker recognition, and iris scanners.
- Certificate-based authentication uses digital certificates to verify the identity of a person, organization, or device to establish a secure connection for the exchange of information over the internet.
How to Setup Authentication?
In this part of the tutorial we’ll first build a dummy React authentication app and then look at how to integrate it with Firebase Authentication and Back4app (Parse) Authentication.
We’re going to be using the following tools:
Prerequisites:
- Experience with JavaScript ES6
- A decent understanding of React (JSX, Hooks)
- Experience with React Router and Material UI is a plus
Before diving into the code let’s look at the differences between the authentication systems.
Firebase Authentication vs Back4app Authentication
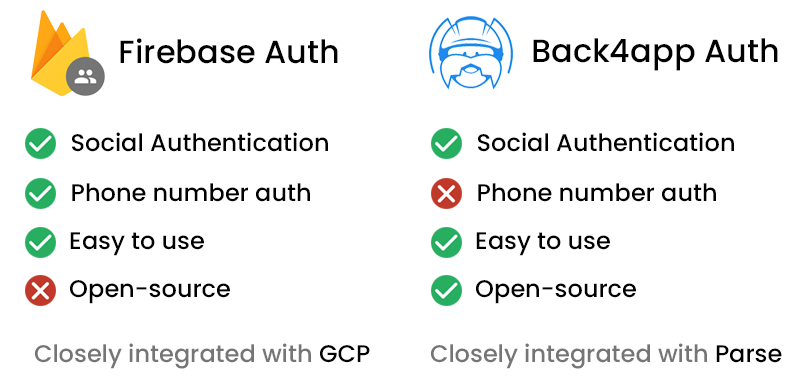
Firebase as well as Back4app both provide great user authentication systems for mobile and web applications. They are both easy to use and come with a bunch of functionalities such as social login, email verification system, password reset system et cetera.
The biggest difference between them is that Back4app is built on open-source software while Firebase uses Google’s proprietary software. Additionally, Back4app tends to be cheaper than Firebase.
I’d suggest you try both of the authentication systems and then decide which one you like better.
If you wish to explore the differences between Back4app and Firebase take a look at Back4app vs Firebase.
Project Setup
We’re done with the theory. It’s time to start coding!
Create React App
Let’s start by creating a new React app.
The following steps will require you to have Node.js installed. If you don’t have it installed yet, download it from their official website.
The easiest way to create a React app is via Create React App:
$ npx create-react-app react-firebase-auth
$ cd react-firebase-auth
This will create a new React app named react-firebase-auth and change your working directory.
Next, start the project:
$ npm startLastly, open http://localhost:3000/ to see your web app.
Material UI
To simplify the UI building process we’ll use Material UI — an open-source React component library that implements Google’s Material Design. The component library includes a comprehensive collection of prebuilt components that work out of the box.
Feel free to swap Material UI for a different UI framework like React Bootstrap or Ant Design.
To add Material UI to your project run:
$ npm install @mui/material @emotion/react @emotion/styledMaterial UI uses Roboto font by default. Let’s install it with:
$ npm install @fontsource/robotoNext, navigate to index.js and add the following imports:
// src/index.js

import '@fontsource/roboto/300.css';
import '@fontsource/roboto/400.css';
import '@fontsource/roboto/500.css';
import '@fontsource/roboto/700.css';
React Router
Our web app is going to have the following endpoints:
/login— displays the login form that allows the user to log in./register— displays the sign-up form that allows the user to register./user— displays user information (email,accessToken, et cetera).
Since we’re building a Single Page Application (SPA) we need a way to implement client-side routing. The easiest way to do it with React is to use react-router-dom.
$ npm install react-router-domNext, create a directory named routes within src for all your view components. Then add the following three files to it:
// src/routes/login.jsx

export default function Login() {
  return (
    <h1>Login</h1>
  )
}
// src/routes/register.jsx
export default function Register() {
return (
<h1>Register</h1>
)
}// src/routes/user.jsx
export default function User() {
return (
<h1>User</h1>
)
}Create a BrowserRouter and register it in index.js like so:
// src/index.js

const router = createBrowserRouter([
  {
    path: "/",
    element: <Navigate to="login"/>,
  },
  {
    path: "/login",
    element: <Login/>,
  },
  {
    path: "/register",
    element: <Register/>,
  },
  {
    path: "/user",
    element: <User/>,
  },
]);

const root = ReactDOM.createRoot(document.getElementById('root'));
root.render(
  <React.StrictMode>
    <RouterProvider router={router}/>
  </React.StrictMode>
);
Don’t forget to add all the required imports at the top of the file:
import {createBrowserRouter, Navigate, RouterProvider} from "react-router-dom";
import Login from "./routes/login";
import Register from "./routes/register";
import User from "./routes/user";
To take care of the “Not Found (404)” error create a new component within your src directory named error-page.jsx with the following contents:
// src/error-page.jsx

import {useRouteError} from "react-router-dom";
import {Container, Typography} from "@mui/material";

export default function ErrorPage() {

  const error = useRouteError();
  console.error(error);

  return (
    <Container maxWidth="xs" sx={{mt: 2}}>
      <Typography variant="h5" component="h1" gutterBottom>
        Oops!
      </Typography>
      <Typography variant="p" component="p" gutterBottom>
        Sorry, an unexpected error has occurred.
      </Typography>
      <Typography variant="p" component="p" gutterBottom>
        <i>{error.statusText || error.message}</i>
      </Typography>
    </Container>
  );
}
Then navigate to index.jsx and add errorElement to the index route like so:
// src/index.js

const router = createBrowserRouter([
  {
    path: "/",
    element: <Navigate to="login"/>,
    errorElement: <ErrorPage/>,  // new
  },
  // ...
]);
Again, make sure to add the required import:
import ErrorPage from "./error-page";At this point your directory structure should look like this:
react-firebase-auth
├── README.md
├── package.json
├── package-lock.json
├── public
│   └── <public files>
└── src
    ├── App.css
    ├── App.js
    ├── App.test.js
    ├── error-page.jsx
    ├── index.css
    ├── index.js
    ├── logo.svg
    ├── reportWebVitals.js
    ├── routes
    │   ├── login.jsx
    │   ├── register.jsx
    │   └── user.jsx
    └── setupTests.js
Let’s start the app and test if everything works. Run:
$ npm startOpen your favorite web browser and navigate to http://localhost:3000/. That should redirect you to the login screen. After that navigate to http://localhost:3000/register and you should see the register screen.
Form
One of the last things we have to do is to implement the login and register form.
To do that navigate to your routes directory and change login.jsx like so:
// src/routes/login.jsx

import {Alert, Box, Button, Container, Link, TextField, Typography} from "@mui/material";
import {useNavigate} from "react-router-dom";
import {useState} from "react";

export default function Login() {

  const navigate = useNavigate();

  const [error, setError] = useState("");
  const [email, setEmail] = useState("");
  const [password, setPassword] = useState("");

  const onSubmit = async (event) => {
    event.preventDefault();

    // validate the inputs
    if (!email || !password) {
      setError("Please enter your username and password.");
      return;
    }

    // clear the errors
    setError("");

    // TODO: send the login request
    console.log("Logging in...");
  }

  return (
    <Container maxWidth="xs" sx={{mt: 2}}>
      <Typography variant="h5" component="h1" gutterBottom textAlign="center">
        Login
      </Typography>
      {error && <Alert severity="error" sx={{my: 2}}>{error}</Alert>}
      <Box component="form" onSubmit={onSubmit}>
        <TextField
          label="Email"
          variant="outlined"
          autoComplete="email"
          value={email}
          onChange={(e) => setEmail(e.target.value)}
          sx={{mt: 1}}
          fullWidth
        />
        <TextField
          label="Password"
          variant="outlined"
          type="password"
          autoComplete="new-password"
          value={password}
          onChange={(e) => setPassword(e.target.value)}
          sx={{mt: 3}}
          fullWidth
        />
        <Button variant="contained" type="submit" sx={{mt: 3}} fullWidth>Login</Button>
        <Box sx={{mt: 2}}>
          Don't have an account yet? <Link href="/register">Register</Link>
        </Box>
      </Box>
    </Container>
  )
}- We used Material UI’s components to build the layout including the form.
- State (
emailandpassword) is handled via ReactuseState()hook. - Form submission calls
onSubmit()which validates the data and displays potential errors.
Next, grab the source code from GitHub and replace the contents of the other two routes:
Run the server again and navigate to your web app. Your views should look like this:

Clean up
Remove the following files that were created by Create React App and are no longer required:
- src/App.css
- src/App.js
- src/App.test.js
- src/logo.svg
Make sure to remove any potential imports from files like index.js et cetera.
Great, our dummy authentication web app is now finished. In the next sections, we’ll upgrade it by adding Firebase Authentication and Back4app Authentication.
Grab the source code for this part of the article from back4app-react-firebase-auth repo.
React Firebase Authentication
In this section of the tutorial, we’ll look at how to integrate Firebase authentication with a React project. As a starting point, we’ll be using the React app we created in the “Project Setup” section.
Check your understanding by working with your own React project as you follow along the tutorial.
Create Project and App
The following steps will require you to have a Firebase account. If you don’t have one yet go ahead and sign up with your Google account.
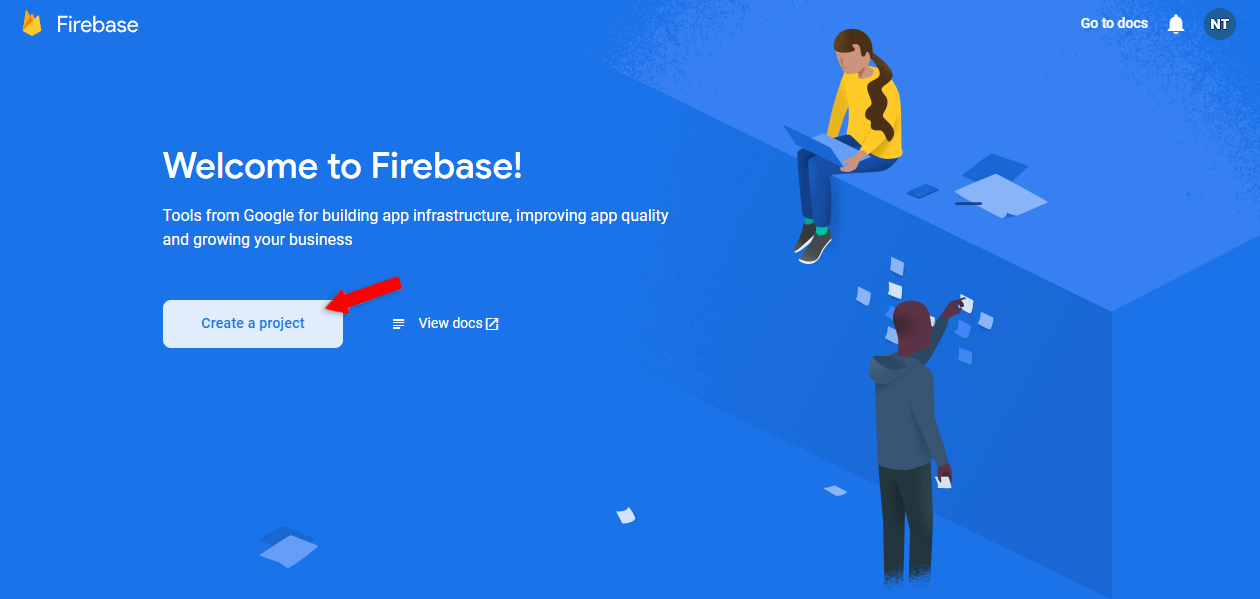
To work with Firebase we first need to create a project. To create a project login to your Firebase Console and click on “Create a project”:
Give it a custom name, I’ll name mine react-firebase-auth.
Accept all the terms and conditions and press “Continue”.
Firebase is going to take a few moments to prepare everything required for your project. Once it’s done you’re going to get redirected to the Firebase Project Dashboard.
Next, create a new Firebase Application. Select “Web” since we are using React as our frontend:
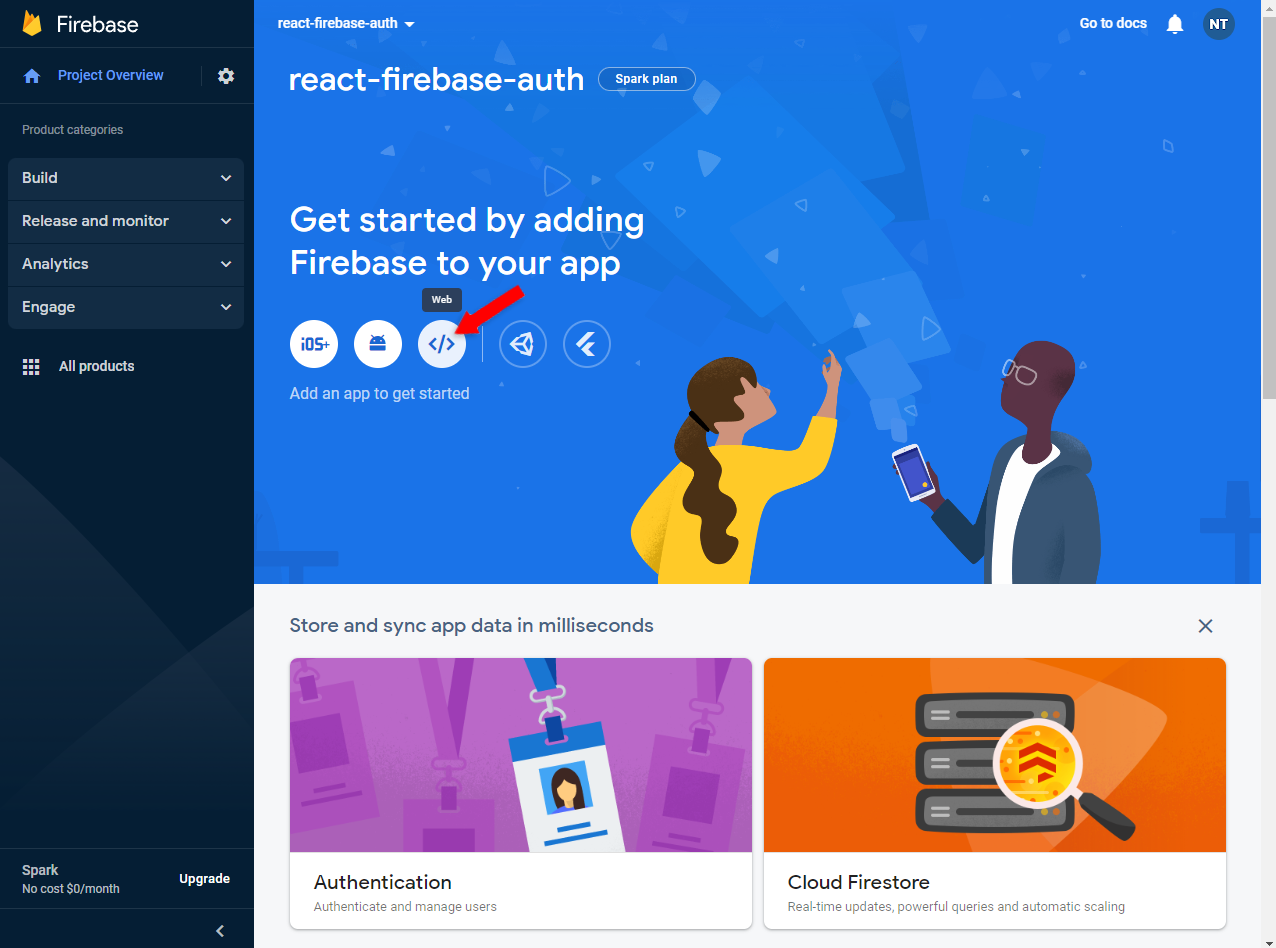
Give it a custom name — or reuse your project name. You don’t have to enable Firebase Hosting since we won’t use it.
Next, click “Register app”:
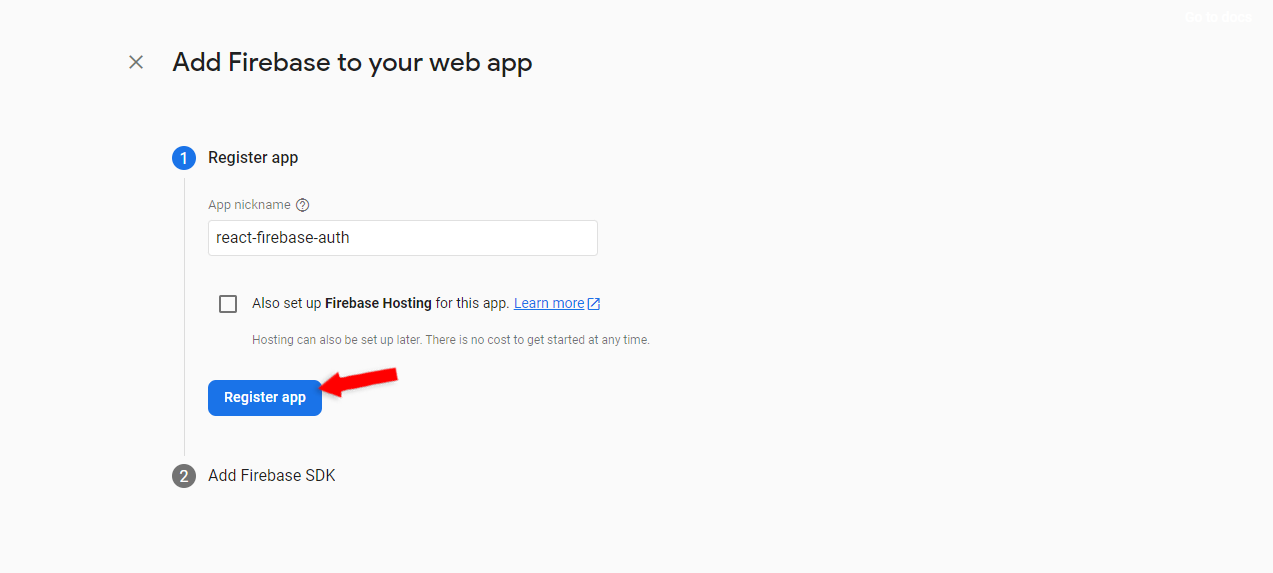
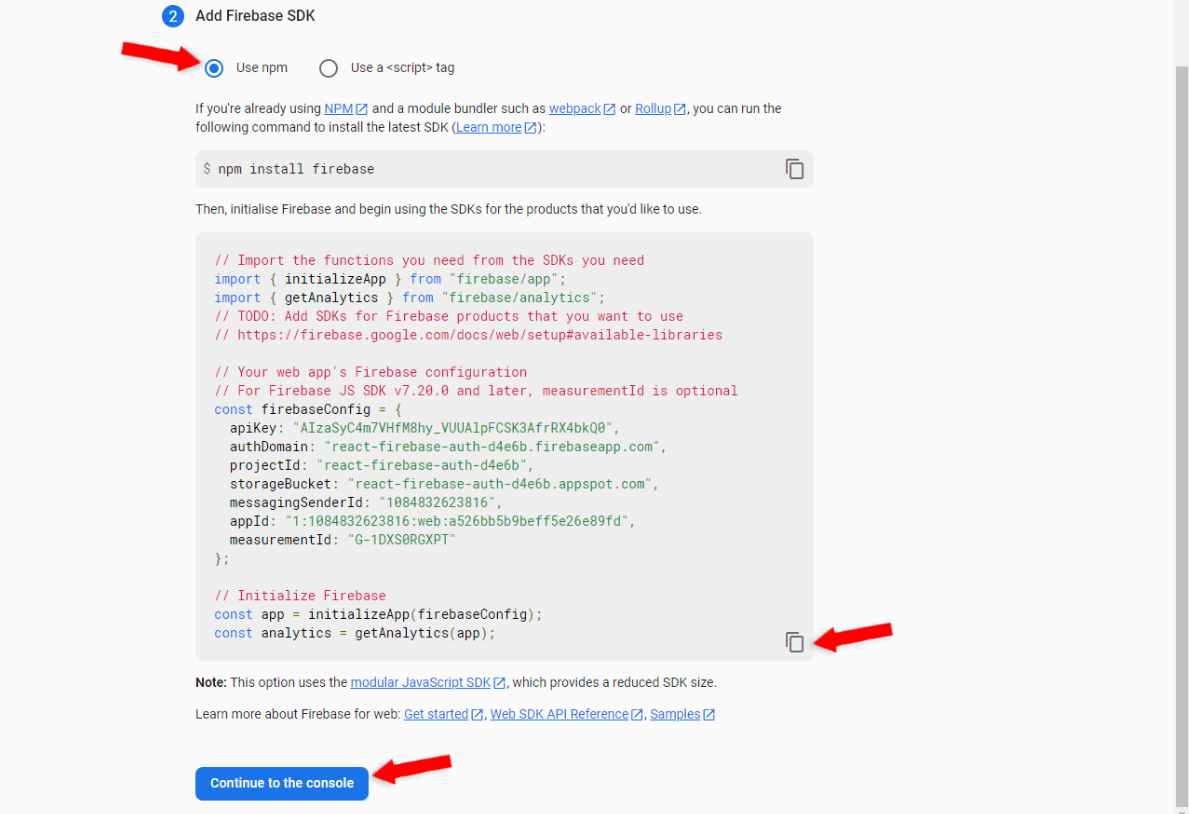
Then select “npm” and take note of your Firebase SDK configuration. Lastly, click on the “Continue to the console” button:
Enable Authentication
Before diving into the code we have to enable authentication.
On the left side of the Firebase Console select “Build” and then “Authentication”. Once you get redirected click on “Get started”:
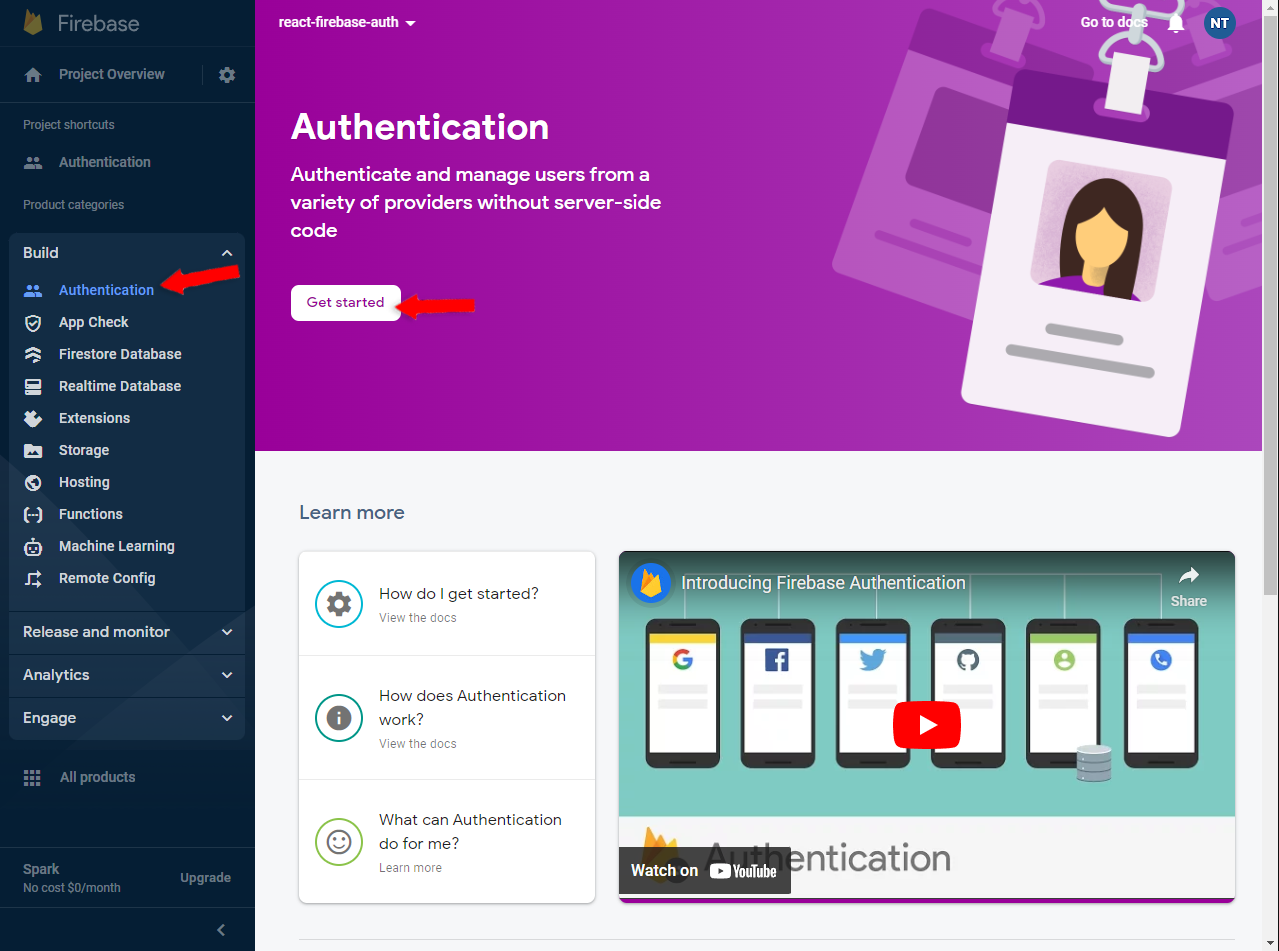
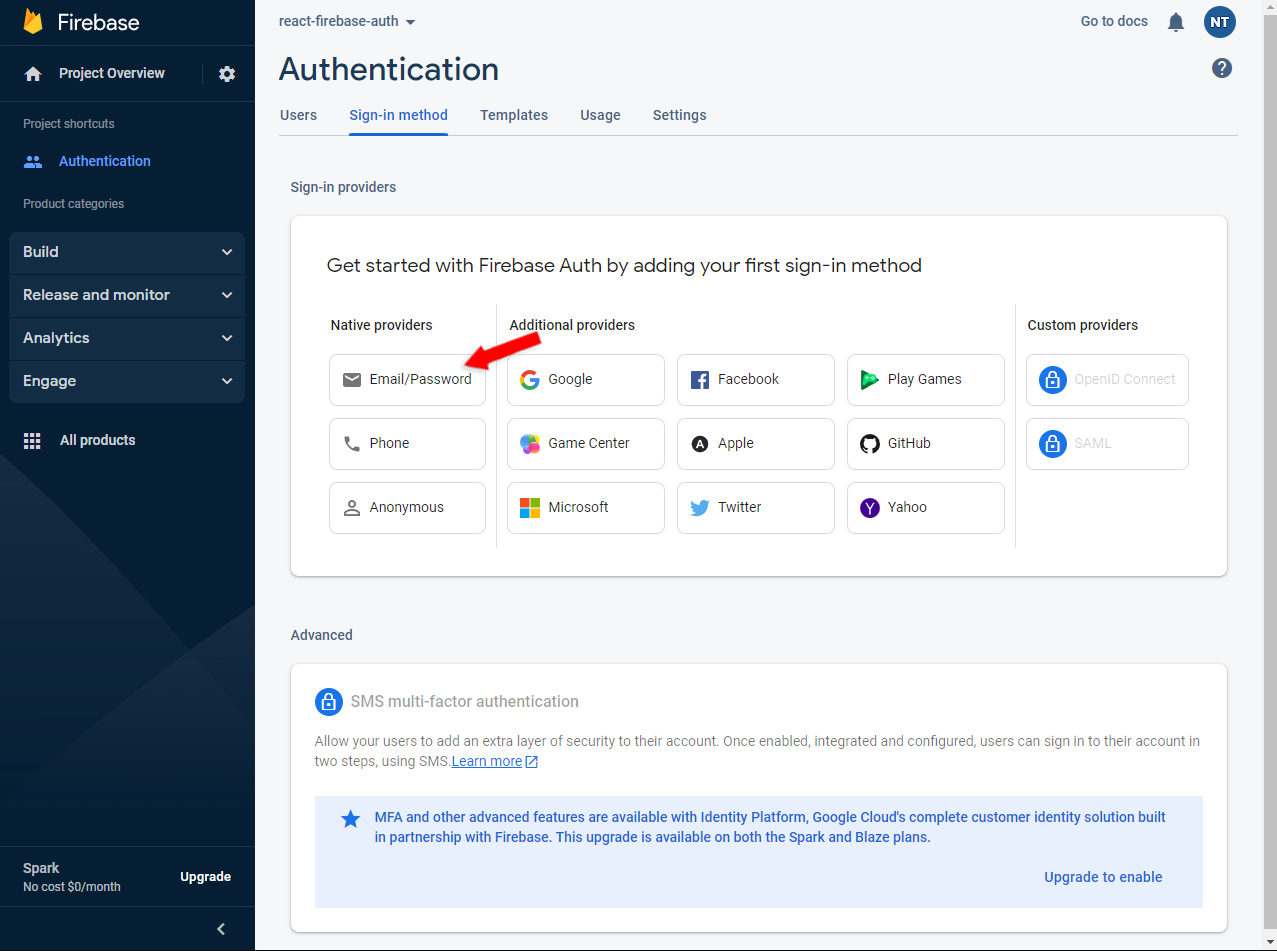
Firebase provides multiple sign in methods. In this tutorial we’ll demonstrate how to use email and password authentication so that’s the only one you have to enable:
Firebase SDK
To use Firebase in your React project you first have to install their Software Developer Kit (SDK).
Install it via npm:
$ npm install firebaseNext, create a new file within the src folder named firebase.js with the following contents:
// src/firebase.js

import { initializeApp } from "firebase/app";
import {createUserWithEmailAndPassword, signInWithEmailAndPassword, getAuth} from "firebase/auth";

// Import the functions you need from the SDKs you need
import { initializeApp } from "firebase/app";

// Your web app's Firebase configuration
// For Firebase JS SDK v7.20.0 and later, measurementId is optional
const firebaseConfig = {
  apiKey: "AIzaSyC4m7VHfM8hy_VUUAlpFCSK3AfrRX4bkQ0",
  authDomain: "react-firebase-auth-d4e6b.firebaseapp.com",
  projectId: "react-firebase-auth-d4e6b",
  storageBucket: "react-firebase-auth-d4e6b.appspot.com",
  messagingSenderId: "1084832623816",
  appId: "1:1084832623816:web:a526bb5b9beff5e26e89fd",
  measurementId: "G-1DXS0RGXPT"
};

// Initialize Firebase
const app = initializeApp(firebaseConfig);
Make sure to replace the
firebaseConfigwith your config from the previous step.
Firebase SDK offers different auth methods like:
createUserWithEmailAndPassword(email: string, password: string)signInWithEmailAndPassword(email: string, password: string)
To utilize these methods let’s create two wrapper functions at the bottom of firebase.js file:
// firebase.js

// ...

export const createUser = async (email, password) => {
  return createUserWithEmailAndPassword(getAuth(app), email, password);
}

export const signInUser = async (email, password) => {
  return signInWithEmailAndPassword(getAuth(app), email, password);
}
Don’t forget to add the import:
import {createUserWithEmailAndPassword, signInWithEmailAndPassword, getAuth} from "firebase/auth";The functions are self-explanatory:
createUsercreates a Firebase user (and returns a response containing user information)signInUsersigns in an existing Firebase user (and returns a response containing user information)
Session Persistence
Firebase doesn’t take care of session persistence on clients’ devices like Parse does.
Because of that, we have to utilize Window.sessionStorage. As the user logs in we have to store their accessToken and retrieve it every time we want to make an authenticated request.
To make things a little bit easier we’ll create a helper class.
Within the src directory create a new file named session.js with the following contents:
// src/storage/session.js

export const startSession = (user) => {
  sessionStorage.setItem("email", user.email);
  sessionStorage.setItem("accessToken", user.accessToken);
}

export const getSession = () => {
  return {
    email: sessionStorage.getItem("email"),
    accessToken: sessionStorage.getItem("accessToken"),
  }
}

export const endSession = () => {
  sessionStorage.clear();
}

export const isLoggedIn = () => {
  return getSession().accessToken;
}
Views
The last thing we have to do is to modify our views to utilize the functions we’ve created and set up the session via helper functions in session.js.
Open login.jsx and change the onSubmit() TODO like so:
// src/routes/login.jsx

import {signInUser} from "../firebase";
import {startSession} from "../session";

const onSubmit = async (event) => {

  // ...

  try {
    let loginResponse = await signInUser(email, password);
    startSession(loginResponse.user);
    navigate("/user");
  } catch (error) {
    console.error(error.message);
    setError(error.message);
  }
}
This code either logs the user in and navigates to /user or displays an error.
Next, change register.jsx onSubmit() TODO like so:
// src/routes/register.jsx

import {createUser} from "../firebase";
import {startSession} from "../session";

const onSubmit = async (event) => {

  // ...

  try {
    let registerResponse = await createUser(email, password);
    startSession(registerResponse.user);
    navigate("/user");
  } catch (error) {
    console.error(error.message);
    setError(error.message);
  }
}
This code either creates a Firebase user or displays an error. Possible errors include:
- Username is already taken.
- Password is not strong enough.
Lastly, modify user.jsx to use the useEffect() hook to fetch user data and make onLogout() destroy the session:
// src/routes/user.jsx

import {endSession, getSession, isLoggedIn} from "../session";

useEffect(() => {
  if (!isLoggedIn()) {
    navigate("/login");
  }

  let session = getSession();
  setEmail(session.email);

  console.log("Your access token is: " + session.accessToken);
}, [navigate]);

const onLogout = () => {
  endSession();
  navigate("/login");
}
Test
Let’s test the web app to see if everything works.
Start the development server with npm start, open your favorite web browser, and navigate to http://localhost:3000/register. Enter your email, pick a password, and click “Register”:

As you register you’ll get redirected to /user where you can see your account information.
To see your accessToken open your browser’s developer console:
Your access token is: 819423a698f9ea9ba3577f20993cb0da98a79ea22ce5d6550b65b69fb36fd438Lastly, navigate to your Firebase project dashboard to check if a new user has been created:
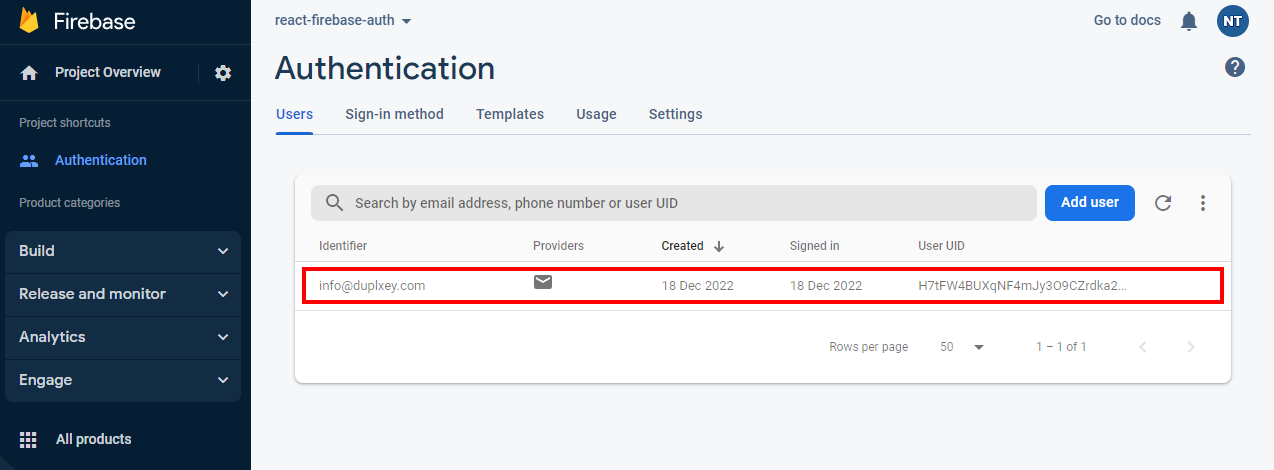
Grab the final source code for this approach from the back4app-react-firebase-auth repo.
React Back4app Authentication
In this section of the tutorial, we’ll look at how to integrate Back4app authentication with a React project. As a starting point, we’ll take the React app we created in the “Project Setup” section.
Check your understanding by working with your own React project as you follow along the tutorial.
Create App
The following steps will require you to have a Back4app account. If you already have it log in otherwise go ahead and sign up for the free account.
To work with Back4app we first need to create an app. As you log in to your dashboard you’ll see the list of your apps. Click on “Build a new app” to create a new app.
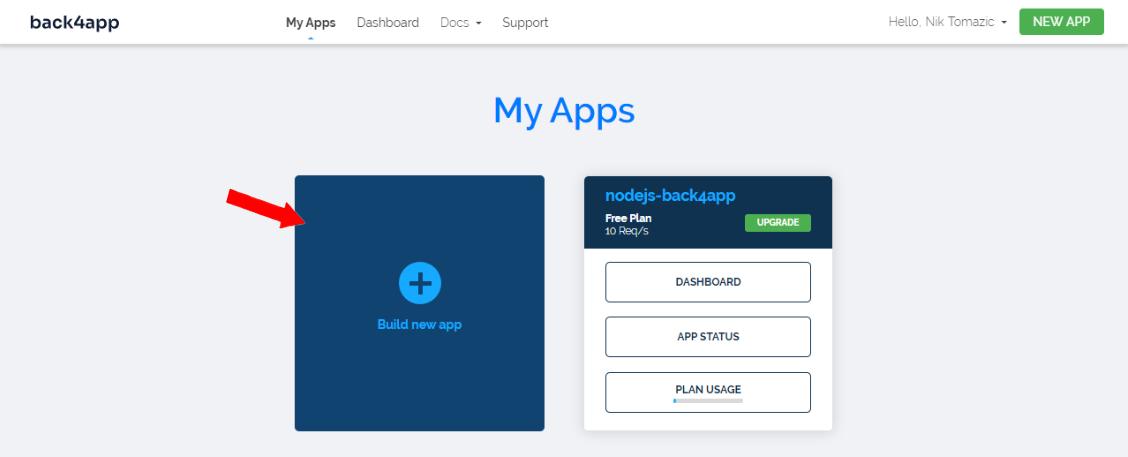
Give it a custom name, pick your database and then click “Continue”.
Back4app is going to take a few moments to prepare everything required for your app like the database, application layer, scaling, backups & security.
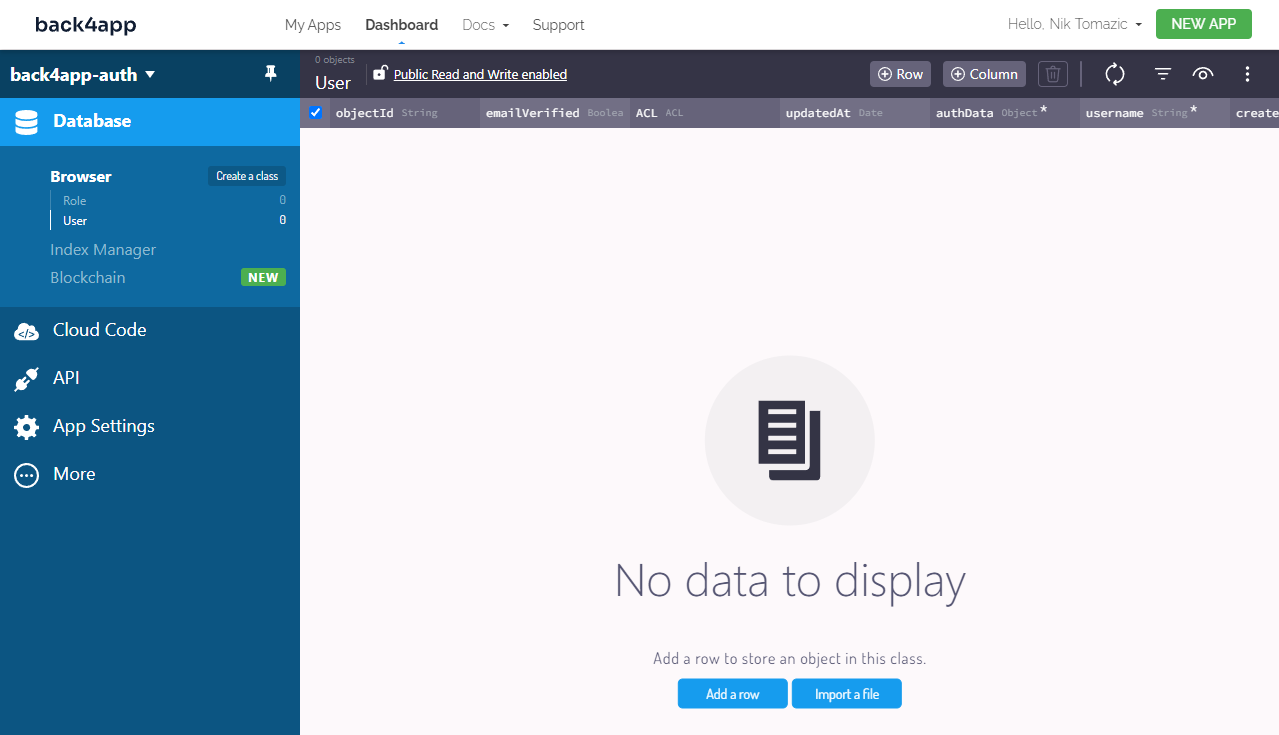
Once your application is ready you will be redirected to your app’s dashboard.
App Keys
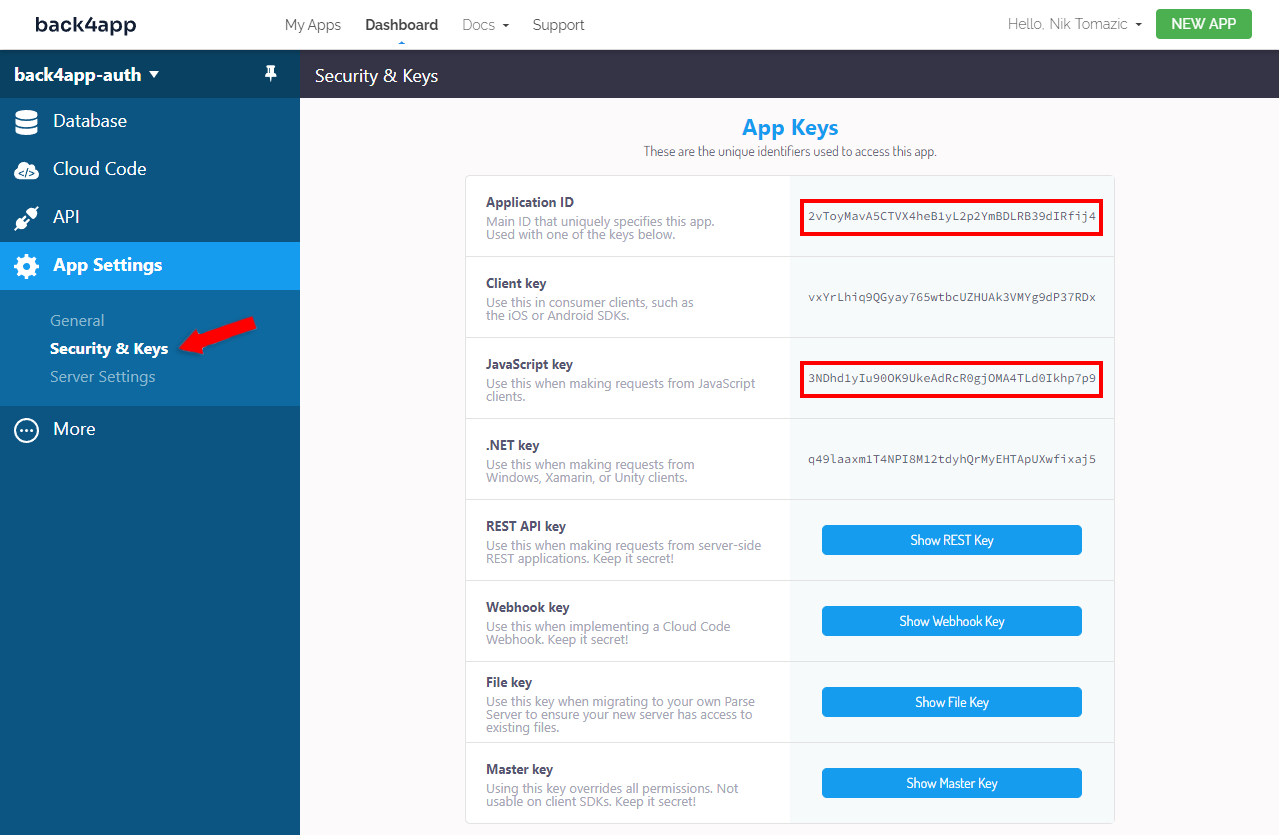
To connect your React project with Back4app you’ll need to obtain your App Keys. To get your App Keys select “App Settings” on the sidebar and then “Security & Keys”.
Take note of the “Application ID” and the “JavaScript key”.
Parse SDK
As you might already know Back4app is based on Parse. Parse is an open-source framework for building application backends. It helps developers to accelerate app development and reduces the total amount of effort required to build an app.
To learn more about Parse take a look at What is Parse?
To set up Back4app authentication we’ll first need to install the Parse SDK. Install it via npm:
$ npm install parseNext, create a new file named parse.js in the src folder with the following contents:
// src/parse.js

import Parse from "parse/dist/parse";

// Initialize Parse
const PARSE_APPLICATION_ID = '<your_parse_application_id>';
const PARSE_HOST_URL = 'https://parseapi.back4app.com/';
const PARSE_JAVASCRIPT_KEY = '<your_parse_javascript_key>';
Parse.initialize(PARSE_APPLICATION_ID, PARSE_JAVASCRIPT_KEY);
Parse.serverURL = PARSE_HOST_URL;
Make sure to replace
PARSE_APPLICATION_IDandPARSE_JAVASCRIPT_KEYwith the keys from the previous step.
Parse provides a specialized class called Parse.User that automatically handles much of the functionality required for user account management. Parse.User is a subclass of ParseObject that provides additional helper methods such as signUp(), current(), getUsername() and so on.
Additionally, Parse SDK takes care of your local storage session handling. For example, Parse.User.logIn() stores the user information in the localStorage and Parse.User.signOut() clears the local storage.
Let’s add a few wrapper functions to further simplify working with the Parse authentication system.
Add the following to the bottom of parse.js:
// src/parse.js

// ...

export const doUserRegistration = async (username, password) => {
  return Parse.User.signUp(username, password);
};

export const doUserLogIn = async (username, password) => {
  return Parse.User.logIn(username, password);
};

export const isLoggedIn = async () => {
  return Parse.User.current() != null;
}

export const getUser = async () => {
  return Parse.User.current();
}

export const logOut = async () => {
  return Parse.User.logOut();
}doUserRegistration()creates a Parse user (using an email and a password)doUserLogIn()tries to log the user in with the provided credentialsisLoggedIn()checks iflocalStoragecontains session informationgetUser()returns the logged-in user fromlocalStoragelogOut()clearslocalStoragetherefore logging out the user
All the functions are asynchronous and return promises.
Views
Let’s utilize the functions we’ve created in the previous step.
Open login.jsx and change the onSubmit() TODO like so:
// src/routes/login.jsx

import {doUserLogIn} from "../parse";

const onSubmit = async (event) => {

  // ...

  try {
    let user = await doUserLogIn(email, password);
    navigate("/user");
  } catch (error) {
    console.error(error.message);
    setError(error.message);
  }
}
This code either logs the user in and navigates to /user or displays an error.
Next, change register.jsx onSubmit() TODO like so:
// src/routes/register.jsx

import {doUserRegistration} from "../parse";

const onSubmit = async (event) => {

  // ...

  let username = email.split("@")[0];
  try {
    let user = await doUserRegistration(username, password);
    user.setEmail(email).save();
    navigate("/user");
  } catch (error) {
    console.error(error.message);
    setError(error.message);
  }
}
Keep in mind that since we are using an email/password registration form we have to extract the user’s username from the email. The username is the part before
@.A better solution would be to create a username/password registration form.
This code either creates a Parse user or displays an error. Possible errors include:
- Username is already taken.
- Password is not strong enough.
Lastly, modify user.jsx to use the useEffect() hook to fetch user data and make onLogout() call the logout function:
// src/routes/user.jsx

import {getUser, isLoggedIn, logOut} from "../parse";

useEffect(() => {
  (async () => {
    let loggedIn = await isLoggedIn();
    if (!loggedIn) {
      navigate("/login");
    }

    let user = await getUser();
    setEmail(user.getEmail());

    console.log("Your session token is: " + user.getSessionToken());
  })();
}, [navigate]);

const onLogout = async () => {
  await logOut();
  navigate("/login");
}
Great, that’s it!
Test
Let’s make sure our authentication system works as expected.
Start the development server with npm start, open your favorite web browser, and navigate to http://localhost:3000/register. Enter your email, pick a password, and click “Register”:

As you register you’ll get redirected to /user where you can see your account information.
To see your sessionToken open your browser’s developer console:
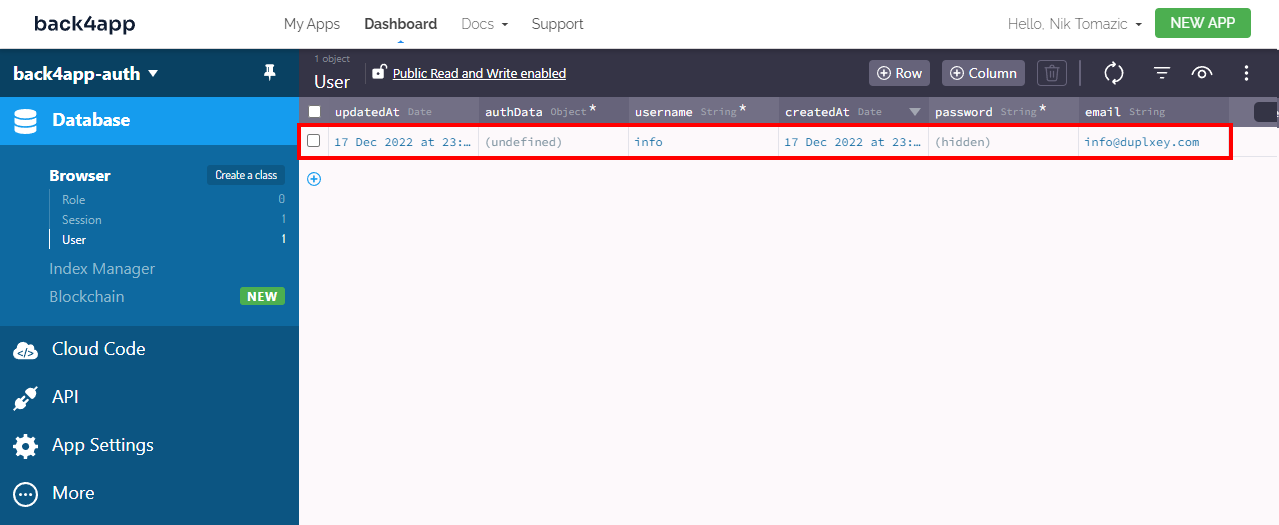
Your session token is: r:90343c307e7bb088e60c348acd8090d1Lastly, navigate to your Back4app App Dashboard and make sure a user has been created:
Grab the final source code for this approach from the back4app-react-firebase-auth repo.
Conclusion
Authentication and authorization are the most important security measures of modern applications. Authentication is the process of verifying who a user is, while authorization is the process of verifying what a user has access to.
Firebase as well as Back4app both offer great user authentication systems. They each come with their own pros and cons that should be considered when starting a project.
Further reading
- Parse User Security
- Social Authentication via 3rd party services
- Email Verification
- Password Reset
FAQ
What is authentication?
Authentication is the process of verifying the identity of a user or device. It is a security measure that is designed to ensure that only authorized users or devices are able to access a system, network, or resource.
What are the authentication types?
– Username and password
– Single sign-on (SSO)
– Social authentication
– Token-based authentication
– Biometric authentication
– Certificate-based authentication
How to set up authentication with Firebase?
1. Log in to Firebase with your Google Account
2. Create a Firebase project and a Firebase app
3. Enable Firebase Authentication
4. Install Firebase SDK and initialize it
5. Use Firebase SDK authentication functions in your views
6. Use Window.sessionStorage to handle sessions
How to set up authentication with Back4app?
1. Create an account on Back4app
2. Create a Back4app app
3. Install Parse SDK and initialize it
4. Use ParseJS authentication functions in your views


