Nest JS Hosting | A step by step guide
Picking the right way to put your Nest.js app out there is really important. It helps your app run well and grow seamlessly when the need arises. This piece talks about various ways to make your Nest.js apps go live. Specifically, it’s about hosting your Nest.js app in a Back4app container.
Contents
- 1 Summary
- 2 A Quick Overview of Nest.js
- 3 Nest.js Benefits in App Development
- 4 Nest.js App Development Drawbacks
- 5 Options for Hosting Nest.js
- 6 How to Host Nest.js Apps Using Back4app?
- 7 Nest.js App Hosting Process
- 8 Making Your Nest.js App Ready for Docker
- 9 Host Your Nest.js App on a Back4app Container
- 10 Improving Hosting with Multi-Stage Build
- 11 A Final Note
- 12 Frequently Asked Questions
- 13 How to host a Nest.js app?
Summary
- It’s super important to choose the best way to launch your Nest.js app so it can handle lots of users and also work smoothly.
- There are two main ways to launch: The first one is Container as a Service (CaaS) and the second is Infrastructure as a Service (IaaS)
- Back4app offers Containers that make launching Nest.js apps easier by taking care of a lot of stuff for you.
A Quick Overview of Nest.js
Nest.js exists as a tool derived from Node.js for making programs that runs on the server and also scales seamlessly.
Nest.js framework that uses modules solves vital architecture problems that most other tools don’t fix. It uses a smart way to write codes so they’re easy to understand and can scale seamlessly without getting messy.
Nest.js Benefits in App Development
Here are a few of the good things about Nest.js:
- Nest.js provides a clear way of organizing code, so you don’t have to worry about how to structure it.
- It uses TypeScript out of the box. However, you can also write regular JavaScript.
- Underneath, it’s powered by Express framework, but you can switch to Fastify that is more responsive.
- This framework works well with libraries for building user interfaces like Angular and React.
- NestCLI is bundled with Nest.js, it makes writing code easier. It creates code for handling vital app functions like middleware, controllers and modules.
- Nest.js is ready for microservices. You can use different ways to communicate between various microservices.
- It works with different types of databases, including the NoSQL and SQL database types.
- It fits with well-known testing tools like Jest and Supertest that allows you to write tests without stress.
- This framework has good documentation with examples for you to learn from.
Nest.js App Development Drawbacks
Here are some not-so-good things about app development with Nest.js:
- Not everyone might like the way Nest.js design things or it might not fit some projects.
- Nest.js hides away the complicated parts of how things work. This is good because you can focus on the main parts of your app. But it might also make you depend on it too much, without knowing some vital designs about an app project.
- Nest.js comes with lots of things you can do. Sometimes, this might lead to developers overcomplicating things and making the project take a longer time to complete.
- Its complicated settings and the usage of TypeScript can make learning Nest.js challenging.
Deciding if Nest.js is right for your app development assignment is subject to your project’s needs, your team’s skills, and what you like.
Think about the good things, the not-so-good things, and the size of your app development assignment before you decide to proceed with Nest.js
Options for Hosting Nest.js
There are several options you can consider to bring a Nest.js app to live. For instance, you can choose to use a Container as a Service solution, also known as (CaaS).
You may also opt for Infrastructure as a Service -IaaS. In the following section, we shall discuss these methods in details.
Infrastructure as a Service
IaaS is a cloud service type which provide users with infrastructure accessible over the cloud. Developers using this solution have access to services like computing power, network, storage as well as other functions that facilitates scaling on-demand.
Developers that use IaaS solutions enjoy the ability to control cloud resources at their disposal. As such, you can set up virtual machines, control network resources, and make sure your app scale seamlessly and work flawlessly. This lets you change backend settings to match your app’s needs.
Note that having high level of control means that you must handle the management as well which may end up costing a lot.
Containers as a Service
Container as a Service (is a cloud service that takes care of managing containers. It’s like an advanced way to control computers, network settings, and storage facilities compared with IaaS.
To use CaaS, simply wrap up a Nest.js app code, what it needs to work, and all the required settings inside the container.
Wondering what’s a container? It’s made using tools such as Docker. After it’s made, you can put it on a CaaS clous service platform. They look after the app and make sure it runs flawlessly.
Because containers are separate, you can put it in different cloud environment without problems. Moreover, since the spot where the Nest.js app runs is the same, it works the same way in different places, no matter the type of infrastructure.
Since CaaS keeps things simple, developers don’t have to worry about complicated stuffs like server machine maintenance.
They can just focus on making the app work perfectly. This makes things go faster and makes development teams more productive.
How to Host Nest.js Apps Using Back4app?
Requirements
For this guide, make sure you have these things:
- The version 16 or higher of Node.js should be set up on your computer.
- Have a GitHub account and having Git set up on your computer.
- You should have a working version of Docker on your device. Simply visit the Docker website and download the Docker Desktop installer.
- You should know how to use Nest.js.
Introduction to Back4app Containers
Back4app Containers takes the form of a CaaS service, handling seamless app deployment. It looks after the server stuff, so you don’t have to set things up by yourself.
Back4app works together with GitHub. You can put dockerized repositories into your app. This makes it simpler to keep your app current.
With the auto-deploy function, Back4app monitors the git repository you used. It automatically redeploys your app once you add changes to the used branch.
The platform allows you to monitor how your deployment is doing on the inbuilt dashboard while offering you tools to fix anything if needed.
Introduction to the Project
In this section, we’ll go over how to deploy Nest.js app to Back4app. First, we’ll make a simple Nest.js app, turn it into a docker thing, and send it to GitHub. Lastly, we’ll deploy the app on the Back4app’s CaaS.
Nest.js App Hosting Process
Do these things to make the Nest.js app you want:
- Enter this command to get Nest.js CLI installed on your computer..
npm install -g @nestjs/cli- Run the command in the columns below to create a fresh Nest.js app.
nest new project-nameYou can change “project-name” to whatever you want your app to be called. In this guide, they use nestjs-deploy-back4app as an example.
nest new nestjs-deploy-back4appWhen you run this command, it will make the required files and directories you need to start.
- Open the folder you made for the project and put this command to start the server where you’ll build your app.
npm run start:devThis command allows the server to monitor your codebase and automatically refreshes the server once a file is saved.
Making Your Nest.js App Ready for Docker
To put your app make with Nest.js on Back4app’s container service, you have to make it work with Docker.
Dockerizing refers to a procedure for converting an app into a computer image. This image is a self-contained package that has everything your app needs to run.
To do this, put a Dockerfile inside your app project.
Wondering what a Dockerfile may be? It’s simply a text document with guideline on how to create the Docker image. The file spells out where to start from and what to do next. It also identifies what folder to work in, what to install, and how to start the app.
Here’s how to go about dockerizing your app:
- Make sure Docker is on your computer. If not, get it from the Docker website.
- Go to the main folder containing your Nest.js files and make a new file with the name Dockerfile.
touch Dockerfile- Use your favorite code editor to open the Dockerfile and specify a base image. This image is what you’ll use to make your final image. In this guide, we’ll use the Node 20 image, which already has npm and Node.
FROM node:18-alpine- After that, make a place to work within the image. All your app’s code will be in this folder.
WORKDIR /usr/src/app- The files you should copy into the container are the package.json as well as package-lock.json files. After that, use the npm install command put in place all the stuff your project needs.
# A wildcard ensures package.json AND package-lock.json are copied
COPY package*.json ./

# Install project dependencies
RUN npm install
- Put the remaining parts of your app’s code into the right place within the container.
COPY ..- Use the build command to put your app together. This command changes TypeScript code into a JavaScript ready to run file and keeps it in the dist folder.
RUN npm run build
- Tell the world that this container will use port 3000. Literarily, it specifies the door other apps can knock on to talk to your container app.
EXPOSE 3000/tcp
- Start your app. For this, type: node dist/main.js . The dist folder has the code you compiled while your app starts in main.js.
CMD [ "node", "dist/main.js" ]
When you put everything together, the Dockerfile the have the following commands:
FROM node:20-alpine

WORKDIR /usr/src/app

COPY package*.json  ./

RUN npm ci

COPY . .

RUN npm run build

EXPOSE 3000/tcp

CMD [ "node", "dist/main.js" ]
Include a .dockerignore File
Consider the .dockerignore file service the same function as the .gitignore file in github. It tells Docker which files to ignore. As such, you can avoid adding big, useless files or private into to the docker image.
To make one, create a file and name it .dockerignore in your Nest.js project project directory. After that, open the file and add these stuff:
.git
.gitignore
.env
README.md
Dockerfile
node_modules/
.github
.vscode
npm-debug.log
npm-debug.log.*
With this settings, your Docker image won’t have your debug logs, env variables, markdown files, and node modules.
Make a Docker Image on Your Computer
Put this command in your CLI to check if the Dockerfile is good.
docker build -t nestjs-back4app .This -t switch helps you give your image a name. For example, nestjs-back4app.
When you run docker images in the CLI, you will see the new image you’ve made.
REPOSITORY        TAG       IMAGE ID       CREATED          SIZE
nestjs-back4app   latest    afcba89613fc   39 seconds ago   333MB
The command below will make the app work on your computer.
docker run -p 49160:3000 -d nestjs-back4appThe above command makes port 49160 go to port 3000, like we said within the Dockerfile. When you go to localhost:49160 in your web browser, you’ll see your app’s home page.
Host Your Nest.js App on a Back4app Container
When you’ve confirmed that your Dockerfile is working fine, you can now send your app to Back4app.
Put Your App on GitHub
Back4app uses GitHub to get your app. The next step is to make a fresh repository with the app you just made.
- Go to GitHub and sign in.
- When you’re in, look at the top of the page, by the right to find a “plus” icon and click. Choose “New repository” from the list.
- On the “Make a new repository” page, specify a name for your repository. Then hit the “Create repository name” button. Remember the URL of the repository on the next page.
Now, go back to your computer and navigate to the location with your project files. Run the command below to send your code to the repository you made on Github.
git remote add origin <https://github.com/remigathoni/nestjs-deploy-back4app.git>
git branch -M main
git push -u origin main
After you do the commands quoted above, your app’s files will go into your GitHub storehouse.
Host your Nest.js App
Now you can send your Next.js app to Back4app platform like this:
If you don’t have a Back4app account, make one. Or if you do, log in. You’ll see your dashboard.
Once you are there, press “Build a new app.”
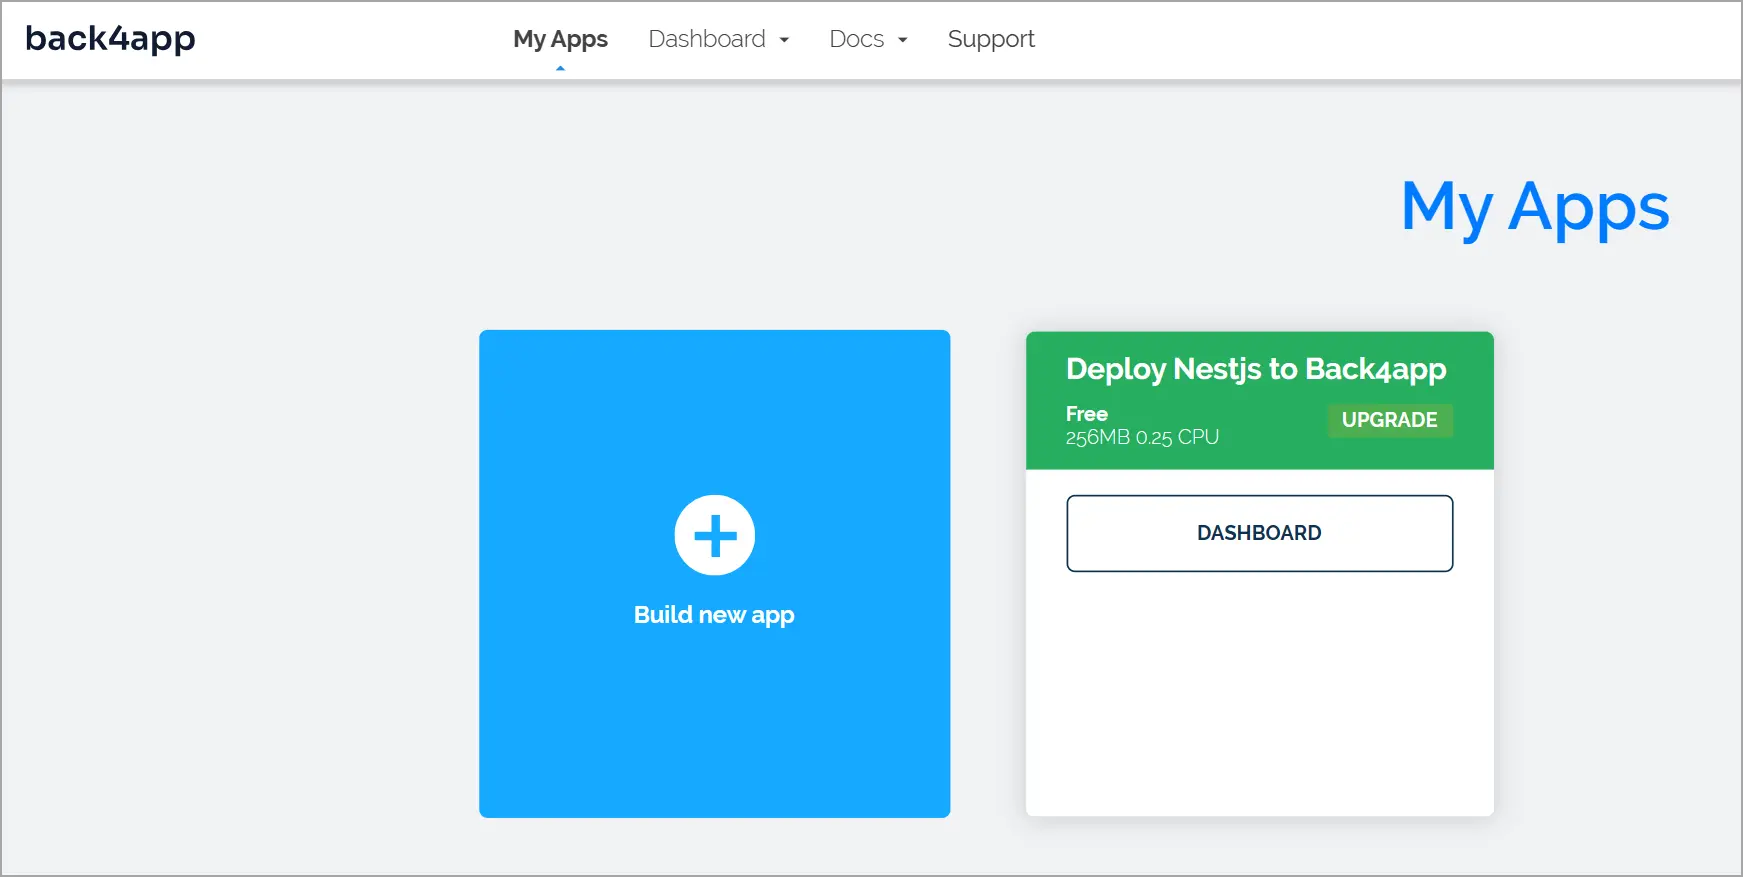
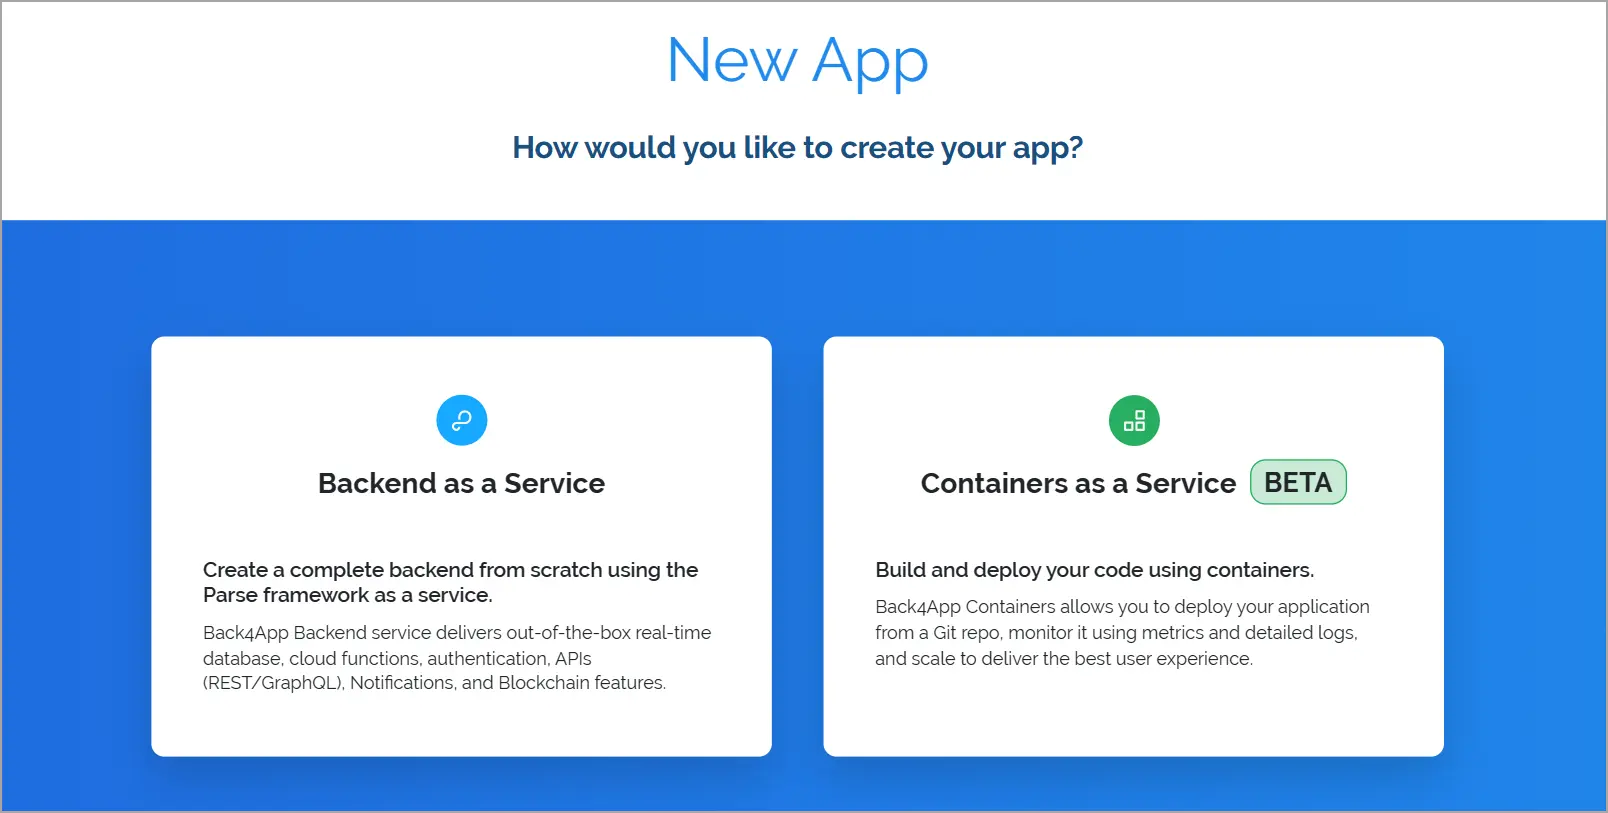
You can choose from two ways to make an app on Back4app. These are CaaS and BaaS solutions described earlier in this article.
While BaaS does everything for your backend, but we want to put our Nest.js app that we’ve converted to a Docker image. So, we’ll choose CaaS.
Back4app Container platform will ask you to link your GitHub account so you can let it use your repositories.
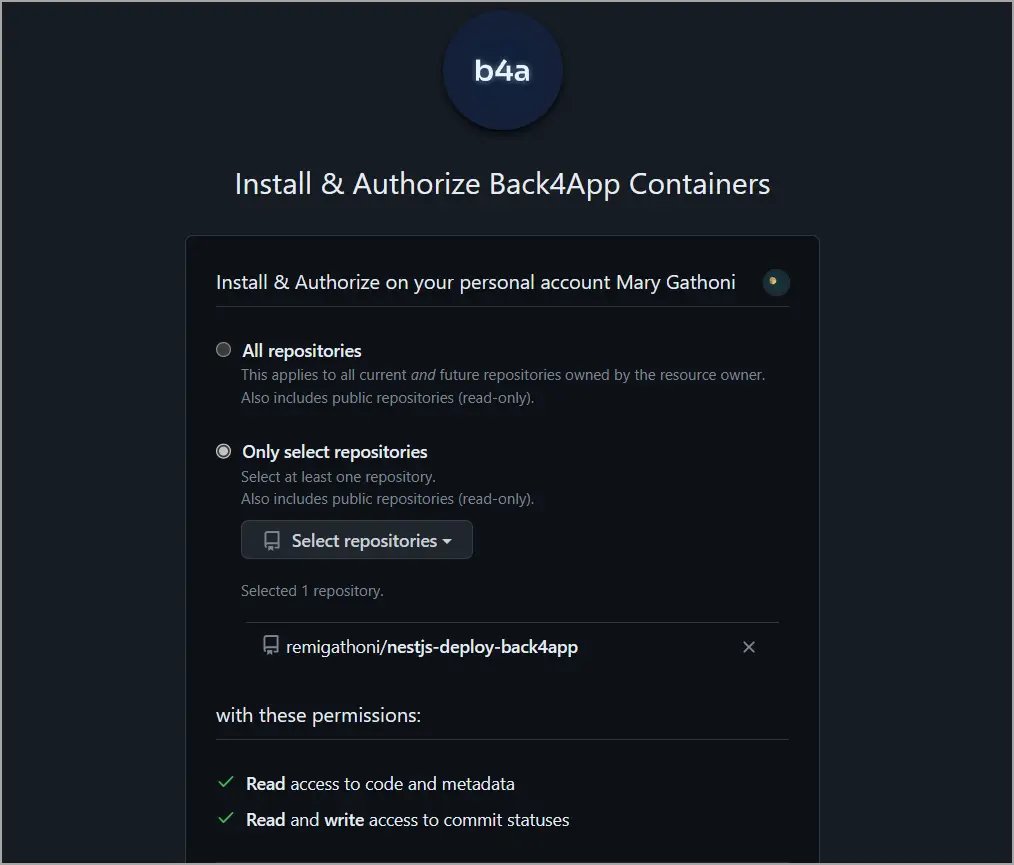
The Next.js repository is the one to choose.
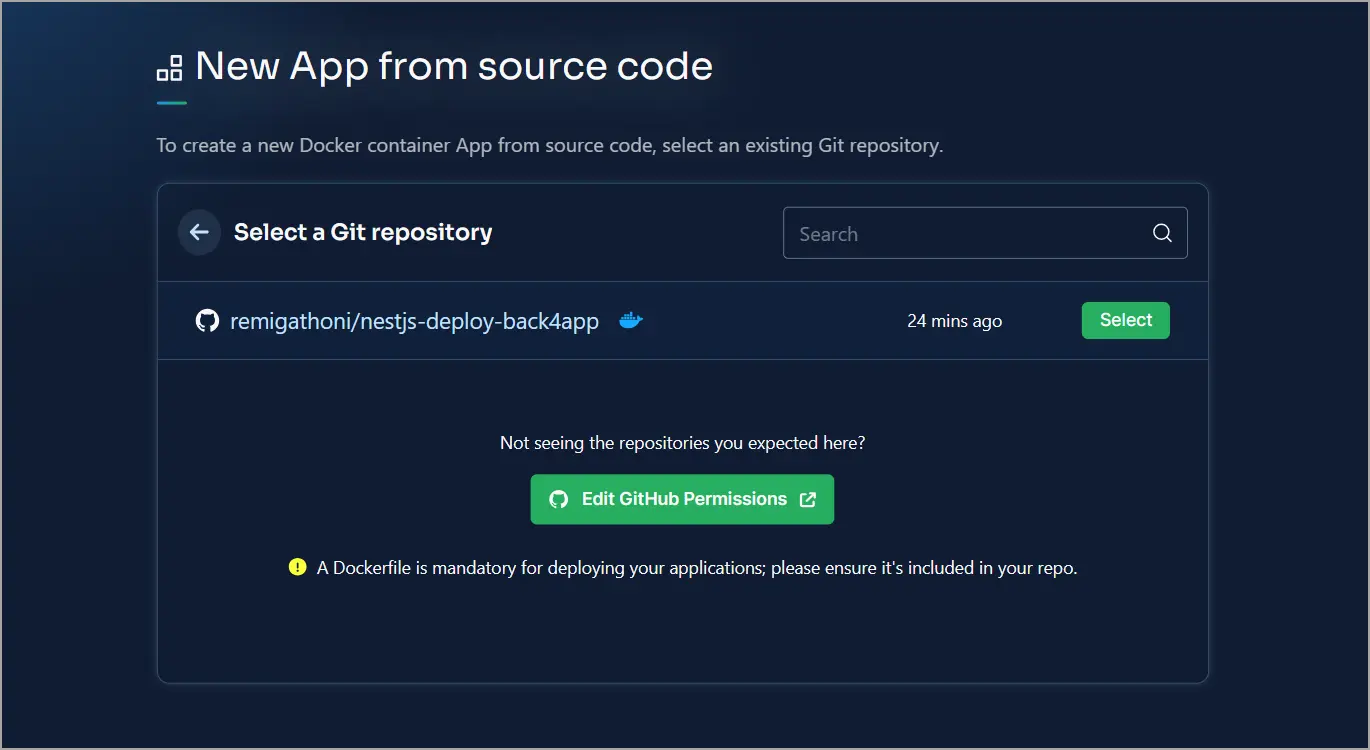
From the deployment choice selections, enter your app’s name. You can also add environment , select the main folder, choose the default branch, and turn auto-deploy on/off. But now, just give it a name.
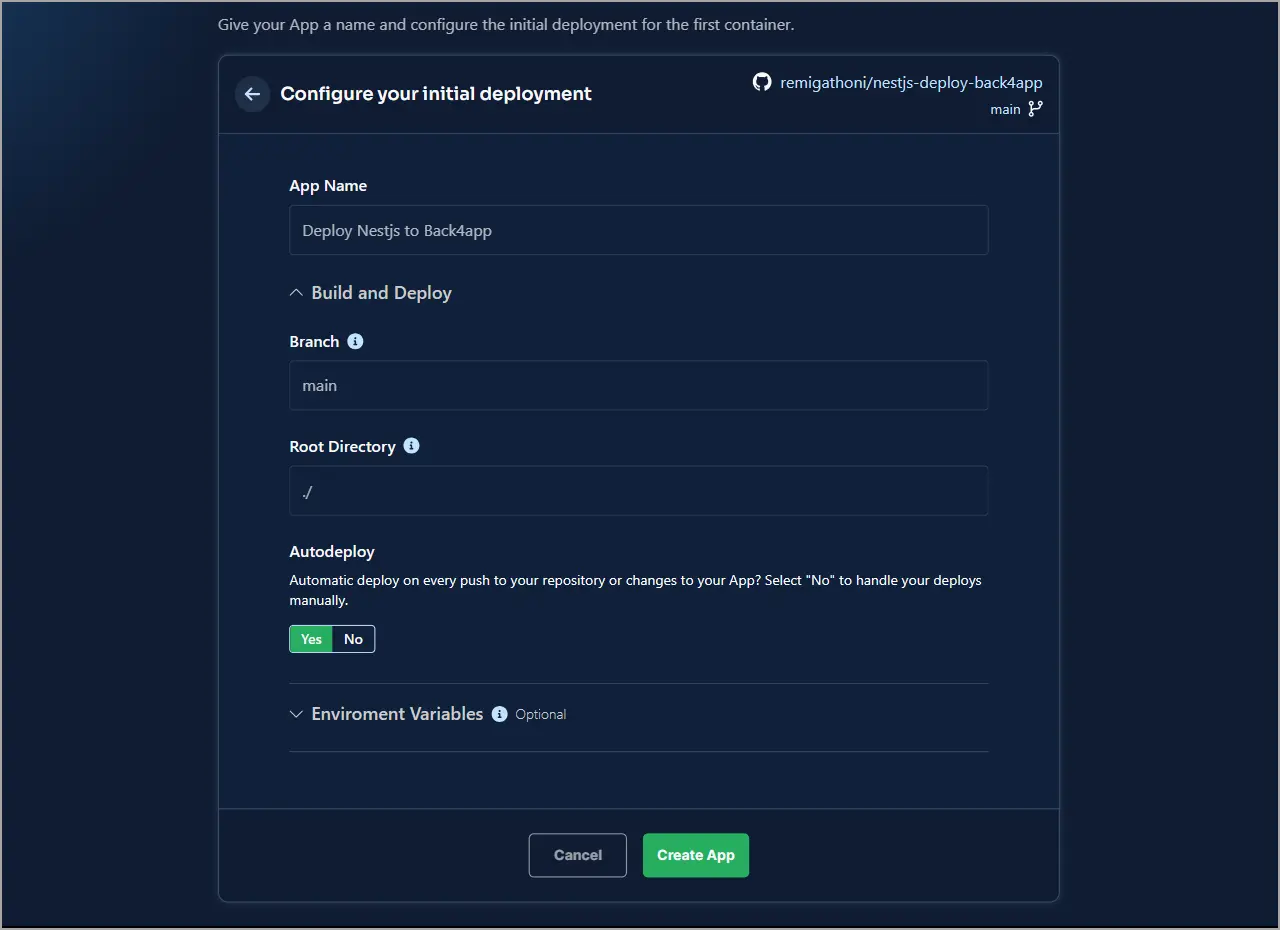
Tap the button labelled “Create App” to begin deploying your app. The process could take a couple of minutes. And that’s pretty much it! You’ve effectively made your app go live on Back4app at no cost.
Improving Hosting with Multi-Stage Build
At present, the size of your Docker image is relatively large, measuring 333 MB.
REPOSITORY        TAG       IMAGE ID       CREATED          SIZE
nestjs-back4app   latest    afcba89613fc   39 seconds ago   333MB
To achieve faster deployment and a smaller image size, it’s important to make the image smaller. Having an image with smaller size not only speeds up deployment but also helps in saving cloud storage expenses and enhances resource optimization. Additionally, it improves security by decreasing the potential points of attack.
One approach to achieve this is by using the multi-stage build method. This approach lets you create distinct building process and runtime environment.
This means that after installing dependencies, we can choose to compile the app in another container. After that, only the relevant files are copied to the ready to deploy image.
To start implementing this, delete all the existing content in your current Dockerfile. There will be two stages in the new Dockerfile:
- The build stage is in charge of creating the app. It installs the relevant dependencies and also converts TypeScript to JavaScript.
- The production stage: this stage will be responsible for creating the runtime image. It will store all the files necessary to run the app.
Each stage is identified by adding AS *name-of-stage* to the FROM command.
Setting Up the Build Stage
To implement the multi-stage build, follow these steps:
- In your DockerFile, create a stage using your Node main image and give it the name “build”.
FROM node:20-alpine as build
It is important to note that the node base images with the suffix -alpine have a smaller size compared to the ones without the suffix.
- Choose your work folder.
WORKDIR /usr/src/app- Next, the files named package.json as well as package-lock.json must be copied into the new container..
# A wildcard ensures package.json AND package-lock.json are copied
COPY package*.json ./
- We shall then install the required tools.
RUN npm ci
We’ve opt to use ” npm ci” rather than “npm install.” While these commands are similar, but “npm ci” guarantees a fresh installation of dependencies whenever it’s executed.
- Then, copy the code of the app to the build stage.
COPY . .
- Construct the app by executing the “npm build” command.
npm run build
Creating the Production Stage
After creating the application, determine the production stage.
- Include the Node.js main image, then give it the name “production.”
FROM node:20-alpine AS build
- Just like we did at the build stage, set the working folder.
WORKDIR /usr/src/app
- The dist folder and the node_modules should be copied from build image into the production image. Simply use the from=build label to achieve this.
COPY  --from=build usr/src/app/dist ./dist
COPY  --from=build usr/src/app/node_modules ./node_modules
- Make the port 3000 accessible to the public.
EXPOSE 3000/tcp
- Add the CMD command to start the app.
CMD ["node", "dist/main.js"]
After you’ve put everything together, the content of your Dockerfile will contain the following:
# Build
FROM node:20-alpine AS build
WORKDIR /usr/src/app
COPY package*.json  ./
RUN npm ci
COPY . .
RUN npm run build && npm prune --production

# Production
FROM node:20-alpine AS production
WORKDIR /usr/src/app

COPY  --from=build usr/src/app/dist ./dist
COPY  --from=build usr/src/app/node_modules ./node_modules

EXPOSE 3000/tcp
CMD [ "node", "dist/main.js" ]
Go ahead and build your docker file. You’ll see that the size has become much smaller.
REPOSITORY             TAG       IMAGE ID       CREATED          SIZE
nestjs-back4app-opt    latest    d29aedae9bef   5 seconds ago   186MB
When you make the Docker image smaller, your deployments faster and also save on storage space.
A Final Note
To sum it up, Nest.js can be described as a framework built on Node.js with a structured and modular nature that aids in creating a codebase that is easy to maintain and also scales seamlessly.
When it comes to Nest.js app deployment, you have different options such as Container as a Service (CaaS) and Infrastructure as a Service (IaaS).
Back4app Containers is a recommended CaaS provider. This platform takes care of managing and overseeing your deployment, streamlining the process of moving from building your app to making it go live.
Throughout this guide, you’ve acquired the knowledge to convert Nest.js to docker and then deploy it to a container with Docker on the Back4app platform. You’ve also learned how to go about managing a multi-stage build deployment.
Now, you should be equipped to generate a Nest.js app, transform it into a Docker image, and make it go live on Back4app.
Do you want to access the source code in this guide? Get it from GitHub repository, and for further insights.
Frequently Asked Questions
How to host a Nest.js app?
– Make a Nest.js app.
– Turn the Nest.js app into a Docker image.
– Upload the Dockerized app to GitHub.
– Sign up for Back4app.
– Make a container in Back4app
– Allow Back4app to access your GitHub.
– Pick your Nest.js repository and proceed to make your app live


