Parse Server Security
Hello everyone in this article I’m going to talk about Security when using Parse Server on Back4App. As security is not a topic that makes developers happy I’ll be very concise and direct. My intention here was to provide a quick security checklist to review your App before making it a Production App.
Parse Security Mechanism
In order to properly configure adequate security access to your App, you should first understand some Parse Basic Security Mechanisms Concepts the Default Parse Classes, and the Auth Mechanisms.
1-Parse Default Classes
Parse creates by default 3 Classes: Users, Roles, and Sessions. Those classes are fully integrated with the whole backend and also will make your life easier when configuring the Authentication Mechanisms to protect your App.
User
Parse provides a specialized user class called Parse.User that automatically handles much of the functionality required for user account management.
The Parse.User class is secured by default. Data stored in a Parse.User can only be modified by that user. By default, the data can still be read by any client. Thus, some Parse.User objects are authenticated and can be modified, whereas others are read-only.
Roles
Role is a Class where you can associate Users and Other Roles into a new Role. Once you create a Role you can use it to define if what that Role will access in your App using CLPs and ACLs.
Session
When you log in a user via a User login method, Parse will automatically create a new unrestricted Session object in your Parse Server. Same for signups and Facebook/Twitter logins.
2-Parse Auth Mechanism
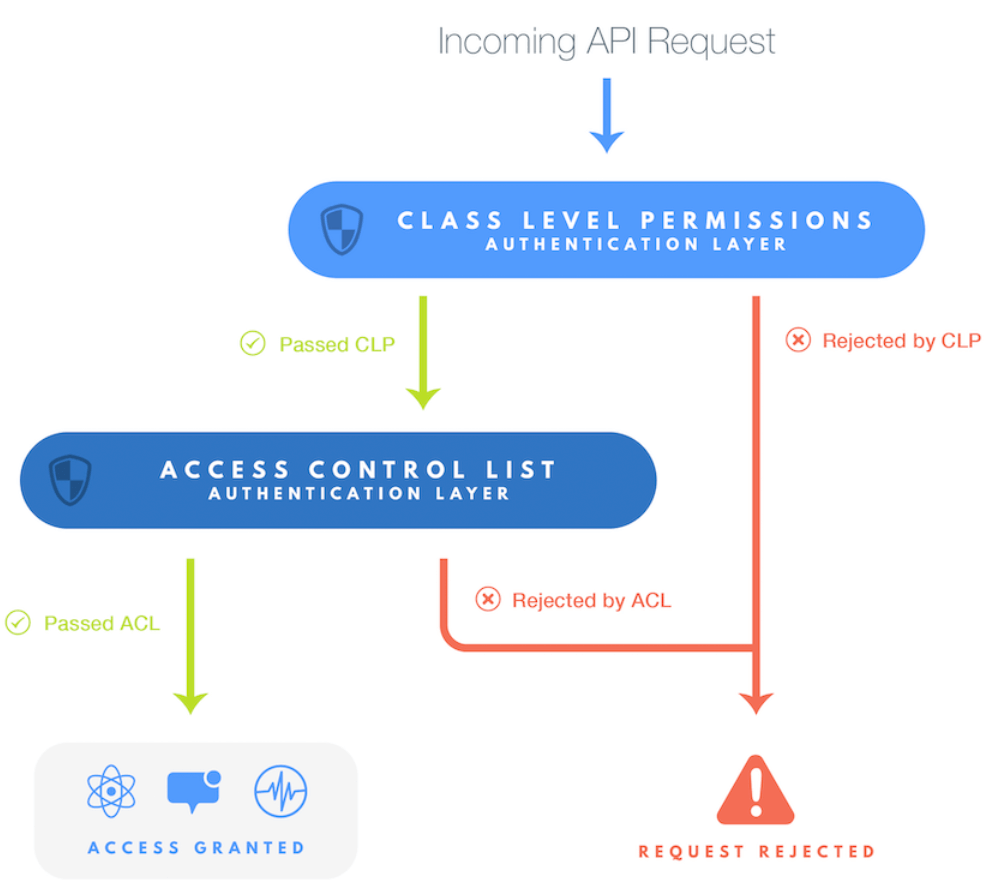
When talking about Data Access on Parse you can control your App Security at 2 different levels:
- Class/Table – Use CLPs(Class Level Permissions) to restrict new columns creation and general Data Access to the whole class;
- Object– Use ACL(Access Control Lists) to control access at a specific object;
Class Level Permissions – CLPs
Class level Permissions are a mechanism that controls access of a Class and all its object. Using CLPs you can configure Read/Write access to a Role, a User, or to a Pointer.
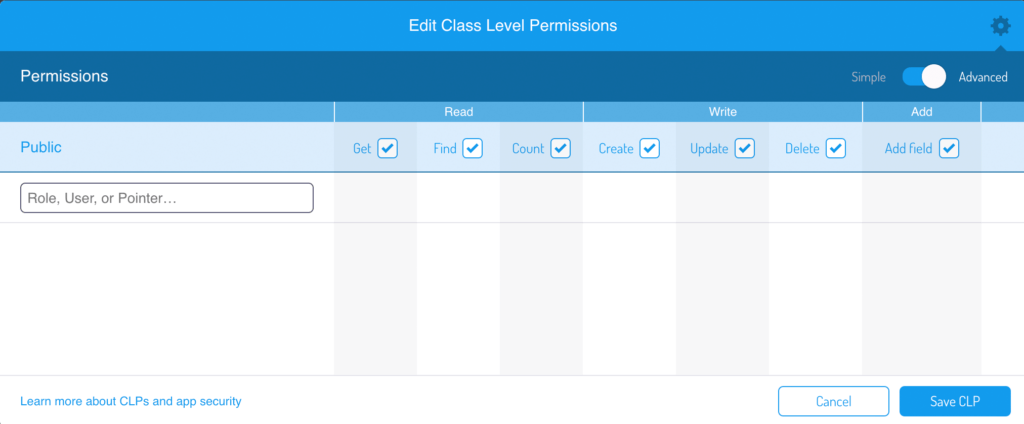
Using this mechanism you can restrict access to the following operations:
- Read
- Get – Fetch objects information for a given ObjectId;
- Find – Query all objects in this Class (ObjectID is not necessary);
- Count – Class Total Number of objects;
- Write
- Create – Create new Objects;
- Update – Update existing Object;
- Delete – Delete existing Object;
- Add
- Add Field – Create new columns in this Class;
To access these configuration options you should go to the small shield icon on Class the top right quick menu.

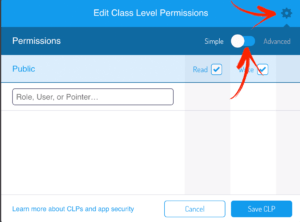
After clicking on the shield icon, you’ll see the simple menu just with read/write options available. Click on the top-right icon of your window to access Advanced CLPs Configuration.
Then you will see the complete CLP configuration window.
Access Control Lists – ACLs
Access Control Lists allow you to control access to each object of a given Class differently. You can create an ACL to an object and configure access (read/write) for each Role or User.
Parse always require an ACL to create any Role. So, to create the First Role you’ll need a user. Let’s create a root user in order to create the First Roles in our App. This user will be the only user who can edit these Roles.
First, we can create the root user just filling username and a password on the User Table.
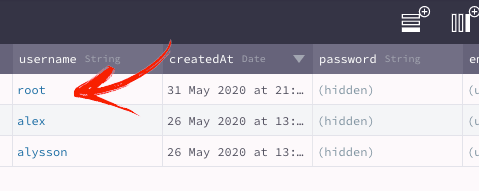
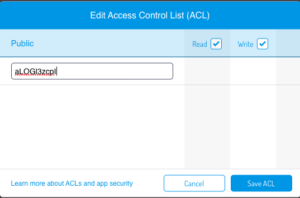
Then you copy the root User ObjectId and go to the Role Class. Create a new Role and double click on the ACL field in order to create the ACL. In this case, I’m going to allow the root user to read/write this ACL, so let’s fill the ACL with root user ObjectID and then save it.
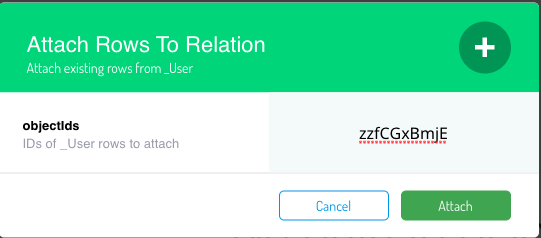
After this step, let’s give this Role the Admin name and associate the users Alex and Alysson. As the Role Class has a relation with the User Class you can click overview relation and then add the ObjectIDs from the user you want to add to this relation.


Now you have a Role Admin with 2 users that you can use to compose new Roles, to attribute on new ACLs or CLPs.
Security App CheckList
Now you’re familiar with the main Parse Security concepts I would like to suggest some advice to make your App more secure.
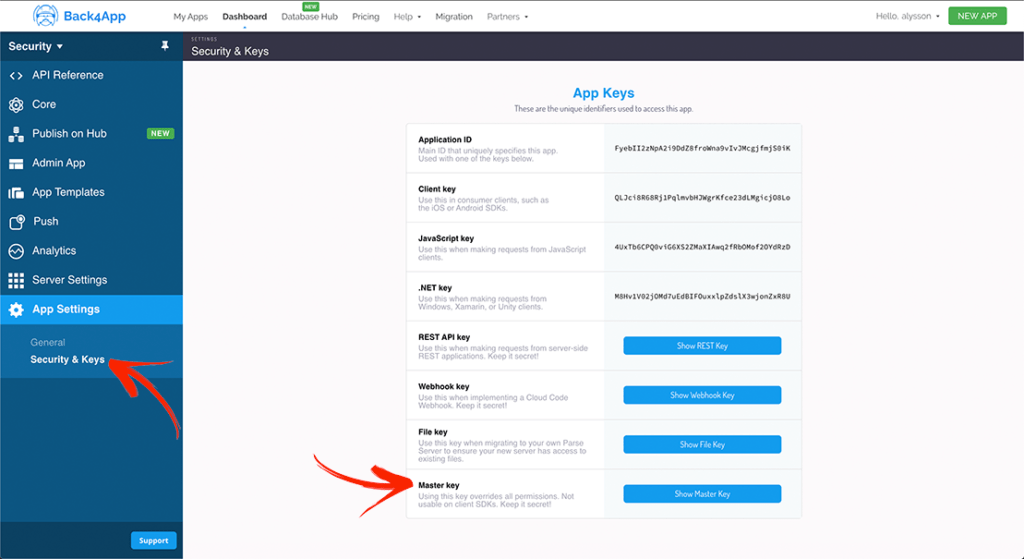
1-Keep Master Key Safe
The Master Key is the Parse mechanism to bypass all other security layers. A good comparison is having the App Master Key for an App is like having the root access of a Server.
This is why you have to protect this key and when necessary use the key only via cloud code. You should avoid using it on your Front end Code because someone can decompile or, in JS case, just click on view source and copy your Key.
Another advice is when using this key in a cloud code make sure you are not going to commit the key (that is part of your cloud code) to any public code repository.
2-Uncheck Client Class Creation
When you create a new App on Back4App the Parse Key allowClientClassCreation is enabled. That means anyone with the AppID and Client Key can create new classes on your database.
You can change this configuration on Back4App on your Server Settings->Core Settings->Settings Menu Option.
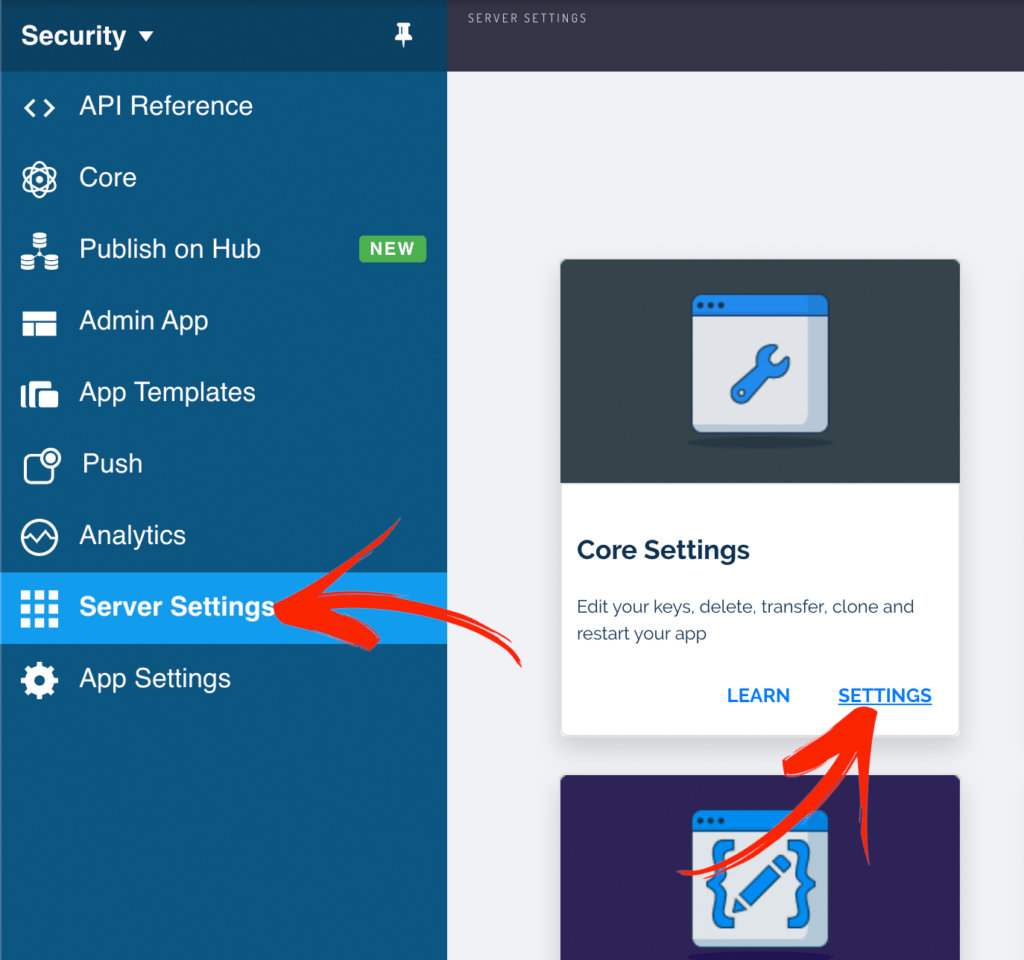
Just scroll down and uncheck the option “Allow Client Class Creation” as shown below.
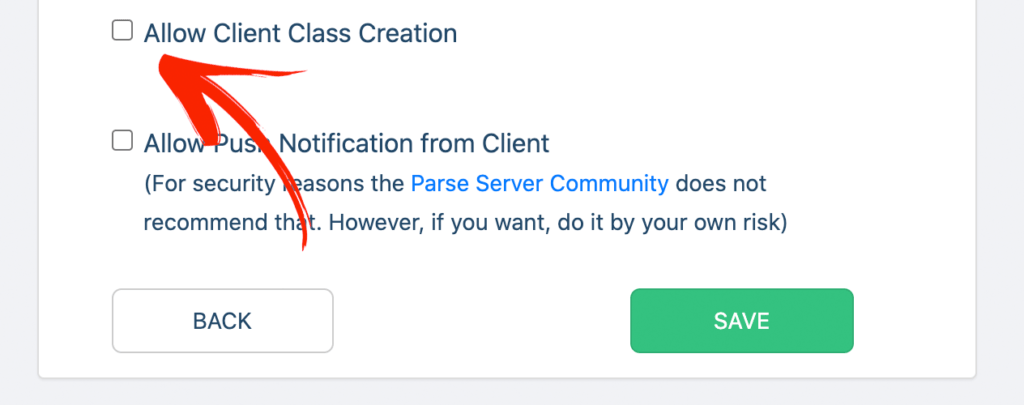
The recommendation here is to keep this option enabled while you develop your app and once you finish then remove it.
3-Create a Role Structure
As we have Started on the ACL section you can go on and build a Role Structure to better control access over all your App Classes and Objects. Let’s say you’re building a Uber-Clone-App and you have 3 main accesses: Admin, Passengers, Drivers.

4-Configure CLP for Users and Roles
As User is a default Parse Class, anyone with the class name, REST API key, and the App ID can request all your user list by making a single curl command:
curl -X GET -H "X-Parse-Application-Id: FyebII2zNpA2i9DdZ8froWna9vIvJMcgjfmjS0iK" -H "X-Parse-REST-API-Key: hluEgfZ084RdR0MyyE8Y9v4RwsOsTIWlJeCc4qGw" https://parseapi.back4app.com/users
And retrieve the User List:
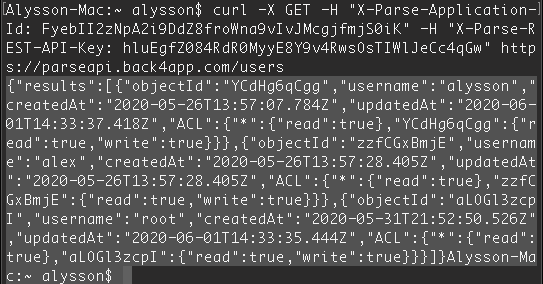
You can avoid that creating a CLP and limiting the Power of who can read/write your User Table (It is also possible to make protection using ACLs). In this case, I’m going to allow only Admin Users to read the complete User List.
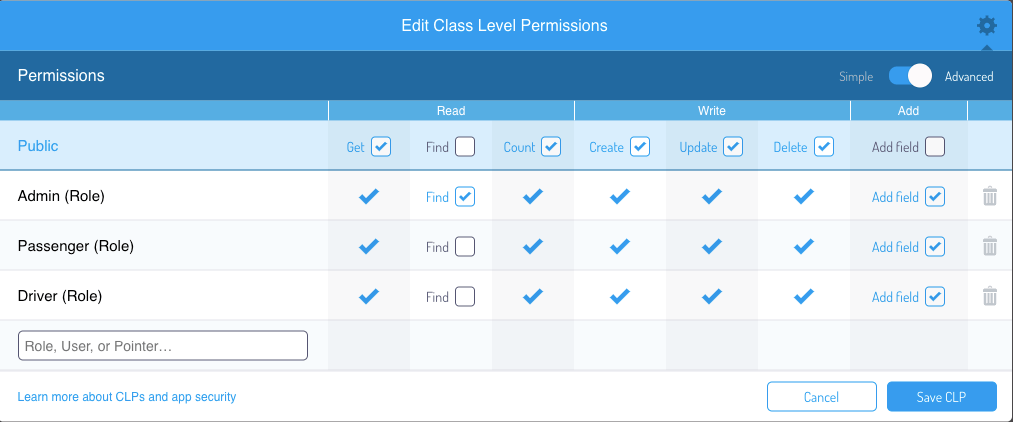
You can make a similar process to the Role Class and remove access from Roles/Users that won’t need to read the complete class.
The Session Class is protected by default because all Session objects have an automatic created ACL that is read and write by that user only.
5-Make Fixed Classes Read-Only
If you have tables/classes that you want only change via Parse Dashboard you can make them read-only using the CLP. In my case, I built a class that defines the city where my Uber-Clone-App is going to operate.

I want to change this Class only via Parse Dashboard so I’ll remove write access rights from all other Roles.

6-General CLP and ACL advice
Most classes in your app will fall into one of a couple of easy-to-secure categories. For fully public data, you can use class-level permissions to lock down the table to put publicly readable and writeable by no one. For fully private data, you can use ACLs to make sure that only the user who owns the data can read it.
But occasionally, you’ll run into situations where you don’t want data that’s fully public or fully private. For example, you may have a social app, where you have data for a user that should be readable only to friends whom they’ve approved. For this, you’ll need a combination of the techniques discussed in this guide to enable exactly the sharing rules you desire.
Check this video on How to create ACL for more details.
7-Set the Lenght of your Session(Just some Cases)
If you are developing an App that involves very sensitive information(Banking App, Health Care App) and you may need to log out the users after a short time.
In order to limit the Session Length go to Server Settings->Custom App Settings.
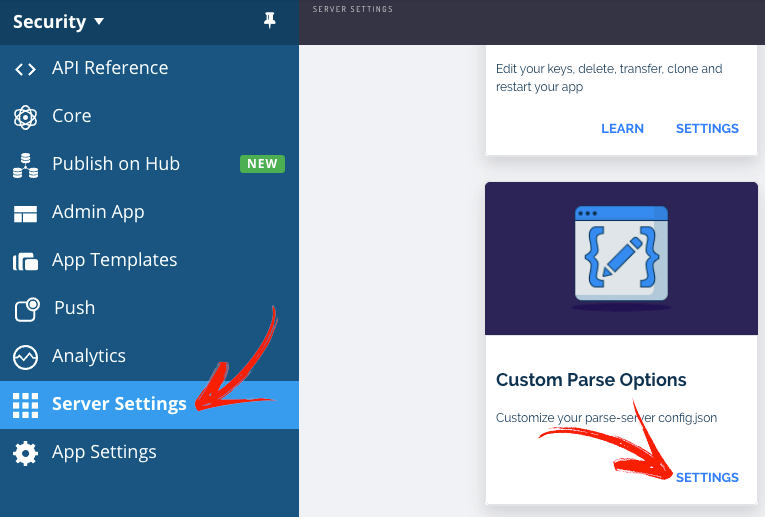
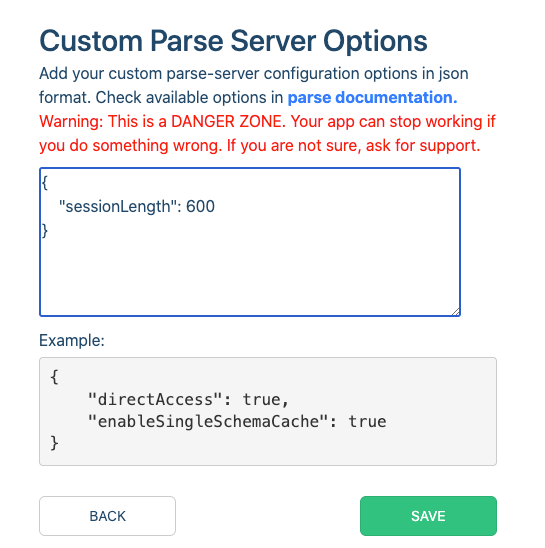
On Custom Parse Options text box define the Session Length in seconds. In the case below I’m defining a Session of 10 minutes. Then click Save.
8-Use Https and SSL
Https is a secure protocol for transferring information from the client’s browser to your server. It’s necessary to prevent hackers from accessing sensitive information with attacks like MITM.
The advice here is to use Https over Http to make connections with Parse Server. Below is an example using a JS Connection with Parse that shows how to use https correctly to establish an active connection. Note that the wrong way would be by using http:// instead of https://.
Parse.initialize("APP_ID","JS_KEY");
Parse.serverURL = 'https://parseapi.back4app.com/'
If you are using Back4App Webhosting is important to note that Back4App already provides an https connection by default(you must use https:// in your calls!).
But if you want to use your own domain name and redirect to Back4App servers make sure your SSL certificate is valid and properly installed and that you are making the redirects to Back4App using https.
Final Words
Back4App and Parse provide a number of ways for you to secure data in the Cloud. As you build your App and evaluate the kinds of data you will be storing, you can make the decision about which implementation to choose.
We hope that you’ll use these tools to do everything you can to keep your App’s data and your users’ data secure. Together, we can make the web a safer place.


