Building a robust AI assistant backend!
As AI technology advances, AI assistants are expected to play an increasingly significant role in managing business customer support. Most businesses have already integrated some sort of AI into their workflows.
In this article we’ll discuss AI assistants, highlighting their incredible benefits and potential drawbacks.
On top of that, we’ll provide a comprehensive step-by-step guide on creating an AI-based assistant using OpenAI and Back4app.
Contents
What is an AI Assistant?
An AI assistant is a piece of software that takes in a prompt through text or voice and generates a response.
Among other things, this technology utilizes natural language processing (NLP) and machine learning.
The purpose of AI assistants is to mimic human-like conversation.
Throughout the article, we’ll use the words AI assistant and AI chatbot interchangeably. However, some people might argue that an assistant is a more complex version of a chatbot that can also perform tasks.
A few examples of popular AI assistants are ChatGPT, Claude, and Gemini.
Some AI assistant applications include:
- Customer support (AI assistants can be trained to answer customer queries)
- Developer help (AI assistants can generate code and help developers work efficiently)
- Education (assistants can be used for educational purposes and user onboarding)
- Marketing & analytics (assistants can generate marketing material & analyze data)
- Entertainment (AI chatbots can craft entertaining or creative responses)
Benefits of AI Assistants
AI assistants come with a number of benefits. Let’s look at them!
Boost Productivity
AI assistants allow you to boost your business productivity greatly.
They can be utilized for task organization, business operations, customer support, marketing, etc.
By utilizing AI, you can create highly scalable, autonomous customer support that’s available 24/7.
Additionally, developers can leverage AI assistants to write, review, and document code. There are already a number of specialized tools for this purpose, including GitHub Copilot, OpenAI Codex, and CodePal.
Ease of Use
AI assistants are among the most accessible software because they “understand” human text. Almost anyone, no matter how tech-savvy, can use them.
Cut Costs
AI assistants can help you significantly cut costs by optimizing your work processes and automating customer support. Some studies have discovered that AI helps businesses cut costs by up to 20%.
Information Retrieval
One of the best perks of AI assistants is their ability to fetch information. They can quickly query several documents and return a simple user-readable response.
Moreover, they can accompany the answers with the sources.
Thanks to recent advancements in OpenAI’s API, you can now train bots using your business data effortlessly.
Customization & Personalization
AI assistants are highly customizable. Repurposing an assistant is as easy as changing the instructions or so-called initial prompt.
In addition, AI assistants can return personalized responses based on who they’re communicating with.
For example, they can answer the user’s query in their native language or consider the context of previous conversations.
Drawbacks of AI Assistants
Nothing comes without drawbacks.
Hallucinations
AI chatbots sometimes generate false or nonsensical information. When that happens, we say that a chatbot hallucinated.
The reason behind it is that bots don’t actually understand what they’re saying — they’re just generating the most likely next word based on the previous words.
If you’re curious to learn how AI chatbots like ChatGPT work, check out this article.
Can’t Perform Complex Operations
AI assistants are great for simple and repetitive tasks but fail miserably when asked to perform complex tasks.
They lack common sense and human intelligence in general. If the answer isn’t within the chatbot’s learning material, it’ll likely return an incorrect response.
Moreover, they’re not guaranteed to return optimal results.
Maintenance
To ensure chatbots trained on business documents provide accurate and current information, you must regularly update them with the latest documents. Without this ongoing maintenance, the chatbot may deliver outdated responses.
Privacy & Security Concerns
Assistants sometimes have to deal with classified business information or personal user data. This raises some ethical questions and makes it possible for the assistant to leak confidential information.
How to Build a AI Assistant?
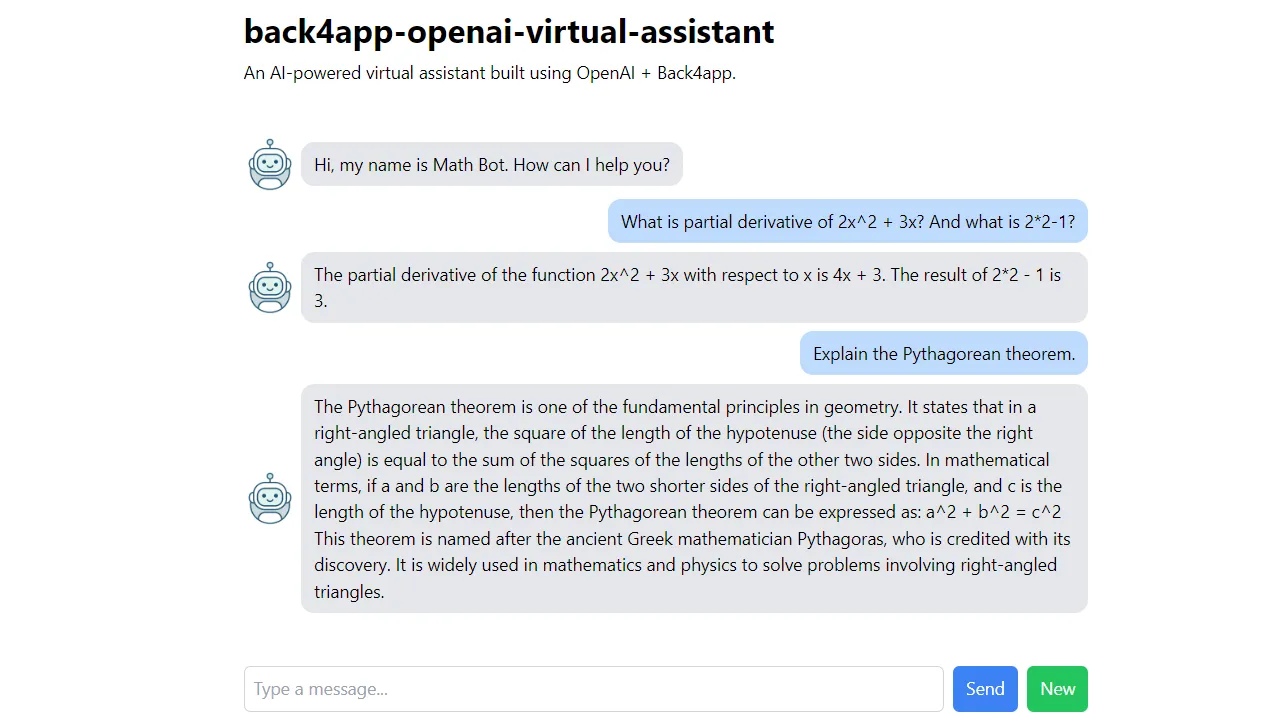
In this part of the tutorial, we’ll create a GPT-powered virtual assistant.
Our virtual assistant will specialize in answering math questions. It will utilize threads, allowing it to answer follow-up questions.
Moreover, the code will be designed for easy repurposing and adaptability to other applications.
On the backend we’ll use OpenAI and Back4app, and the frontend will be built using React (with TailwindCSS).
Prerequisites
- Basic understanding of JavaScript ES6
- Experience with React and React Hooks
- An OpenAI account with some credits
- A free Back4app account
Objectives
| # | Backend | Frontend |
| 1 | Create a Back4app application | Bootstrap a new project |
| 2 | Upgrade app’s Node.js version | Install TailwindCSS |
| 3 | Create an OpenAI secret key | Code the user interface |
| 4 | Add the secret key as an env variable | Install and configure Parse SDK |
| 5 | Create Cloud Code functions | Connect to the backend |
Let’s start coding!
Backend
At this stage of the tutorial, we’ll take care of the backend. We’ll create a Back4app app, create OpenAI secret keys, add them as environmental variables, and write the required Cloud Code functions.
Create Back4app App
First, log into your Back4app account or create one if you don’t have one yet.
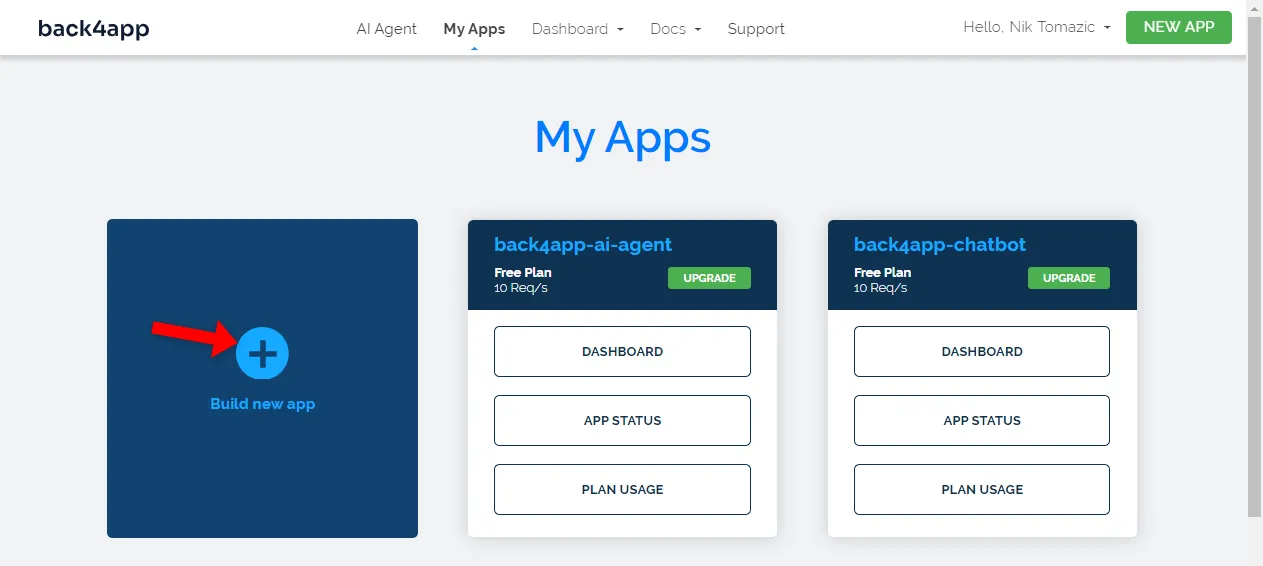
As you log in, you’ll be redirected to your app list. Click “Build new app” to create an app.
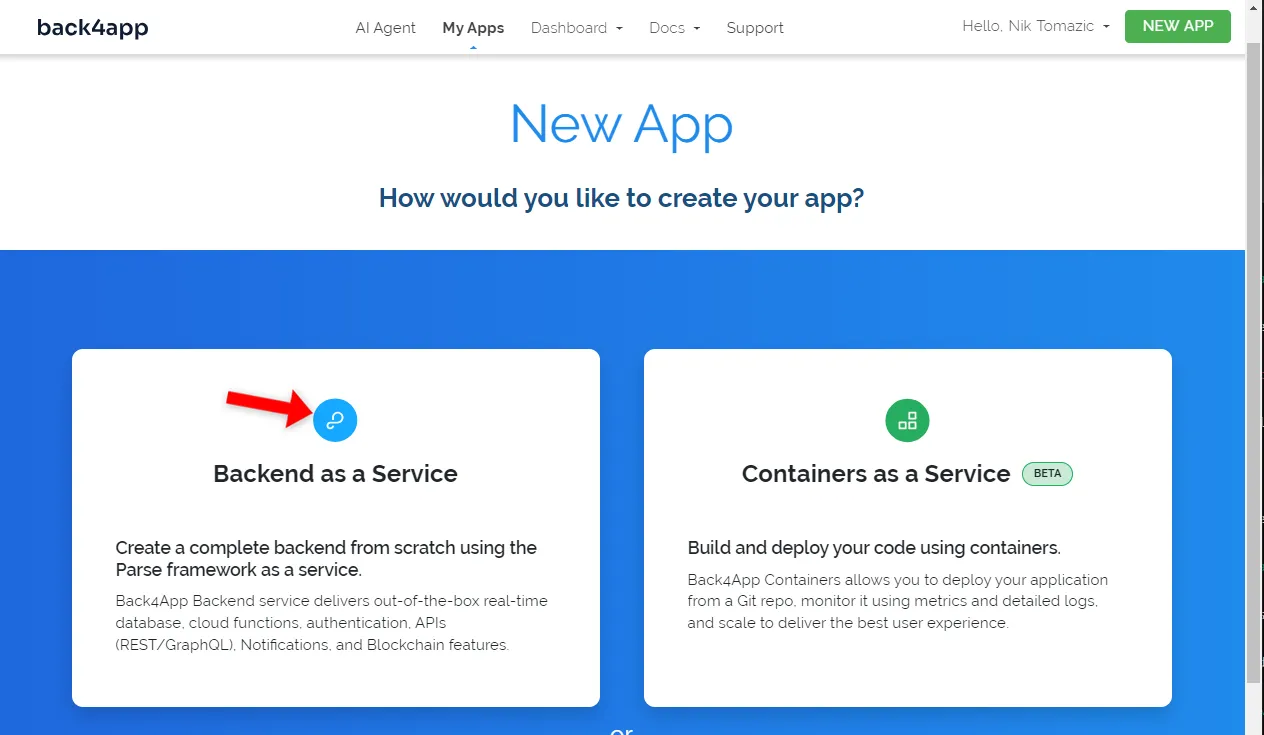
The Back4app platform allows you to deploy two types of apps: Backend as a Service (BaaS) and Containers as a Service (CaaS). We’re building a backend, so go with BaaS.
Next, give your app a informative name, leave the database as NoSQL, and click “Create”.
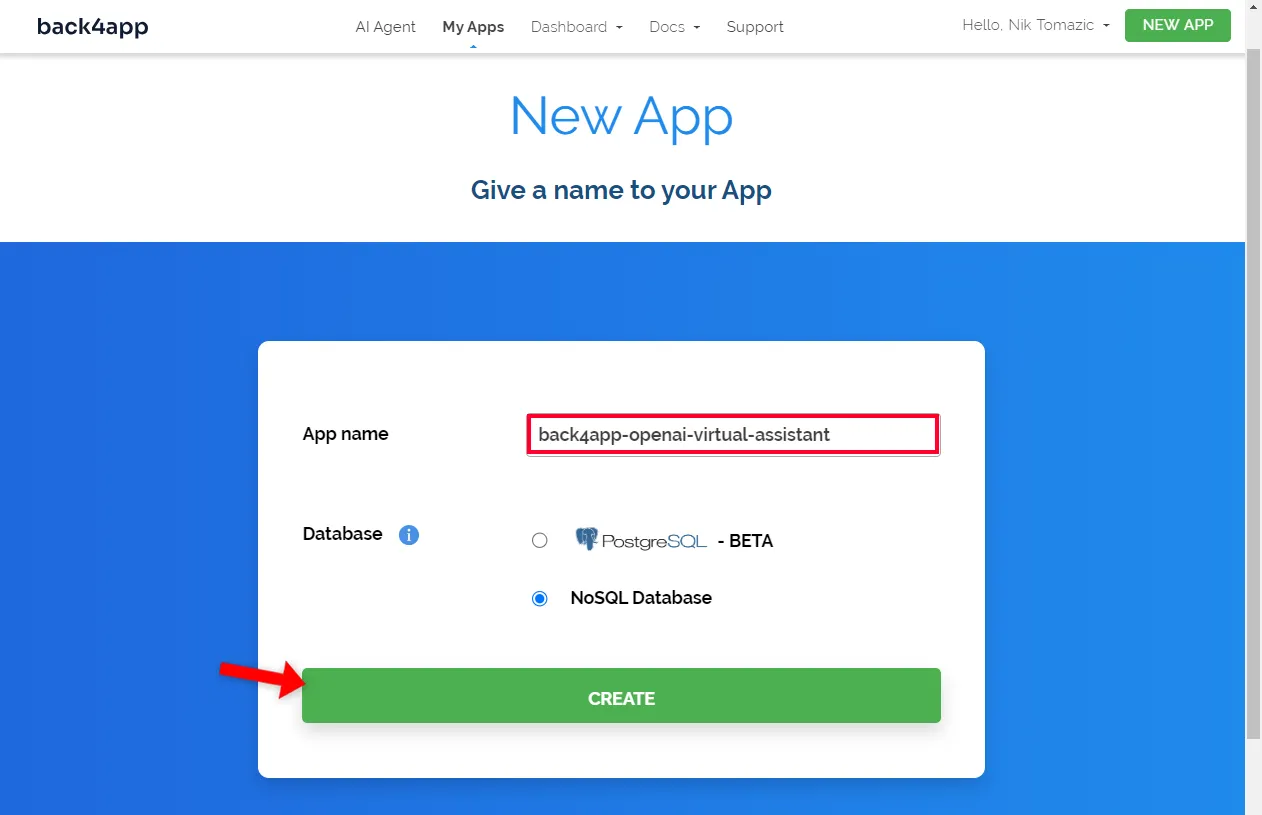
Wait roughly three minutes for the platform to create the app. Back4app will handle everything from making the app layer to setting up the database, security, scaling, and more.
Once done, you’ll be redirected to your app’s database interface.
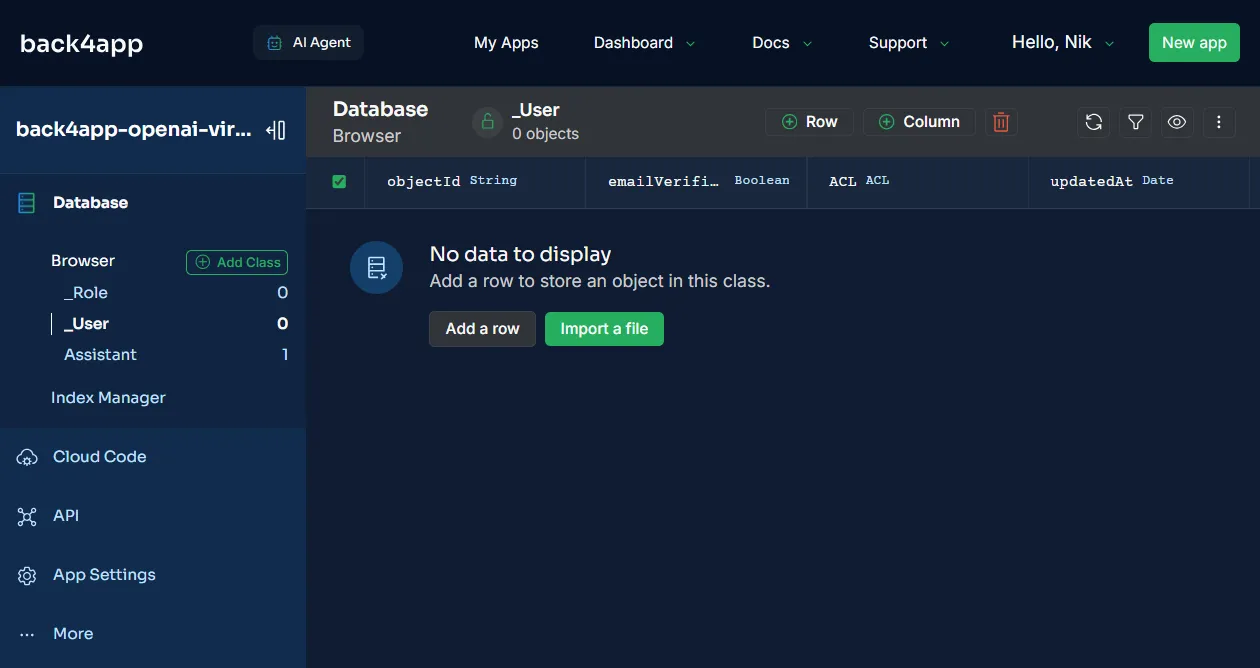
Change Node Version
By default, Back4app apps are powered by Parse v4.10.4. This version of Parse Server uses Node v14, which is incompatible with the OpenAI’s library, which requires Node v18+.
Let’s upgrade the Parse Server version.
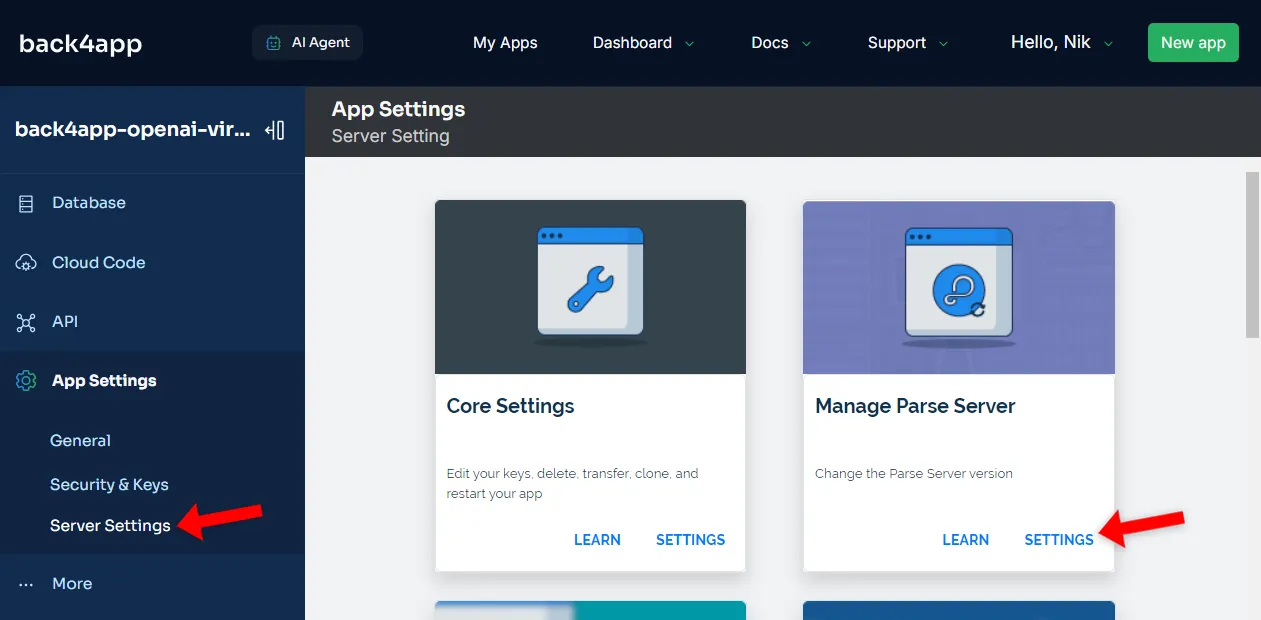
First, select “Server Settings” on the sidebar, then navigate to “Manage Parse Server” settings as depicted in the image below.
Change the Parse Server version to 5.2.3 or newer.
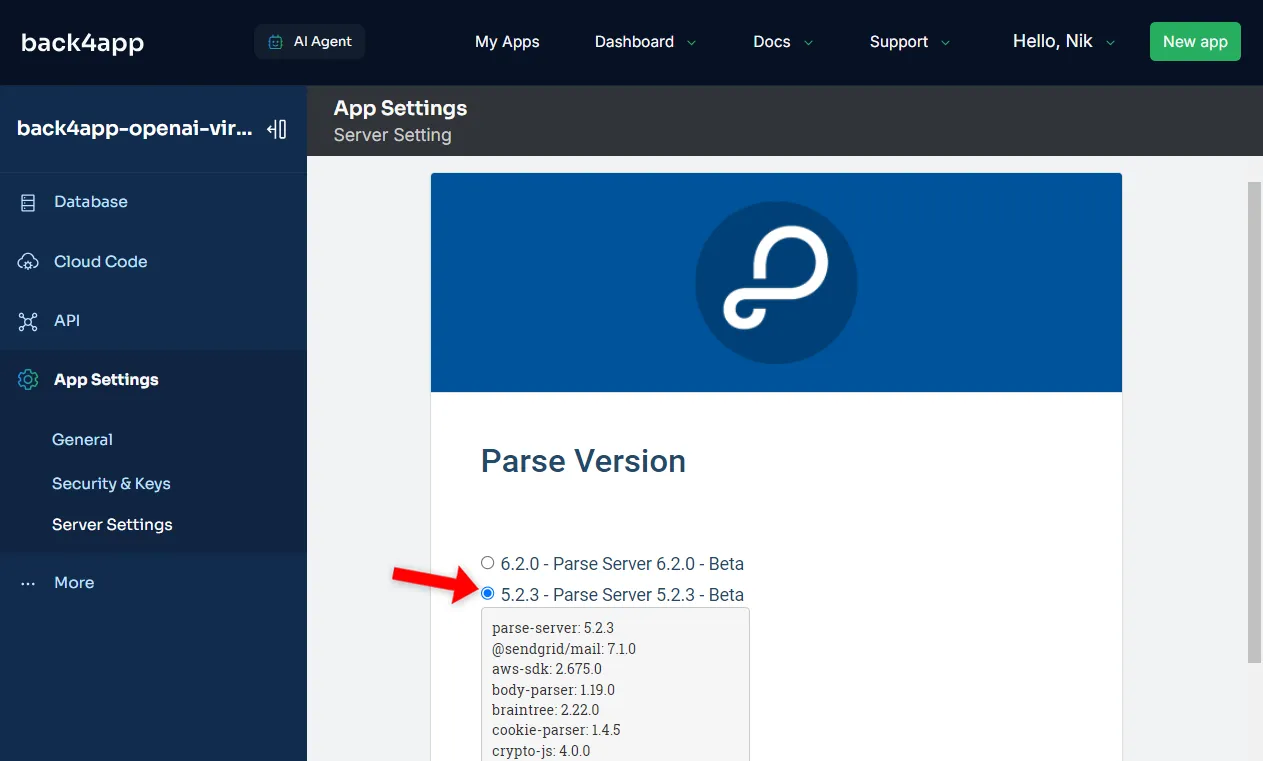
Click “Save” and wait a few minutes for Back4app to upgrade the server version.
To verify the Node.js version, you can define the following Cloud Code function:
Parse.Cloud.define("getNodeVersion", async(request) => {
  return process.version;
});
Then, trigger it via the built-in “API > Console > REST” by sending a POST request to functions/getNodeVersion.
OpenAI API Keys
Moving along, let’s create an OpenAI API key to connect to OpenAI from our backend.
Navigate to OpenAI’s dashboard and create a new project by clicking on “Default project” and then “Create project”.
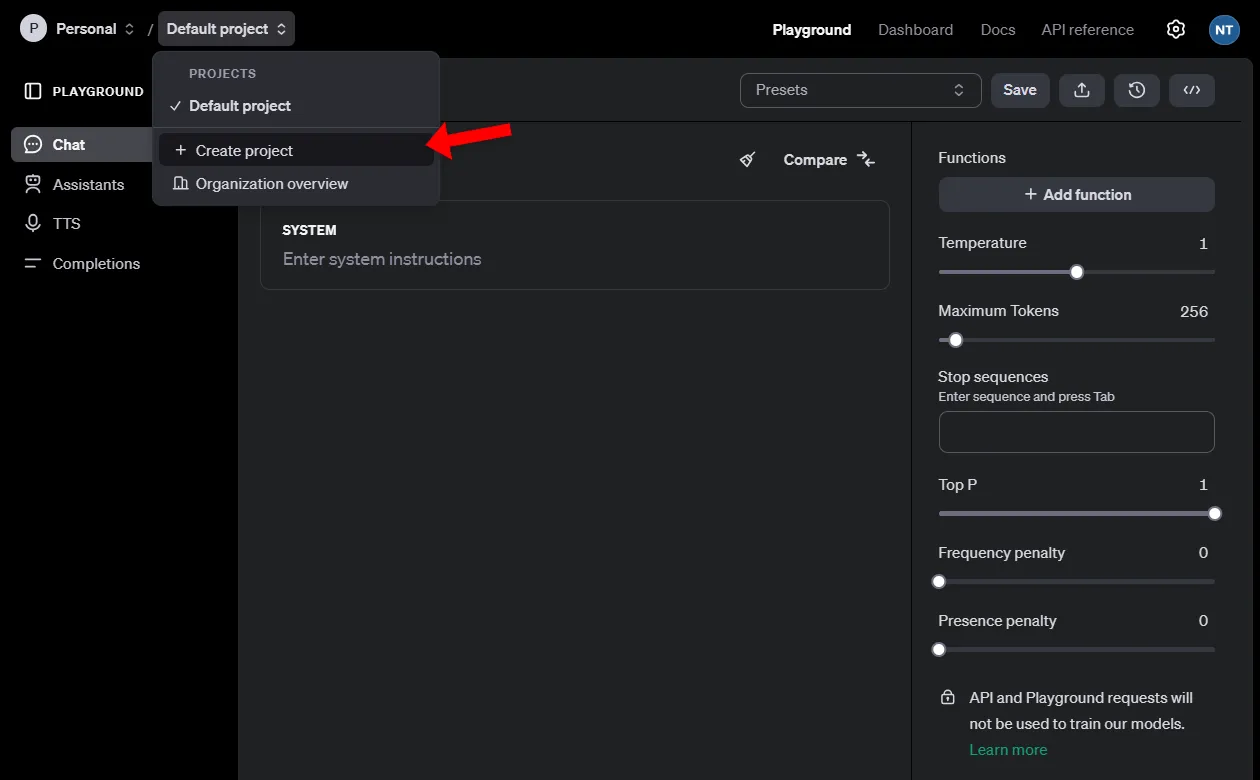
Give your project a descriptive name — I’ll go with “back4app”. After that, click “Create”.
OpenAI should automatically switch to the newly created project.
Next, go to the “API keys” section by selecting “Dashboard” in the navbar and then “API keys” in the sidebar. Click “Create new secret key” to start the API key creation process.
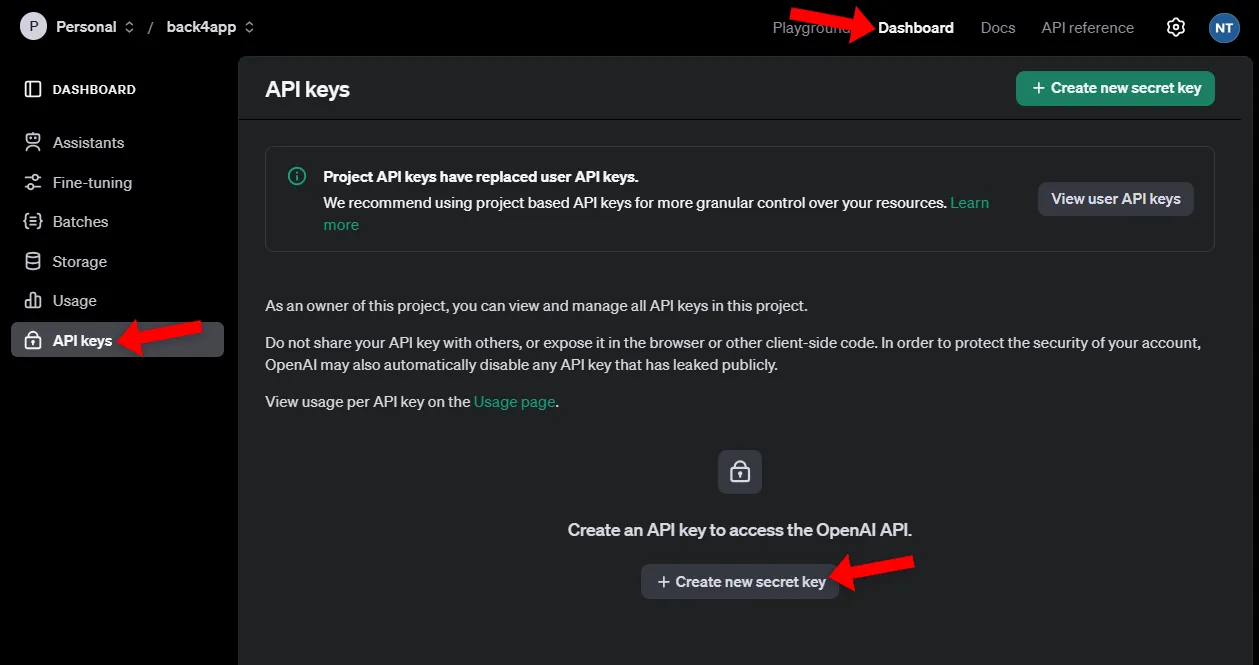
Leave all settings as default and click “Create secret key” to confirm the key creation.
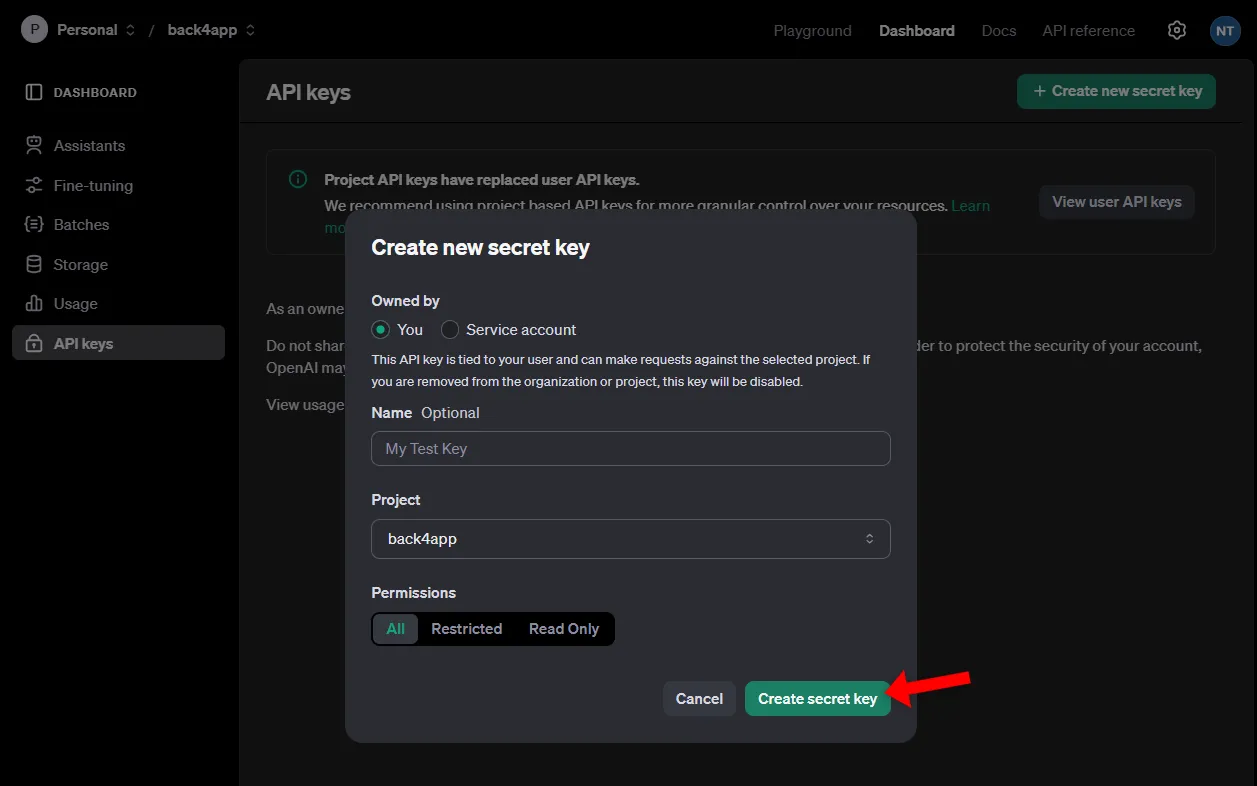
Please take note of the secret key since you’ll only be able to see it once.
Treat your secret key as securely as you would a password. If someone else obtains it, they could generate substantial OpenAI charges. Additionally, I suggest setting usage limits.
Set Environmental Variables
To avoid exposing our secret key in source code, we’ll add it as an environmental variable.
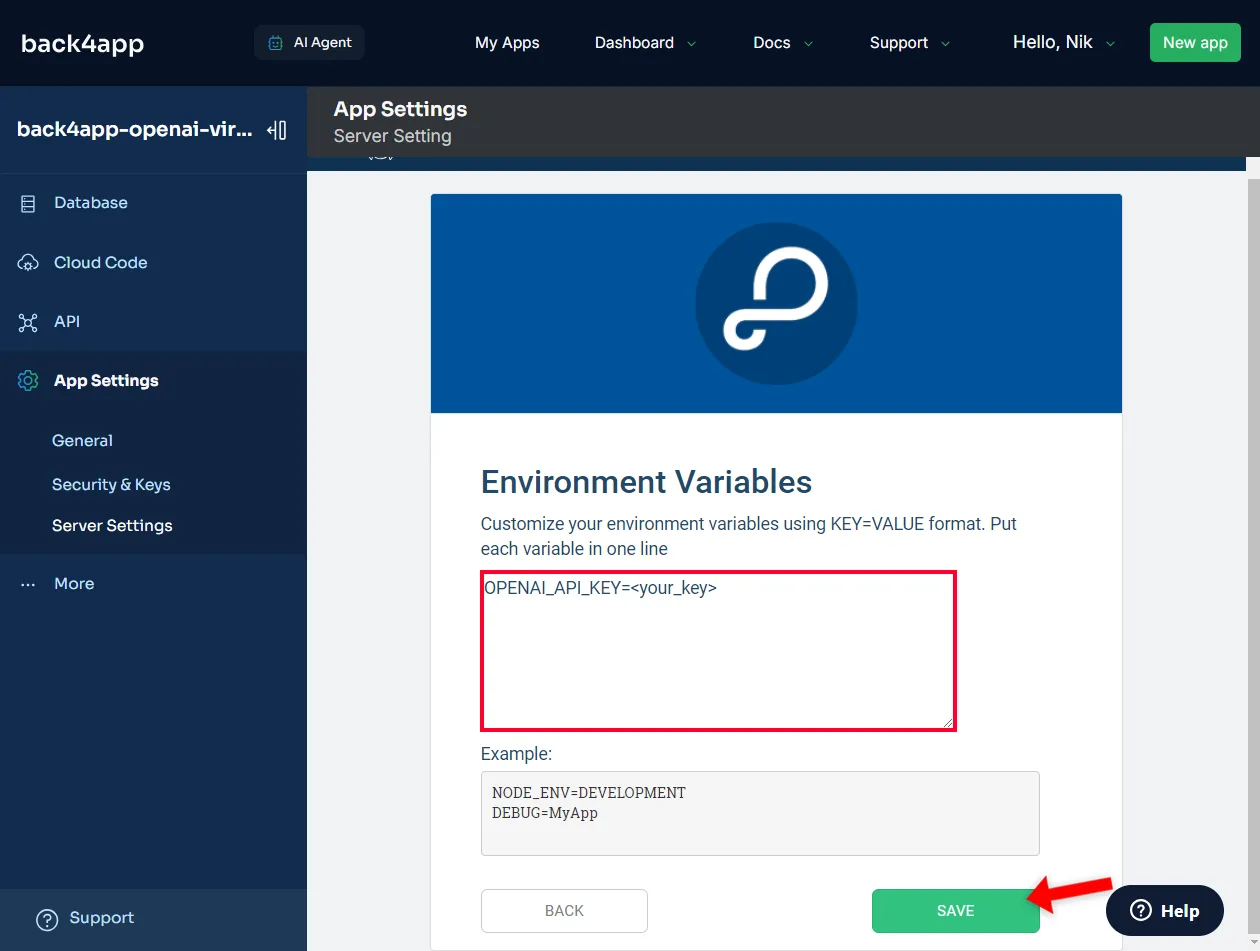
Navigate to “Server Settings > Environment Variables > Settings”.
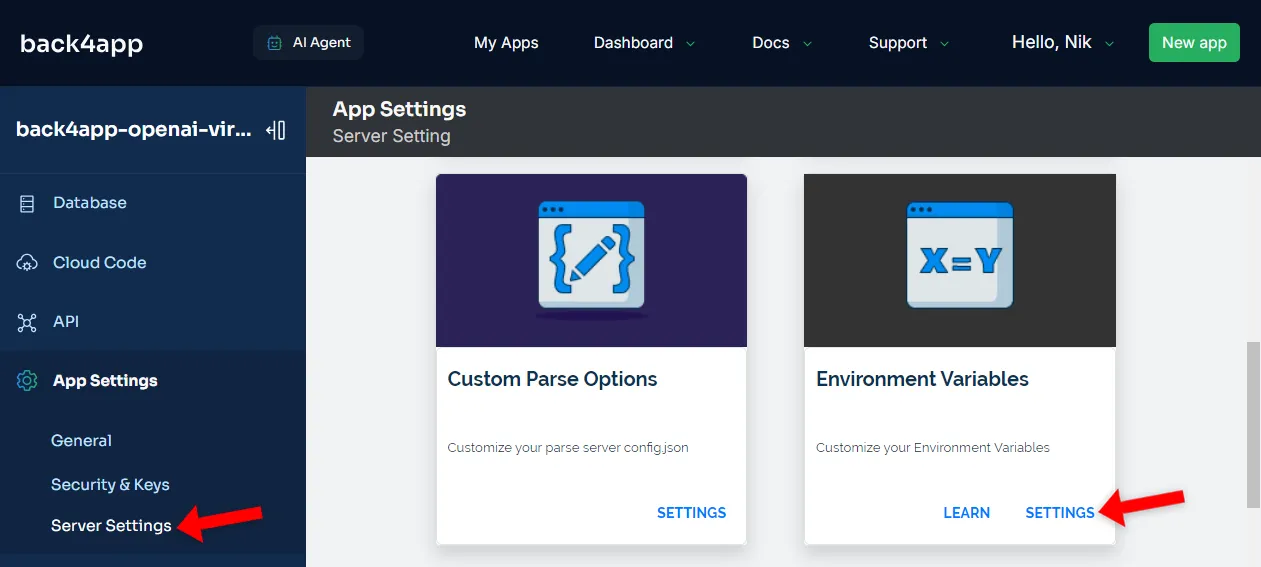
Then set the OPENAI_API_KEY environmental variable like you would in a .env file:
OPENAI_API_KEY=<your_openai_api_key>Ensure to replace
<your_openai_api_key>with your OpenAI secret key from the previous step.
Lastly, click “Save” to save the environmental variables.
You can now access the secret key from Cloud Code functions like so:
const secretKey = process.env.OPENAI_API_KEY;
console.log(secretKey);

// sk-proj-...
Cloud Code
To implement the backend logic, we’ll utilize Cloud Code functions. Cloud Code functions are a robust feature of Parse Server that enables developers to run custom server-side JavaScript code.
They can be triggered via REST, using Parse SDK, or scheduled on a timed basis.
Check out What are Serverless Functions? to learn more about Functions as a Service.
First, select “Cloud Code > Functions & Web Hosting” in the sidebar to access Cloud Code.
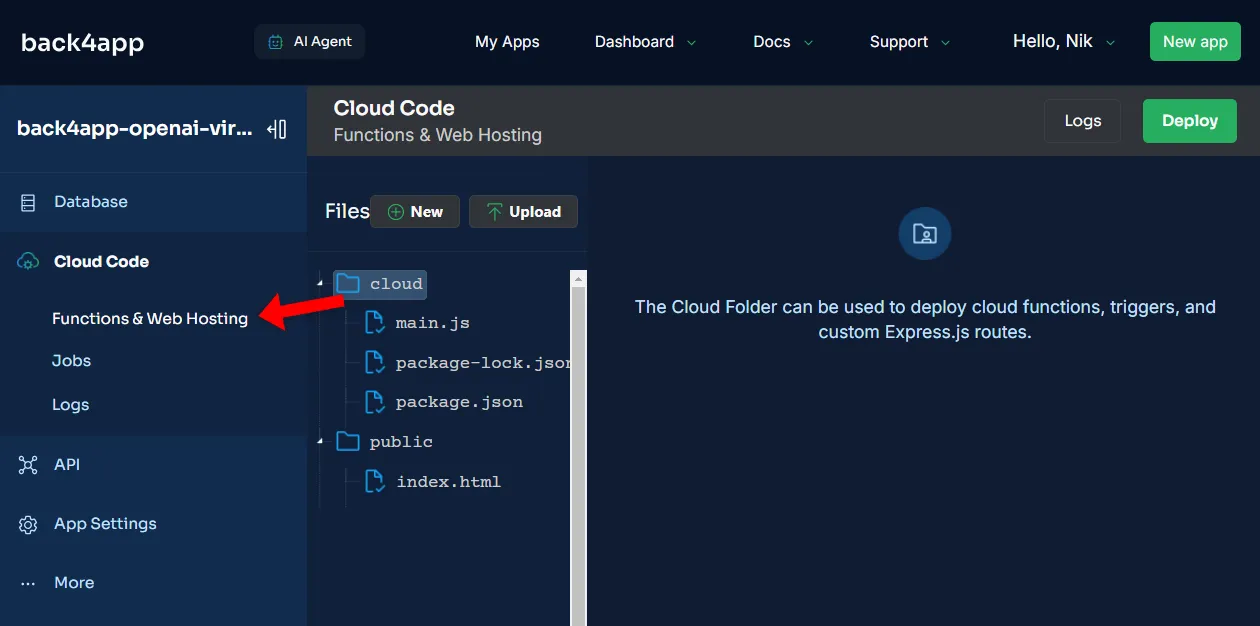
You’ll notice that the screen is split into two sections. You have the directory structure on the left side and the JavaScript code editor on the right. By default, there are two directories:
- cloud folder used for deploying Cloud Code functions and other custom code
- public folder used to deploy static content (e.g., images, videos, icons)
Install OpenAI Library
To interact with the OpenAI API, we’ll install the OpenAI JavaScript library.
Installing NPM packages using Cloud Code is easy. To do so, create a package.json file in the cloud folder listing the packages you want to install.
// cloud/package.json

{
  "dependencies": {
    "openai": "^4.51.0"
  }
}
To get the latest
openaipackage version, check the NPM package page.
Then click “Deploy” at the top right of the screen.
If the installation is successful, you should see a newly-generated package-lock.json in the cloud folder. The lock file should contain the openai package.
Cloud Code Functions
Next, let’s take care of the Cloud Code functions.
We’ll create the following four functions:
setup()will create a virtual assistant and save its configuration to the databasecreateThread()will create a new virtual assistant threaddeleteThread(threadId)will delete an existing virtual assistant threadaddMessage(threadId, message)will add a message to the thread and generate a response
Go ahead and paste the following code into cloud/main.js:
// cloud/main.js

const OpenAI = require("openai");
const openai = new OpenAI({
  apiKey: process.env.OPENAI_API_KEY,
});

const ASSISTANT_INITIAL_MESSAGE = "Hi, my name is Math Bot. How can I help you?";
const ASSISTANT_SETTINGS = {
  name: "Math Bot",
  instructions: "Very smart math bot that answers math questions.",
  model: "gpt-3.5-turbo-0125",
  tools: [],
};

Parse.Cloud.define("setup", async (request) => {
  const Assistant = Parse.Object.extend("Assistant");
  const query = await new Parse.Query(Assistant);
  const count = await query.count();

  // Check if virtual assistant already exists
  if (count !== 0) {
    throw new Parse.Error(
        Parse.Error.VALIDATION_ERROR,
        "A virtual assistant already exists!",
    );
  }

  // Use OpenAI's API to create an assistant
  const openAssistant = await openai.beta.assistants.create(
    ASSISTANT_SETTINGS,
  );

  // Store the assistant in Back4app database
  const assistant = new Assistant();
  for (const key in ASSISTANT_SETTINGS) {
    assistant.set(key, ASSISTANT_SETTINGS[key]);
  }
  assistant.set("initialMessage", ASSISTANT_INITIAL_MESSAGE);
  assistant.set("assistantId", openAssistant.id);
  await assistant.save();

  return assistant.get("assistantId");
});

Parse.Cloud.define("createThread", async (request) => {
  const thread = await openai.beta.threads.create();
  return thread.id;
});

Parse.Cloud.define("deleteThread", async (request) => {
  const _threadId = request.params.threadId;
  return await openai.beta.threads.del(_threadId);
});

Parse.Cloud.define("addMessage", async (request) => {
  const _threadId = request.params.threadId;
  const _message = request.params.message;

  // Verify all the parameters are provided
  if (!_threadId || !_message) {
    throw new Parse.Error(
        Parse.Error.VALIDATION_ERROR,
        "You need to provide: threadId & message.",
    );
  }

  const Assistant = Parse.Object.extend("Assistant");
  const query = await new Parse.Query(Assistant);
  const count = await query.count();

  // Check if a virtual assistant exists
  if (count === 0) {
    throw new Parse.Error(
        Parse.Error.VALIDATION_ERROR,
        "A virtual assistant does not exist!",
    );
  }

  const assistant = await new Parse.Query(Assistant).first();
  const assistantId = assistant.get("assistantId");

  // Get the thread, add the message, and generate a response
  let buffer = "";
  const message = await openai.beta.threads.messages.create(
    _threadId, {role: "user", content: _message},
  );
  let run = await openai.beta.threads.runs.createAndPoll(
    _threadId, {assistant_id: assistantId},
  );

  // Add the last message to the buffer
  if (run.status === "completed") {
    const messages = await openai.beta.threads.messages.list(run.thread_id);
    buffer += messages.data[0].content[0].text.value;
  } else {
    console.error("Failed to run the assistant.");
  }

  return buffer;
});
Code rundown
- Code imports and initializes the OpenAI library.
- It then defines the assistant settings (e.g.,
name,instructions, andinitialMessage). - Code provides four Cloud Code functions, which are described up above.
- In
setup(), we fetch the assistant and thread and then add a message to the thread. We then use a run to generate a response using the assistant.
Test Cloud Code Functions
Before moving onto the frontend, we must ensure the backend works as expected.
For testing purposes, we’ll use Back4app’s built-in console. Navigate to “API > Console > REST” on the sidebar.
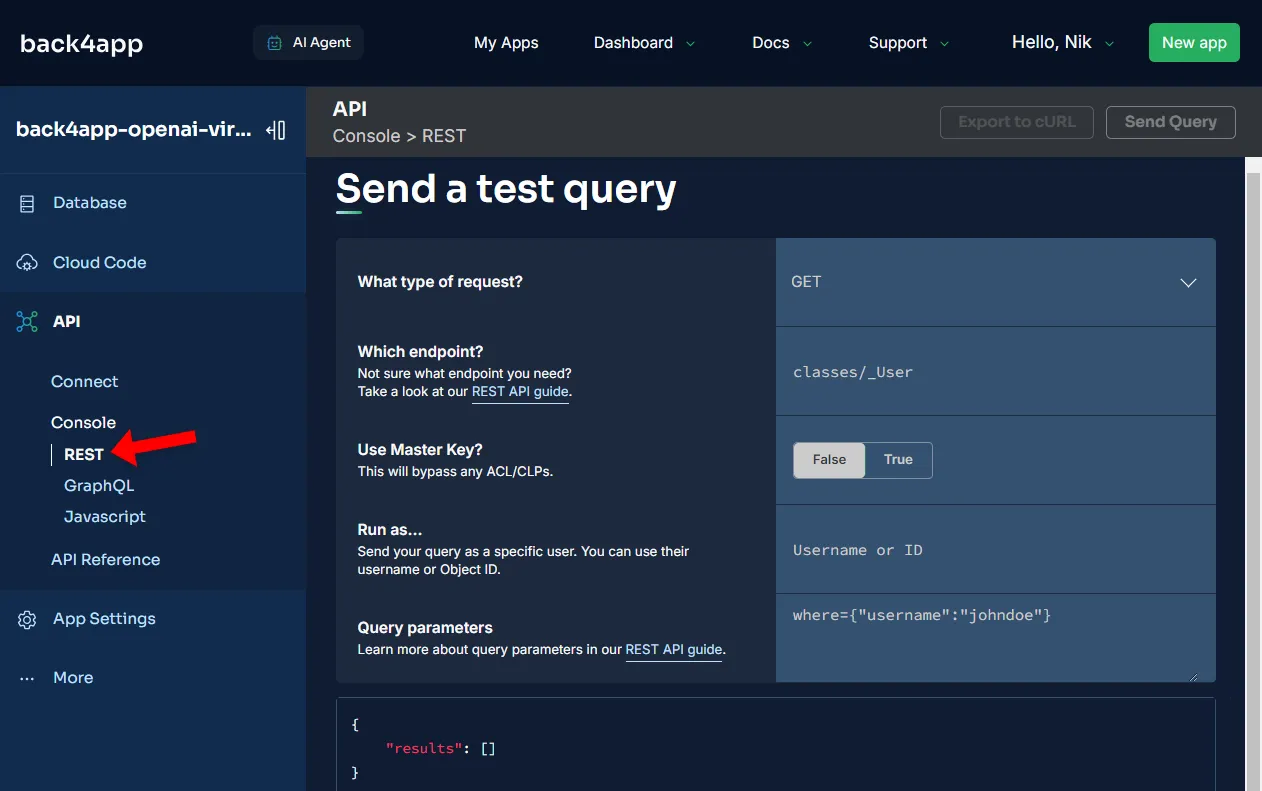
First, trigger the setup() function:
- What type of request:
POST - Which endpoint:
functions/setup - Use Master Key:
false - Run as: leave blank
- Query parameters: leave blank
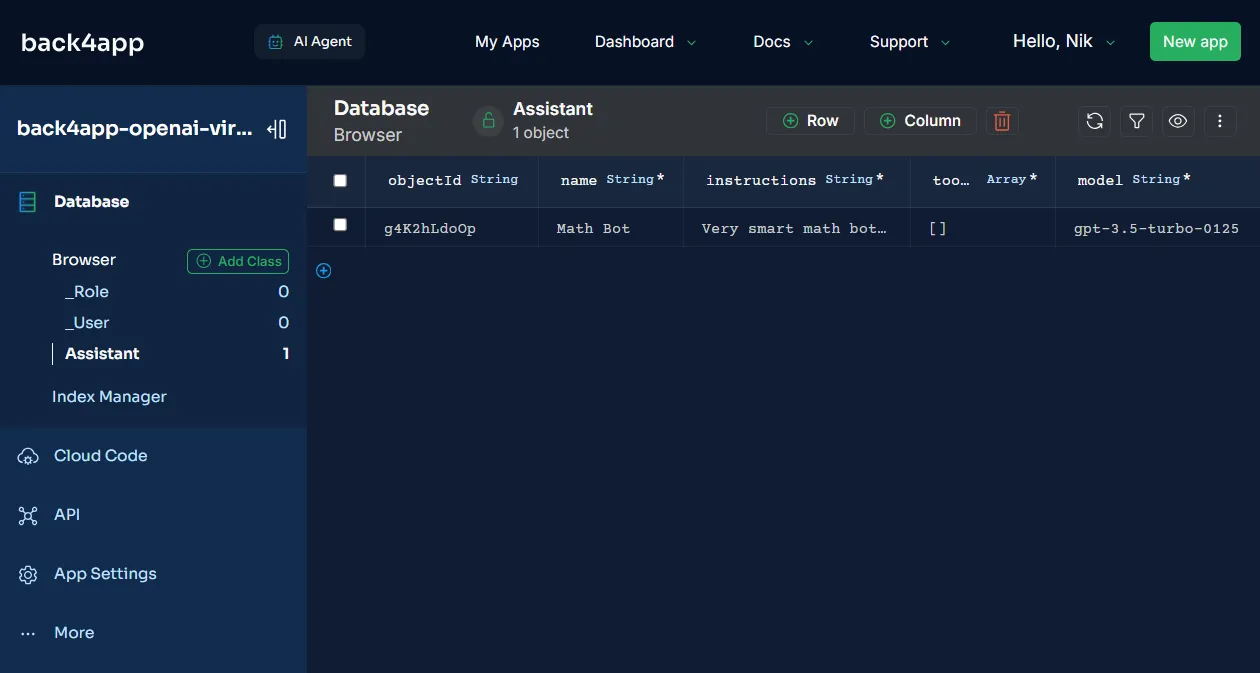
This will create a new assistant and save it to the database. If you navigate to the database view, you should see that the Assistant class now has one row.
Moving along, let’s test the conversation endpoints.
POSTtofunctions/createThreadto create a thread. Take note of the thread ID.POSTa question tofunctions/addMessagewith the following parameters{"threadId": "<thread_id>", "message": "What is 2+2?"}. Verify the generated response is correct.POSTtofunctions/deleteThreadwith the following parameters{"threadId": "<thread_id>"}to delete the thread.
Great, the backend seems to be working well!
Frontend
In this tutorial section, we’ll bootstrap a new React project, install TailwindCSS, implement the UI, set up Parse SDK, and implement the required logic.
Create Vite App
Start off by bootstraping a new Vite project using the React template:
$ npm create vite@latest frontend -- --template reactChange directory to the newly-created folder and install the dependencies:
$ cd frontend
$ npm install
Run the development server:
$ npm run devOpen your favorite web browser and navigate to http://localhost:5174/. You should see the default Vite + React landing page.

TailwindCSS
To simplify our work, we’ll use TailwindCSS, a utility-first CSS framework that allows you to rapidly build custom designs without leaving your HTML.
The framework provides a highly customizable and responsive approach to styling.
To install TailwindCSS, please follow the official guide.
Views
Moving along, let’s implement the UI.
To make our code more organized, we’ll first create a few components. First, create a components folder within the src folder and place the following three files inside:
On top of that, add this avatar.png to the src/assets folder.
At this point your directory structure should look like this:
frontend/
└── src/
    ├── components/
    │   ├── Spinner.jsx
    │   ├── AssistantMessage.jsx
    │   └── UserMessage.jsx
    ├── assets/
    │   └── avatar.png
    └── ...
Next, put the following code in src/App.jsx:
// src/App.jsx

import {useEffect, useState} from "react";

import AssistantMessage from "./components/AssistantMessage.jsx";
import UserMessage from "./components/UserMessage.jsx";
import Spinner from "./components/Spinner.jsx";

function App() {

  const [initialMessage, setInitialMessage] = useState(undefined);
  const [loading, setLoading] = useState(true);

  const [threadId, setThreadId] = useState(undefined);
  const [message, setMessage] = useState("");
  const [messages, setMessages] = useState([
    {role: "assistant", content: "Welcome! How can I help you today?"},
    {role: "user", content: "What is 2+2?"},
    {role: "assistant", content: "2+2 is 4."},
  ]);

  async function getInitialMessage() {
    // TODO: get the initial message
  }

  async function reset(message) {
    // TODO: create a new thread
  }

  useEffect(() => {
    setLoading(false);
    // TODO: get the initial message
  }, []);

  function onSubmit(event) {
    // TODO: add the message to the thread and generate response
  }

  function onNewThread() {
    // TODO: create a new thread
  }

  return (
    <main className="container mx-auto py-8 px-8 md:px-32 lg:px-64 h-[100vh]">
      <div className="pb-12 space-y-2">
        <h1 className="text-3xl font-bold">
          back4app-openai-virtual-assistant
        </h1>
        <p>
          An AI-powered virtual assistant built using OpenAI + Back4app.
        </p>
      </div>
      <div className="space-y-2">
        {messages.map((message, index) => {
          switch (message.role) {
            case "assistant":
              return <AssistantMessage key={index} content={message.content}/>;
            case "user":
              return <UserMessage key={index} content={message.content}/>;
            default:
              return <></>;
          }
        })}
        {loading && <Spinner/>}
      </div>
      <form className="inline-block flex flex-row pt-12" onSubmit={onSubmit}>
        <input
          type="text"
          className="w-full p-2 border border-gray-300 rounded-md outline-none"
          placeholder="Type a message..."
          value={message}
          onChange={(event) => setMessage(event.target.value)}
        />
        <button
          type="submit"
          className="bg-blue-500 hover:bg-blue-600 text-white p-2 px-3 rounded-md ml-2"
        >
          Send
        </button>
        <button
          type="button"
          className="bg-green-500 text-white p-2 px-3 rounded-md ml-2"
          onClick={onNewThread}
        >
          New
        </button>
      </form>
    </main>
  );
}

export default App;
This code creates a simple UI, which renders messages from the messages state. On top of that, it provides a text box and a button for submitting messages to the virtual assistant.
Start the development server once again and navigate to http://localhost:5174/. You should be able to see ChatGPT-like user interface.
Install Parse SDK
To connect to our Back4app-based backend, we’ll use Parse SDK.
The Parse SDK enables developers to seamlessly interact with Parse-based backends, allowing for efficient data queries, user authentication, notifications, real-time data handling, and more.
First, install Parse via npm:
$ npm install parseNext, navigate to your Back4app application. Select “App Settings > Security & Keys” on the sidebar. Then, take note of the “Application ID” and “JavaScript Key”.
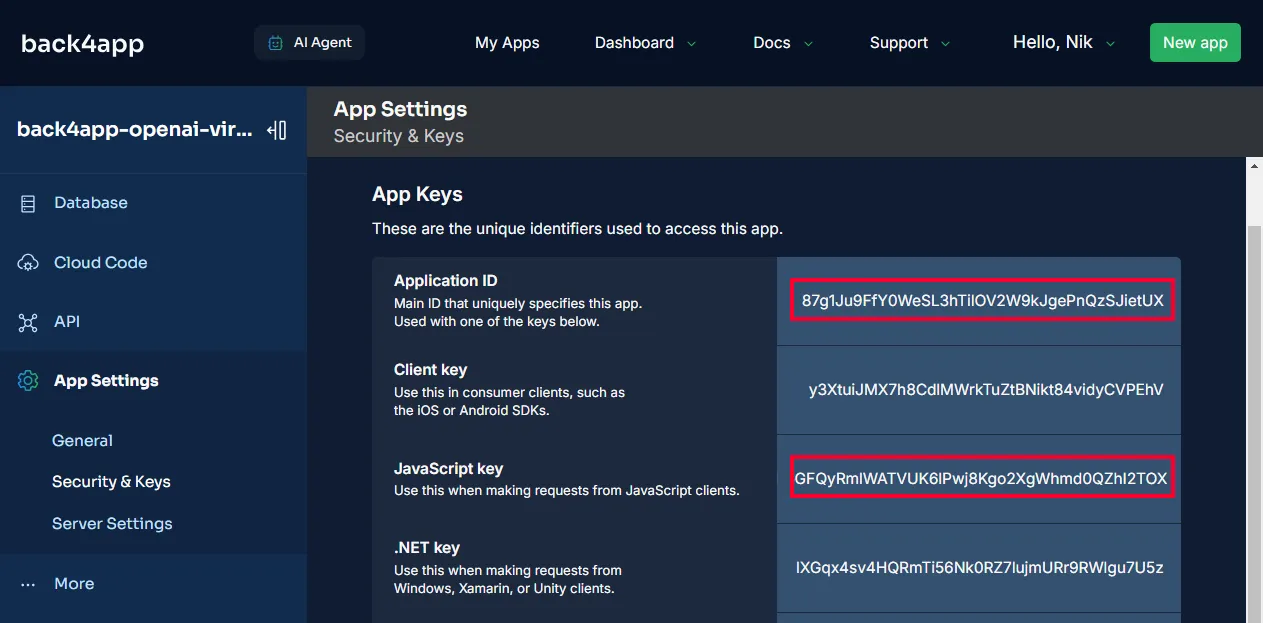
Instead of exposing the secret keys in source code, create .env file in the project root:
VITE_BACK4APP_APPLICATION_ID=<your_back4app_application_id>
VITE_BACK4APP_JAVASCRIPT_KEY=<your_back4app_javascript_key>
Ensure to replace the variables with your actual keys.
Next, navigate to src/main.jsx and initialize Parse using the environmental variables:
// src/main.jsx

// ...
import Parse from "parse/dist/parse.min.js";

// Initialize Parse SDK using the Back4app API keys
Parse.initialize(
  import.meta.env.VITE_BACK4APP_APPLICATION_ID,
  import.meta.env.VITE_BACK4APP_JAVASCRIPT_KEY,
);
Parse.serverURL = "https://parseapi.back4app.com/";

ReactDOM.createRoot(document.getElementById("root")).render(
  // ...
);
You can now use the Parse instance in all your views by importing it:
import Parse from "parse/dist/parse.min.js";Logic
Lastly, replace the React hooks in src/App.jsx with the following:
// src/App.jsx

// ...
import Parse from "parse/dist/parse.min.js";

function App() {

  // ...

  async function getInitialMessage() {
    const Assistant = Parse.Object.extend("Assistant");
    const assistant = await new Parse.Query(Assistant).first();
    return assistant.get("initialMessage");
  }

  async function reset(message) {
    setMessages([
      {role: "assistant", content: message},
    ]);
    setMessage("");
    const threadId = await Parse.Cloud.run("createThread");
    setThreadId(threadId);
  }

  useEffect(() => {
    (async () => {
      const assistantInitialMessage = await getInitialMessage();
      setInitialMessage(assistantInitialMessage);
      await reset(assistantInitialMessage);
      setLoading(false);
    })();
  }, []);

  function onSubmit(event) {
    event.preventDefault();
    if (loading || !threadId || !message) return;

    setMessages([
      ...messages,
      {role: "user", content: message},
    ]);
    setMessage("");

    setLoading(true);
    (async () => {
      const response = await Parse.Cloud.run("addMessage", {threadId, message});
      setMessages(messages => [
        ...messages,
        {role: "assistant", content: response},
      ]);
      setLoading(false);
    })();
  }

  function onNewThread() {
    if (loading || !threadId) return;

    setLoading(true);
    (async () => {
      await reset(initialMessage);
      setLoading(false);
    })();
  }

  return (
      // ...
  );
}

export default App;
This code handles the message and submits it to the backend. It also allows users to create a new thread by clicking a button.
Voila! The frontend is now complete.
Restart the development server and test out the app to ensure everything works.
If you wish to deploy the assistant’s frontend, check out How to host a React app?
Conclusion
This article taught you everything you need to know to build personalized AI-based assistants.
You should now be able to use the OpenAI’s Assistant API and Back4app to back & deploy your AI assistants,
The final source code is available in the back4app-openai-virtual-assistant GitHub repo.


