Android App for Raspberry Pi
In our previous tutorials on IoT, we covered how to setup a Raspberry Pi and how to connect it to Parse Server using Back4App API to save objects to the server and to perform Queries and Live Queries.
Now we cover how to reproduce everything done on the Raspberry side to the App side. In this tutorial, we describe an Android App to interact with the IoT device configured earlier. From the Parse Server side, the App does the same tasks as the Raspberry: writes objects and performs Queries and Live Queries. Please note these functionalities may be useful even if you do not plan to develop an IoT application!
Parse has proven to be an amazing framework to crate IoT applications. In 2020, with the addition of the GraphQL API protocol it provides an even better way to retrieve data.
We provide our codes as a first step for you to develop your desired Apps.
Contents
Prerequisites
The only prerequisite is to complete our Android QuickStart tutorial. For that, you need to click on the link mentioned below.
https://www.back4app.com/docs/pages/android/how-to-build-an-android-app-on-back4app
Here is a tutorial on LiveQuery which will be required on section 3 of this IoT Series tutorial. You do not have to complete it beforehand, though.
https://docs.back4app.com/docs/android/live-query/
If you have any questions throughout the tutorial, you may get them resolved by following the official Parse guide for Android in the link below.
http://docs.parseplatform.org/android/guide/
Section 1: Basics of creating your App and connecting with Back4App
In this project, we name our class as “MainActivity.java”. Here is the basic code that will help you get started.
public class MainActivity extends AppCompatActivity {
   @Override
   protected void onCreate(Bundle savedInstanceState) {
      super.onCreate(savedInstanceState);
      setContentView(R.layout.activity_main);
      // Insert toolbar on app. Further description of this bar ins on menu_main_activity.xml file
      Toolbar toolbar = (Toolbar) findViewById(R.id.toolbar);
      setSupportActionBar(toolbar);
   }
   @Override
   public boolean onCreateOptionsMenu(Menu menu) {
      // Inflate the menu; this adds items to the action bar if it is present.
      getMenuInflater().inflate(R.menu.menu_main_activity, menu);
      return true;
   }
   @Override
   public boolean onOptionsItemSelected(MenuItem item) {
      // Handle action bar item clicks here. The action bar will
      // automatically handle clicks on the Home/Up button, so long
      // as you specify a parent activity in AndroidManifest.xml.
      int id = item.getItemId();
      //noinspection SimplifiableIfStatement
      if (id == R.id.action_settings) {
         return true;
      }
      return super.onOptionsItemSelected(item);
   }
}
You may need to add the following imports:
import android.os.Bundle;
import android.support.design.widget.FloatingActionButton;
import android.support.design.widget.Snackbar;
import android.support.v7.app.AppCompatActivity;
import android.support.v7.widget.Toolbar;
import android.view.View;
import android.view.Menu;
import android.view.MenuItem;
import android.widget.EditText;
import android.widget.Button;
import android.widget.ToggleButton;
import android.view.View.OnClickListener;
On your layout XML file, make sure you add the following code:
<?xml version="1.0" encoding="utf-8"?>
<android.support.design.widget.CoordinatorLayout xmlns:android="http://schemas.android.com/apk/res/android"
   xmlns:app="http://schemas.android.com/apk/res-auto"
   xmlns:tools="http://schemas.android.com/tools"
   android:layout_width="match_parent"
   android:layout_height="match_parent"
   android:id="@+id/myCoordinatorLayout"
   tools:context="com.example.guilherme.myiotapplication.MainActivity">
<include layout="@layout/content_main_activity" />
   <android.support.design.widget.AppBarLayout
      android:layout_width="match_parent"
      android:layout_height="wrap_content"
      android:theme="@style/AppTheme.AppBarOverlay">
      <android.support.v7.widget.Toolbar
          android:id="@+id/toolbar"
          android:layout_width="match_parent"
          android:layout_height="wrap_content"
          android:background="?attr/colorPrimary"
          app:popupTheme="@style/AppTheme.PopupOverlay" />
</android.support.design.widget.AppBarLayout>
</android.support.design.widget.CoordinatorLayout>
To connect your app to Back4App, add the following code below within the onCreate() function of your class.
// Initializing Parse Server
Parse.initialize(new Parse.Configuration.Builder(this)
    .applicationId("YOUR_APP_ID") // from Core Settings, on "Features"
    .clientKey("YOUR_CLIENT_KEY") // from Core Settings, on "Features"
    .server("https://parseapi.back4app.com/")
    .build()
);
Remember to follow the step-by-step instructions on QuickStart to grant Internet Access to your app.
Section 2: Saving and Retrieving Objects on Parse and Displaying on App
Start by adding the imports below
import com.parse.FindCallback;
import com.parse.Parse;
import com.parse.ParseException;
import com.parse.ParseObject;
import com.parse.ParseQuery;
import com.parse.SaveCallback;
import org.json.JSONException;
import org.json.JSONObject;
import java.util.List;
In this section, we save objects of “CommandGPIO1” class with a button click. Every Parse Object has three default attributes: objectId, createdAt, and updatedAt. Our class will have two more additional attributes: content and destination. The values for content will be either “on” or “off”, and represent a status to be sent to a LED. For destination, all objects will contain “command”, but we could define different strings for different LEDs.
For example:
We create two buttons, and each of them writes a different value on content. To create a button, to add the following code to your layout XML file:
<Button
   android:id="@+id/buttonSendOn"
   android:layout_width="wrap_content"
   android:layout_height="wrap_content"
   android:layout_gravity="top|start"
   android:layout_marginBottom="0dp"
   android:layout_marginTop="120dp"
   android:layout_marginEnd="0dp"
   android:layout_marginRight="0dp"
   android:layout_marginLeft="16dp"
   android:layout_marginStart="16dp"
   android:text="Send ON"/>
In your class file, creating the button is as easy as writing:
Button buttonOn = (Button) findViewById(R.id.buttonSendOn);
If you are a beginner to Android programming, please note that the “findViewById” argument contains “buttonSendOn”, and this is the Android:Id we defined on the XML.
We want this button to save an object on Parse Server when it is clicked. To do so, add the following code:
buttonOn.setOnClickListener( new OnClickListener(){
   @Override
   public void onClick(final View view) {
      // Creating new object and assigning proper attributes
      ParseObject command = new ParseObject("CommandGPIO1");
      command.put("content","on");
      command.put("destination", "command");
      command.saveInBackground(new SaveCallback(){
      @Override
      public void done(ParseException e){
         Snackbar.make(view, "Sent ON to Output", Snackbar.LENGTH_LONG )
         .setAction("Action", null).show();
      }
   });
});
Note, we can add whatever function we want performed within the onClick callback function. Here, we create a “CommandGPIO1” class object, set content as “on”, and destination as “command”.
It is useful to know that we DO NOT have to define this class beforehand on the Parse dashboard! If you later choose to add a new attribute, or change the name of your class, then you just need to work on your code, and the changes will be automatically updated on the dashboard.
At this point, you should better test your app and check if the object is being created!
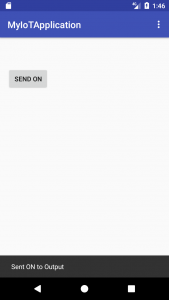

The SaveCallback shows a snackbar, which is a lightweight feedback on the bottom of your screen, as shown in the figure above.
Copy this code to create a button that writes objects with “off”. Change the following lines on the layout XML
android:id="@+id/buttonSendOff"
android:layout_gravity="top|center"
android:layout_marginLeft="0dp"
android:layout_marginStart="0dp"
android:text="Send OFF"/>
Create a new button and change the line where the content is being written:
Button buttonOff = (Button) findViewById(R.id.buttonSendOff);
command.put("content","off");
Now that things are working properly on Parse Server, we want to provide a permanent feedback to the app user. For that, we will use the EditText element, as shown below.
Define this element on the layout XML:
<EditText
    android:id="@+id/status1Text"
    android:layout_width="wrap_content"
    android:layout_height="wrap_content"
    android:layout_gravity="top|start"
    android:maxLines ="2"
    android:ems="10"
    android:singleLine="false"
    app:layout_behavior="@string/appbar_scrolling_view_behavior" />
Within the onCreate() scope of your class, add the following code:
// Defining text element for showing status of output pin, which receives commands from the app
// The commands are sent by buttons, which are later described on this code.
final EditText textOutPin = (EditText) findViewById(R.id.status1Text);
textOutPin.setFocusable(false);
textOutPin.setClickable(true);
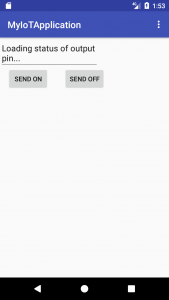
textOutPin.setText("Loading status of output pin...");
The first line creates the object. The second line makes it non-editable for users. The third line makes it clickable, so it can be copied and pasted. The fourth line sets the initial text.
We want to write the content field of the last “CommandGPIO1” object saved on Parse onto this EditText object. Although we could do this using some logic within the code, we will actually retrieve objects from Parse by performing a ParseQuery since this provides more realistic and robust results.
The code below declares, sets parameters, and prints the results of a Parse Query.
ParseQuery<ParseObject> queryOut = ParseQuery.getQuery("CommandGPIO1");
queryOut.whereEqualTo("destination", "command");
queryOut.addDescendingOrder("createdAt");
queryOut.setLimit(1);
queryOut.findInBackground(new FindCallback<ParseObject>() {
   @Override
   public void done(List<ParseObject> objects, ParseException e) {
      if (e == null){
         textOutPin.setText("Output is " + objects.get(0).getString("content"));
      }
      else{
         textOutPin.setText("Error: " + e.getMessage());
      }
   }
});
The first line creates the query. The second adds a constraint to select only those objects whose destination field contains “command”. The third line the objects starting with the newest ones. The fourth line limits the results to one, assuring we will retrieve the newest object.
The fifth line actives the query, and calls the callback function when it is finished. Here, we write the content of the retrieved object onto the previously defined EditText object.
We will add that piece of code right after declaring the EditText object, so a query is performed when the app is open, and also in the SaveCallback when saving a new object on Parse, to update the text automatically when creating new objects.
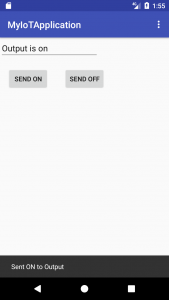
At this point, your app should work as illustrated in the following screen captures.
Finally, we add a refresh button to allow the users to perform the query above whenever they want. It will be done with a different style of button, i.e., a Floating Action Button.
Add this code onto the layout XML file:
<android.support.design.widget.FloatingActionButton
    android:id="@+id/fab"
    android:layout_width="wrap_content"
    android:layout_height="wrap_content"
    android:layout_gravity="top|end"
    android:layout_marginBottom="0dp"
    android:layout_marginTop="120dp"
    android:layout_marginEnd="16dp"
    android:layout_marginRight="16dp"
    android:layout_marginLeft="0dp"
    android:layout_marginStart="0dp"
    app:srcCompat="@android:drawable/ic_popup_sync" />
Now, within the onCreate() scope in the class, add the following code:
// Refresh button to obtain the output status when requested.
// The same query as the first is performed here
FloatingActionButton fab = (FloatingActionButton) findViewById(R.id.fab);
fab.setOnClickListener(new View.OnClickListener(){
    @Override
    public void onClick(final View view){
        ParseQuery<ParseObject> queryOut = ParseQuery.getQuery("CommandGPIO1");
        queryOut.whereEqualTo("destination", "command");
        queryOut.addDescendingOrder("createdAt");
        queryOut.setLimit(1);
        queryOut.findInBackground(new FindCallback<ParseObject>() {
            @Override
            public void done(List<ParseObject> objects, ParseException e) {
               if (e == null){
                   textOutPin.setText("Output is " + objects.get(0).getString("content"));
               }
               else{
                   textOutPin.setText("Error: " + e.getMessage());
               }
               Snackbar.make(view, "Updated status of Output", Snackbar.LENGTH_LONG ).setAction("Action", null).show();
            }
        });
     }
 });
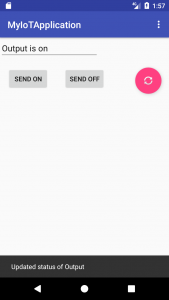
At this point we can now save objects on Parse Server, retrieve information from them and display them in your app! Your app should be working as shown in the figure below:
Section 3: Listening to Real-Time Events Using Live Query and Displaying on App
In this section, we monitor in real-time the “InputGPIO” class in the Parse Dashboard, and display the “content” of the objects for the user.
Start by defining a new EditText in the layout XML:
<EditText
    android:id="@+id/status2Text"
    android:layout_width="wrap_content"
    android:layout_height="wrap_content"
    android:layout_gravity="center|start"
    android:layout_marginBottom="0dp"
    android:maxLines ="2"
    android:ems="10"
    android:singleLine="false"
    app:layout_behavior="@string/appbar_scrolling_view_behavior" />
In the scope of onCreate(), create a new EditText object and perform an initialization query (not live yet) immediately afterwards.
final EditText textInPin = (EditText) findViewById(R.id.status2Text);
textInPin.setFocusable(false);
textInPin.setClickable(true);
textInPin.setText("Loading status of input pin...");
// Initial (non live) query to obtain last stored status of pin
ParseQuery<ParseObject> queryIn = ParseQuery.getQuery("InputGPIO");
queryIn.whereEqualTo("type", "interrupt");
queryIn.addDescendingOrder("createdAt");
queryIn.setLimit(1);
queryIn.findInBackground(new FindCallback<ParseObject>() {
    @Override
    public void done(List<ParseObject> objects, ParseException e) {
        if (e == null){
            textInPin.setText("Input is " + objects.get(0).getString("content"));
        }
        else{
            textInPin.setText("Error: " + e.getMessage());
        }
    }
});
Note that the attributes of “InputGPIO” are content and type, the latter playing the role of destination on the “CommandGPIO” class.
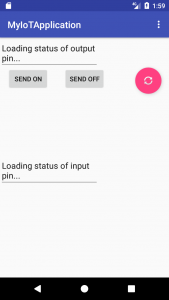
At this point, your app should be looking like the figure shown below.
Now we will implement the Live Query. The tutorial referred to earlier is needed here.
https://docs.back4app.com/docs/android/live-query/
Make sure you follow step 1 in our Live Query tutorial to select in which classes Live Query will be enabled and define a subdomain name. You may need to create the “InputGPIO” class (if it does not already exist) to enable the feature on it. Follow step 2 in the tutorial to set up the Live Query client on Android.
Remember to add the following imports:
import tgio.parselivequery.BaseQuery;
import tgio.parselivequery.LiveQueryClient;
import tgio.parselivequery.LiveQueryEvent;
import tgio.parselivequery.Subscription;
import tgio.parselivequery.interfaces.OnListener;
Add the following code to initialize LiveQuery and define its parameters.
// Initializing Live Query
LiveQueryClient.init("wss:YOUR_SUBDOMAIN_NAME.back4app.io", "YOUR_APP_ID", true );
LiveQueryClient.connect();
// Defining attributes of LiveQuery
 Subscription subIn = new BaseQuery.Builder("InputGPIO")
    .where("type","interrupt")
    .addField("content")
    .build()
    .subscribe();
When defining the subscription, we take only those elements whose type attribute is “interrupt” and retrieve the field content.
Now, add the following code to respond whenever an object defined by the subscription is created at Parse Server.
// Starting to listen to LiveQuery CREATE events, getting its content and writing
subIn.on(LiveQueryEvent.CREATE, new OnListener() {
    @Override
    public void on(JSONObject object) {
        try {
            final String subInContent = (String) ((JSONObject) object.get("object")).get("content");
            runOnUiThread(new Runnable() {
                @Override
                public void run() {
                   textInPin.setText("Input is " + subInContent);
                   Snackbar.make(findViewById(R.id.myCoordinatorLayout), "Input pin was changed to " + subInContent.toUpperCase(), Snackbar.LENGTH_LONG ).setAction("Action", null).show();
                }
            });
        } catch (JSONException e){
            e.printStackTrace();
        }
    }
});
The content field of the object will be displayed in our new EditText element.
What we have done by this point is sufficient to display any input sent by the IoT device. However, to verify how the app is working, we will implement another kind of button, i.e., a Toggle Button that will create an “InputGPIO” class object and will save it on Parse Server.
Add the following code to the layout XML file:
<ToggleButton
    android:id="@+id/toggleTest"
    android:layout_width="wrap_content"
    android:layout_height="wrap_content"
    android:layout_gravity="center|end"
    android:layout_marginBottom="0dp"
    android:layout_marginTop="100dp"
    android:layout_marginEnd="0dp"
    android:layout_marginRight="0dp"
    android:layout_marginLeft="0dp"
    android:layout_marginStart="0dp"
    android:textOn = "input on"
    android:textOff = "input off"/>
Add the code mentioned below in the scope of onCreate() function, in MainActivity class.
// Toggle button is here just to emulate the objects the hardware would create
ToggleButton toggleTest = (ToggleButton) findViewById(R.id.toggleTest);
toggleTest.setOnClickListener( new OnClickListener(){
    @Override
    public void onClick(final View view) {
        ParseObject command = new ParseObject("InputGPIO");
        if(gpioStatusTest.equals("off"))
            gpioStatusTest = "on";
        else
            gpioStatusTest = "off";
        command.put("type","interrupt");
        command.put("content", "From Toggle: " + gpioStatusTest);
        command.saveInBackground(new SaveCallback(){
            @Override
            public void done(ParseException e){
                Snackbar.make(view, "Changed input pin", Snackbar.LENGTH_LONG ).setAction("Action", null).show();
            }
        });
    }
});
Also, declare the String in the MainActivity scope.
String gpioStatusTest = "off";
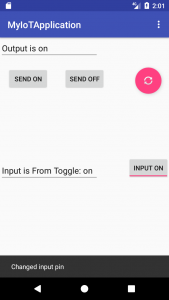
We are done with the app! At the end of this tutorial, your app should look quite similar to the figure shown below.
If you want to continue developing our IoT application, please read our IoT Series, a step-by-step guide, which teaches you the basics to set up a Raspberry Pi and specific applications, such as retrieving and saving objects from Parse Server using JavaScript.
Our codes are available in the following link:
https://github.com/back4app/iot-raspberry-node
References
Connecting Raspberry Pi to Parse Server
How to interact an Android app with an IoT device?
– Section 1: Basics of creating your App and connecting with server side.
– Section 2: Saving and Retrieving Objects on Parse and Displaying on App.
– Section 3: Listening to Real-Time Events Using Live Query and Displaying on App
