GraphQL iOS: Using Cloud Functions in a Swift App
On this article, I showed you how to use GraphQL with NodeJS Cloud Code in Back4app.
And on this guide, I showed you how to use Apollo GraphQL iOS Client with Swift.
Now let’s bring it all together and make lots of complicated operations by producing really easy code. And let’s also have XCode to automatically generate any API code for us even when we change Classes.
Sounds good? So get some coffee and get along!
Contents
- 1 Before starting…
- 2 A few pieces of software that will help us…
- 3 Creating our Classes
- 4 Bring Cloud Code on, baby!
- 5 Testing… Testing…
- 6 Some XCoding
- 7 Our GraphQL file
- 8 Some Swift Code
- 9 Let’s run it!
- 10 Conclusion
- 11 Which software can be used to use cloud functions in swift app?
- 12 What is the magic of NPM?
Before starting…
You will need a Back4app account with one App created. If you don’t have one yet, follow this guide and you’ll have everything in no time.
A few pieces of software that will help us…
We will also be using a few things to speed things up.
Of course, you can do it all manually if you prefer, but I don’t recommend that route especially for beginners.
By manually adding packages, you will also need to manually maintain packages which can be troublesome after some time.
You don’t have to use the package managers I’ll demonstrate here, but I strongly recommend that you use at least some package managers instead of doing manual management. As I said before, manual management can get quirky over time.
I will be using Cocoapods for iOS package management and NPM for desktop management, but again, feel free to use whatever floats your boat.
Instructions for installing Cocoapods can be found on this site.
Instructions for installing NPM can be found on this site.
Creating our Classes
We will be implementing 3 classes: Owner, Dog, and Breed.
Our model will imply that:
- An Owner can have multiple Dogs
- A Dog can have only one Breed
Our properties will be:
- Owner
- name (String)
- age (Number)
- address (String)
- hasDogs (Relation to Dog, as an Owner can have multiple Dogs)
- Dog
- name (String)
- birthday (Date)
- breed (Pointer to Breed, as a Dog has only one Breed)
- Breed
- Name (String
Create those classes graphically or programmatically and populate with some data. My Classes ended up like this:
Breed
Dog
Owner
Bring Cloud Code on, baby!
Time for some Cloud Code. But this time I want to get deeper into that as well.
Have I ever told you that Cloud Code is compatible with NPM modules? It is! And it can save you a LOT of time!
You know that cool stuff functionality you wanted to have, and someone else already did it? Well, if it is a NPM module, you can use!
There is already an article about how to use modules using this tutorial, so for this implementation, I will be using Moment so we can use the birthday of a Dog and calculate its age in months.
So my package.json file will look like this:
{
      "dependencies": {
           "moment": "*"
      }
}
The * means I’ll be using the latest version.
My Cloud Code ended up like below. It is well commented so I won’t get into much detail here, but you can see on the very first line I am using the Moment NPM module:
// Instantiating the Moment NPM Module
const moment = require('moment')

Parse.Cloud.define("retrieveOwnersOrderedByAgeDescending", async req => {
    /*
        This function retrieves all Owners ordered by age descending.
        If there are no Owners, an empty array is retrieved.
    */
    const query = new Parse.Query("Owner");
    query.descending("age")
    const results = await query.find();

    return results;
});

Parse.Cloud.define("retrieveAllGermanShepherds", async req => {
    /*
        This function retrieves the Dogs that are has the breed "German Shepherd"
        All properties of the Dogs are retrieved.
        If there are no Dogs, an empty array is retrieved.
    */
    const breedQuery = new Parse.Query("Breed");
    breedQuery.equalTo("name", "German Shepherd")
    const query = new Parse.Query("Dog");
    query.matchesQuery("breed", breedQuery);
    const results = await query.find();
    return results;
});

Parse.Cloud.define("retrieveDogIncludingBreedByName", async req => {
    /*
        This function retrieves the specific Dog details including its breeds details (name) by Dog name
        All properties of the Dogs and Breed are retrieved.
        If there are no Dogs, null is retrieved.
    */
    const query = new Parse.Query("Dog");
    query.equalTo("name", req.params.name);
    query.include("breed")
    const results = await query.find();
    return results;
});

Parse.Cloud.define("retrieveDogsNamesWithAgesInMonths", async req => {
    /*
        This function retrieves the Dogs names with the birthday property converted in Months using the NPM module moment
        Only the name of the Dogs are retrieved and the age calculated in months.
        If there are no Dogs, an empty array is retrieved.
    */
    let dogs = [];
    const query = new Parse.Query("Dog");
    const results = await query.find();

    for (let i = 0; i < results.length; i ++){
        // calculating the age in Months using the NPM Module Moment
        let ageInMonths = moment.duration(moment().diff(results[i].get("birthday"))).humanize();

        let newDog = {
            "dogName": results[i].get("name"),
            "dogAgeInMonths": ageInMonths
        }

        dogs.push(newDog);
    }

    return dogs;
});
My schema.graphql file exposing my four methods came out like this:
extend type Query {
  getAllOwnersAgeDescending: [OwnerClass!]! @resolve(to: "retrieveOwnersOrderedByAgeDescending")
  getAllGermanShepherds: [DogClass!]! @resolve(to: "retrieveAllGermanShepherds")
  getThisDogWithBreed (name:String): [DogClass!]! @resolve(to: "retrieveDogIncludingBreedByName")
  getDogsAgesInMonths: [DogAge!]!  @resolve(to: "retrieveDogsNamesWithAgesInMonths")
}

type DogAge {
    dogName: String!
    dogAgeInMonths: String!
}
If you don’t understand the syntax, check it out this article in the “A little extra step” section.
Just notice the [DogAge!]! on the getDogsAgesInMonths. As I will be retrieving a system-generated object, it won’t have a schema for GraphQL to interpret, so I have to create the type as well so our client can interpret it.
Testing… Testing…
Time for some testing!
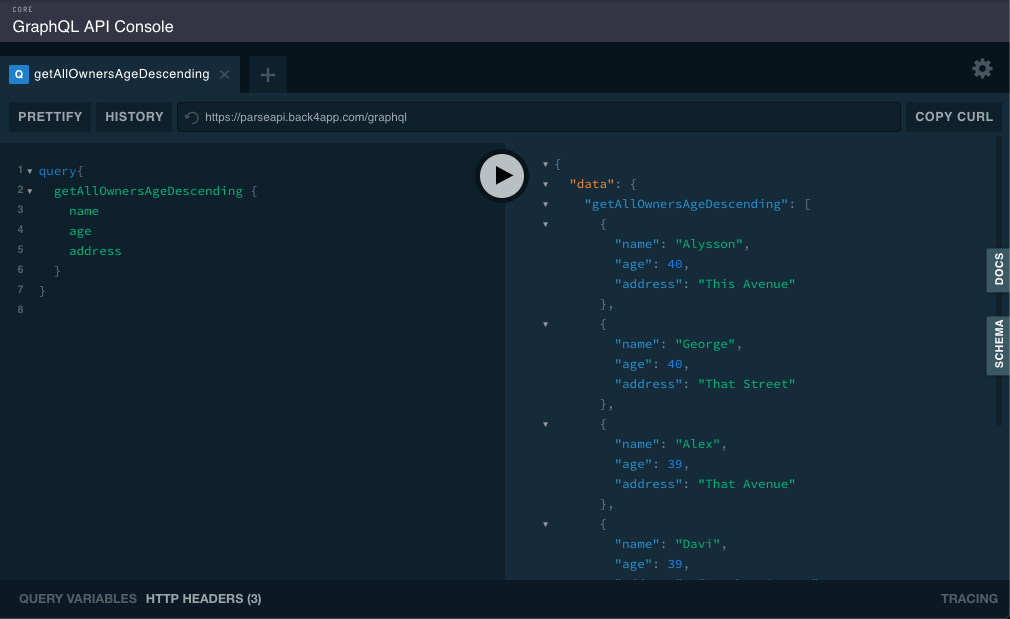
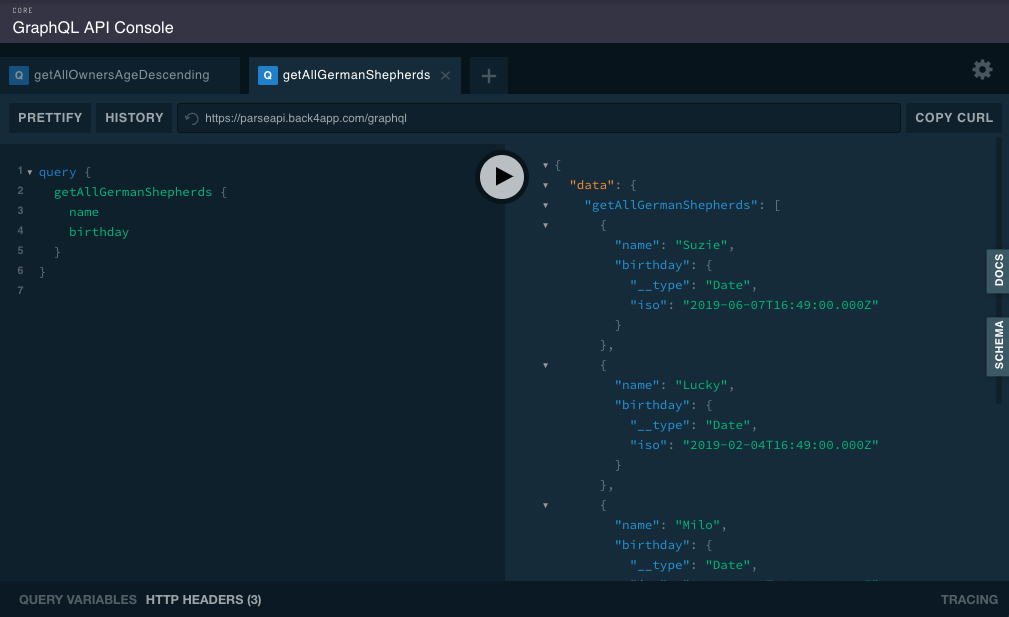
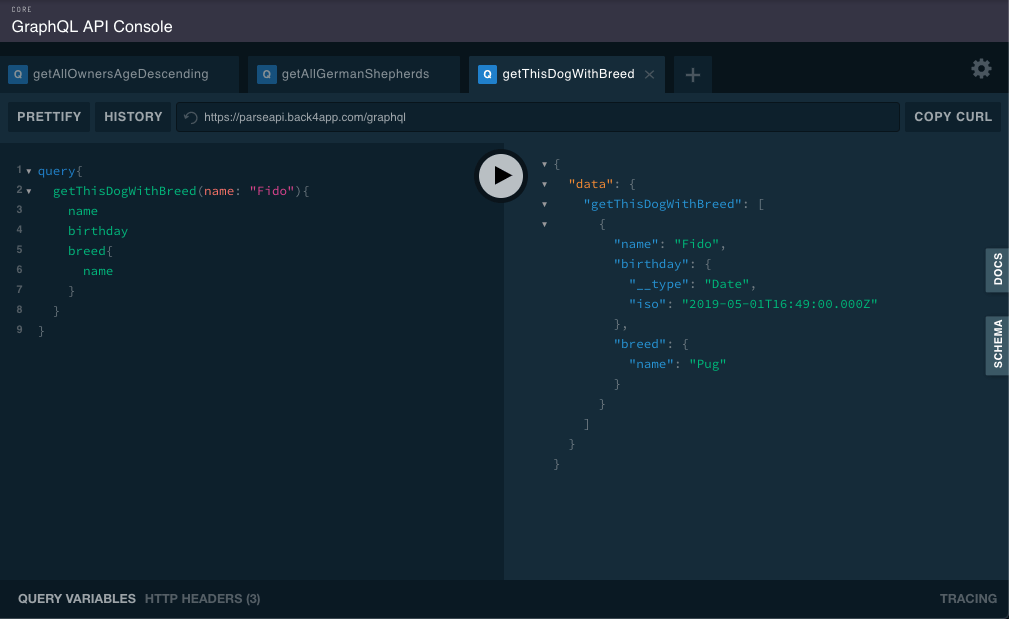
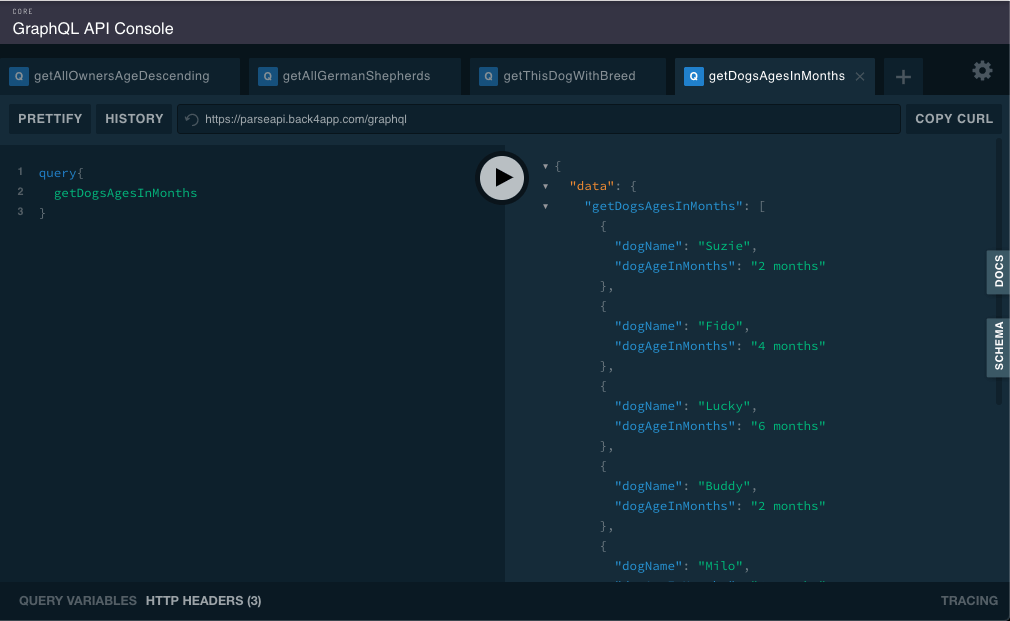
Let’s go to our Parse GraphQL Console and run our queries, checking its results:
Query for getAllOwnersAgeDescending:
query{
  getAllOwnersAgeDescending {
    name
    age
    address
  }
}
Query for getAllGermanShepherds:
query {
  getAllGermanShepherds {
    name
    birthday
  }
}
Query for getThisDogWithBreed:
query{
  getThisDogWithBreed(name: "Fido"){
    name
    birthday
    breed{
      name
    }
  }
}
Query for getDogsAgesInMonths:
query{
  getDogsAgesInMonths
}
Everything working! Great! Now it is time to…
Some XCoding
We’ve got everything that we need from Back4app up and running. It is time to consume that on XCode.
This guide showed how to get that up and running but this time we got a little bit more advanced: we have multiple methods, one of those expect variables, so we will need to make a few changes.
If you didn’t follow that article yet, I strongly suggest you do as it is very detailed.
Let’s start by creating the application and installing the Apollo client as described in the article.
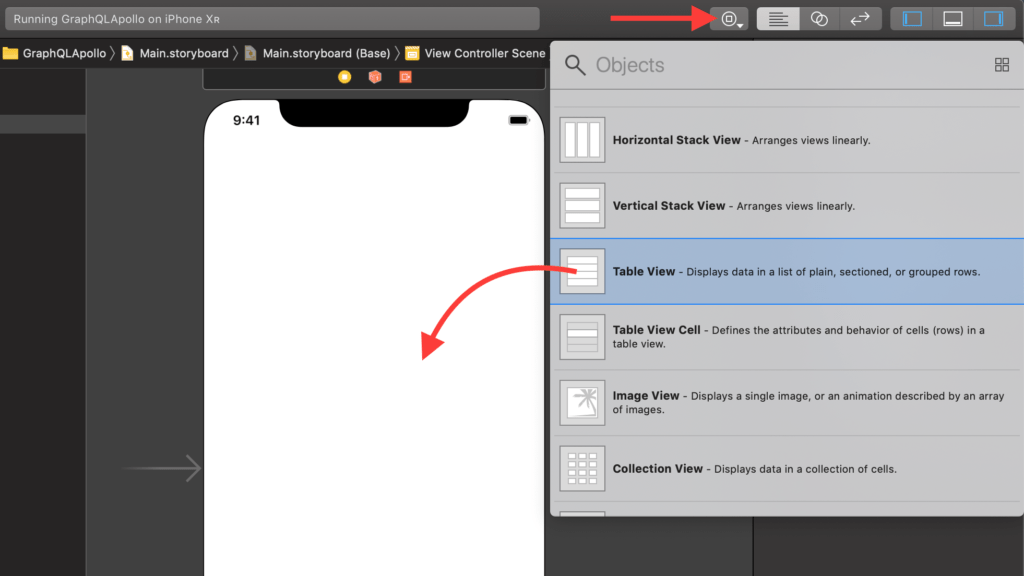
After that, open your Main.storyboard file, click the Objects button on the top right corner and drag and drop a Table View to the View Controller:
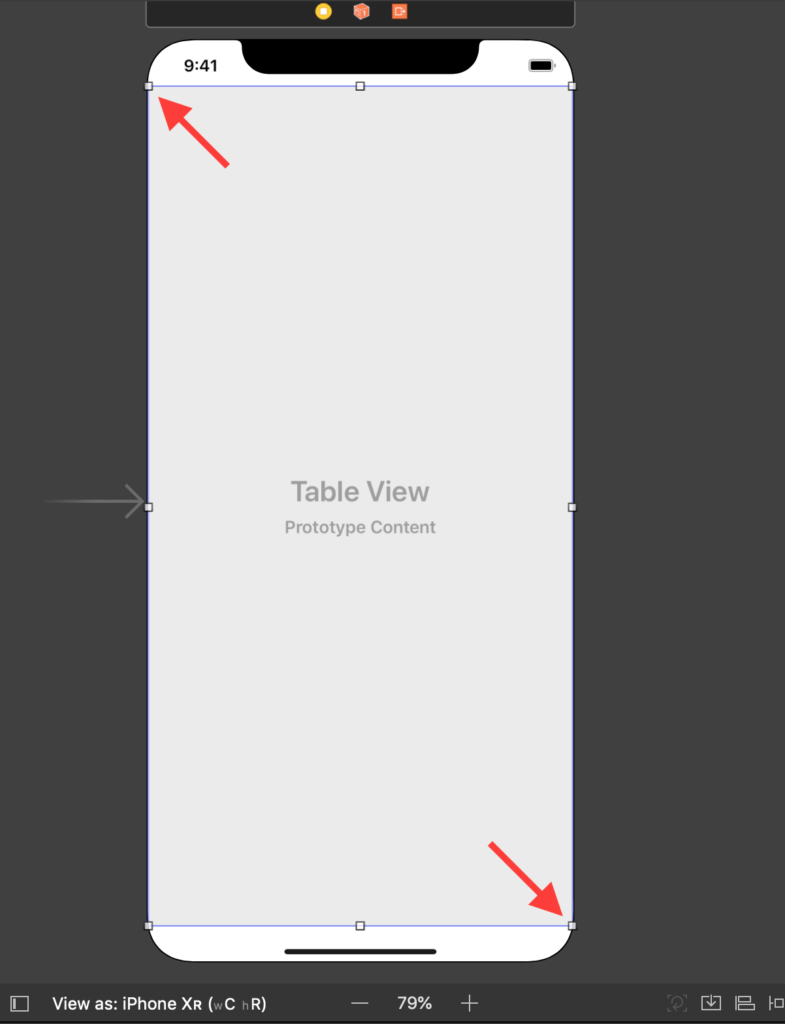
Change the size of your Table View to match the whole View of the View Controller by dragging the corners:
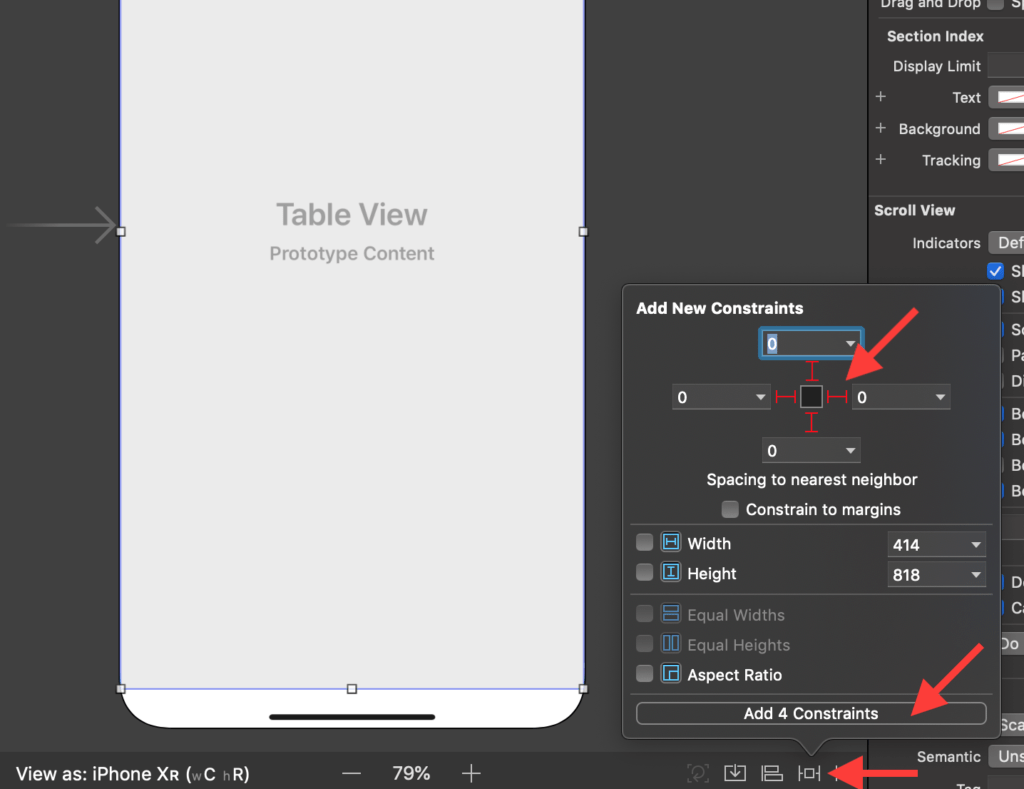
And create Constraints for all four sides by clicking the Add New Constraints button on the bottom right of the screen. Click the four sides (red markers) and click the Add Constraints button to assign those new constraints:
Now, with the Table View selected (click on it to select), let’s add a Prototype Cell. Click the Attributes Inspector on the top right, and replace the 0 for a 1 on the Prototype Cells box:
Now, click on the newly created Prototype Cell to select it, and give it a good identifier: “cell”.
We will use it later on the code to identify that cell.
Now we have to link our Data Source and Delegate from the Table View to our View Controller.
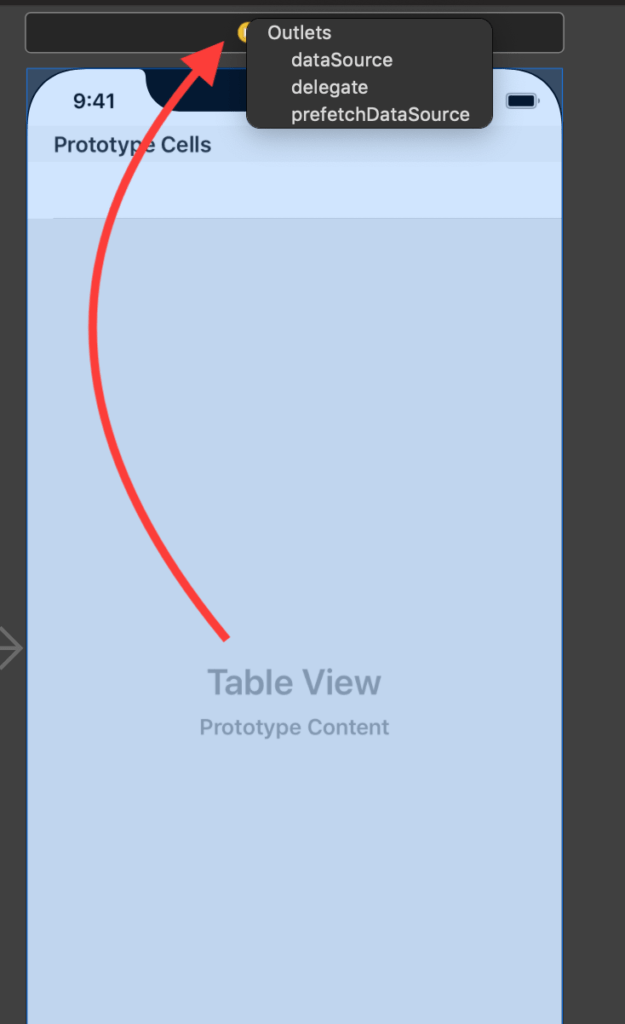
While holding the Control key on your keyboard, click the Table View and drag it to the yellow icon on the top of your View Controller, the one that says View Controller when you hover.
By releasing the Table View link there, a small popup will show. Choose both DataSource and Delegate on the popup:
Now, that will cover the basics but we will still need to invoke a refresh on that Table View after we retrieve our data from Back4app. In order to do so, we must create an Outlet and connect it to our User Interface.
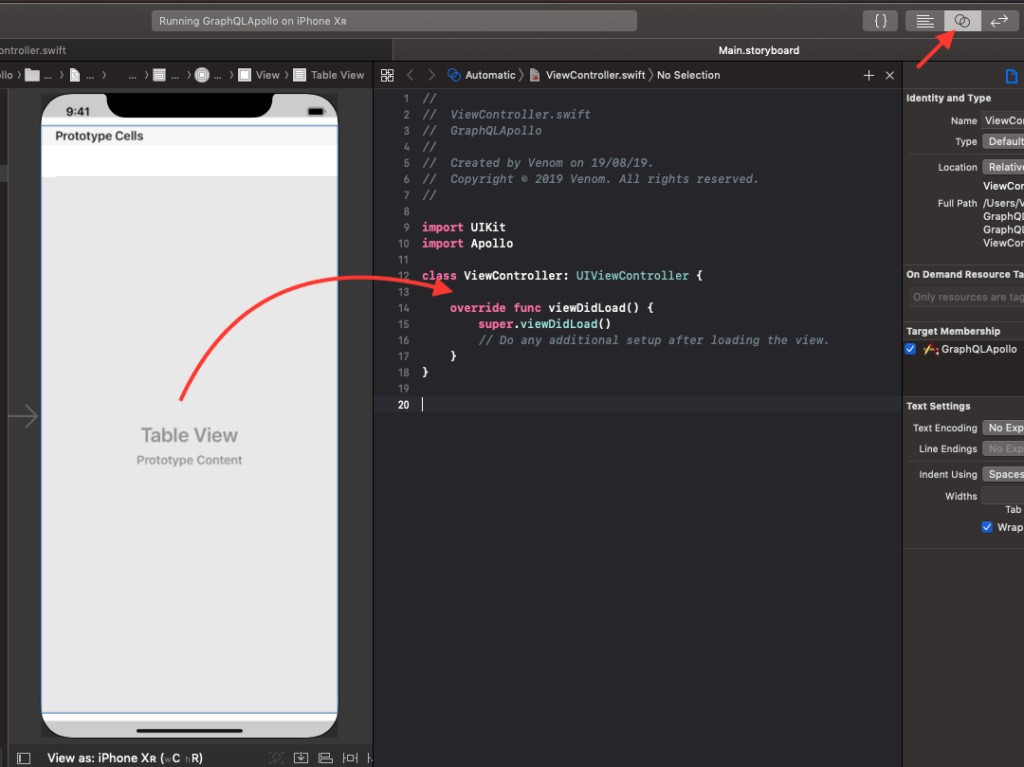
The easiest way to do it is by clicking the Show Assistant Editor on the top right of the screen, so you can see side by side the UI and the code.
Then Control click your Table View and drag it to the code:
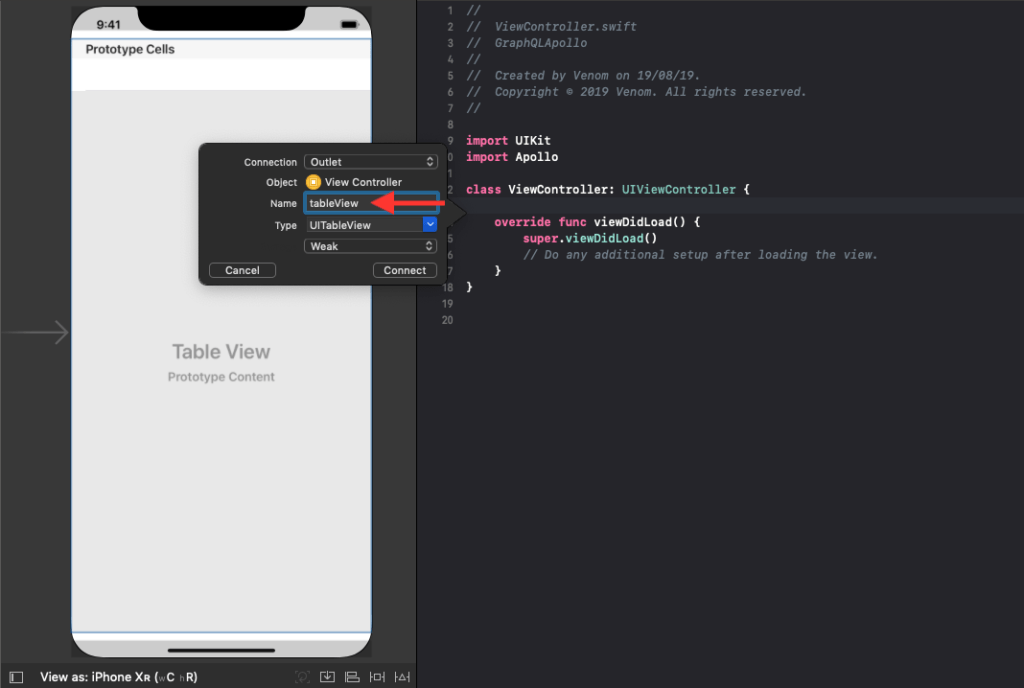
When you release, you will get a popup. Fill the Name for it and click Connect:
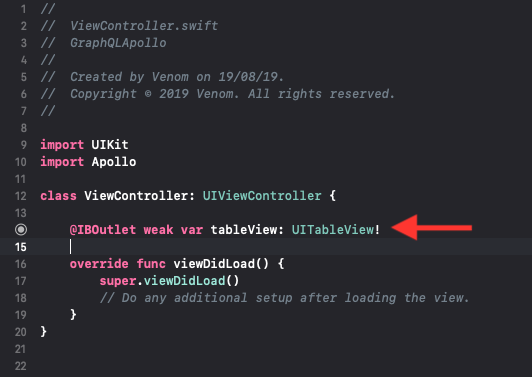
That done, you should have a nice Outlet connected (notice the small circle filled on the line number) so we can now invoke code for that Table View:
With all that done, we can go to our ViewController.swift file because it is time for…
Our GraphQL file
Our GraphQL guide showed you how to create your GraphQL file. For this project, mine ended like this:
query findAllOwners{
    getAllOwnersAgeDescending{
        name
        age
        address
    }
}

query findAllGermanShepherds{
    getAllGermanShepherds {
        name
    }
}

query findThisDog ($name: String!){
    getThisDogWithBreed(name: $name){
        name
        birthday
        breed{
            name
        }
    }
}

query agesInMonths{
    getDogsAgesInMonths
}
Some Swift Code
Once again, we already covered how to configure Apollo in Swift on this guide, but today’s code have a few changes.
As we are going to display the data graphically on our Table View, we must include two methods for our Data Source and Delegate to execute. Those methods are
func tableView(_ tableView: UITableView, numberOfRowsInSection section: Int) -> Int
and
func tableView(_ tableView: UITableView, cellForRowAt indexPath: IndexPath) -> UITableViewCell
I am not going to cover much on that as those are documented on the code. Just keep in mind that those two methods are mandatory for our Table View to work.
Your full code should look like this:
//
//  ViewController.swift
//  GraphQLApollo
//
//  Created by Venom on 19/08/19.
//  Copyright © 2019 Venom. All rights reserved.
//

import UIKit
import Apollo

class ViewController: UIViewController, UITableViewDelegate, UITableViewDataSource {
    @IBOutlet weak var tableView: UITableView!

    var list = [] as [String] // This array will hold the values for us to display

    // Apollo Client initialization.
    // More about it here: https://www.back4app.com/docs/ios/swift-graphql
    let apollo: ApolloClient = {
        let configuration = URLSessionConfiguration.default
        configuration.httpAdditionalHeaders = [
            "X-Parse-Application-Id": "lAcIOgR0ndd7R4uMqovhNAoudpi6tMsrOI9KCuyr",
            "X-Parse-Client-Key": "f1wwm6uWqQoxazys3QQrrtY4fKuQuxYvNYJmYQJP"
        ]

        let url = URL(string: "https://parseapi.back4app.com/graphql")!

        return ApolloClient(
            networkTransport: HTTPNetworkTransport(
                url: url,
                configuration: configuration
            )
        )
    }()

    override func viewDidLoad() {
        super.viewDidLoad()
        // Do any additional setup after loading the view.

        apollo.fetch(query: FindAllOwnersQuery()) { result in
            guard let data = try? result.get().data else { return }

            for name in data.getAllOwnersAgeDescending {
                //Appends each name for our list array
                self.list.append(name.name!)
            }

            //the line below will force a reload of our Table View after we retrieve the data
            DispatchQueue.main.async { self.tableView.reloadData() }
        }
    }

    func tableView(_ tableView: UITableView, numberOfRowsInSection section: Int) -> Int {
        // This Function is called by our Table View trough the Data Source and Delegate.
        // It just returns the number of objects for the Table View to show.
        // It is mandatory for a Table View to work.
        return list.count
    }

    func tableView(_ tableView: UITableView, cellForRowAt indexPath: IndexPath) -> UITableViewCell {
        // This Function is called by our Table View trough the Data Source and Delegate.
        // It creates the Cells to be displayed with the Identifier we set on the Storyboard
        // It is mandatory for a Table View to work.
        let cell = UITableViewCell(style: UITableViewCell.CellStyle.default, reuseIdentifier: "cell")
        cell.textLabel?.text = list[indexPath.row]
        return(cell)
    }
}
Let’s run it!
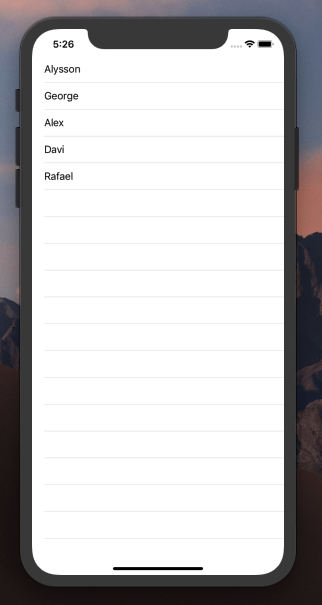
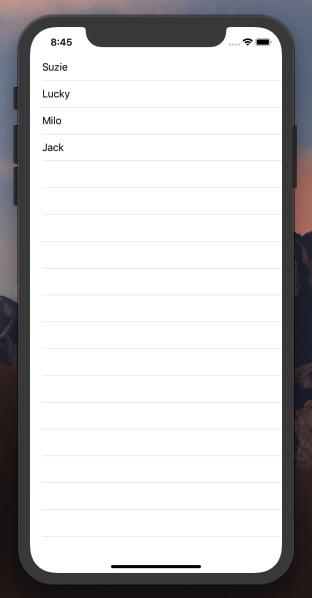
Time for running our code! Hit Command + R and if everything is right, you should see our names in your Table View:
Cool, huh?
Now we can even change our code to execute our other GraphQL methods and see how it will work!
Let’s change our GraphQL query to execute our getAllGermanShepherds method:
    override func viewDidLoad() {
        super.viewDidLoad()
        // Do any additional setup after loading the view.

        apollo.fetch(query: FindAllGermanShepherdsQuery()) { result in
            guard let data = try? result.get().data else { return }

            print(data.getAllGermanShepherds)

            for name in data.getAllGermanShepherds {
                //Appends each name for our list array
                self.list.append(name.name!)
            }

            //the line below will force a reload of our Table View after we retrieve the data
            DispatchQueue.main.async { self.tableView.reloadData() }
        }
    }
and the result…
What if we want to pass a variable to our query?
    override func viewDidLoad() {
        super.viewDidLoad()
        // Do any additional setup after loading the view.

        apollo.fetch(query: FindThisDogQuery(name: "Fido")) { result in
            guard let data = try? result.get().data else { return }

            print(data.getThisDogWithBreed)

            for name in data.getThisDogWithBreed {
                //Appends each name for our list array
                self.list.append(name.name! + " - " + (name.breed?.name!)!)
            }

            //the line below will force a reload of our Table View after we retrieve the data
            DispatchQueue.main.async { self.tableView.reloadData() }
        }
    }
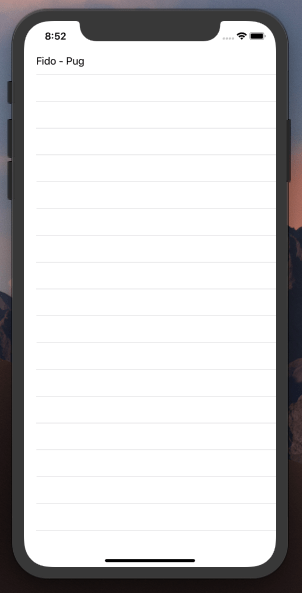
And now we know that Fido is a Pug:
And how about that method that returns a new type? Let’s test it too:
   override func viewDidLoad() {
        super.viewDidLoad()
        // Do any additional setup after loading the view.

        apollo.fetch(query: AgesInMonthsQuery()) { result in
            guard let data = try? result.get().data else { return }

            print(data.getDogsAgesInMonths)

            for dog in data.getDogsAgesInMonths {
                //Appends each name for our list array
                self.list.append(dog.dogName + " - " + dog.dogAgeInMonths)
            }

            //the line below will force a reload of our Table View after we retrieve the data
            DispatchQueue.main.async { self.tableView.reloadData() }
        }
    }
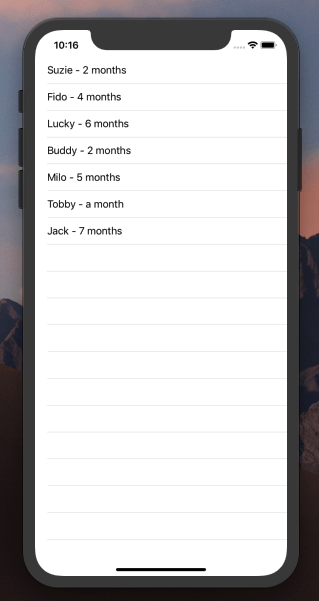
and the result:
Conclusion
Cloud code is cool. GraphQL is super cool. Apollo brings a new level of awesomeness to your iOS native applications. With all three together, you have some serious power to create very complex applications with very minimal effort.
Now that you are able to create a fully working flow for an App, that is easy to create and to maintain over time, the question really is: what are you going to create next?
Hope you enjoyed this! We have more coming out soon! Stay tuned!
Which software can be used to use cloud functions in swift app?
It will depend on your own choice. You should use that software which you can use and operate easily. I used the below two in above practical.
-Cocoapods for IOS package management
-NPM for Desktop package management
What is the magic of NPM?
Cloud code is compatible with NPM modules. This is a great thing. It will help you save heaps of time. It will also give edge over your competitor also. So, NPM compatibility with cloud codes will give you a boost.


