How To Deploy a Backend?

A backend is a server-side component of a web application that stores data. It consists of an application programming interface (API), database, and web server layer. You can deploy a backend on various technologies such as Java, Node.js, or Python. A better alternative is learning how to deploy a backend using managed services.
Deploying a backend involves ensuring that all components are running in the cloud. It also means ensuring they are secure and stable. It is a complex process requiring knowledge about configuring server-side technologies. These technologies include databases, web servers, and networking protocols.
A backend is essential for any web application. It enables data sharing between the client (web browser) and server. Without a backend, clients couldn’t access dynamic content or complete complex tasks. According to Future Market Insights, the BaaS market may to grow from 2022 to 2032 with a CAGR of 24.6%.
Many managed cloud services offer automated deployment options. These can help streamline the deployment process. These services allow users to deploy their backend with a few clicks. Many managed cloud services provide features such as scalability, observability, security, and more. These can help ensure the performance of the deployed application.
Contents
What Are The Cloud Options To Deploy A Backend?
Several service providers offer managed solutions when it comes to how to deploy a backend in the cloud. These include Amazon Web Services, Back4App, Heroku, etc.
Each of these services offers different features and pricing depending on the application. However, their deployment models are usually based on the following 3:
BaaS
BaaS (Backend as a Service) is cloud-based allowing developers to deploy their backend. These services provide an automated platform for deploying, storage, databases, and other services.
Using BaaS, developers can focus on coding the features of their app. It works without knowing how to deploy a backend in the cloud. It makes it easy to manage and monitor applications, databases, storage, and other resources from a single interface.
Additionally, they provide scalability options for managing large amounts of data or workloads. That too without needing to deploy additional servers. It makes deploying a backend with BaaS an ideal solution for businesses that need to scale their applications quickly.
BaaS services usually come with additional features such as:
- Security
- Automated backups
- Monitoring tools
These can help ensure the performance of your application.
PaaS
PaaS (Platform as a Service) is another cloud-based service for deploying and managing applications. It provides an automated platform for developers to deploy backend. It works without worrying about how to configure the infrastructure components.
Organizations that need to set up complex applications with cloud deployment often use PaaS services. These services usually offer the following features to help ensure the applications’ performance:
- Reliability
- Hardware scaling
- Monitoring
- Security
Additionally, they support popular languages and frameworks such as:
- Python
- Node.js
Thus, making it easy to deploy a backend quickly with minimal effort.
IaaS
IaaS (Infrastructure as a Service) is a cloud-based service for deploying and managing applications. It provides an automated platform to provision:
- Virtual machines
- Storage
- Databases
Along with other resources without the need to set up and configure physical hardware. It is ideal for organizations that want to deploy their backend with minimal effort quickly.
Additionally, they provide APIs and SDKs. These make it easy to integrate with third-party services. So, your app gets other functionalities such as databases, storage services, and authentication providers.
So, these were the top 3 cloud options to deploy a backend. Each of these services provides different features and options depending on the applications. By choosing an appropriate cloud service, developers can ensure their application runs securely. All without needing to manage additional infrastructure components.
Step-By-Step Guide To Deploy An App Backend.
With multiple options from various service providers, it might seem overwhelming how to deploy a backend in the cloud. However, the steps are fairly straightforward. Below are complete guides for Back4App, Heroku, and AWS.
Back4App
Back4App is a Backend as a Service (PaaS) provider. It provides automates deployment for developers. So, they can deploy without configuring the underlying infrastructure. It also offers scalability, monitoring, and security to help ensure the performance of the applications.
1. Login And Setup
Login at Back4App, and you will have the “My Apps” page. Go for the “build a new app” button that will take you to the initial setup. You must select your database type and application’s name during the setup. Once you finish the initial setup process, you will see an instance on my apps page for this new application.

2. Database Browser
Back4App is based on Parse Server, and with its power support, Back4App provides NoSQL usage. The platform has its database browser interface where developers can build, upgrade, and remove classes. It provides a spreadsheet-like interface. You can create classes and columns in them by clicking “create” in the left menu.

Additionally, Back4App supports importing JSON and CSV files if you want to use previous data. Similarly, its interface allows modifying rows anytime.
3. Authorization and Security
Back4App ensures that your applications stay secure through data integrity features and authorization. It provides CLPs (class-level permissions) along with object-level access control. With class-level permissions, you can change the permissions different users have on classes and objects. Authorization at Back4App allows you to change roles for every user.
You can set permissions for public users and your team of developers. There is some data that you want to protect from the public. You can do it by using access control lists.
4. Cloud Code Functions
Cloud Code allows you to run JavaScript-centric backend functions. It works by installing the JS script on Back4App’s servers. After installation, it works in managed Back4App environment. Open the cloud code from the left menu and the main.js file in the cloud folder.

Paste your script in this file and click to deploy changes. Alternatively, you can upload your previous files with JavaScript script in them. Apart from JS, cloud code functions also support:
- PHP
- Android
- Flutter
- iOS
- Unity
- .Net
In the cloud code functions, you can also find cloud jobs for instantly running long scripts. It also provides server logs that help coders.

5. App Settings
Back4App provides an app settings function with App keys. So, users can access the app keys using the Application ID:
- Client Key
- File Key
- JavaScript Key
- Master Key
- .Net Key
- Webhook Key

Under the app settings option, you also find the Server Settings feature. It has a user-friendly interface with multiple server settings guides. Apart from learning, you can also mend your server settings here.

6. API and SDK Support
Back4App not only brings backend support but it allows the integration of third-party services. You can use REST or GraphQL APIs and Parse SDKs regarding feature requirements. Thus, you may add multiple external functionalities to your app.
7. App Status
Back4App takes deployment to the next level. After you deploy your app, you can monitor its health and performance. So, by going to my apps page, you will find the app status button.
It is present inside the instance of your app. Here you may measure several metrics, including server errors, log issues, security health, etc. Start processing with app ID and Key.

Heroku
Heroku is a PaaS provider that allows developers to deploy their backend with minimal effort instantly. It provides a platform for hosting web applications. Some of its features include scalability, monitoring, and security.
1. Getting Started
Login or Signup with Heroku to begin. After you log in, you will have the dashboard in the front. Click Create new app option and pick the language according to the project.

Additionally, you may specify the app name and any other requirements. After the initial setup, you can use 3 deployment methods at Heroku.

2. Heroku Git
Heroku Git deployment uses a command line interface. So, download it from Heroku on your Windows PC or Mac. With CLI, developers can set up, administer, and build the application. Additionally, CLI allows developers to generate your project’s Git repository. Thus, you can deploy once you commit.

3. GitHub
If you are familiar with GitHub, then Heroku deployment will be very easy. For GitHub users, Heroku makes it very simple to learn and implement how to deploy a backend. Heroku is very simple to connect with GitHub. This connection makes cloud deployment easy. It also allows programmers to work with diffs and script setups. In fact, GitHub deployment with Heroku offers 2 experiences:

- Manual deployment gives you more control. Individual developers or teams can identify which branch needs deployment.
- Auto deployment implementation makes frequent pushes against a branch. Thus, developers don’t have to work to deploy actively.
4. Container Registry
The container registry depends on the command line interface in Heroku. However, it is a better option for Docker-oriented applications. Employing docker images is very easy because of runtime and private spaces. It becomes easy because these have robust backing from Heroku.

AWS
AWS (Amazon Web Services) is a cloud provider that offers managed services. It provides an automated platform for deploying. AWS helps in managing applications with features such as scalability and security. Additionally, it offers APIs and SDKs that make it easy to integrate with third-party services.

1. Account Setup
You need to begin by creating an AWS account. Once you create an account, knowing how to deploy a backend will be much simpler. Amazon Web Services has different products that provide backend deployment support. Below are the details of each step you must follow:
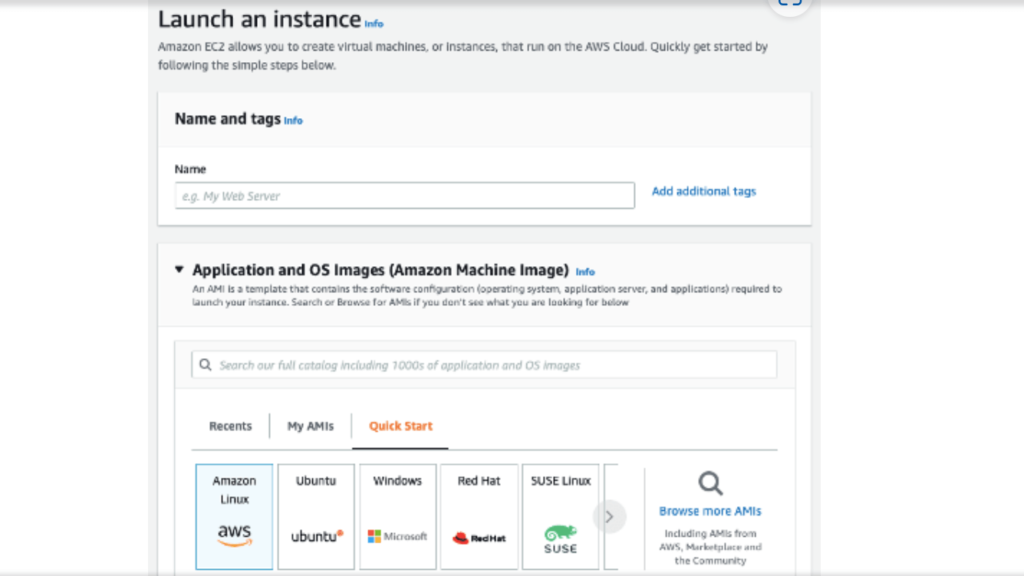
2. EC2 Instance Creation
To create your scalable backend, you can use database VMs and applications. By creating your EC2 instances, you may get several features like:
- Compute optimization
- Memory optimization
- Storage optimization
- Computing acceleration
- Horizontal and vertical scaling.
- General purpose instance

From all instances, you may choose the t4g.medium instance. It is based on ARM architecture and handles great workloads at cheap prices. So, from the AWS dashboard, you can go to EC2 and then to instances. Here you can launch a new instance. Additionally, you must configure scaling, synchronize data, and transfer workload among instances.
3. Elastic Block Storage Management
EBS volume is necessary to add storage to your services. So, determine the right size to get adequate capacity. Next, choose the right EBS type so your costs stay within your budget.
4. Simple Storage Service: S3
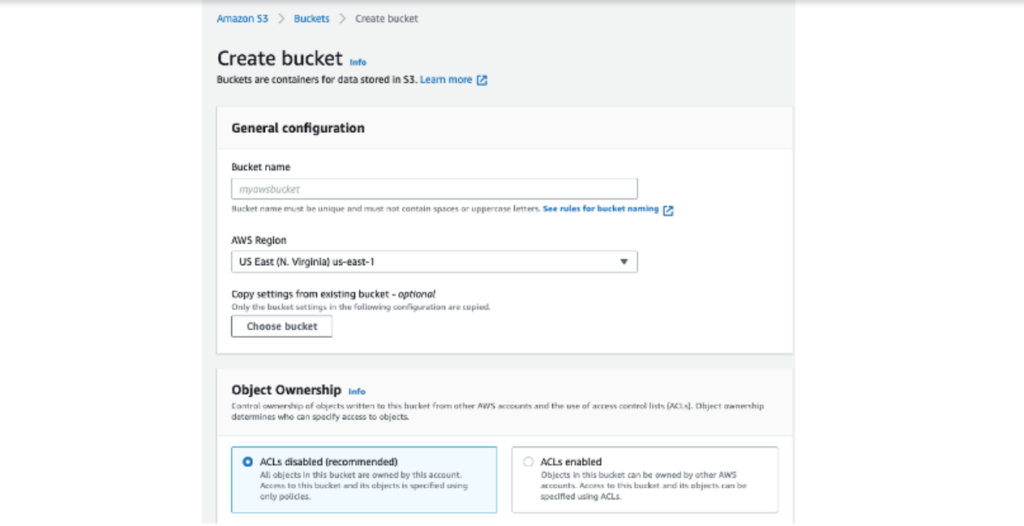
For your object storage requirements, you can use AWS S3. So, create an S3 bucket and define the region for file storage. It would be good to select the same region as your EC2 instance. Additionally, you can:
- Create processes.
- Mend access rules
- Setup encryption
- Work on bucket visioning
- Define object ownership.

5. Load Balancers
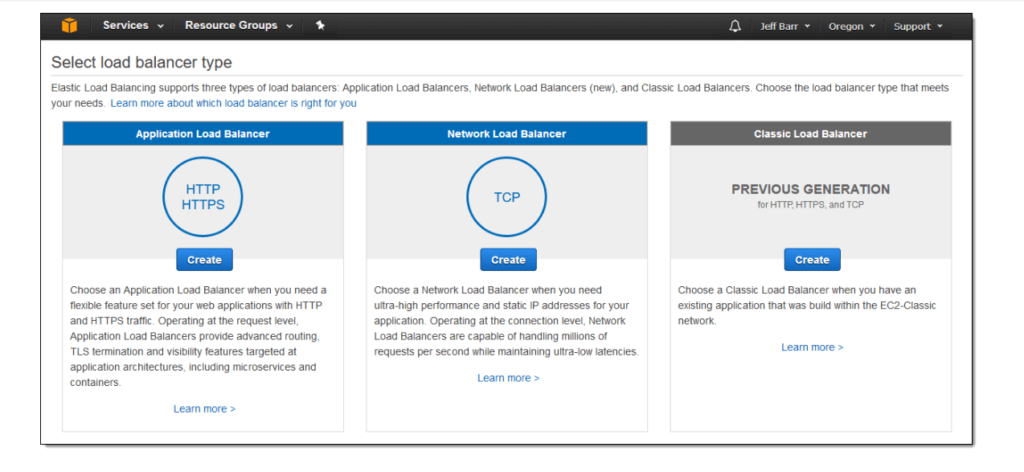
Load balancers route requests to the right EC2 instance for monitoring their health. So, go to the EC2 dashboard and then to load balancing. Here you may create load balancers and select the right type. Lastly, you must configure these according to availability zones, VPCs, and IP address type.

6. CloudFront CDN
It is the content delivery network of AWS. In your backend deployment, it connects with S3 buckets and load balancers. These contain a configuration for targeting groups. So, set up the CDNs for efficient EC2 distribution, and you will be done.
Conclusion
Deploying a backend can be intimidating. With the right cloud service, it can be quick and secure. Knowing how to deploy a backend with managed services such as BaaS, PaaS, or IaaS can help developers. So, they may save time and resources while ensuring their applications run smoothly.
Following the step-by-step guides above, developers can deploy their backends minimal effort. With the right cloud solution, anyone can quickly and easily deploy a reliable backend for their application.
What Is a Backend?
A backend is the server side of an application that stores and manages data.
What are The Backend Deployment Options?
The three main backend deployment options are BaaS (Backend as a Service), PaaS (Platform as a Service), and IaaS (Infrastructure as a Service).
What are the Top 3 Providers To Deploy A Backend?
The three main backend deployment options are BaaS (Backend as a Service), PaaS (Platform as a Service), and IaaS (Infrastructure as a Service).


