Step-by-step guide on how to deploy a React app
Due to its various advantages and large community, many modern web applications use React. In this article, you’ll explore React’s advantages and disadvantages, its different deployment options, and how to deploy your React app on Back4app.
Contents
- 1 What is React?
- 2 Advantages of React
- 3 Limitations of React
- 4 React Deployment Options
- 5 Deploying a React App on Back4app
- 6 Conclusion
- 7 FAQ
- 8 What is React?
- 9 What are the Advantages of React?
- 10 What are the Limitations of React?
- 11 How can I deploy my React app?
- 12 What is Back4app?
- 13 How can I deploy my React app on Back4app?
What is React?
React is an open-source frontend JavaScript library for building user interfaces (UI). Meta (previously known as Facebook) developed React and released it in 2013, and since then, it has become one of the most popular libraries for building web applications.
React uses reusable pieces known as components as building blocks for a UI. These components describe a part of a UI, such as a button, form, or card.
Components are typically defined as JavaScript functions that return a description of the component’s UI using JSX, a syntax extension for JavaScript that allows you to write HTML-like elements in your JavaScript code.
React allows you to create reusable UI components and manage the state of your application. It uses a virtual DOM (Document Object Model), a lightweight copy of the actual DOM, to track changes and efficiently update the view of the application.
This makes React applications feel more responsive and performant, as it only updates the components that need to change rather than re-rendering the entire page.
Advantages of React
Some features of React that make it a prime choice for building user interfaces include the following.
Reusability
A web application with React comprises multiple components, each with its logic responsible for outputting JSX. These components can be as simple as a button or as complex as a form with various fields and validation.
React’s reusability refers to using the same component in multiple places throughout an application or across different applications.
Reusing components reduces code repetition, maintains the DRY principle, and saves development time. This also allows for better code organization and maintainability, making it easier to understand, test, and debug the application.
SEO-Friendly
Search engines have difficulty indexing JavaScript-heavy pages as they require a browser to execute the JavaScript code before they can be rendered.
However, React supports a feature known as server-side rendering (SSR), which allows React components to be rendered on the server and sent to the client as fully-rendered HTML.
This means that the initial load of a React website will show the fully-rendered content to the user, and any other interactions will be handled by the React code running in the browser.
This approach allows search engines to index the fully-rendered content, making React-powered websites more SEO-friendly. Server-side rendering also improves the initial loading time of web pages, making them more responsive to users.
Although, implementing server-side rendering in a React application can be complex and will require additional setup.
Community
The React community is a large and active group of developers, designers, and enthusiasts who use and contribute to the React library.
The community includes developers, startups, and large corporations using React to build web applications.
The community is active and vibrant, with many developers sharing their experiences, tips, and code snippets on social media, blogs, and forums.
Many meetup groups and conferences are also dedicated to React, such as React Conf, React Native EU, and React Summit.
The React community is also active in contributing to the open-source React library, with many developers submitting pull requests to fix bugs and add new features. This helps to keep the library up-to-date and improve its overall quality.
Support for Mobile Development
React Native is a cross-platform mobile development framework allowing developers to build apps using React.
It allows developers to write code in JavaScript and reuse the same codebase for iOS and Android. It uses the same principles and concepts as React and has a large and active community.
It also provides a set of built-in components and allows developers to use native modules and APIs.
Limitations of React
React, like any other technology, has some limitations. Some of the main limitations of React include the following.
Complexity and Steep Learning Curve
React might be a popular and flexible library, but it can be complex to learn and use, especially for developers new to JavaScript and web development.
It can take some time to understand the concepts of the virtual DOM, JSX, and component-based architecture.
React is also constantly updated, adding new tools and patterns frequently. This makes it difficult for the community to maintain the documentation, making it harder for new developers to keep up with the latest changes.
Large Bundle Sizes
React applications generally have large bundle sizes, which can increase the initial loading time and make the app less responsive.
This makes React less SEO-friendly because search engines have difficulty indexing JavaScript-heavy pages.
However, as mentioned earlier, React has a feature called server-side rendering (SSR), which allows React components to be rendered on the server and sent to the client as fully-rendered HTML.
But since React is primarily a client-side library, it requires additional setup and resources to implement server-side rendering.
These limitations can be mitigated by using the right tools and techniques. For example, using a tool like Webpack to optimize the bundle size or server-side rendering to make React websites more SEO-friendly.
React Deployment Options
There are multiple ways you can deploy a React app. Some of them include the following.
Static Hosting
Static hosting is a simple and cost-effective way to deploy a website or web application, especially if it does not require complex server-side processing.
Static hosting is a popular option for deploying small-scale websites or web applications and can be a cost-effective and easy way to get started.
However, it may not be suitable for larger-scale sites that require more complex server-side processing or dynamic features.
Examples of platforms that offer static hosting:
- Netlify
- GitHub Pages
- Surge
PaaS Services Like Vercel
Platform as a Service, or PaaS, is a category of cloud computing service that offers a platform for creating, deploying, and managing online applications and services without the hassle of setting up and managing the underlying infrastructure.
With PaaS, developers can concentrate on writing code because the PaaS provider will take care of the network, servers, and storage.
This frees developers from worrying about the underlying infrastructure and enables them to launch, expand, and manage their applications quickly and easily.
Some examples of PaaS platforms include:
- Vercel
- Heroku
- Dokku
- Microsoft Azure App Service
However, there are certain drawbacks to using a PaaS, including:
- Restricted control over infrastructure
- Vendor lock-in
- Restricted scalability
- Lack of control over upgrades and maintenance
These drawbacks may differ depending on the PaaS provider. Thus, carefully assessing their capabilities and constraints is crucial before deciding whether to use them.
BaaS Services Like Back4app
BaaS (Backend as a Service) is a cloud-based service that provides developers with a pre-built backend infrastructure for their mobile and web applications.
BaaS providers typically offer services such as databases, user authentication, push notifications, and storage, which can be easily integrated into an application.
It allows for a faster development process and reduces developers’ need for back-end technology expertise.
However, it can be expensive over time, developers may have limited control over the backend infrastructure, and there may be vendor lock-in.
Some examples of PaaS platforms include:
- Back4app
- Firebase
- AWS Amplify
- Kinvey
Deploying a React App on Back4app
Deploying a React application on Back4app can be highly advantageous due to its straightforward deployment process, which can save significant time.
Additionally, Back4app includes a pre-built database that can store data for your React application, eliminating the need for creating and managing a separate database.
Back4app also enables easy scaling of your application to handle increased traffic and has performance monitoring tools to help optimize your app’s performance.
Furthermore, Back4app offers security measures to ensure that your application and data remain secure and it can be conveniently integrated with other services.
What is Back4app?
Back4App is a cloud platform that enables developers to create and host web applications.
The platform provides an intuitive interface for managing web applications, a database for storing data, and compatibility with several programming languages.
It also offers a range of tools for creating and testing web applications, such as a command line interface, SDKs, performance optimization tools, analytics, monitoring, and a built-in system for user authentication and authorization.
Project Introduction
This tutorial will walk you through building a basic to-do application using React. The to-do application will support CRUD (Create, Read, Update, Delete) functionality, and you will use Back4app to handle the data storage and access layer.
To follow this tutorial, you need to satisfy the following:
- Knowledge of HTML and CSS
- Knowledge of JavaScript
- Basic knowledge of Bootstrap
Creating a new Back4app App
Before you can create an app on Back4app, you need to have a Back4app account. If you do not have a Back4app account, you can create one by following the steps below.
- Navigate to the Back4app website.
- Click the Sign up button on the top-right corner of the landing page.
- Fill out the sign-up form and submit it.
After successfully creating your Back4app account, log into your Back4app account and click the NEW APP button on the top right corner. Clicking this button will take you to a form that requires you to input an app name. Input your app name and click the CREATE button.
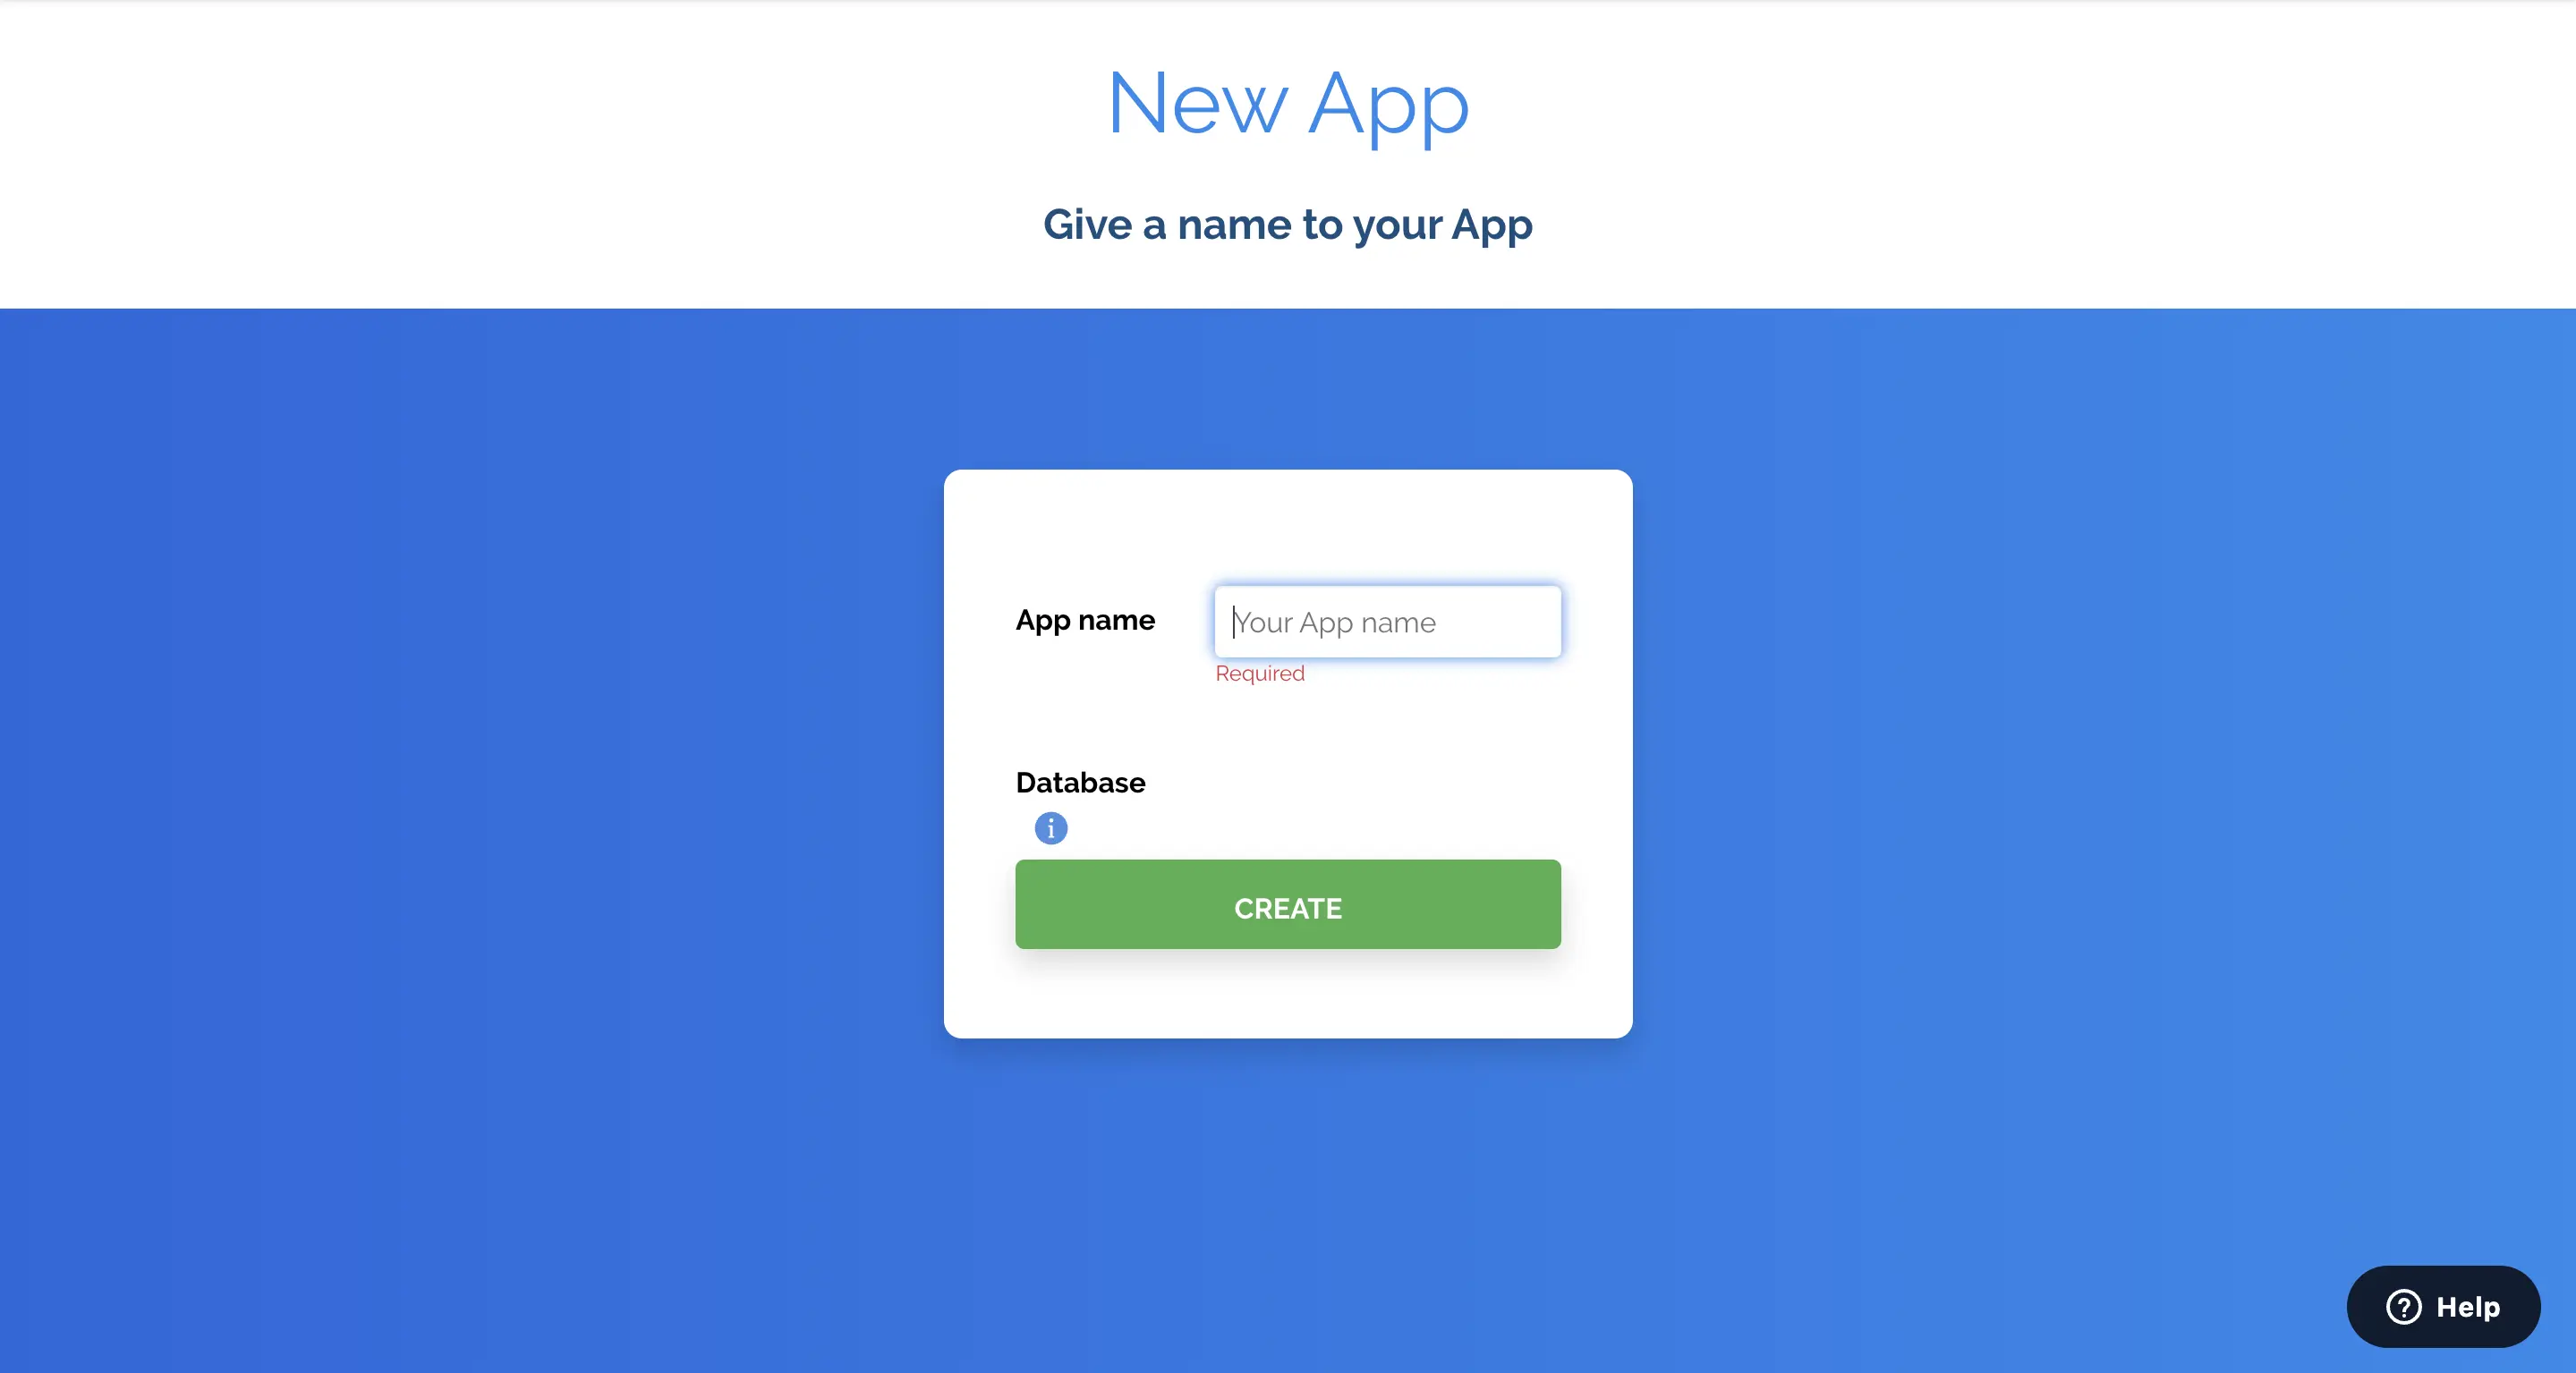
Clicking the CREATE button will scaffold your new application and take you to your application’s dashboard.
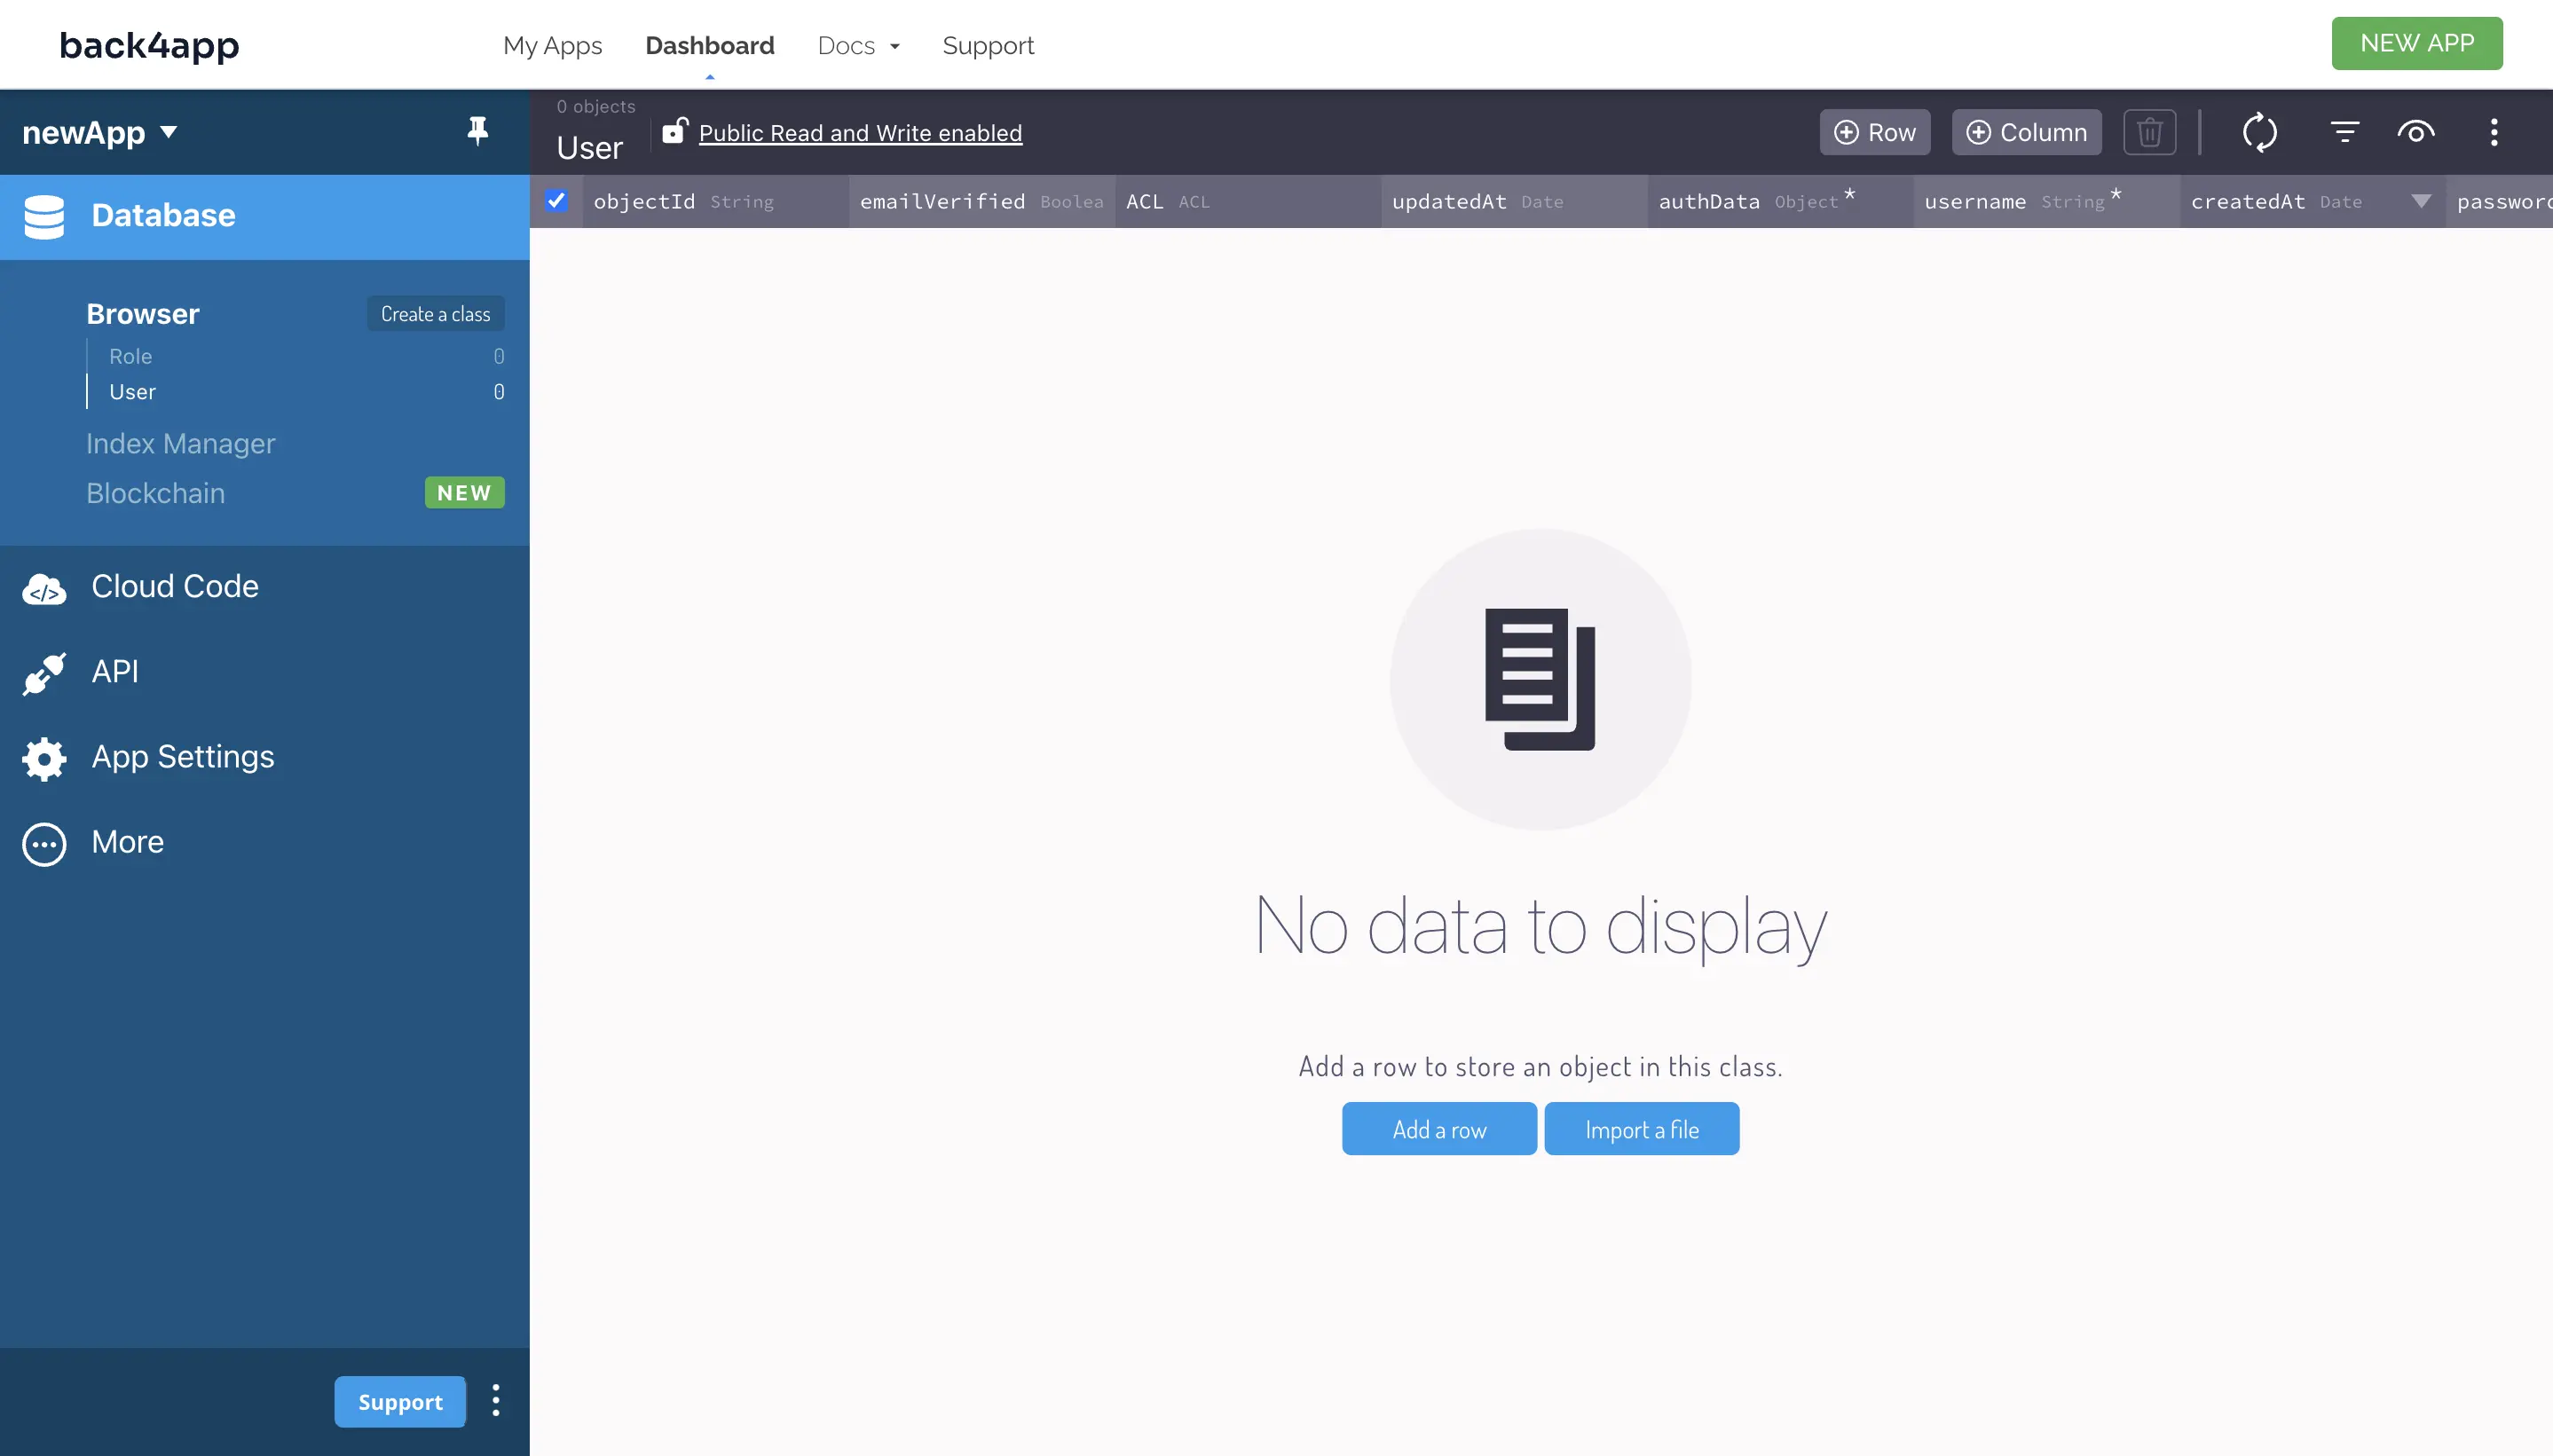
Now you have created a new application on Back4app.
Setting up your Development Environment
First, you are going to scaffold some boilerplate code using create-react-app.
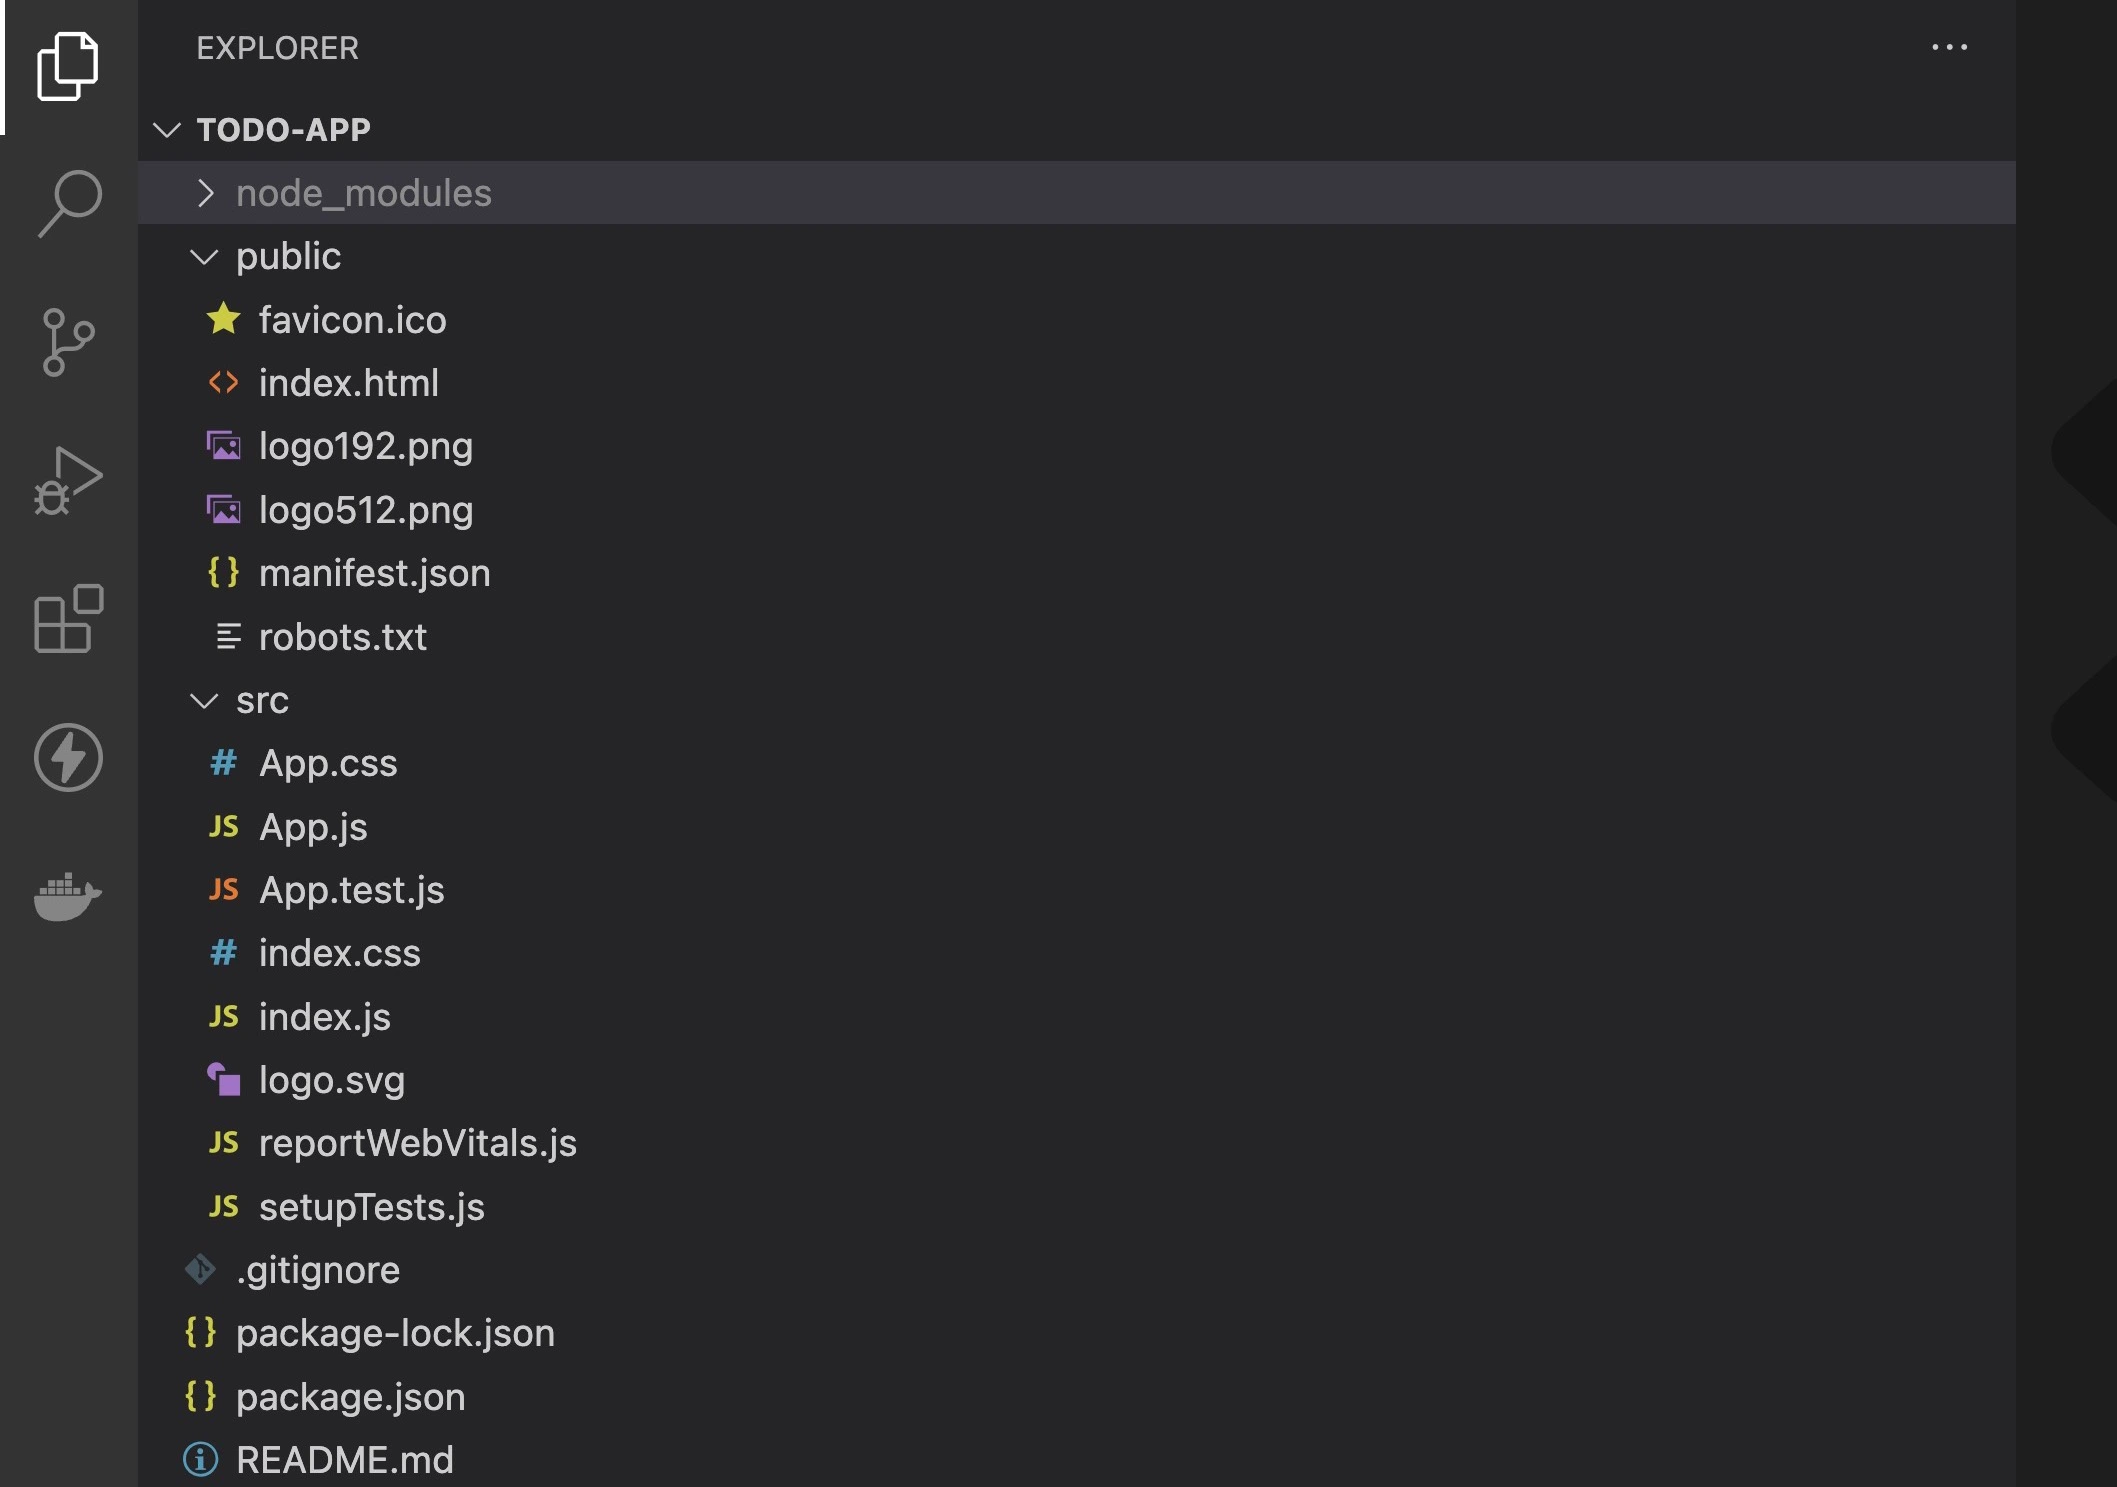
Run the command below to scaffold your React app.
npx create-react-app todo-app
The command above creates an initial project structure and installs the core dependencies you need to start building your React application, as shown in the image below.
cd into todo-app by running the command below:
cd todo-app
This tutorial will feature the use of Bootstrap to style your UI components. Install Bootstrap by running the command below:
npm install react-bootstrap bootstrap
Connecting to Back4app
To connect your app to Back4app servers, you need to install the Parse JavaScript SDK.
Install the SDK by running the command below:
#Using npm
npm install parse

#Using yarn
yarn add parse
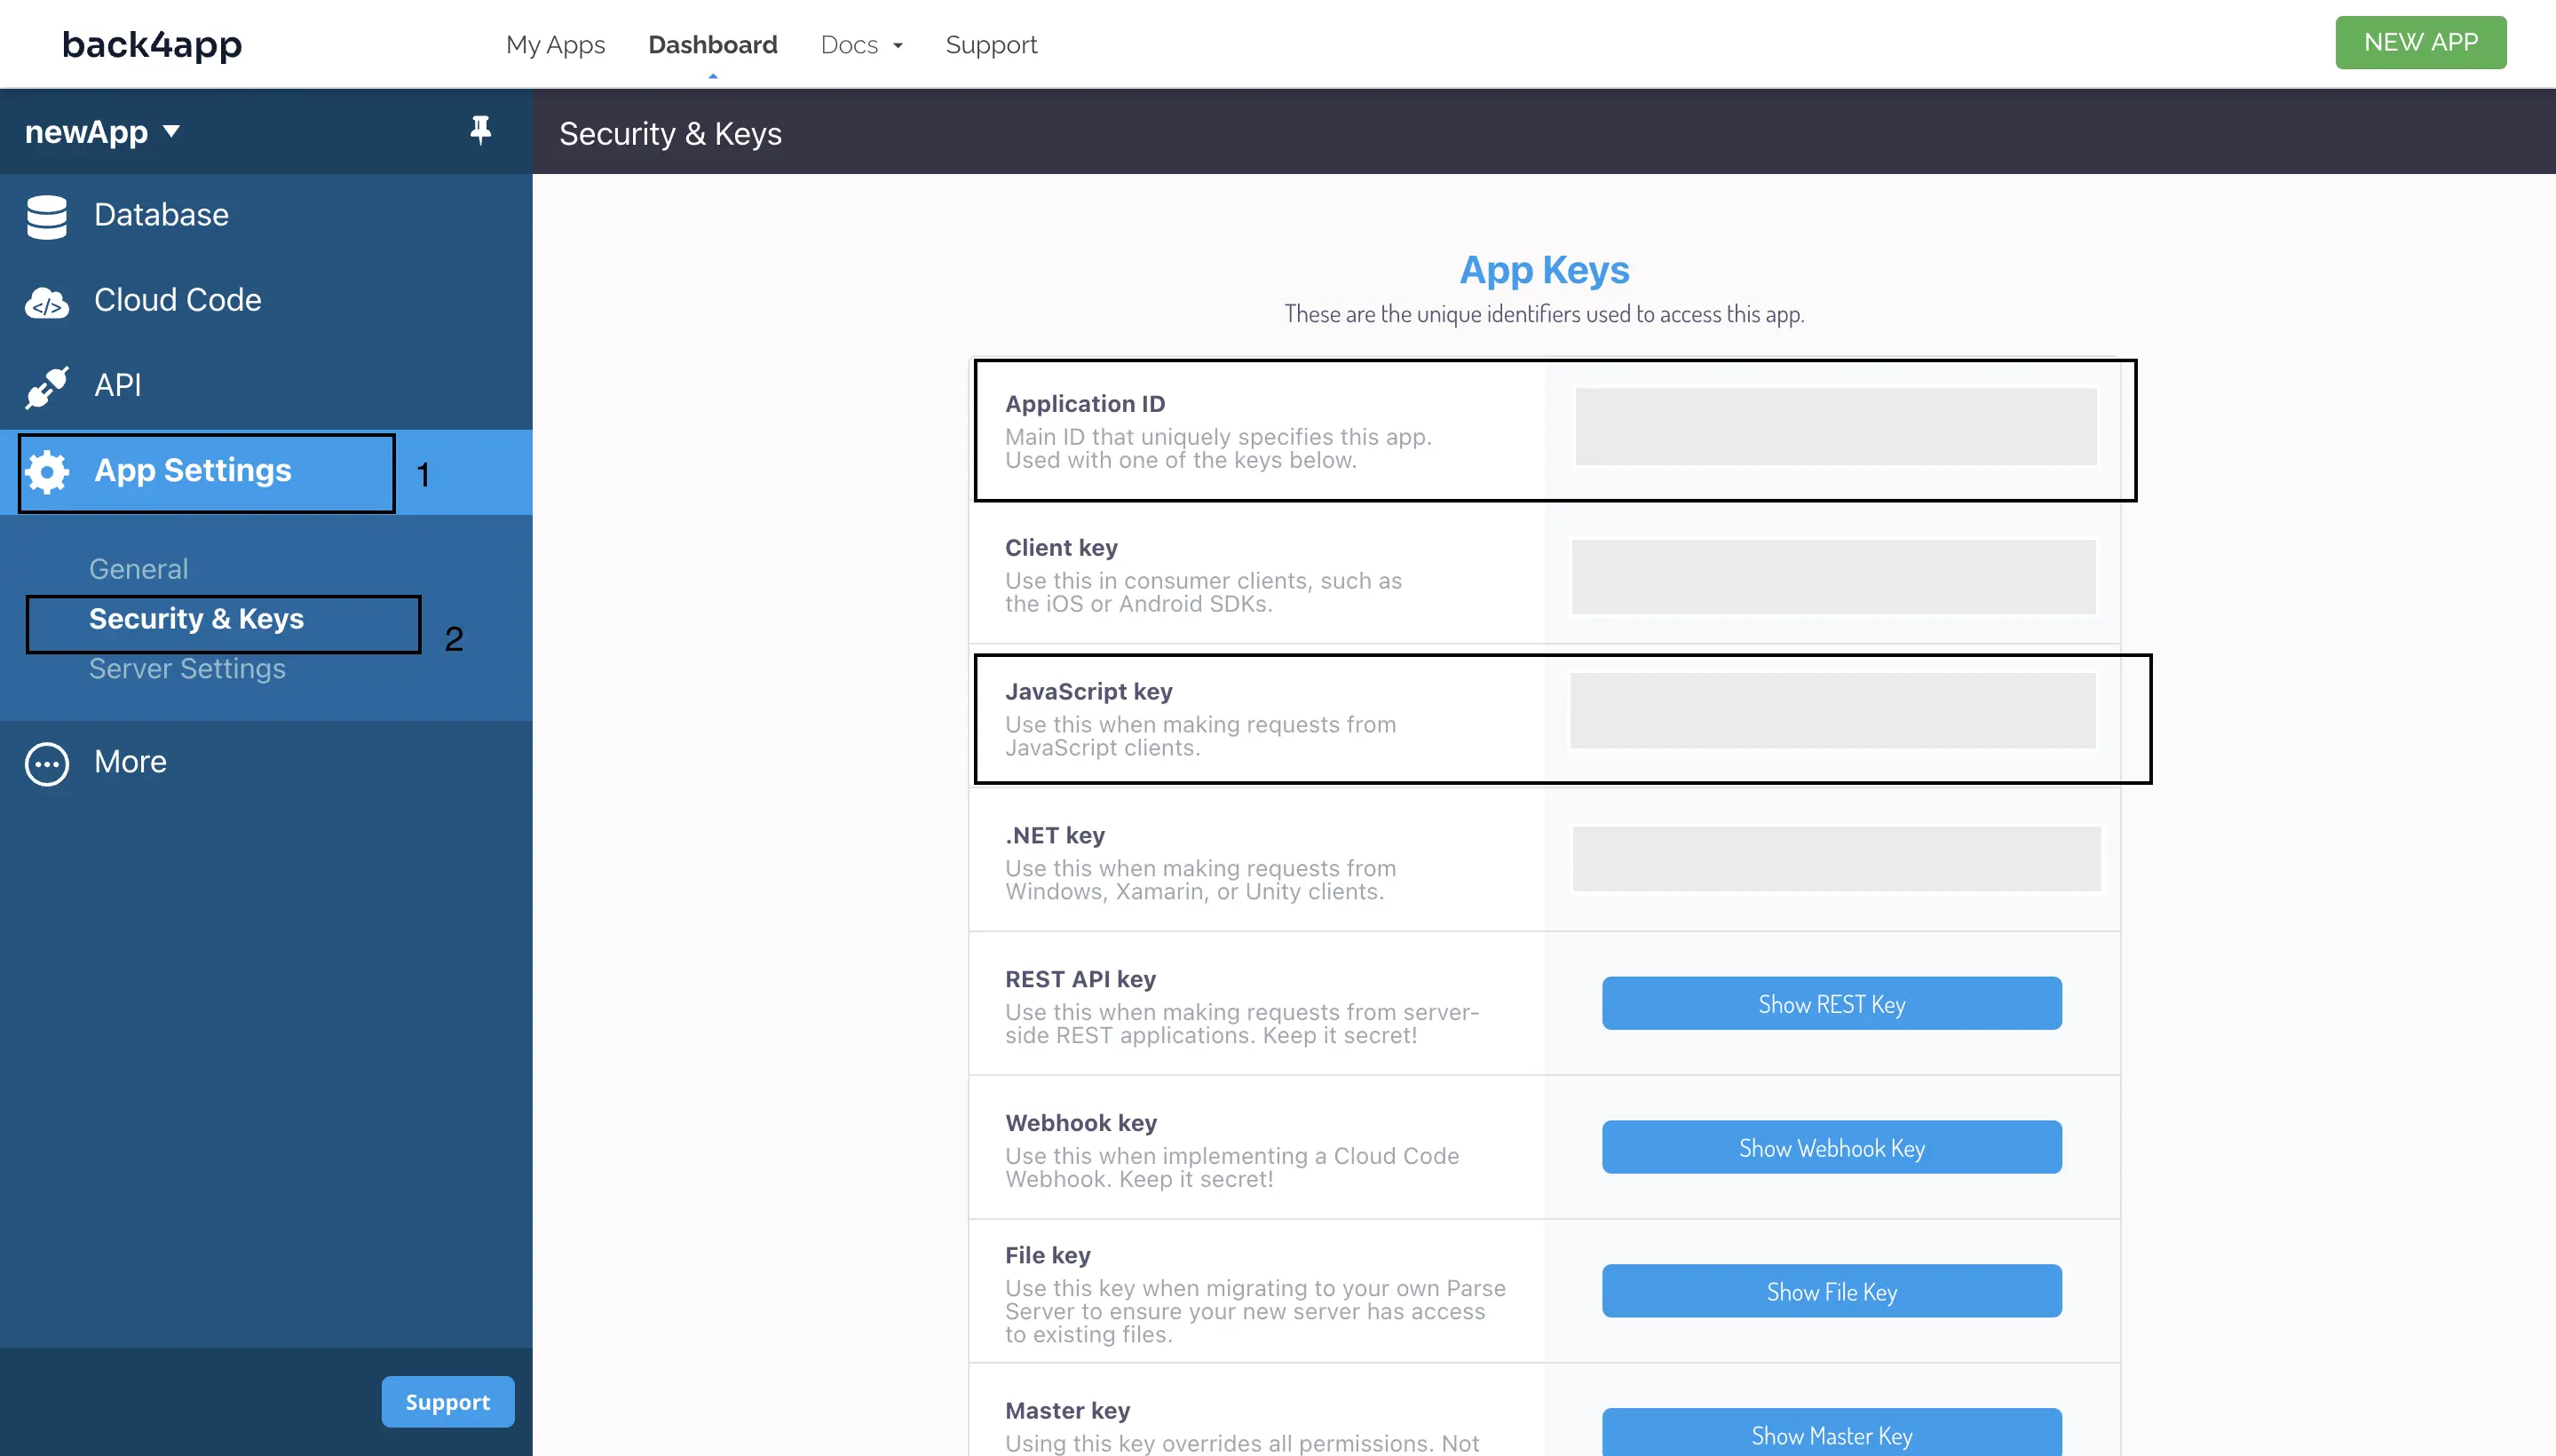
Next, you’ll need to configure the SDK using two of your Back4app application’s credentials, Application ID and Javascript KEY.
Select App Settings on your Back4app app’s dashboard to retrieve these credentials, then select Security & Keys. This will take you to a page with various App keys. Copy the Application ID and Javascript KEY, and store them securely.
Next, import the minified version of Parse from parse in your react application’s entry file (app.js).
Like so:
//app.js
import Parse from "parse/dist/parse.min.js";
Next, call the initialize method on Parse. This method takes your Application ID and Javascript KEY as arguments.
For example:
//app.js
Parse.initialize(APPLICATION_ID, JAVASCRIPT_KEY);
Calling the initialize method and passing your Application ID and Javascript KEY as arguments will initialize the parse SDK.
Next, set the serverURL property on Parse to https://parseapi.back4app.com/.
For example:
Parse.serverURL = "<https://parseapi.back4app.com/>";
Your app has been initialized and can securely connect to Back4app.
Building the Todo App
In your app.js file, import useEffect and useState hook from react.
Like so:
import { useEffect, useState } from 'react';
The useEffect ****hook allows you to manage side effects in your components. It lets you perform side effects, such as data fetching or manually changing the DOM after a component has been rendered.
It takes two arguments, a function and an optional array of dependencies, that specify when the effect should be re-run.
The useState hook allows you to add “state” to your components. It lets you create a state variable and a function to update it and automatically re-renders the component whenever the state changes. It takes one argument, the initial state value.
Next, replace the existing code in the App function with the code block below:
const [todos, setTodos] = useState([]);
const [input, setInput] = useState('');
The code block above creates two state variables, todos and input, using useState. The todos variable is an array initialized as an empty array, and the input variable is a string initialized as an empty string. This allows you to keep track of a list of todos and any user input related to them.
Next, add the code block below to the App function:
useEffect(() => {
    fetchTodos();
  }, []);
The code uses the useEffect hook to fetch todos by calling a fetchTodos method (you will create this function later) when the component is first rendered.
As the second argument, the empty array ensures that the effect only runs once when the component is rendered.
Next, you will create a fetchTodos function. This function will contain the logic that fetches todo data from Back4app.
Add the code block below to your App function:
const fetchTodos = async () => {
    try {
      const query = new Parse.Query("Todo");
      const results = await query.find();
      const todos = results.map((result) => {
        return {
          id: result.id,
          task: result.get("task"),
          completed: result.get("completed"),
        };
      });
      setTodos(todos);
    } catch (error) {
      console.log(error);
    }
  };
The code block above searches for a “Todo” object from your Back4app app’s database using the Parse.Query() method.
Then it returns an array containing the “results” of the query by calling the Parse SDK’s find method on the result of the Parse.Query() call.
Finally, it maps the returned array to an array of objects containing each result’s id, task, and completed properties and sets the todos variable to this array of objects.
Next, create an addTodo function. This function will contain the logic for adding a new todo to your Back4app app’s database.
Add the code block below to your App function:
const addTodo = async () => {
    try {
      if (input.trim() !== "") {
        const Todo = Parse.Object.extend("Todo");
        const todo = new Todo();
        todo.set("task", input);
        todo.set("completed", false);
        await todo.save();
        setTodos([...todos, { id: todo.id, task: input, completed: false }]);
        setInput("");
      }
    } catch (error) {
      console.log(error);
    }
  };
The code block above checks whether an input value is empty or contains only whitespace. If the input value is not empty, it creates a new Parse Todo object, sets its task property to the value of the input, sets its completed property to false, and saves it to the Parse server using the **a**wait todo.save() statement.
Then, it updates the component’s state with the new todo item by calling the setTodos function with a new array that includes the previous state (todos) and a new object representing the new todo item.
The new todo item is defined as an object with three properties: id (the ID of the saved Todo object), task (the value of the input), and completed (which is set to false by default). Finally, the setInput function is called to clear the input field and set its value to an empty string.
Next, you will create a toggleComplete function. This function will contain the logic for toggling tasks between completed and uncompleted based on a given ID.
Add the code block below to your App function:
const toggleComplete = async (id) => {
    try {
      const Todo = Parse.Object.extend("Todo");
      const todo = new Todo();
      todo.id = id;
      todo.set("completed", !todos.find((todo) => todo.id === id).completed);
      await todo.save();
      setTodos(
        todos.map((todo) =>
          todo.id === id ? { ...todo, completed: !todo.completed } : todo
        )
      );
    } catch (error) {
      console.log(error);
    }
  };
The code block above creates a new Todo object using the Parse.Object.extend ****method. Then, it sets the id property of the Todo object to the id parameter passed to the function.
Next, it sets the completed property of the Todo object to the opposite of its current value, using the ! operator and the todos.find method to look up the current status of the todo item with the given ID. Then, it saves the updated Todo object to Back4app using the await todo.save() statement.
After the Todo object has been saved, the function updates the component’s state using the setTodos function, called with a new array created using the todos.map method.
The todos.map method creates a new array by mapping over the existing todos array and replacing the todo item with the given id with a new object with the same properties as the original todo item but with the completed property set to the opposite of its previous value.
Next, you will create a deleteTodo function. This function will contain the logic for deleting tasks from your Back4app app’s database based on a given ID.
Add the code block below to your App function:
const deleteTodo = async (id) => {
    try {
      const Todo = Parse.Object.extend("Todo");
      const todo = new Todo();
      todo.id = id;
      await todo.destroy();
      setTodos(todos.filter((todo) => todo.id !== id));
    } catch (error) {
      console.log(error);
    }
  };
The code block above creates a new Todo object using the Parse.Object.extend method. Then, it sets the id property of the Todo object to the id parameter passed to the function.
Next, it calls the asynchronous destroy method of the Todo object to delete the todo item with the given ID from Back4app.
After the todo item has been deleted from the Back4app, it updates the component’s state using the setTodos function.
The setTodos function is called with a new array created using the todos.filter method. The todos.filter method creates a new array by filtering out the todo item with the given id. This is accomplished using the !== operator and the id parameter passed to the deleteTodo function.
Next, import the Container, Form, Button, and ListGroup elements from react-bootstrap. You will need these elements to create the JSX markup for your todo application.
Like so:
import { Container, Form, Button, ListGroup } from "react-bootstrap";
Next, add the code block below to the end of your App function:
return (
    <Container className="mt-4">
      <h1 className="header">Todo App</h1>
      <Form className="form">
        <Form.Control
          type="text"
          placeholder="Add a new todo..."
          value={input}
          onChange={(e) => setInput(e.target.value)}
        />
        <Button variant="primary" className="add-button" onClick={addTodo}>
          Add
        </Button>
      </Form>
      <ListGroup className="list">
        {todos.map((todo) => (
          <ListGroup.Item key={todo.id} className="d-flex align-items-center">
            <div className="task">
              <Form.Check
                type="checkbox"
                checked={todo.completed}
                onChange={() => toggleComplete(todo.id)}
              />
              <div
                className={`flex-grow-1 ${
                  todo.completed ? "text-decoration-line-through" : ""
                }`}
              >
                {todo.task}
              </div>
            </div>
            <Button
              variant="danger"
              className="del-button"
              onClick={() => deleteTodo(todo.id)}
            >
              Delete
            </Button>
          </ListGroup.Item>
        ))}
      </ListGroup>
    </Container>
  );
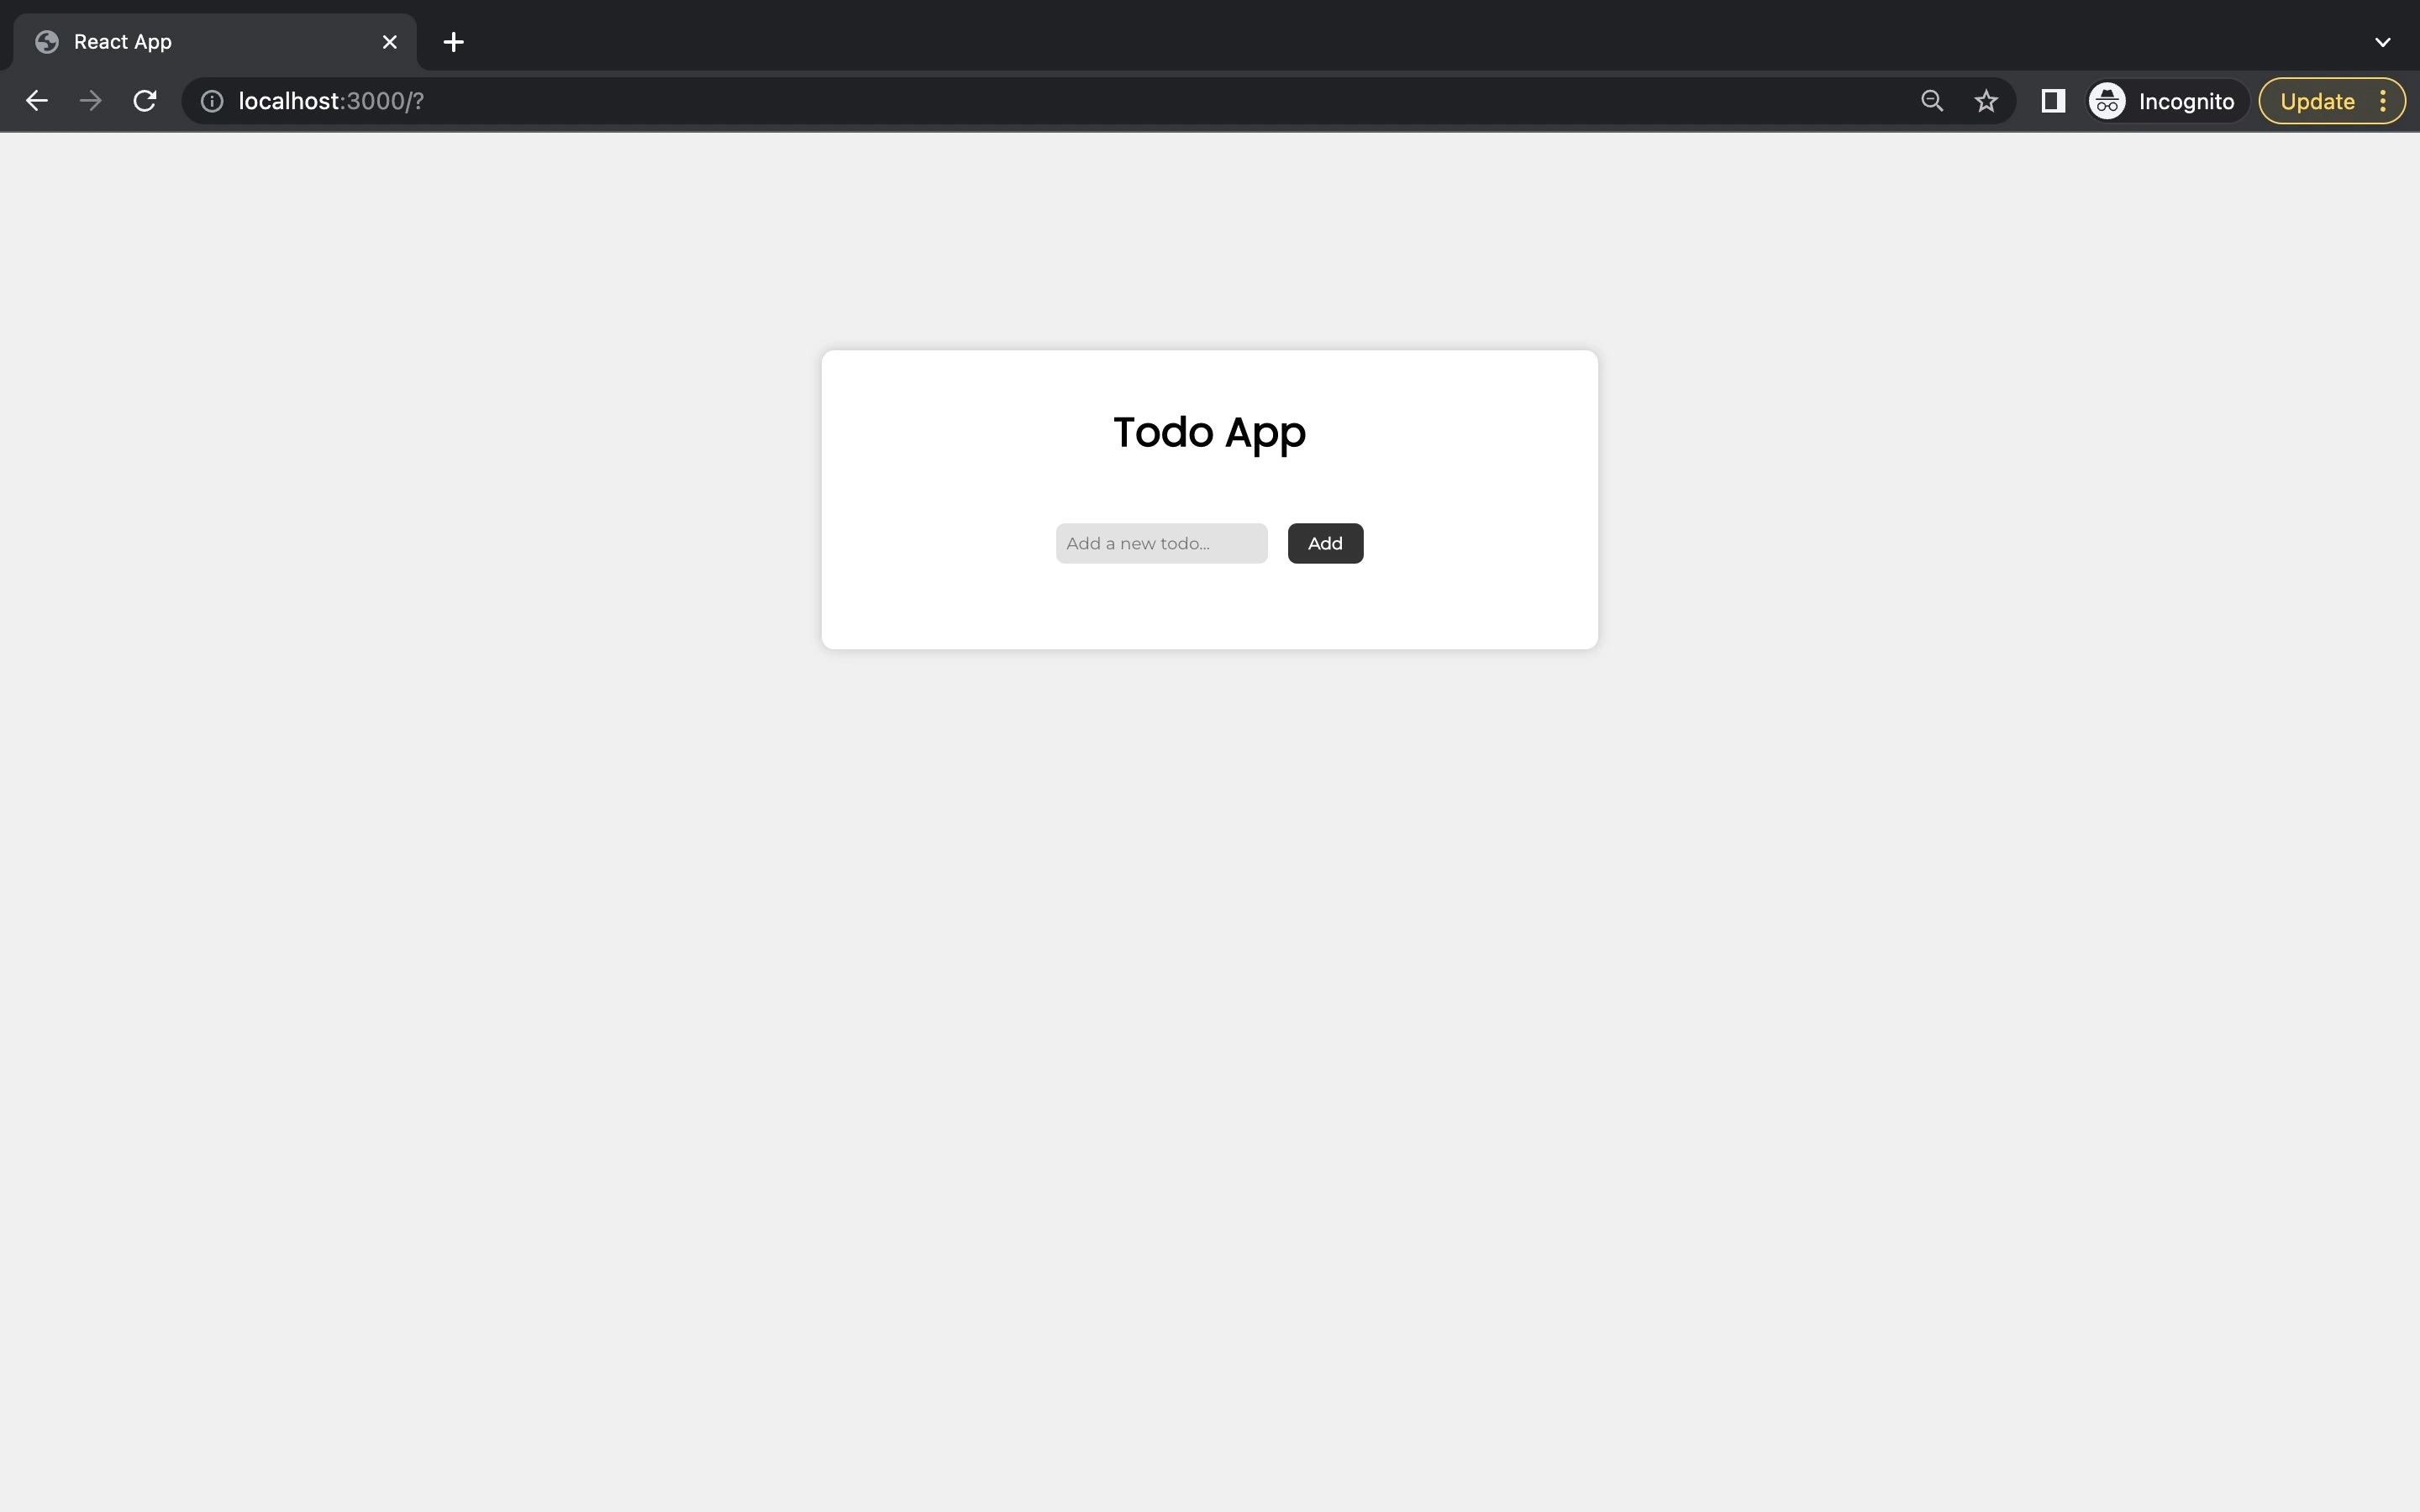
The code block above renders a simple Todo application using the **r**eact-bootstrap library. The component returns a Container element that contains a Form and a ListGroup element. Inside the Form element, there is a Form.Control element that allows the user to input a new todo item.
The value attribute is set to the input variable, which is a piece of component state. When the user types in the input field, the onChange event handler updates the input state with the new value.
Next to the Form.Control, there is a Button element that triggers the addTodo function when clicked.
Inside the ListGroup element, there is a .map method that loops through the todos array and renders a ListGroup.Item for each todo item.
Each ListGroup.Item contains a Form.Check element that allows the user to mark a todo item as completed by clicking on the checkbox.
The checked attribute is set to the completed property of the corresponding todo item. When the user clicks on the checkbox, the onChange event handler calls the toggleComplete function with the id of the corresponding todo item.
Next to the Form.Check element. There is a div that displays the task text of the corresponding todo item. The className attribute is set to flex-grow-1 to make the text fill up the remaining space.
Finally, a Button element with a “Delete” label triggers the deleteTodo function when clicked. The onClick event handler passes the id of the corresponding todo item to the deleteTodo function.
Styling the Todo App
Navigate to your App.css file and replace the existing code with the code block below.
@import url('<https://fonts.googleapis.com/css2?family=Montserrat&display=swap>');
@import url('<https://fonts.googleapis.com/css2?family=Poppins&display=swap>');

body {
  background-color: #f0f0f0;
  font-family: 'Montserrat', sans-serif;
}

input{
  padding: 0.5rem;
  border: none;
  background-color: #e2e2e2;
  color: #333333;
  font-family: 'Montserrat', sans-serif;
  border-radius: 7px;
}

.container {
  max-width: 30%;
  margin: 0 auto;
  margin-block-start: 9%;
  margin-block-end: 9%;
  background-color: #fff;
  padding: 20px;
  border-radius: 10px;
  box-shadow: 0 0 10px rgba(0, 0, 0, 0.2);
}

.header{
  text-align: center;
  margin-block-end: 3rem;
  font-family: 'Poppins', sans-serif;
}

.list-group-item {
  border: none;
  border-radius: 10px;
  margin-bottom: 10px;
  padding: 10px 15px;
  transition: all 0.3s ease;
}

.list-group-item:hover {
  background-color: #f8f8f8;
}

.text-decoration-line-through {
  text-decoration: line-through;
}

.add-button{
  border: none;
  padding: 0.5rem 1rem;
  color: #FFFFFF;
  font-family: 'Montserrat', sans-serif;
  background-color: #333333;
  border-radius: 7px;
  font-weight: bold;
}

.list{
  display: flex;
  flex-direction: column;
  gap: 2rem;
  margin-block-start: 3rem;
}

.form{
  display: flex;
  justify-content: center;
  gap: 1rem;
  margin-block-end: 2rem;
}

.task{
  display: flex;
  gap: 0.5rem;
}

.del-button{
  padding: 0.5rem 1rem;
  margin-block-start: 1rem;
  background-color: #FFFFFF;
  color: #333333;
  border-radius: 12px;
  border: none;
  font-weight: bold;
  font-family: 'Montserrat', sans-serif;
}

.del-button:hover{
  color: #FFFFFF;
  background-color: #333333;
}
Finally, start up your project by running the command below:
npm run start
Your finished application should look like the image below:
You can find the finished project in this GitHub repository.
Conclusion
React, a popular JavaScript library provides a powerful and flexible platform for building complex user interfaces with reusable components.
It also enables developers to efficiently manage the application state and update the UI in response to changes in data or user interactions.
When it comes to deploying a React app, Back4app provides a comprehensive backend solution that simplifies the process of deploying and managing your application.
With its built-in cloud infrastructure, scalable database, and real-time data synchronization, Back4app offers developers a reliable and efficient platform for deploying their React apps.
FAQ
What is React?
React is an open-source frontend JavaScript library for building user interfaces (UI). It was developed by Meta (previously known as Facebook) and released in 2013. React uses a virtual DOM (Document Object Model) to track changes and efficiently update the view of the application.
What are the Advantages of React?
React has several advantages, including reusability, server-side rendering (SSR), a large and active community of developers, and support for mobile development through React Native.
What are the Limitations of React?
React has some limitations, including a complex and steep learning curve and large bundle sizes that can increase initial loading time.
How can I deploy my React app?
There are multiple ways to deploy a React app, including static hosting, PaaS services like Vercel or Heroku, and BaaS services like Back4app or Firebase.
What is Back4app?
Back4app is a cloud platform that enables developers to create and host web applications. It provides an intuitive interface for managing web applications, a database for storing data, and compatibility with several programming languages. It also offers a range of tools for creating and testing web applications, such as a command line interface, SDKs, performance optimization tools, analytics, monitoring, and a built-in system for user authentication and authorization.
How can I deploy my React app on Back4app?
To deploy your React app on Back4app, you need to create a new Back4app app and retrieve your Application ID and Javascript KEY, install the Parse JavaScript SDK, and configure the Parse SDK with your Application ID and Javascript KEY. Then, implement the logic for interacting with Back4app through your React app, such as functionality for adding, updating, and deleting todos in your React app, as discussed in the article above.


