How to Deploy a Rust Application?
Rust has been the most admired language in the StackOverflow developer survey for more than 4 years due to the multiple features it offers adopters.
Mozilla created Rust to be reliable, performant, and developer-friendly. Rust has a similar syntax to languages like C++ and C whose developers are the language’s main target.
Rust also focuses on memory safety and concurrency with models that avoid the associated pitfalls that developers using other languages face.
You’ll learn how to build APIs in Rust to harness the benefits from this article. You’ll learn by crafting, containerizing, and deploying a Rust application on Back4app’s free containerization service.
Contents
- 0.1 Advantages of Using Rust
- 0.2 Limitations of Using Rust
- 0.3 Rust Deployment Options
- 0.4 The Rust Application Deployment Process
- 1 What Is Back4app?
- 1.1 Building and Deploying
- 1.2 The POST Handler Function
- 1.3 The GET Handler Function
- 1.4 The PUT Handler Function
- 1.5 The DELETE Handler Function
- 1.6 Mapping the Handler Functions to Routes
- 1.7 Containerizing Rust apps with Docker
- 1.8 Deploying a Container on Back4app
- 1.9 Deploying With The Back4app AI Agent
- 1.10 Conclusion
Advantages of Using Rust
There are many advantages you stand to garner from using Rust in your projects. Here are some of the important ones:
Zero-Cost Abstractions
Rust provides high-level abstractions without imposing additional runtime costs. This insinuates that the abstractions you use in your code (functions, iterators, or generics) do not make your programs slower.
The Rust compiler optimizes the abstractions for compiled low-level code manually. Rust bridges the gap between expressive, low-level, fine-grained control over performance.
The Fearless Concurrency Approach for Memory Safety in Concurrent Programs
Rust takes a “fearless approach” to concurrency characterized by safety and efficiency. Rust’s concurrency model leverages it’s ownership model and type checking to prevent data races at compile time.
This feature enables you to write multi-threaded apps without the drawbacks of shared state concurrency, like deadlocks and race conditions.
Advanced Type System and Ownership Model
Rust’s type system and its ownership rules are unique features that help enforce memory safety.
The ownership model uses the borrow checker to ensure that each piece of data has a single owner and manages its life cycle to prevent issues like dangling pointers and memory leaks.
Cross-Platform Compatibility and Integration
Rust is a great choice if you’re looking to build cross-platform applications. You can write code once and compile it on multiple platforms without significant changes to the existing codebase.
Rust integrates well with other programming languages, especially C, making the language suitable for web assembly and embedded system tasks.
Limitations of Using Rust
You’re bound to encounter some setbacks while building production-grade apps with Rust.
Some of these may include Rust’s steep learning curve, the longer compilation time due to memory and other checks, and its new, small ecosystem.
There are some drawbacks you may encounter while building production-grade products with Rust. Here are some of them:
The Learning Curve for Rust Programming is Steep
Compared to other popular languages (Go, Python, JavaScript etc.), It takes significant time to master Rust and build production-grade applications with the language.
This shouldn’t make you shy away from using Rust. On mastering Rust, you will get really productive building and deploying apps, and you get all the benefits of using Rust.
Rust Programs have Long Compilation Time
The memory and concurrency checks at compile time, coupled with several other factors, result in long compilation times for Rust programs.
Depending on the size of the application, long compilation times may result in bottlenecks in the development or production stages.
Rust has a Smaller Ecosystem of Libraries
Rust is relatively new compared to many other popular languages, and there’s a limited ecosystem of libraries that you can use.
Many libraries (crates) are still in production, and you can check out websites like AreWeWebYet for an overview of production-ready crates that you can use to build web apps in Rust.
Rust Deployment Options
Rust is already gaining wide adoption, so there are many deployment options you can choose from for your apps.
Most of the Rust deployment options are IaaS or CaaS-based platforms. You can choose one based on your project specifications.
Infrastructure as a Service (IaaS) like AWS
Infrastructure as a Service (IaaS) providers provide you with the infrastructure for deploying and managing your apps running on virtual machines on the cloud.
You can use the services that IaaS platforms provide to deploy your Rust apps on virtual machines running operating systems like Linux, Windows, macOS, and other Rust-supported operating systems.
Here’s a list of popular IaaS platforms:
- Amazon Web Services
- Digital Ocean
- Google Cloud
- Linode
- Microsoft Azure
Containerization as a Service Like Back4app Containers
Containerization services (CaaS) providers help you facilitate your app’s deployment with containerization technologies.
In order to deploy your application on platforms that support containerization, you will bundle your application and all of its dependencies into an isolated container.
Containers are isolated and portable, but you’ll have to work within the confines of the features of the CaaS provider.
Some IaaS providers provide CaaS functions. Also, there are platforms that provide only flexible CaaS functionality in isolation.
Here’s a list of some CaaS platforms:
- Oracle Container Service
- Back4app
- Mirantix
- Docker Enterprise
The Rust Application Deployment Process
In this section, you’ll learn how you can deploy your Rust app to Back4app’s CaaS platform.
What Is Back4app?
Back4app is a cloud platform you can leverage to create and deploy all types of backend services for your mobile, web, and other application types.
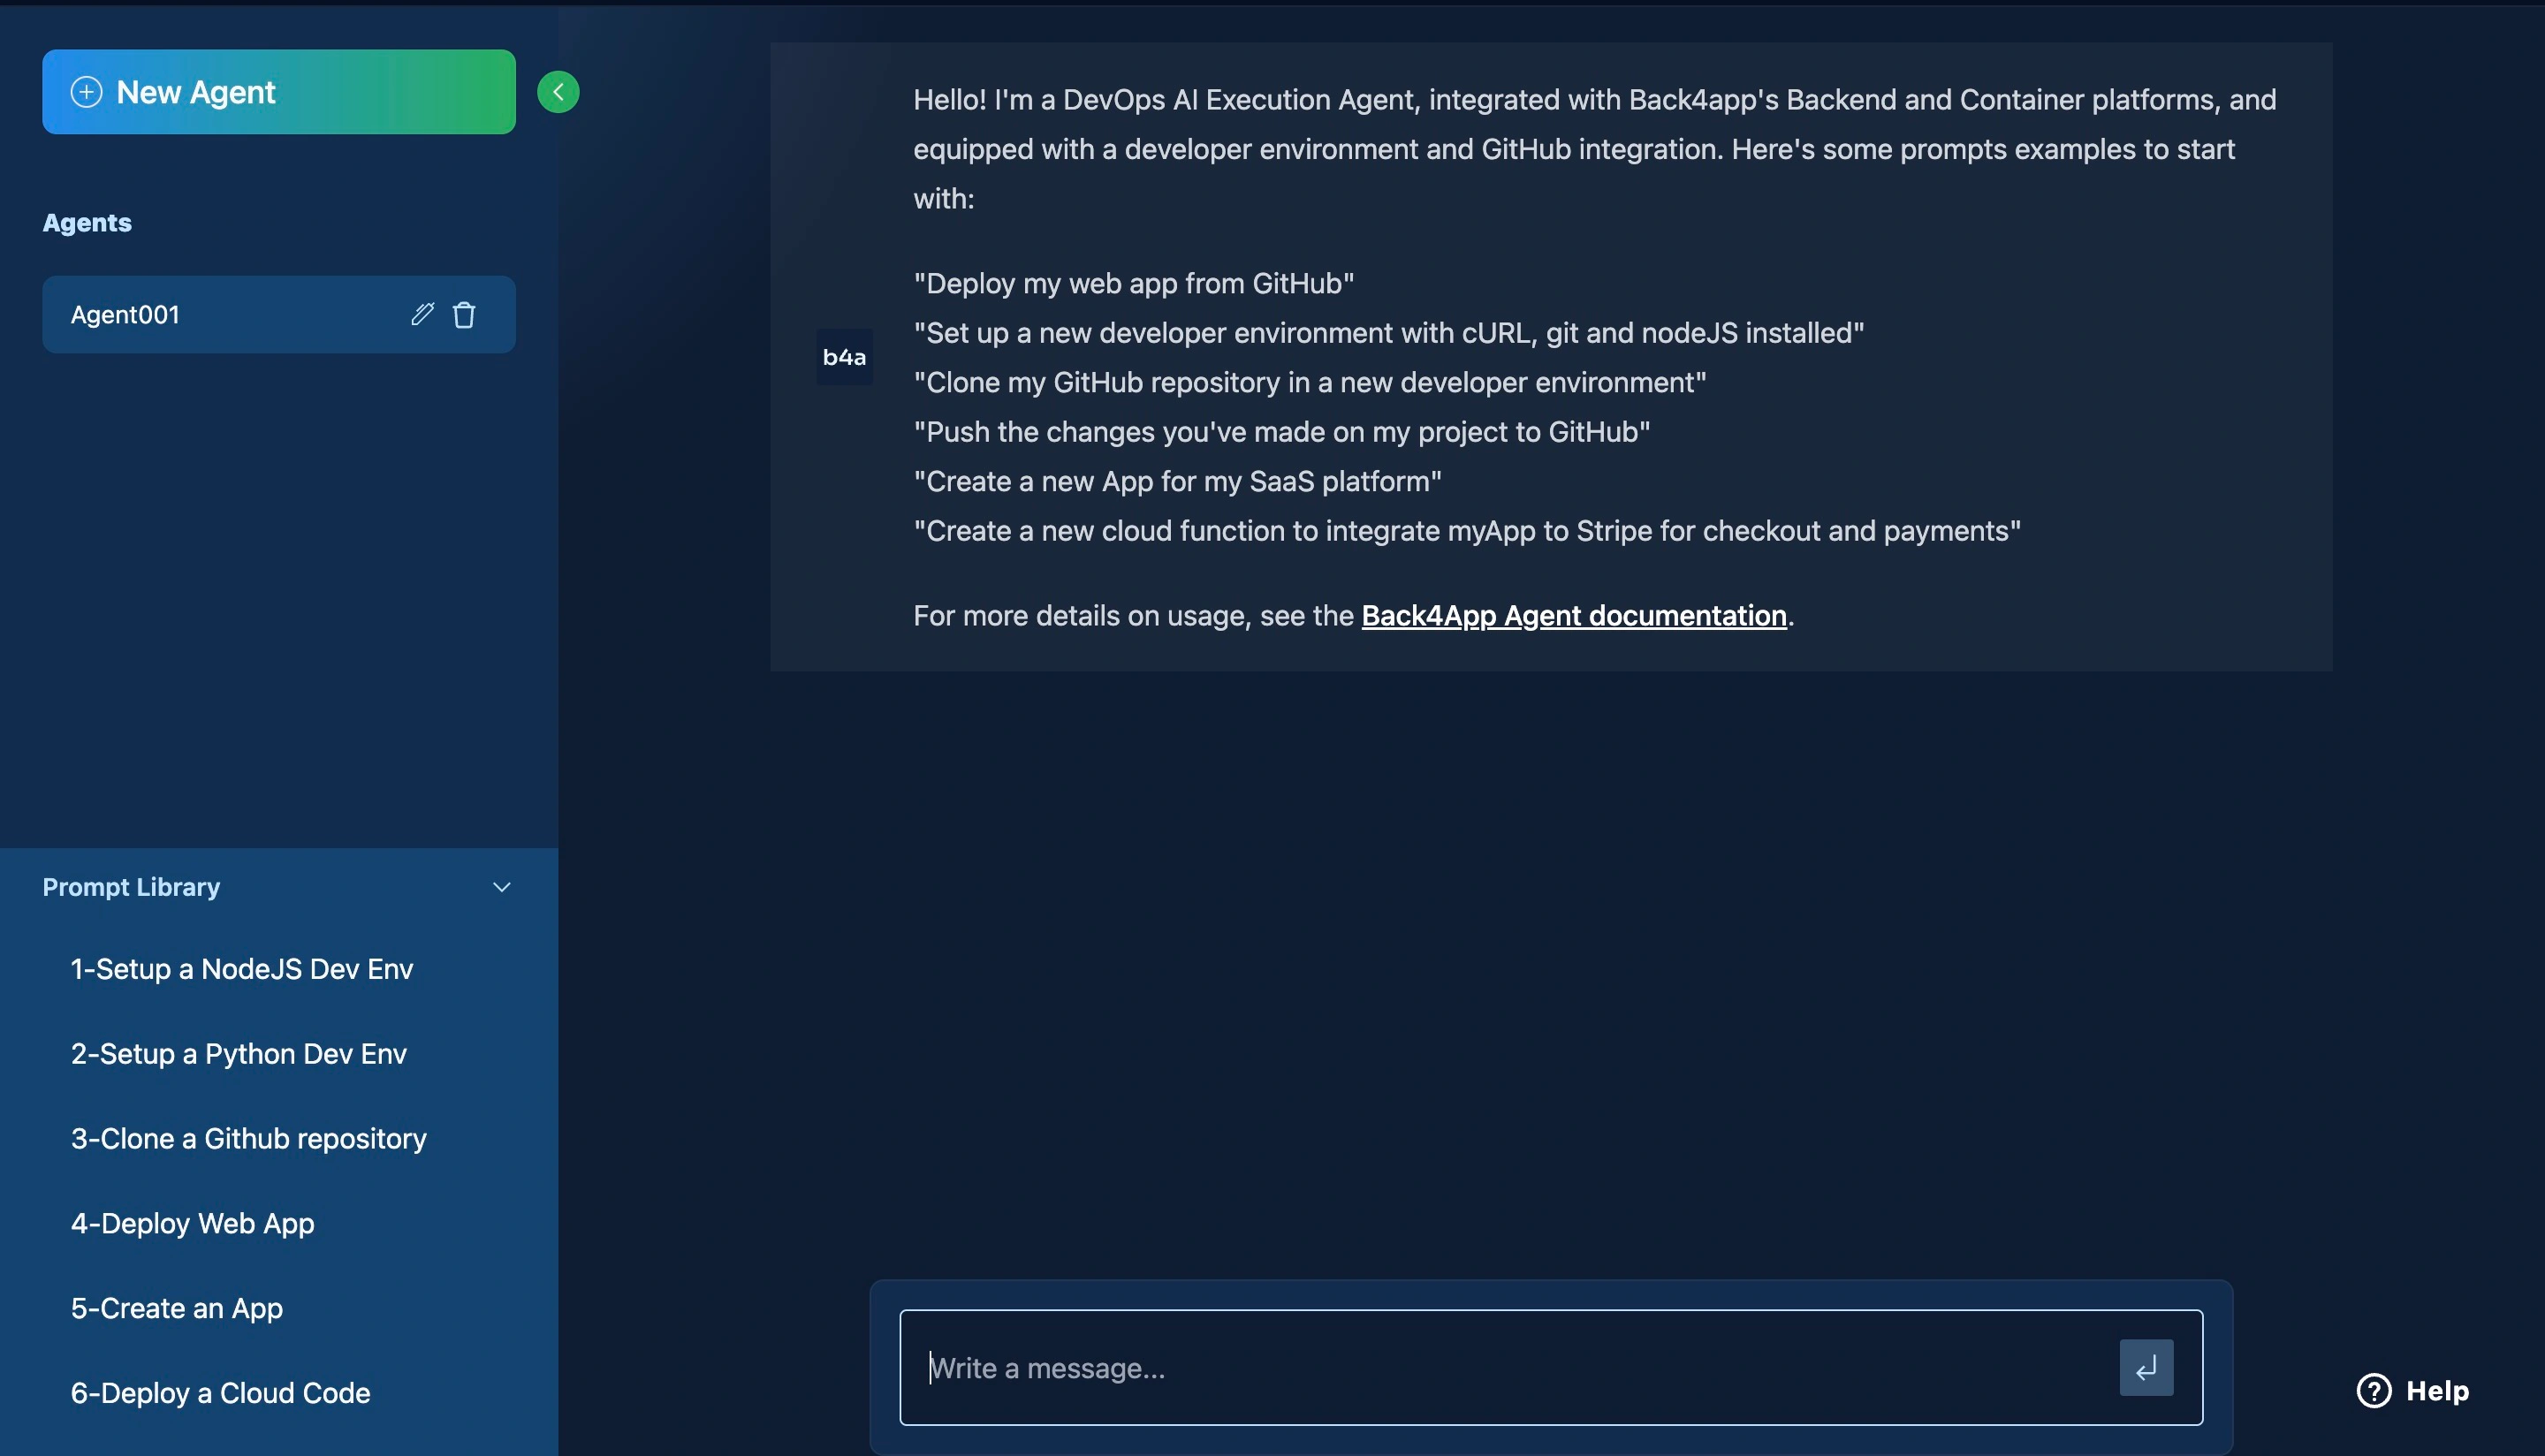
Back4app provides an AI agent that you can use to streamline your app’s deployment on the platform. You can use it to manage your GitHub repositories, deploy code on the cloud easily, and manage your running apps.
On Back4app’s backend servers, custom containers can be deployed and run via the CaaS functionality.
Using your container images, you can extend your app’s logic without worrying about maintaining your server architecture.
Building and Deploying
You must have Rust installed on your computer to follow this tutorial. You can visit the Rust installations page for the different installation options available.
Once you’ve installed Rust, create a terminal session and execute this command to initialize a new Rust project
mkdir back4app-rust-deployment && cd back4app-rust-deployment && cargo init
When you run the command, you should see a cargo.toml file in the new directory you just created. You’ll use the cargo.toml to manage dependencies.
Next, add these directives to the [dependencies] section of your Cargo.toml file to install these dependencies when you build your app.
[dependencies]
actix-web = "4.0"
serde = { version = "1.0", features = ["derive"] }
serde_derive = { version = "1.0" }
serde_json = "1.0"
lazy_static = "1.4"
The actix-web crate provides routing and other HTTP-related functions, the serde, serde_derive, and serde_json crates provide functions for the different JSON operations and the lazy_static crate provides the in-memory data storage for the API in runtime.
Add these imports at the top of your [main.rs](<http://main.rs>) file:
use serde::{Serialize, Deserialize};
use actix_web::{web, App, HttpServer, HttpResponse, Error};
use std::sync::Mutex;
extern crate lazy_static;
use lazy_static::lazy_static;
You can use a struct to define the data structure for your API based on the fields you need. Here’s a structure that depicts a person with an ID, username, and email.
#[derive(Serialize, Deserialize, Debug, Clone)]
pub struct Person {
    pub id: i32,
    pub username: String,
    pub email: String,
}
The #[derive(Serialize, Deserialize, Debug, Clone)] are implementations of the serde_derive crate for the Person struct to access and use its functions.
Here’s how you can use the lazy_static crate to set up an in-memory data store for your API based on the Person struct type:
lazy_static! {
    static ref DATA_STORE: Mutex<Vec<Person>> = Mutex::new(Vec::new());
}
You’ve created a lazily initialized, thread-safe shared storage for the People struct. You’ll use it in your handler functions to store and retrieve data.
The POST Handler Function
The POST request handler function accepts a JSON representation of the Person struct as your input. It will then return an HTTP response and an error to the client on request.
Add this code block to your [main.rs](<http://main.rs>) file to implement the POST request handler functionality.
async fn create_person(new_person: web::Json<Person>) -> Result<HttpResponse, Error> {
    let mut data_store = DATA_STORE.lock().unwrap();
    let new_id = data_store.len() as i32 + 1;
    let mut person = new_person.into_inner();
    person.id = new_id;
    data_store.push(person.clone());

    Ok(HttpResponse::Ok().json(person))
}
The create_person is an asynchronous function that accesses the shared data store, generates a new ID for the Person struct, converts the JSON representation Person to a struct, and pushes it into the data store.
Following a successful request, the function provides the client with the data that was entered into the database along with a 200 status code.
The GET Handler Function
Here a GET handler function demonstrates reading all the data in the data store and returning them to the client as JSON.
Add this code block to your project to implement a GET handler function
async fn get_people() -> Result<HttpResponse, Error> {
    let data_store = DATA_STORE.lock().unwrap();
    let people: Vec<Person> = data_store.clone();

    Ok(HttpResponse::Ok().json(people))
}
The get_people function is an asynchronous function that accesses the data store and writes the content to the client as a response.
On a successful request, the function responds with the 200 status code to the client with all the data in the data store.
The PUT Handler Function
Your PUT request handler function should update an entry in the data store based on a field of the object.
Here’s how you can implement a PUT handler function for your API:
async fn update_person(
    id: web::Path<i32>,
    person_update: web::Json<Person>,
) -> Result<HttpResponse, Error> {
    let mut data_store = DATA_STORE.lock().unwrap();

    if let Some(person) = data_store.iter_mut().find(|p| p.id == *id) {
        *person = person_update.into_inner();
        Ok(HttpResponse::Ok().json("Person updated successfully"))
    } else {
        Ok(HttpResponse::NotFound().json("Person not found"))
    }
}
The update_person function takes in the ID and the new entry from the request. It then traverses through the data store and replaces the entry with the new one if it exists.
The DELETE Handler Function
The DELETE request function will take one argument; the ID field from the made request. On function run it will delete the entry with the ID from the data store.
Add this implementation of the DELETE handler function to your program.
// DELETE
pub async fn delete_person(id: web::Path<i32>) -> Result<HttpResponse, Error> {
    let mut data_store = DATA_STORE.lock().unwrap();

    if let Some(index) = data_store.iter().position(|p| p.id == *id) {
        data_store.remove(index);
        Ok(HttpResponse::Ok().json("Deleted successfully"))
    } else {
        Ok(HttpResponse::NotFound().json("Person not found"))
    }
}
The delete_person function deletes the entry with the specified ID from the data store. Depending on the state of the operation, the function returns the client a string and a status code.
Mapping the Handler Functions to Routes
After defining the endpoints, you’d need to map routes to the handler functions for access to the handler functions functionality.
Here’s how you can assign routes to handler functions:
#[actix_web::main]
async fn main() -> std::io::Result<()> {
    HttpServer::new(|| {
        App::new()
            .route("/person", web::post().to(create_person))
            .route("/people", web::get().to(get_people))
            .route("/person/{id}", web::put().to(update_person))
            .route("/person/{id}", web::delete().to(delete_person))
    })
        .bind("0.0.0.0:8000")?
        .run()
        .await
}
The main function is an asynchronous function that sets up the server after mapping routes to handler functions.
The HttpServer::new function instantiates an HTTP server, the App::new() function creates a new app instance, and the route function maps routes to the handler function.
The bind function specifies the address for the new app, and the run function runs the app.
Containerizing Rust apps with Docker
Docker is the most popular containerization technology in the market. You can containerize your Rust apps with Docker for portability and deploy them to Back4app with a few clicks.
Execute this command to create a new Dockerfile in your project:
touch Dockerfile
Open the Dockerfile and add these build instructions to the Dockerfile:
# Use Rust Nightly as the base image
FROM rustlang/rust:nightly

# Set the working directory inside the container
WORKDIR /usr/src/myapp

# Copy the current directory contents into the container
COPY . .

# Build the application
RUN cargo build --release

# Expose port 8000
EXPOSE 8000

# Define the command to run the application
CMD ["./target/release/back4app-rust-deployment"]
These instructions specify the base image and build instructions for containerizing your Rust application with Docker.
Here’s a breakdown of the contents of the Dockerfile:
- The
FROM rustlang/rust:nightlydirective specifies the base image for the Dockerfile. Docker pulls this image from the repository and builds your programs on it. - The
WORKDIR /usr/src/myappdirective sets the working directory for your application inside the container. - The
COPY . .directive copies all the content of your working directory into the container’s current working directory. - The
RUN cargo build --releasedirective executes the command for building your application in the container. - The
EXPOSE 8000directive exposes port8000of the container for incoming requests. - The
CMD ["./target/release/back4app-rust-deployment"]runs the program (the executable from the build operation).
Once you’ve written the Dockerfile, you can proceed to deploy the container on Back4app’s container service.
Deploying a Container on Back4app
You need to create an account on Back4app to deploy containers.
Here are the steps for creating a Back4app account.
- Visit the Back4app website
- Click the Sign-up button on the top-right corner of the page.
- Complete the sign-up form and submit it to create the account.
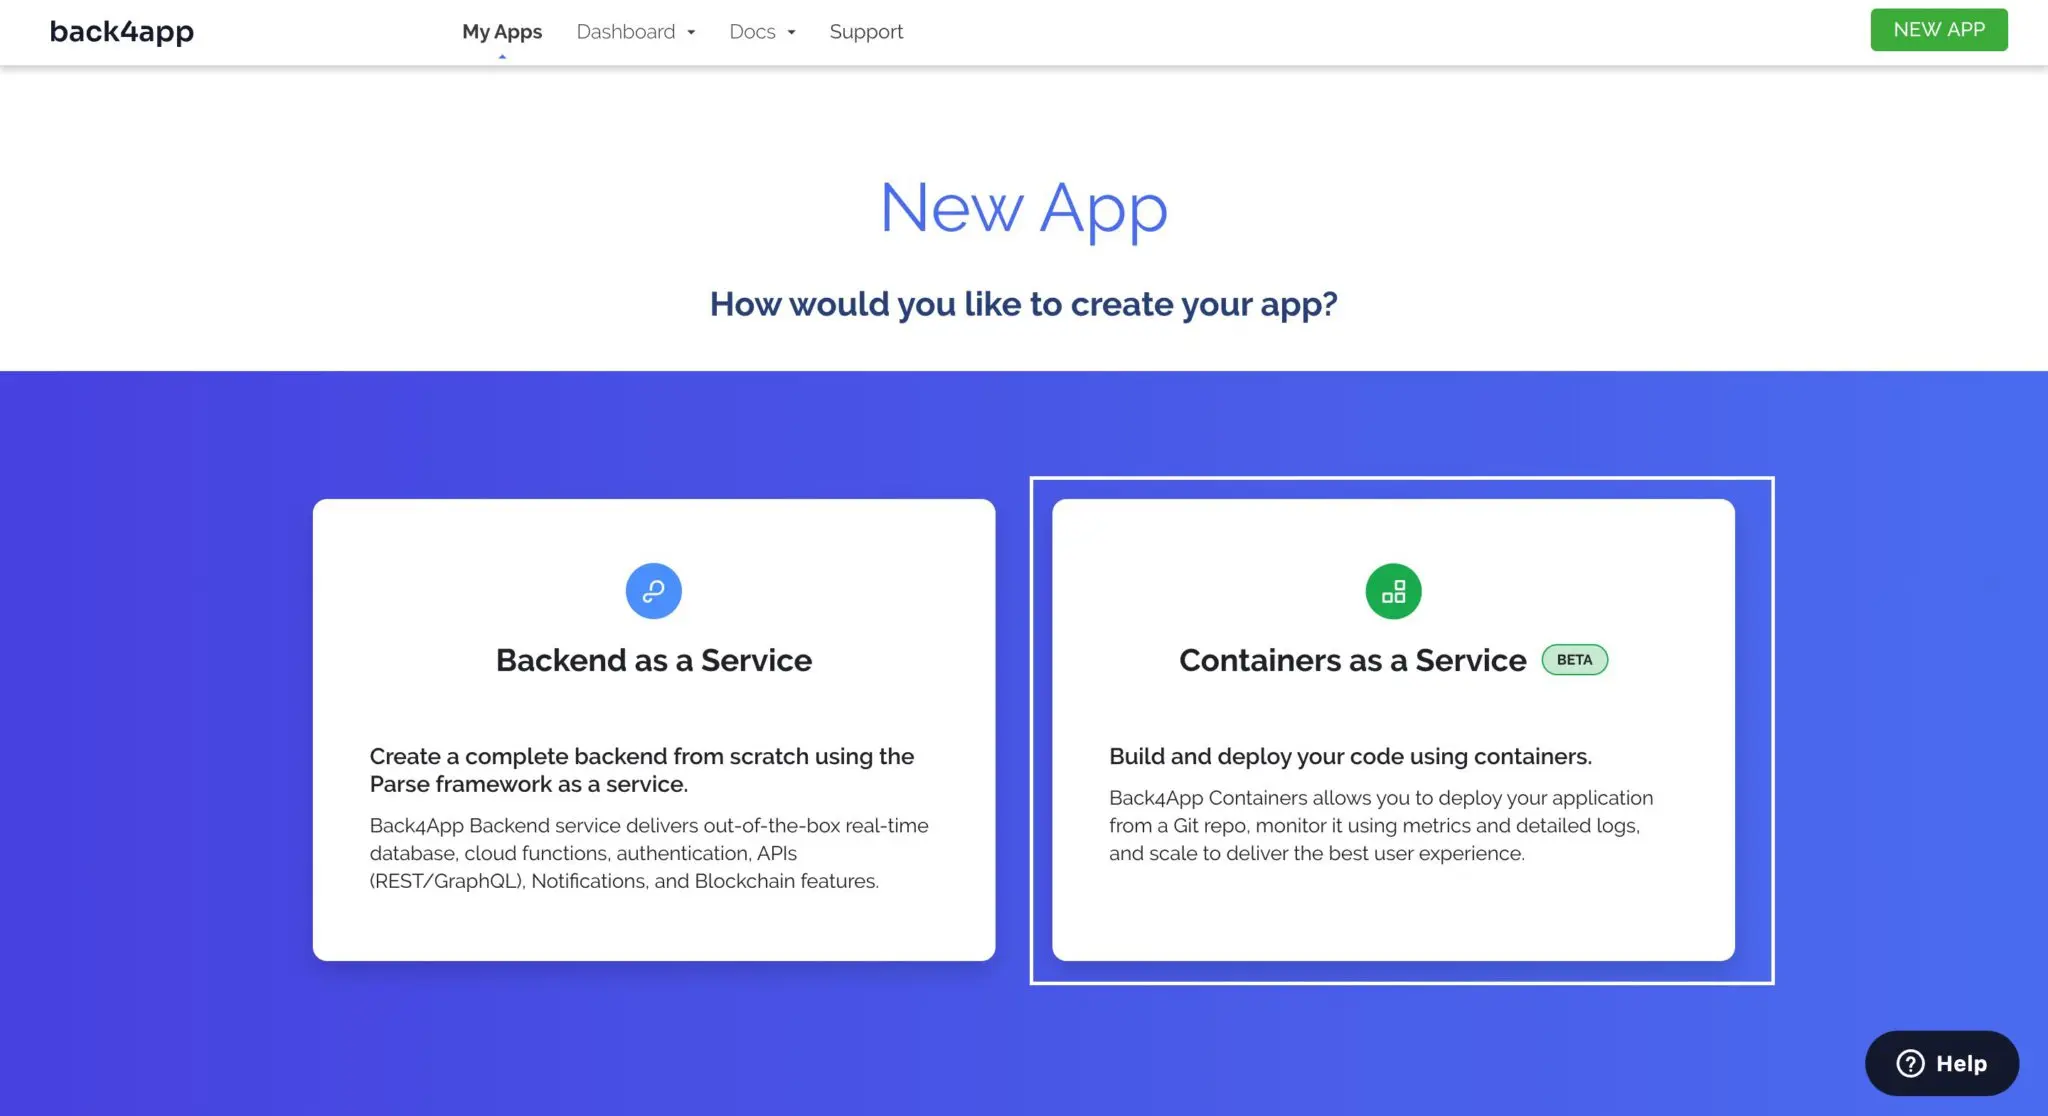
Now that you have successfully created a Back4app account, log in and click the NEW APP button located at the top right corner of the landing page.
You will be presented with options to choose how you want to build your app. Choose the Container as a Service option.
Now, connect your Github account to your Back4app account and configure access to the repositories in your account or a specific project.
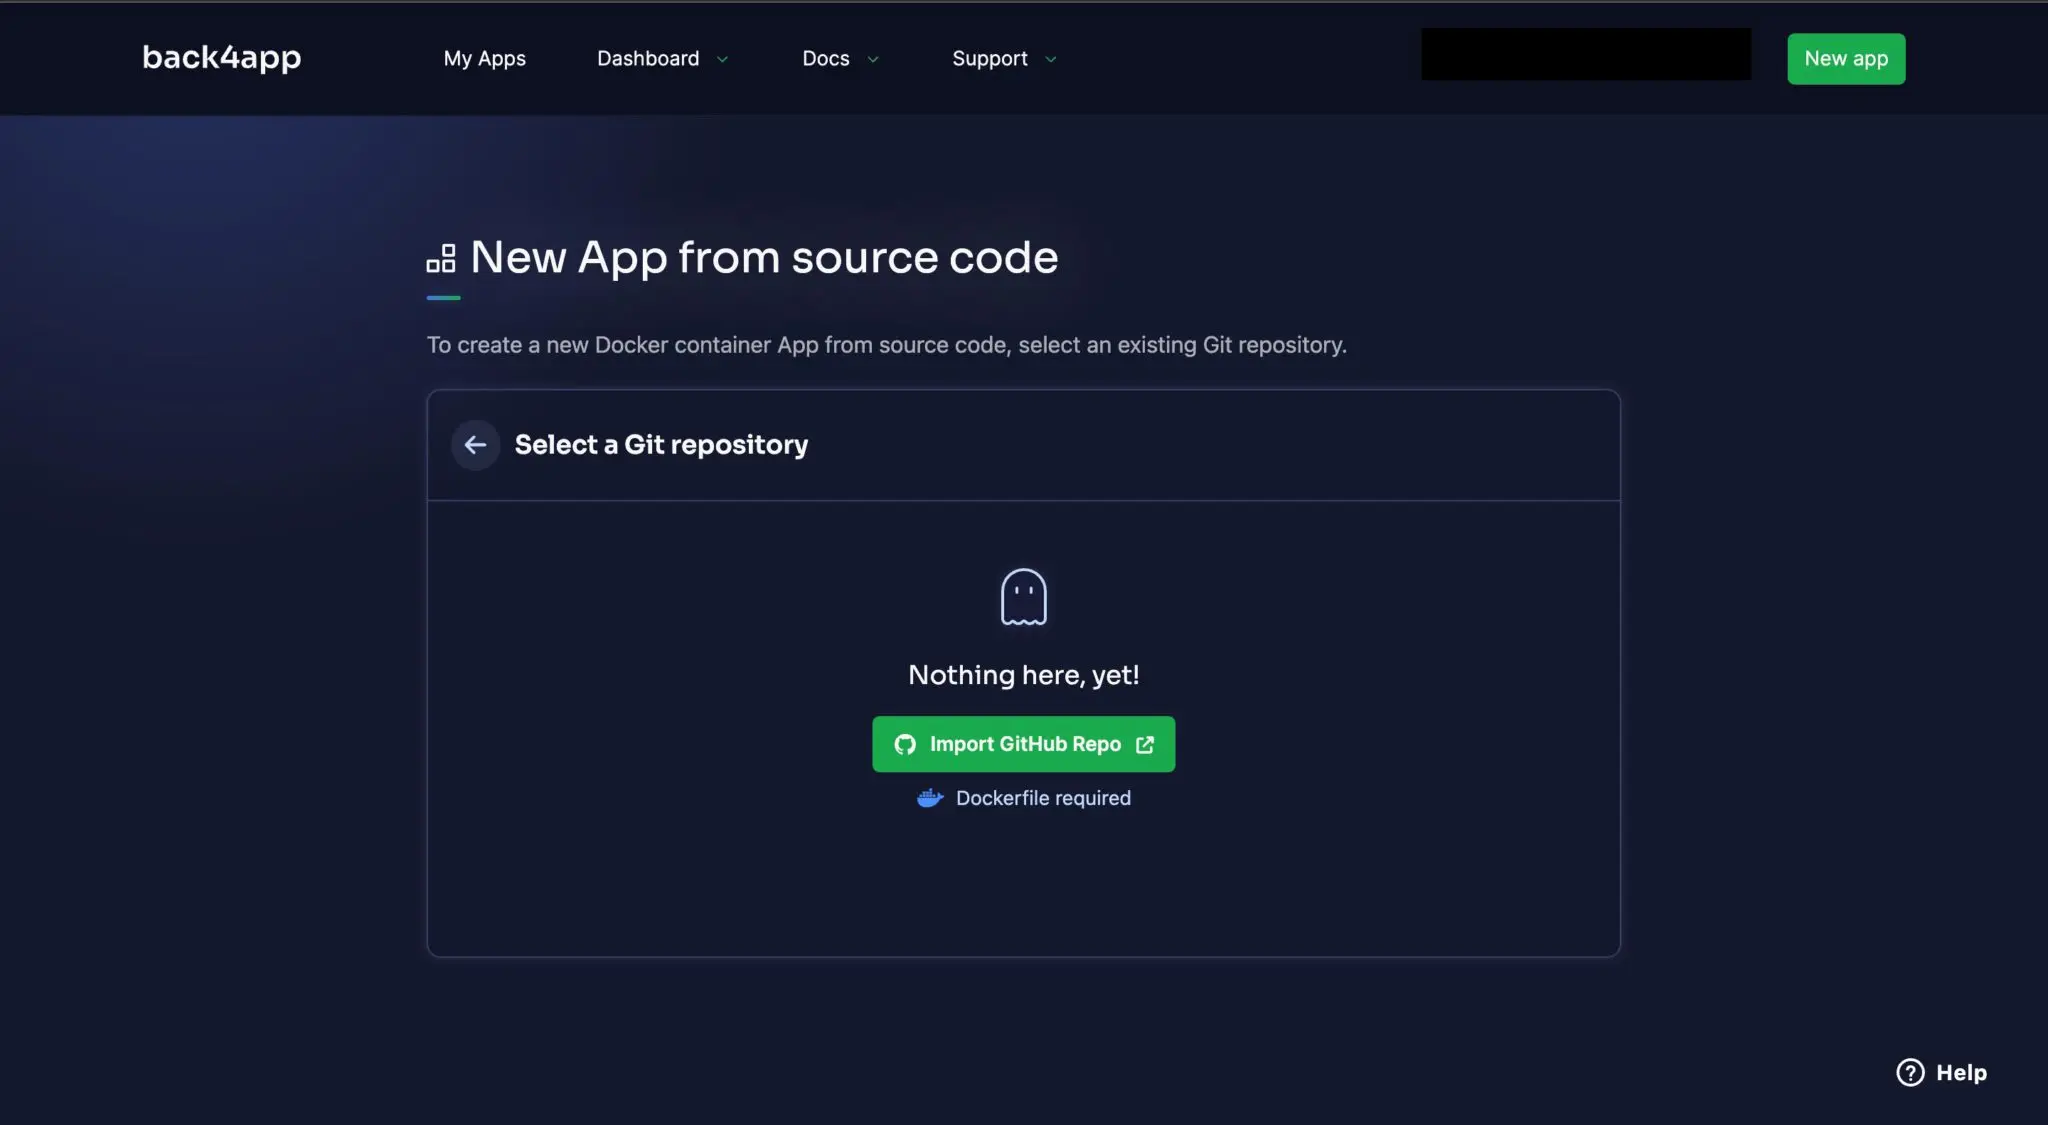
Choose the application you want you want to deploy (the one from this tutorial) and click select.
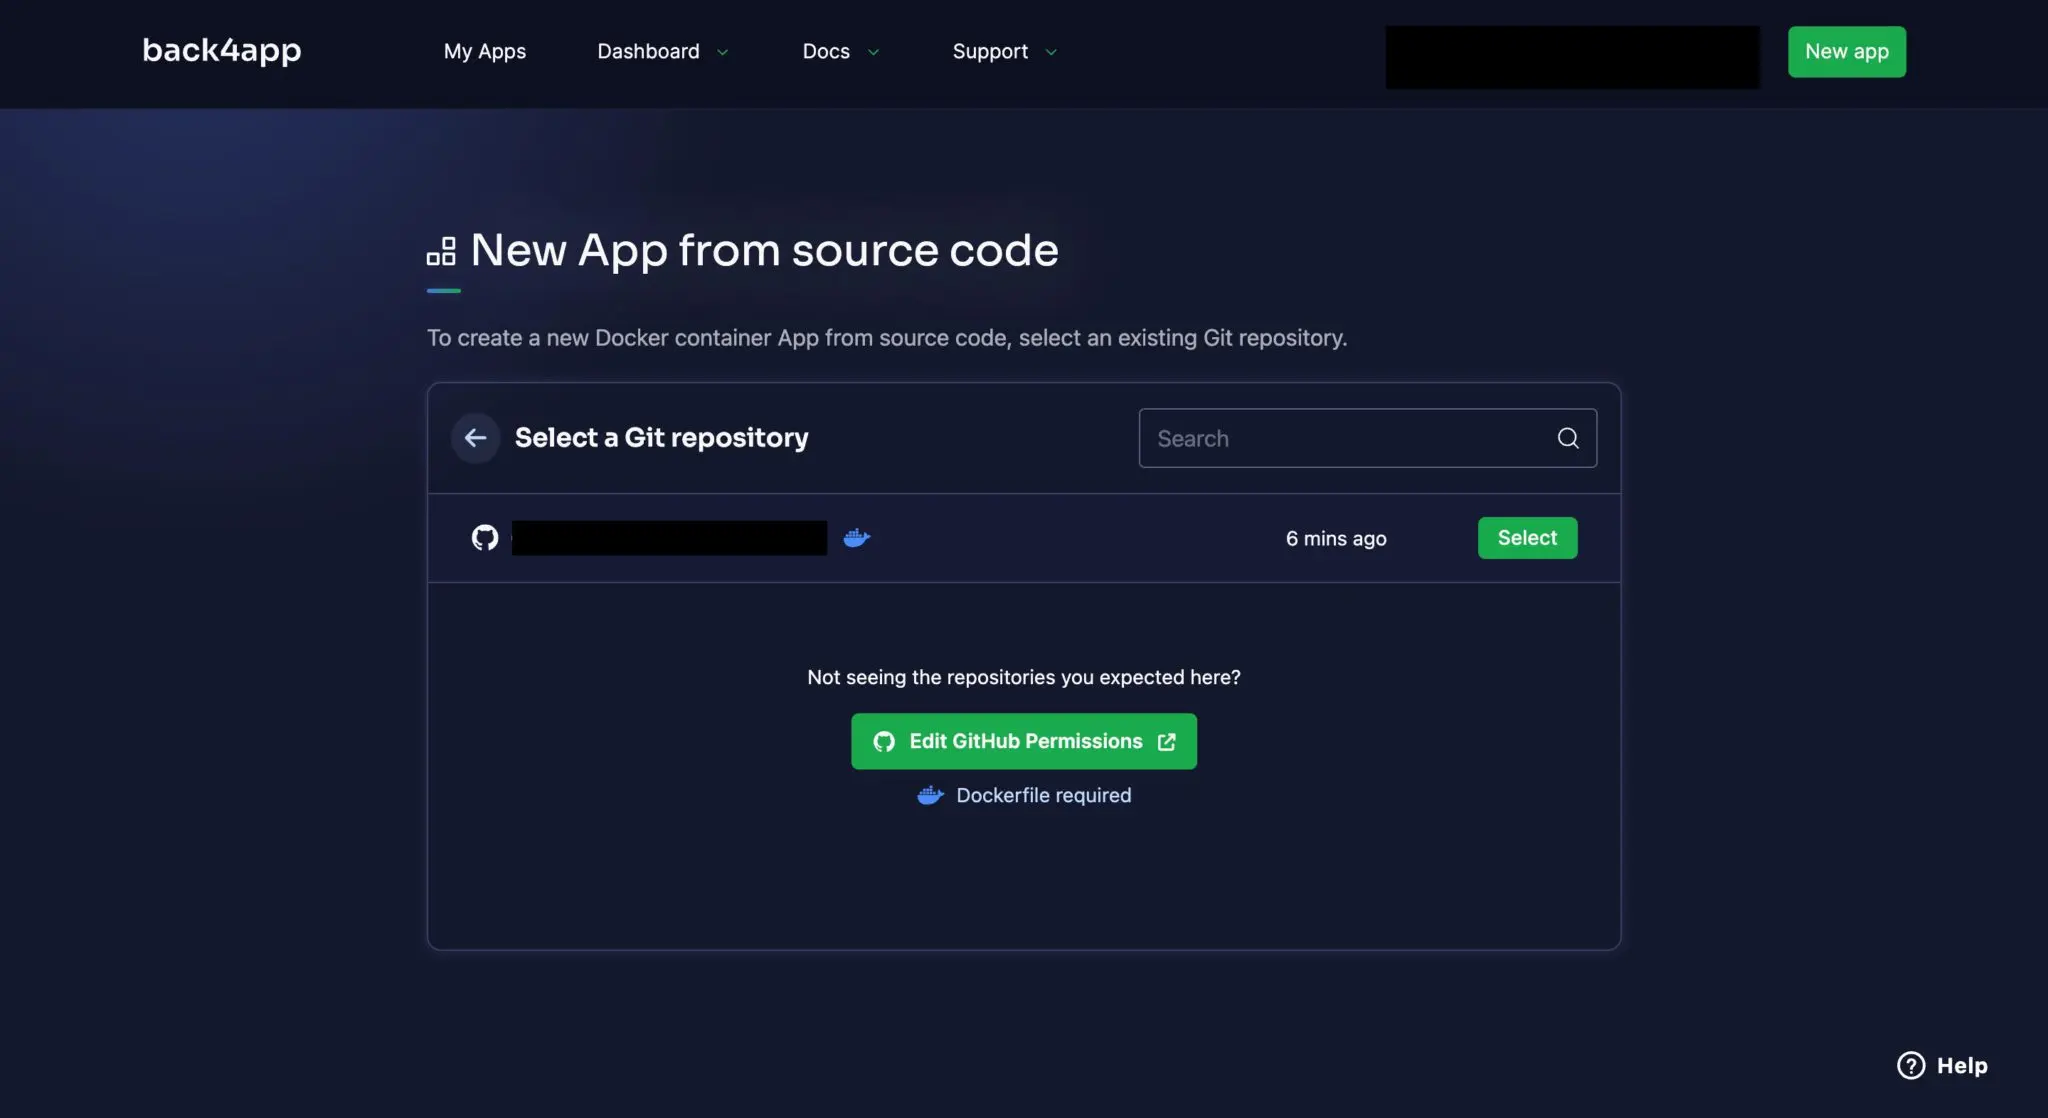
On clicking select, the button will take you to a page where you can fill in information about your app, including the name of the branch, root directory, and environment variables.
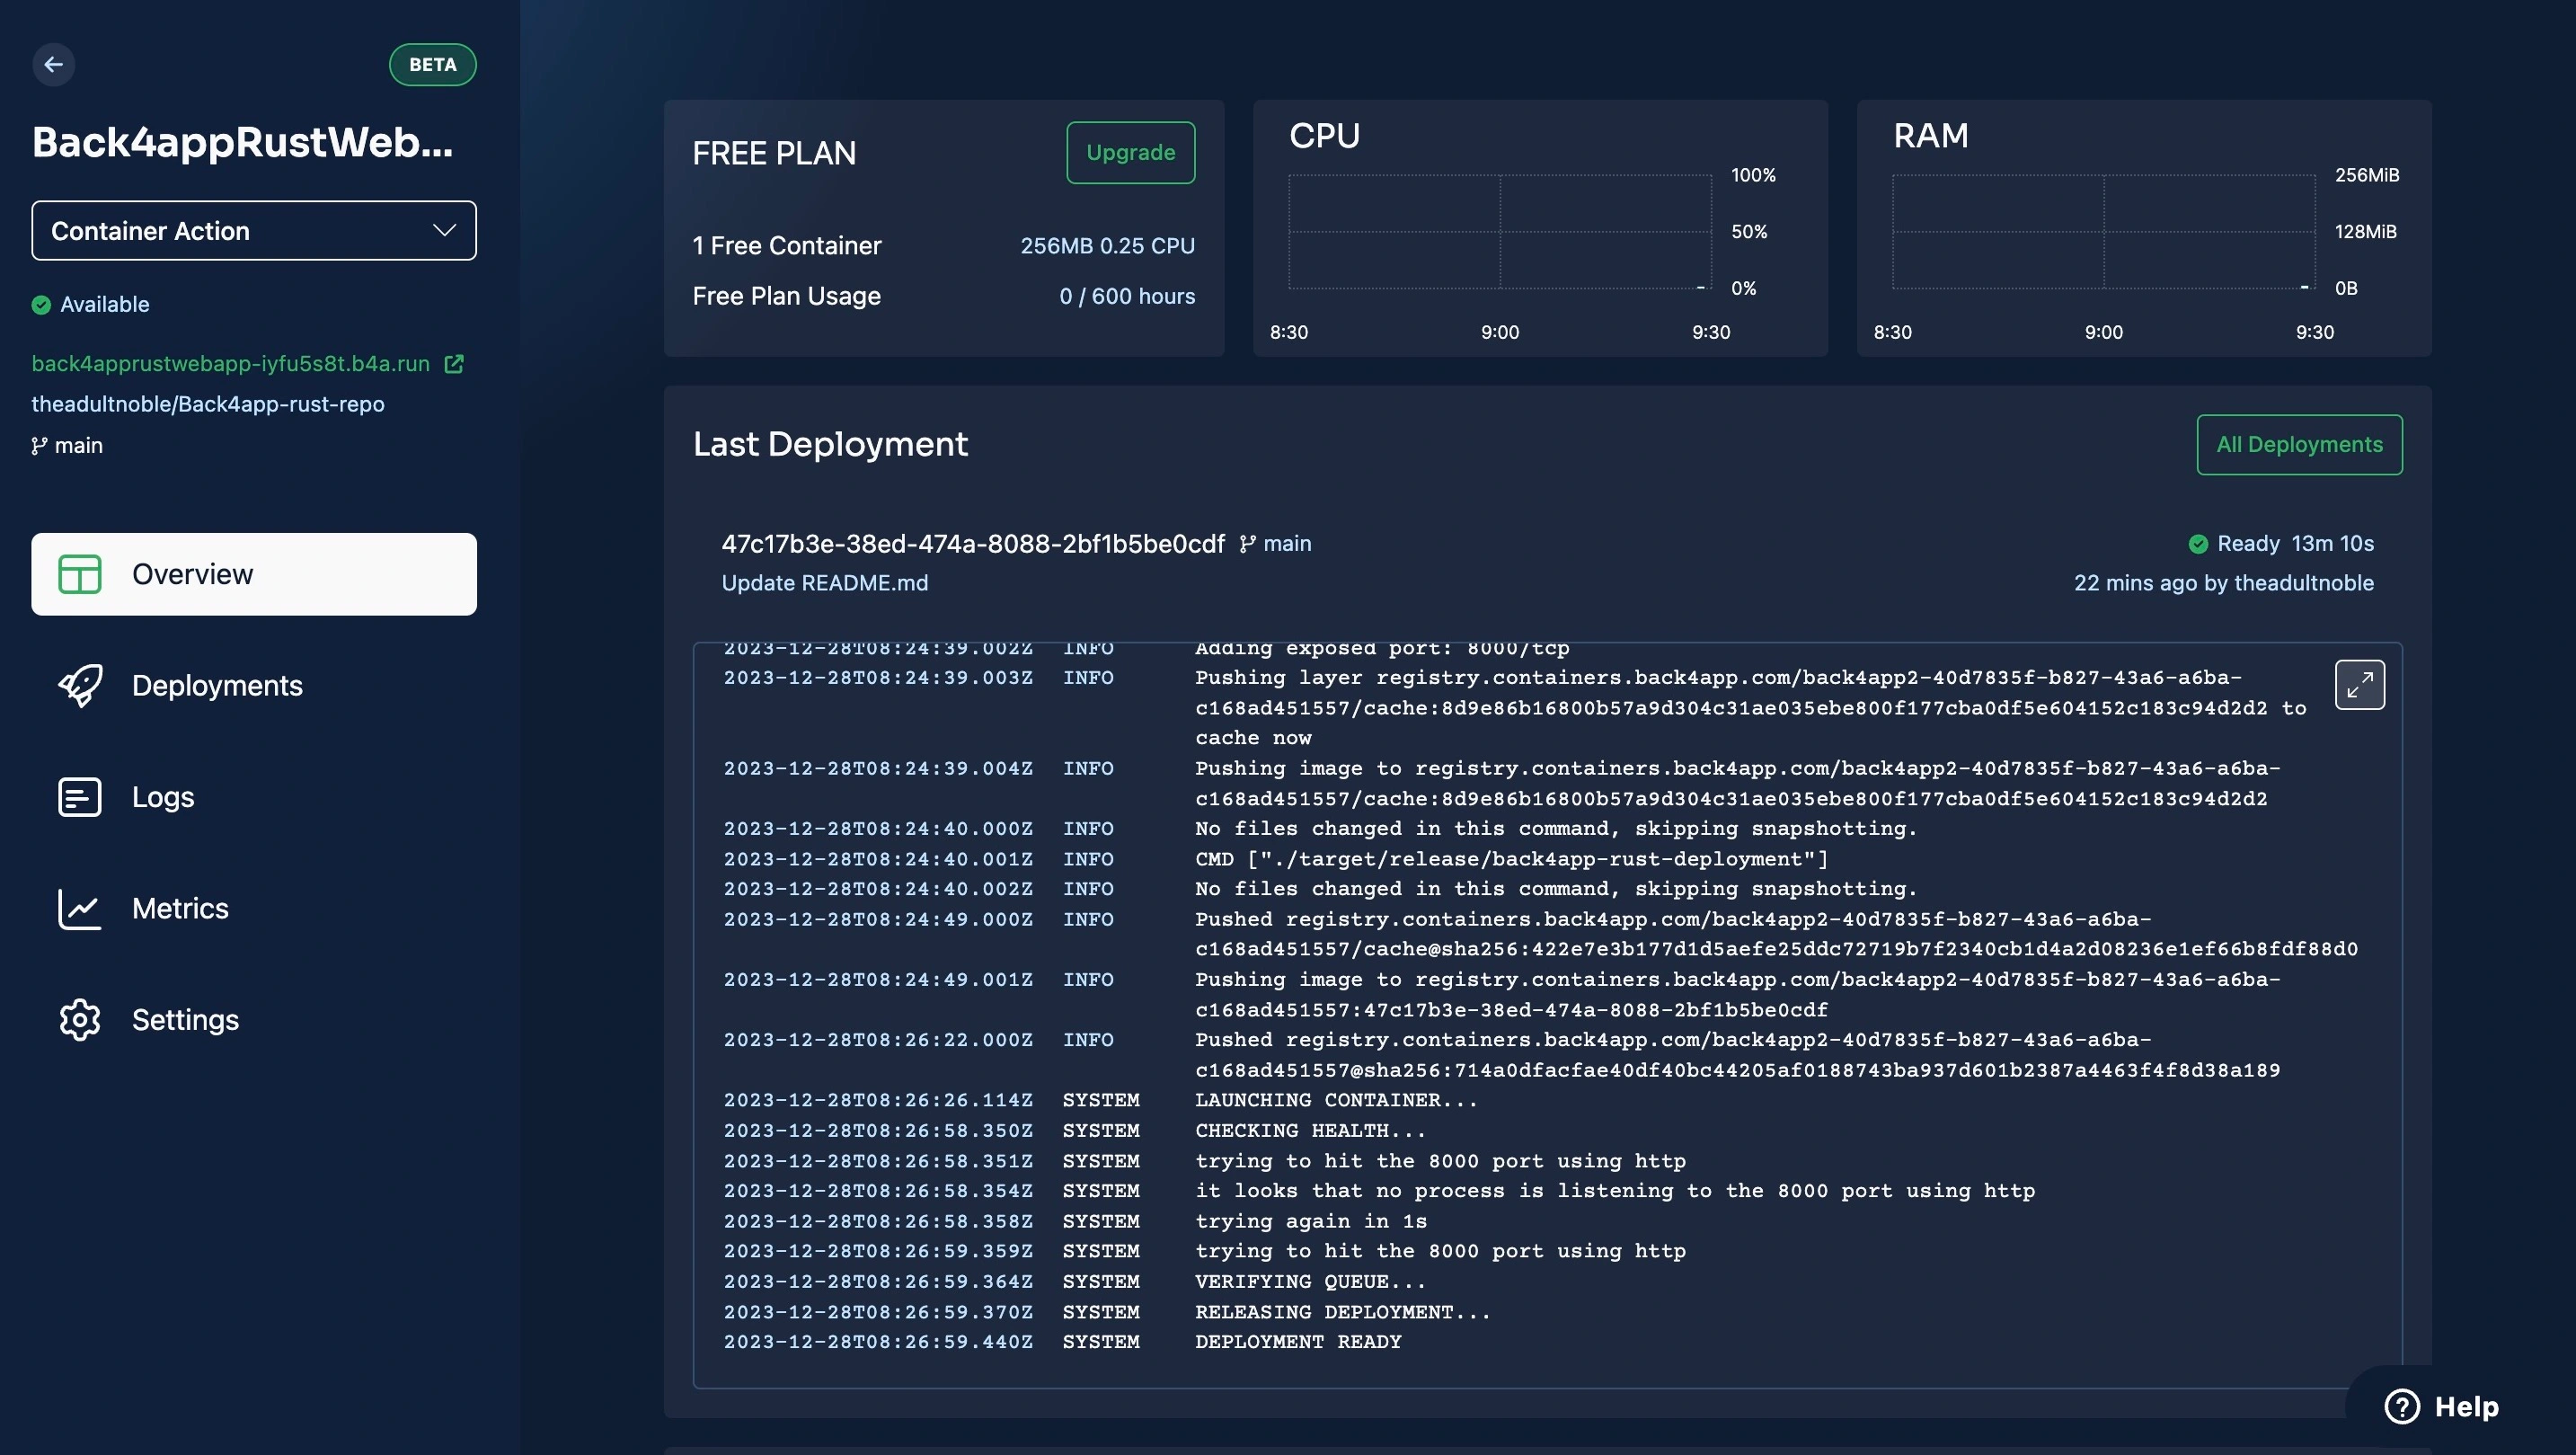
The deployment process starts automatically,
Deploying With The Back4app AI Agent
To supercharge your development workflow, you could also deploy your app using the Back4app AI agent, as you can see in the image below:
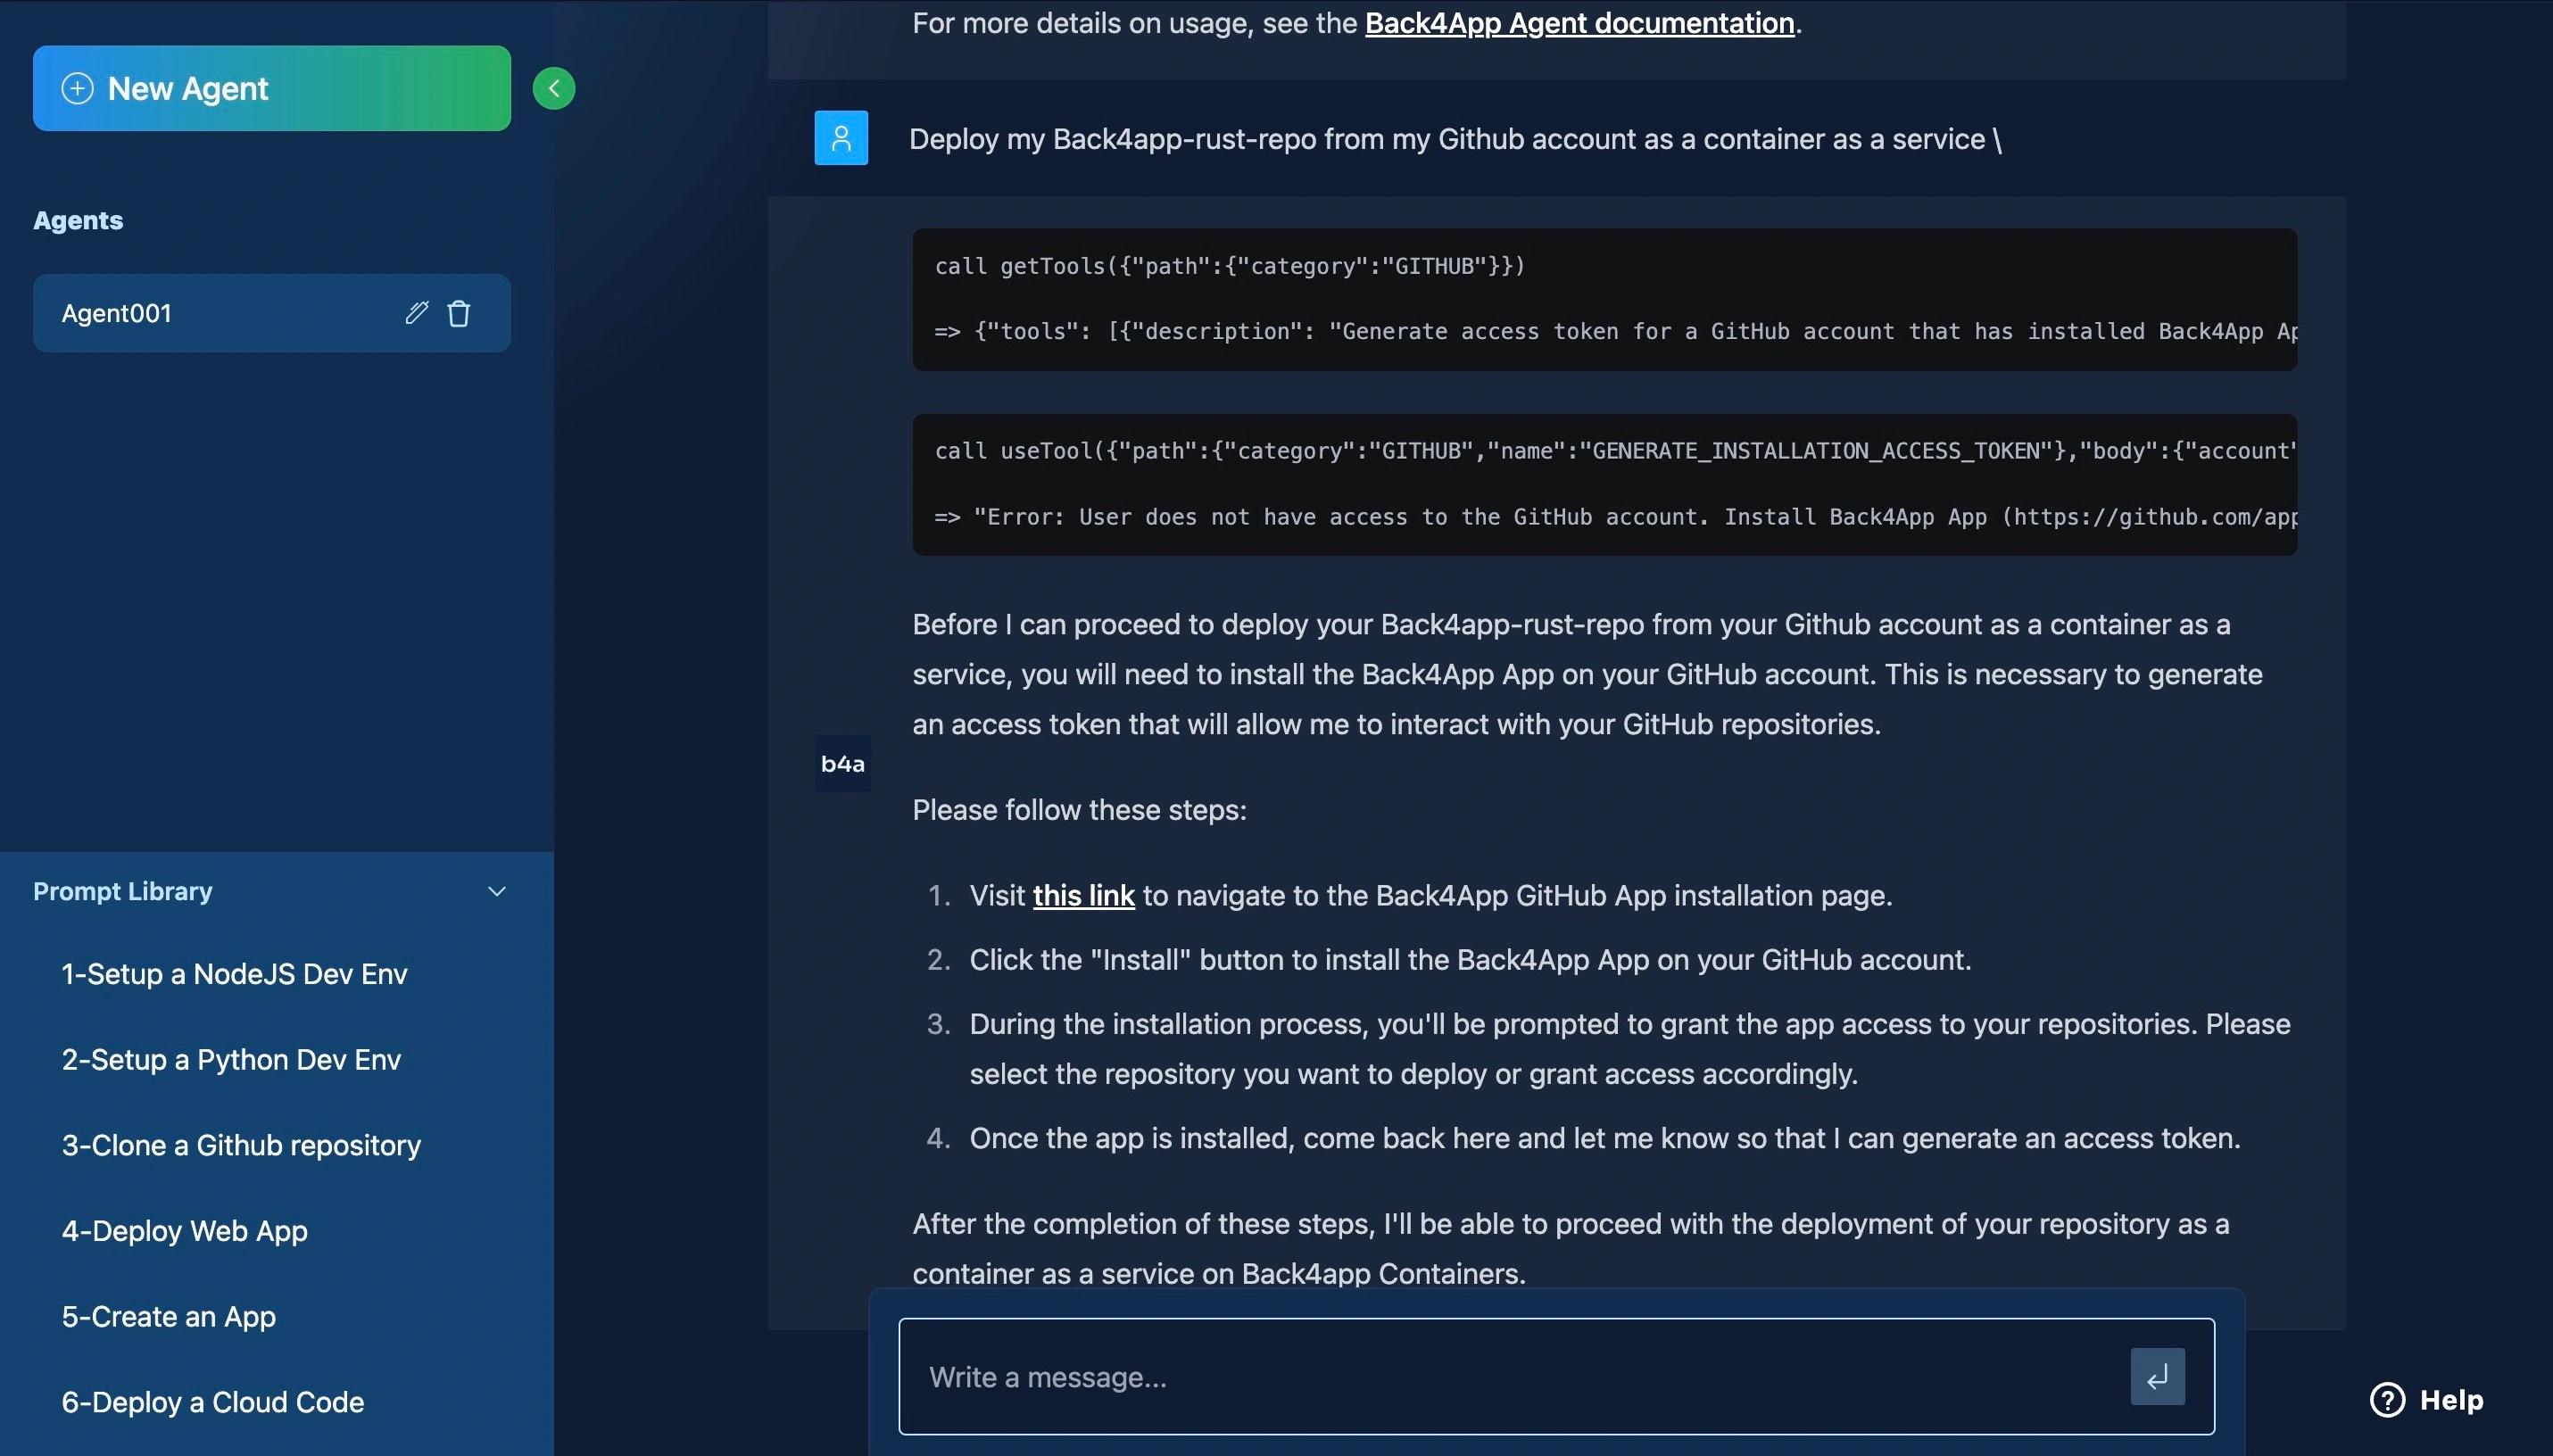
Follow this link to install the Back4app container app in your GitHub account, and follow the steps in the image above to configure it.
On completing the app setup, you can proceed with deploying your app with the AI agent.
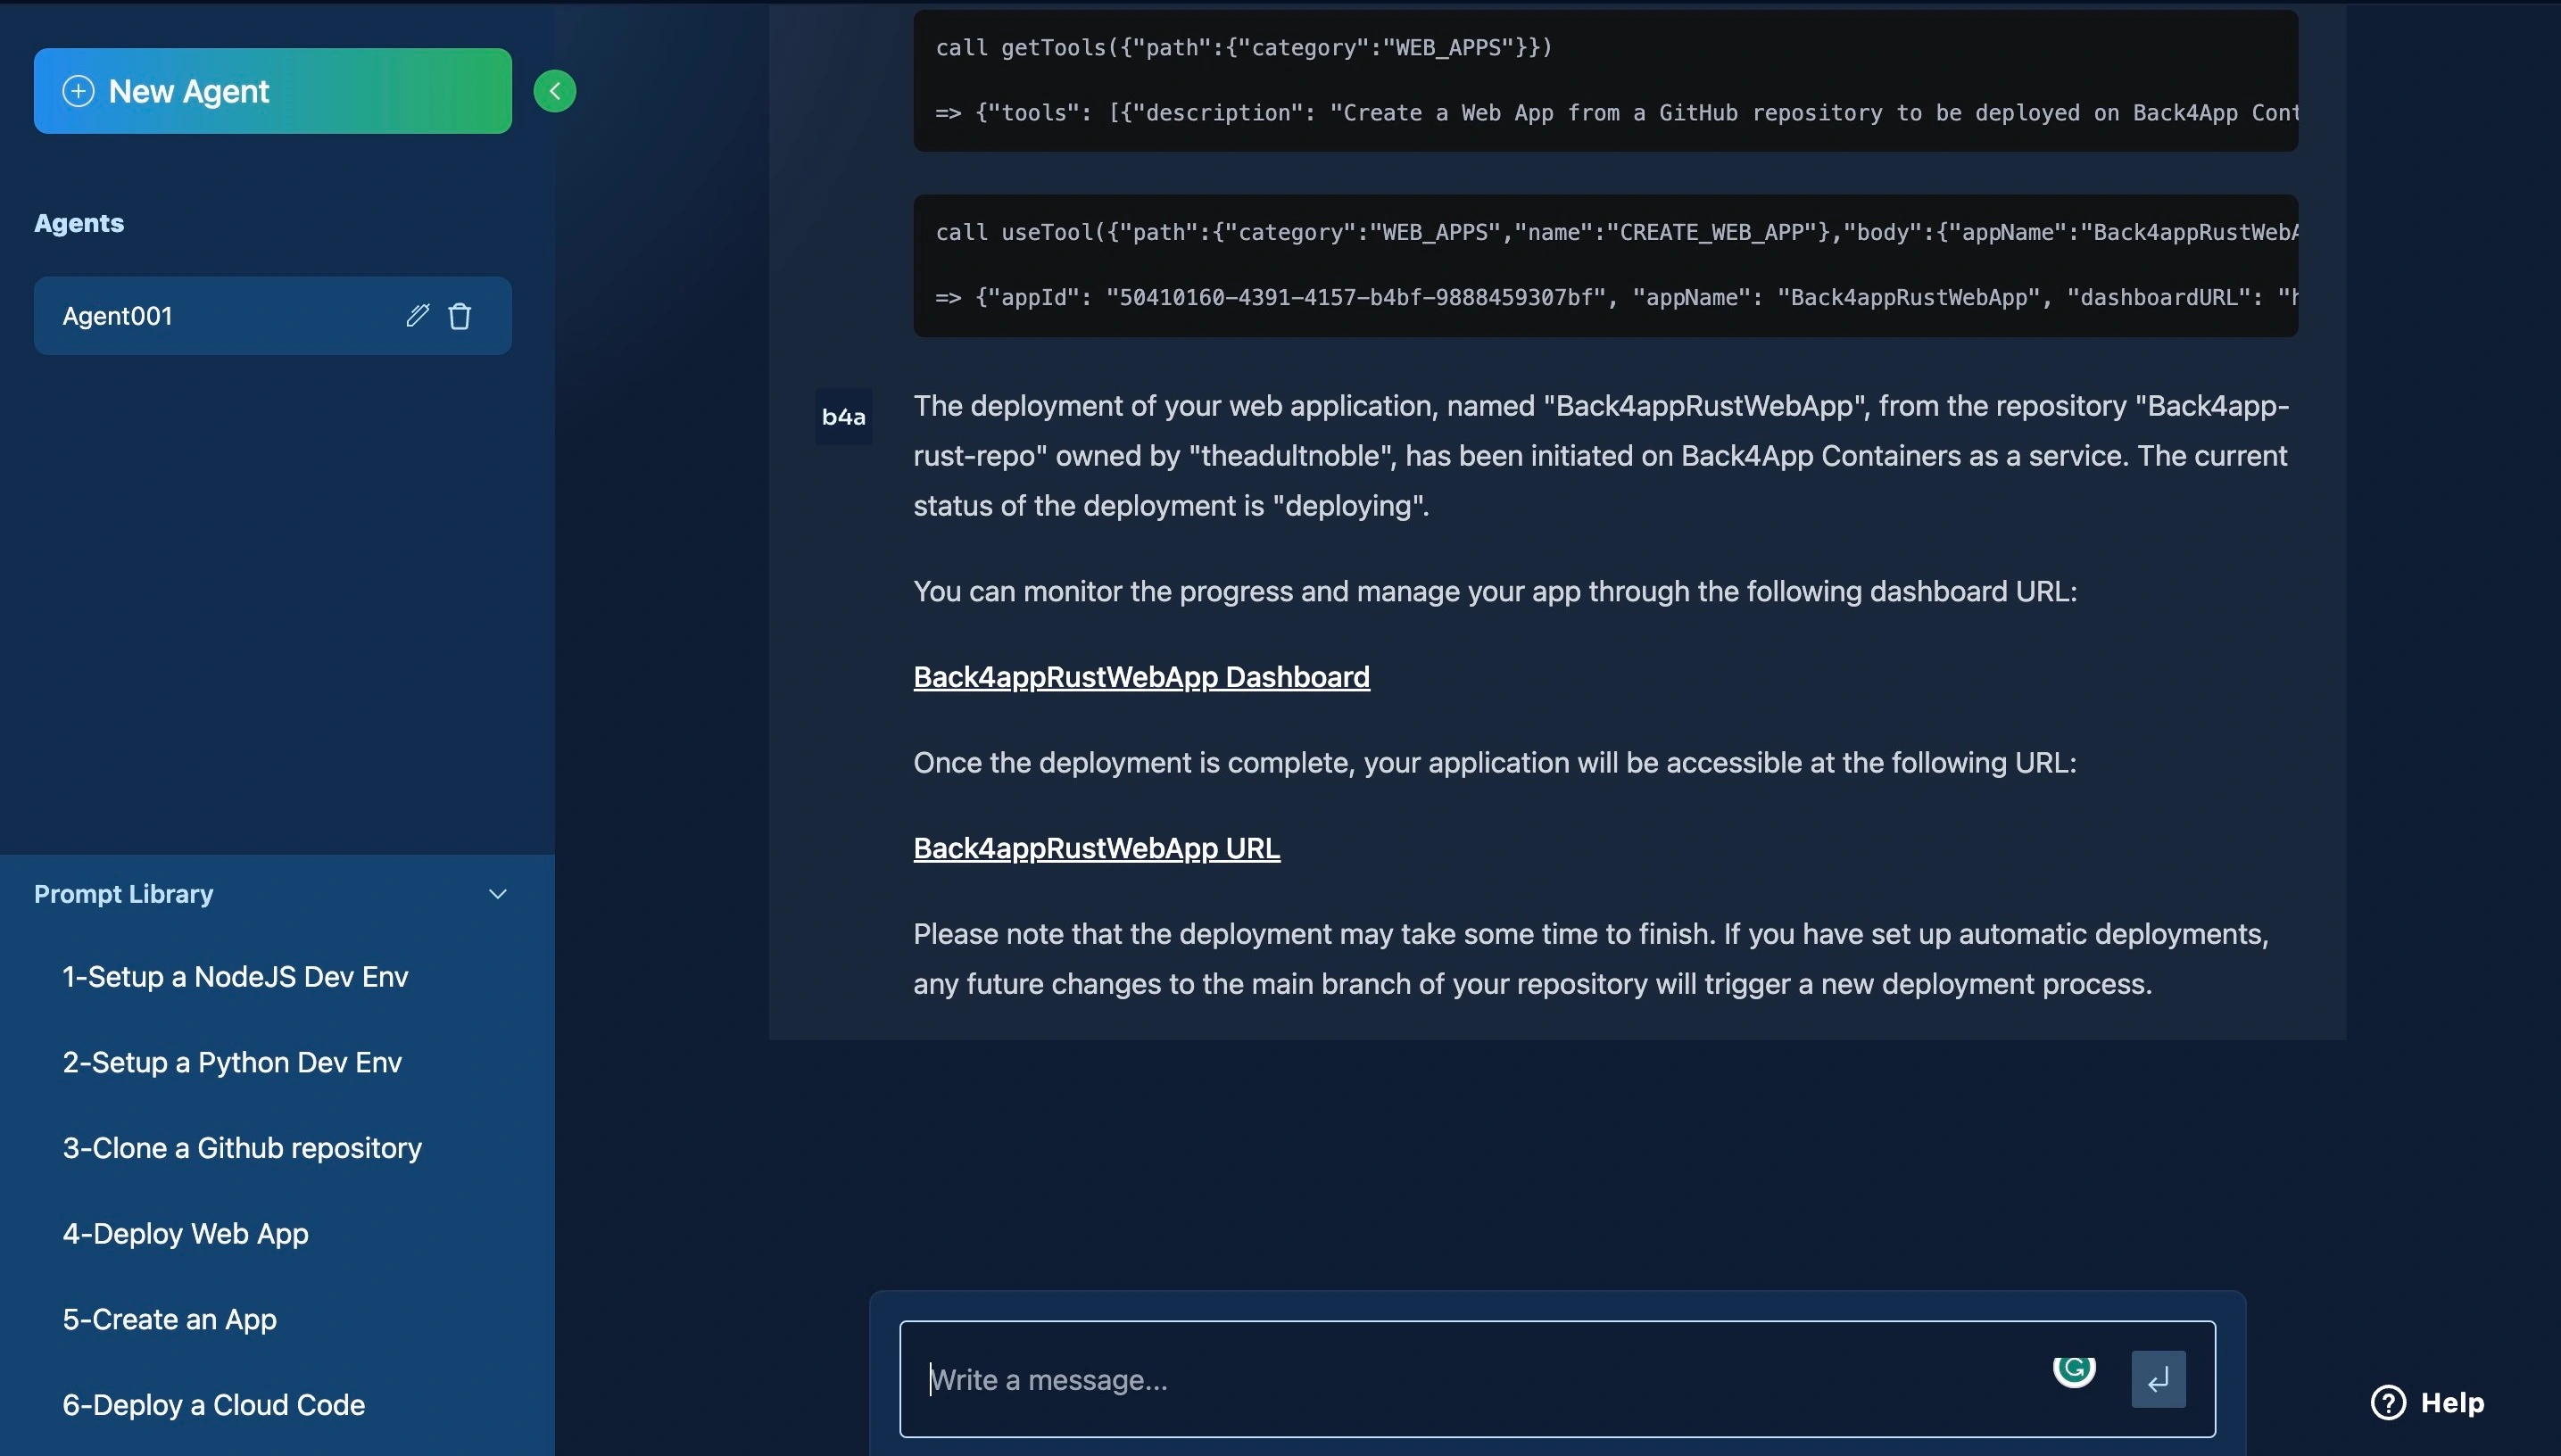
Follow the provided link to monitor your app’s deployment progress.
Conclusion
You’ve learned how to build and deploy a Docker-containerized Rust application on Back4app.
Deploying your apps to Back4app is a great way to simplify backend infrastructure management.
Back4App provides powerful tools for managing your data, scaling your application, and monitoring its performance.
It is an excellent choice for developers looking to build great applications rather than manage servers.


