What are Push Notifications?
Push notifications are a powerful communication channel that was introduced by Apple in 2009. Since then they’ve skyrocketed in popularity and become an essential part of most marketing campaigns. Notifications can be used to drive engagement, increase app usage, influence conversions, and more!
In this article, we’ll learn about push notifications, their benefits, use cases, types of notifications, and their do’s and don’ts. On top of that, we’ll look at how to send push notifications to Android devices using Back4app — one of the best mBaaS providers.
Contents
- 1 What is a push notification?
- 2 Why use push notifications?
- 3 What are the benefits of using push notifications?
- 4 What are the push notification types?
- 5 What makes a good push notification?
- 6 What to avoid when sending push notifications?
- 7 What is a push notification service?
- 8 How to send a push notification?
- 9 Conclusion
- 10 FAQ
- 11 What is a push notification?
- 12 What are the benefits of push notifications?
- 13 What are the push notification types?
- 14 What is a push notification service?
- 15 How to send a push notification?
What is a push notification?
A push notification is a short message or an alert that can be sent directly to your customer’s mobile device, web browser, wearable, or any other device that supports notifications. They are used as a quick communication channel that allows companies to send reminders, updates, time-sensitive messages, promotions, and more.
Push notifications are an opt-in service meaning that the customer needs to agree to receive notifications. The consent is usually obtained in a simple pop-up message or by installing the publisher’s mobile app.
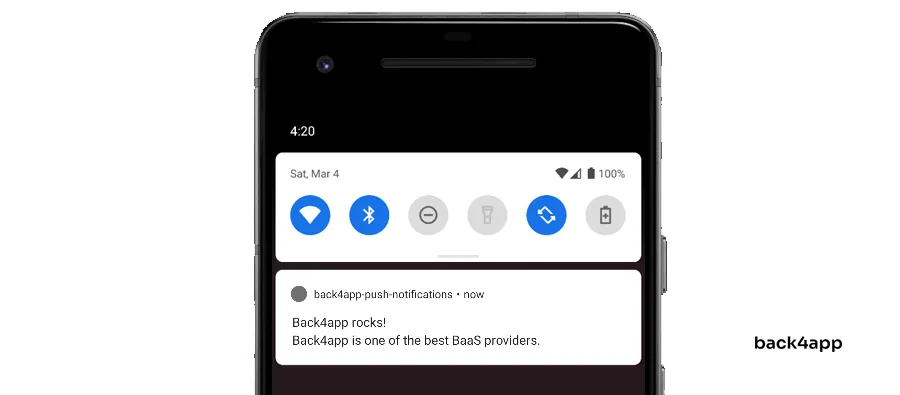
Push notifications are composed of multiple elements. Their structure and appearance slightly vary depending on the customer’s device and operating system. They can generally contain text, emojis, images, and buttons or so-called CTAs that perform a specific action on click.
An example push notification on an Android device looks like this:

Why use push notifications?
Push notifications are a multipurpose tool. They can be used for marketing, time-sensitive messages, security alerts, updates & more. Let’s look at some of the most common use cases.
Promotions and Offers
Businesses can leverage push notifications to send promotional offers and discounts to users, encouraging them to make purchases. On top of that, they can personalize push notifications to make them more relevant and effective.
Reducing Abandoned Carts
If you own an e-commerce store push notifications can help you reduce abandoned carts. After a cart has been abandoned for a few days you can nudge the user with a push notification offering them an additional discount.
Social Interactions
Push notifications are great for user retention. Most social applications such as Facebook, Instagram, and Twitter send you a notification every time another user interacts with you. For example: likes your post, comments on your post, sends you a message, and so on.
Updates & Reminders
Push notifications can be a useful tool for receiving updates and reminders for things like events, appointments, and deadlines.
Security
Push notifications can also be used for security purposes. Some companies send customers a push notification every time someone logins into their account. Additionally, you can use push notifications to initiate a 2FA confirmation.
What are the benefits of using push notifications?
We’ve mentioned many of the push notification benefits in the previous section. To sum it up, the benefits include:
- Increased user engagement
- Higher user retention
- Higher conversion rates
- Enhanced customer care
- Increased sales & revenue
- Improved user experience
What are the push notification types?
There are three types of push notifications: mobile notifications, web notifications, and desktop notifications.

Mobile push notification
Mobile push notifications are the most used and well-known push notification type. They can appear in a variety of forms including in the status bar, notification drawer, heads-up notification, and lock screen.
They can contain a small icon, app name, timestamp, large icon, title, text, and buttons. Mobile notifications can be organized into different channels based on their content and importance.
Mobile push notifications are typically sent using a push notification service, such as Apple Push Notification Service (APNS) for iOS devices and Firebase Cloud Messaging (FCM) for Android devices. More about push notification services later in the tutorial.
Web push notification
Web-based push notifications are notifications that can be sent by websites to the user’s browser even when the browser isn’t opened. They appear in the desktop notification drawer and on the browser’s home screen.
The first version of web push notifications was released by Google in 2014. By now they’re supported by most modern web browsers, including Google Chrome, Mozilla Firefox, and Microsoft Edge.
In contrast to mobile notifications, these notifications are delivered through the browser’s Push API.
Desktop push notification
Desktop push notifications are similar to web push notifications. The main difference between them is how they’re sent. While web notifications are sent by a website or a web app, desktop notifications are sent by an application installed on the computer.
They appear in the notification drawer and are supported on most modern operating systems.
What makes a good push notification?
In 2023 a typical smartphone user gets around 50 notifications per day. Most of the notifications are left unread and swiped away. If you wish for your push notification campaign to be more successful consider the following tips.
Personalization
Tailoring notifications to users’ interests and preferences can make the notifications more relevant and attention-grabbing. This can improve user retention, engagement, and loyalty. On top of that it can increase your business revenue, by encouraging users to take desired actions via CTAs.
Use Rich Media and Emojis
To make your notifications more engaging and interesting make sure to include relevant images and emojis. Studies have shown that images and emojis can greatly increase click-through rates.
If you opt for emojis make sure to not overuse them. Use max one or two emojis either at the beginning or the end of the notification.
Time Them Right
It’s important for you to time your push notifications right. Before sending notifications make sure you know your customer base. If your customers live in different timezones you can split them into multiple groups based on their timezones and then send the notifications group by group.
Notix’s research found out that notifications sent between:
- 8:00 a.m. and 11:00 a.m. have a 5.55% click-through rate
- 11:00 a.m. and 8:00 p.m have a 7% click-through rate
- 8:00 p.m. and 11:00 p.m have a 10.4% click-through rate
Include CTAs
Push notifications should clearly communicate their intent and what the user should do next. For example: if you’ve just published a new article make sure to include the article link, if there’s a new product available in your store add a “Buy now” button.
Remember: A good push notification is relevant, engages the user, and provides value to them.
What to avoid when sending push notifications?
Even though push notifications are a powerful tool for engaging users and driving conversions, there are some situations where they should be avoided. Make sure not to:
- Advertise another product
- Send too many notifications
- Send irrelevant or meaningless notifications
- Try to acquire users via notifications
- Overwhelm your users
What is a push notification service?
A push notification service is a service that allows 3rd party developers to send push notifications to their customers’ devices via an API or a dashboard. They work by establishing a connection between the application or website and the customer’s device. The push notification service uses a unique identifier for each device to ensure that the message is delivered only to the intended recipient.
Typical push notification service functionalities include managing customers and audiences, managing notifications (including past pushes), scheduling notifications, and analytics (click-through rate, deliveries et cetera).
A few examples of push notification services are:
- Firebase Cloud Messaging (FCM)
- Apple Push Notification Service (APNS)
- Amazon Simple Notification Service (SNS)
- Back4app (Parse) Push Notifications
- OneSignal
How to send a push notification?
This section of the article looks at how to send push notifications to Android devices using Back4app.
Prerequisites
- You need to have Android Studio installed
- Basic understanding of Android app development
- A Gradle-based Android Studio project
Objectives
- Create a Back4app application
- Install and configure Parse SDK for Android
- Initialize Parse with
Application IDandClient key
- Create a Firebase project and application
- Install Firebase SDK
- Link Firebase and Back4app via
GCM sender IDandGCM server key - Configure Android permissions, and register a service and a receiver for notifications.
- Send push notifications via the Back4app dashboard or Cloud Code
What is Back4app?
Back4app is a great Backend as a Service (BaaS) provider that allows the developers to focus on their app without worrying about the backend or the underlying infrastructure. It is built on top of open-source technology like Parse, GraphQL, Node.js, and Redis.
Back4app is easy to use, has a slick dashboard and a command line interface (CLI) for more advanced users and task automation.
The platform has several built-in features including:
- Spreadsheet-like database
- Authentication and social authentication
- Push and email notifications
- Cloud Code and Jobs
- User management
- Security features
Back4app has a straightforward pricing model. They also offer a generous free tier that can be used to try out their platform or even host small applications.
To learn more about Back4app check out Why use Back4app?
Create Back4app App
If you’ve already created a Back4app application, installed the Parse SDK, and configured your Android project feel free to skip section!
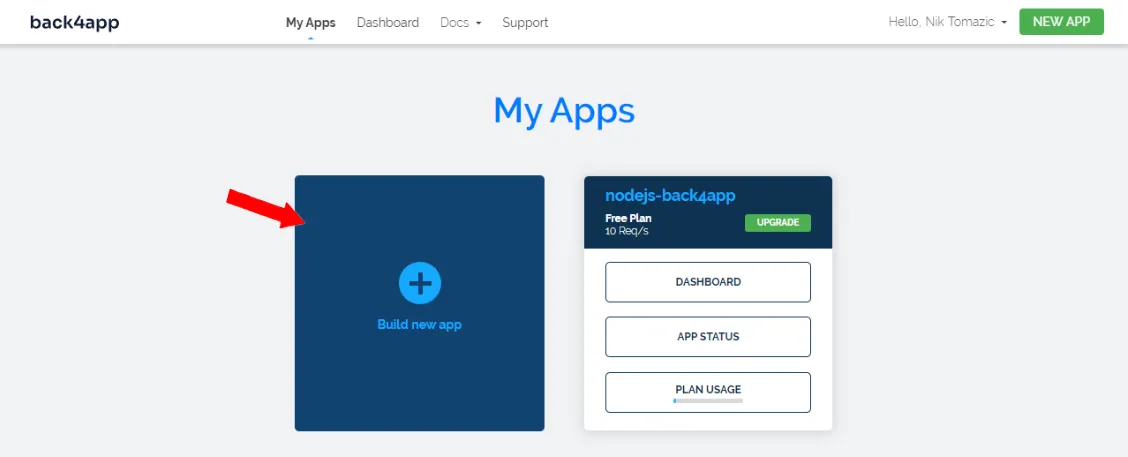
To work with Back4app we first need to create an app. As you log in to your dashboard you’ll see the list of your apps. Click on “Build new app” to start the app creation process.
Select “Backend as a Service”, enter your app name, select “NoSQL Database” as your database, and lastly click “Create”.
Back4app is going to take a few moments to prepare everything required for your app like the database, application layer, scaling, backups & security.
Once your application is ready you will be redirected to your app’s dashboard.
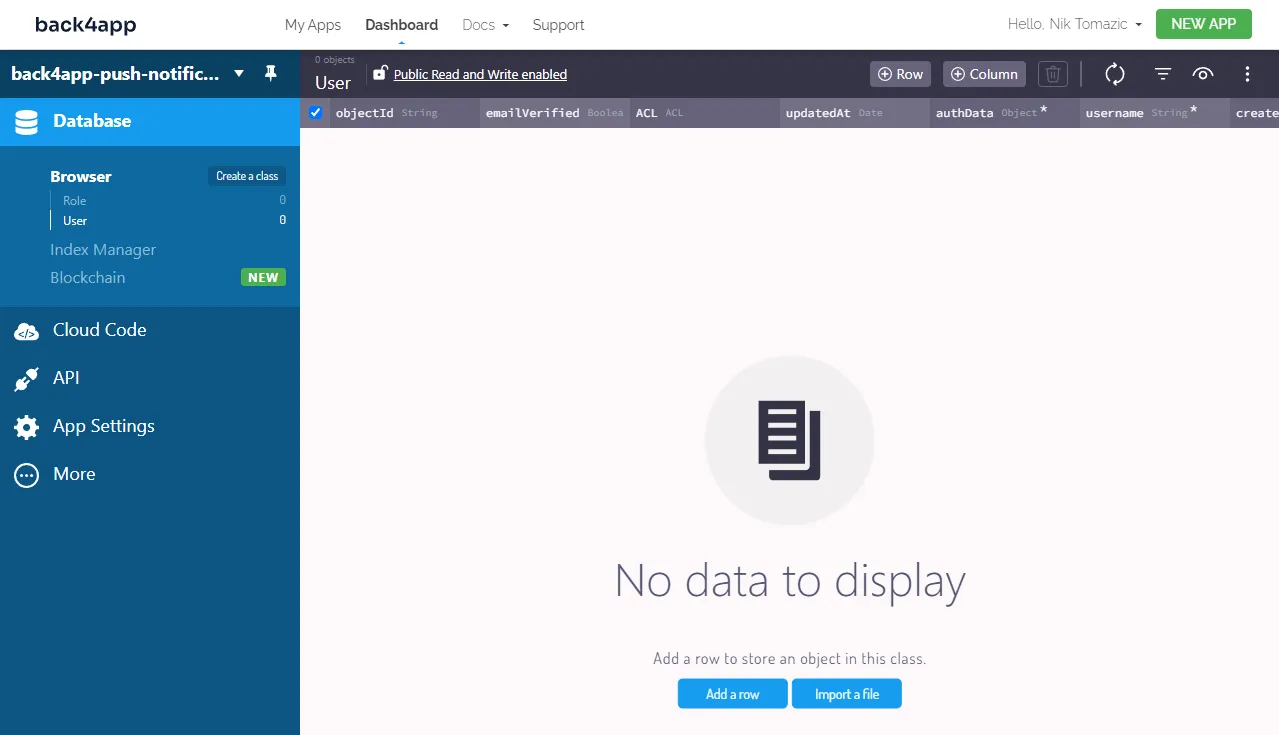
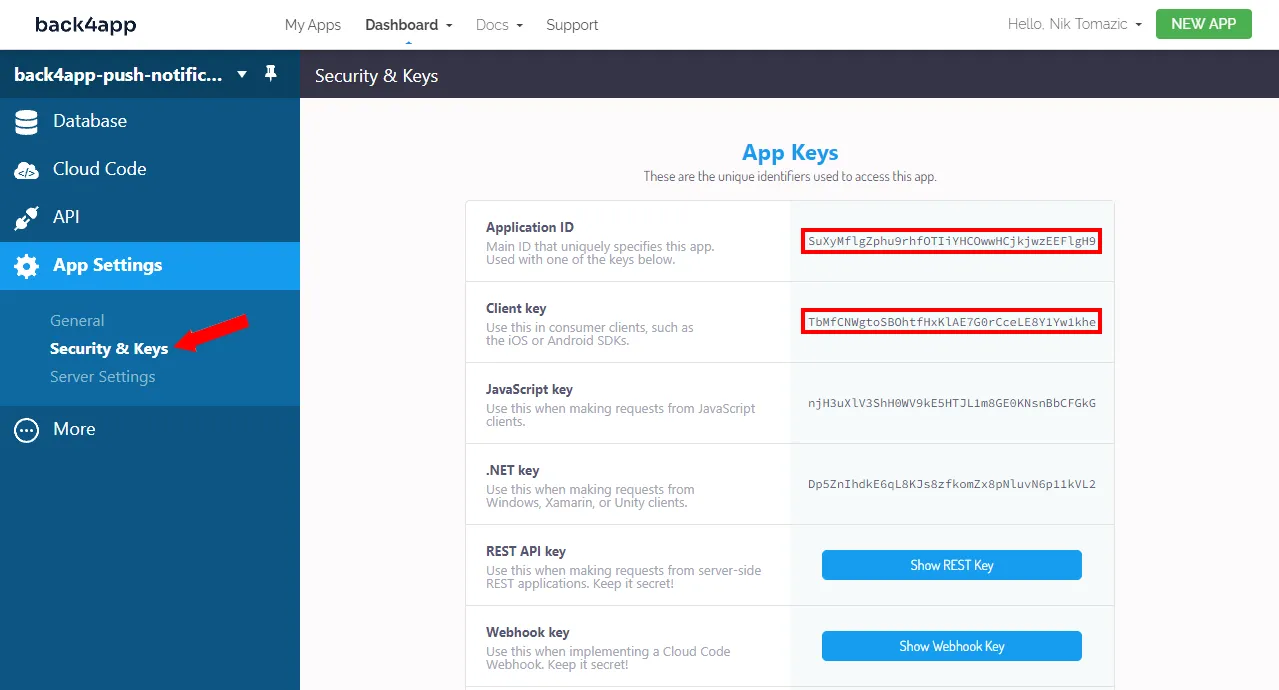
Next, select “App Settings > Security & Keys” in the sidebar and take note of your “Application ID” and “Client key”. We’ll need them to connect our Android app to Back4app servers.
Install Parse SDK
For our app to communicate with the Back4app servers we have to install Parse SDK.
The process we’re going to use requires Android SDK 27 or higher. Before installing Parse navigate to your app/build.gradle and make sure that compileSdk and targetSdk are set to the correct versions:
// app/build.gradle

android {
    namespace "com.back4app.push"
    compileSdk 33  // <-- check this line

    defaultConfig {
        applicationId "com.back4app.push"
        minSdk 27
        targetSdk 33   // <-- check this line
        versionCode 1
        versionName "1.0"

        testInstrumentationRunner "androidx.test.runner.AndroidJUnitRunner"
    }
    // ...
}
To access the latest software packages let’s install the JitPack package repository.
Navigate to your settings.gradle and add JitPack repo to dependencyResolutionManagement like so:
// settings.gradle

dependencyResolutionManagement {
    repositoriesMode.set(RepositoriesMode.FAIL_ON_PROJECT_REPOS)
    repositories {
        google()
        mavenCentral()
        maven { url "https://jitpack.io" }   // new
    }
}
rootProject.name = "back4app-push-notifications"
include ":app"
Next, navigate to app/build.gradle and add the following dependencies:
// app/build.gradle

dependencies {
    implementation "com.parse.bolts:bolts-android:1.4.0"
    implementation "com.github.parse-community.Parse-SDK-Android:parse:4.2.0"
    implementation "com.github.parse-community.Parse-SDK-Android:fcm:4.2.0"
    // ...
}
Check if there’s a newer version available on JitPack and if so bump it.
For Parse to work we need to enable internet access in our application. On top of that, we have to provide our “Application ID” and “Client key” from the previous section. Navigate to AndroidManifest.xml and modify it like so:
<!-- app/src/main/AndroidManifest.xml -->

<?xml version="1.0" encoding="utf-8"?>
<manifest xmlns:android="http://schemas.android.com/apk/res/android"
    xmlns:tools="http://schemas.android.com/tools">

    <!-- new -->
    <uses-permission android:name="android.permission.ACCESS_NETWORK_STATE"/>
    <uses-permission android:name="android.permission.INTERNET"/>
    <!-- end of new -->

    <application>
        <activity
            android:name=".MainActivity"
            android:exported="true">
            <intent-filter>
                <action android:name="android.intent.action.MAIN" />

                <category android:name="android.intent.category.LAUNCHER" />
            </intent-filter>

            <meta-data
                android:name="android.app.lib_name"
                android:value="" />

            <!-- new -->
            <meta-data
                android:name="com.parse.SERVER_URL"
                android:value="@string/back4app_server_url" />
            <meta-data
                android:name="com.parse.APPLICATION_ID"
                android:value="@string/back4app_app_id" />
            <meta-data
                android:name="com.parse.CLIENT_KEY"
                android:value="@string/back4app_client_key" />
            <!-- end of new -->

        </activity>
    </application>
</manifest>
Lastly, go to strings.xml and add the strings we’ve just used:
<!-- app/src/main/res/values/strings.xml -->

<resources>
    <string name="app_name">back4app-push-notifications</string>
    <string name="back4app_server_url">https://parseapi.back4app.com</string>
    <string name="back4app_app_id">YOUR_PARSE_APP_ID</string>
    <string name="back4app_client_key">YOUR_PARSE_CLIENT_KEY</string>
</resources>
Make sure to replace YOUR_PARSE_APP_ID and YOUR_PARSE_CLIENT_KEY with your actual ID and key.
Initialize Parse
To initialize Parse we’ll use Android’s Application class.
The Application class provides global access to application-wide resources and state. It’s instantiated before any other class when the application process is started and can be used to manage application lifecycle events, initialize global variables, and implement custom behavior
To learn more about the
Applicationclass take a look at the official docs.
Navigate to the folder where your MainActivity.kt is located and create a new file named App.kt with the following contents:
// app/src/main/java/.../App.kt

package com.back4app.push

import android.app.Application
import com.parse.Parse

class App : Application() {
    override fun onCreate() {
        super.onCreate()

        Parse.initialize(
            Parse.Configuration.Builder(this)
                .applicationId(getString(R.string.back4app_app_id))
                .clientKey(getString(R.string.back4app_client_key))
                .server(getString(R.string.back4app_server_url))
                .build()
        )
    }
}
Next, tell Android to use the newly created Application class by setting application‘s android:name in AndroidManifest.xml like so:
<?xml version="1.0" encoding="utf-8"?>
<manifest xmlns:android="http://schemas.android.com/apk/res/android"
    xmlns:tools="http://schemas.android.com/tools">

    <application
        android:name=".App"
    >
        <!-- ... -->
    </application>
</manifest>
Your application should now be connected to Back4app. To make sure everything works try running the application and check the logs for any errors.
Create Firebase Project and App
The following steps will require you to have a Firebase account. If you don’t have one yet go ahead and sign up with your Google account.
Navigate to your Firebase Console and click on “Create a project”.
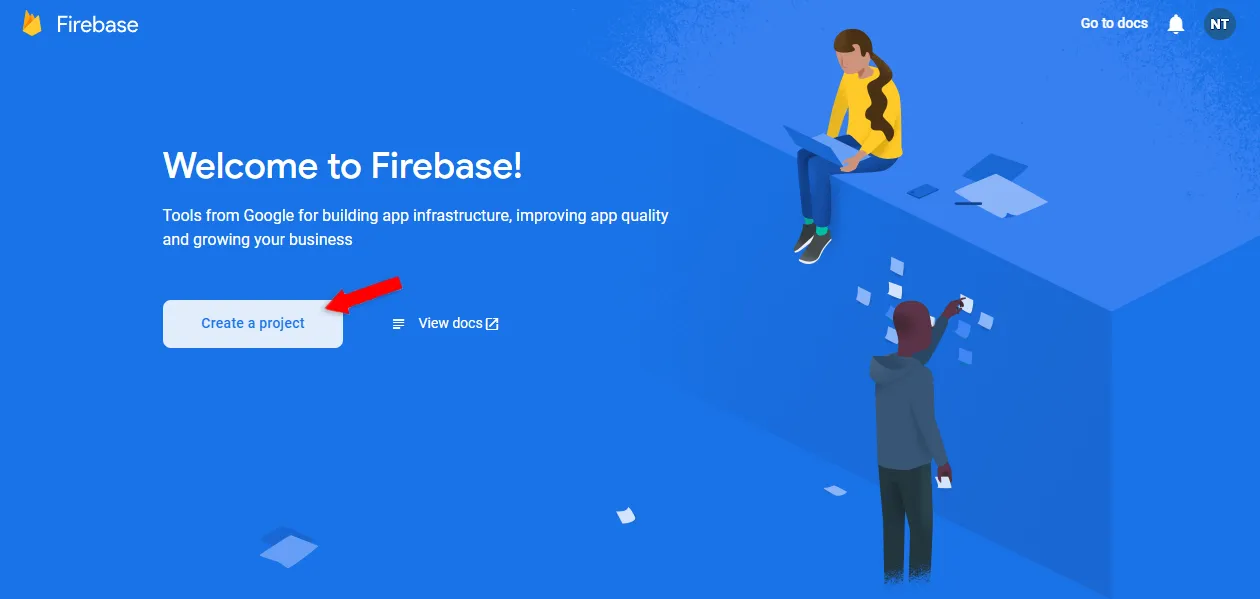
Give it a custom name, I’ll name mine back4app-push-notifications.
Accept the terms and conditions, enable Google Analytics, and press “Create project”.
Wait for Firebase to provision your project and prepare everything required. Once it’s done you’re going to get redirected to your project dashboard.
Next, create a new application by clicking on the Android icon.
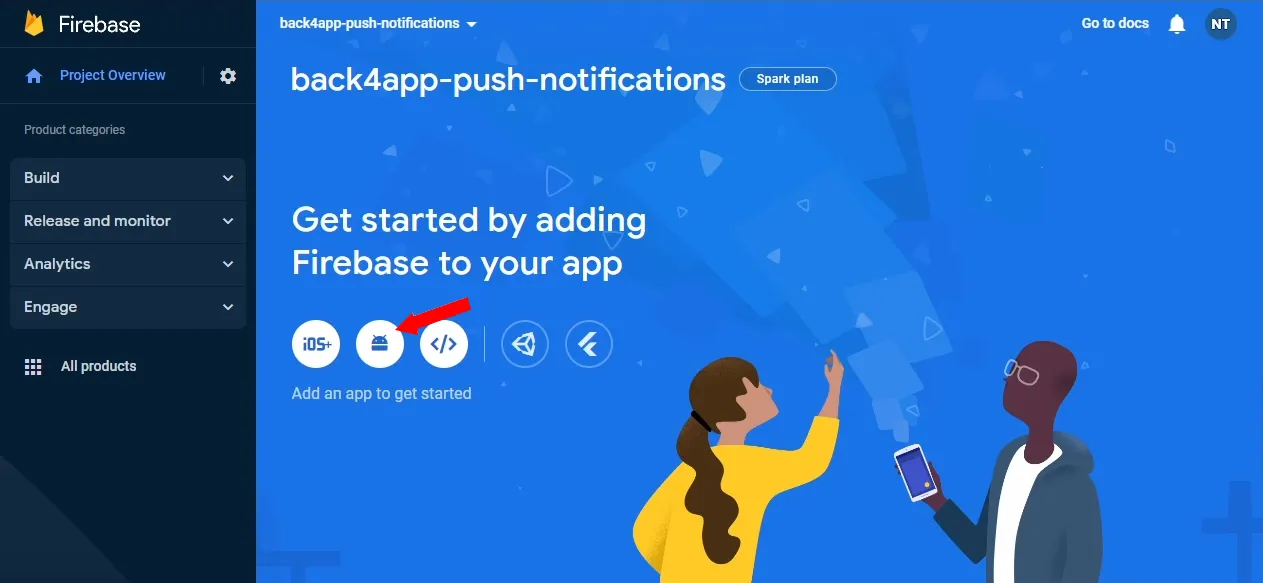
Enter the following details:
- Android package name: Use your package name (eg. com.back4app.push)
- App nickname (optional): Enter a custom nickname
- Debug signing key: Leave empty (or obtain your key by following this article)
Lastly, download the google-services.json file and place it in your app folder.
Skip the “Add Firebase SDK” and “Next steps” since we’ll do it in the next section of the article.
Install Firebase SDK
To install the Firebase SDK navigate to your project-level build.gradle and add the buildscript property like so:
// build.gradle

buildscript {
    dependencies {
        classpath "com.google.gms:google-services:4.3.15"
    }
}
Next, add the following plugins and dependencies to your app/build.gradle:
// app/build.gradle

plugins {
    id "com.android.application"
    id "org.jetbrains.kotlin.android"
    id "com.google.gms.google-services"  // new
}

dependencies {
    implementation platform("com.google.firebase:firebase-bom:31.2.2")  // new
    implementation "com.google.firebase:firebase-analytics-ktx"  // new
    // ....
}
Sync your Gradle settings.
Link Firebase Project with Back4app App
To link the Firebase project with the Back4app app we first need to obtain the GCM sender ID and GCM server key. To do that open your Firebase console, click on the cog icon, and then “Project Settings”.
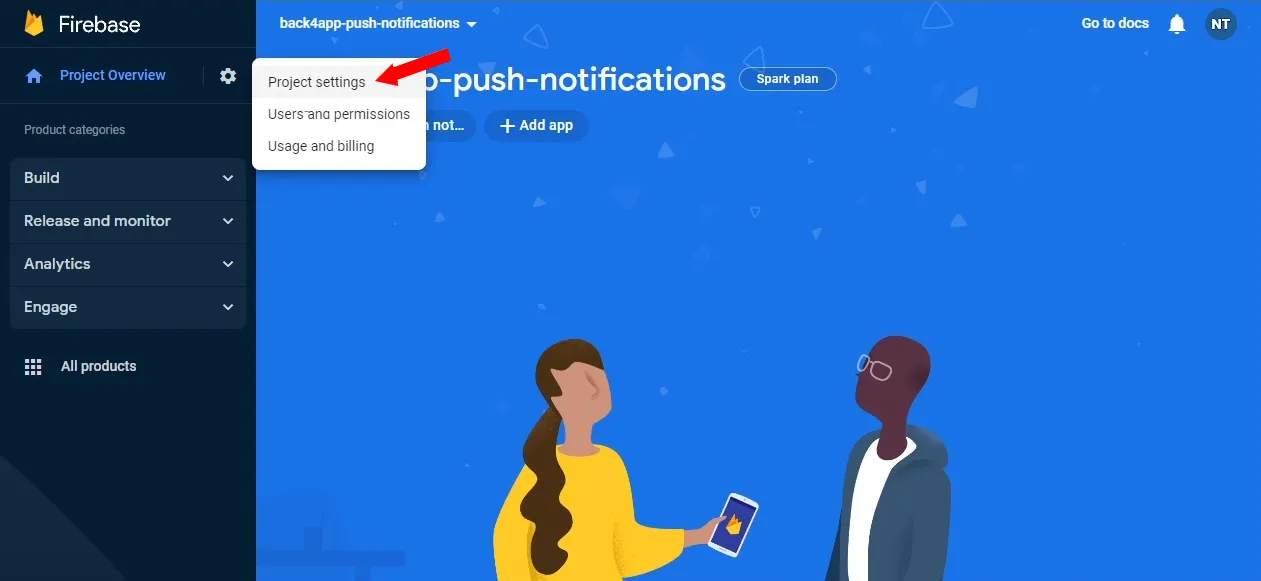
Select “Cloud Messaging” in the top navigation.
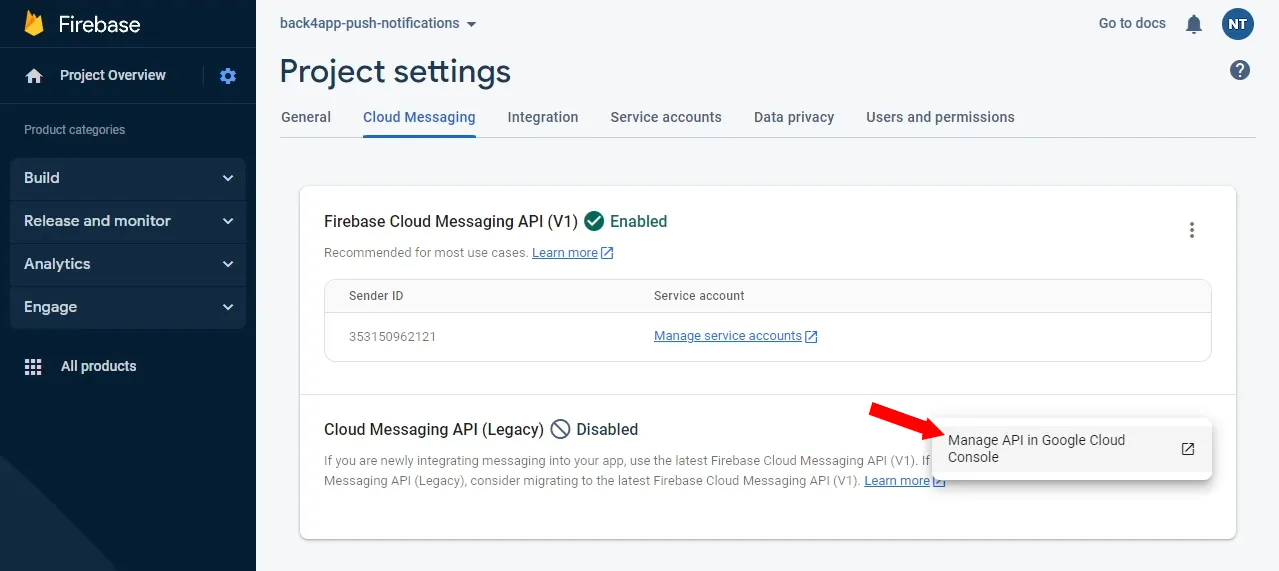
Parse push notifications require Cloud Messaging API which is disabled by default. To enable it use the more option and then click on “Manage API in Google Cloud Console”. Click “Enable API” and wait a few seconds for Google to enable it.
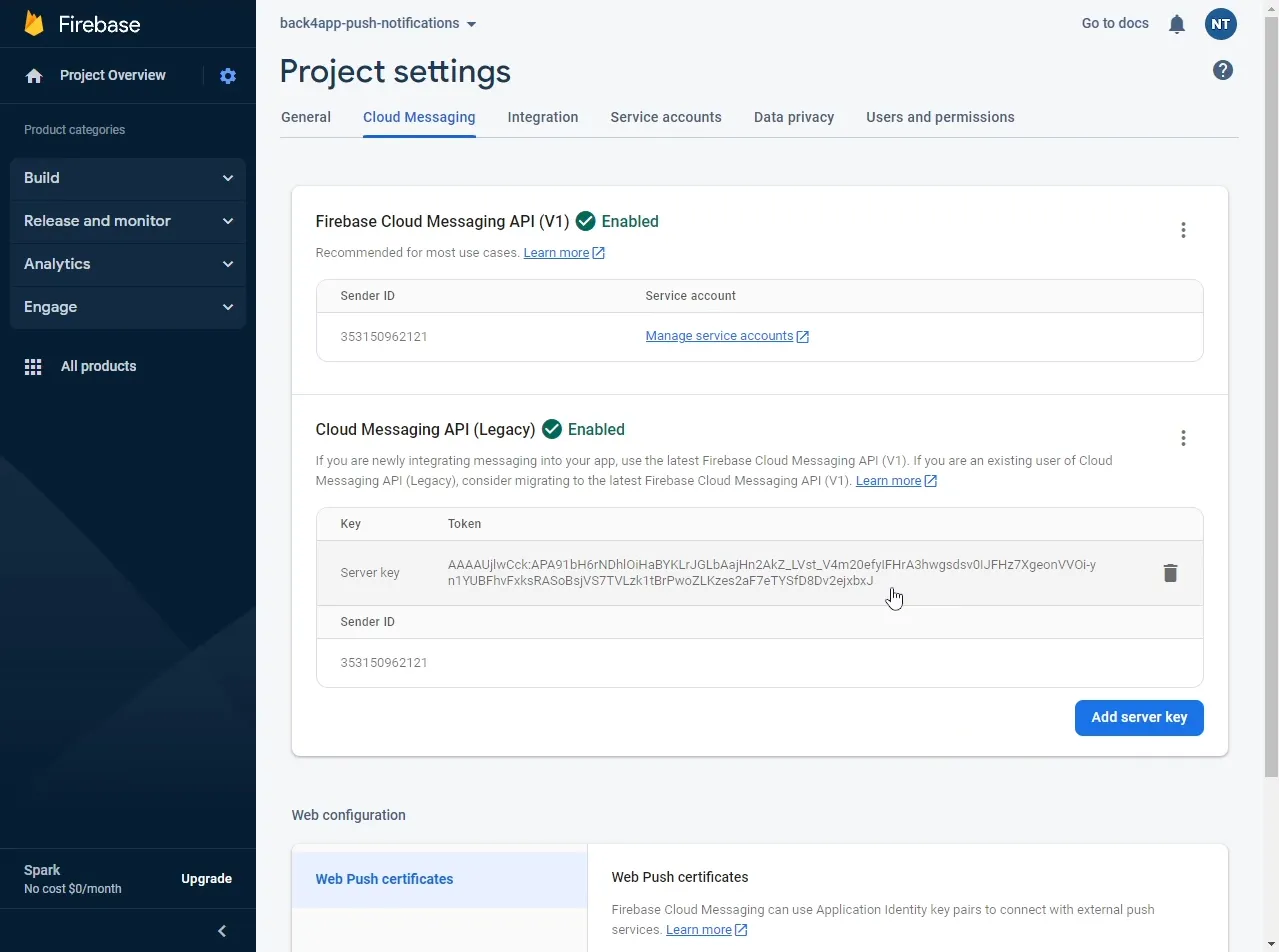
Once the API has been successfully enabled, close the current tab and navigate back to your Cloud Messaging settings. Take note of your “Sender ID” and “Server Key”.
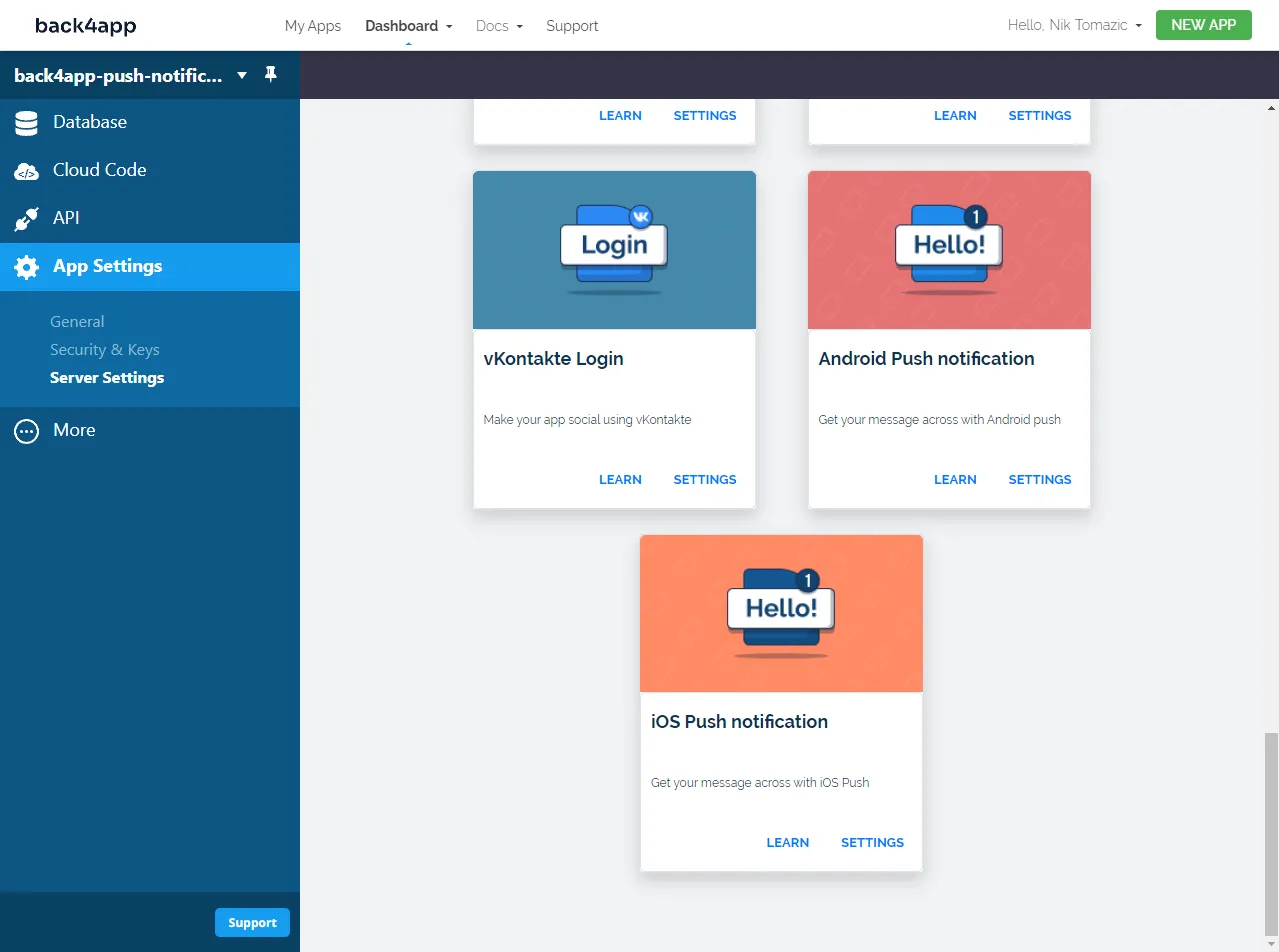
Next, navigate to your Back4app app dashboard and select “App Settings > Server Settings” in the sidebar. Scroll down until you see “Android Push notification” and click on “Settings”.
Click “Edit”, enter your “Sender ID” and “Server key” and save.
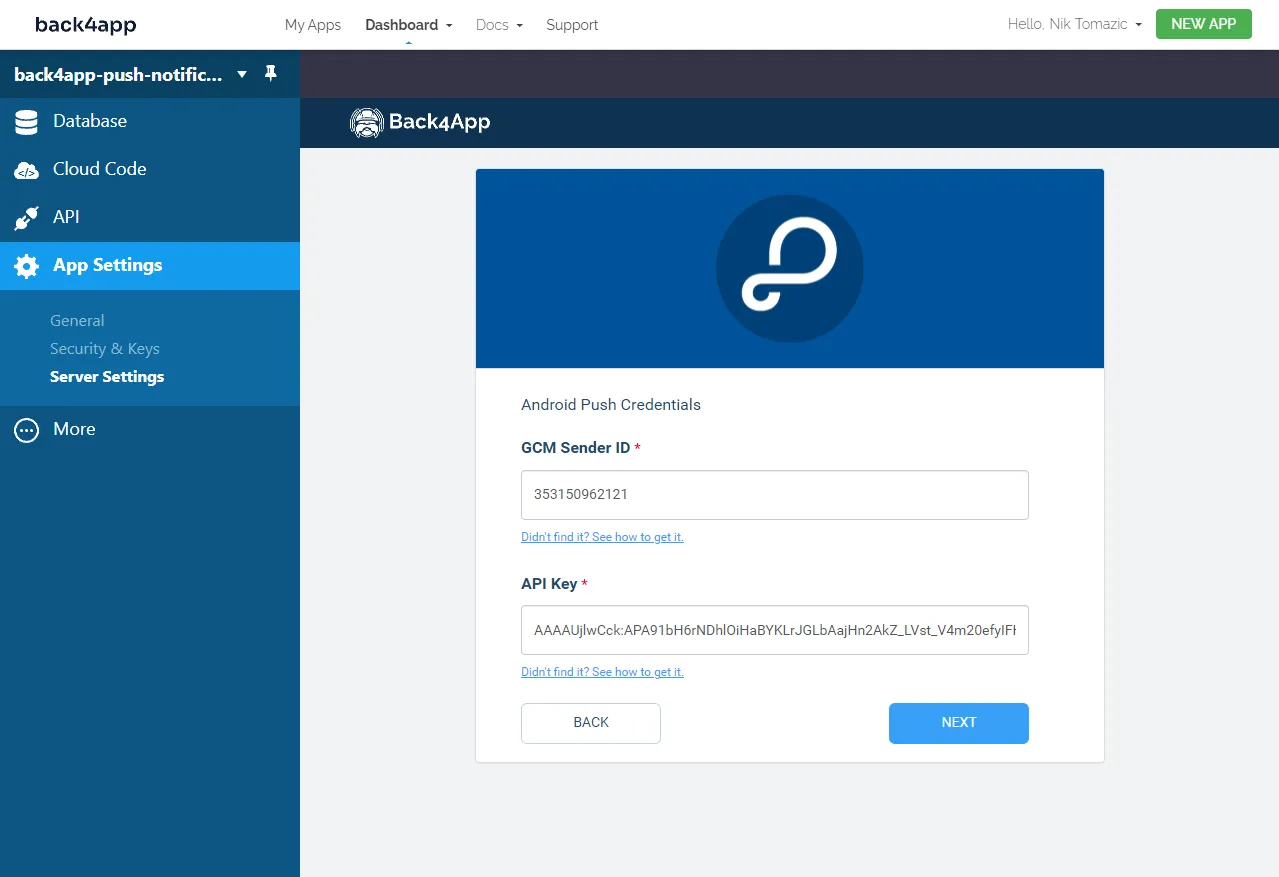
Your Firebase project and Back4app app are now connected.
Configure App for Push Notifications
The last thing we have to do before we can send notifications is to configure our Android app. We’ll have to:
- Set the GCM sender ID and add permissions in AndroidManifest.xml
- Add a service and a receiver to AndroidManifest.xml
- Create a
ParseInstallationin App.kt
Navigate to your AndroidManifest.xml and modify it like so:
<!-- app/src/main/AndroidManifest.xml -->

<?xml version="1.0" encoding="utf-8"?>
<manifest xmlns:android="http://schemas.android.com/apk/res/android"
    xmlns:tools="http://schemas.android.com/tools">

    <!-- new -->
    <uses-permission android:name="android.permission.WAKE_LOCK" />
    <uses-permission android:name="android.permission.VIBRATE" />
    <uses-permission android:name="android.permission.RECEIVE_BOOT_COMPLETED" />
    <uses-permission android:name="android.permission.GET_ACCOUNTS" />
    <uses-permission android:name="com.google.android.c2dm.permission.RECEIVE" />
    <!-- end of new -->

    <uses-permission android:name="android.permission.ACCESS_NETWORK_STATE" />
    <uses-permission android:name="android.permission.INTERNET" />

    <application>
        <activity
            android:name=".MainActivity"
            android:exported="true">
            <intent-filter>
                <action android:name="android.intent.action.MAIN" />
                <category android:name="android.intent.category.LAUNCHER" />
            </intent-filter>

            <meta-data
                android:name="android.app.lib_name"
                android:value="" />
            <meta-data
                android:name="com.parse.SERVER_URL"
                android:value="@string/back4app_server_url" />
            <meta-data
                android:name="com.parse.APPLICATION_ID"
                android:value="@string/back4app_app_id" />
            <meta-data
                android:name="com.parse.CLIENT_KEY"
                android:value="@string/back4app_client_key" />

            <!-- new -->
            <meta-data
                android:name="com.parse.push.gcm_sender_id"
                android:value="YOUR_GCM_SENDER_ID" />
            <!-- end of new -->

        </activity>

        <!-- new -->
        <service
            android:name="com.parse.fcm.ParseFirebaseMessagingService"
            android:exported="false">
            <intent-filter>
                <action android:name="com.google.firebase.MESSAGING_EVENT" />
            </intent-filter>
        </service>

        <receiver
            android:name="com.parse.ParsePushBroadcastReceiver"
            android:exported="false">
            <intent-filter>
                <action android:name="com.parse.push.intent.RECEIVE" />
                <action android:name="com.parse.push.intent.OPEN" />
                <action android:name="com.parse.push.intent.DELETE" />
            </intent-filter>
        </receiver>
        <!-- end of new -->
    </application>
</manifest>
Make sure to replace YOUR_GCM_SENDER_ID with your actual GCM sender ID.
Your final AndroidManifest.xml should look like this.
Next, navigate to your App.kt and add the following code at the bottom of onCreate():
// app/src/main/java/.../App.kt

import com.parse.ParseInstallation

class App : Application() {
    override fun onCreate() {
        // ...

        val installation = ParseInstallation.getCurrentInstallation()
        installation.put("GCMSenderId", "YOUR_GCM_SENDER_ID")
        installation.put("channels", listOf("news", "updates"))
        installation.saveInBackground()
    }
}
Make sure to enter your actual GCM sender ID. You can also modify the channel names.
This code creates a ParseInstallation and saves it to the DB. Additionally, it configures the notification channels in our case news and updates. These channels can be used to send different types of notifications via Cloud Code.
Great, we’ve successfully configured our Android app for push notifications.
Send Push Notifications
Back4app dashboard
Sending a push notification via the Back4app dashboard is easy. This approach is appropriate for manually sending one-time push notifications.
First, select “More > Push > Send New Push” in the sidebar and then fill out the form.
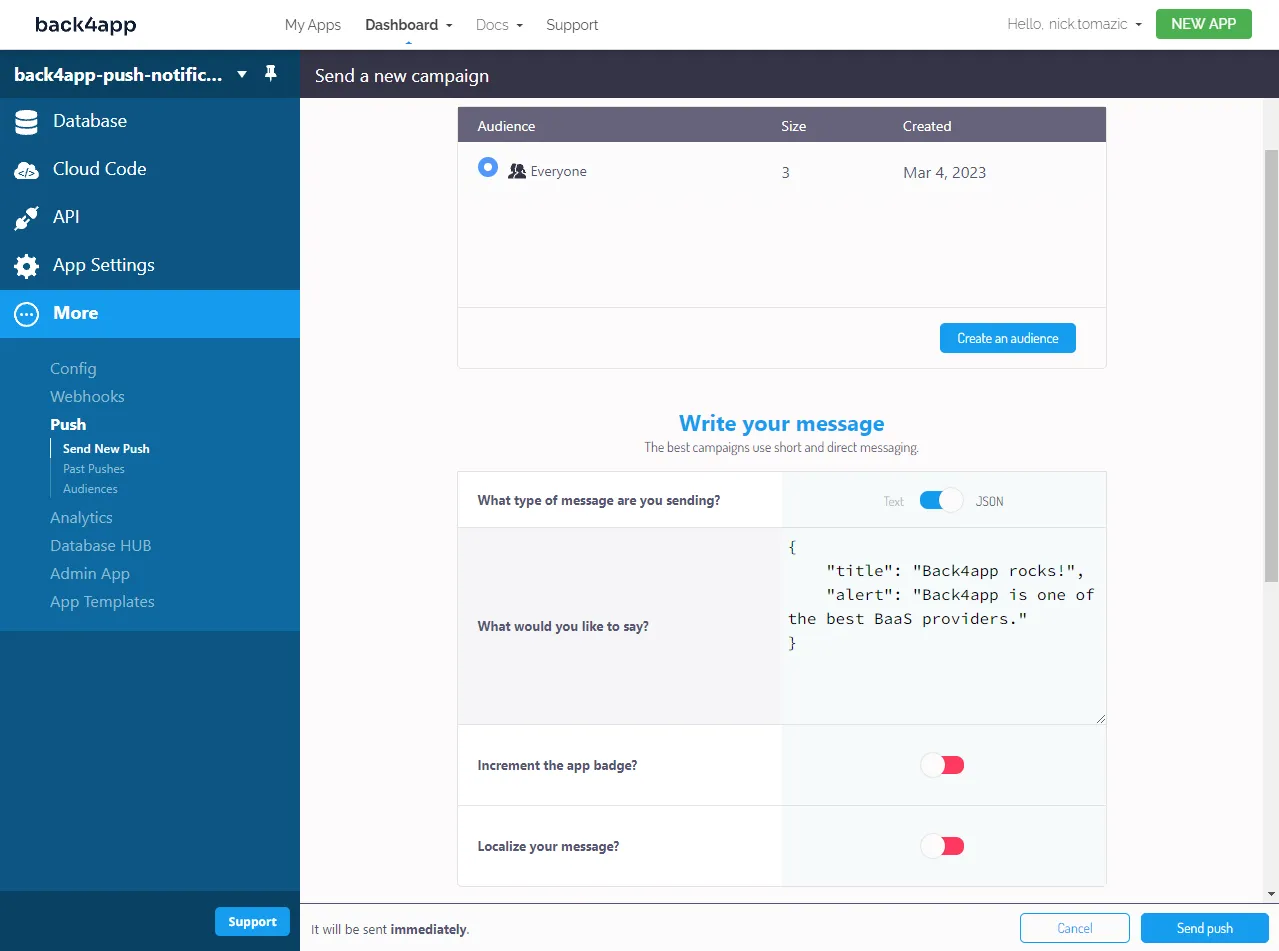
Lastly, click on the “Send push” button.
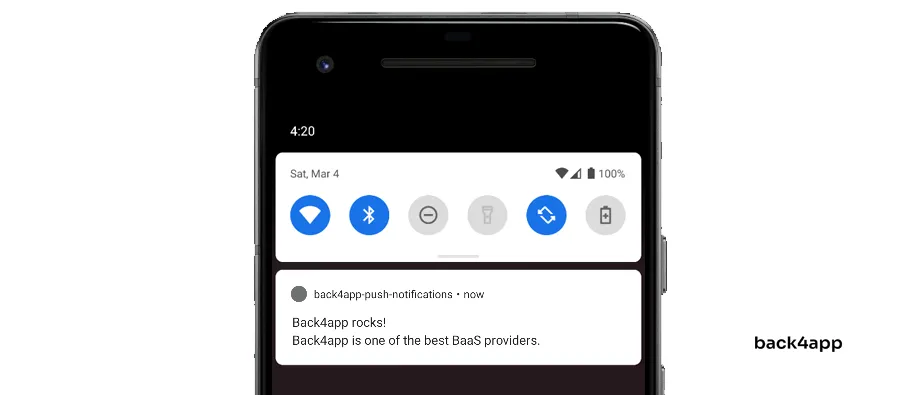
I suggest you use
JSONformat since it allows you to specify the title of the notification viatitleand the body viaalert.
Cloud Code
Cloud Code can be used to programmatically send push notifications. On top of that, you can use it to schedule push notifications or send push notifications on specific events.
To send a push notification via Cloud Code select “Cloud Code > Functions & Web Hosting” in the sidebar and then add the following code to main.js:
// cloud/main.js

Parse.Cloud.define("pushTest", (request) => {
    return Parse.Push.send({
        channels: ["news"],
        data: {
            title: "Cloud Code",
            alert: "This push notification was sent via Cloud Code.",
        }
    }, { useMasterKey: true });
});
Deploy the code by clicking on the “Deploy” button.
Lastly, trigger the cloud function via a REST call:
curl --location --request POST 'https://parseapi.back4app.com/functions/pushTest' \
--header 'X-Parse-Application-Id: YOUR_APPLICATION_ID' \
--header 'X-Parse-REST-API-Key: YOUR_REST_KEY' \
--header 'Content-Type: application/json'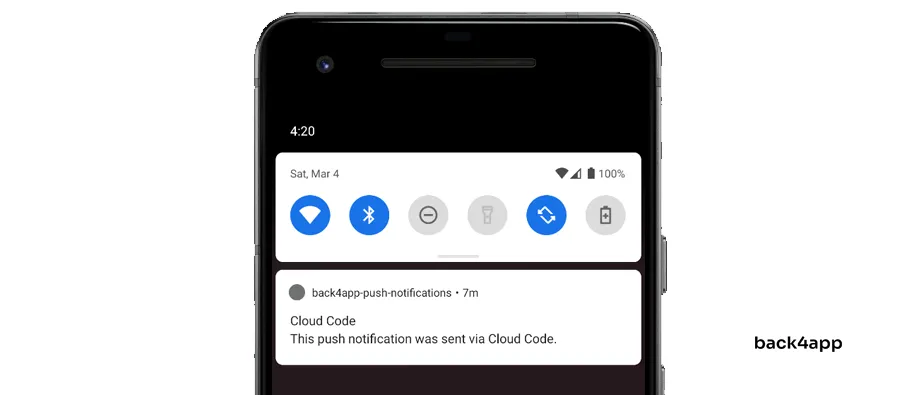
Application ID and REST key can be obtained from “App Settings > Security & Keys”.
To schedule push notifications take a look at Cloud Jobs.
Conclusion
In the article we’ve talked about push notifications, their benefits, notification types, and their do’s and don’ts. Additionally, you’ve learned how to configure your Android application to send your push notifications via Back4app.
The final source code is available on a GitHub repo.
Future steps
- If you’d like to schedule your notifications or target specific users take a look at Parse docs.
- To learn how to send push notifications to iOS devices check out the official docs.
- To learn more about Cloud Code take a look at What is FaaS in Cloud Computing?
FAQ
What is a push notification?
A push notification is a short message or an alert that can be sent directly to your customer’s mobile device, web browser, wearable or any other device that supports notifications.
What are the benefits of push notifications?
– Higher user retention
– Higher conversion rates
– Enhanced customer care
– Increased sales & revenue
What are the push notification types?
– Mobile push notifications
– Web push notifications
– Desktop push notifications
What is a push notification service?
A push notification service is a service that allows 3rd party developers to send push notifications to their customers’ devices via an API or a dashboard.


