What are Serverless Functions?
In this article, we’ll talk about serverless computing, various software architectures, serverless functions, their benefits, and use cases. In the second part of the article, we’ll learn how to build a serverless backend on Back4app using Cloud Code functions.
Contents
- 1 What is a serverless function?
- 2 How do serverless functions work?
- 3 What are the different software architectures?
- 4 What are the benefits of serverless functions?
- 5 What are some of the serverless functions use cases?
- 6 What are examples of serverless environments?
- 7 Building a Serverless Backend on Back4app
- 8 Conclusion
- 9 What are serverless functions?
- 10 Why use the serverless architecture?
- 11 What are the different software architectures?
- 12 What are the benefits of serverless functions?
- 13 How to deploy serverless functions?
What is a serverless function?
A serverless function is an event-driven piece of code that serves a single purpose. It can be triggered by specific events such as HTTP requests, database changes, or other messages. These functions are written by a software developer and later deployed to the cloud. The cloud provider then manages the infrastructure, security, takes care of running the code, and automatically scales resources based on demand.
Serverless functions are often confused with serverless computing. While the terms are related to one another they cannot be used interchangeably. Serverless computing is a cloud computing model where cloud providers manage the infrastructure required to run the applications, while serverless functions are a type of serverless computing that allows developers to easily run and deploy small pieces of code in the cloud.
How do serverless functions work?
Most modern applications are split into two parts: the frontend and the backend. The frontend is what the user sees and can interact with, while the backend is everything the user can’t see. That includes business logic, data storage, databases, APIs, and so on.
Serverless functions simplify the backend component of software applications, splitting the backend into multiple reusable single-purpose functions. These functions can later be connected to perform complex tasks.
The easiest way to understand serverless functions is by looking at a real-world example. Suppose that we have an e-commerce store where a user can view products, add products to the cart, remove products from the cart, and checkout.
Our serverless backend would most likely include the following functions:
getProductList()                       -> retrieves the products from the database
getProduct(productId)                  -> retrieves a specific product from the database
getCart(user)                          -> returns the products in the user's cart
addToCart(user, productId)             -> adds a product to the user's cart
removeFromCart(user, productId)        -> removes the product from the user's cart
clearCart(user)                        -> clears user's cart
And then we’d also have more complex functions that utilize other serverless functions:
checkout()
    cart = getCart(user)
    finalizeCheckout(user, cart)       -> deducts money from user's account
    clearCart(user)
    sendConfirmationEmail(user, cart)  -> sends a confirmation email to the user
Okay, but how do serverless functions work under the hood?
Under the hood, serverless functions work by leveraging containerization technology, which involves packaging code into lightweight, isolated containers that can be easily deployed and scaled on demand. When a serverless function is triggered, the cloud provider creates a new instance of the container, runs the code in it, and then shuts down the container when the code has finished executing.
The cloud provider typically handles all aspects of managing the underlying infrastructure, including scaling, load balancing, and resource allocation, so developers don’t have to worry about configuring or managing servers. Instead, developers simply write code, upload it to the cloud provider, and define the trigger conditions for when the code should run.
What are the different software architectures?
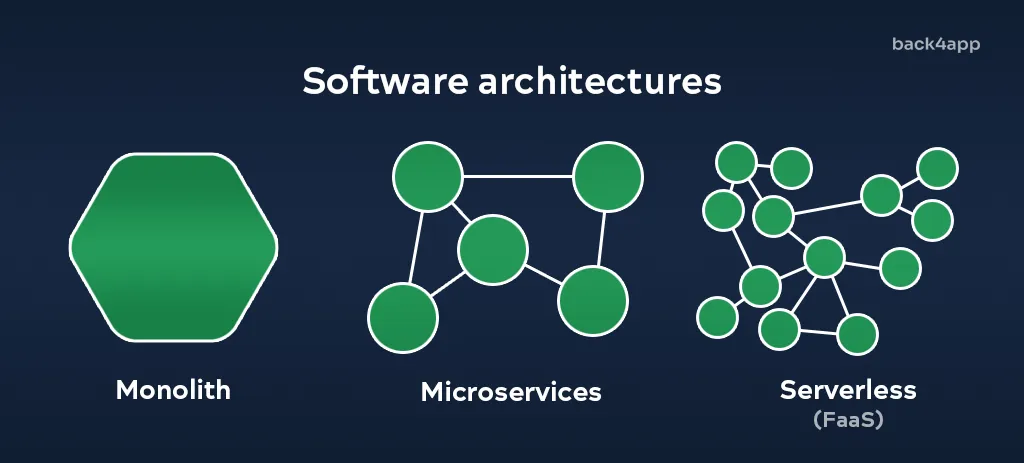
In addition to serverless functions, we also have monolithic architecture and microservices architecture. Let’s look at them.
Monolithic Architecture
In a monolithic architecture, the application is built as a single unit with all the components tightly integrated. All the functionalities are combined into one codebase, and the application is deployed as a single package. Monolithic architecture is simple to build and maintain, but it can become complex and hard to scale as the application grows.
Microservices Architecture
Microservices architecture is an approach to building software applications as a collection of small, independent services that communicate with each other through APIs. Each microservice is responsible for a specific function of the application and can be developed, deployed, and scaled independently. This approach allows for greater flexibility, scalability, and resiliency, but it can also introduce complexity in terms of service communication and management.
In conclusion, monolithic apps are best suited for simpler projects that don’t require to scale much. On the other hand microservices and serverless are generally more appropriate for more complex projects that need to be highly scalable and flexible. In addition to all the perks of microservices, serverless architecture also abstracts away infrastructure management. Therefore saving you a lot of time and money.
What are the benefits of serverless functions?
Functions as a Service (FaaS) come with many benefits.
Faster development
Serverless functions allow for faster development and deployment since there’s no need for managing the infrastructure, configuring the servers, setting up scaling, or managing servers. Since serverless functions are small pieces of code that serve a single purpose they can be easily tested and debugged. Best of all, serverless functions can be easily integrated with other cloud services or 3rd party APIs offloading a lot of common problems.
High scalability & availability
Serverless functions can handle a large number of requests and scale automatically based on demand. This ensures that the application can accommodate any level of traffic. On top of that if no one is using your service the environment can scale to zero, saving you lots of money.
It is also possible to deploy your Functions-as-a-Service (FaaS) to multiple zones. This can help you improve the availability of your app by distributing your functions across the globe.
Greater flexibility
Serverless functions allow developers to choose the programming language and tools that best fit their needs. Most serverless vendors support multiple languages such as JavaScript, Java, Python, Go, and .NET. This provides greater flexibility in developing and deploying applications.
Cost-effectiveness
Serverless is the most cost-effective architecture since you only pay for what you consume. That is your functions runtime and other managed services your functions use. Additionally, you don’t need to pay for idle resources.
What are some of the serverless functions use cases?
Serverless functions can be used in practically any project. You can use serverless functions to build the project from the ground up or just for specific tasks. The main use cases include:
- Web applications
- Building RESTful APIs
- Trigger-based tasks
- Scheduled task automation
- Asynchronous processing
- Internet of Things (IoT)
- CI/CD
Most developer teams migrate to serverless in stages. They migrate task by task until there’s no more need for traditional servers.
What are examples of serverless environments?
Platform as a Service (PaaS)
Platform as a Service (PaaS) is an advantageous cloud computing solution that offers users the ability to create, manage, and deploy applications in a cloud-based environment.
It provides preconfigured tools for application development, customization, and testing, eliminating much of the time spent on infrastructure management.
Developing an app that will be deployed to PaaS isn’t much different from building a traditional app. PaaS vendors don’t support serverless functions out of the box.
PaaS services include: Heroku, AWS Elastic Beanstalk, DigitalOcean App Platform and Fly.io.
Backend as a Service (BaaS)
BaaS streamlines and simplifies backend development by providing a platform to manage cloud infrastructure.
It handles all of the tedious tasks associated with building a backend, allowing developers to focus on creating applications. By automating many of these processes, BaaS helps developers create robust applications quickly and efficiently.
The platform offers a wide range of features including user management, notifications, social media integrations, and storage. Making it an ideal choice for businesses looking to build out their digital presence. Additionally, it provides convenience and ease of use that makes it accessible to users across the board.
Developers are liberated from the need to worry about backend infrastructure and can instead focus their efforts on creating the frontend of their projects. This enables them to concentrate on the core business without having to devote time and energy to other tasks.
Some BaaS vendors also allow us to deploy serverless functions:
- Back4app has Cloud Code functions
- Firebase has Google Cloud Functions
- AWS Amplify has AWS Lambda
Other BaaS vendors include Supabase, Kinvey and Parse.
Function as a Service (FaaS)
Function as a Service (FaaS) is a cloud computing model specialized for serverless functions. FaaS allows developers to focus on writing and deploying individual functions rather than building and managing a full application stack. Serverless functions usually integrate with 3rd party APIs and other cloud services. This computing model can scale automatically and quickly scale to accommodate any traffic.
The main differences between BaaS and FaaS lie in:
- Application construction
- Scalability
- Pricing model
Serverless functions are run in containers, are more scalable, and are more cost-efficient since you only pay for your functions’ runtime. BaaS on the other hand has a lot of built-in features like user management, push notifications, social media integrations, and other out-of-the-box tools that allow you to rapidly build backends. On top of that BaaS is extremely easy to use.
A few FaaS examples include: AWS Lambda, Google Cloud Functions, and Azure Functions.
Building a Serverless Backend on Back4app
In this section of the tutorial, we’ll demonstrate how to code and deploy Cloud Code functions to Back4app. Additionally, we’ll learn how to connect a frontend to a serverless backend.
Objectives:
By the end of this tutorial, you’ll be able to:
- Explain what Cloud Code functions are and how they work
- Code your Cloud Code functions that can manipulate the database
- Use Cloud Code functions to fetch data from 3rd party APIs
- Create your own Cloud Jobs and schedule them
- Connect a frontend project with a serverless backend
What is Back4app?
Back4app is a leading BaaS – Backend as a Service platform that provides developers with the tools and features they need to easily create web and mobile apps.
With its comprehensive set of advantages, it enables developers to focus on the main aspects of their business instead of worrying about backend complexities or infrastructure issues. It is one of the most preferred open-source BaaS solutions available today.
The comprehensive solution comes with an interactive dashboard and a flexible CLI – Command Line Interface for maximum convenience. Additionally, it provides SDKs that are compatible with React Native, Flutter, Node.js, Angular, iOS, Android, and more – making integration into existing systems effortless!
Back4app’s core features incorporate a spreadsheet-style database, GraphQL and REST APIs, live queries, authentication with social login options, scalability for hosting, and notifications all available in this powerful platform.
For additional information please read Back4app Features.
Back4app offers a cost-effective model for all types of apps, ranging from small to large. They provide a complimentary plan that is perfect for developing and experimenting with the platform.
Project Introduction
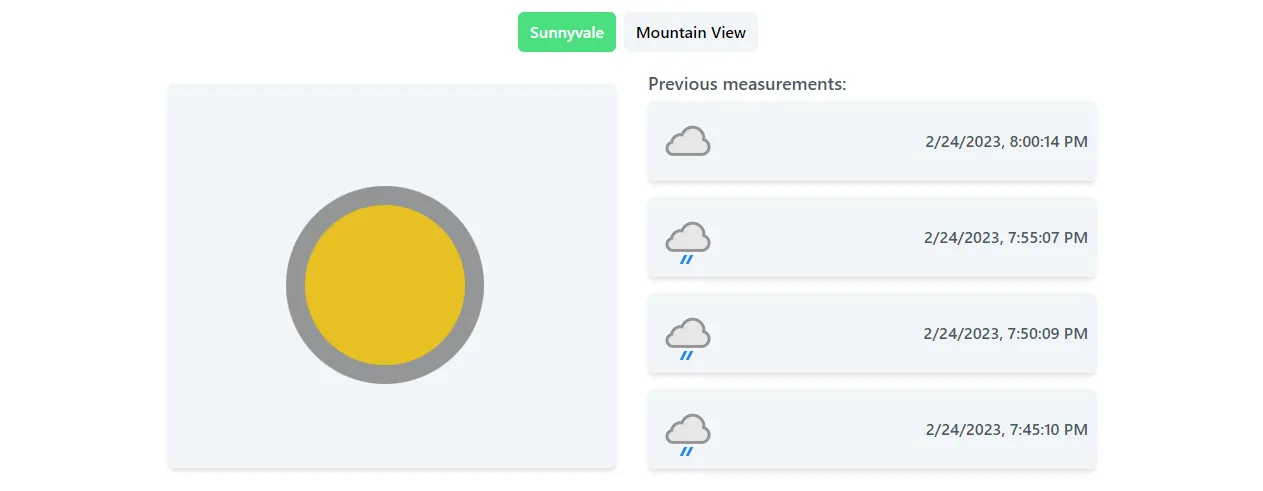
We’ll be building a simple weather station management app. We’ll first create virtual weather stations and then use WeatherAPI to get actual weather information at the weather stations’ locations. To define our app logic we’ll use Cloud Code functions and Cloud Jobs. In the end, we’ll demonstrate how to easily connect a frontend project to a serverless backend.
Create App
If you do not have a Back4app account yet, sign up now to take advantage of their free services. Otherwise, log in to your existing account and proceed with the following steps.
To begin using Back4app, you’ll need to create an app. Log in to your dashboard to view the list of apps and click on “Build new app” to start building your app.
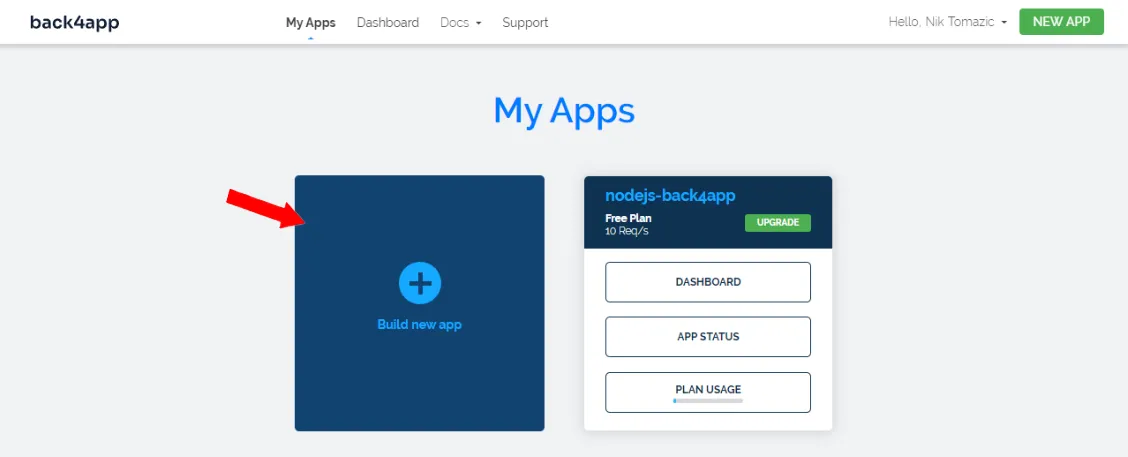
Since we’ll use the Parse framework to build our application select “Backend as a Service”.
Next, enter a custom app name, select “NoSQL Database” as your database, and lastly click “Create”.
Back4app is going to set up all the necessary components for your app including the database, application layer, scaling, backups, and security. It only takes a short time to get it done.
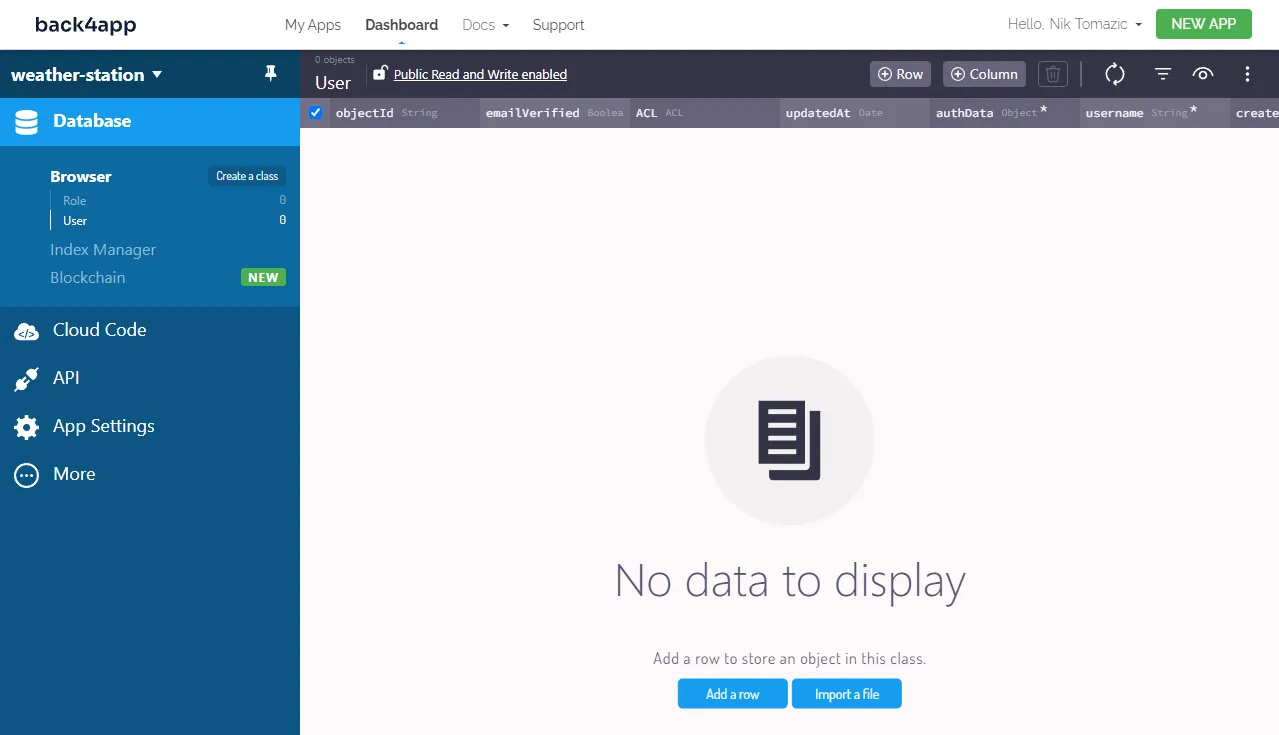
Once your application has been completed, you will be redirected to the dashboard of your app.
Database
Let’s define our database models. We’ll create two models:
WeatherStationrepresents a virtual weather station located at some location.WeatherRecordrepresents a measurement of the weather at a specificWeatherStation.
Navigate to your “Database” and click on “Create a class”. Name it WeatherStation, make sure to enable “Public Read and Write” and add the following fields to it:
+---------------------------+-----------------+---------------+----------+
| Data type                 | Name            | Default value | Required |
+---------------------------+-----------------+---------------+----------+
| String                    | name            | <leave blank> | yes      |
+---------------------------+-----------------+---------------+----------+
| String                    | location        | <leave blank> | yes      |
+---------------------------+-----------------+---------------+----------+
Next, follow the same steps to create another class named WeatherRecord with the following fields:
+---------------------------+-----------------+---------------+----------+
| Data type                 | Name            | Default value | Required |
+---------------------------+-----------------+---------------+----------+
| Pointer -> WeatherStation | weatherStation  | <leave blank> | yes      |
+---------------------------+-----------------+---------------+----------+
| String                    | weatherText     | <leave blank> | yes      |
+---------------------------+-----------------+---------------+----------+
| String                    | weatherIcon     | <leave blank> | yes      |
+---------------------------+-----------------+---------------+----------+
| Number                    | weatherCode     | <leave blank> | yes      |
+---------------------------+-----------------+---------------+----------+
Lastly, navigate to the WeatherStation model and create two weather stations. Example:
+---------------------------+---------------+
| name                      | location      |
+---------------------------+---------------+
| Sunnyvale Station         | sunnyvale     |
+---------------------------+---------------+
| Mountain View Station     | mountain view |
+---------------------------+---------------+
Great, that’s it for the database.
WeatherAPI
To fetch the current weather information we’ll use a free API called WeatherAPI.
The following steps will require you to have a WeatherAPI account. If you don’t have one yet go ahead and sign up otherwise log into your dashboard.
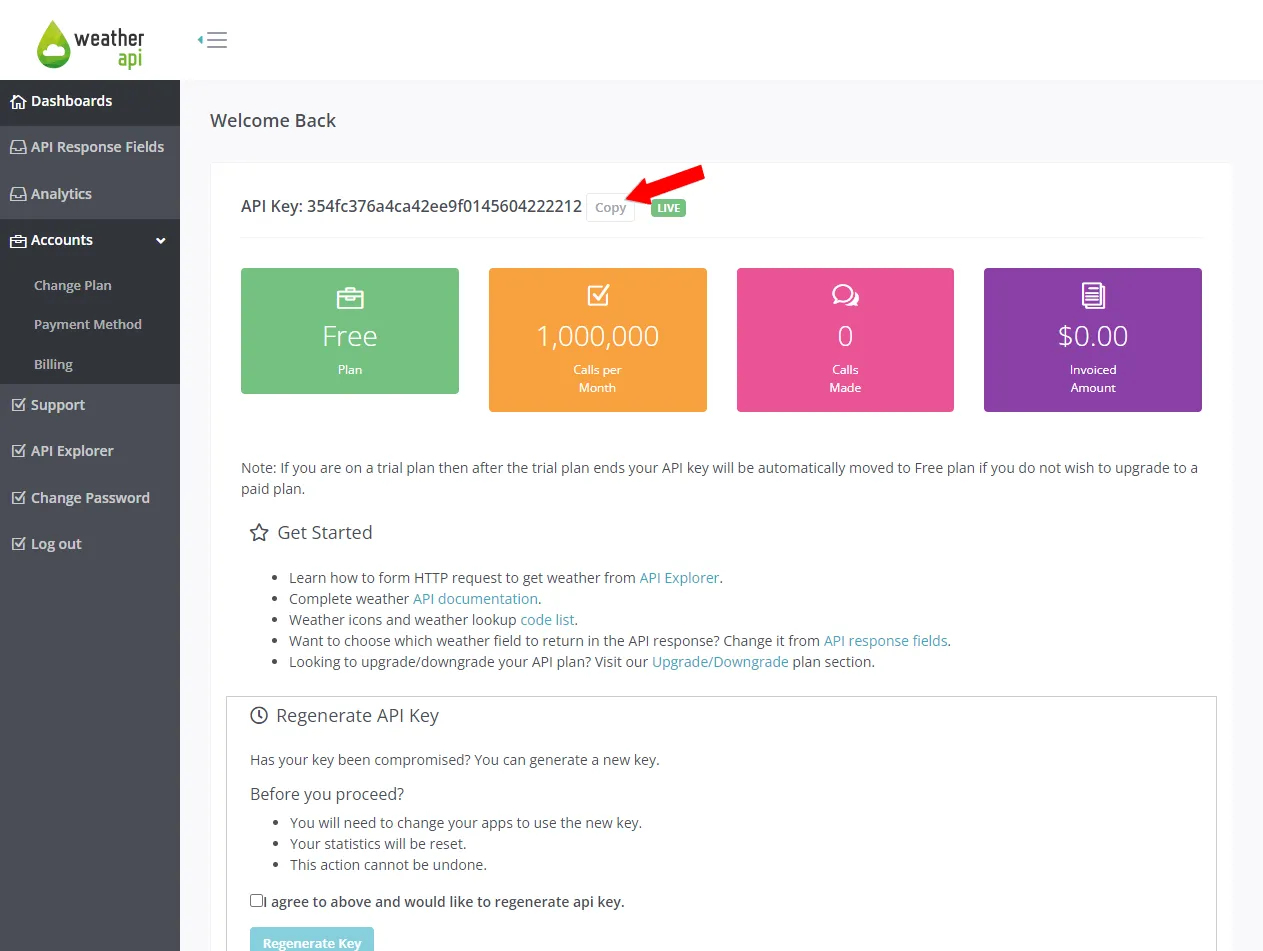
Once you’re logged in take note of your API key:
Next, open your terminal and try to fetch the current weather information for “Sunnyvale” using your API key:
curl "https://api.weatherapi.com/v1/current.json?key=<your_api_key>&q=<location>&aqi=no"

# Example:
# curl "https://api.weatherapi.com/v1/current.json?key=354fc376a4c&q=Sunnyvale&aqi=no"
You should get a response similar to this one:
{
    "location": {
        "name": "Sunnyvale",
        "region": "California",
        "country": "United States of America",
        "lat": 37.37,
        "lon": -122.04,
    },
    "current": {
        "temp_c": 7.0,
        "temp_f": 44.6,
        "is_day": 1,
        "condition": {
            "text": "Light rain",
            "icon": "//cdn.weatherapi.com/weather/64x64/day/296.png",
            "code": 1183
        },
        ...
    }
}
In the next section of the article, we’ll use Cloud Code functions to fetch weather information from the WeatherAPI and then store it in the database.
Cloud Code
Cloud Code functions are a powerful feature of the Parse Server that allows developers to execute custom server-side JavaScript code. Developers can use these functions to implement business logic, validate data, process complex data, and build serverless backends in general.
Navigate to your Back4app app dashboard and select “Functions & Web Hosting” under “Cloud Code” on the sidebar.
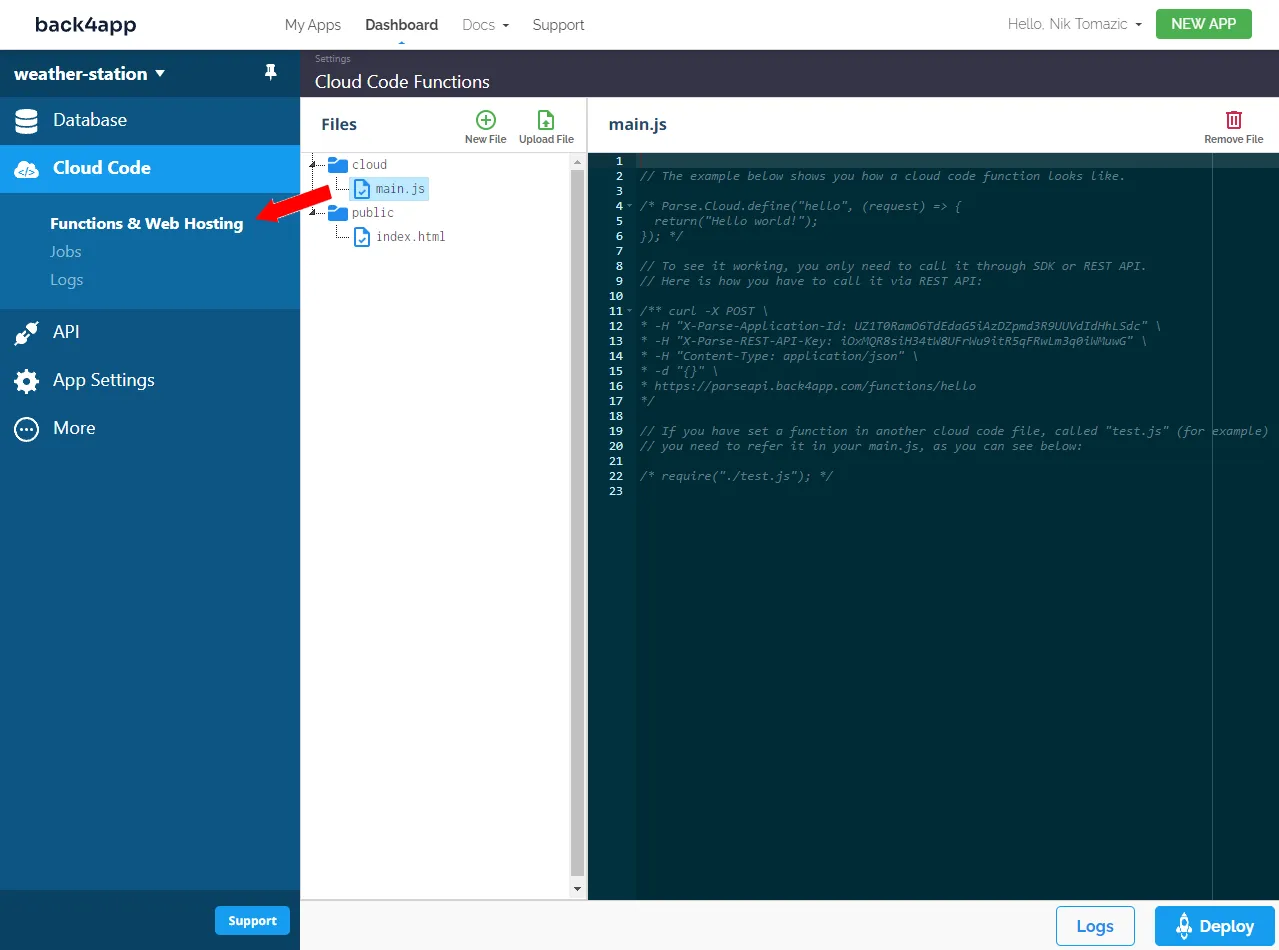
The Back4app Cloud Code UI is easy to use. On the left side of the screen, you can see the directory structure. By default there are two directories:
- cloud is a directory for all the cloud code
- public is a directory for public files like images, stylesheets & more
And on the right side of the screen, you have a built-in code editor.
Define Cloud Code functions
We’ll define the following functions:
weatherLocationsreturns the list of weather station locations.weatherInforeturns the weather report for a specific location.
But before that let’s install a 3rd party package called axios. Axios is a promise-based HTTP client for JavaScript that greatly simplifies making HTTP requests.
Create a new file called package.json within the cloud folder and put the following inside:
{
  "dependencies": {
    "axios": "*"
  }
}
Next, define the Cloud Code functions in cloud/main.js like so:
// cloud/main.js

const axios = require("axios");

// make sure to replace `<api_key>` with your actual WeatherAPI key
const WEATHER_API_BASE = "https://api.weatherapi.com/v1/current.json?key=<api_key>";

Parse.Cloud.define("weatherLocations", async (request) => {
  const WeatherStation = Parse.Object.extend("WeatherStation");
  const weatherStationQuery = new Parse.Query(WeatherStation);
  const weatherStationResults = await weatherStationQuery.find();

  return weatherStationResults.map(result => result.get("location"))
});

Parse.Cloud.define("weatherInfo", async (request) => {
  let location = request.params.location;

  if (!location) {
    throw new Parse.Error(400, "Location not provided.");
  }

  const WeatherStation = Parse.Object.extend("WeatherStation");
  const weatherStationQuery = new Parse.Query(WeatherStation);
  weatherStationQuery.equalTo("location", location);
  const weatherStationResults = await weatherStationQuery.find();

  if (weatherStationResults.length == 0) {
    throw new Parse.Error(400, "Invalid location.");
  }

  const WeatherRecord = Parse.Object.extend("WeatherRecord");
  const weatherRecordQuery = new Parse.Query(WeatherRecord);
  weatherRecordQuery.equalTo("weatherStation", weatherStationResults[0]);
  weatherRecordQuery.descending("createdAt");
  weatherRecordQuery.limit(5);
  const weatherRecordResults = await weatherRecordQuery.find();

  return weatherRecordResults;
});
Lastly, click “Deploy” at the bottom right of the screen to deploy your functions to Back4app.
Cloud Job
Cloud Jobs allow developers to run background jobs, such as sending push notifications or processing data. These jobs are written similarly to Cloud Code functions and can be scheduled to run on a one-time or recurring basis.
Let’s create a Cloud Job that measures the weather at all our weather stations every 30 minutes.
Define Cloud Job
Select “Cloud Code” on the sidebar and paste the following code to the bottom of cloud/main.js:
// cloud/main.js

// ...

Parse.Cloud.job("weatherCapture", async (request) => {
  const {params, headers, log, message} = request;
  message("weatherCapture just started...");

  const WeatherStation = Parse.Object.extend("WeatherStation");
  const weatherStationQuery = new Parse.Query(WeatherStation);
  const weatherStationResults = await weatherStationQuery.find();

  for (let i = 0; i < weatherStationResults.length; i++) {
    let weatherStation = weatherStationResults[i];

    try {
      const response = await axios.get(
        WEATHER_API_BASE + "&q=" + weatherStation.get("location") + "&aqi=no"
      );
      const currentWeather = response.data.current.condition;
      let icon = currentWeather.icon
        .replace("//", "https://")
        .replace("64x64", "128x128");

      const WeatherRecord = Parse.Object.extend("WeatherRecord");
      const weatherRecord = new WeatherRecord();
      weatherRecord.set("weatherStation", weatherStation);
      weatherRecord.set("weatherText", currentWeather.text);
      weatherRecord.set("weatherIcon", icon);
      weatherRecord.set("weatherCode", currentWeather.code);
      weatherRecord.save();
    } catch (error) {
      throw new Parse.Error(400, error);
    }
  }

  message("weatherCapture just finished!");
});
This code defines a new cloud job named weatherCapture. The job loops through all the WeatherStation, fetches the weather information from WeatherAPI, and stores it in the database.
To test if it works navigate to “Jobs > All Jobs” on the sidebar and try to run the job. If everything goes well there should be two new WeatherRecord in the database afterward.

Schedule Cloud Job
Let’s schedule the job to run every 30 minutes.
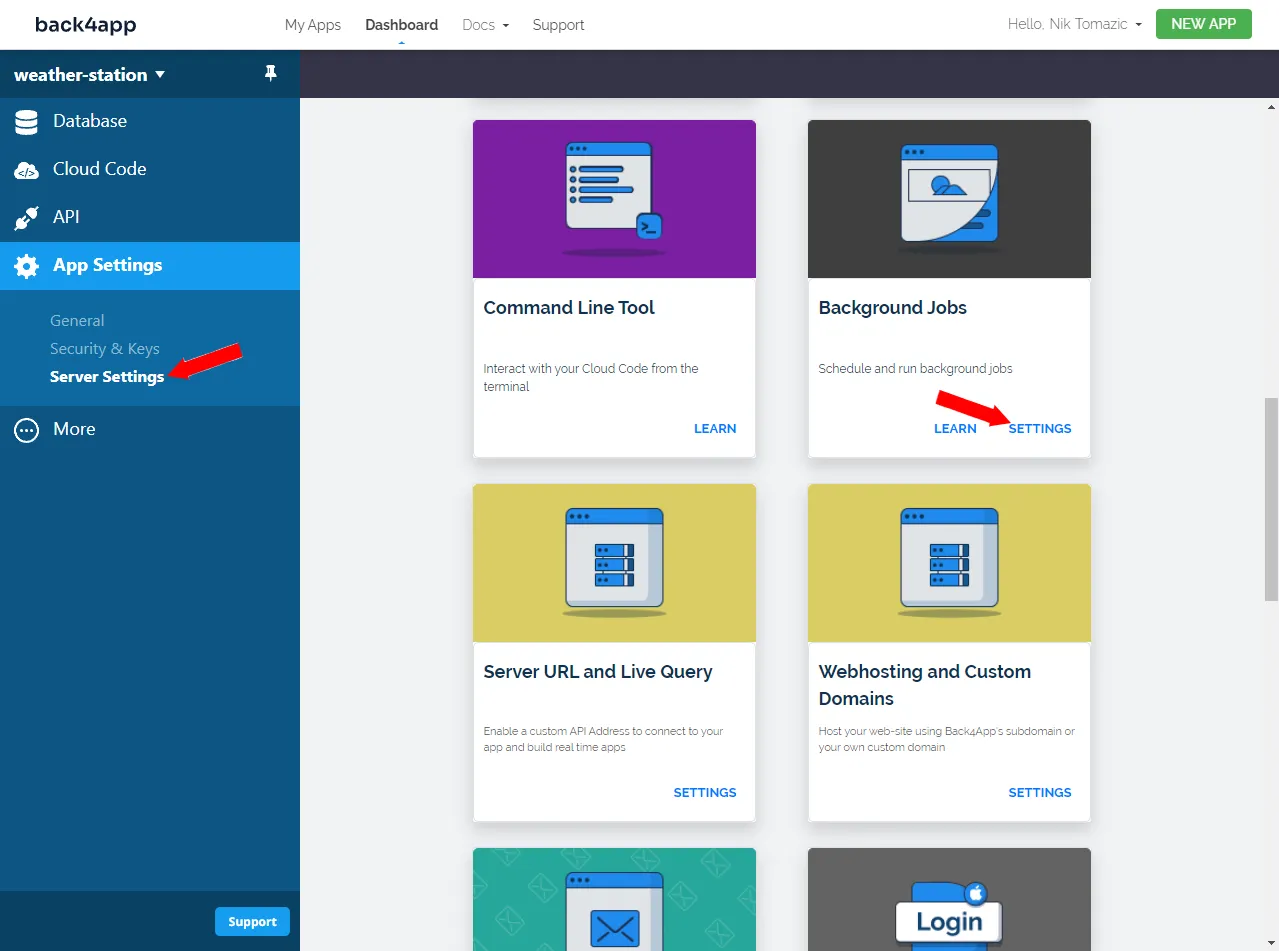
Select “App Settings > Server Settings” on the sidebar and look for “Background Jobs”. Then click on the “Settings” button:
Next, schedule a new job with the following details:
- Description: Measures weather at all the stations
- Cloud job: weatherCapture
- Parameters: Leave blank
- Schedule time: Start immediately
- Should it repeat? Yes
- Frequency: Interval
- On what interval it will repeat? 30 minutes
That’s it. The weatherCapture job is now going to run every 30 minutes.
Our serverless backend is now done. In the next section, we’ll look at how to connect a frontend to the serverless backend.
Frontend
Building a custom frontend from the ground up is out of the scope of this tutorial. Nevertheless, I’m going to describe the basic steps of connecting a JavaScript frontend to a serverless backend.
import Parse from "parse/dist/parse.min.js";

// to get the keys navigate to your Back4app app > App Settings > Security & Keys
Parse.initialize(
  "<your_app_id>",              // replace me
  "<your_javascript_key>",      // replace me
);
Parse.serverURL = "https://parseapi.back4app.com/";- You can then call Cloud Code functions like this:
const fetchWeatherLocations = async () => {
    return await Parse.Cloud.run("weatherLocations");
};
For more information refer to the official documentation.
I’ve also prepared a sample project for our weather station backend. The project is accessible on GitHub. The README.md contains all the information you need to get the project up and running locally. Feel free to fork it and play around with it.
Conclusion
Serverless computing has become an increasingly popular solution for developers looking to build and deploy applications without worrying about managing servers.
In this article, we have explored various software architectures, looked at serverless functions, and highlighted their benefits and use cases. Lastly, we’ve demonstrated how to build a simple serverless backend on Back4app using Cloud Code functions.
The final source code can be found in the back4app-serverless repo on GitHub.
Future steps
- Look into Parse Server Security to make your backend more secure.
- Take a look at The Ultimate Guide to Deploy Docker Apps to learn how to build and deploy a custom frontend to Back4app Containers.
- Learn about Parse Triggers.
FAQ
What are serverless functions?
Serverless functions are event-driven pieces of code that serve a single purpose. They can be triggered by specific events such as HTTP requests, database changes, or other messages.
Why use the serverless architecture?
Serverless architecture allows developers to focus on their apps instead of worrying about the underlying infrastructure or deployment. Additionally, serverless apps are scalable and flexible.
What are the different software architectures?
Monolithic architecture, microservices architecture, and serverless architecture. They each have their pros and cons that should be considered when starting a project.
What are the benefits of serverless functions?
– Faster development
– High scalability & availability
– Greater flexibility
– Cost-effectiveness
How to deploy serverless functions?
1. Create an account on Back4app.
2. Use Back4app Cloud Code editor or local IDE to code serverless functions.
3. Use Back4app Cloud Code editor or run b4a deploy to deploy your functions.
4. Test the functions.


