如何使用 PostgreSQL 数据库构建和部署网络应用程序?

在本文中,您将学习如何使用人工智能技术通过 Postgres 数据库构建和部署网络应用程序。
在开发工作流程中加入人工智能可以提高您的工作效率。通过自动化重复性任务和使用代码生成等人工智能功能,您可以缩短开发时间并节约成本。
Contents
在网络开发中使用人工智能的优势
将人工智能融入网络开发的优势包括以下几点。
重复性任务自动化
将人工智能引入开发工作流程可帮助您自动执行重复性任务,如生成虚拟数据和模板代码。
它还可以帮助测试生成单元测试和集成测试。
不过,虽然人工智能可以自动完成许多任务,但必须注意的是,它并不是万无一失的解决方案,仍然需要人工监督。
始终审查和验证人工智能工具的输出结果,确保其准确无误。
代码生成
人工智能工具可以帮助您编写代码片段甚至整个函数。这种自动化可加快您的编码过程,让您专注于更高层次的设计和问题解决。
然而,人工智能生成的代码可能会产生误导,并在软件开发生命周期的更远阶段导致难以发现的错误;因此,在将代码推向生产之前,应对其进行审核。
改进代码优化
人工智能工具可以帮助您优化代码速度,建议您重写或重构代码中的某些部分,以生成更高效、更可维护的解决方案。
这可能涉及简化复杂的逻辑、消除冗余代码或更好地使用语言特性。
人工智能工具还可以帮助您选择更高效的算法和数据结构,从而提高代码的整体性能和数据操作的效率。
错误检测和纠正
人工智能工具可以通过分析错误和提供可行的错误解决方案,帮助您更快地调试代码。
例如,当您使用 Back4app 容器部署应用程序时,Back4app AI 会分析因 Dockerfile 中的错误而产生的错误,并提供可解决错误的建议,帮助您成功部署应用程序。
使用 Back4app AI 代理和 PostgreSQL 构建后端
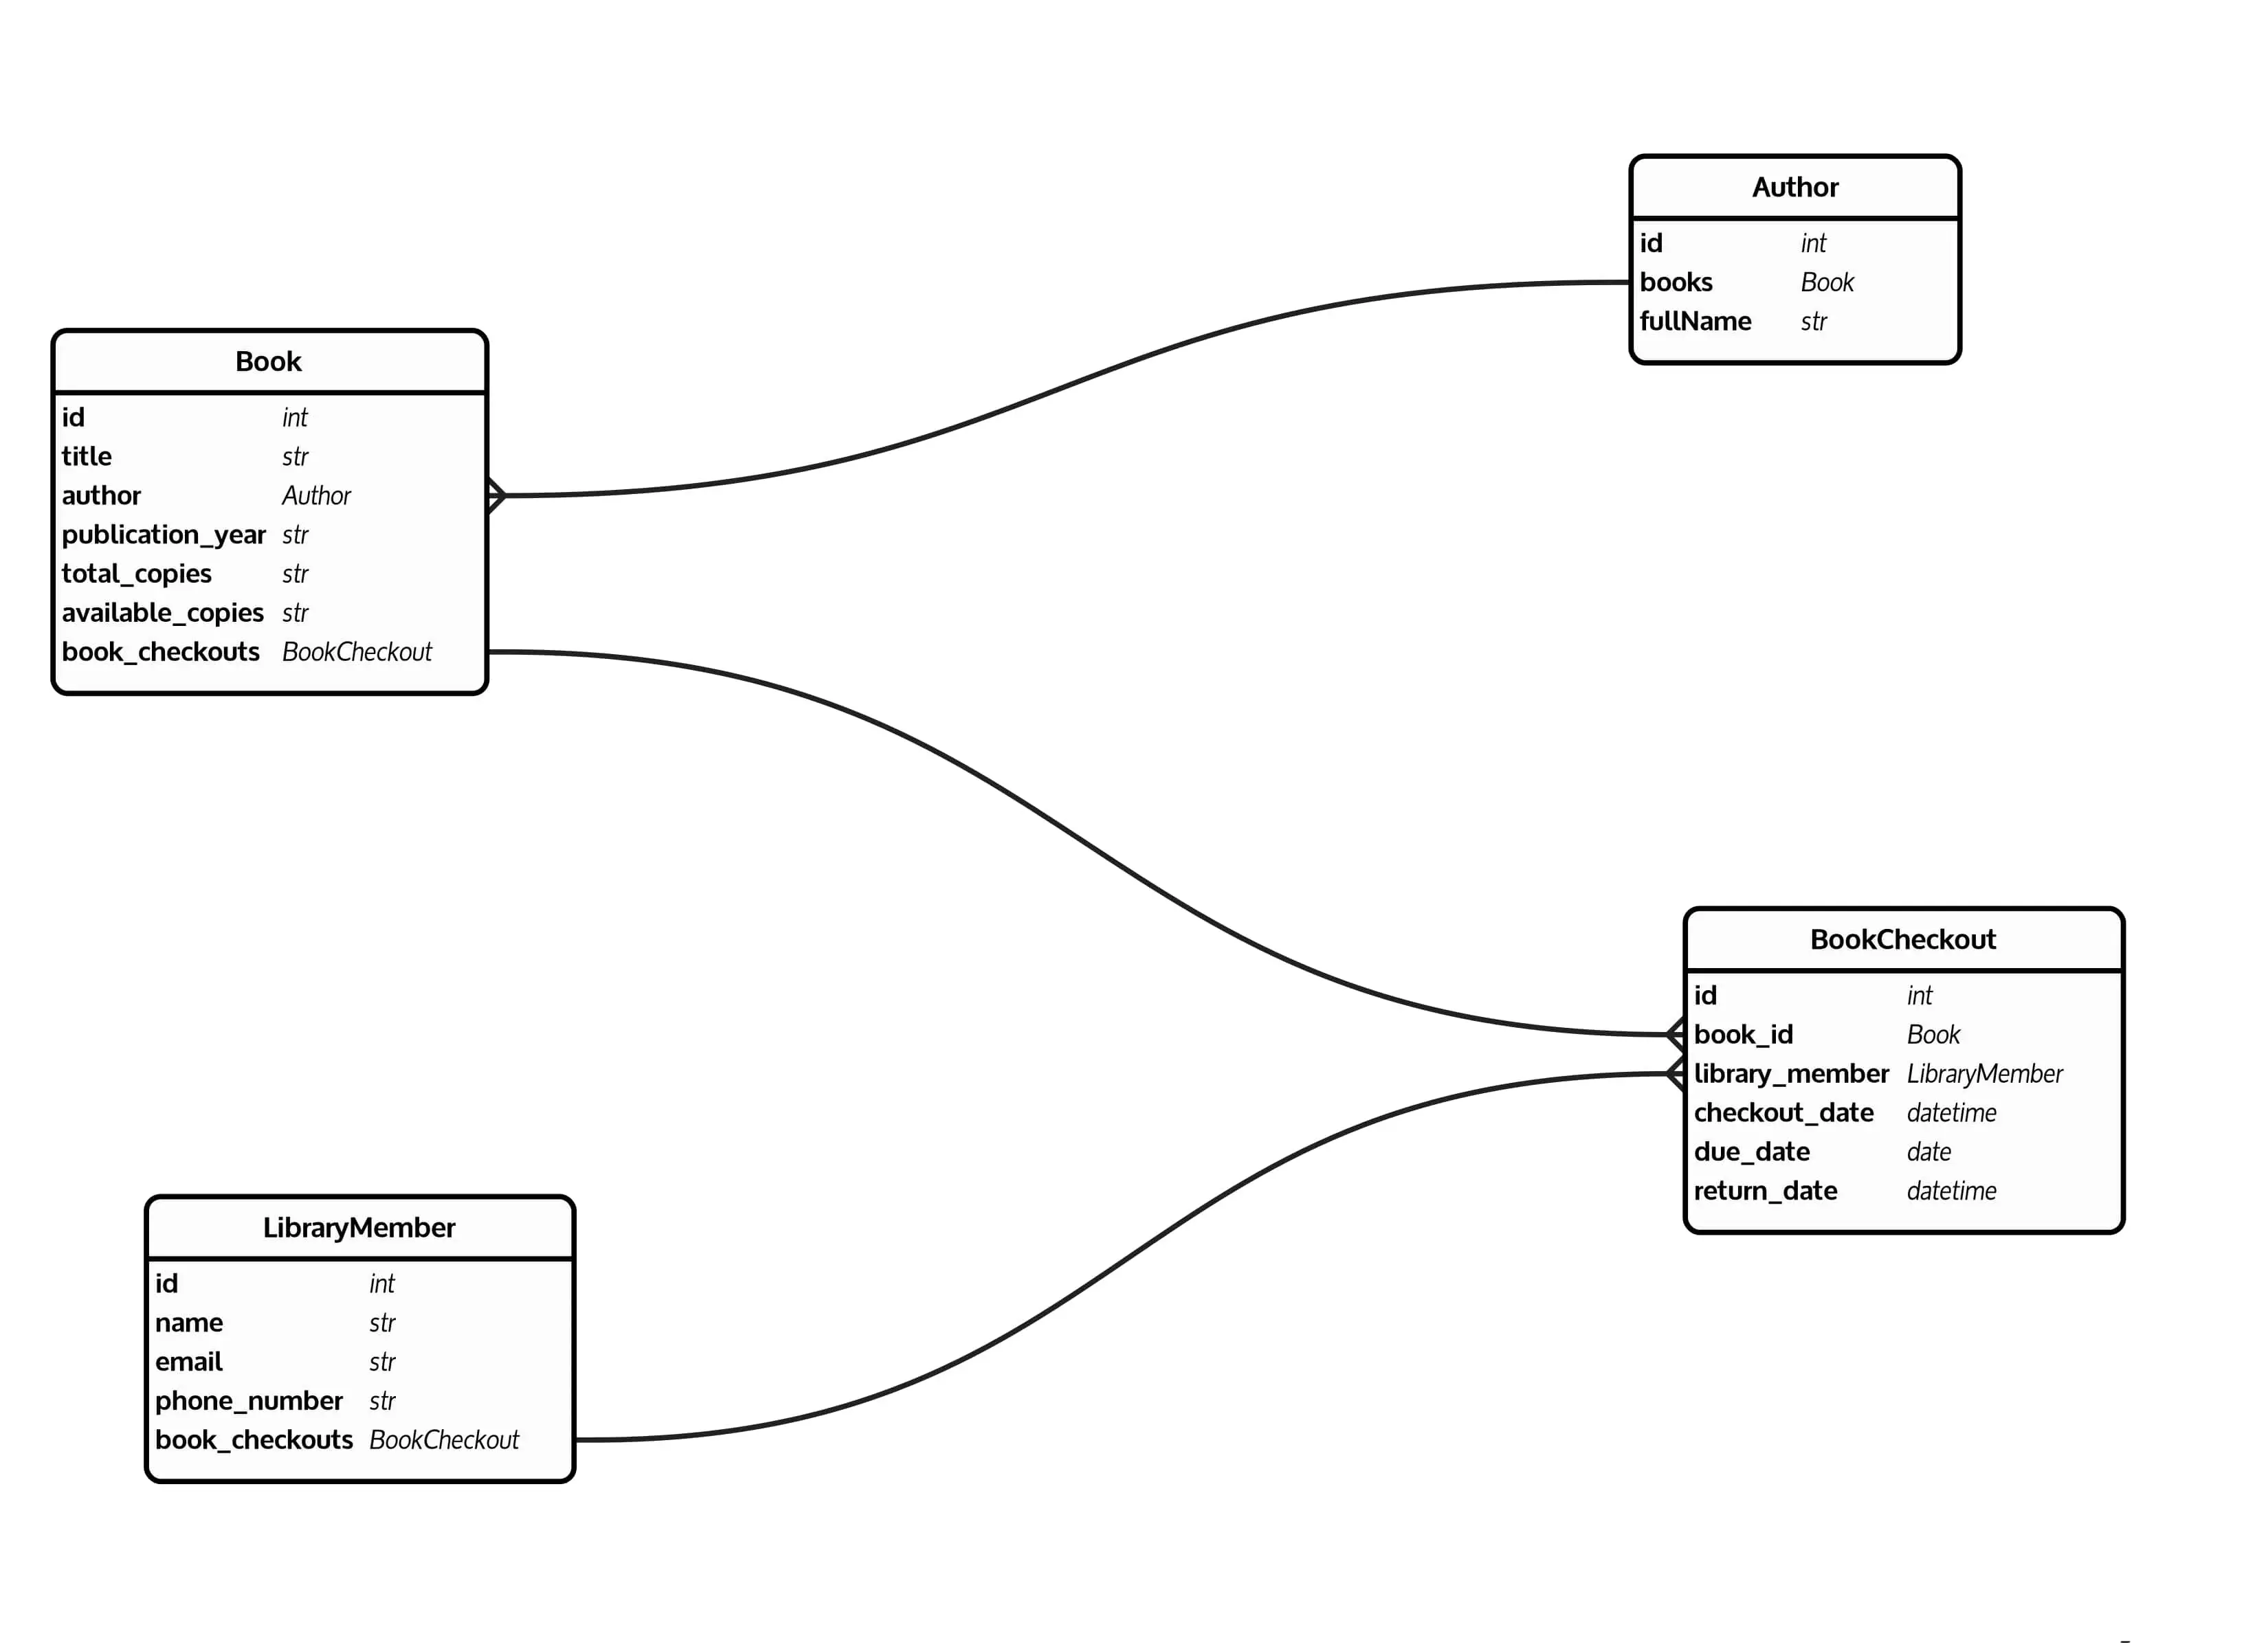
在本教程中,您将构建一个库 API。您将与带有以下表格的 PostgreSQL 数据库交互:Book、Author、BookCheckout 和LibraryMember。
数据库结构和设计
图书表包含图书的大部分信息,如书名、作者、出版年、总印数和可用印数。
作者表与图书表是一对多的关系,即一个作者可以有很多本书,但每本书只能有一个作者。该表还包含有关作者的细微信息,如作者的全名。
LibraryMemeber表包含图书馆成员的信息,如姓名、电子邮件和电话号码。
BookCheckout表是Book表和LibraryMemeber表之间的连接表,在它们之间建立多对多的关系。
也就是说,一个会员可以借阅多本书,多个会员可以借阅一本书。它引用了图书、借书会员以及借出日期、到期日期和归还日期。
下面是数据库的数据库模型图。
在 Back4app 上创建数据库
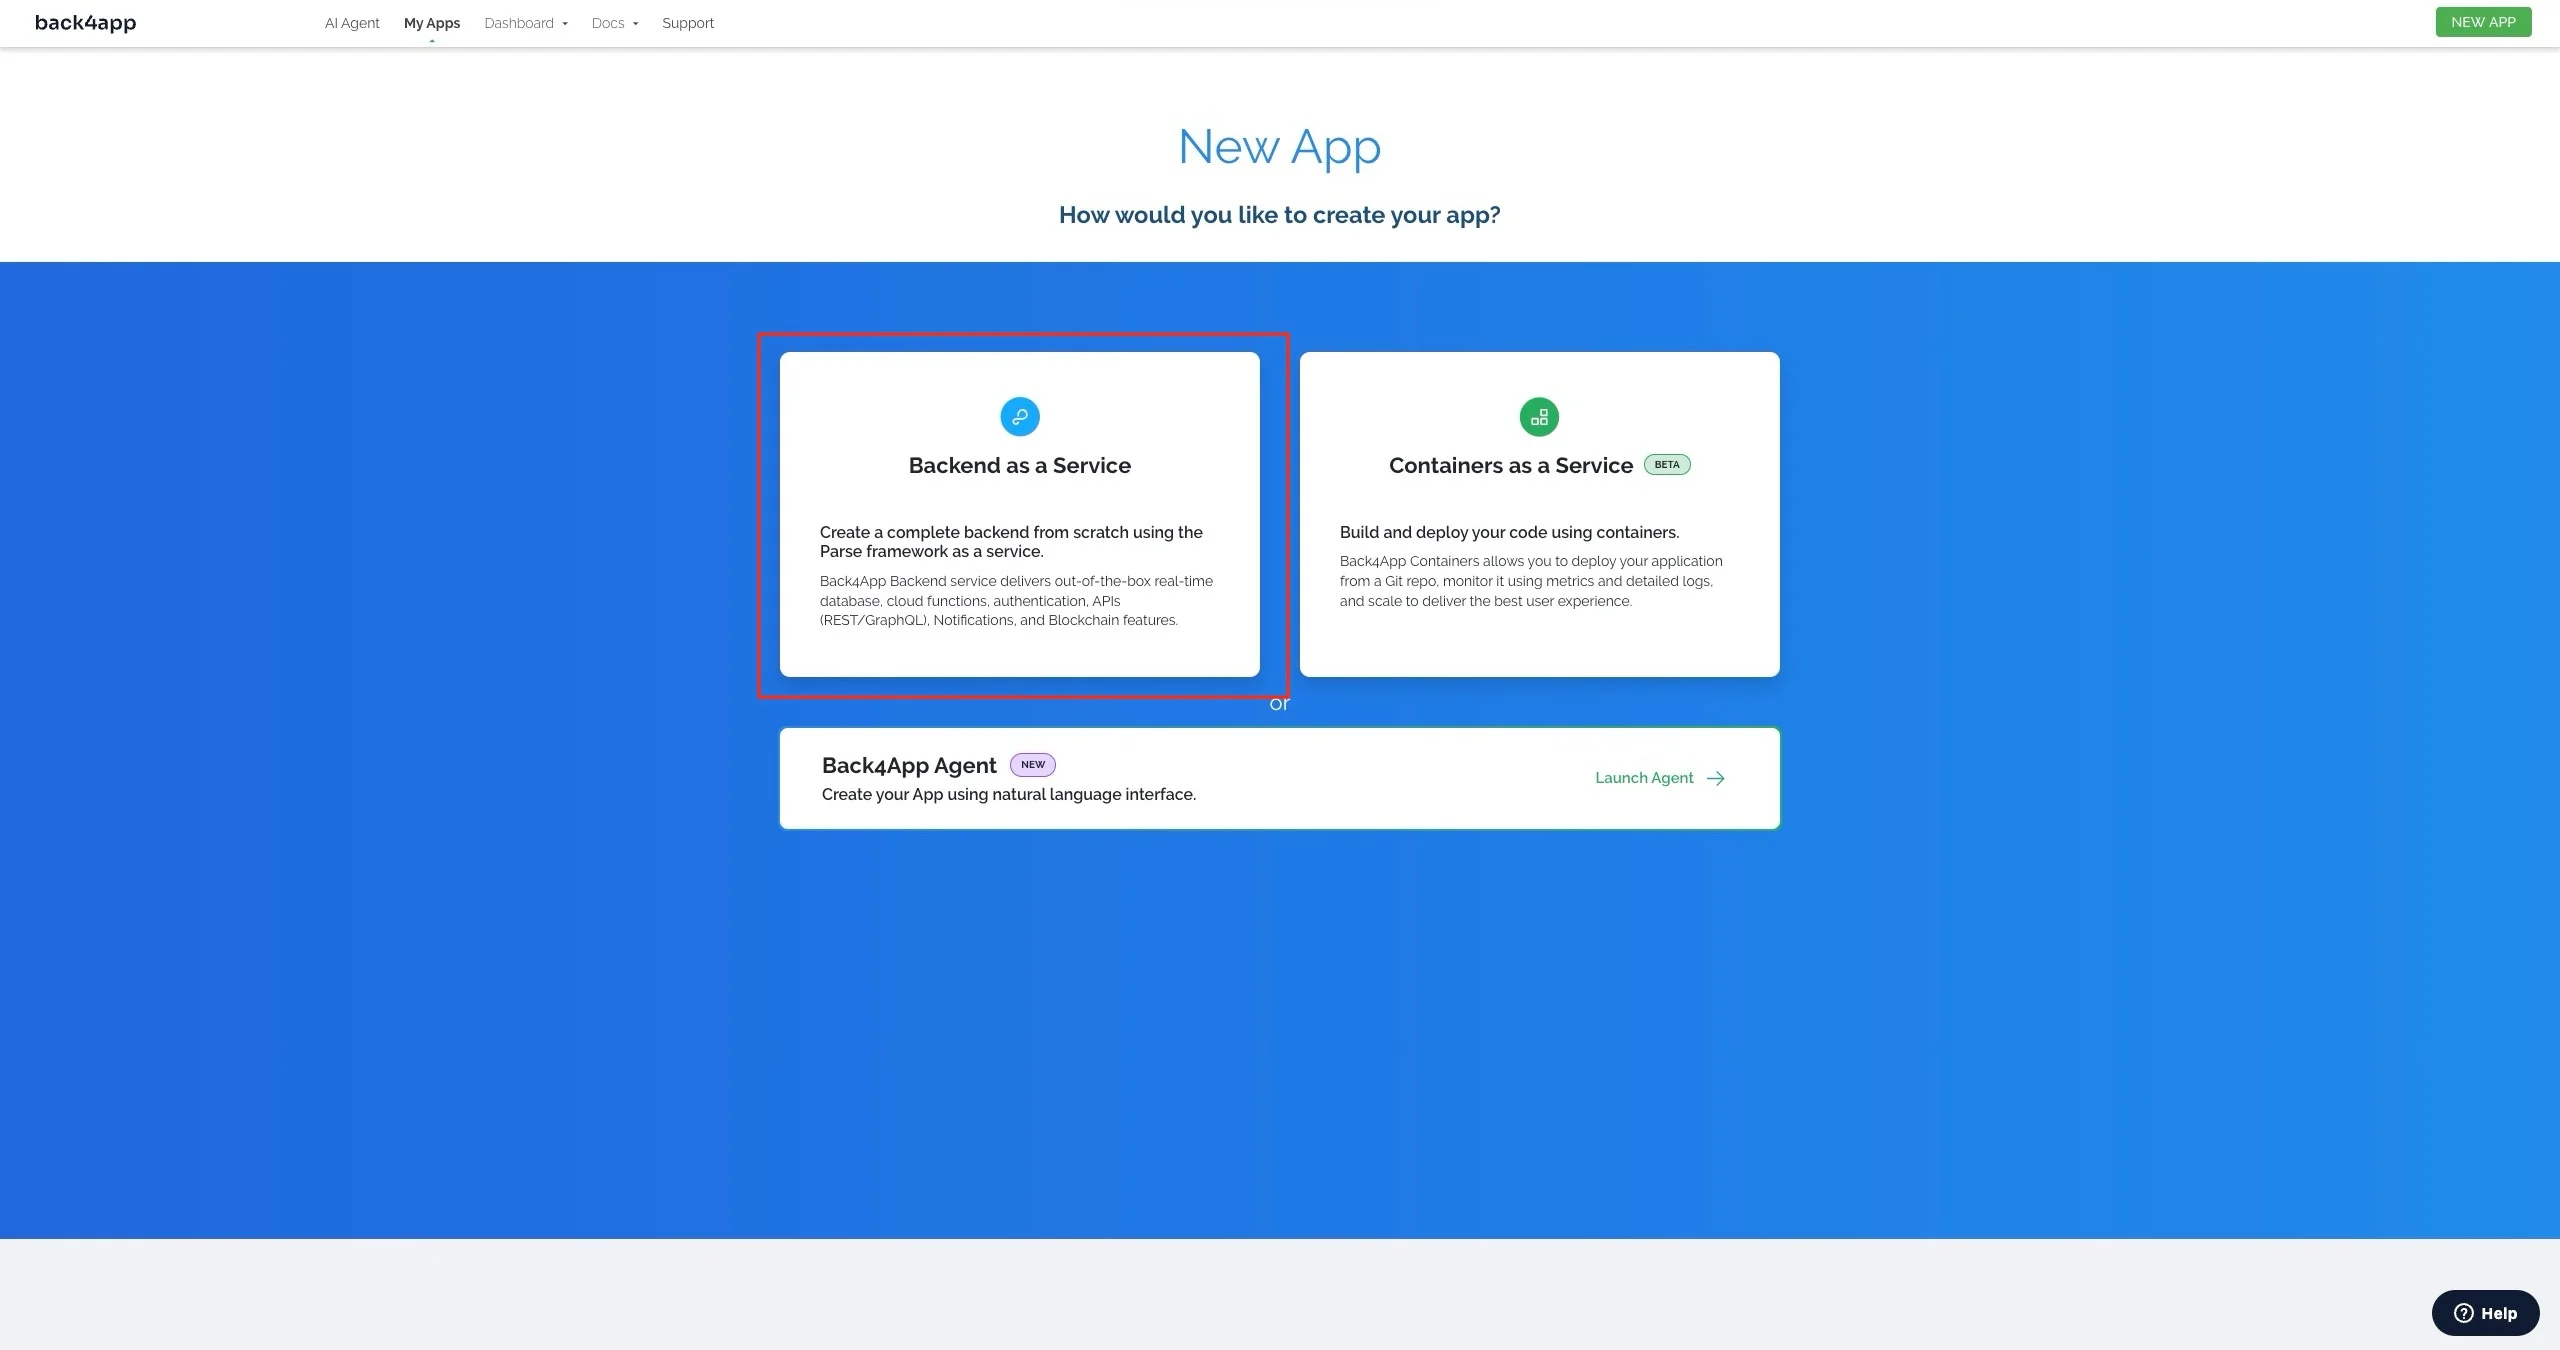
访问back4app.com,登录(如果没有账户,请创建一个),然后点击屏幕右上角的“新建应用程序 “按钮。
选择后台即服务选项,如下图所示。
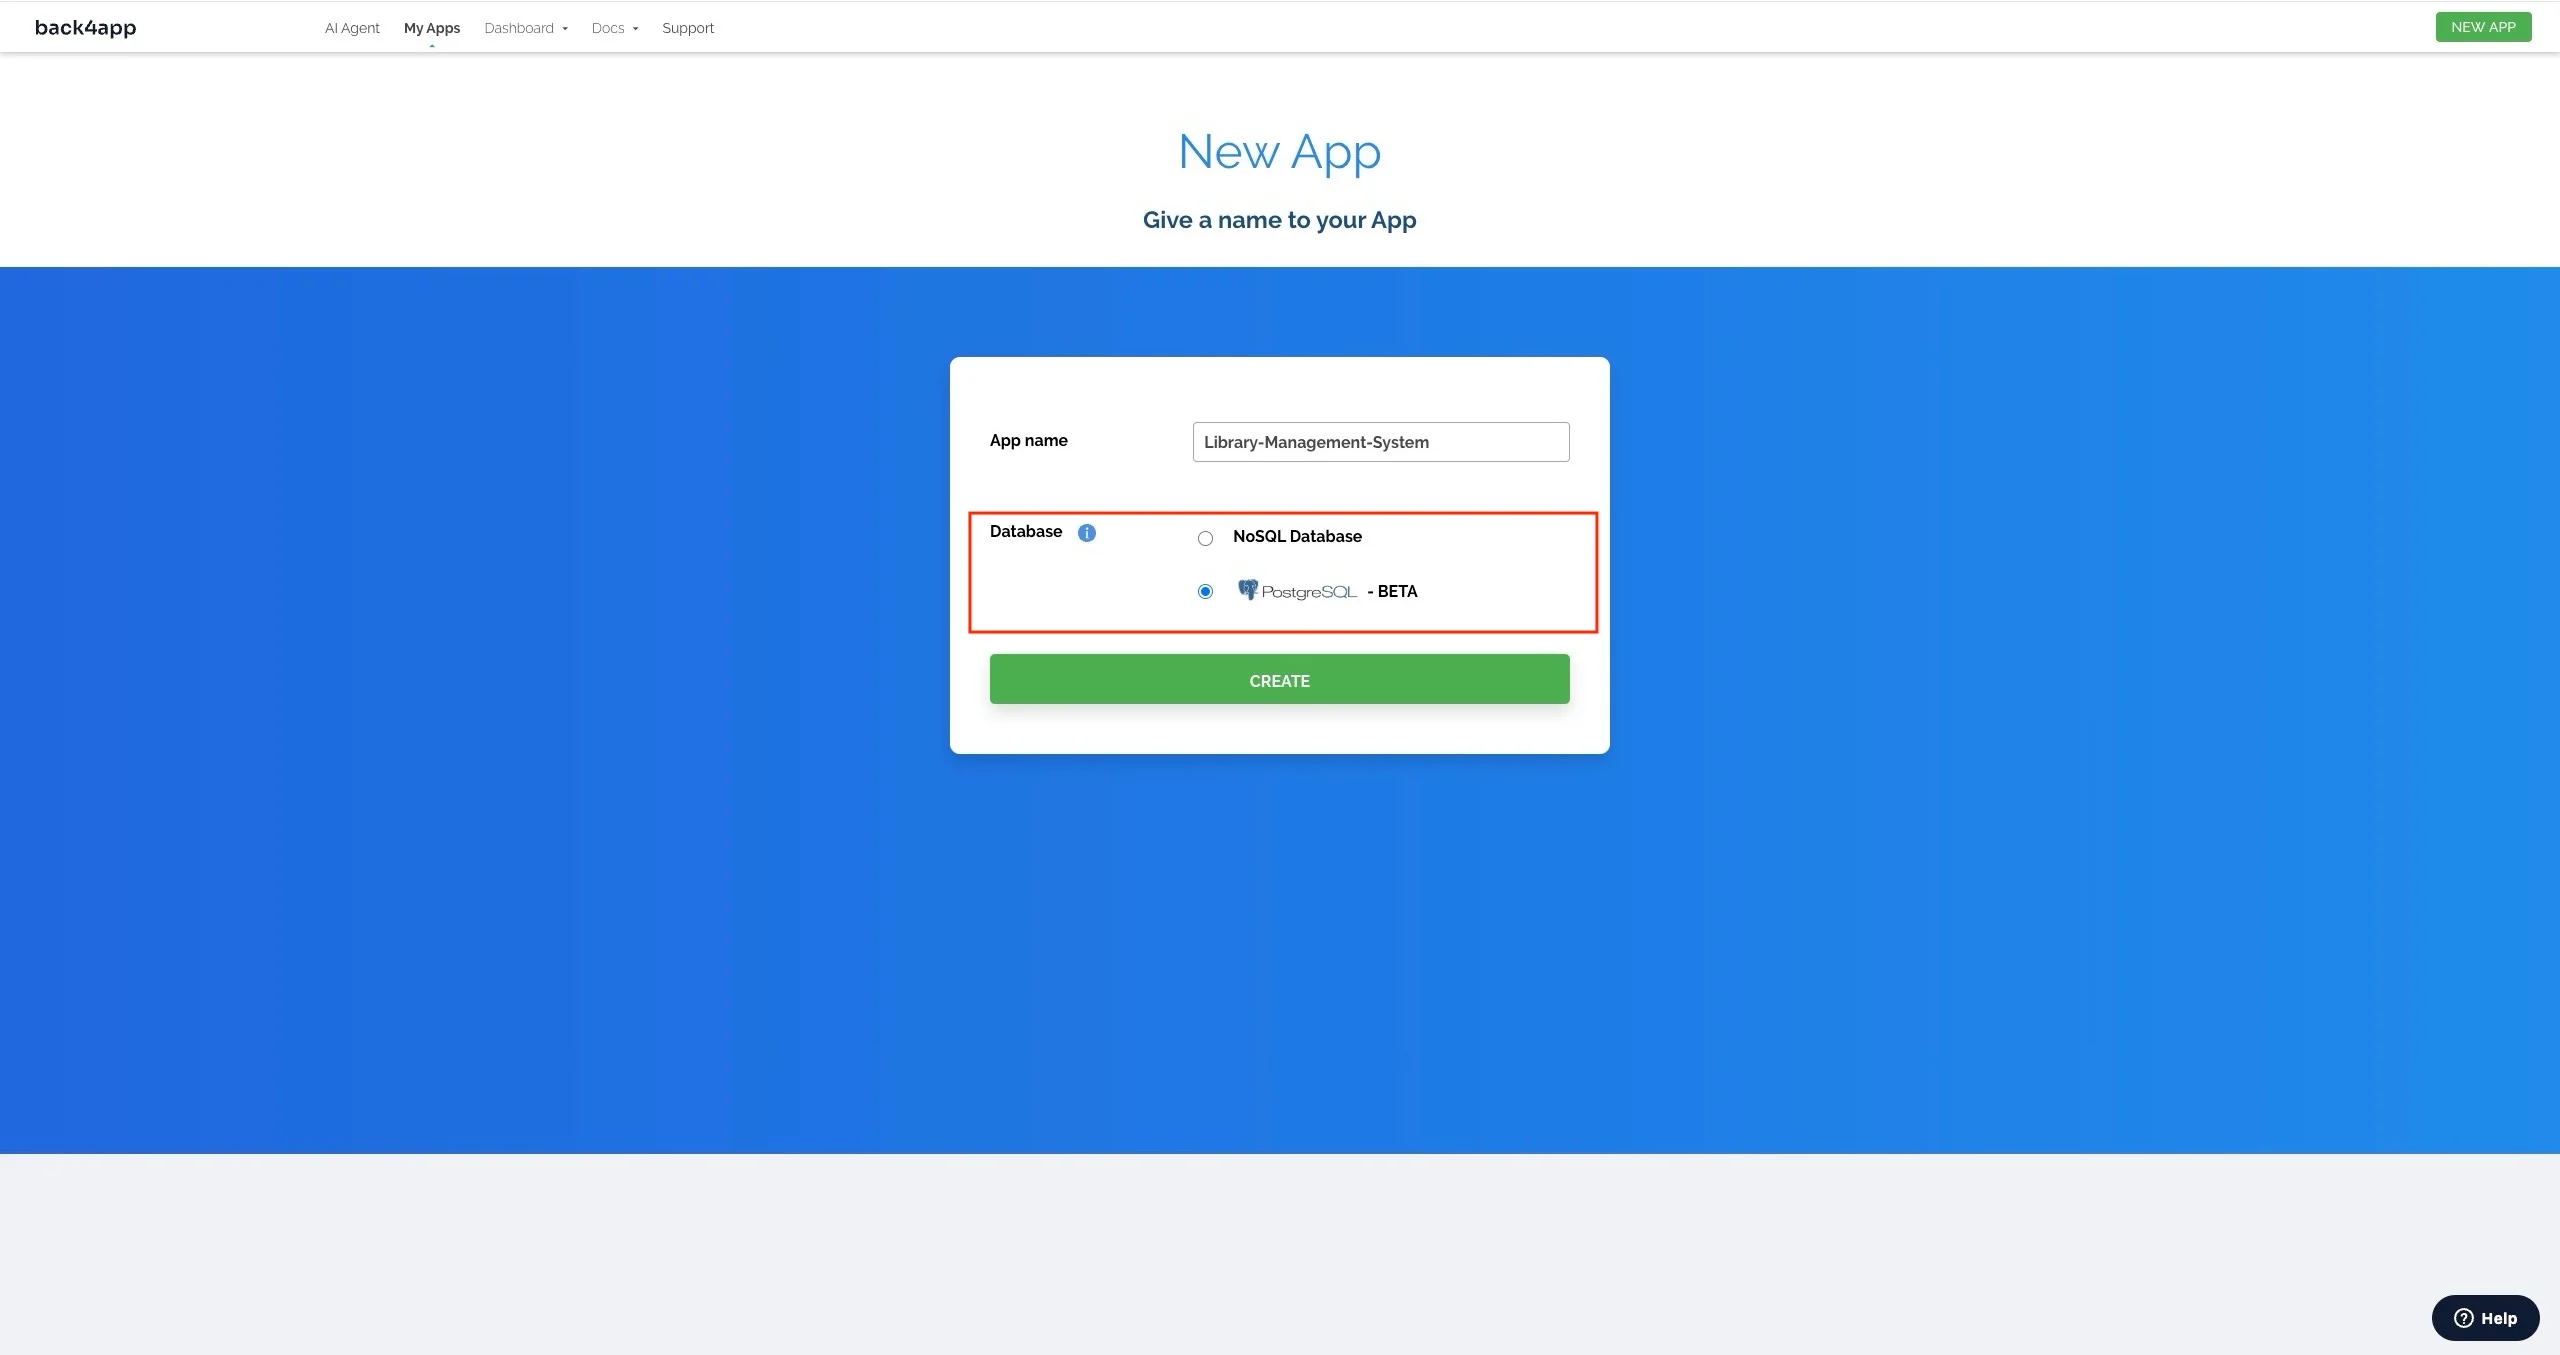
如下图所示,为应用程序命名并选择 PostgreSQL 选项。
导航至 Back4app AI 代理并输入以下提示:
"I need you to create database tables in my Back4app app; what do you need me to provide?"
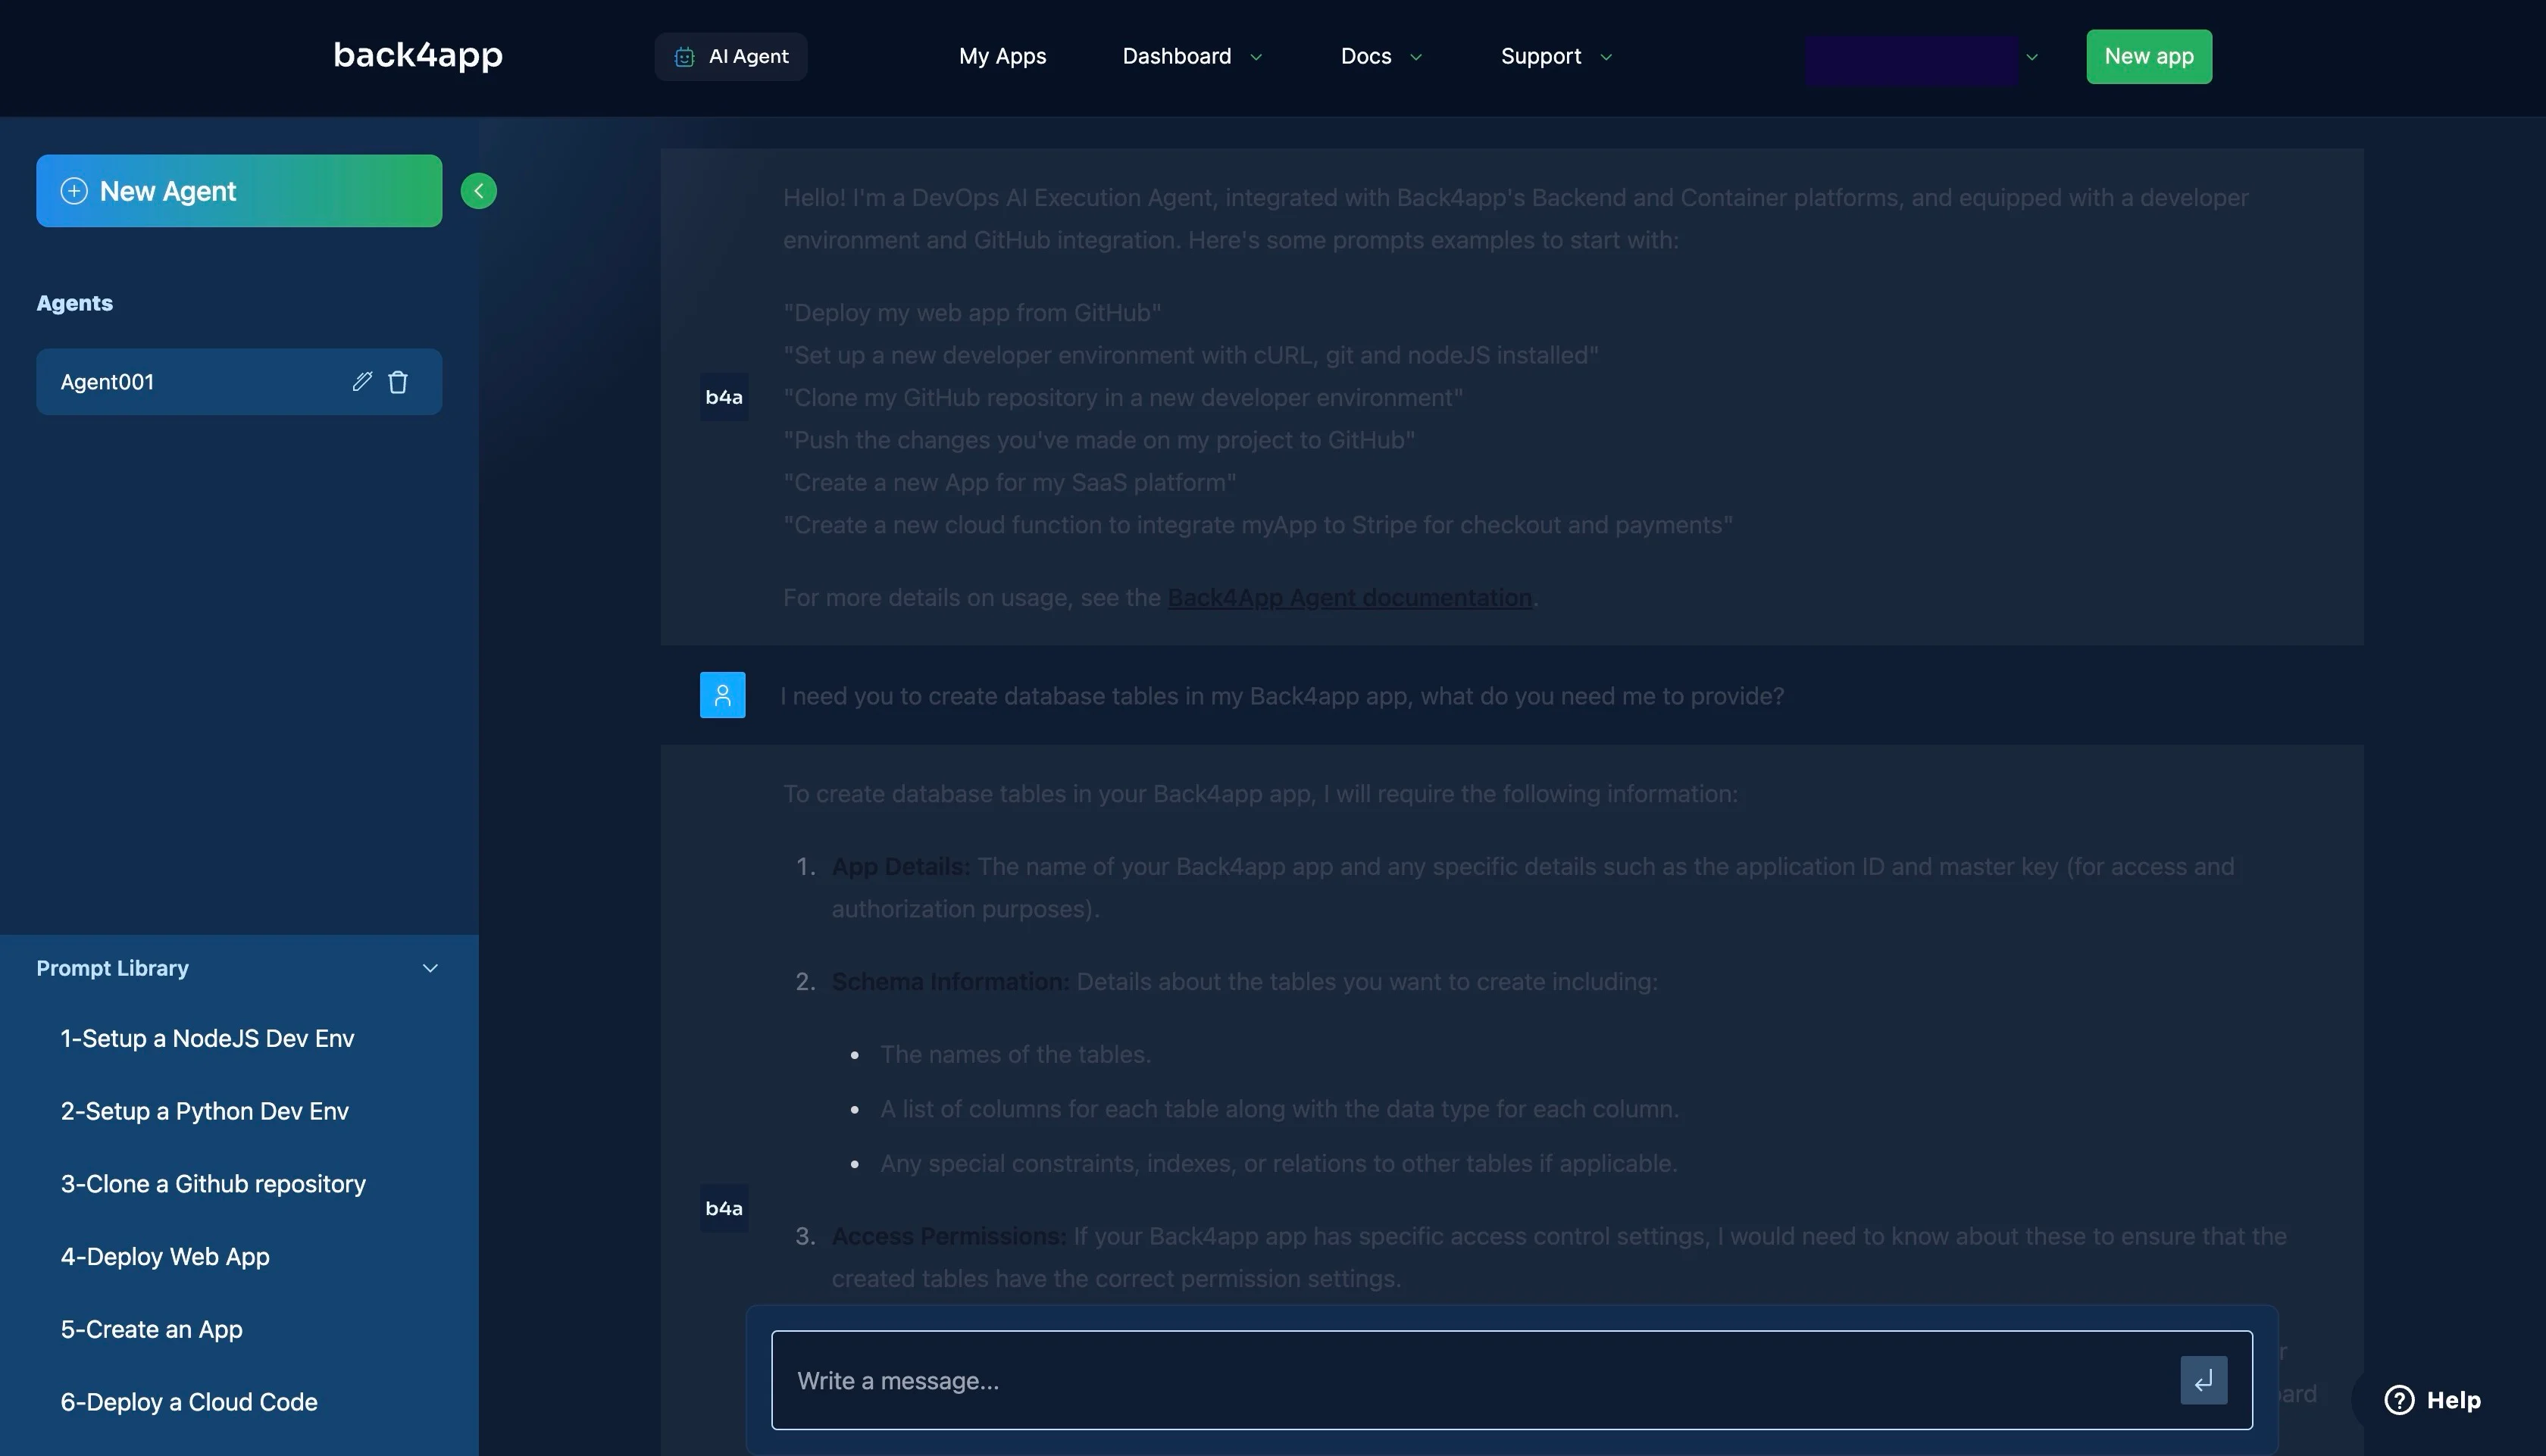
该人工智能代理将返回一份为您创建数据库表所需的列表。其中应包括应用程序键和模式定义。
根据上一节的数据库设计,模式定义应与下面的代码块类似:
1. **Authors Class:**
    - Class Name: `Authors`
    - Fields:
        - `authorId` (Auto-generated, Primary Key)
        - `authorName` (String, Required)
2. **Books Class:**
    - Class Name: `Books`
    - Fields:
        - `bookId` (Auto-generated, Primary Key)
        - `title` (String, Required)
        - `author` (Pointer to the `Authors` class)
        - `publicationYear` (Number)
        - `availableCopies` (Number)
        - `totalCopies` (Number)
3. **LibraryMembers Class:**
    - Class Name: `LibraryMembers`
    - Fields:
        - `memberId` (Auto-generated, Primary Key)
        - `name` (String, Required)
        - `email` (String, Required)
        - `phoneNumber` (String)
4. **BookCheckouts Class:**
    - Class Name: `BookCheckouts`
    - Fields:
        - `checkoutId` (Auto-generated, Primary Key)
        - `book` (Pointer to the `Books` class)
        - `member` (Pointer to the `LibraryMembers` class)
        - `checkoutDate` (Date)
        - `dueDate` (Date)
        - `returnDate` (Date)
上面的代码块描述了您的数据库模式,通过正确描述数据类型和关系,人工智能可以准确地创建您的数据库。
在向人工智能代理提供详细信息且代理确认已成功创建数据库后,您可以查看应用程序控制面板来验证数据库是否已创建。
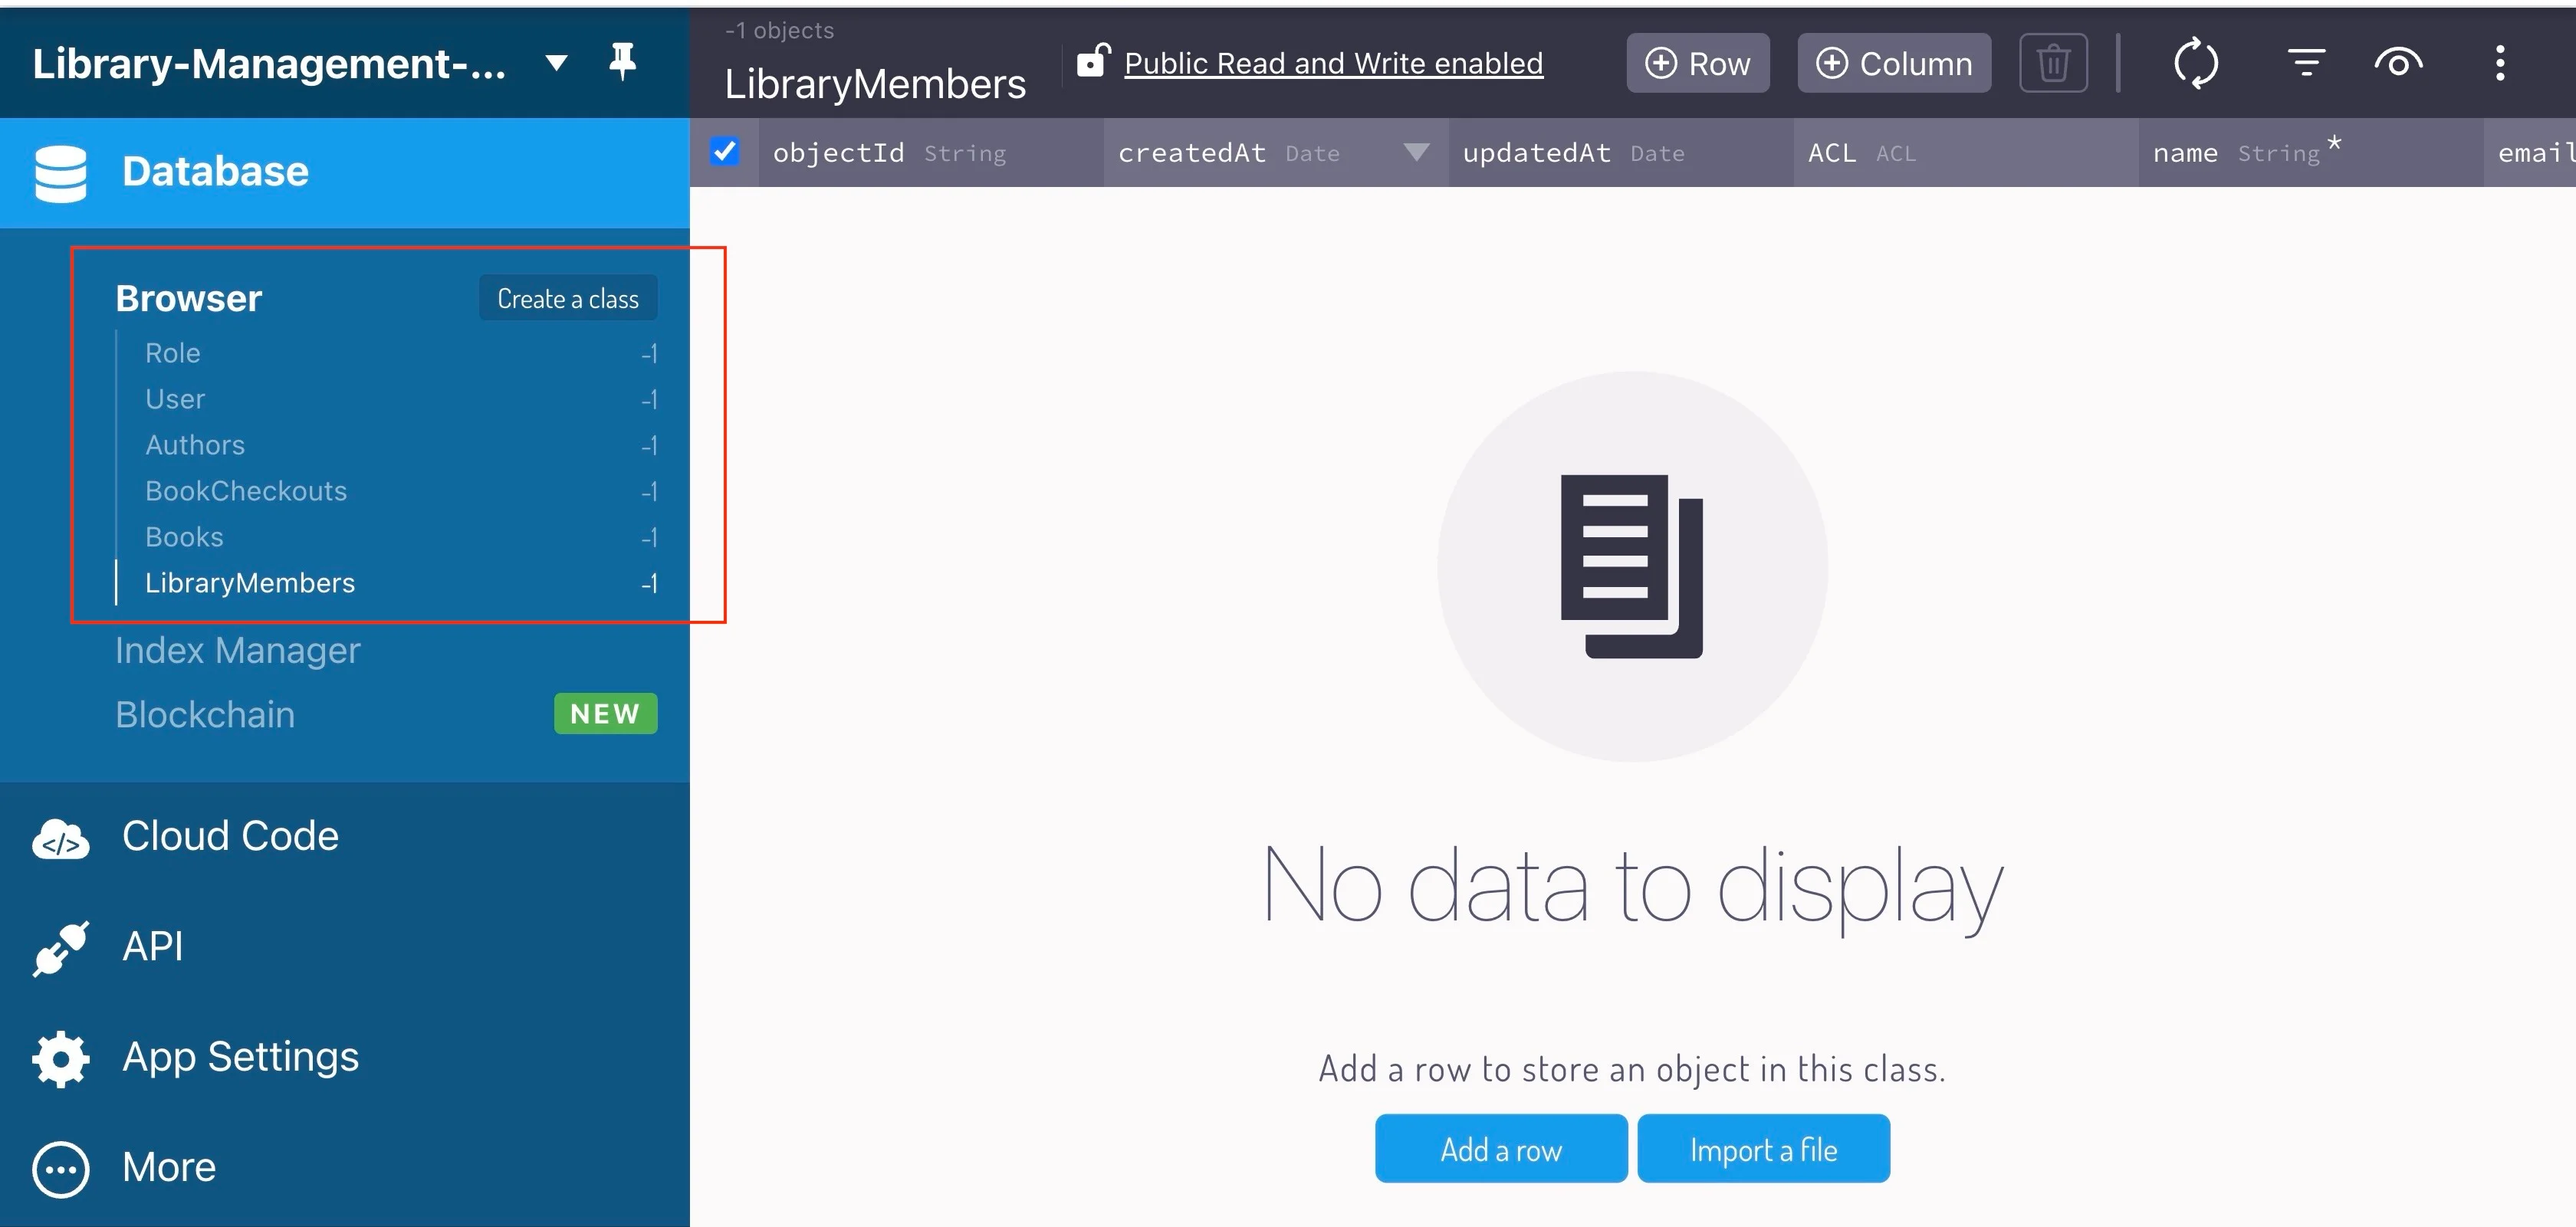
接下来,请人工智能代理根据下面的提示在数据库中填充测试数据。
Populate my database with test data for the Authors, their books,
and some library members who have checked out books from the library.
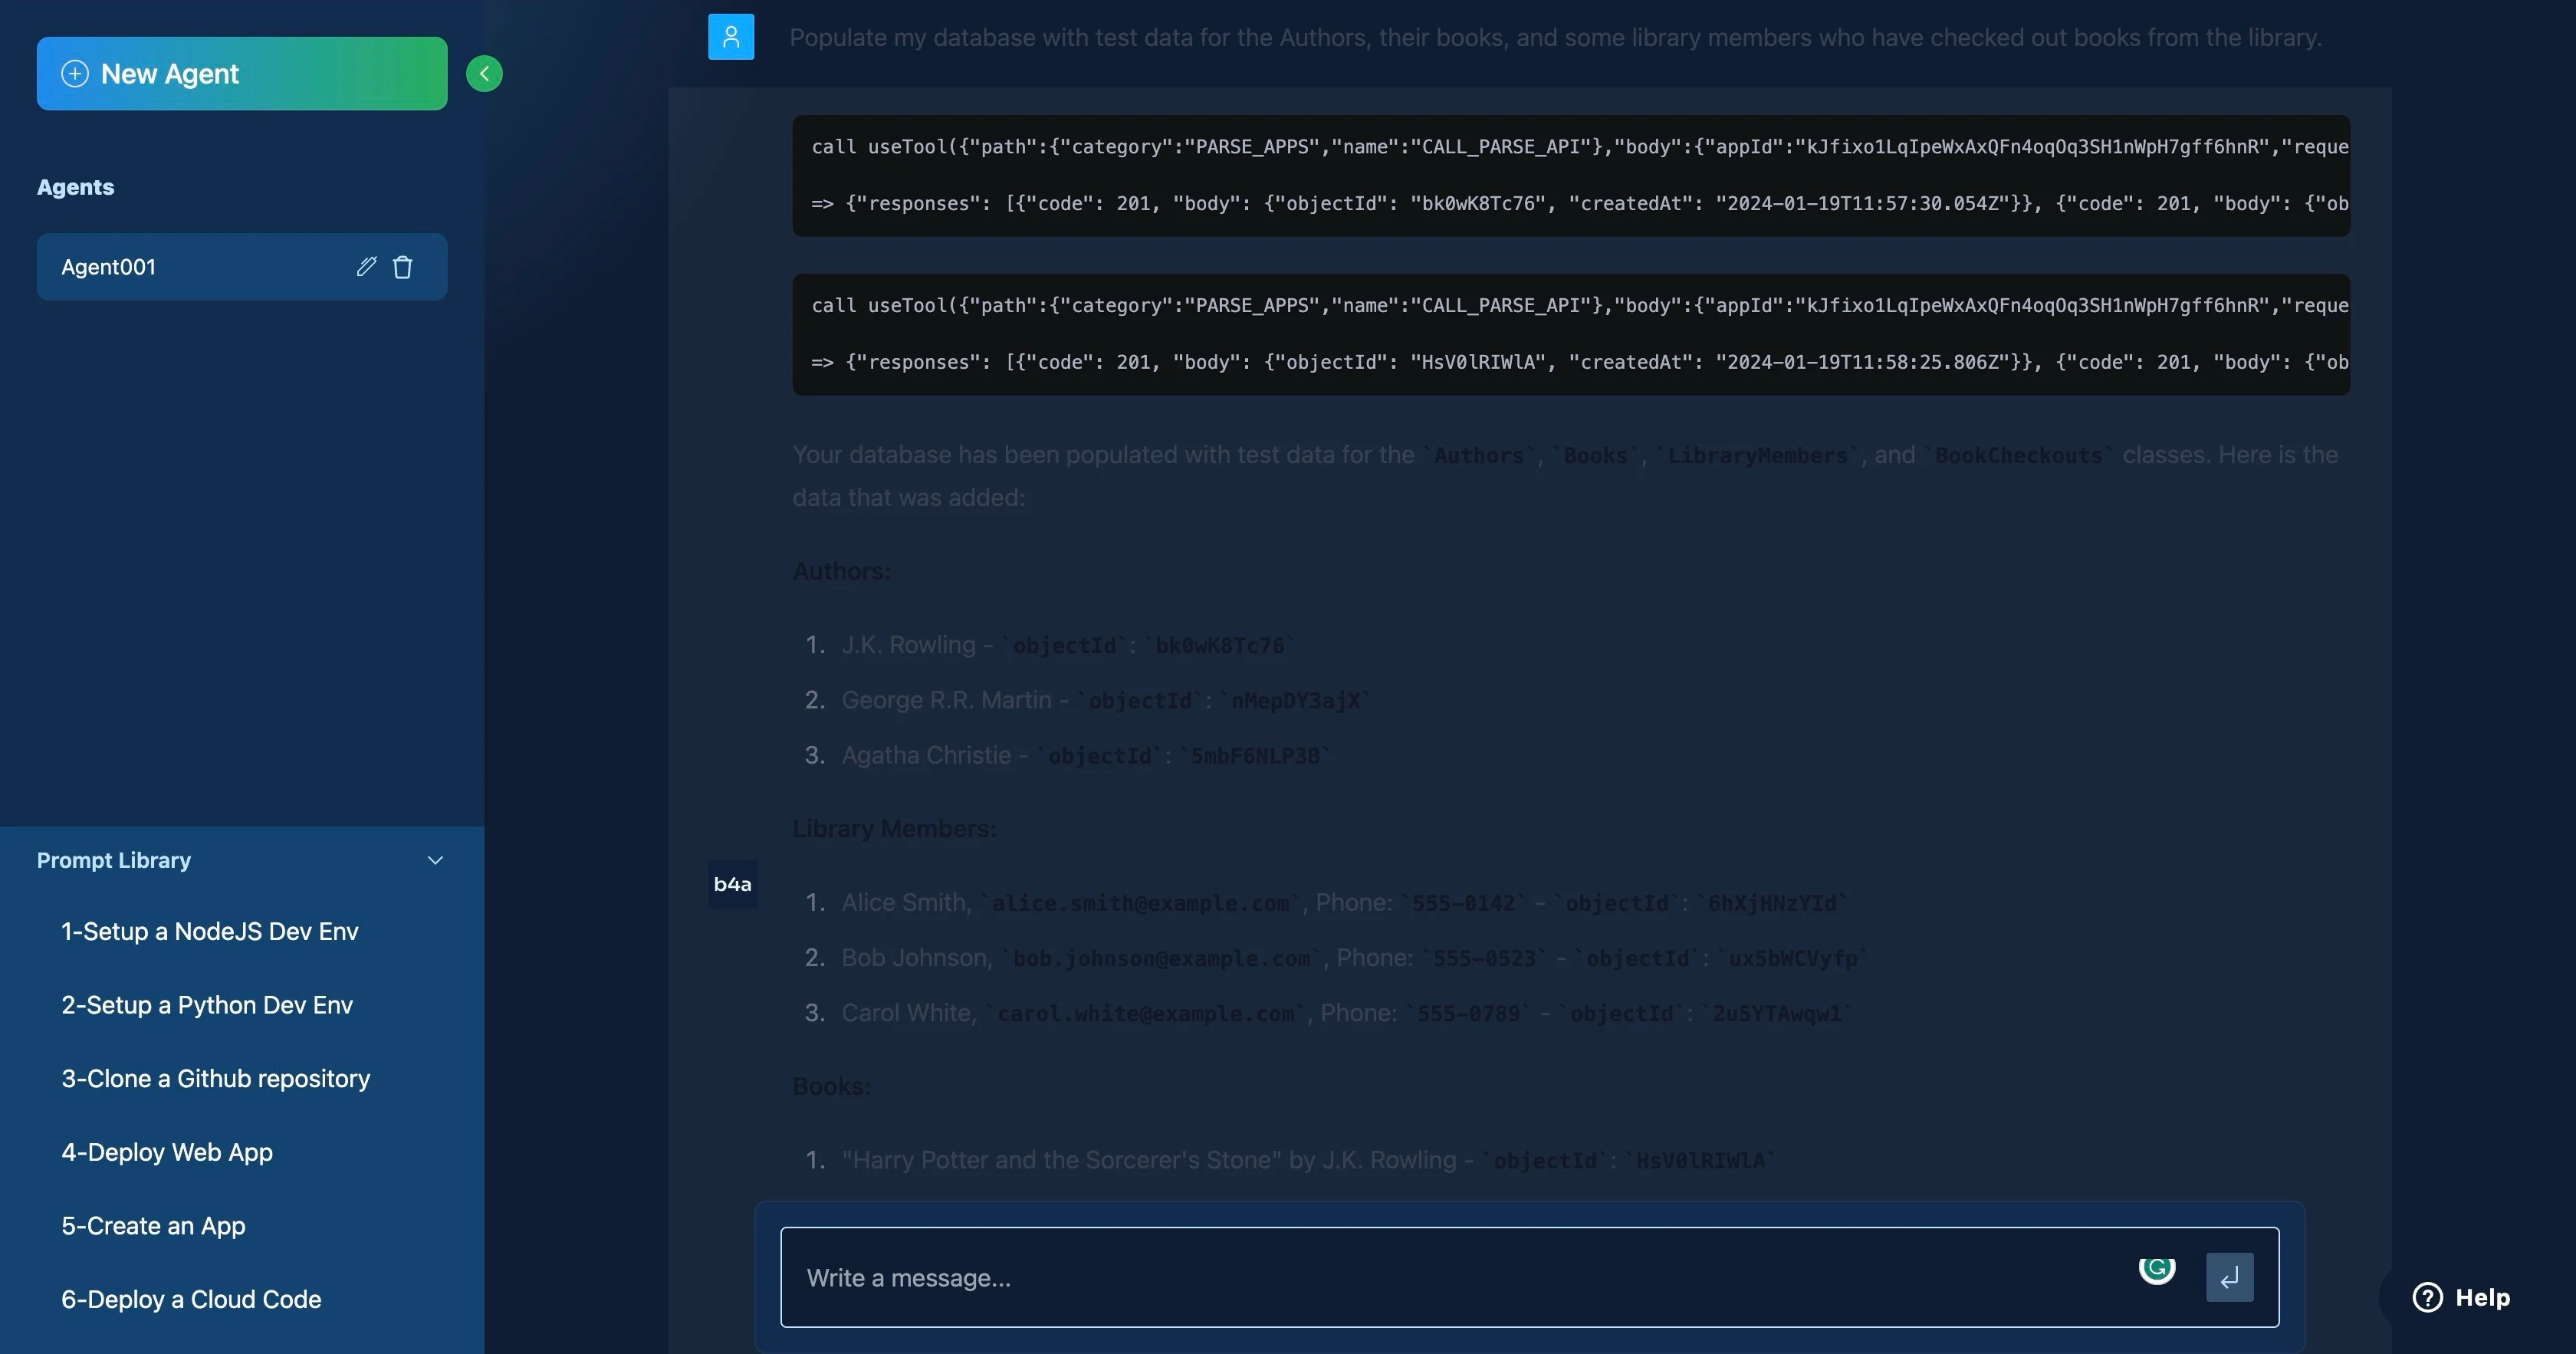
现在,您可以使用数据库中的测试数据了。

创建云代码
既然有了测试数据,就需要为图书馆管理系统实现功能。
在本教程中,您的应用程序将具有以下功能。
- 获取图书馆中的所有书籍。
- 查看图书馆中的特定图书。
- 查看特定作者的所有书籍。
- 从图书馆借一本书。
- 将借阅的图书归还给图书馆。
您可以使用 Back4app 的云代码功能实现该功能,该功能允许您的应用程序在 Back4app 上运行 JavaScript 功能,以响应 HTTP 请求触发的事件。
您可以使用 Back4app AI 代理创建自定义云代码功能,以简化开发流程。
向 Back4app 人工智能代理发出以下提示,生成获取图书馆所有图书的云代码。
Create a cloud code function called `getAllBooks`
that will return all the books in the database with their respective authors.
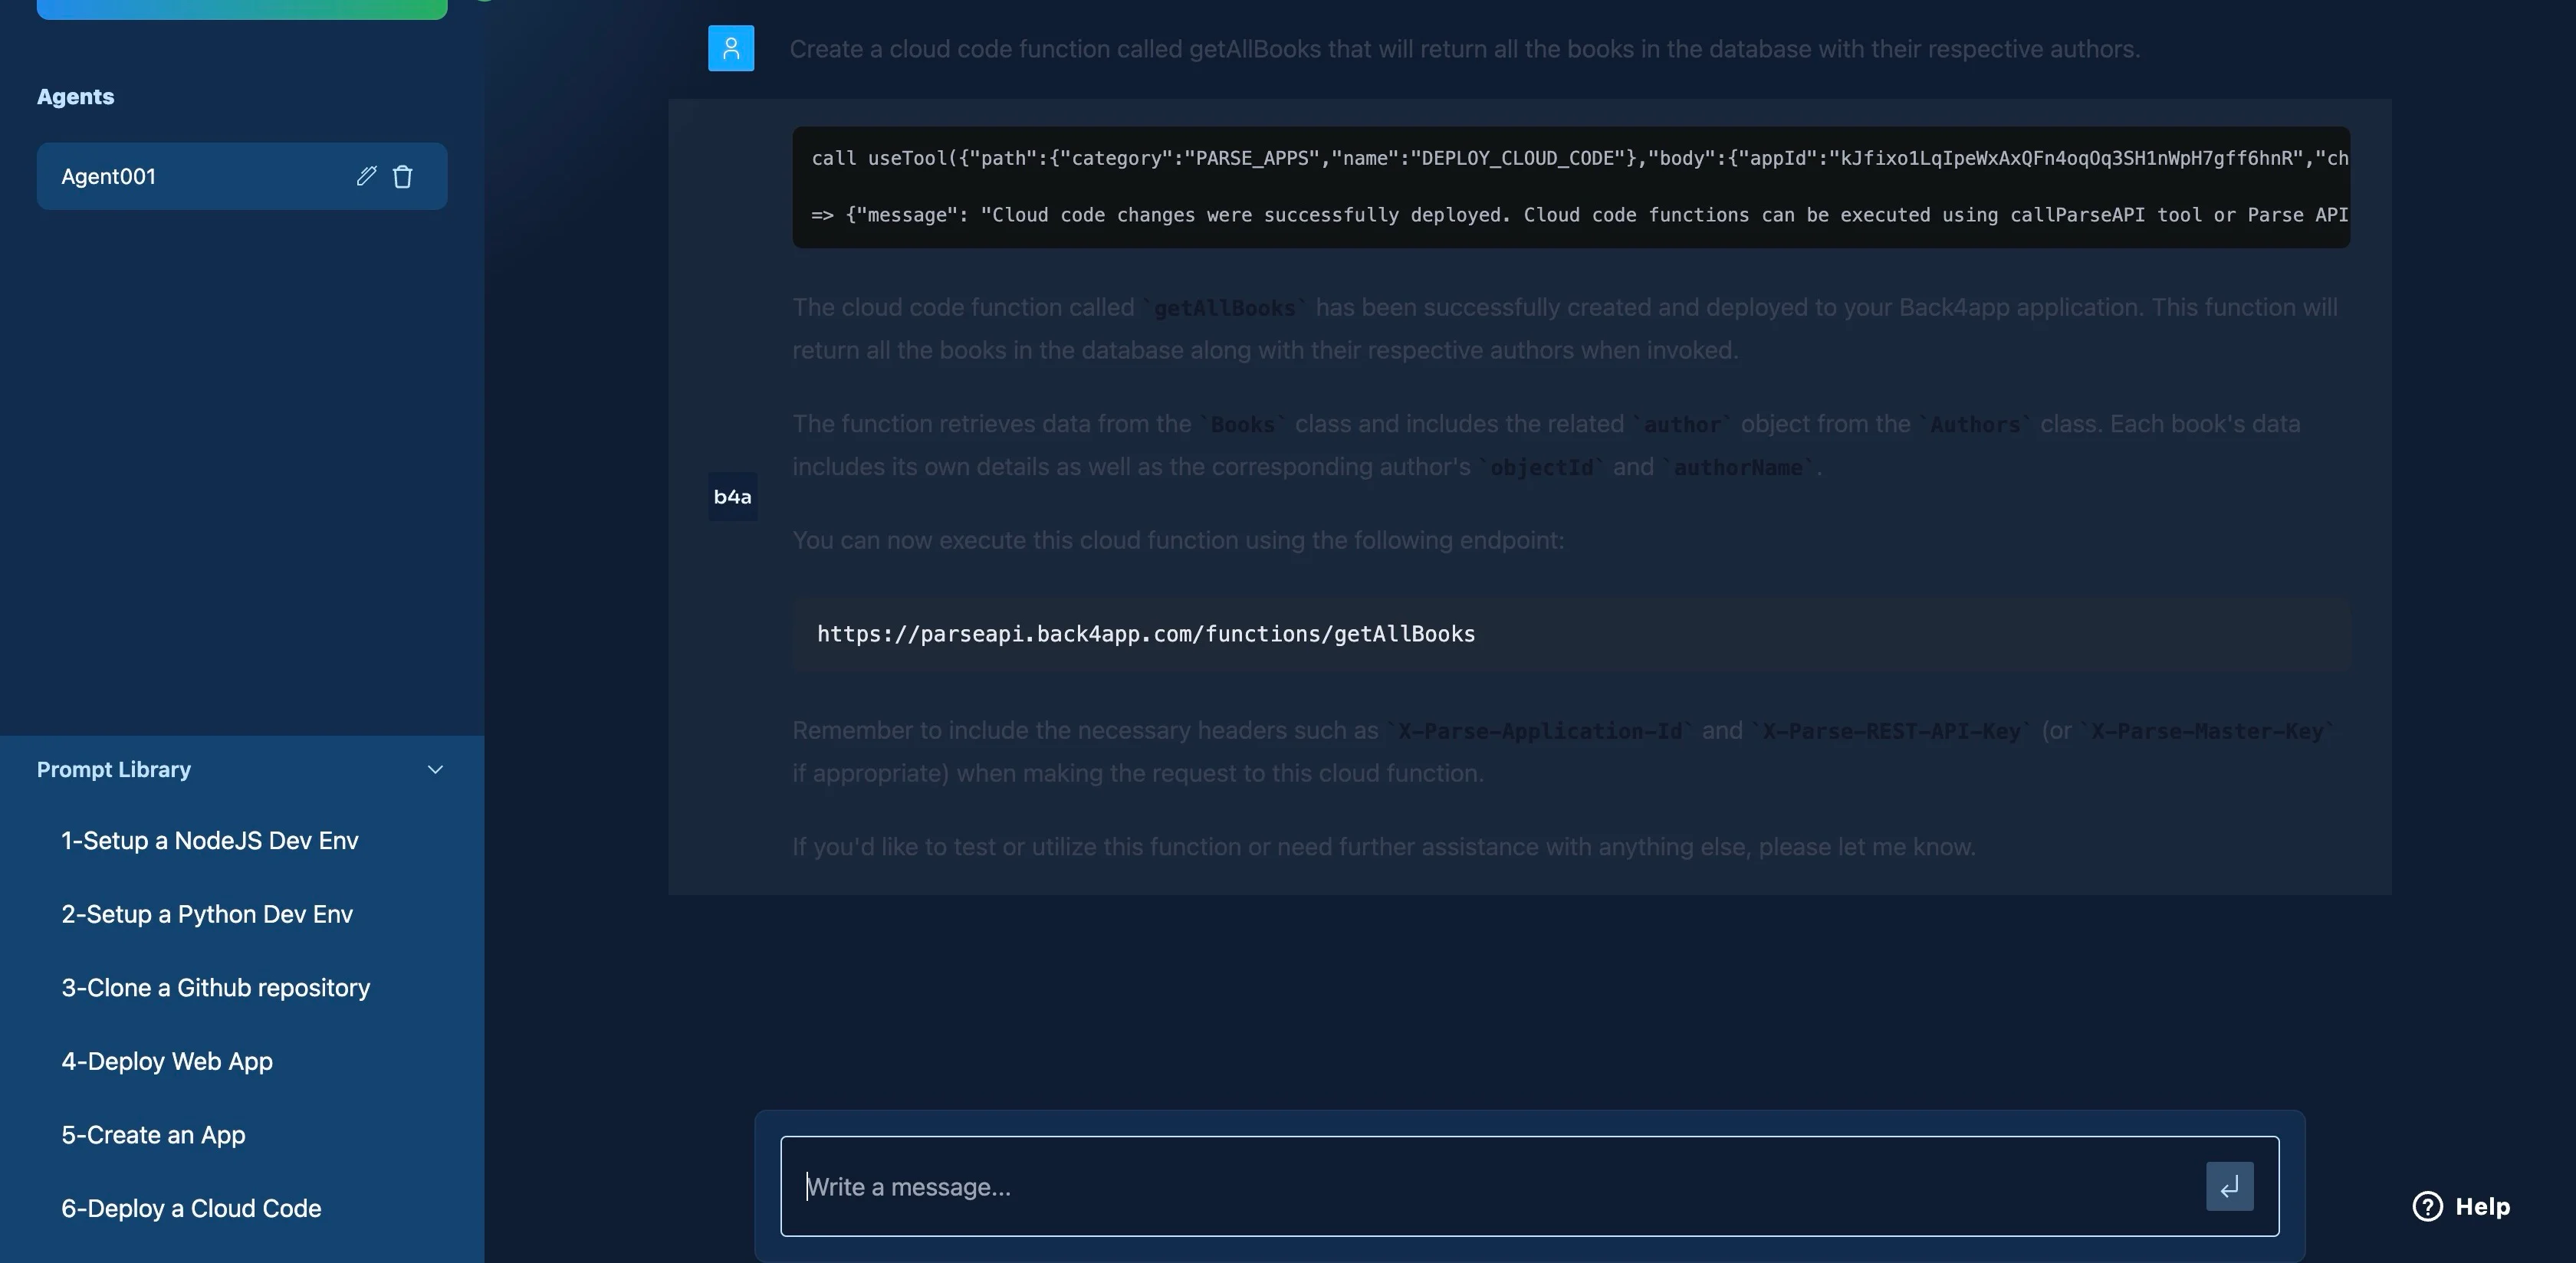
接下来,向 Back4app 人工智能代理发出以下提示,以生成用于获取 ID 上图书的云代码。
Create a cloud code function called `viewBook(bookId)`
that allows me to provide a book ID and return a book with the matching ID.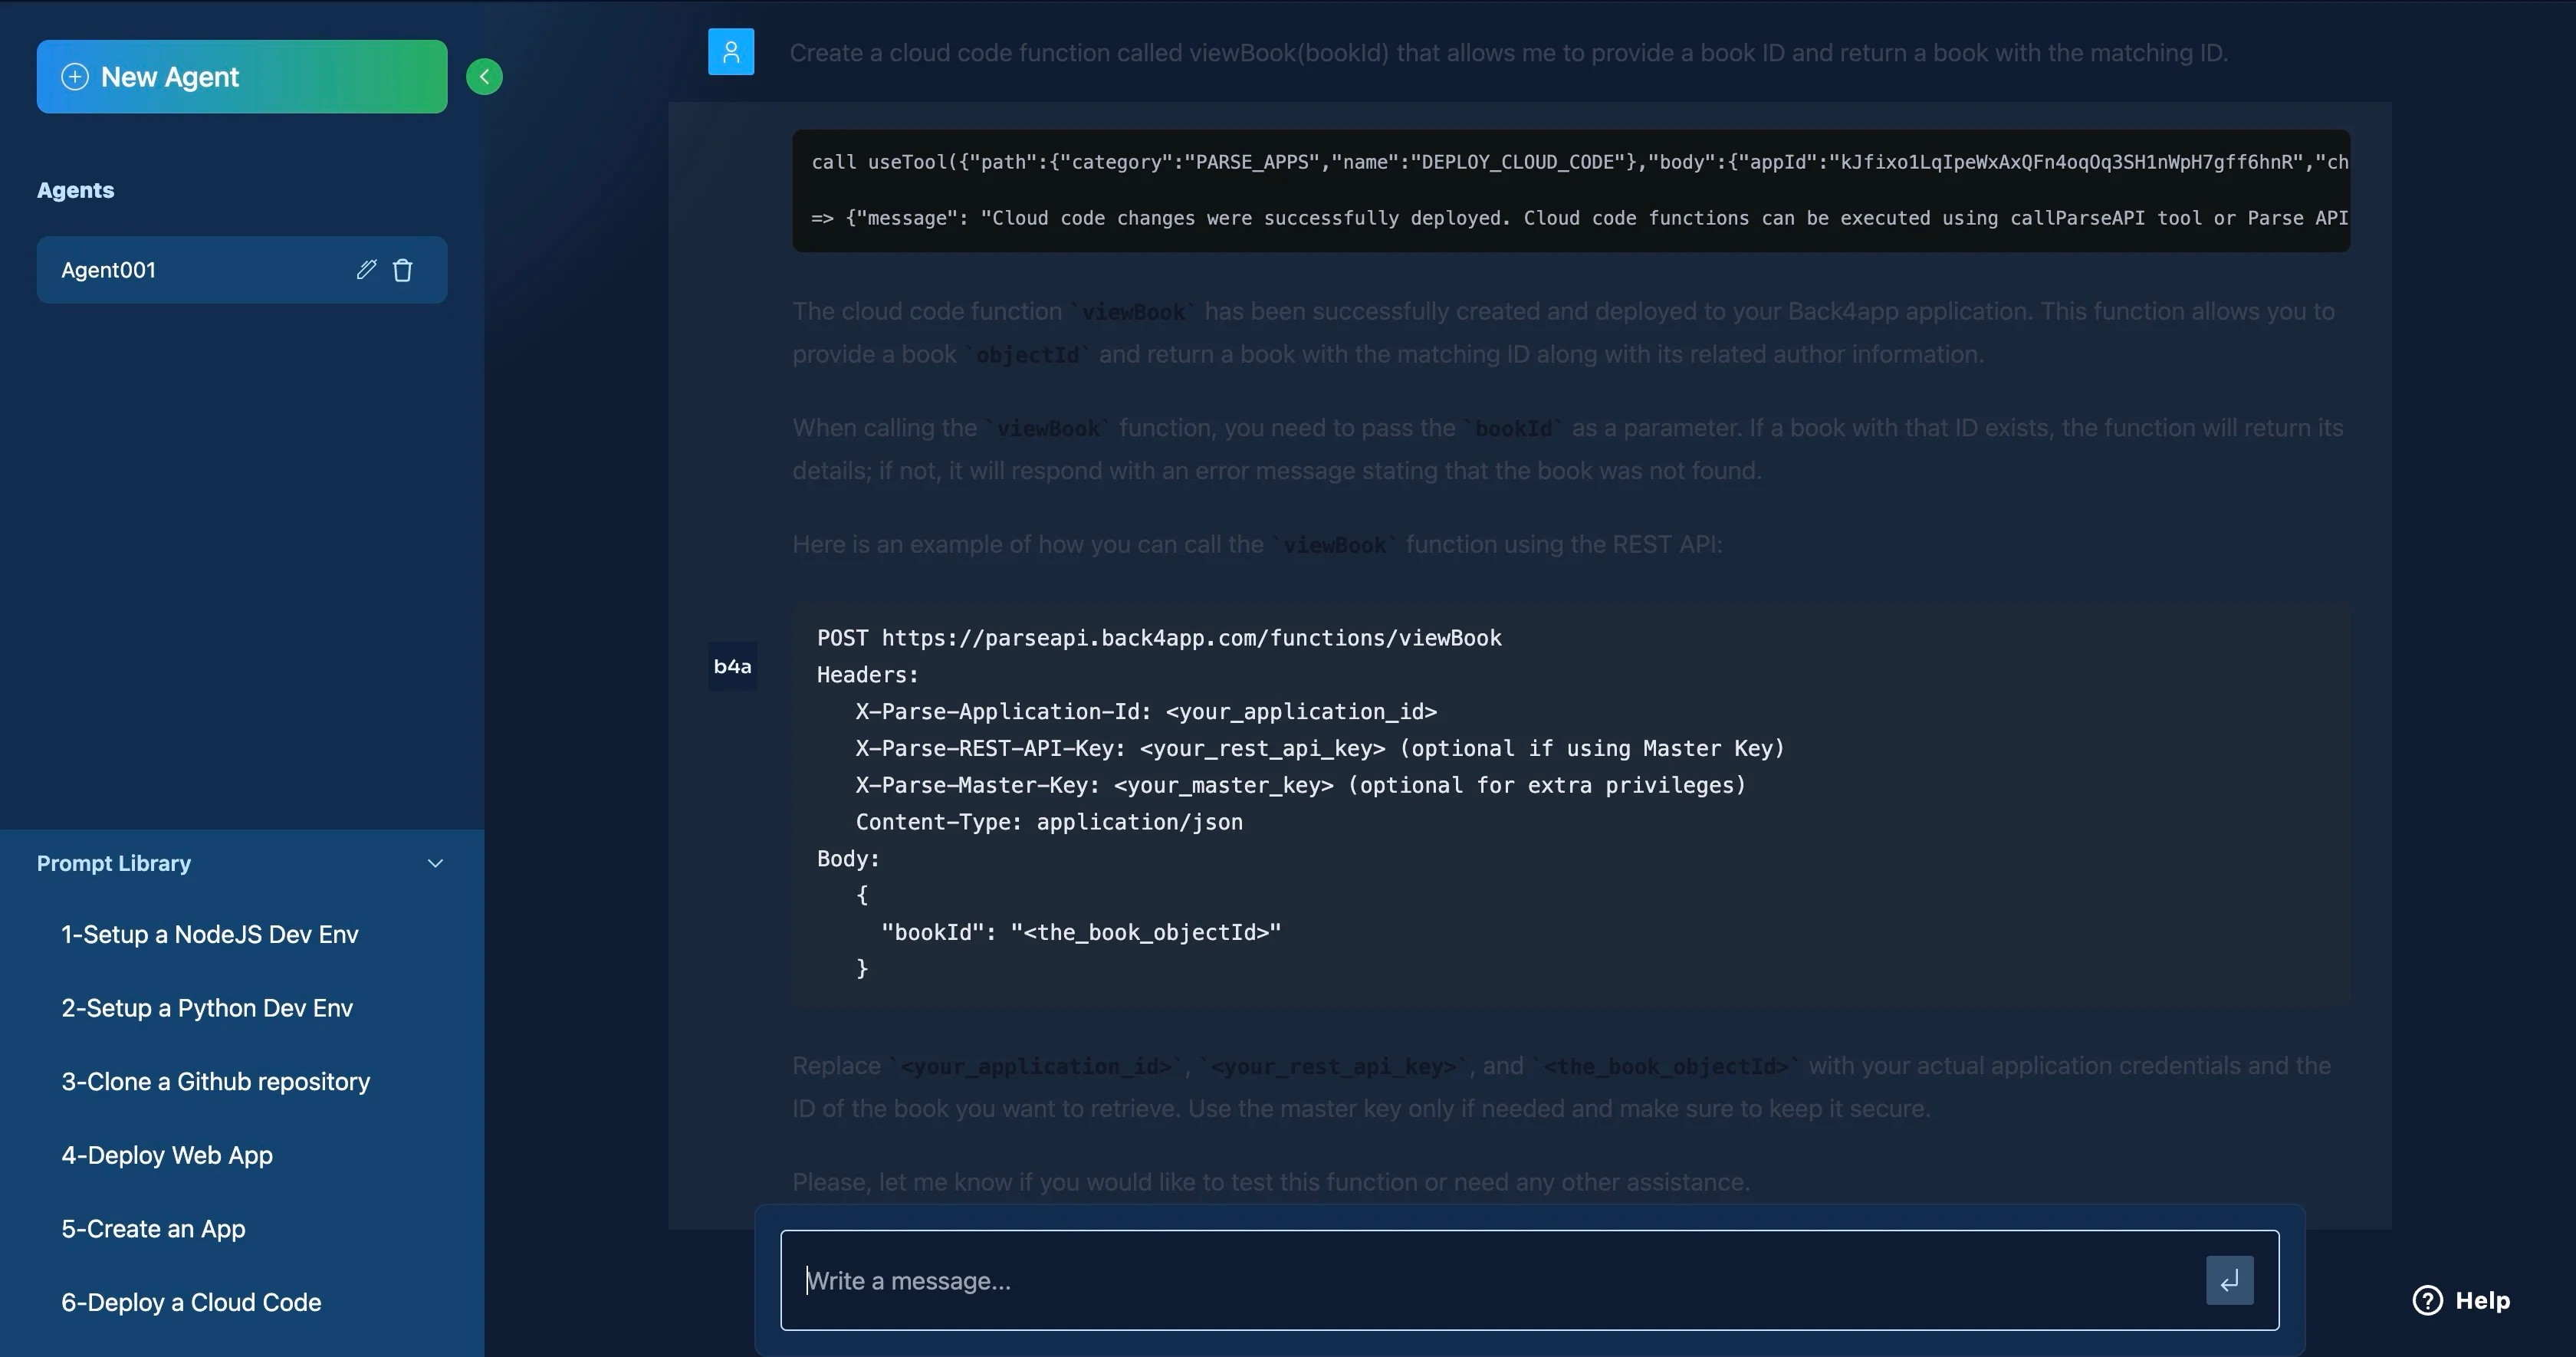
然后,向 Back4app 人工智能代理发出以下提示,生成用于获取特定作者所有书籍的云代码。
Create a cloud code function called `getByAuthor(authorName)` that allows me to provide an author name and return all the books by the author.
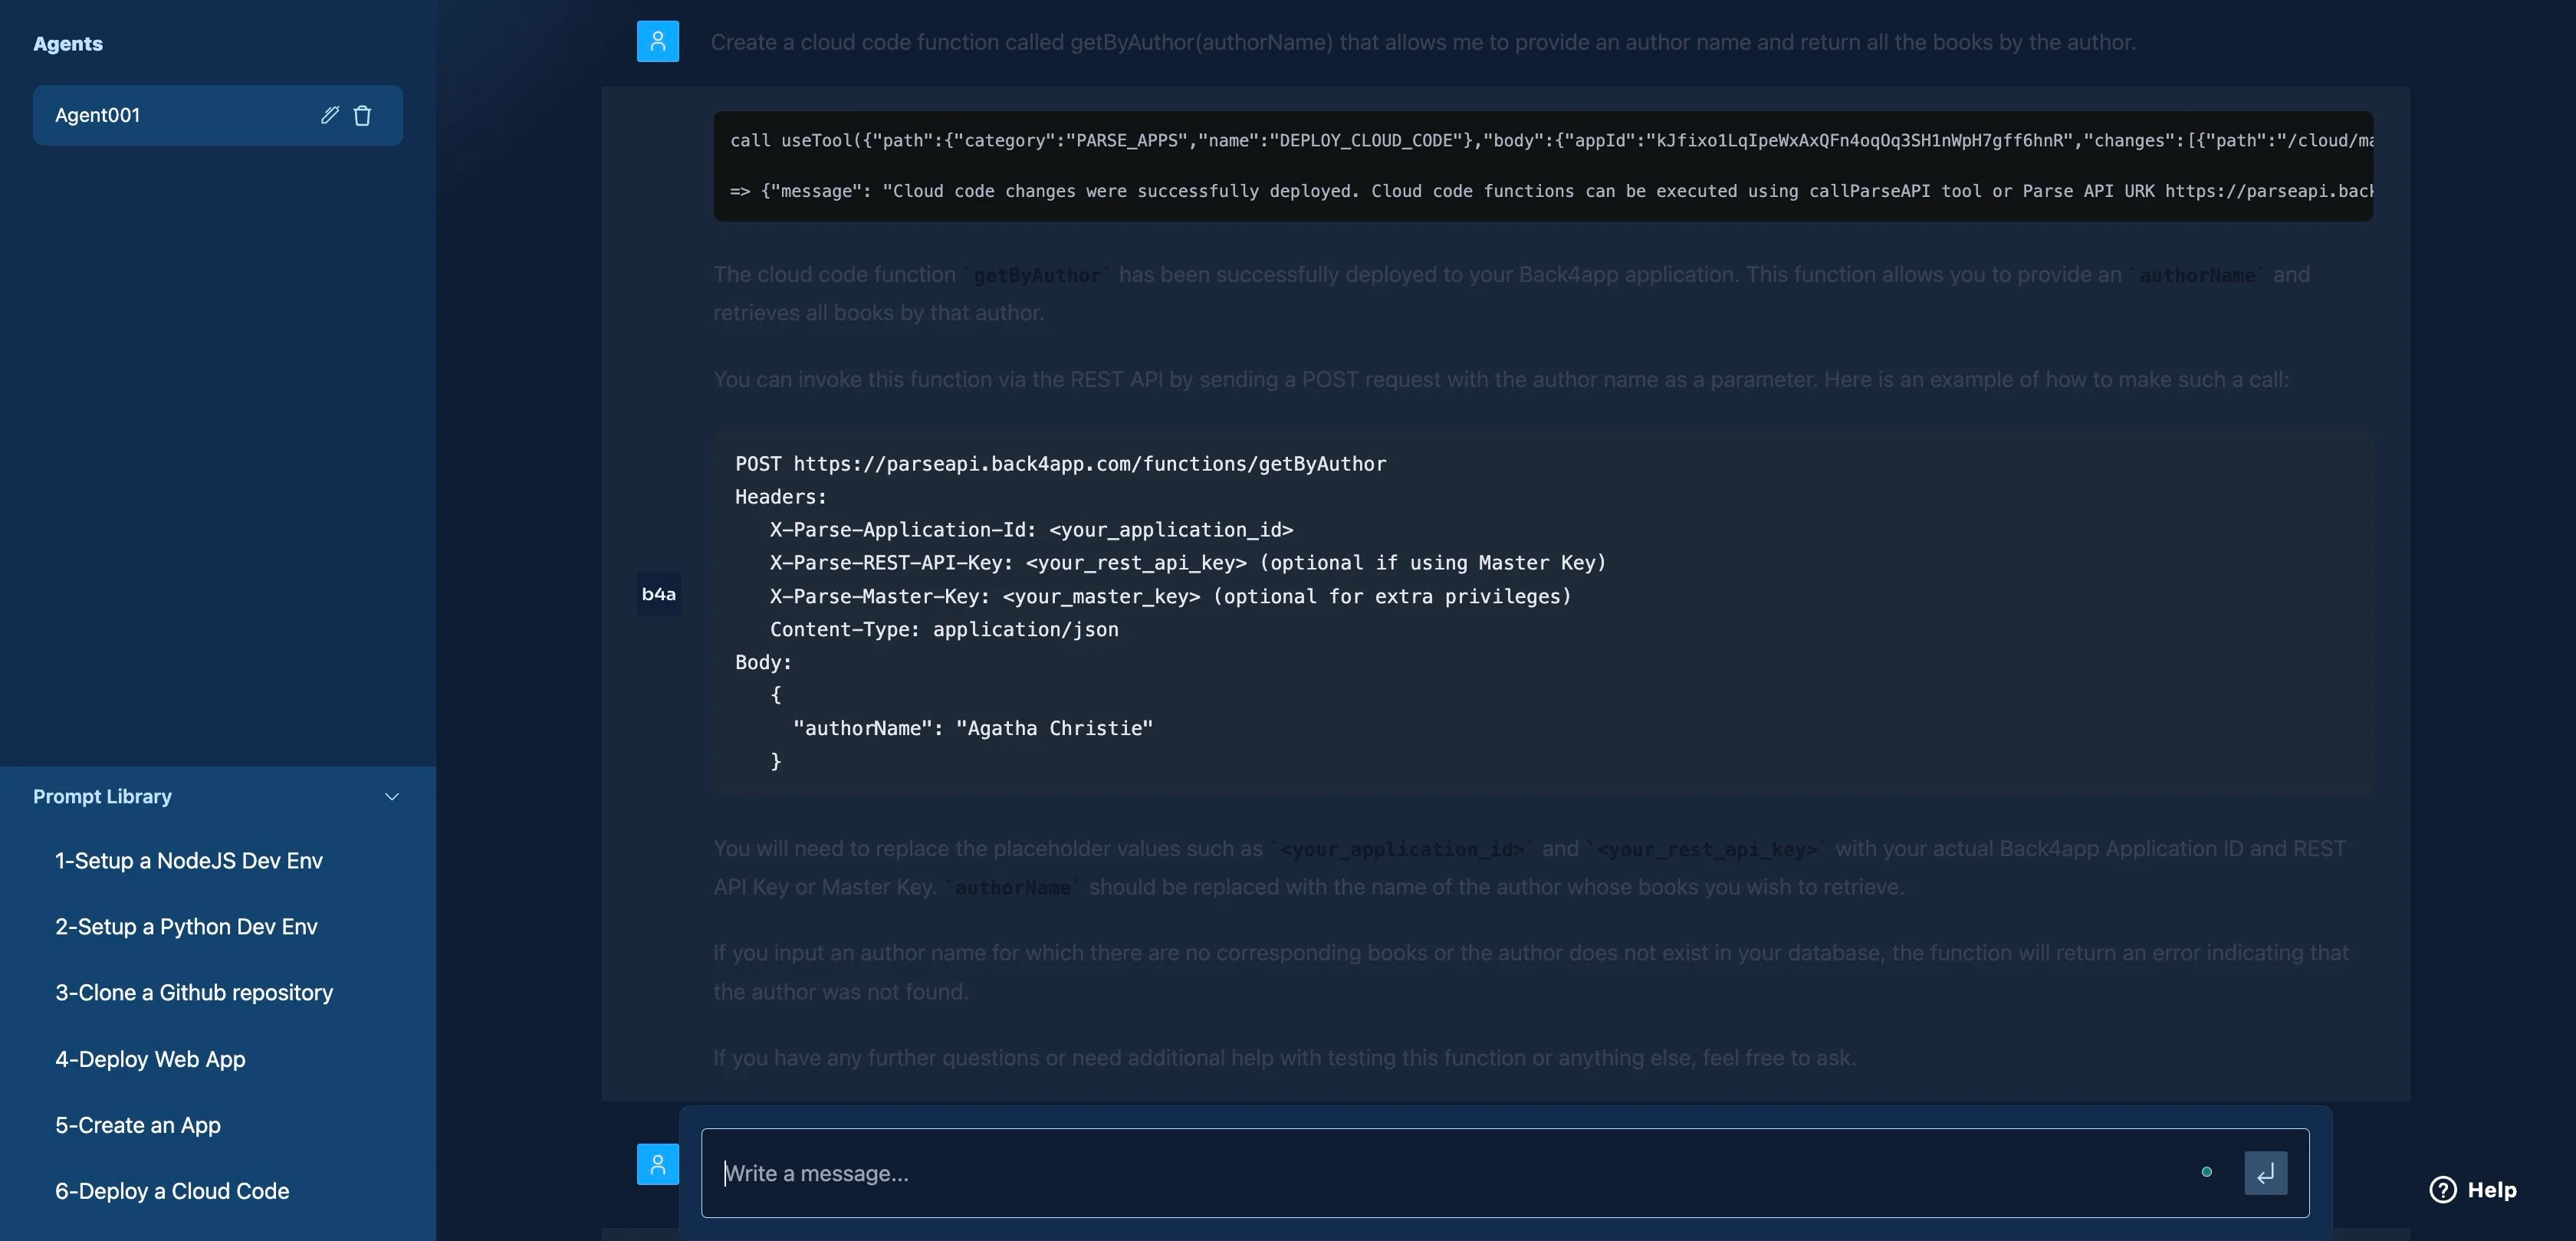
接下来,向 Back4app 人工智能代理发出以下提示,生成从图书馆借书的云代码。
Create a cloud code function called `borrowBookFromLibrary(libraryMemberId, bookId)` that allows me to provide a Library member ID and a Book ID  and records a book checkout for the member with the due date and return date set to a month from the current date.

The function should also check if the book is available (ie `availableCopies` != 0). The book should display a proper error message if it is unavailable.
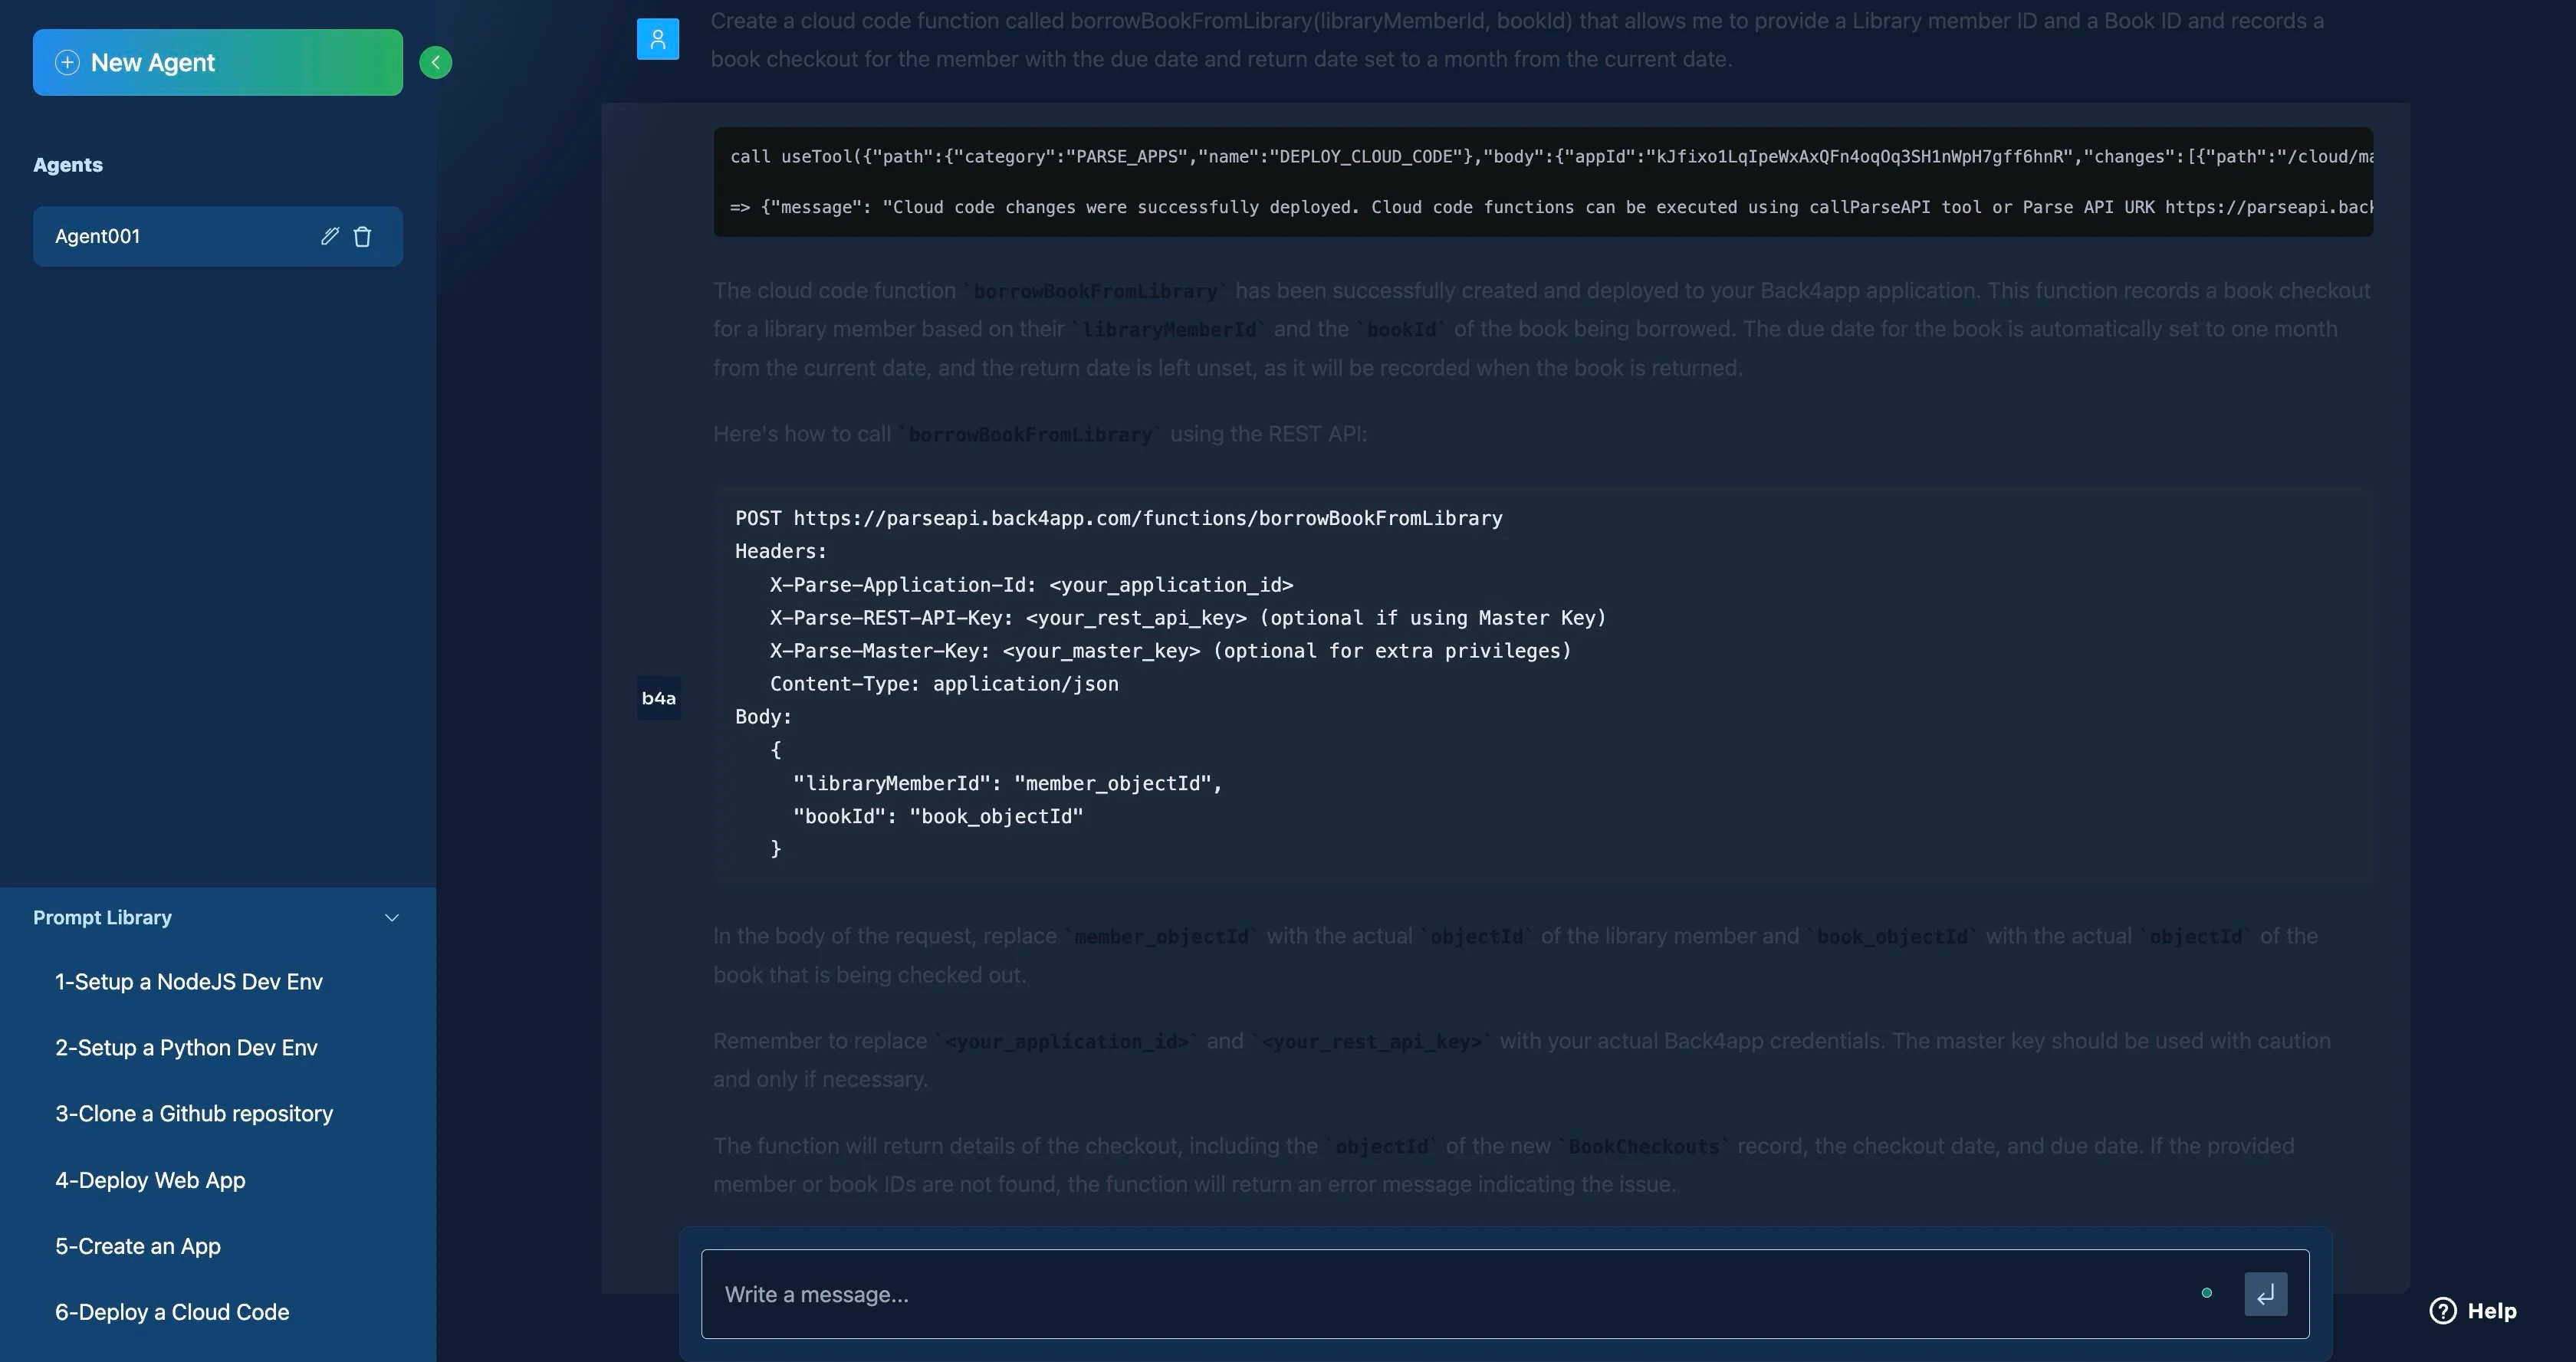
最后,向 Back4app 人工智能代理发出以下提示,生成向图书馆还书的云代码。
Create a cloud code function called `returnBookToLibrary(libraryMemberId, bookId)` that allows me to provide a Library member ID and a Book ID.

The function should fetch the BookCheckout record  with the libraryMemberId and bookId provided and update  the return date of the BookCheckout record to the current date.

The function should also increment the book's `availableCopies` by 1.
您可以在Back4app 控制面板 → 云代码 → 功能和虚拟主机 → 云 → main.js 上查看人工智能代理是否正确创建了云功能。
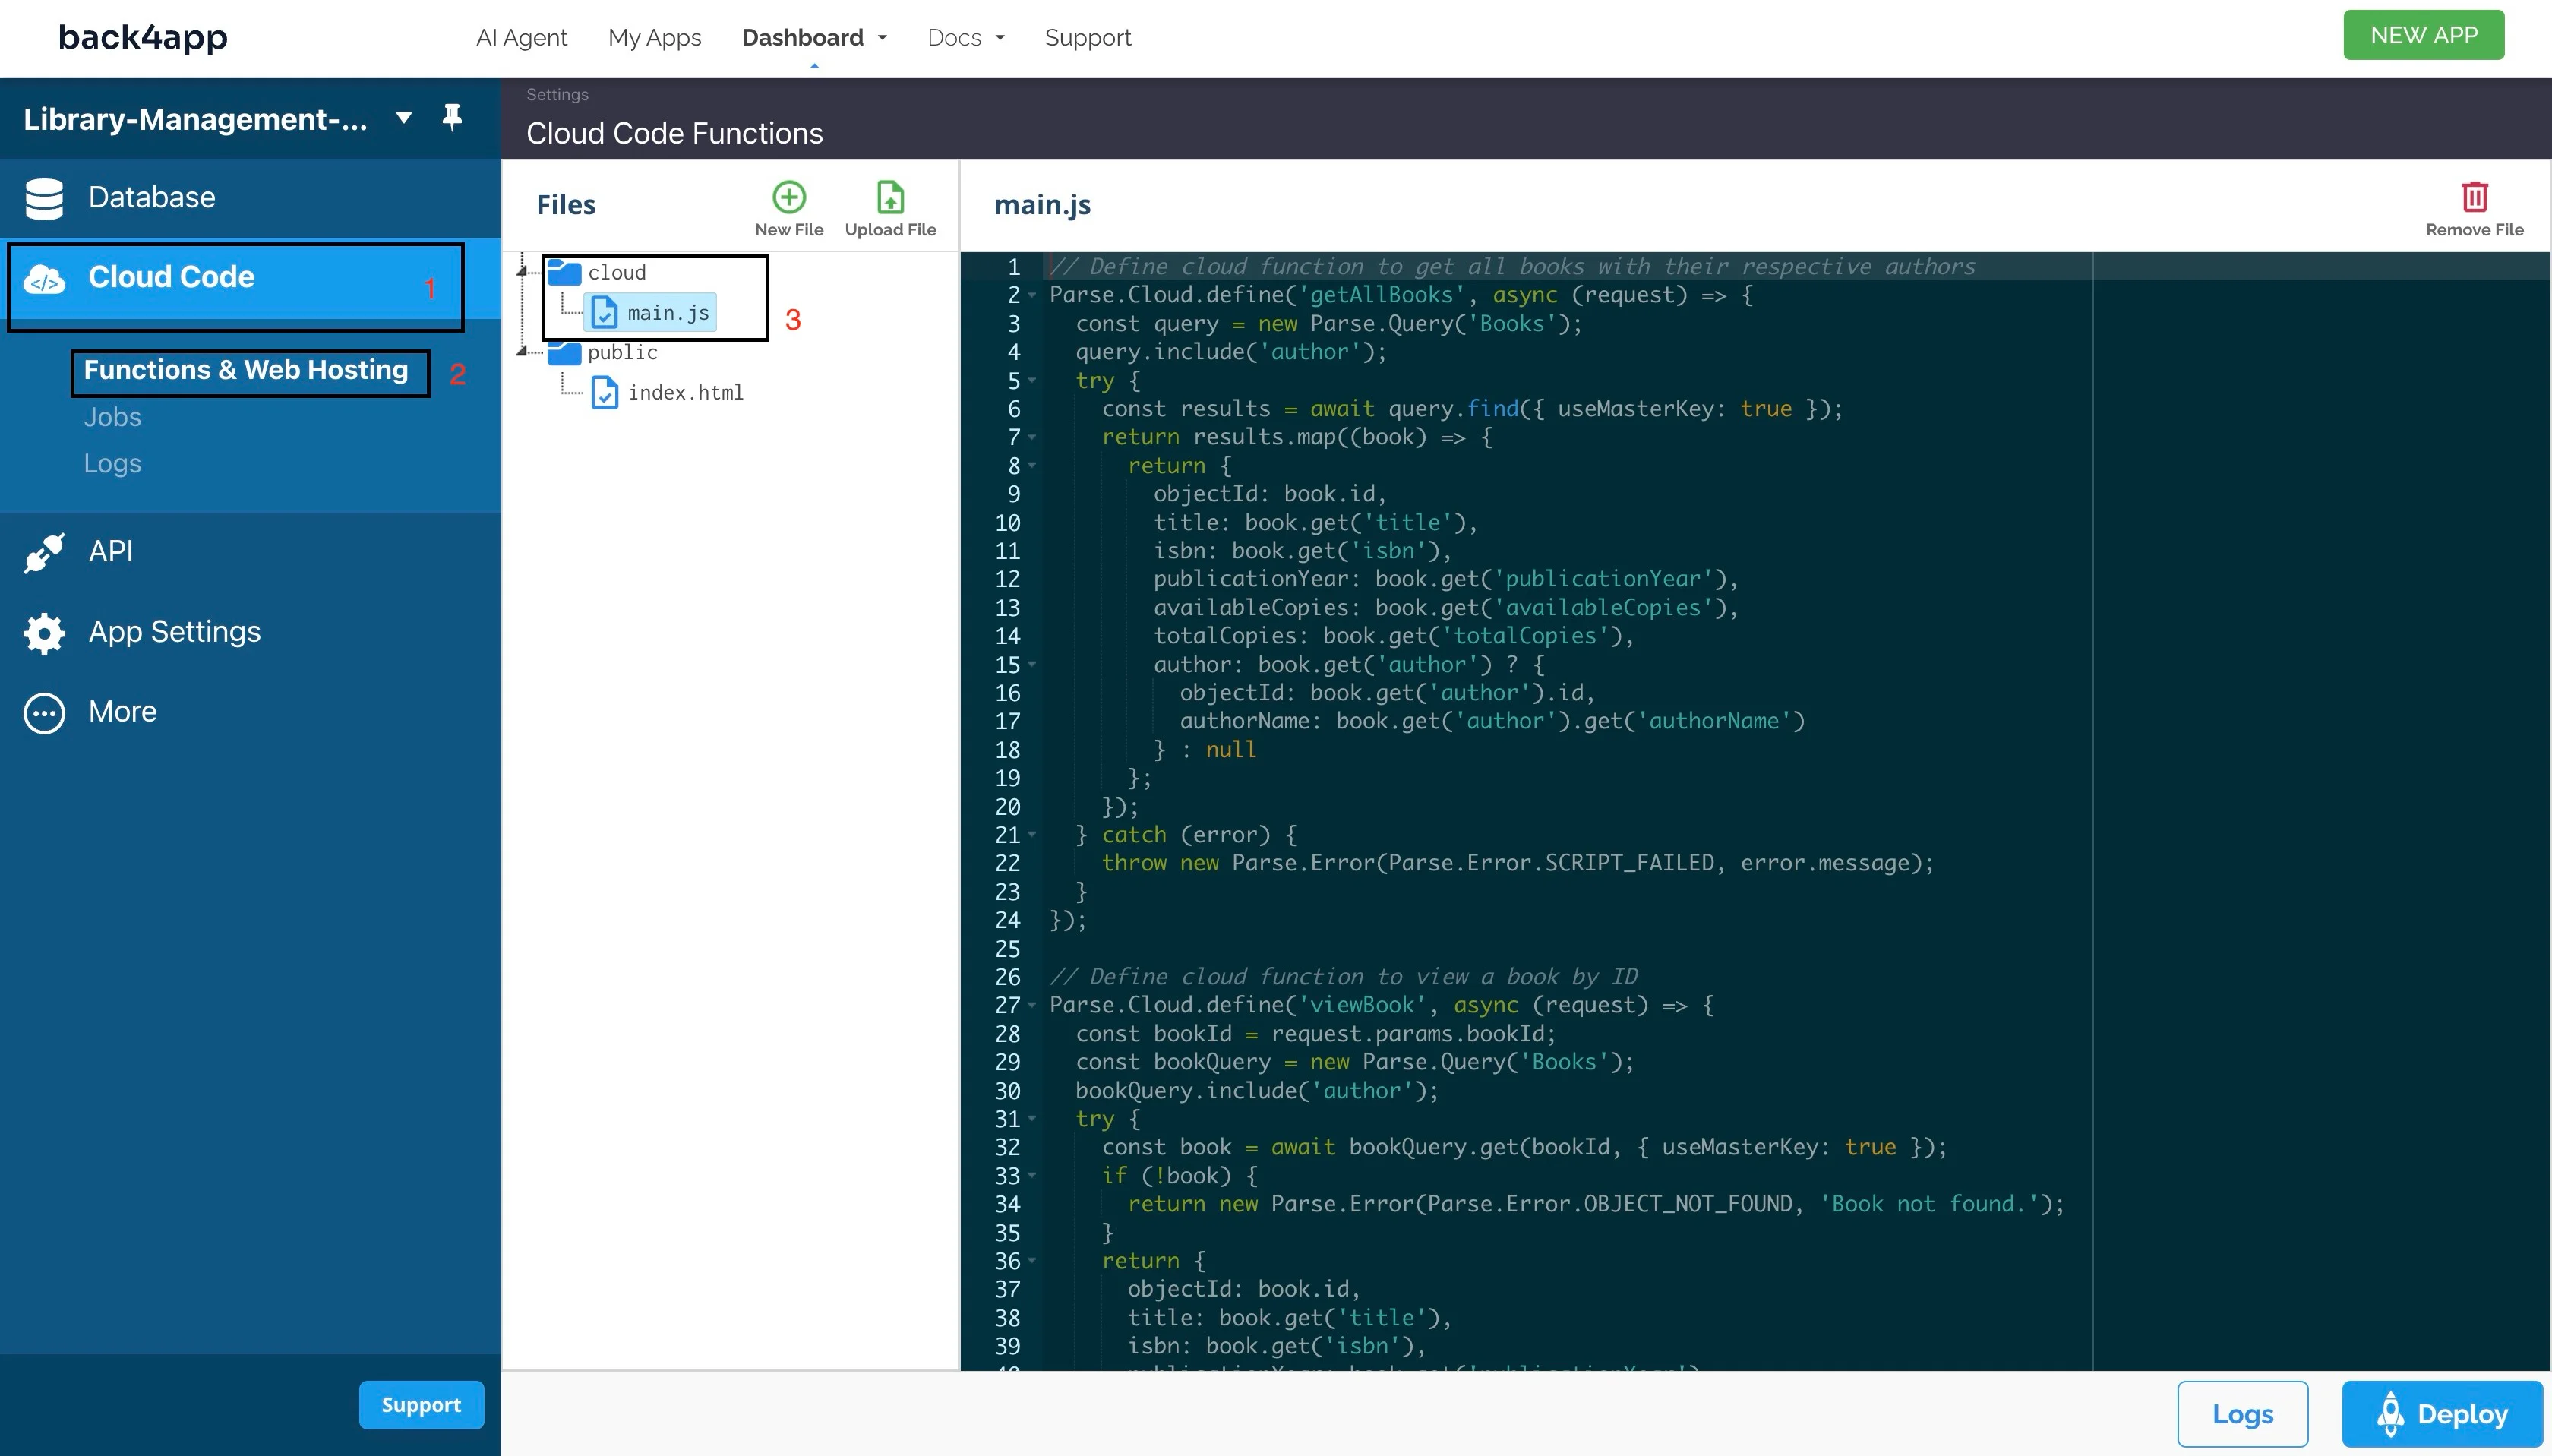
现在,您已经通过一些提示创建了一个功能强大的后台。接下来,您将创建一个用户界面,让您可以与后台进行交互。
使用 Back4app AI 代理构建前端
在本节中,您将使用 React 构建网络应用程序的用户界面。
首先,向人工智能代理提供以下提示,让其了解为应用程序创建用户界面所需的步骤。
Describe the steps required to build a React Frontend for my backend. I want the app to have the following routes
1. `/books` to display all the books in the library
2. `/books/:bookId` to view a specific book
3. `/books/authors/:authorName` to view all books by a specific author
4. `/books/:bookId/borrow` allows a member to borrow a book
5. `/books/:bookId/return-to-library` allows a member to return a book to the library
I also want the app to be created using vite
代理应回答几个步骤,这些步骤可能与下面的步骤不同,但最终会导致相同的结果。如果人工智能概述的任何步骤不够清楚,您可以要求人工智能在另一个提示中加以说明。
第 1 步:初始化新的 Vite 项目并安装依赖项
在终端中运行下面的命令,用 Vite 搭建一个新的 React 应用程序:
npm create vite@latest library-app -- --template react
导航至项目目录,运行以下命令安装依赖项:
cd library-app && npm install
运行以下命令,安装用于路由选择的 React Router 和用于与 Back4app 交互的 Parse SDK:
npm install react-router-dom parse
第 2 步:初始化 JavaScript Parse SDK
将下面的代码块添加到您的main.jsx文件中,以便在应用程序中初始化 Parse。
import Parse from "parse";

const PARSE_APPLICATION_ID = "YOUR_APPLICATION_ID";
const PARSE_HOST_URL = "<https://parseapi.back4app.com/>";
const PARSE_JAVASCRIPT_KEY = "YOUR_JAVASCRIPT_KEY";

Parse.initialize(PARSE_APPLICATION_ID, PARSE_JAVASCRIPT_KEY);
Parse.serverURL = PARSE_HOST_URL;
记住用实际值替换 “YOUR_APPLICATION_ID “和 “YOUR_JAVASCRIPT_KEY”,您可以在 Back4app 面板 → 应用程序设置 → 安全性和密钥中找到它们。
步骤 3:设置路由
用下面的代码块替换App.jsx文件中的代码:
import React from 'react';
import { BrowserRouter as Router, Routes, Route } from 'react-router-dom';
import Books from './components/Books';
import BookDetails from './components/BookDetails';
import BooksByAuthor from './components/BooksByAuthor';
import BorrowBook from './components/BorrowBook';
import ReturnBook from './components/ReturnBook';

const App = () => {
  return (
    <Router>
      <Routes>
        <Route path="/books" element={<Books />} />
        <Route path="/books/:bookId" element={<BookDetails />} />
        <Route path="/books/authors/:authorName" element={<BooksByAuthor />} />
        <Route path="/books/:bookId/borrow" element={<BorrowBook />} />
        <Route path="/books/:bookId/return-to-library" element={<ReturnBook />} />
      </Routes>
    </Router>
  );
};

export default App;
第 4 步:构建和风格化组件
根据人工智能代理的说法,您的应用程序应包含五个组成部分:
书籍部分BooksDetails组件BooksByAuthor组件借书组件ReturnBook组件
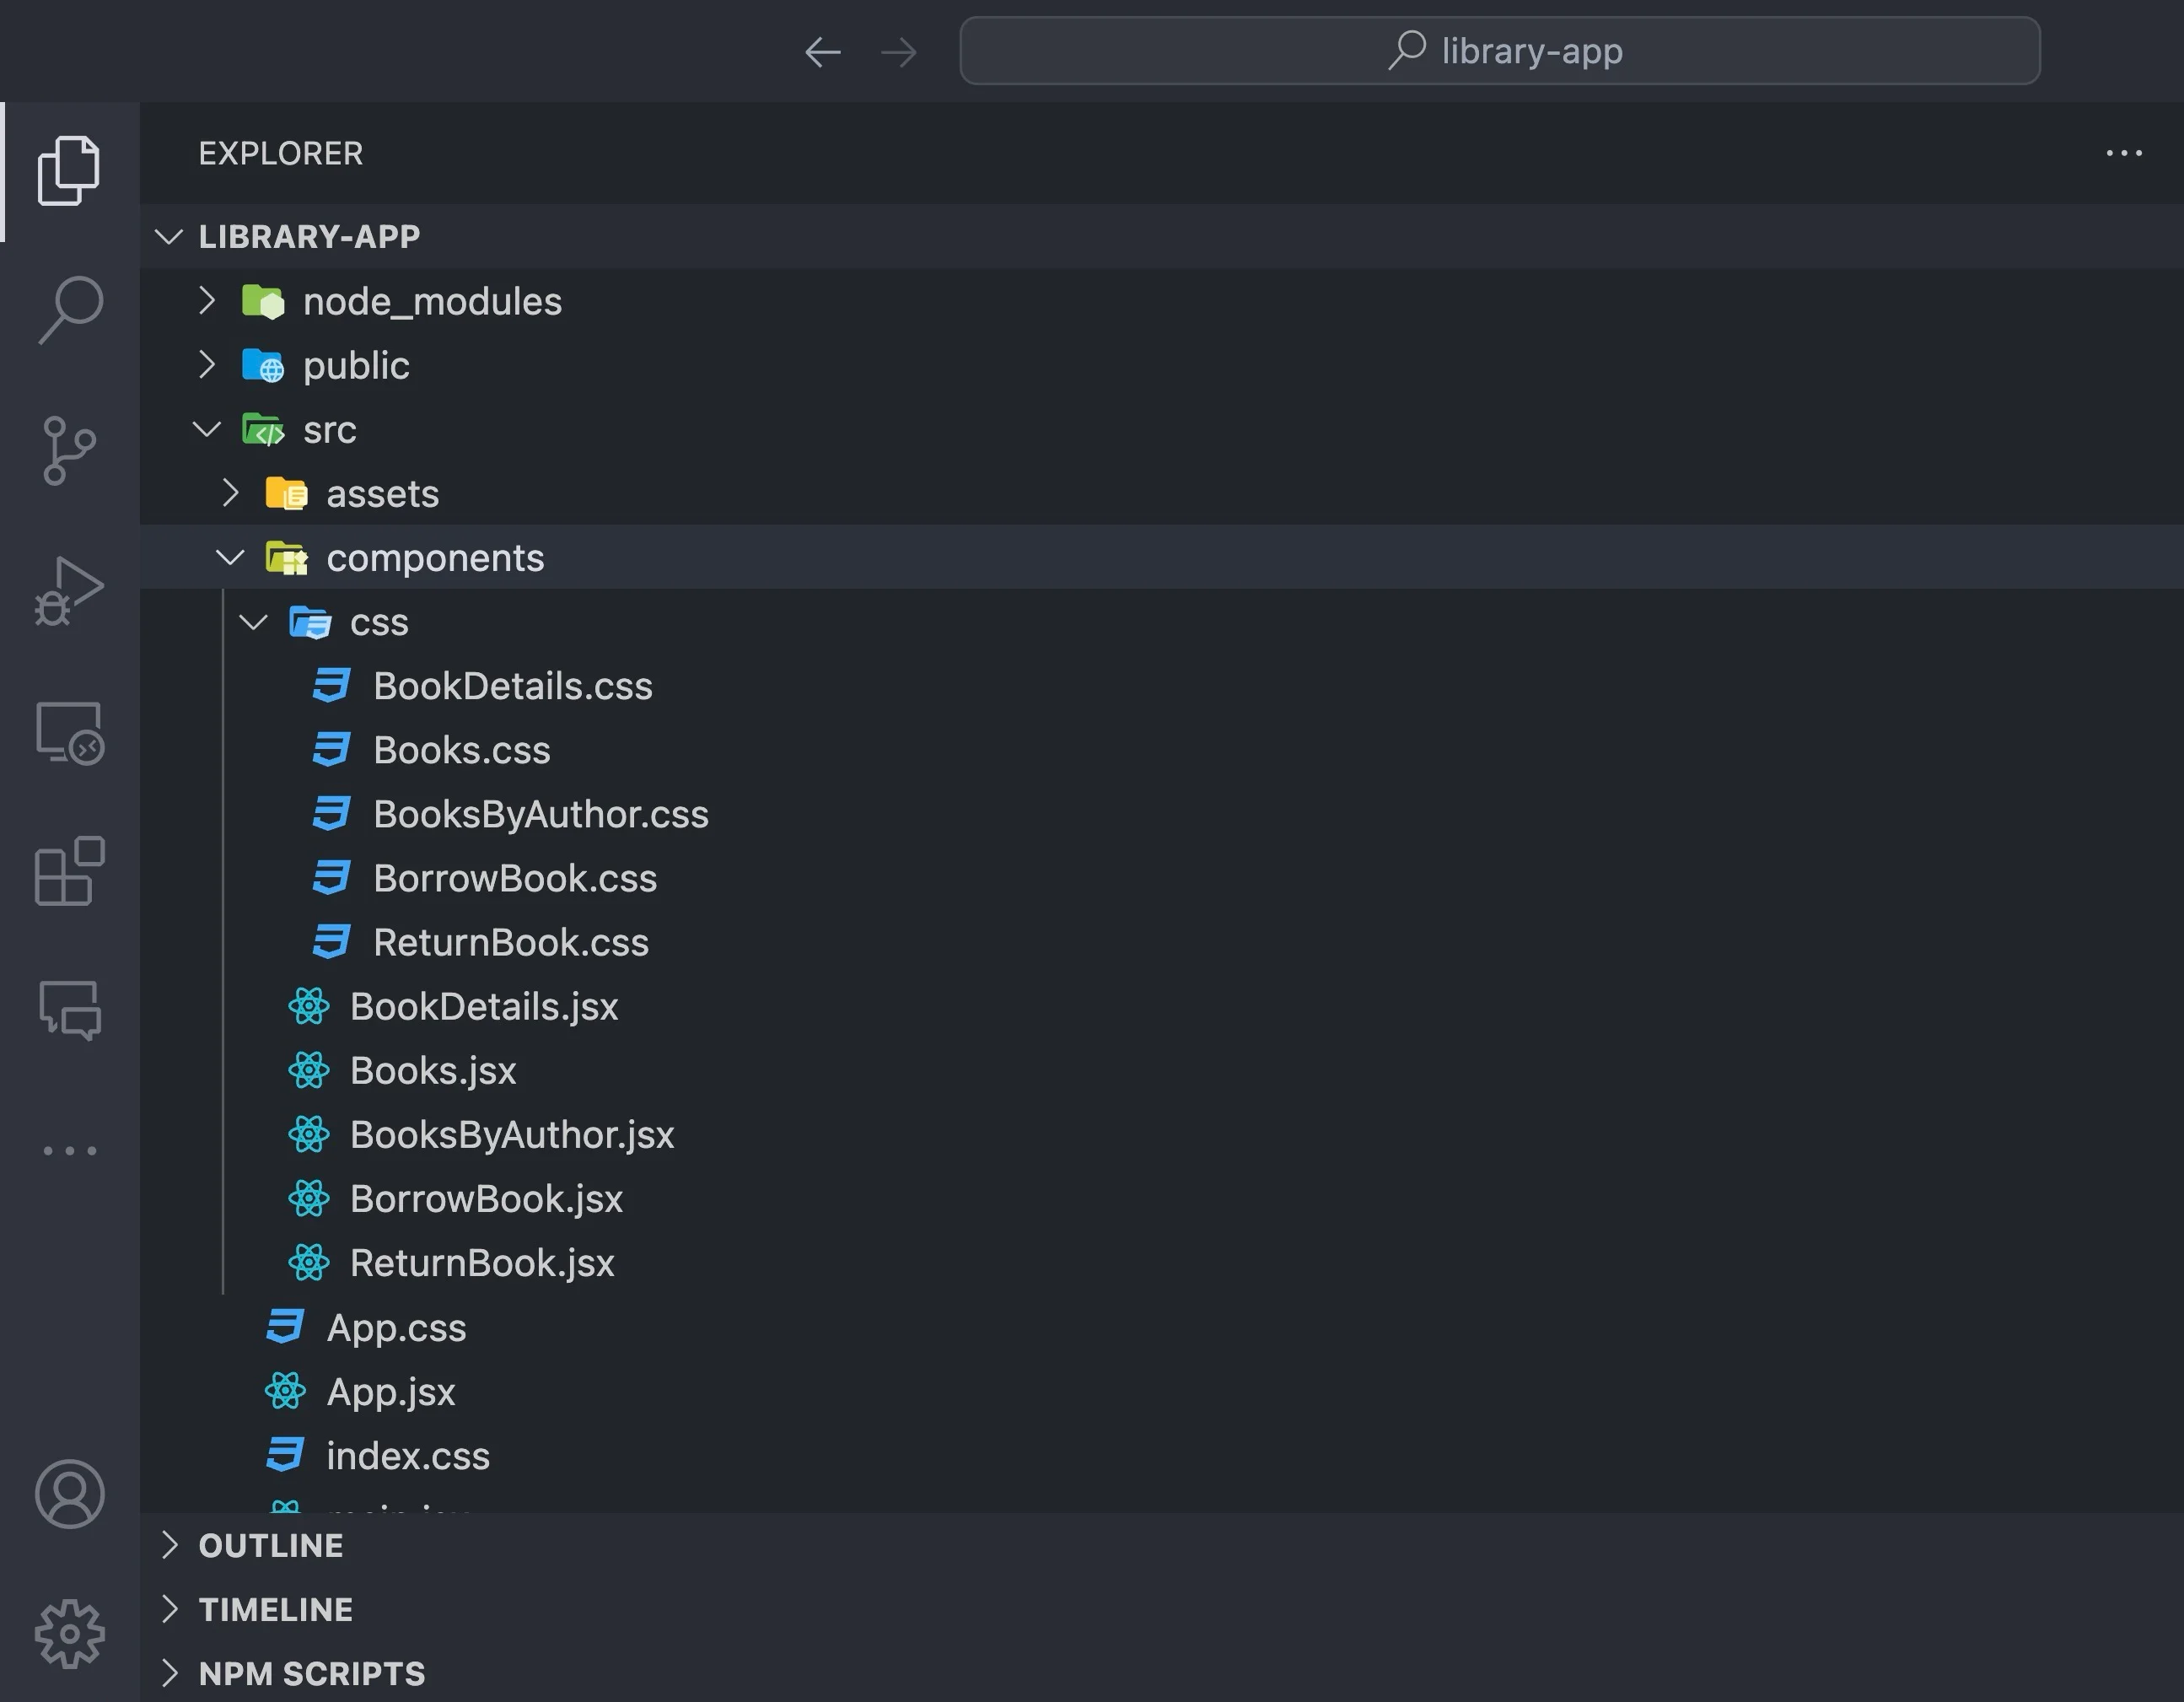
首先,在项目目录下创建一个 “组件 “文件夹,并为组件创建每个文件。然后,在 “组件 “文件夹中创建 CSS 文件夹,并为每个组件创建 CSS 文件。
组件文件夹应该如下图所示:
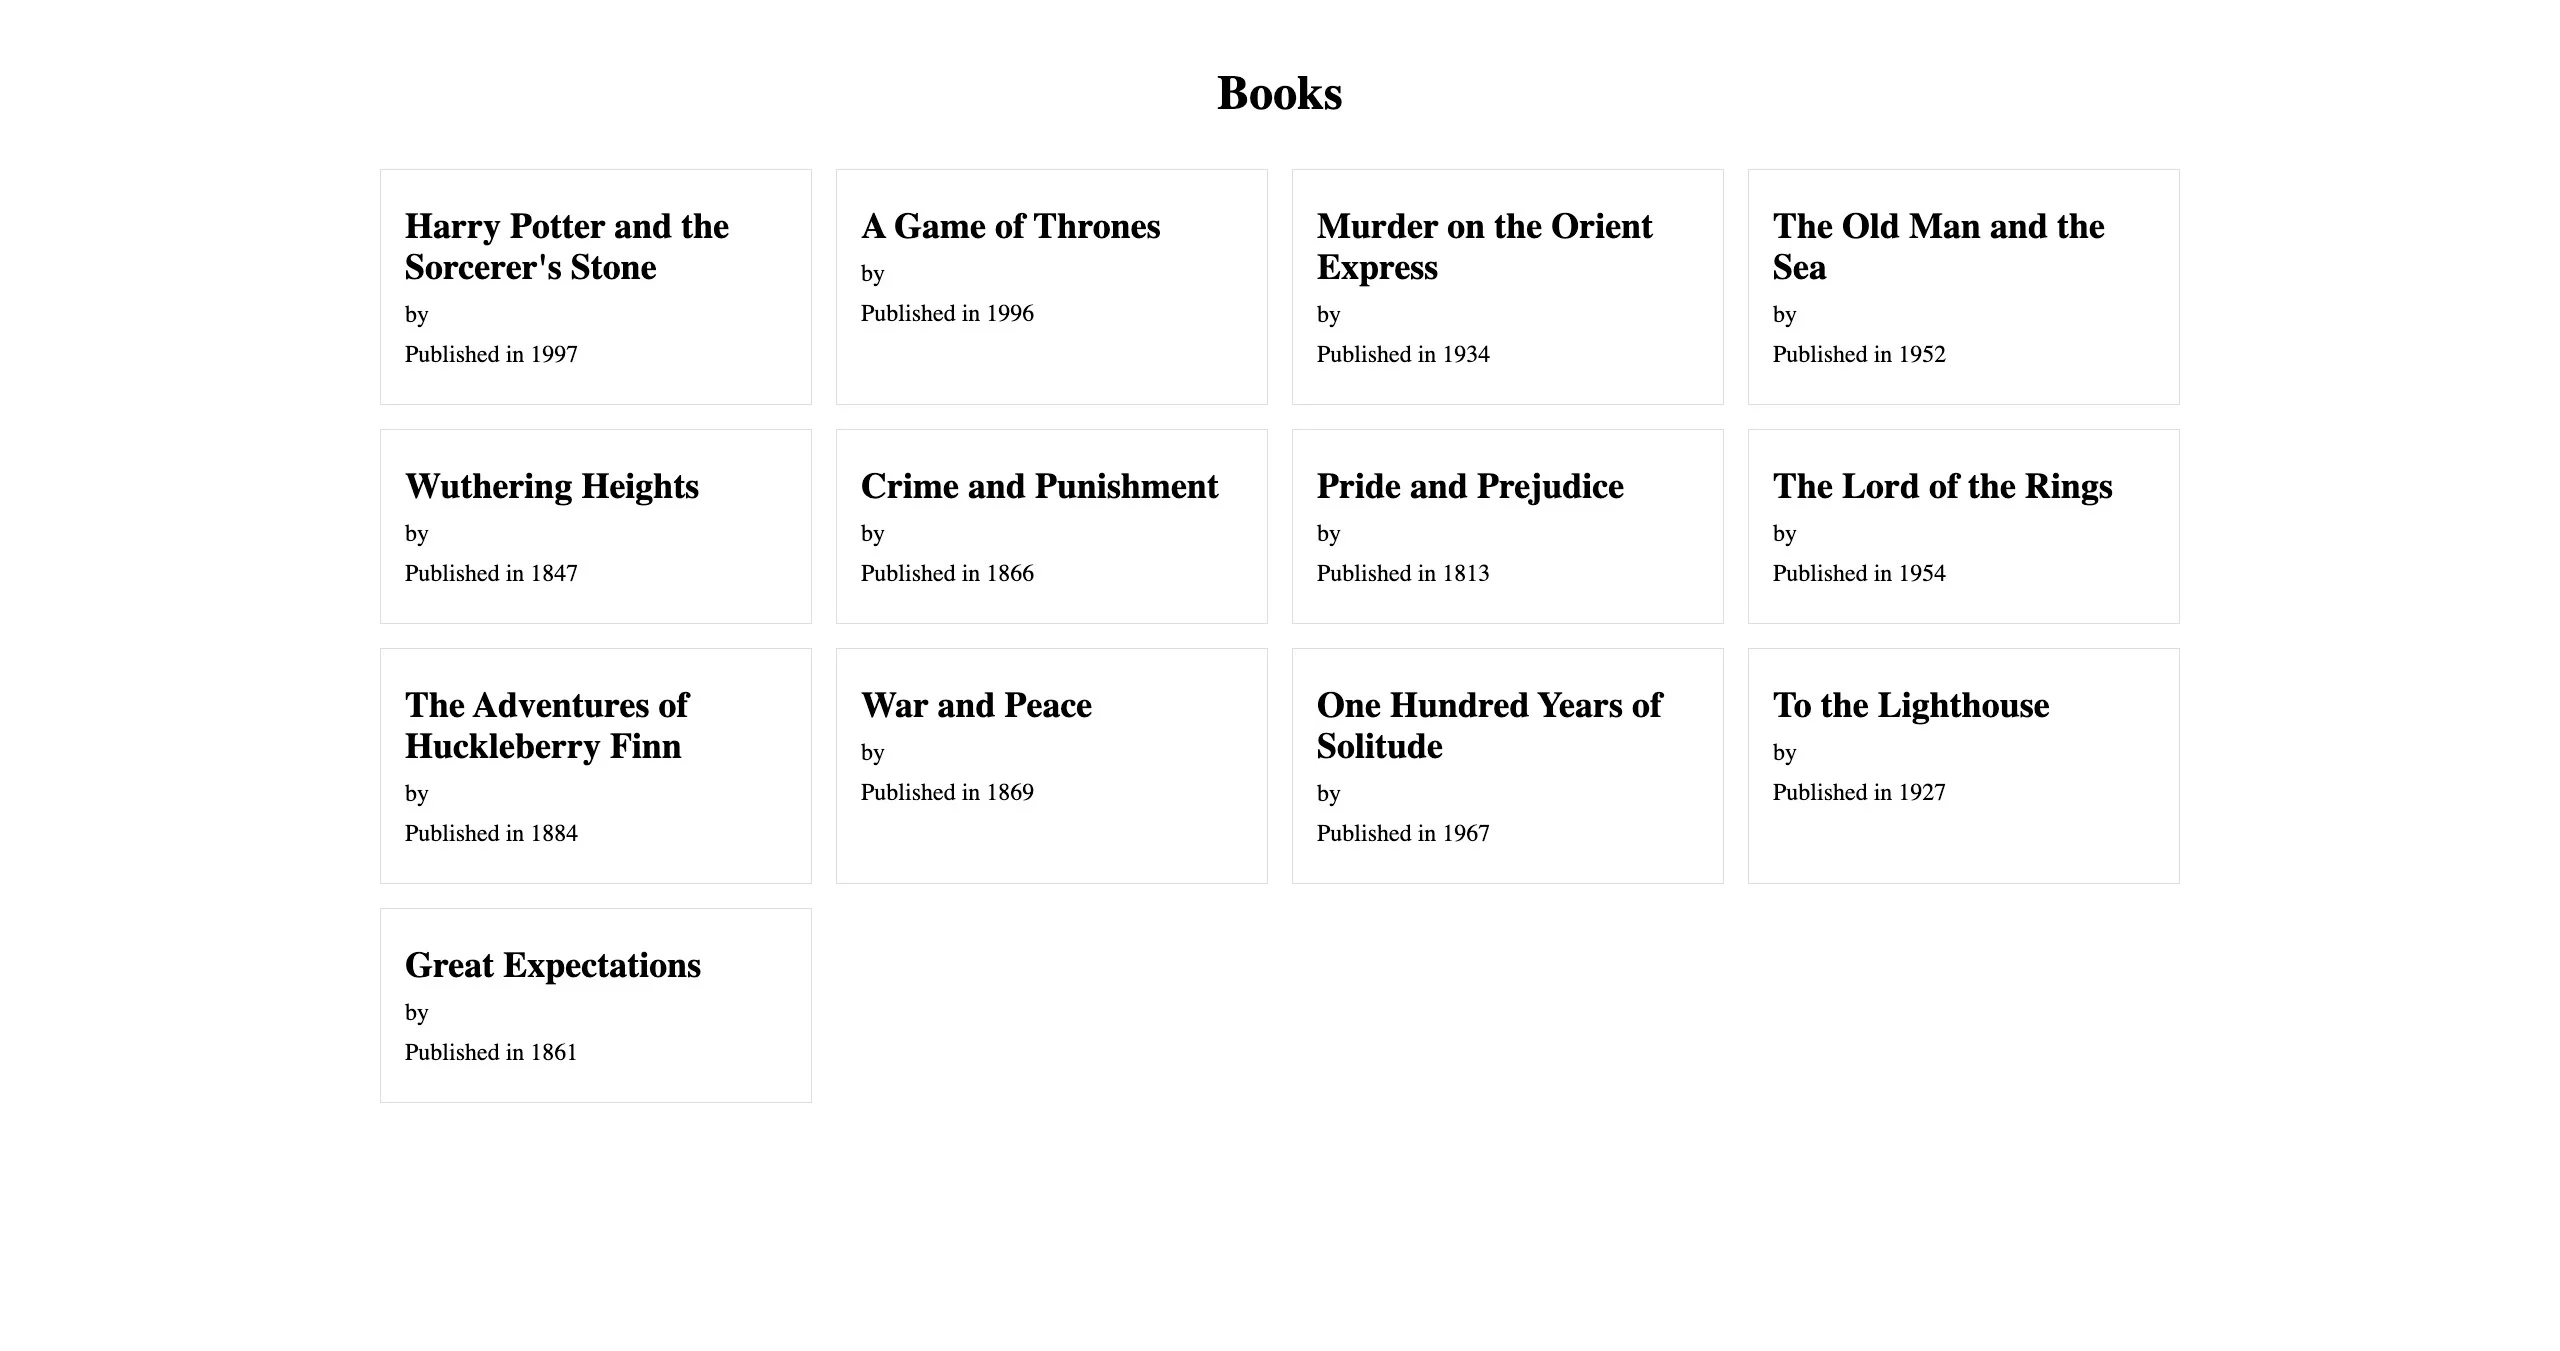
接下来,按照下面的提示让人工智能创建书籍组件并为其设计样式:
Create the component for the `books` route.
Be sure to add proper class names for styling and ensure that you are accessing the correct properties returned by the Parse server (Plain JavaScript Objects).
When the book card is clicked, I want to go to the route /books/:bookId using the bookId of the bookcard I clicked.
For the styling, the books should be displayed in a grid at the center of the webpage, taking the full width of the browser.
The component should also have a proper header like "Books".
人工智能应提供Books.css文件的样式表和Books.jsx 的 jsx代码段。
将代码块添加到各自的文件中,并将Books.css导入main.jsx文件。
就像这样
//main.jsx
import "./components/css/Books.css";
注意: 禁用您的 index.css文件,以防止样式覆盖您的自定义样式。
根据下面的提示,让人工智能创建BookDetails组件并为其设计样式。
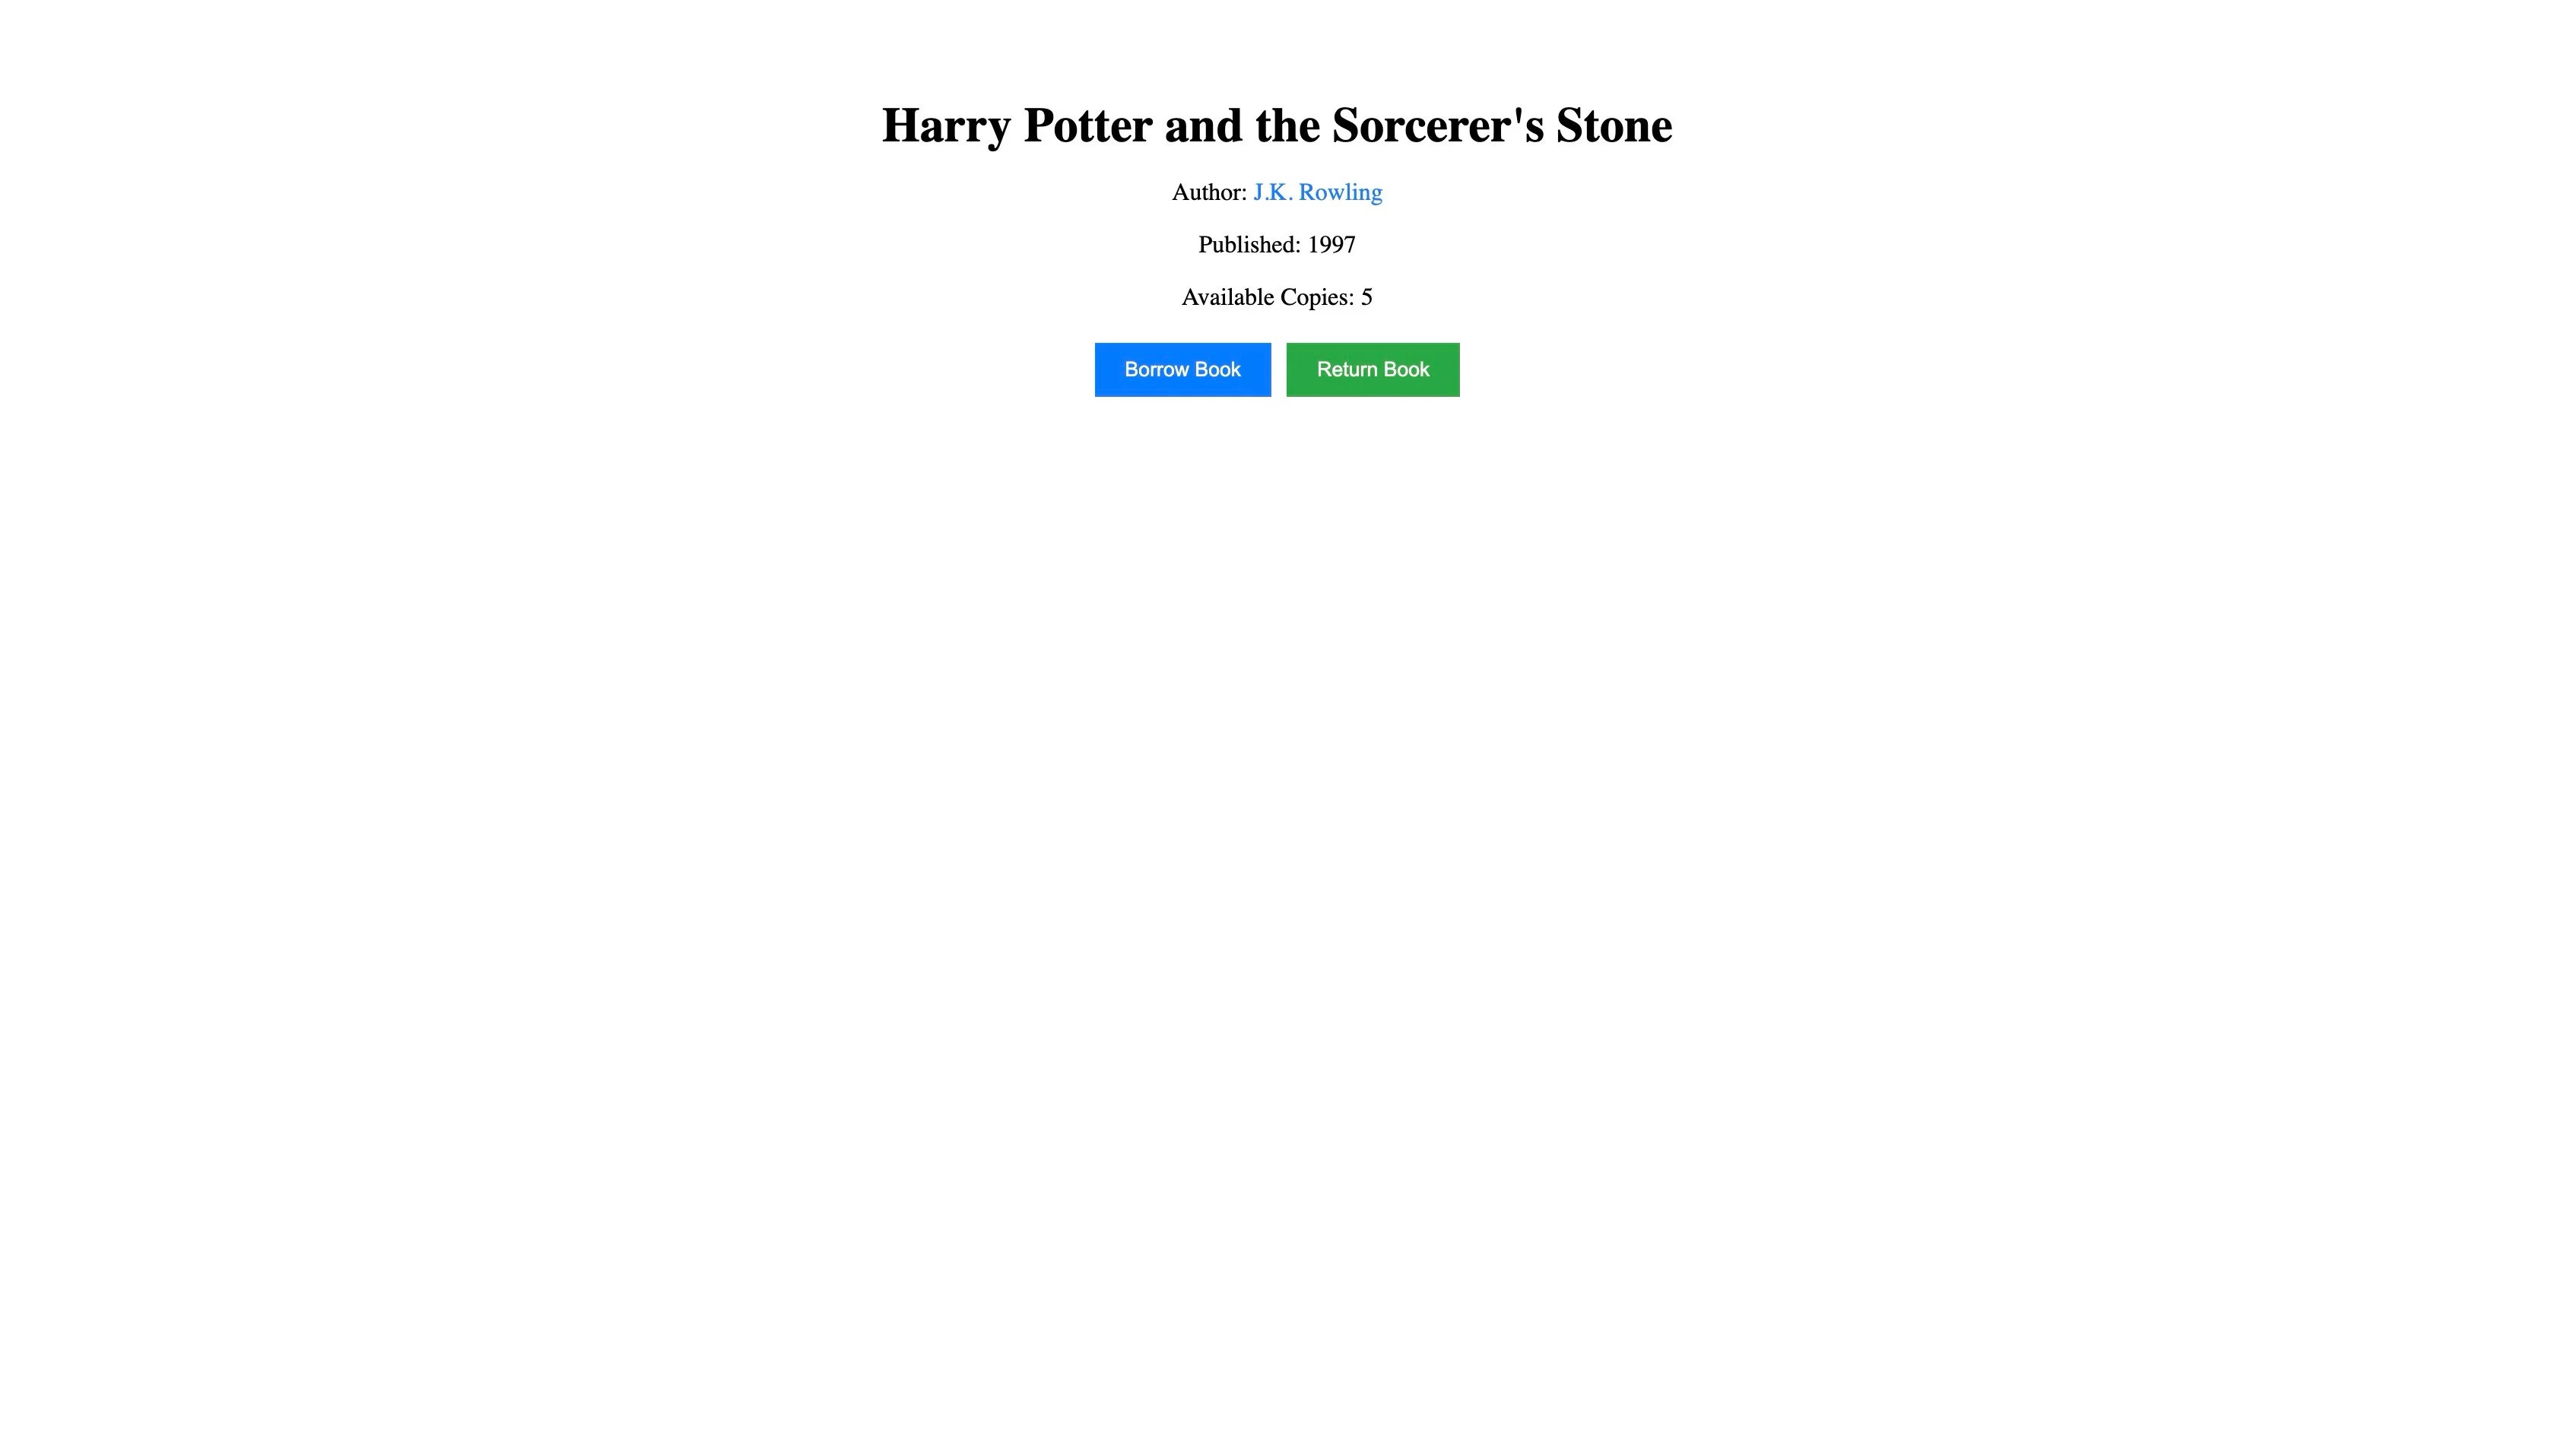
Create a component for the `books/:bookId` route. The component should have a button that takes you to the `books/:bookId/borrow` route to allow the user to borrow the book.

The component should also have a button that takes you to the `books/:bookId/return-to-library` route that allows a user to return a book.

The component should also include a link to the author names of the book that takes the user to the `/books/authors/:authorName` route, allowing them to view books from other authors.

Be sure to add proper class names for styling and ensure that you are accessing the correct properties returned by the Parse server (Plain JavaScript Objects).
人工智能应为BookDetails.css文件提供样式表,为BookDetails.jsx 文件提供jsx代码段。将代码块添加到各自的文件中。
让人工智能根据下面的提示创建BooksByAuthor组件:
Create a component for the `books/authors/:authorName` route.
Be sure to add proper class names for styling and ensure you are accessing the correct properties returned by the Parse server (Plain JavaScript Objects).
When the book card is clicked, I want to go to the route /books/:bookId using the bookId of the bookcard I clicked.
For the styling, the books should be displayed in a grid at the center of the webpage, taking the full width of the browser.
The component should also have a proper header, such as `AuthorName's Books` for example "Jane Austen's Books".
将生成的代码添加到适当的文件中。

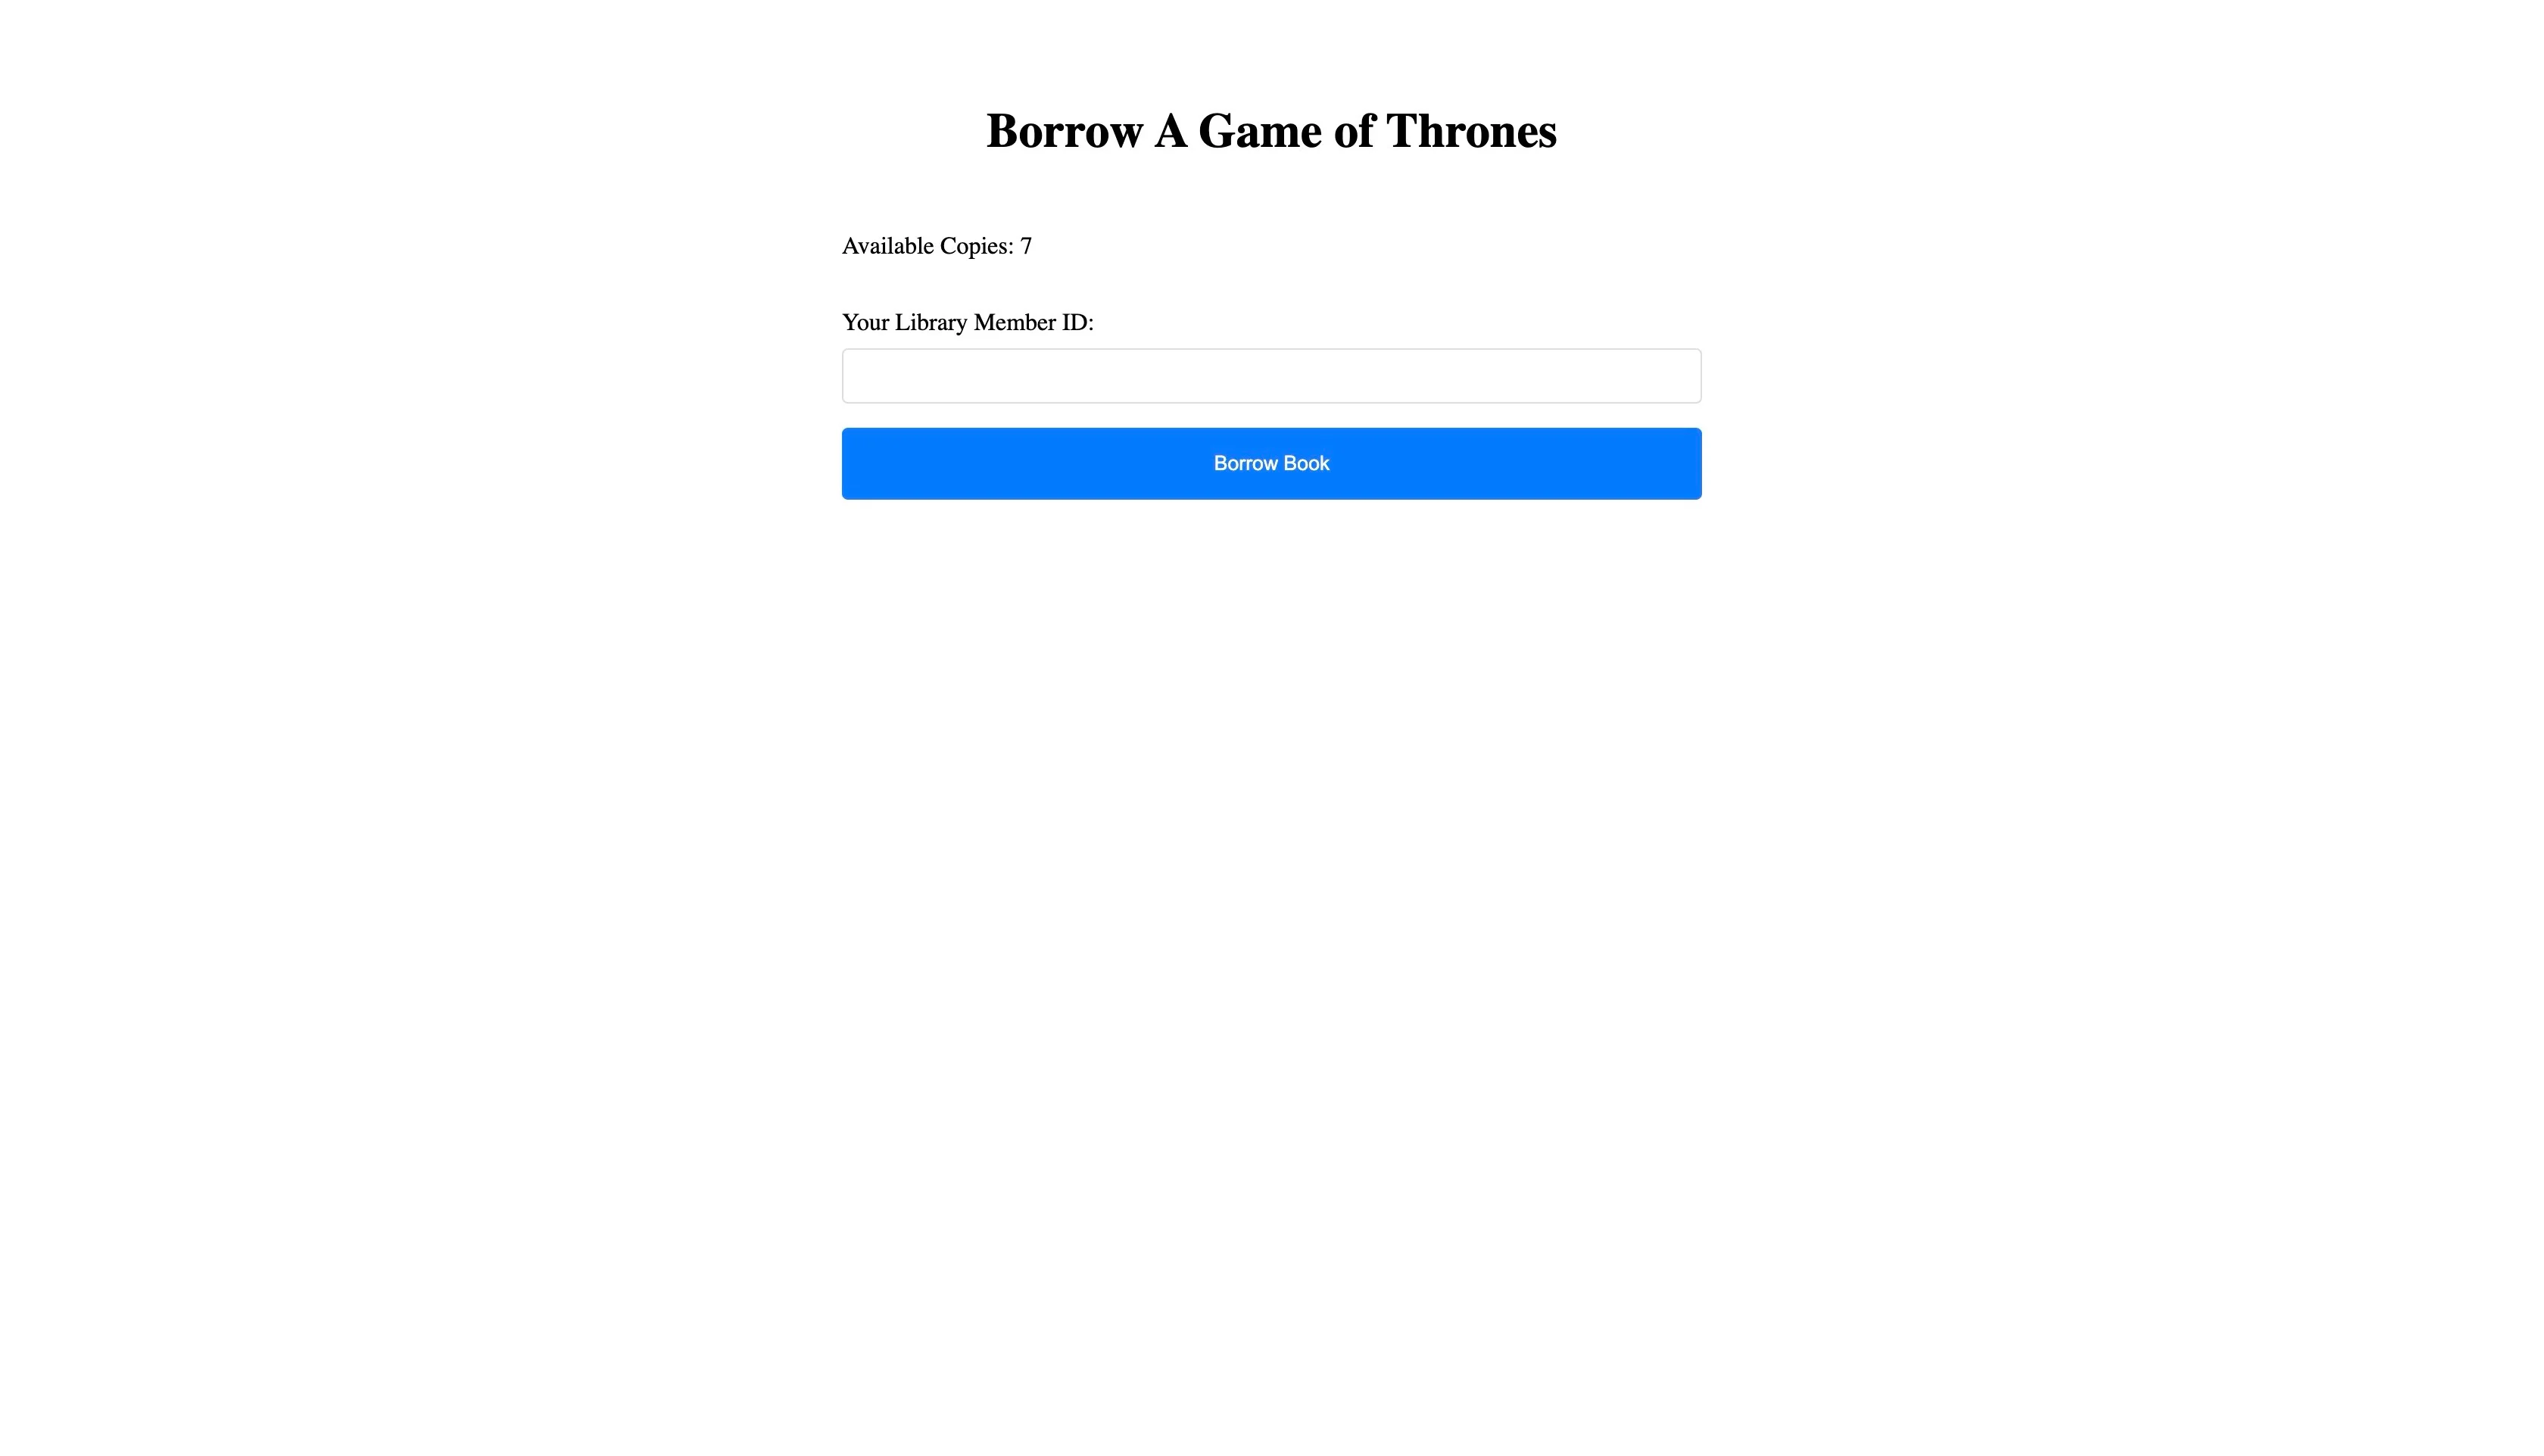
让人工智能根据下面的提示创建BorrowBook组件:
Create a component for the `/books/:bookId/borrow`.

The component should display a form that allows users to enter their `libraryMemberId` and borrow the book.

Be sure to add proper class names for styling and ensure you are accessing the correct properties returned by the Parse server (Plain JavaScript Objects).

For the styling, the elements should be properly spaced and have a proper header like "Borrow <NAME_OF_BOOK>".
The form should be at the center of the webpage, taking the full width of the browser.

The component should also display the number of remaining books.
将生成的代码添加到适当的文件中。
让人工智能根据下面的提示创建ReturnBook组件:
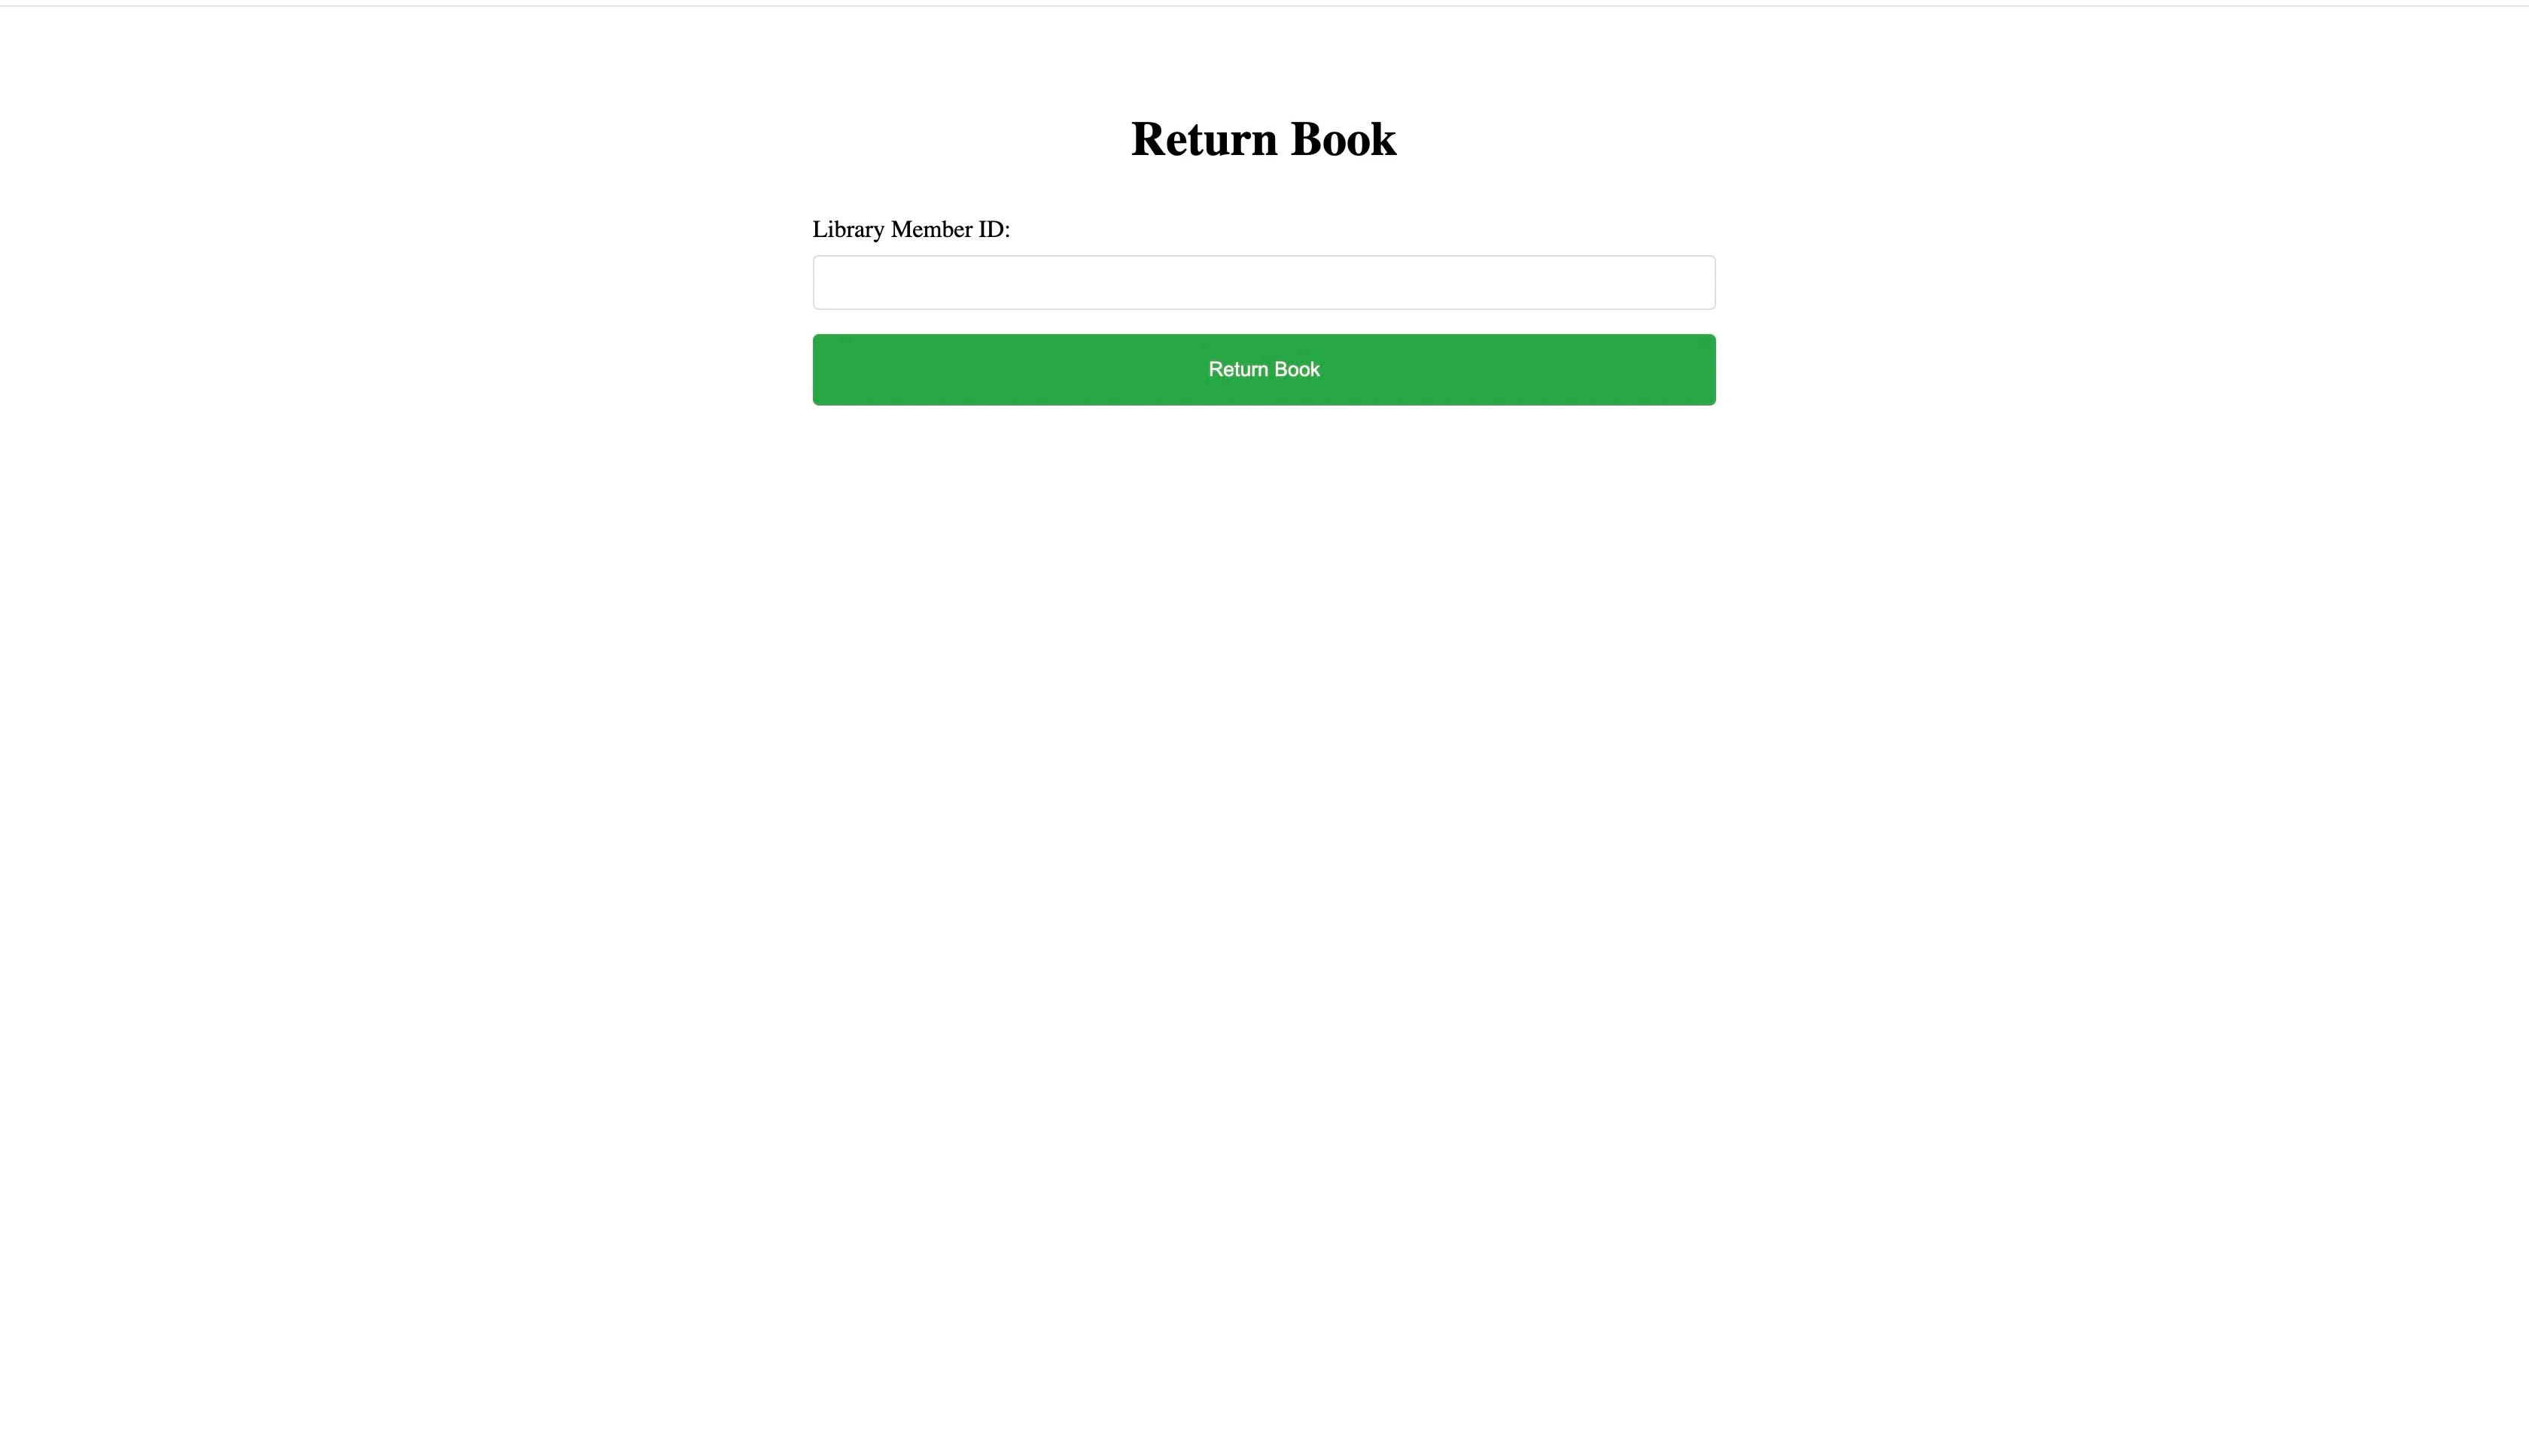
Create a component for the `/books/:bookId/return-to-library`.

The component should display a form that allows users to enter their `libraryMemberId` and `bookId` of the book they want to return.

For the styling, the elements should be properly spaced and have a proper header like "Return Book".

The form should be at the center of the webpage, taking the full width of the browser.
将生成的代码添加到适当的文件中。
在 Back4app 容器上部署网络应用程序
现在,您已经完成了应用程序的构建,您需要部署应用程序,使其公开可用。在本教程中,您将使用 Back4app 容器部署应用程序。
向人工智能代理发出以下提示:
What steps do I need to follow to deploy my app on Back4app containers?
人工智能应采取类似以下的措施:
- 创建 Dockerfile
- 将代码推送到公共仓库
- 将公共仓库连接到 back4app
- 部署
向人工智能代理发出提示:
Generate a dockerfile for my application
在应用程序的根目录下创建一个Dockerfile文件,并添加生成的代码。
接下来,将代码推送到公共仓库,并向人工智能代理发出以下提示:
Connect to my "YOUR_REPOSITORY_URL" repository on GitHub and deploy it to Back4app Containers.
要使上述提示起作用,Back4app 的 GitHub 应用程序必须与您的 GitHub 账户适当集成。您也可以使用 Back4app 容器手动部署 React 应用程序。
结论
Back4app AI Agent 简化了整个开发生命周期,从创建数据库表到生成云代码函数,再到构建 React 前端用户界面,甚至部署应用程序。
通过这种方法,您只需极少的人工即可开发应用程序的后端和前端。
不过,重要的是要审查人工智能工具的输出结果,以确保准确性并解决任何潜在问题。


