Yearly Archives

14 Articles

The secret of Parse and Facebook

facebook-parse


Over the last few years, open source has become the “default” way of building software. Currently, the world of open source is witnessing a plethora of innovations at a considerably high pace. Many of today’s business models are built around free, open source technology. As a result, enterprises are adequately providing support on various open source components and are increasingly shifting their workloads towards open data architecture.


Android App for Raspberry Pi

In our previous tutorials on IoT, we covered how to setup a Raspberry Pi and how to connect it to Parse Server using Back4App API to save objects to the server and to perform Queries and Live Queries.

Now we cover how to reproduce everything done on the Raspberry side to the App side. In this tutorial, we describe an Android App to interact with the IoT device configured earlier. From the Parse Server side, the App does the same tasks as the Raspberry: writes objects and performs Queries and Live Queries. Please note these functionalities may be useful even if you do not plan to develop an IoT application!

Parse has proven to be an amazing framework to crate IoT applications. In 2020, with the addition of the GraphQL API protocol it provides an even better way to retrieve data.  


Serverless Architecture: AWS Lambda vs Parse Cloud Code

1024x512-boxers


Come on, let’s get ready to RUMBLE!

Introducing first, the challenger, fighting out of the blue corner: It came with its open source stack and huge open source community. Ladies and Gentlemen, please welcome ‘Parse Cloud Code’

And now introducing the Titleholder, fighting out of the red corner, it came with its bunch of resources and features. Presenting the reigning, defending Serverless champion of the world: ‘AWS Lambda’


Parse Server: The Best Practices Guide

Parse Server: The Best Practices Guide

Introduction 

This guide aims to provide a set of good practices that will be helpful to beginners as well as expert developers who are starting to work with Back4App. If you are an experienced user of the platform, we recommend you to at least take a quick look at this tutorial, as it will surely help you find something informative that you didn’t know before.


IoT Series: Real-Time Events on Parse Using Android


artigo-3


In our previous tutorials on IoT, we covered how to setup a Raspberry Pi and how to connect it to Parse Server using Back4App API to save objects to the server and to perform Queries and Live Queries.

Now we cover how to reproduce everything done on the Raspberry side to the App side. In this tutorial, we describe an Android App to interact with the IoT device configured earlier. From the Parse Server side, the App does the same tasks as the Raspberry: writes objects and performs Queries and Live Queries. Please note these functionalities may be useful even if you do not plan to develop an IoT application!

We provide our codes as a first step for you to develop your desired Apps.

Prerequisites

The only prerequisite is to complete our Android QuickStart tutorial. For that, you need to click on the link mentioned below.

https://www.back4app.com/docs/pages/android/how-to-build-an-android-app-on-back4app

Here is a tutorial on LiveQuery which will be required on section 3 of this IoT Series tutorial. You do not have to complete it beforehand, though.

https://docs.back4app.com/docs/android/live-query/

If you have any questions throughout the tutorial, you may get them resolved by following the official Parse guide for Android in the link below.

http://docs.parseplatform.org/android/guide/

Section 1: Basics of creating your App and connecting with Back4App

In this project, we name our class as “MainActivity.java”. Here is the basic code that will help you get started.

public class MainActivity extends AppCompatActivity {

   @Override
   protected void onCreate(Bundle savedInstanceState) {
      super.onCreate(savedInstanceState);
      setContentView(R.layout.activity_main);

      // Insert toolbar on app. Further description of this bar ins on menu_main_activity.xml file
      Toolbar toolbar = (Toolbar) findViewById(R.id.toolbar);
      setSupportActionBar(toolbar); 
   }

   @Override
   public boolean onCreateOptionsMenu(Menu menu) {
      // Inflate the menu; this adds items to the action bar if it is present.
      getMenuInflater().inflate(R.menu.menu_main_activity, menu);
      return true;
   }

   @Override
   public boolean onOptionsItemSelected(MenuItem item) {
      // Handle action bar item clicks here. The action bar will
      // automatically handle clicks on the Home/Up button, so long
      // as you specify a parent activity in AndroidManifest.xml.
      int id = item.getItemId();

      //noinspection SimplifiableIfStatement
      if (id == R.id.action_settings) {
         return true;
      }

      return super.onOptionsItemSelected(item);
   }
}

You may need to add the following imports:

import android.os.Bundle;
import android.support.design.widget.FloatingActionButton;
import android.support.design.widget.Snackbar;
import android.support.v7.app.AppCompatActivity;
import android.support.v7.widget.Toolbar;
import android.view.View;
import android.view.Menu;
import android.view.MenuItem;
import android.widget.EditText;
import android.widget.Button;
import android.widget.ToggleButton;
import android.view.View.OnClickListener;

On your layout XML file, make sure you add the following code:

<?xml version="1.0" encoding="utf-8"?>
<android.support.design.widget.CoordinatorLayout xmlns:android="http://schemas.android.com/apk/res/android"
   xmlns:app="http://schemas.android.com/apk/res-auto"
   xmlns:tools="http://schemas.android.com/tools"
   android:layout_width="match_parent"
   android:layout_height="match_parent"
   android:id="@+id/myCoordinatorLayout"
   tools:context="com.example.guilherme.myiotapplication.MainActivity">

   <include layout="@layout/content_main_activity" />

   <android.support.design.widget.AppBarLayout
      android:layout_width="match_parent"
      android:layout_height="wrap_content"
      android:theme="@style/AppTheme.AppBarOverlay">

      <android.support.v7.widget.Toolbar
          android:id="@+id/toolbar"
          android:layout_width="match_parent"
          android:layout_height="wrap_content"
          android:background="?attr/colorPrimary"
          app:popupTheme="@style/AppTheme.PopupOverlay" />

   </android.support.design.widget.AppBarLayout>

</android.support.design.widget.CoordinatorLayout>

To connect your app to Back4App, add the following code below within the onCreate() function of your class.

// Initializing Parse Server
Parse.initialize(new Parse.Configuration.Builder(this)
    .applicationId("YOUR_APP_ID") // from Core Settings, on "Features"
    .clientKey("YOUR_CLIENT_KEY") // from Core Settings, on "Features"
    .server("https://parseapi.back4app.com/")
    .build()
);

Remember to follow the step-by-step instructions on QuickStart to grant Internet Access to your app.

Section 2: Saving and Retrieving Objects on Parse and Displaying on App

Start by adding the imports below

import com.parse.FindCallback;
import com.parse.Parse;
import com.parse.ParseException;
import com.parse.ParseObject;
import com.parse.ParseQuery;
import com.parse.SaveCallback;
import org.json.JSONException;
import org.json.JSONObject;
import java.util.List;

In this section, we save objects of “CommandGPIO1” class with a button click. Every Parse Object has three default attributes: objectId, createdAt, and updatedAt. Our class will have two more additional attributes: content and destination. The values for content will be either “on” or “off”, and represent a status to be sent to a LED. For destination, all objects will contain “command”, but we could define different strings for different LEDs.

For example:

We create two buttons, and each of them writes a different value on content. To create a button, to add the following code to your layout XML file:

<Button
   android:id="@+id/buttonSendOn"
   android:layout_width="wrap_content"
   android:layout_height="wrap_content"
   android:layout_gravity="top|start"
   android:layout_marginBottom="0dp"
   android:layout_marginTop="120dp"
   android:layout_marginEnd="0dp"
   android:layout_marginRight="0dp"
   android:layout_marginLeft="16dp"
   android:layout_marginStart="16dp"
   android:text="Send ON"/>

In your class file, creating the button is as easy as writing:

Button buttonOn = (Button) findViewById(R.id.buttonSendOn);

If you are a beginner to Android programming, please note that the “findViewById” argument contains “buttonSendOn”, and this is the Android:Id we defined on the XML.

We want this button to save an object on Parse Server when it is clicked. To do so, add the following code:

buttonOn.setOnClickListener( new OnClickListener(){
   @Override
   public void onClick(final View view) {

      // Creating new object and assigning proper attributes
      ParseObject command = new ParseObject("CommandGPIO1");

      command.put("content","on");
      command.put("destination", "command");
      command.saveInBackground(new SaveCallback(){
      @Override
      public void done(ParseException e){
         Snackbar.make(view, "Sent ON to Output", Snackbar.LENGTH_LONG )
         .setAction("Action", null).show();
      }
   }); 
});

Note, we can add whatever function we want performed within the onClick callback function. Here, we create a “CommandGPIO1” class object, set content as “on”, and destination as “command”.

It is useful to know that we DO NOT have to define this class beforehand on the Parse dashboard! If you later choose to add a new attribute, or change the name of your class, then you just need to work on your code, and the changes will be automatically updated on the dashboard.

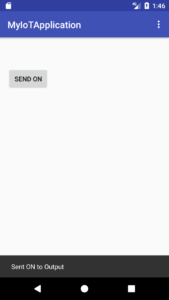
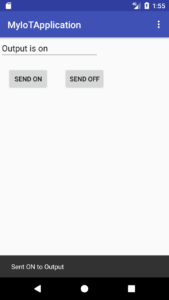
At this point, you should better test your app and check if the object is being created!

screenshot_1506530816

screenshot_parsedashboard

The SaveCallback shows a snackbar, which is a lightweight feedback on the bottom of your screen, as shown in the figure above.

Copy this code to create a button that writes objects with “off”. Change the following lines on the layout XML

android:id="@+id/buttonSendOff"
android:layout_gravity="top|center"
android:layout_marginLeft="0dp"
android:layout_marginStart="0dp"
android:text="Send OFF"/>

Create a new button and change the line where the content is being written:

Button buttonOff = (Button) findViewById(R.id.buttonSendOff);
command.put("content","off");

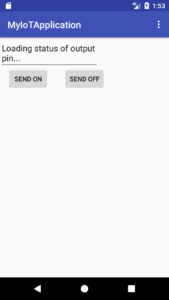
Now that things are working properly on Parse Server, we want to provide a permanent feedback to the app user.  For that, we will use the EditText element, as shown below.

Define this element on the layout XML:

<EditText
    android:id="@+id/status1Text"
    android:layout_width="wrap_content"
    android:layout_height="wrap_content"
    android:layout_gravity="top|start"
    android:maxLines ="2"
    android:ems="10"
    android:singleLine="false"
    app:layout_behavior="@string/appbar_scrolling_view_behavior" />

Within the onCreate() scope of your class, add the following code:

// Defining text element for showing status of output pin, which receives commands from the app
// The commands are sent by buttons, which are later described on this code.
final EditText textOutPin = (EditText) findViewById(R.id.status1Text);
textOutPin.setFocusable(false);
textOutPin.setClickable(true);
textOutPin.setText("Loading status of output pin...");

The first line creates the object. The second line makes it non-editable for users. The third line makes it clickable, so it can be copied and pasted. The fourth line sets the initial text.

We want to write the content field of the last “CommandGPIO1” object saved on Parse onto this EditText object. Although we could do this using some logic within the code, we will actually retrieve objects from Parse by performing a ParseQuery since this provides more realistic and robust results.

The code below declares, sets parameters, and prints the results of a Parse Query.

ParseQuery<ParseObject> queryOut = ParseQuery.getQuery("CommandGPIO1");
queryOut.whereEqualTo("destination", "command");
queryOut.addDescendingOrder("createdAt");
queryOut.setLimit(1);

queryOut.findInBackground(new FindCallback<ParseObject>() {
   @Override
   public void done(List<ParseObject> objects, ParseException e) {
      if (e == null){
         textOutPin.setText("Output is " + objects.get(0).getString("content"));
      }
      else{
         textOutPin.setText("Error: " + e.getMessage());
      }
   }
});

The first line creates the query. The second adds a constraint to select only those objects whose destination field contains “command”. The third line the objects starting with the newest ones. The fourth line limits the results to one, assuring we will retrieve the newest object.

The fifth line actives the query, and calls the callback function when it is finished. Here, we write the content of the retrieved object onto the previously defined EditText object.

We will add that piece of code right after declaring the EditText object, so a query is performed when the app is open, and also in the SaveCallback when saving a new object on Parse, to update the text automatically when creating new objects.

At this point, your app should work as illustrated in the following screen captures.

screenshot_1506531209    screenshot_1506531359

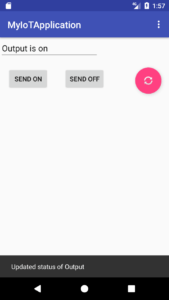
Finally, we add a refresh button to allow the users to perform the query above whenever they want. It will be done with a different style of button, i.e., a Floating Action Button.

Add this code onto the layout XML file:

<android.support.design.widget.FloatingActionButton
    android:id="@+id/fab"
    android:layout_width="wrap_content"
    android:layout_height="wrap_content"
    android:layout_gravity="top|end"
    android:layout_marginBottom="0dp"
    android:layout_marginTop="120dp"
    android:layout_marginEnd="16dp"
    android:layout_marginRight="16dp"
    android:layout_marginLeft="0dp"
    android:layout_marginStart="0dp"
    app:srcCompat="@android:drawable/ic_popup_sync" />

Now, within the onCreate() scope in the class, add the following code:

// Refresh button to obtain the output status when requested.
// The same query as the first is performed here
FloatingActionButton fab = (FloatingActionButton) findViewById(R.id.fab);
fab.setOnClickListener(new View.OnClickListener(){
    @Override
    public void onClick(final View view){
        ParseQuery<ParseObject> queryOut = ParseQuery.getQuery("CommandGPIO1");
        queryOut.whereEqualTo("destination", "command");
        queryOut.addDescendingOrder("createdAt");
        queryOut.setLimit(1);
        queryOut.findInBackground(new FindCallback<ParseObject>() {
            @Override
            public void done(List<ParseObject> objects, ParseException e) {
               if (e == null){
                   textOutPin.setText("Output is " + objects.get(0).getString("content"));
               }
               else{
                   textOutPin.setText("Error: " + e.getMessage());
               }
               Snackbar.make(view, "Updated status of Output", Snackbar.LENGTH_LONG ).setAction("Action", null).show();
            }
        });
     }
 });

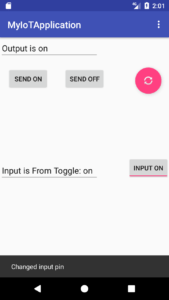
At this point we can now save objects on Parse Server, retrieve information from them and display them in your app! Your app should be working as shown in the figure below:

screenshot_1506531440


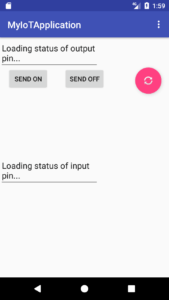
Section 3: Listening to Real-Time Events Using Live Query and Displaying on App

In this section, we monitor in real-time the “InputGPIO” class in the Parse Dashboard, and display the “content” of the objects for the user.

Start by defining a new EditText in the layout XML:

<EditText
    android:id="@+id/status2Text"
    android:layout_width="wrap_content"
    android:layout_height="wrap_content"
    android:layout_gravity="center|start"
    android:layout_marginBottom="0dp"
    android:maxLines ="2"
    android:ems="10"
    android:singleLine="false"
    app:layout_behavior="@string/appbar_scrolling_view_behavior" />

In the scope of onCreate(), create a new EditText object and perform an initialization query (not live yet) immediately afterwards.

final EditText textInPin = (EditText) findViewById(R.id.status2Text);
textInPin.setFocusable(false);
textInPin.setClickable(true);
textInPin.setText("Loading status of input pin...");

// Initial (non live) query to obtain last stored status of pin
ParseQuery<ParseObject> queryIn = ParseQuery.getQuery("InputGPIO");
queryIn.whereEqualTo("type", "interrupt");
queryIn.addDescendingOrder("createdAt");
queryIn.setLimit(1);

queryIn.findInBackground(new FindCallback<ParseObject>() {
    @Override
    public void done(List<ParseObject> objects, ParseException e) {
        if (e == null){
            textInPin.setText("Input is " + objects.get(0).getString("content"));
        }
        else{
            textInPin.setText("Error: " + e.getMessage());
        }
    }
});

Note that the attributes of “InputGPIO” are content and type, the latter playing the role of destination on the “CommandGPIO” class.

At this point, your app should be looking like the figure shown below.

screenshot_1506531581

Now we will implement the Live Query. The tutorial referred to earlier is needed here.

https://docs.back4app.com/docs/android/live-query/

Make sure you follow step 1 in our Live Query tutorial to select in which classes Live Query will be enabled and define a subdomain name. You may need to create the “InputGPIO” class (if it does not already exist) to enable the feature on it. Follow step 2 in the tutorial to set up the Live Query client on Android.

Remember to add the following imports:

import tgio.parselivequery.BaseQuery;
import tgio.parselivequery.LiveQueryClient;
import tgio.parselivequery.LiveQueryEvent;
import tgio.parselivequery.Subscription;
import tgio.parselivequery.interfaces.OnListener;

Add the following code to initialize LiveQuery and define its parameters.

// Initializing Live Query
LiveQueryClient.init("wss:YOUR_SUBDOMAIN_NAME.back4app.io", "YOUR_APP_ID", true );
LiveQueryClient.connect();

// Defining attributes of LiveQuery
 Subscription subIn = new BaseQuery.Builder("InputGPIO")
    .where("type","interrupt")
    .addField("content")
    .build()
    .subscribe();

When defining the subscription, we take only those elements whose type attribute is “interrupt” and retrieve the field content.

Now, add the following code to respond whenever an object defined by the subscription is created at Parse Server.

// Starting to listen to LiveQuery CREATE events, getting its content and writing
subIn.on(LiveQueryEvent.CREATE, new OnListener() {
    @Override
    public void on(JSONObject object) {
        try {
            final String subInContent = (String) ((JSONObject) object.get("object")).get("content");
            runOnUiThread(new Runnable() {
                @Override
                public void run() {
                   textInPin.setText("Input is " + subInContent);
                   Snackbar.make(findViewById(R.id.myCoordinatorLayout), "Input pin was changed to " + subInContent.toUpperCase(), Snackbar.LENGTH_LONG ).setAction("Action", null).show();
                }
            });
        } catch (JSONException e){
            e.printStackTrace();
        }
    }
});

The content field of the object will be displayed in our new EditText element.

What we have done by this point is sufficient to display any input sent by the IoT device. However, to verify how the app is working, we will implement another kind of button, i.e., a Toggle Button that will create an “InputGPIO” class object and will save it on Parse Server.

Add the following code to the layout XML file:

<ToggleButton
    android:id="@+id/toggleTest"
    android:layout_width="wrap_content"
    android:layout_height="wrap_content"
    android:layout_gravity="center|end"
    android:layout_marginBottom="0dp"
    android:layout_marginTop="100dp"
    android:layout_marginEnd="0dp"
    android:layout_marginRight="0dp"
    android:layout_marginLeft="0dp"
    android:layout_marginStart="0dp"
    android:textOn = "input on"
    android:textOff = "input off"/>

Add the code mentioned below in the scope of onCreate() function, in MainActivity class.

// Toggle button is here just to emulate the objects the hardware would create
ToggleButton toggleTest = (ToggleButton) findViewById(R.id.toggleTest);
toggleTest.setOnClickListener( new OnClickListener(){
    @Override
    public void onClick(final View view) {
        ParseObject command = new ParseObject("InputGPIO");
        if(gpioStatusTest.equals("off"))
            gpioStatusTest = "on";
        else
            gpioStatusTest = "off";

        command.put("type","interrupt");
        command.put("content", "From Toggle: " + gpioStatusTest);
        command.saveInBackground(new SaveCallback(){
            @Override
            public void done(ParseException e){
                Snackbar.make(view, "Changed input pin", Snackbar.LENGTH_LONG ).setAction("Action", null).show();
            }
        });
    }
});

Also, declare the String in the MainActivity scope.

String gpioStatusTest = "off";

We are done with the app! At the end of this tutorial, your app should look quite similar to the figure shown below.

screenshot_1506531687

If you want to continue developing our IoT application, please read our IoT Series, a step-by-step guide, which teaches you the basics to set up a Raspberry Pi and specific applications, such as retrieving and saving objects from Parse Server using JavaScript.

Our codes are available in the following link:

https://github.com/back4app/iot-raspberry-node

References

Connecting Raspberry Pi to Parse Server

Setting Up Raspberry Pi


What tasks does the app do from the service side?

The tasks done by the Parse server side are the same which are done by Raspberry.  There are two major tasks,

-Writing of objects
-Performing of queries and live queries.

In which class we save our objects?

We save our objects in the class named as “CommandGPIO1”. These objects have further 3 attributes which are mentioned below.

– objectId
– createdAt
-updatedAt

What are additional attributes CommandGPIO1 will have?

Our class “CommandGPIO1” will have two additional attributes. 

-Content
-Destination

Content will have further two values which will be “on” and “off”. These values will be further sent to LED. For the destination attribute, all the objects will have string “command”. In this development given above we will define different strings for different LED’s.


IoT Series: Connecting Raspberry Pi to Parse Server with NodeJS

prancheta-1-1

In our previous tutorial on IoT, we explained how to setup your Raspberry Pi and to write values to the GPIO pins. In this part, we will take a step towards a real IoT application, by opening a connection between Raspberry Pi and Parse Server and letting events on each side trigger actions on the other.

Here you will learn how to connect your Raspberry Pi to Parse Server using Back4App and to perform actions such as Queries, Live Queries and writing objects, and how the events on Parse Server may trigger real-world events!

We also provide our codes as a first step for you to develop your desired IoT Apps.

Prerequisites

Of course, you need some electronic components. Three LEDs, three resistors (1k works fine), a breadboard and jumpers are sufficient.

You have to set up a Raspberry Pi environment. We strongly recommend you to follow our tutorial on Raspberry Pi, in the following link:

https://blog.back4app.com/2017/10/16/raspberry-pi-setup/

You must have a working app on Back4App. Follow Step 3 on the following tutorial if you still do not have.

https://www.back4app.com/docs/pages/android/how-to-build-an-android-app-on-back4app

You will also need to enable Live Query on your app. You may follow step 1 on the following tutorial if you have not enabled Live Query.

https://docs.back4app.com/docs/android/live-query/

This code was designed to interact with the Android App described in this series of tutorials. However, you may choose to develop it independently and interact directly with Parse Dashboard to create/inspect objects.

Section 1: Responding to Real-Time events on Parse Server

We will use Live Query functionality, made easy in our Back4App dashboard, to listen to real-time events. The real-world response is an interaction with the pins on Raspberry using the onoff package. Make sure you have installed it using npm.

Import Gpio class to initialize each pin.

var Parse = require('parse/node');
var onoff = require('onoff');
var Gpio = onoff.Gpio;

var ledPower = new Gpio(4, 'out'), output1 = new Gpio(17, 'out');

ledPower is a LED that will always be on to indicate the application is running. output1 is the LED that will be turned on/off as a response to Live Query.

Please note our Raspberry Pi has the following the pin diagram, extracted from here.

raspberry-pi-gpio-layout-model-b-plus-rotated-2700x900

There is a physical numbering corresponding to the numbers inside the circles and a GPIO specific numbering. For example, pin number 7 is GPIO4 and pin number 11 is GPIO17.

The integer argument on the constructor in the code above corresponds to the GPIO specific numbering! The second argument just sets it as an output pin. Please note that Raspberry Pi 2B outputs 3.3 V!

To turn on the power LED for the rest of the application, just add the following code.

ledPower.write(1,function(){
   console.log('Application is ON');
});

We want the second LED to respond whenever a new object from “CommandGPIO1” class is created on Parse Server. It will turn on/off depending on its “content” attribute. Since we want it to respond in real-time, we will have to use LiveQuery.

Add the following code to start LiveQuery on NodeJS.

var LiveQueryClient = Parse.LiveQueryClient;
var client = new LiveQueryClient({
   applicationId: 'YOUR_APP_ID',
   serverURL: 'wss:YOUR_SUBDOMAIN_NAME.back4app.io/', // defined on LiveQuery section on Back4App dashboard
   javascriptKey: '',
   masterKey: ''
});
console.log("pre client.open");
client.open();
console.log("post client.open");

The App ID can be found on “Core Settings” -> “Features” in your app dashboard. The serverURL is the same subdomain that you defined on LiveQuery in the app dashboard.

Now we have to define the query to be used with LiveQuery, and add the code to run when the event happens. Add the code below.

var query1 = new Parse.Query("CommandGPIO1");
var sub1 = client.subscribe(query1);
console.log("post sub1");
var count1 = 0;
sub1.on('create', (object) => {
   if(object.get("content") == 'off') count1 = 0;
   if(object.get("content") == 'on') count1 = 1;

   output1.write(count1, function(){
      console.log('Output 1 status changed to ' + count1);
   });
});

Object query1 corresponds to a new query for objects from “CommandGPIO1” class. Make sure you allowed Live Query for this class on your app dashboard!

The following lines create the subscription and activate it for the creation of a new object of the corresponding class. The function called whenever this event happens sets the variable count1 as 0 or 1 for off or on contents, and it writes this logic voltage value to output1.

We are almost done with this part of the tutorial! Add the following code to turn off our application properly when the process is interrupted.

process.on('SIGINT', function (){
   ledPower.writeSync(0);
   output1.writeSync(0);
   ledPower.unexport();
   output1.unexport();
   console.log('Bye, bye! Turning off LEDs');
   process.exit();
});

Section 2: Watching for Real-World Events and Acting on Parse Server

WARNING!!!: THE MAXIMUM INPUT VOLTAGE ON A PIN IS 3.3V! SOME PINS ON RASPBERRY PI SUPPLY 5V! BE CAREFUL NOT TO DAMAGE YOUR RASPBERRY WITH A WRONG CONNECTION!

We will define a pin on Raspberry Pi as an input. When the voltage in the input becomes high or low, we will turn on/off a LED and write an object on Parse Server with content as “high” or “low”.

var input1 = new Gpio(21, 'in', 'rising'), output2 = new Gpio(23, 'out');

Note, for the input pin, we have to define a second argument to specify on which edge of the signal the pin will operate. 

Now we have to initialize Parse Server. Add the code below

Parse.initialize('YOUR_APP_ID','YOUR_JAVASCRIPT_KEY');
Parse.serverURL = "https://parseapi.back4app.com";

We want to create “InputGPIO” class objects. The following code has a key role.

// Name of the class to be saved on Parse Server when event happens
var InputGPIO = Parse.Object.extend("InputGPIO");

// asynchronously reading from GPIO 21 (pin 40) on RPi 2B
// "value" can be either 0 (0 V) or 1 (3.3 V)

// Often multiple readings may come at once, even when the voltage on the pin is kept constant
// Therefore, the variable "valuePrev" is introduced to store the last voltage
// read from the pin and to trigger the desired actions only when it changes.
var valuePrev = -1;
input1.watch( function (err, value) {
   if(err){
      throw err;
   }

   if(value != valuePrev){
      valuePrev = value;

     // Turning on/off a LED when another voltage is read in the input pin
     output2.write(value, function(){
        console.log('Output2 changed to: ' + value);
     });

     // Creating new object
     var inputGPIO = new InputGPIO();
     inputGPIO.set("type","interrupt");

     if (value == 0){
        inputGPIO.set("content", "low");
        console.log("written low: " + value);
     }
     
     else{
        inputGPIO.set("content", "high");
        console.log("written high: " + value);
     }

     // Saving object to Parse Server
     inputGPIO.save().then( function(m){
        console.log(m);
     }).catch( function(err){
        console.error(err);
     });
   }
});

We start by extending Parse Object to the desired class, “InputGPIO”. Whenever a reading comes from the pin corresponding to input1, if it has a value different from the previous one:

  • This value is written to the pin corresponding to output2
  • An “inputGPIO” object with a proper content and type fields is created
  • The object is saved to Parse Server.

The logic involving value and valuePrev is useful because even when the voltage in the input pin is kept constant, multiple readings with the same state may continue to arrive.

We have almost finished! As in Section 1, we have to update the code to manage interruptions to the process.

process.on('SIGINT', function (){
   (...)
   output2.writeSync(0);
   output2.unexport();

   process.exit();
});

To test this process, connect and later disconnect the pin on Raspberry that supplies 3.3 V to the pin defined as input.

To have a real IoT device, these node processes need to run automatically when the device boots. Please refer to the pm2 package, already mentioned in our Setting up Raspberry Pi tutorial.

We provide a working code for this tutorial. If you prefer, you may write separated codes for each task and run both simultaneously with pm2. Here is the link for our GitHub repository.

https://github.com/back4app/iot-raspberry-node

Our next tutorial will cover how to write an Android App that works with the code described here. The code is also available in the repository.

References

Setting up Raspberry Pi

Onoff library documentation on npm

Using onoff package


How will we respond to real time events on real time events on Parse server?

Live query functionality is being used. It is developed in the back4app dashboard and is easily accessible. The real world response is a sort of interaction between pins of Raspberry by using the “on” and “off” response. For doing this, you need to make sure that npm is installed already.

What are the Prerequisites required?

You need following things before starting.

-3 LEDs
-3 Resistors
-Breadboard
-Jumpers

These are some of the main things which are required before starting it out.

Where can you find an Apple ID and what is the server URL?

You need to go to your app dashboard and go to core settings> Features. The server URL is the sub domain you have defined on live query.

The code is provided above in the article which you need to add after defining the query to be used in Live Query.


Parse Server example – Continuous Integration

continous_integration_back4app

Introduction

Continuous Integration (CI) is the practice of merging all developer working copies to a shared repository several times a day. Its primary objective is to prevent integration problems, ensure quality and eliminate rework. It is meant to be used in combination with automated unit tests and continuous delivery so as, to reduce the breaking of code and to ensure that the software is always in a state that can be deployed to users, thus making the deployment process much quicker.


To enable all these features, it is necessary to use a CI server. For this tutorial, we will be using Travis CI , which is a hosted, distributed continuous integration service used to build and test software projects hosted on GitHub. Travis can be used to automate all sorts of tasks such as building, testing, and deploying software, with continuous integration and facilitation of technical aspects of continuous delivery.


Node JS and Raspberry pi – Setup

raspberry-back4app-android3x

The Internet of Things is coming closer to our daily lives each day more. With the advent of affordable, connected and small electronics, such as Raspberry Pi or other microcontrollers, we have the feeling that we can remotely control the entire world around us.

However, there is a difference between playing once or twice with electronics and building a reliable application to be actually installed in your home or even sold as a product. One of the features an IoT application must have is a solid Internet backend, in order to handle a high volume of requests, ensure scalability or work even under realistic connectivity.


Android App: Using Travis with Parse Server

travis-ci

Introduction

Travis CI is a hosted, distributed continuous integration service used to build and test software projects hosted on Github. Travis can be used to automate all sorts of tasks such as building, testing, and deploying software, with continuous integration and facilitation of technical aspects of continuous delivery.

In this tutorial, we will explain how to build your own Back4App professional app aided by the Travis CI software. We will create a sample Android app using GitHub as the Git repository to test the continuous build feature of Travis. Even though we will focus on an Android app, you will be aided whenever there is a specific step just for Android, in a way that this tutorial will make possible to use Travis for other platforms.


open
Build, deploy and scale your app with Back4App Containers

open
Build, deploy and scale your app with Back4App Containers. Start today!