Running Node.JS Applications in Azure
Are you looking to deploy a Node JS application in Azure? Here is an in-depth tutorial detailing how to build a sample Node JS app, sign in to Visual Studio, deploy to Microsoft Azure App Service, and deploy changes.
Contents
What is Node.js?
Node.js is an open source server-side JavaScript runtime environment. Node.js allows you to run JavaScript applications and code outside of a browser, as part of a back-end server.
Node.js is based on a JavaScript engine called V8 that supports many browsers such as Google Chrome, Opera and Microsoft Edge.
It also includes many V8 optimizations that can help you run server-side applications. For example, Node.js adds a Buffer class that allows V8 to handle file uploads on the local file system. This feature makes Node.js suitable for web server-like deployments.
Developing server-side applications with JavaScript lets you create powerful, modular applications. Developing with Node.js has several advantages compared to traditional web languages like PHP:
- Ability to share logic such as form validation rules between the browser and the server.
- Native support for JavaScript Object Notation (JSON) data exchange format, which is used by many NoSQL database technologies and many other components in a modern web stack.
What is Azure App Service?
Azure App Service is an HTTP-based service for hosting web applications, REST APIs, and mobile backends. It supports Node.js and other popular web frameworks. It lets you run and scale applications in both Windows- and Linux-based environments.
Azure App Service provides the following key capabilities:
Continuous Integration/Delivery Support
Azure portal provides out-of-the-box continuous integration and deployment via Azure DevOps, GitHub, Bitbucket, FTP, or a local Git repository on your development machine.
You can connect your web application to one of the above sources and App Service will automatically synchronize your code and any code changes to your cloud-based web application.
Built-in Auto Scaling Support
Azure App Service automatically supports Azure auto scaling. It can scale applications vertically (within the same machine) or horizontally (across multiple machines).
You can elastically scale the resources available to the web application, including the number of cores and the amount of RAM available.
Azure App Service Plans
When you use Azure App Service, applications run within an App Service plan, which defines the compute resources it has available and other features such as automation and auto scaling.
You can configure one or more apps to run on the same compute resource (meaning they share the same App Service plan).
Running multiple applications in the same App Service plan can conserve costs, but gives you less control over resource allocation to each application.
Azure App Service Cost
You can change the App Service plan of your application at any time. For example, you can decide to move an app to a higher service plan if it needs more resources or improved management features. Use an Azure cost calculator to estimate the total cost of all resources for an application deployment.
Quick Tutorial: Running Node.js Applications in Azure
Prerequisites
Before starting to build a Node.js application in Azure, set up the following:
- Create a free Azure account and ensure you have at least one active subscription.
- Install Node.js and npm on your local machine. Verify Node.js is installed by running node –version
- Install Visual Studio Code with the Azure App Service extension.
Step 1: Create Your Node.js Application
We’ll start by running a simple Node.js application on your local machine:
- Create a Node.js application using Express Generator, which comes with Node.js by default:
npx express-generator myExpressApp –view ejs
- Change to the directory of the new Express application and install the required NPM packages:
cd myExpressApp && npm install
- Start the Node.js server with debug logging:
DEBUG=myexpressapp:* npm start
Navigate to http://localhost:3000. You should see the Express app home screen.
Step 2: Sign Into Visual Studio Code
We’ll need to sign into Visual Studio Code with our Azure credentials to deploy the application:
- In the terminal, ensure you’re in the myExpressApp directory, then start Visual Studio Code with the following command:
code .
- When Visual Studio Code starts, find the Activity Bar and click the Azure logo.
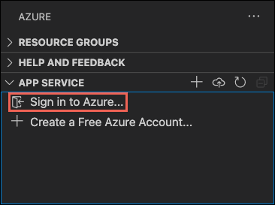
- Expand App Service and click Sign in to Azure…

Image Source: Azure
- Provide your Azure credentials.
Step 3: Deploy Code to Azure Using Azure App Service
We’ll deploy the application using Azure App Service:
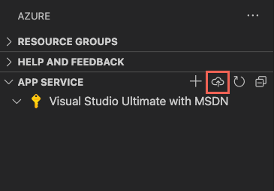
- In the App Service explorer, click Deploy to Web App.

Image Source: Azure
- Select the myExpressApp folder and click Create new Web App. This creates a web application entity in Azure App Service. By default, the app is created in a Linux container.
- Type a unique name for the web app.
- Select the Node.js version you want to run from the Select a runtime stack drop down.
- Under Select a pricing tier, choose Free (F1)
- Wait for resources to be provisioned.
- A popup appears with the message: Always deploy the workspace “myExpressApp” to <app-name>”? Select Yes to tell Visual Studio Code to always deploy this application to the same App Sevice app.
- When the app finishes deploying, another popup should appear. Click Browse Website, and a browser opens showing the Express app homepage.
Step 4: Deploy Changes
The nice thing about Azure App Service is that it lets you automatically deploy changes to your web applications. Let’s give it a try:
- In the application folder on your local machine, edit the file views/index.ejs in a text editor. Find this line:
<p>Welcome to <%= title %></p>
- And change it to a unique phrase like:
<p>Welcome to my Node app!</p>
- Go back to Visual Studio Code. In the App Service explorer, click the Deploy to Web App icon and click Deploy to confirm.
- Wait for the popup notifying that deployment is complete and click Browse Website. You will see the new message in the Express app homepage: “Welcome to my Node app!”
Conclusion
In this article, I explained the basics of Azure App Service and showed how to deploy a Node JS application to the cloud in 4 steps:
- Create a sample Node.js application
- Sign Into Visual Studio Code with your Azure credentials
- Deploy your code to Azure using Azure App Service
- Deploy a change and see how it is automatically updated in the cloud
I hope this will be useful as you discover new and innovative deployment options for your Node.js projects.
FAQ
What is Node JS?
Node.js is an open source server-side JavaScript runtime environment.
What is Azure App Service?
Azure App Service is an HTTP-based service for hosting web applications, REST APIs, and mobile backends.
How to run a Node JS application in Azure?
– Create a sample Node.js application
– Sign Into Visual Studio Code with your Azure credentials
– Deploy your code to Azure using Azure App Service
– Deploy a change and see how it is automatically updated in the cloud


