What is CaaS – Containers as a Service?
In this article, we’ll talk about Containers as a Service (CaaS). One of the newer but powerful cloud models. You’ll learn about its core functionalities, pros and cons, how it compares to other cloud models, and how to deploy a simple application using containers.
Contents
- 1 Key Takeaways
- 2 What is Containers as a Service?
- 3 What are Containers as a Service’s core functionalities?
- 4 What are the advantages of Containers as a Service?
- 5 What are the limitations of Containers as a Service?
- 6 What role do Docker and Kubernetes play in a CaaS platform?
- 7 How does Containers as a Service compare to other models?
- 8 What are the best Containers as a Service providers?
- 9 How to host a simple application using containers?
- 10 Conclusion
- 11 FAQ
- 12 What is Containers as a Service?
- 13 What are the advantages of Containers as a Service?
- 14 What are the disadvantages of Containers as a Service?
- 15 What are the best Containers as a Service providers?
- 16 How to deploy an application using containers?
Key Takeaways
- CaaS facilitates seamless development and deployment with built-in functionalities.
- CaaS offers high scalability and portability, mitigating vendor lock-in.
- CaaS limitations include potential security risks and steep learning curve.
What is Containers as a Service?
The CaaS definition is Containers as a Service is a cloud computing model that allows developers to upload, build, scale, and manage containers.
DevOps containers are lightweight standalone executable packages that include everything required to run an application. That consists of the runtime, code, libraries, config files, and more. Containers are highly portable, small in size, and efficient.
By utilizing CaaS, developers and IT operations teams don’t have to worry about the underlying infrastructure. Instead, they can think on a much higher level.
They only need to code the application, dockerize it, and push it to the cloud. The cloud provider will then take care of everything else — such as scaling, load balancing, and monitoring!
On top of that, CaaS is excellent since it promotes agile development, supports microservice architecture, and is extremely useful for building highly scalable applications rapidly.
What are Containers as a Service’s core functionalities?
There’s no official specification that would define what features a CaaS has to include. They differ from vendor to vendor. Nevertheless, the most basic functionalities of Containers as a Service are:
- Container runtime (responsible for running your containerized applications)
- Container registry (allows you to store and distribute already built Docker images)
- Automatic scaling (increases or decreases the number of containers based on traffic)
- Built-in CI/CD system (pulls your code from a VCS system such as GitHub or GitLab)
- Load balancing (divides traffic among multiple containers for better performance)
- Monitoring & logging (provides advanced container monitoring capabilities)
What are the advantages of Containers as a Service?
Faster Development & Deployment
By using CaaS, you can significantly accelerate your software development and deployment process. Containers make it easy for onboarding developers to set up their local development environments. All they have to do is run a command or two instead of installing a bunch of dependencies or fiddling with OS settings.
Additionally, once your project is containerized, it can be easily deployed to any CaaS vendor.
Resource Efficiency
Containers have a resource-friendly nature. They’re designed to efficiently utilize system resources such as CPU, memory, and storage. With containers, you can generally run more applications with fewer system resources. In comparison to VMs, containers are more resource optimized.
Portability
Containerized applications are highly portable since they aren’t dependent on the operating system or the underlying hardware. Using CaaS, you’ll never have the “it runs on my machine” problem again.
On top of that, containers eliminate the risk of vendor lock-in. If you’re unsatisfied with your current vendor, you can easily switch from one vendor to another without modifying your code much.
Scalability
Containers in combination with orchestration software such as Kubernetes are highly scalable. Most CaaS vendors have built-in autoscaling capabilities, load balancing, and more. That enables them to accommodate any traffic and quickly scale down once the traffic spike ends.
Simplified Operation
CaaS bridges the gap between the development and production environment. On top of that, it simplifies the DevOps process by offering a built-in CI/CD system, which integrates with your VCS system.
Best of all, CaaS will enable you to cut significant costs since you won’t need any SysAdmins or DevOps engineers.
What are the limitations of Containers as a Service?
Security Problems
Containers offer lower isolation and security than VMs since they share the same system kernel. That could be a potential security risk. If you’re running your Docker container processes as root, a hacker could break out of the container and take control of the host system.
Lack of Control
CaaS platforms typically offer a lower level of control compared to other cloud models. Customers can’t fine-tune the machines their containers run on or configure how their apps should scale.
Learning Curve
Containers as a Service model is more challenging than PaaS or BaaS. It requires a lot of technical knowledge about programming, containerization technology, Docker, etc. It has a steeper learning curve, but mastering it can help you save a lot of time and money.
Data Persistence
Containers are designed to be stateless. They shouldn’t be used for storing files, databases, or anything else that requires data persistence. Using CaaS, you’ll have to utilize a 3rd-party service for hosting files, such as AWS S3, Google Cloud Storage, et cetera. Regarding the database, you can go with a managed database solution.
What role do Docker and Kubernetes play in a CaaS platform?
Docker and Kubernetes play a crucial role in most CaaS platforms.
Docker is a free and open-source platform for building, deploying, running, and managing containers. It was released in 2013 and has become the de facto standard for packaging containerized software.
Kubernetes (sometimes also referred to as K8s) is an orchestration software. It works on a higher level than Docker. The purpose of Kubernetes is to ensure that container clusters play nicely together. It takes care of scaling, load balancing, replacing broken containers, et cetera.
How does Containers as a Service compare to other models?
In this section, we’ll compare CaaS to other cloud computing services, including IaaS, PaaS, and BaaS. They all have their pros and cons that should be considered when deploying your project.
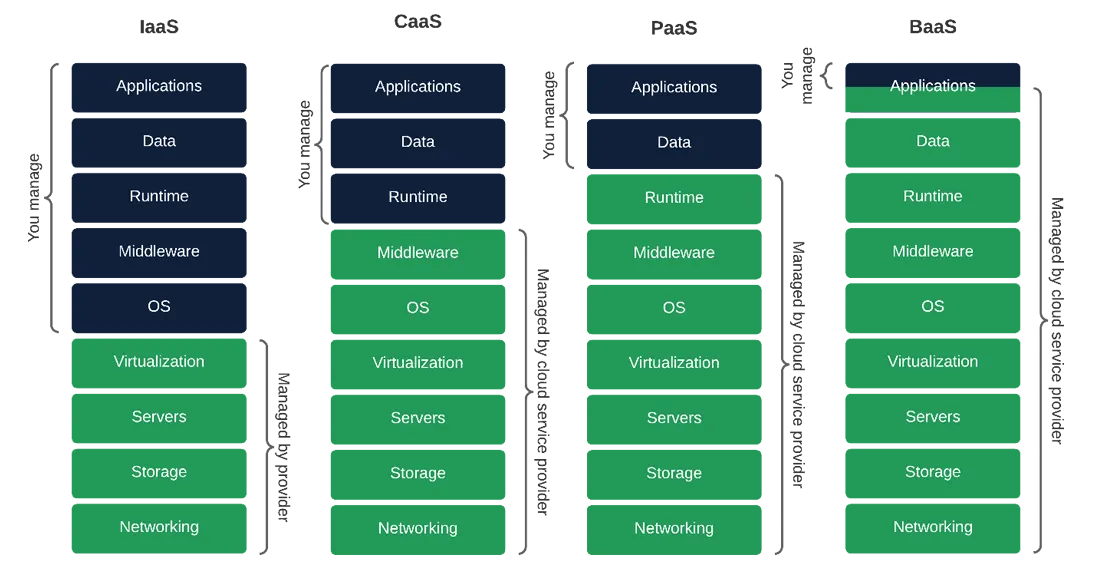
Based on the abstraction layers, CaaS falls somewhere between IaaS and PaaS (as depicted in the image below).
CaaS vs IaaS
Infrastructure as a Service (IaaS) is a flexible cloud computing model in which a cloud provider offers the basic infrastructure in a virtualized environment. That includes servers, storage, operating systems, and networking. IaaS is the least abstracted option and gives clients complete control over their infrastructure.
CaaS is less flexible and offers a lower control level than IaaS. But on the other hand, it is way easier to manage and allows for greater scalability and portability. As a rule of thumb, use IaaS if you require high-level control and CaaS if you need a fast way to deploy scalable containerized apps.
CaaS vs PaaS
Platform as a Service (PaaS) is a cloud computing service that provides developers with the tools to build and deploy their applications. PaaS lets users focus on their app instead of worrying about the underlying infrastructure. Most PaaS providers enable you to get your app running in one or two clicks!
CaaS is more flexible and scalable compared to PaaS. CaaS allows you to deploy practically anything, while PaaS providers are usually limited to a few programming languages. In terms of software development tools & features, PaaS is more advanced. PaaS is more suitable for monolithic applications, while CaaS exceeds in microservice architecture.
To learn more about Platform as a Service, check out What is Paas?
CaaS vs BaaS
Backend as a Service (BaaS) is a cloud computing model that completely abstracts away the backend side of a project. It comes with a database, file storage, user management, APIs, SDKs, push notifications, and authentication, to name a few. BaaS lets you focus on your frontend and business logic instead of wasting time and money on repetitive programming tasks.
CaaS can be used to deploy backends and frontends, while BaaS is mostly for deploying backends. BaaS is extremely easy to use and sometimes doesn’t require any code. CaaS, on the other hand, requires a decent amount of technical knowledge of programming, dockerization, and DevOps.
To learn more about Backend as a Service, check out What is BaaS?
What are the best Containers as a Service providers?
Back4app Containers
Back4app Containers is a powerful cloud service that offers a CaaS platform for deploying and scaling apps on globally distributed containers.
It lets developers focus on their software and dockerization process without worrying about DevOps. The platform has a built-in CI/CD system, GitHub integration, and supports no-downtime deployments.
Best of all, it offers a free plan and allows you to get your app running in a matter of minutes!
Amazon Elastic Container Service
Amazon Elastic Container Service (ECS) is a fully managed container orchestration service that simplifies the management and deployment of containerized software. All you have to do is describe your application and the required resources, and then AWS will handle all the rest.
There’s no exclusive charge for ECS since ECS utilizes other AWS services in the background. To effectively use ECS, you must be familiar with the AWS ecosystem. AWS also offers a free tier for new customers.
Google Cloud Kubernetes
Google Cloud Kubernetes (GKE) is Google’s Kubernetes-based orchestration platform. It allows you to put your containers on autopilot, eliminating the need to manage nodes. It comes with prebuilt Kubernetes applications & templates, autoscaling capabilities, multi-cluster management, and more!
GKE is exceptionally performant and flexible but requires quite a lot of initial configuration. That makes it not appropriate for beginners. Like the other two options, Google also offers free credits for new users.
How to host a simple application using containers?
In this section, we’ll look at how to build, dockerize, and deploy a simple Python web application. This guide was designed specifically for Back4app Containers, but similar steps can be applied to any other CaaS provider.
Objectives
- Code the application.
- Dockerize the application and test it.
- Push the source code to GitHub.
- Deploy the app to CaaS.
Code App
To demonstrate the deployment process, we’ll build a simple RESTful API using FastAPI — a modern, high-performance Python framework for building production-ready APIs.
Project Setup
Start by creating a dedicated folder for the project and a virtual environment:
$ mkdir fastapi-example && cd fastapi-example
$ python3.9 -m venv env && source env/bin/activate
Next, install FastAPI with all of its dependencies:
$ pip install "fastapi[all]"Using the extra specifier installs some optional dependencies, such as the Uvicorn server, Jinja2 templating engine, and so on. If you want the bare minimum, don’t include the extra.
Create a main.py file with the following contents:
# main.py

from fastapi import FastAPI

app = FastAPI()


@app.get("/")
async def root():
    return {"message": "Back4app Containers rocks!"}
This is the most basic FastAPI app you can write. We had to import FastAPI, initialize it, and register the root endpoint. Visiting / should return the Back4app Containers rocks! message.
Run and test
To run the web app, you can use the built-in Uvicorn ASGI server:
$ uvicorn main:app --reload

INFO:     Uvicorn running on http://127.0.0.1:8000 (Press CTRL+C to quit)
INFO:     Started reloader process [9528] using WatchFiles
INFO:     Started server process [26308]
INFO:     Waiting for application startup.
INFO:     Application startup complete.
We added the --reload flag because we want the server to reload if we make any changes to the source code.
Use cURL to send a GET request to the API root:
$ curl http://localhost:8000/

{
    "message": "Back4app Containers rocks!"
}
requirements.txt
Another thing we need to do is to freeze all the requirements to a requirements.txt file. Doing so enables others to quickly install all the necessary dependencies for our project.
$ pip freeze > requirements.txt

fastapi==0.97.0
pydantic==1.10.9
python-dotenv==1.0.0
...
We’ll use this file to install Python dependencies in the Docker image-building process.
Dockerize App
Before following along, make sure you have Docker on your local machine. The best way to check that is to run
docker --versionin your terminal.
Dockerfile
To dockerize our project, we’ll use a Dockerfile. A Dockerfile is a text file that contains all the commands a user could execute to assemble an image.
Create a Dockerfile in the project root like so:
# Dockerfile

# Use Alpine Linux as the base image
# we're using it since it's tiny in size (~5 MB)
FROM python:3.9.6-alpine

# Set the working directory
WORKDIR /app

# Set environmental variables
ENV PYTHONDONTWRITEBYTECODE 1  # Prevents Python from writing out .pyc files
ENV PYTHONUNBUFFERED 1         # Keeps Python from buffering stdin/stdout

# Copy over the requirements file and install the dependencies
COPY ./requirements.txt .
RUN pip install --no-cache-dir --upgrade -r ./requirements.txt

# Copy over the source code
COPY . .

# Expose the port
EXPOSE 80

# Run the server
CMD ["uvicorn", "main:app", "--host", "0.0.0.0", "--port", "80"]
Check out the comments to figure out how different instructions work.
Don’t worry; you don’t have to memorize all the instructions. If you ever get stuck, you can always check Docker documentation. Additionally, Dockerfiles for most languages and frameworks can be found online. You only need to copy them and tailor them to your needs.
.dockerignore
Our project contains files and directories we don’t want included in the Docker image. To ignore them, we can use a .dockerignore file.
Create a .dockerignore file in the project root:
# .dockerignore

.git/
.idea/
venv/
Feel free to add additional files and directories.
Build, run, and test
Before deploying your code to CaaS, ensure your project successfully builds and runs on your machine.
Start by building the Docker image:
$ docker build -t fastapi-example:1.0 .Arguments rundown:
-t fastapi-example:1.0tags/names the image..defines the build context.
Next, check if the image was built successfully:
$ docker images

REPOSITORY        TAG       ID             CREATED AT      SIZE
fastapi-example   1.0       33feac11707d   4 seconds ago   72.8MB
After that use the newly created image to spin up a new container:
$ docker run -p 80:80 --name fastapi-example -d fastapi-example:1.0Arguments rundown:
-p 80:80exposes port80.--name fastapi-examplenames the container.-druns the container in detached mode (without occupying the terminal).fastapi-example:1.0specifies what image to use.
Check the running containers:
$ docker ps

ID        IMAGE                 COMMAND                CREATED   PORTS
e67fdeg   fastapi-example:1.0   "uvicorn main:app.."   9s ago    0.0.0.0:80->80/tcp
Lastly, send a GET request to the API index to see if you get the message:
$ curl http://localhost/

{
    "message": "Back4app Containers rocks!"
}
To stop the container, you can use the following command:
$ docker kill fastapi-examplePush to GitHub
The next steps will require you to have a GitHub account. If you don’t have one, go ahead and sign up. Additionally, make sure you have Git installed and configured on your machine.
Create Repository
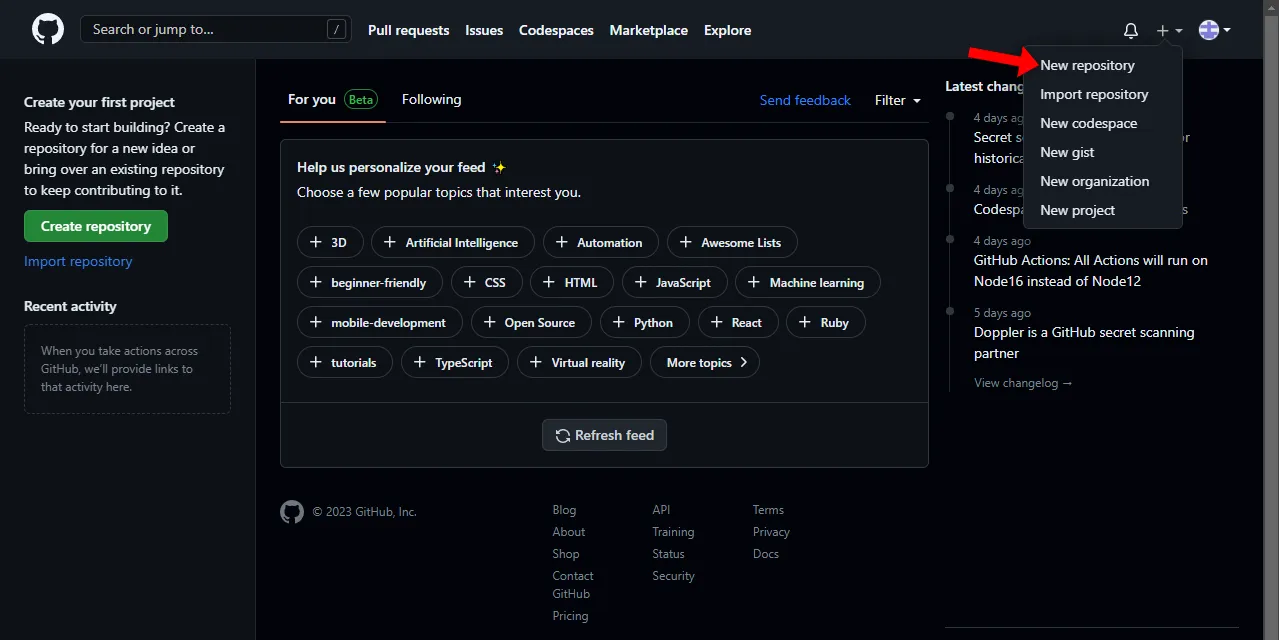
You’ll be redirected to your dashboard as you log into your GitHub account. Use the add button at the top right of the screen to see the repository creation form.
Next, give your repository a descriptive name and click the “Create repository” button.
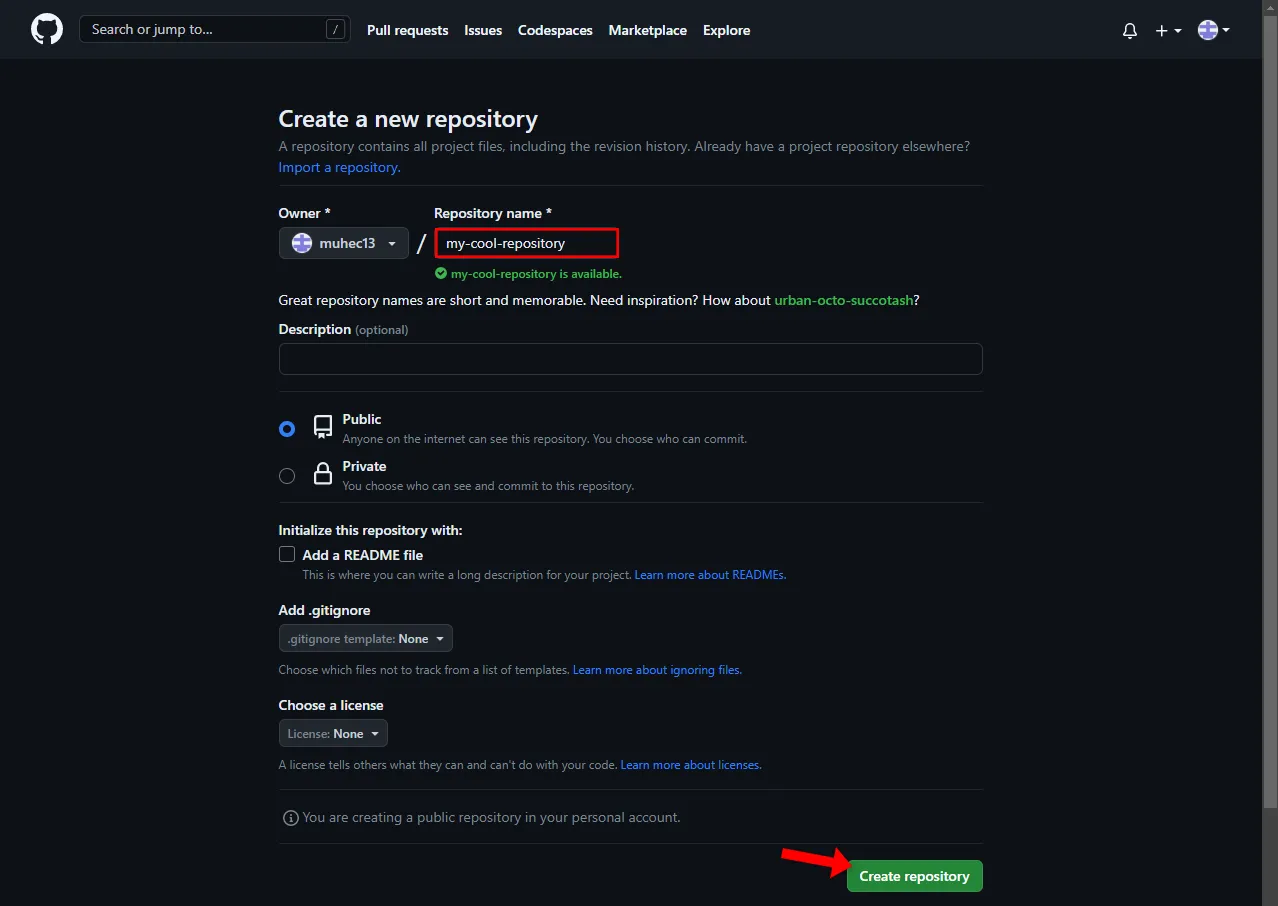
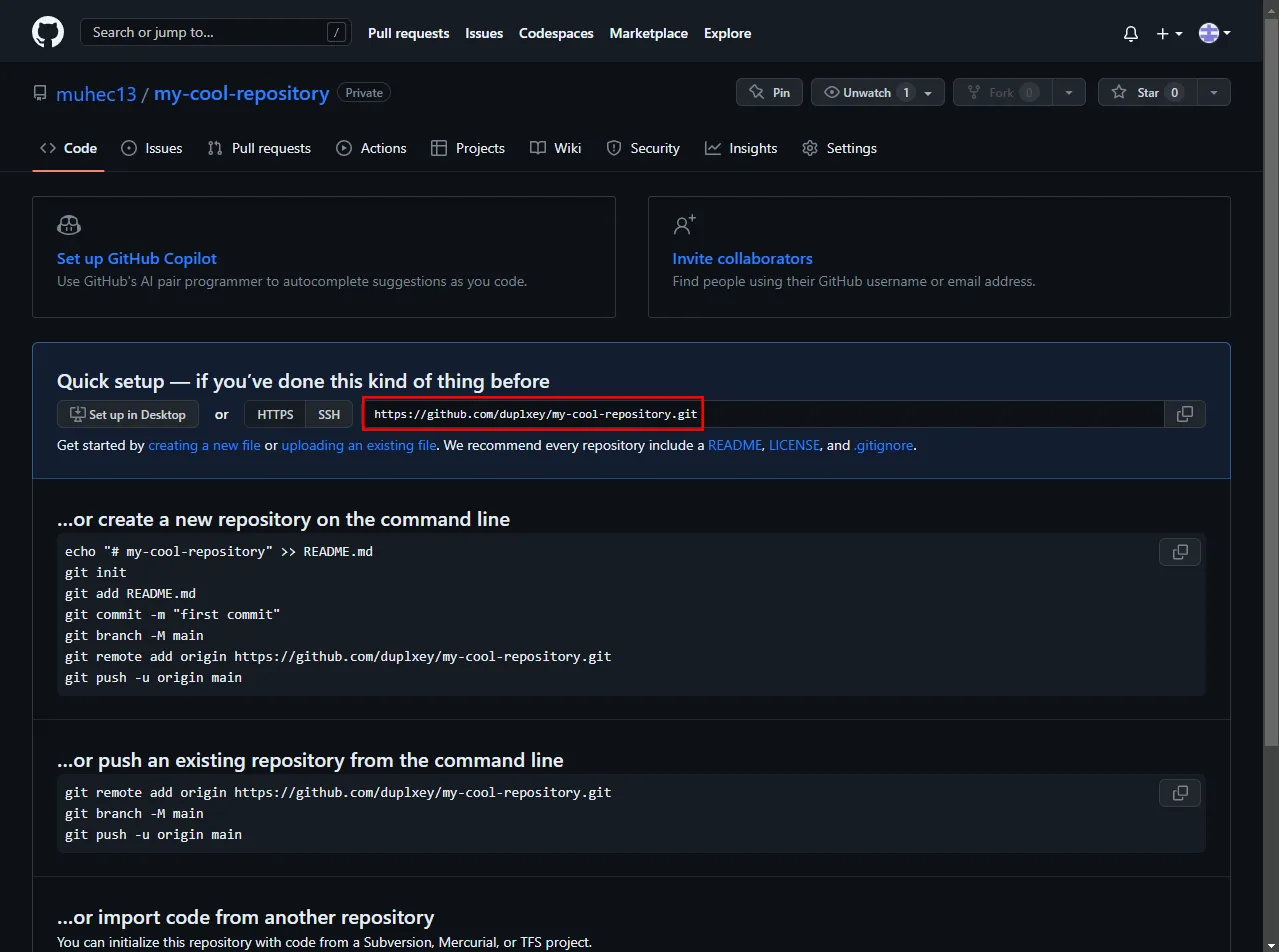
GitHub will take a few moments to create the repository. Once the repository is created, you’ll get redirected to it. Take note of the “Remote repository URL”.
Push Source Code
Moving along, navigate back to your local project.
Before you version control your code, it’s wise to create a .gitignore file. A .gitignore file allows you to define what files and directories shouldn’t be added to the version control system. This file works the same way as a .dockerignore file.
Create a .gitignore file in the project root with the following contents:
# .gitignore

.idea/
venv/
.env
build/
Feel free to modify the file according to your needs.
Next, open the terminal and run the following command to initialize the local Git repository:
$ git initThen add all the files to VCS and create the initial commit:
$ git add .
$ git commit -m "my initial commit"
Lastly, add the remote GitHub origin and push the source code to it:
$ git remote add origin <remote_url>
$ git push origin master
Make sure to replace
<remote_url>with the remote URL from the previous step.
That should be it. If you check the GitHub repository page now, you should see that all the files were successfully added.
Deploy App
To deploy an app to Back4app Containers you’ll need a Back4app account. If you don’t have one yet, go ahead and register.
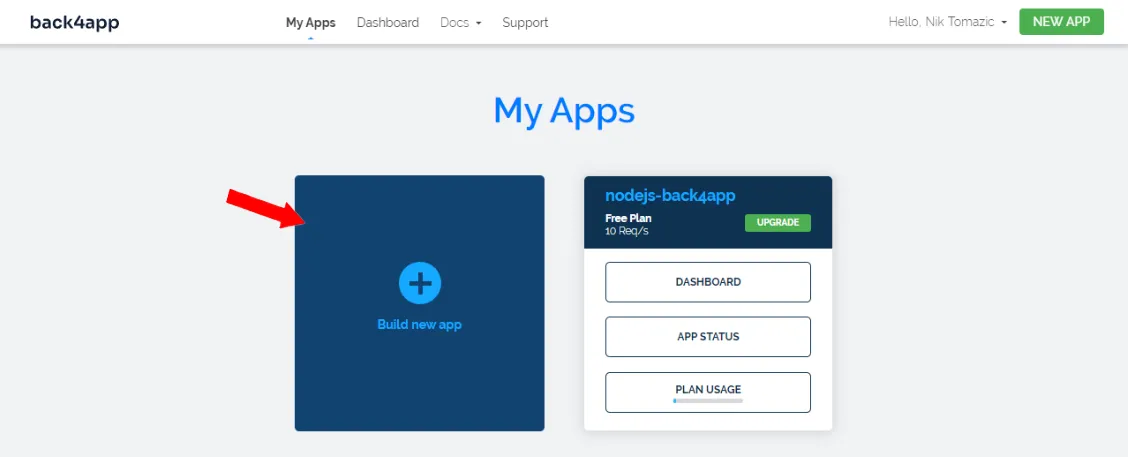
As you log in, you’ll see the list of your apps. Click on the “Build new app” button to initialize the app creation process.
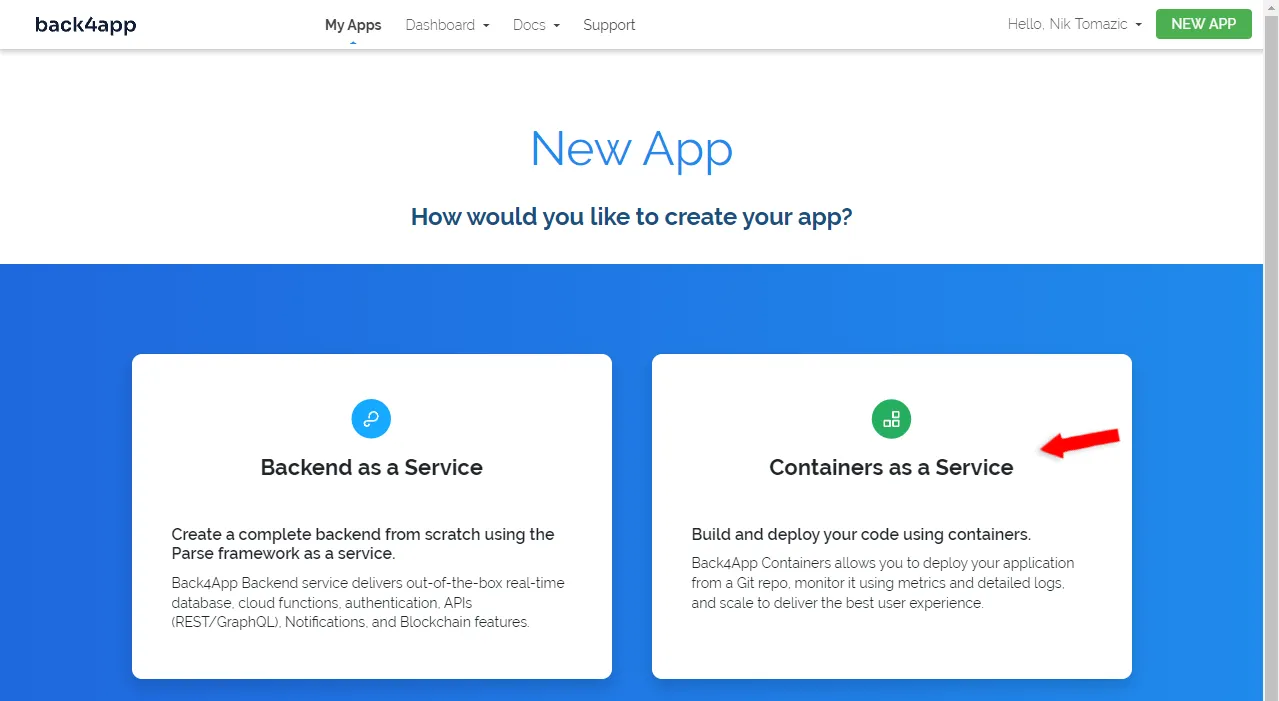
Back4app lets you deploy two types of apps — either Backend as a Service (BaaS) or Containers as a Service (CaaS). Since we’re deploying a containerized application, go with the “Containers as a Service” option.
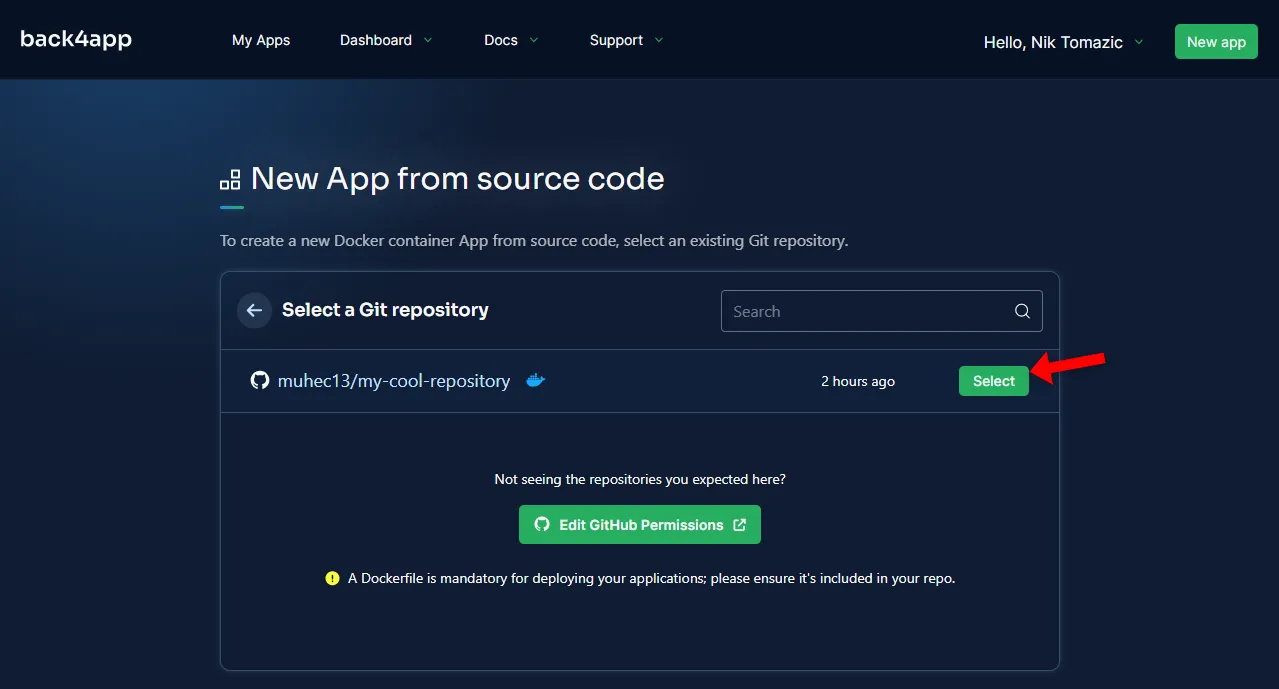
If you still need to link your GitHub profile and import the repository, we’ve created in the previous step. Next, select it.
Back4app Containers allows you to highly customize the deployment. You can set the deployment branch, root directory, toggle auto-deploy, and set the environmental variables.
Since we’re deploying a simple app, we don’t need any of these options. You only need to set the “App Name” and then click on the “Create App” button.
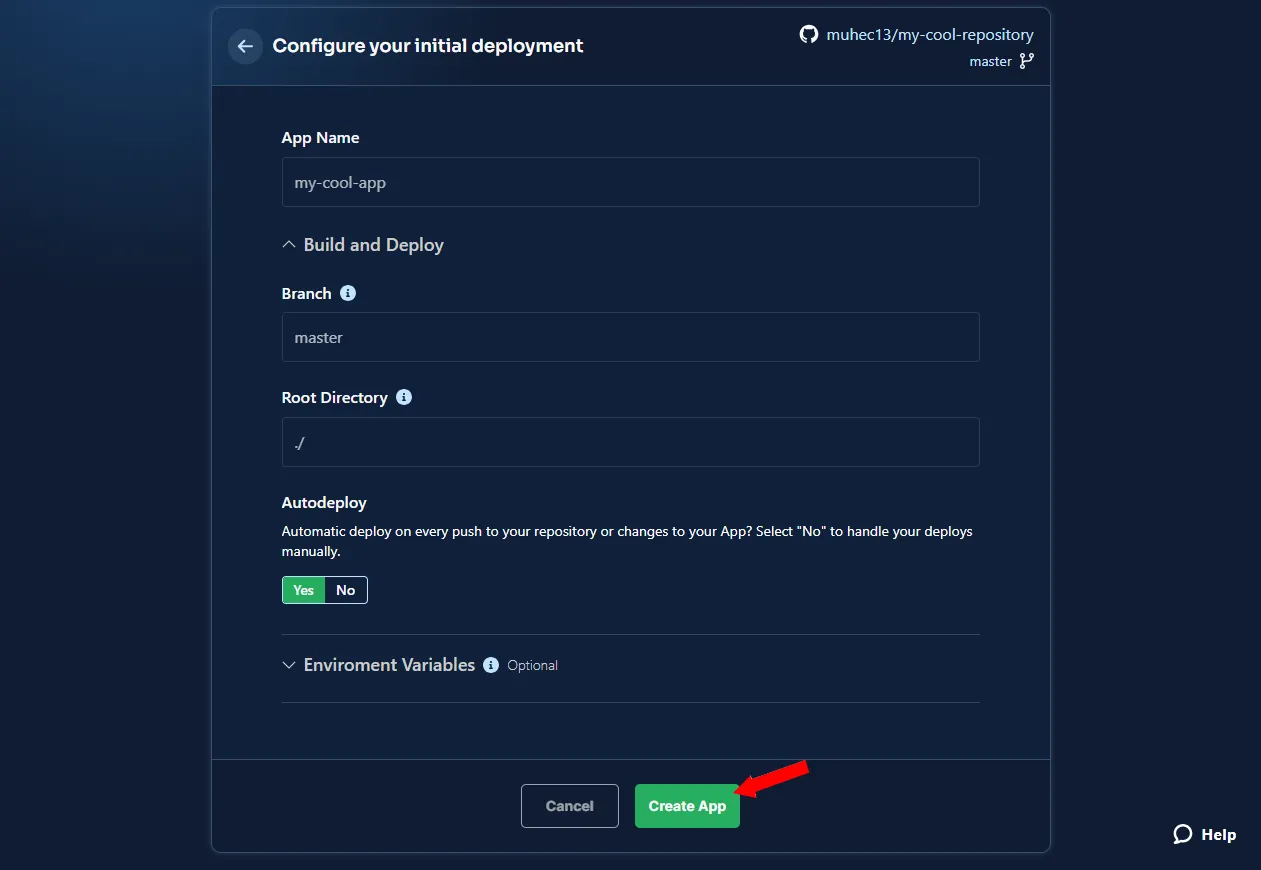
Back4app Containers will take a few moments to pull the source code from GitHub, build the image, and spin up a new container. Once your application is ready, the status will change to “Ready”.
When that happens, you can click the green link at the left side of the screen to open your app in the browser. You might also notice that Back4app Containers issued a free SSL certificate for your app.
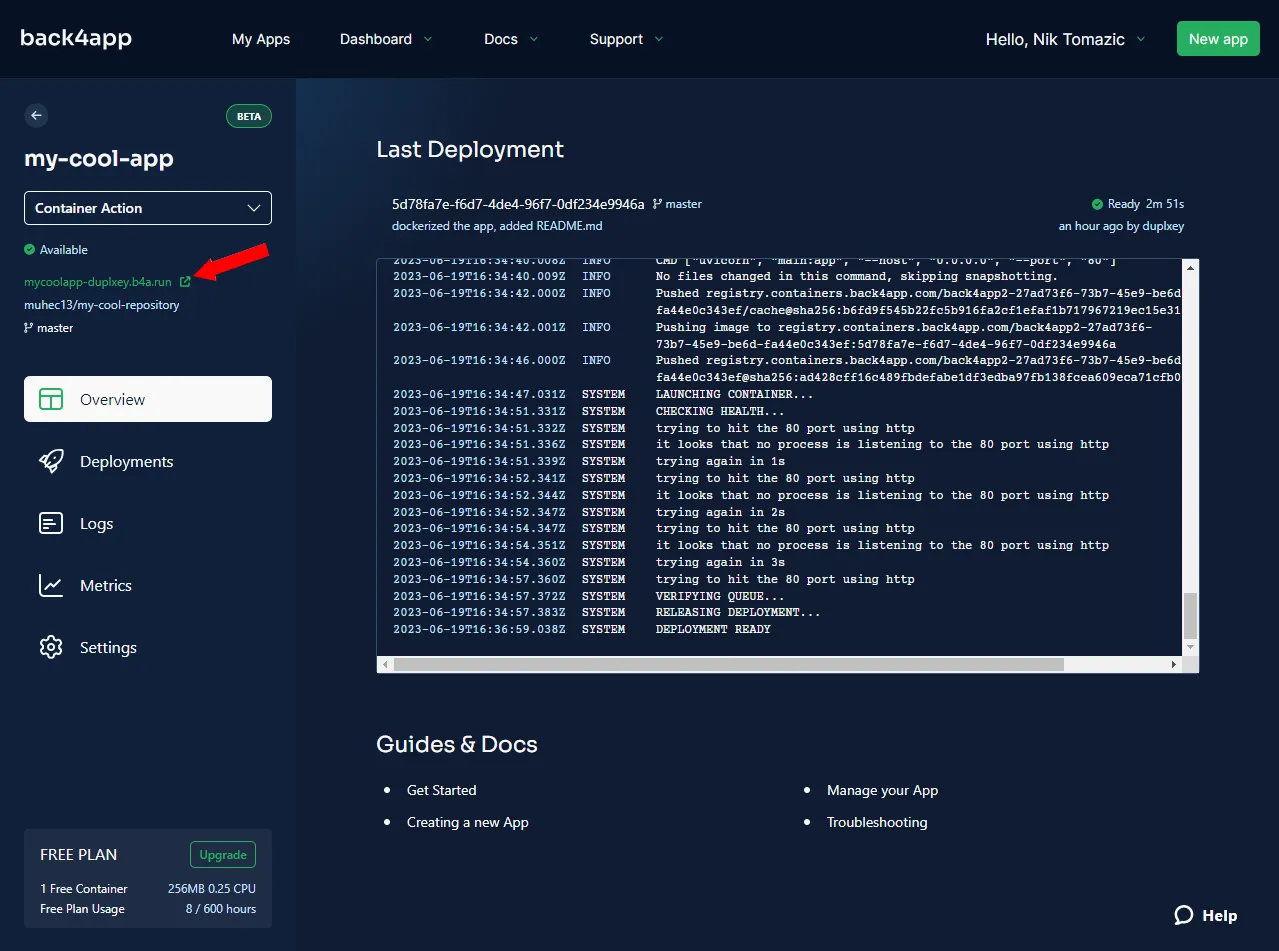
Good job, that’s it!
Conclusion
In conclusion, you’ve learned about CaaS — one of the best cloud native models for microservice architecture. You now know its core features, benefits, limitations, and the best CaaS vendors. On top of that, you’ve learned how to deploy a simple dockerized application to Back4app Containers.
The project source code is available on the back4app-containers-fastapi repository.
Further steps
- Look into Multi-stage builds to improve your Dockerfiles and make them easier to maintain.
- It’s good security practice to run your Docker Container processes with a non-root user.
- Check out Back4app Containers docs to learn how to deploy other programming languages and frameworks.
FAQ
What is Containers as a Service?
Containers as a Service (CaaS) is a cloud computing model that allows developers to upload, build, scale, and manage containers. Containers are small executable application packages that can be easily deployed anywhere. Using CaaS, developer and IT operations teams don’t have to worry about the underlying infrastructure. Instead, they can think on a much higher level.
What are the advantages of Containers as a Service?
– Faster development & deployment
– Resource efficiency
– Portability
– Scalability
– Simplified operation
What are the disadvantages of Containers as a Service?
– Security problems
– Lack of control
– Learning curve
– Data persistence
What are the best Containers as a Service providers?
– Back4app Containers
– Amazon Elastic Container Service (ECS)
– Google Cloud Kubernetes (GKE)
How to deploy an application using containers?
1. Code the application.
2. Dockerize the application and test it on your local machine.
3. Push the source code to GitHub.
4. Deploy the app to Back4app Containers.


