5 Ways to Deploy a React App for Free

This article explores five ways to deploy your React app for free using cloud platforms like Back4app and Netlify.
React has become a popular go-to library for building dynamic user interfaces in modern web development.
However, the journey from development to deployment often stumbles at one critical point – cost.
The need for affordable hosting solutions has grown with the growing number of React applications being developed daily.
Contents
- 1 Key Takeaways
- 2 Overview of React Hosting Options
- 3 Deploy your React App with Back4app’s AI Agent
- 4 Deploy your React App using Netlify’s Drag-and-Drop
- 5 Deploy your static React App using GitHub Pages
- 6 Deploy your React App using Vercel’s CLI
- 7 Deploy your React App using Firebase Hosting
- 8 Conclusion
Key Takeaways
- Learn multiple ways to deploy a React app, including AI, Drag, and drop, and via CLI
- Overview of the deployment experience using multiple clouds like Back4app and Vercel
- Compare the deployment options according to your requirements
Overview of React Hosting Options
| Name | Headline | Deployment Overview |
|---|---|---|
| Back4app | Simplified Web App Deployment | Offers BaaS and CaaS services, and an AI agent for easy deployment. |
| Netlify | Hassle-Free Modern Web Hosting | Builds from any code repository with global server network hosting. |
| GitHub Pages | Direct Hosting from GitHub Repositories | Hosts static websites directly from GitHub with no server-side processing. |
| Vercel | Amazing experience to build, scale, and secure apps | Features like scalability and serverless functions for easy deployment. |
| Firebase | Secure and Fast Web Hosting Service | Provides a range of tools including Firestore database and global CDN hosting. |
Deploy your React App with Back4app’s AI Agent
Back4app is a cloud platform that simplifies the process of building, deploying, and managing your web applications. It’s a great option option to host a React app and let’s start.
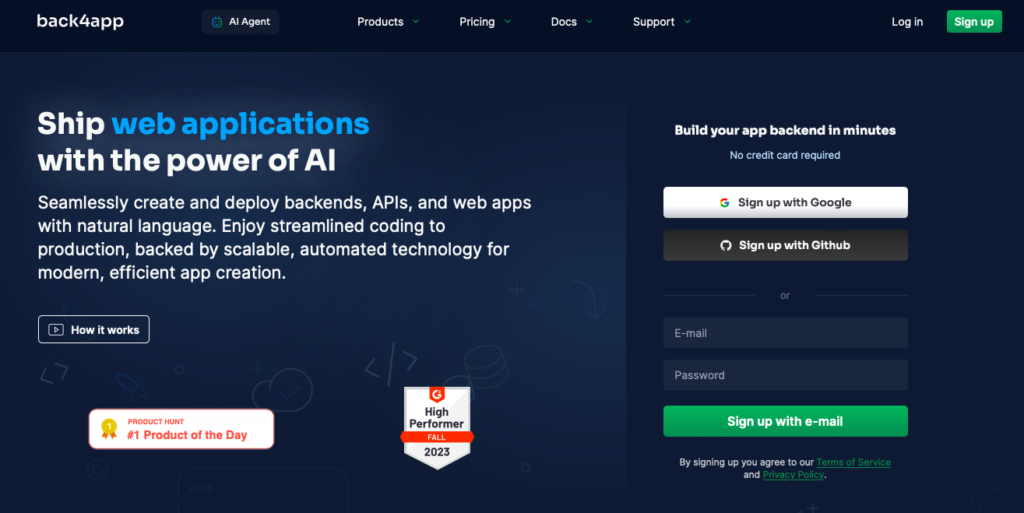
Back4app allows users to deploy React for free and it offers various services, including a Backend as a Service (BaaS), a Container as a Service (CaaS), and an AI agent.
Back4app’s BaaS service allows you to easily set up the backend of your web and mobile apps, removing the complexity of building and maintaining the infrastructure typically associated with setting up a backend for your React apps from scratch.
The BaaS service offers database management and user authentication, among other features.
The CaaS service allows you to manage and deploy your web app using Docker containers. The service eliminates the gap between development and production by automating repetitive tasks and managing your server-side infrastructure.
The Back4app AI agent allows you to use prompts for all of Back4app’s services and simplifies the way to host a React app.
You can manage code repositories, create and manage applications, and deploy web applications.
Below are detailed instructions on how to deploy your React App with the Back4app AI Agent
To deploy your React app using the AI agent and Back4app containers, you need a few things:
- A Back4app account. Visit the Back4app website and click the Sign up button to create an account.
- The Back4App Containers GitHub App is installed on your GitHub account.
After you have installed the Back4app Containers GitHub app, you need to grant the app access to the repository you want to deploy.
Additionally, your repository needs to have a Dockerfile. Here’s a sample Dockerfile you can add to your Repository:
FROM node:17-alpine
WORKDIR /app
COPY package.json .
RUN npm install
COPY . .
EXPOSE 8080
CMD [ "npm", "run", "dev" ]
Note that if your React project was created using Vite. You will also need to modify the vite.config.ts file.
Like so:
import { defineConfig } from 'vite'
import react from '@vitejs/plugin-react'

// <https://vitejs.dev/config/>
export default defineConfig({
  plugins: [react()],
  server: {
    host: true,
    strictPort: true,
    port: 8080,
  }
})
This code block configures the server to accept connections on all network interfaces and sets the port on which the development server will run.
In this case, the server will be accessible at http://localhost:8080.
After adding your Dockerfile and modifying your Vite configuration file, ensure to push the changes to the GitHub repository.
Log into your account, and click the “AI Agent” button to access the Back4app AI Agent.
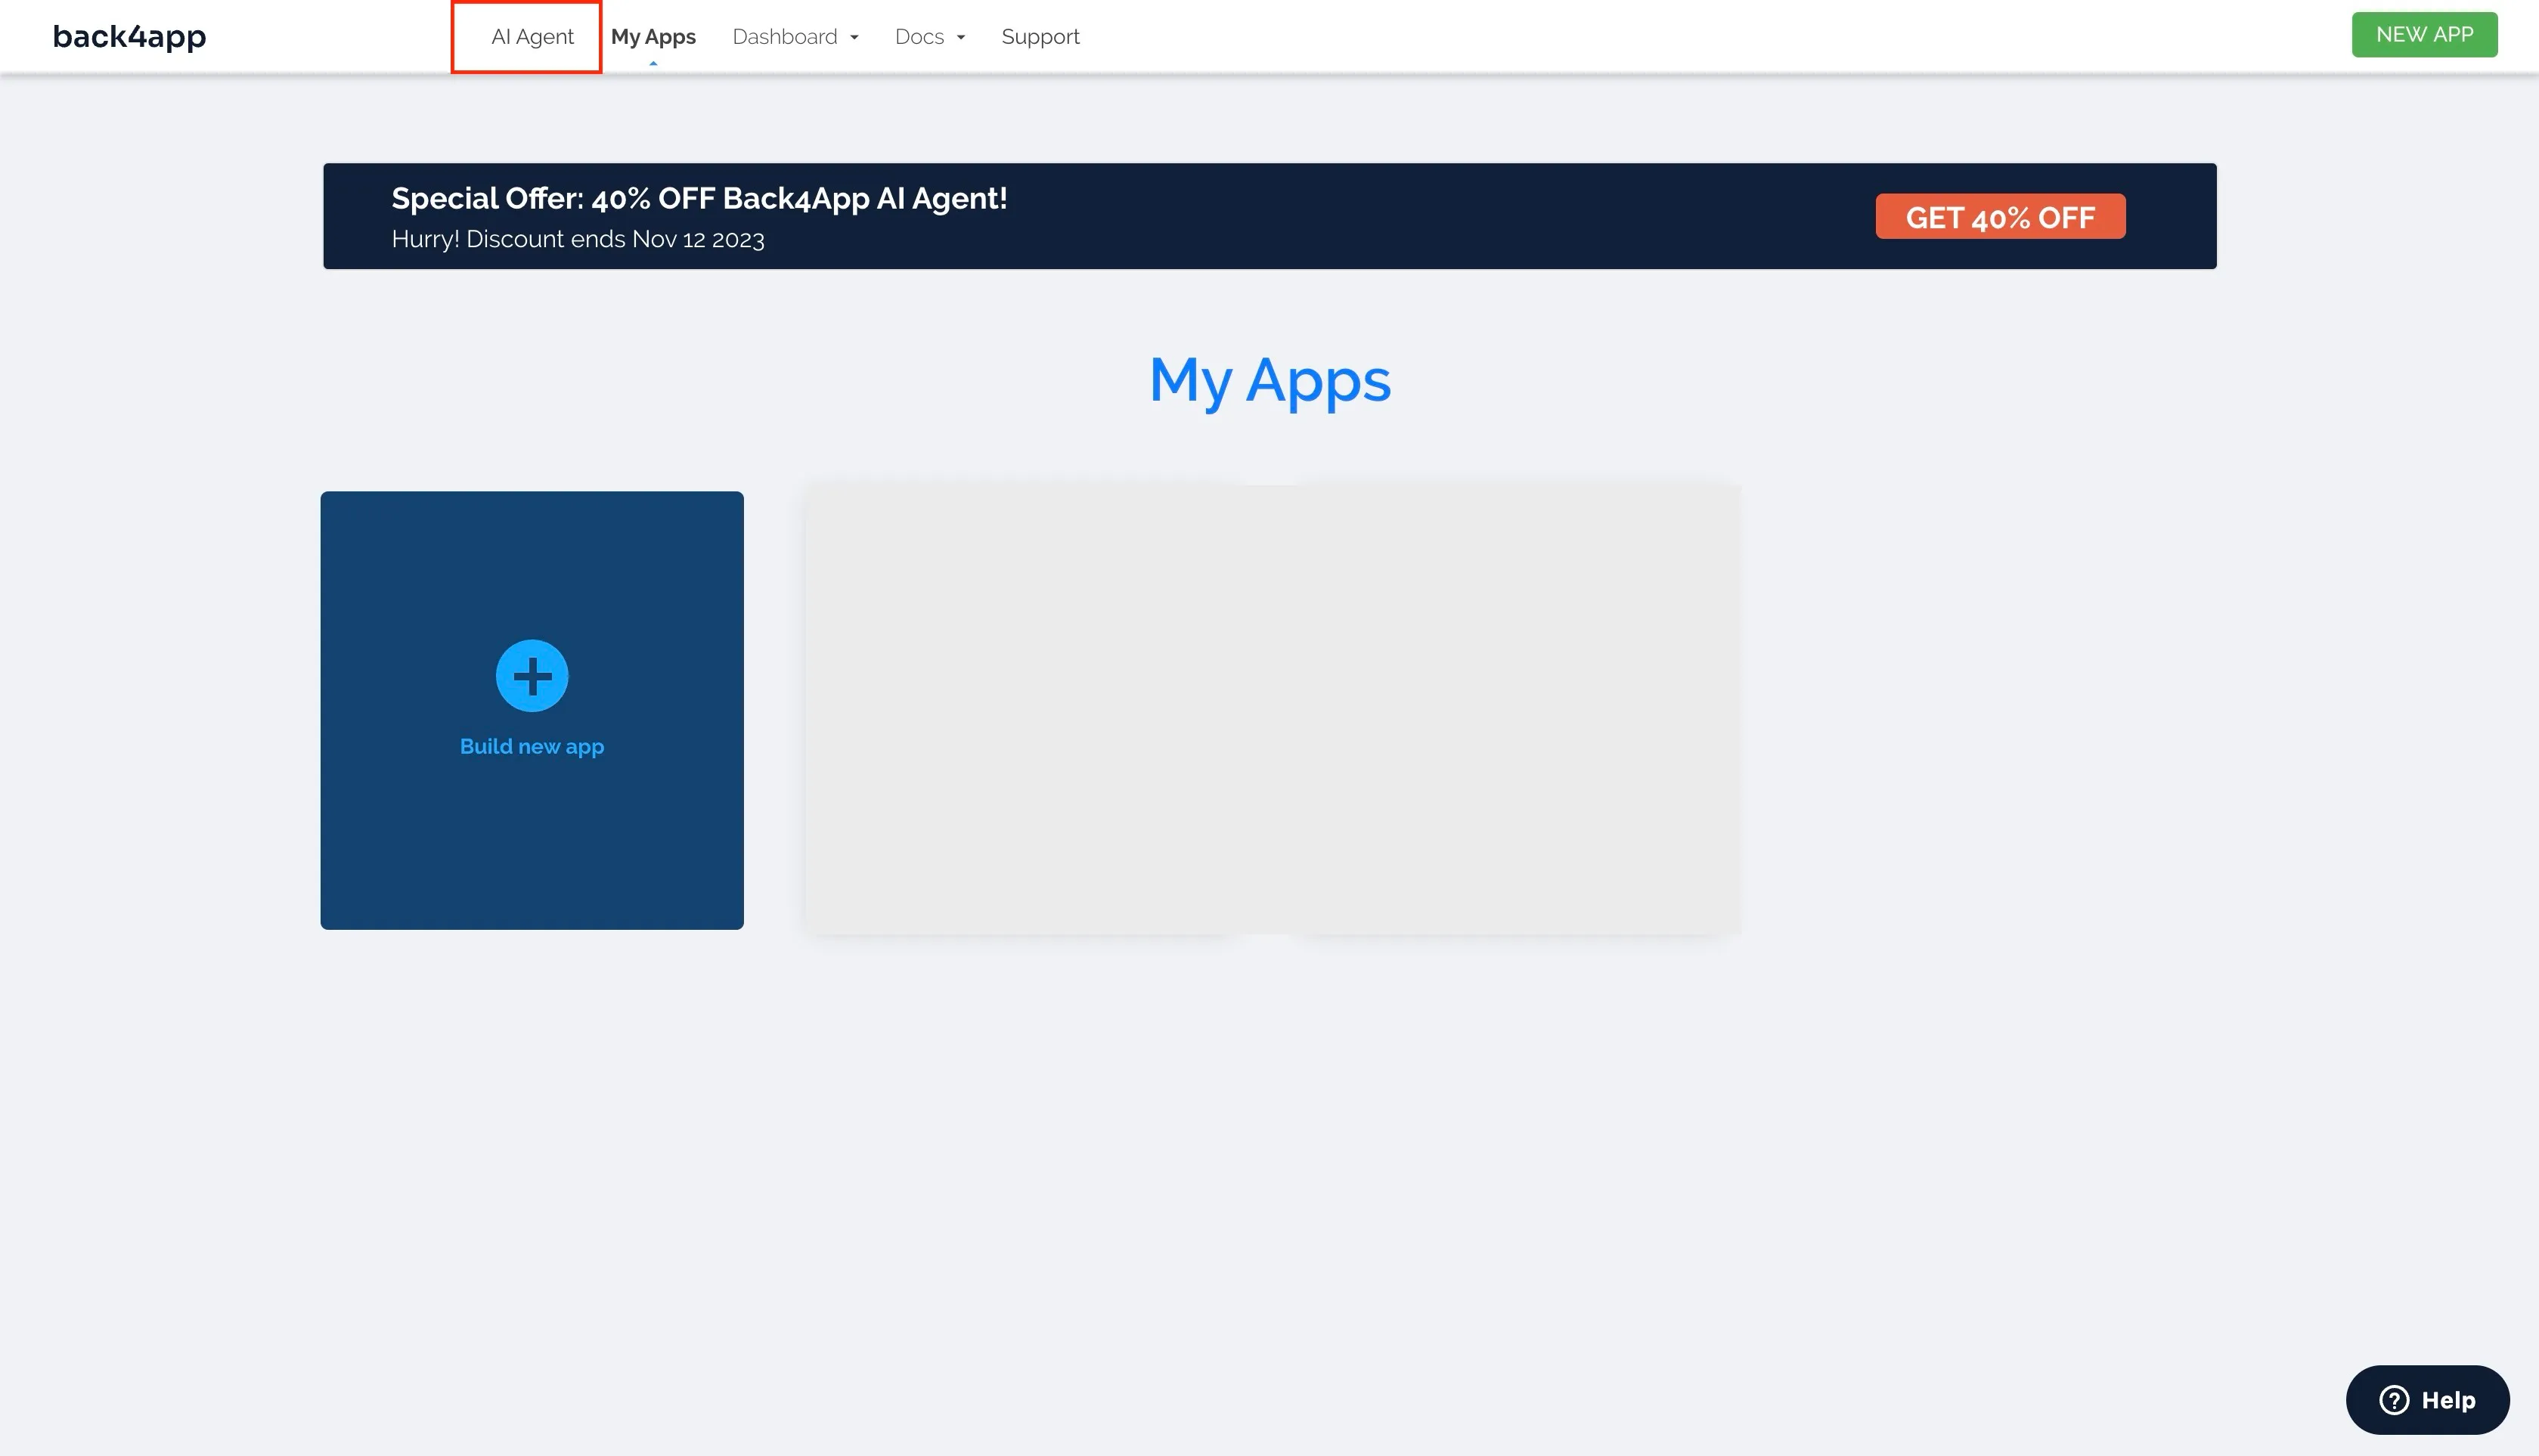
This will take you to the Back4app AI agent page.
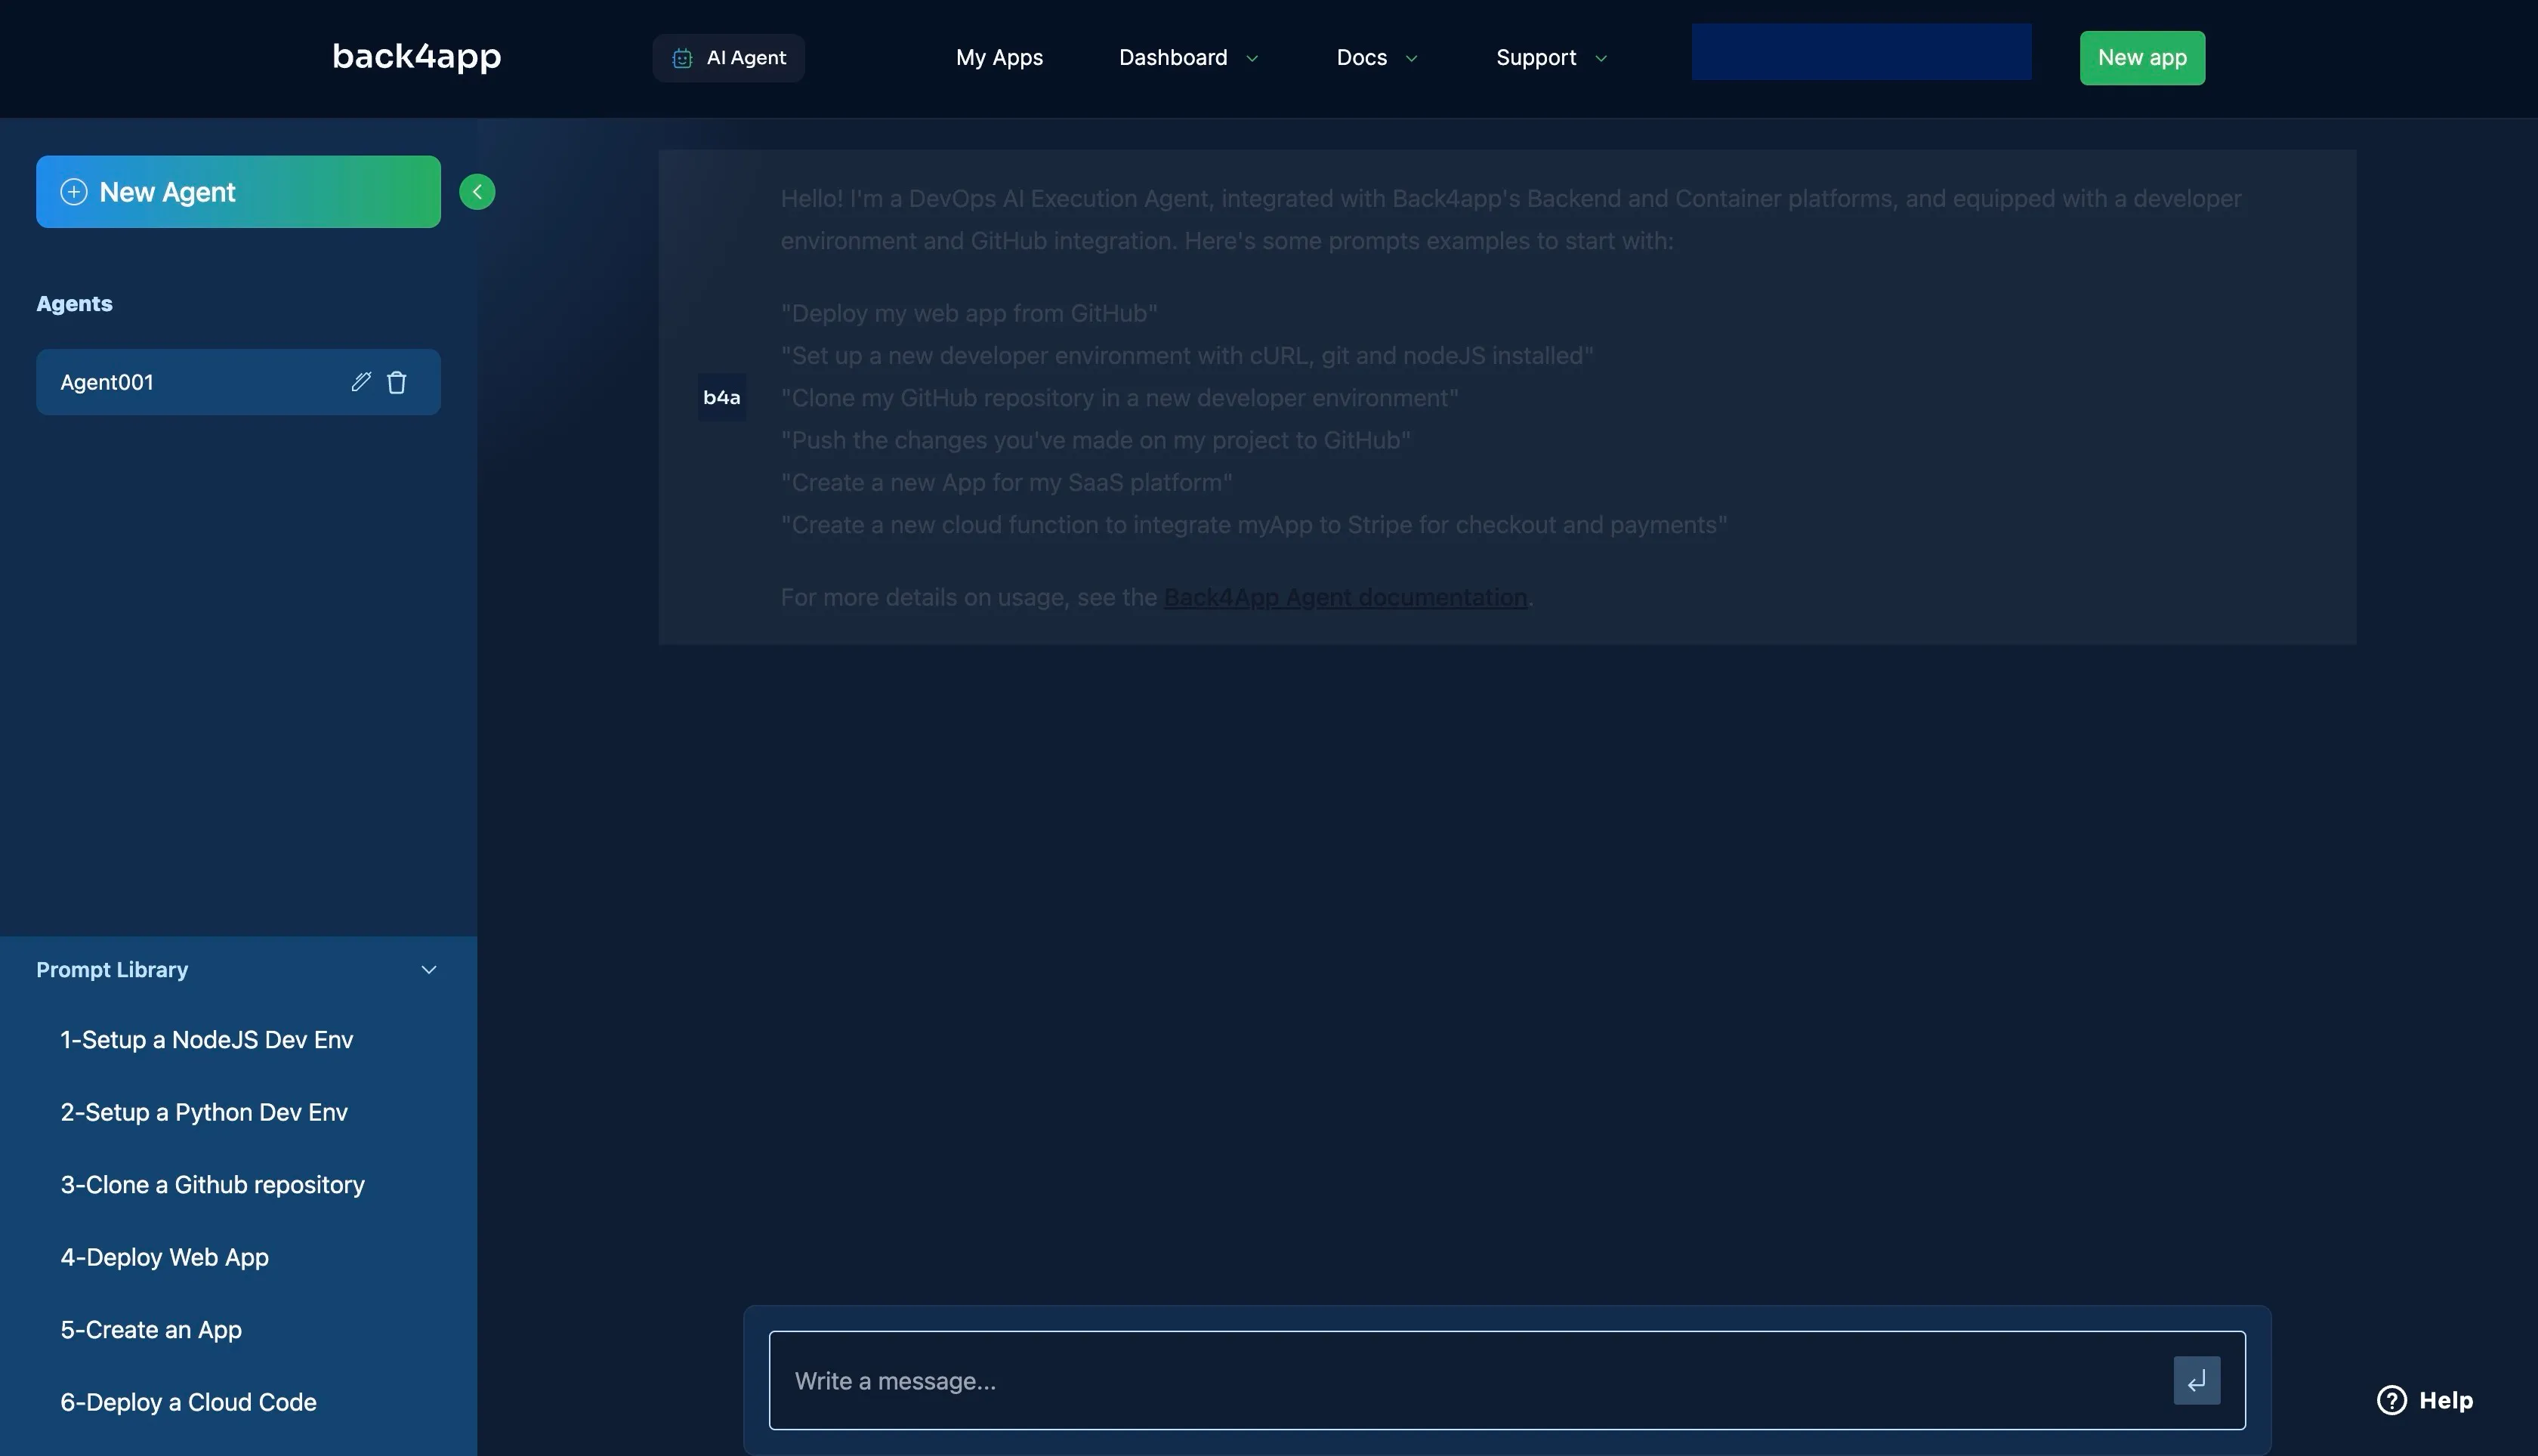
Next, prompt the AI to “Deploy my Web App from GitHub”
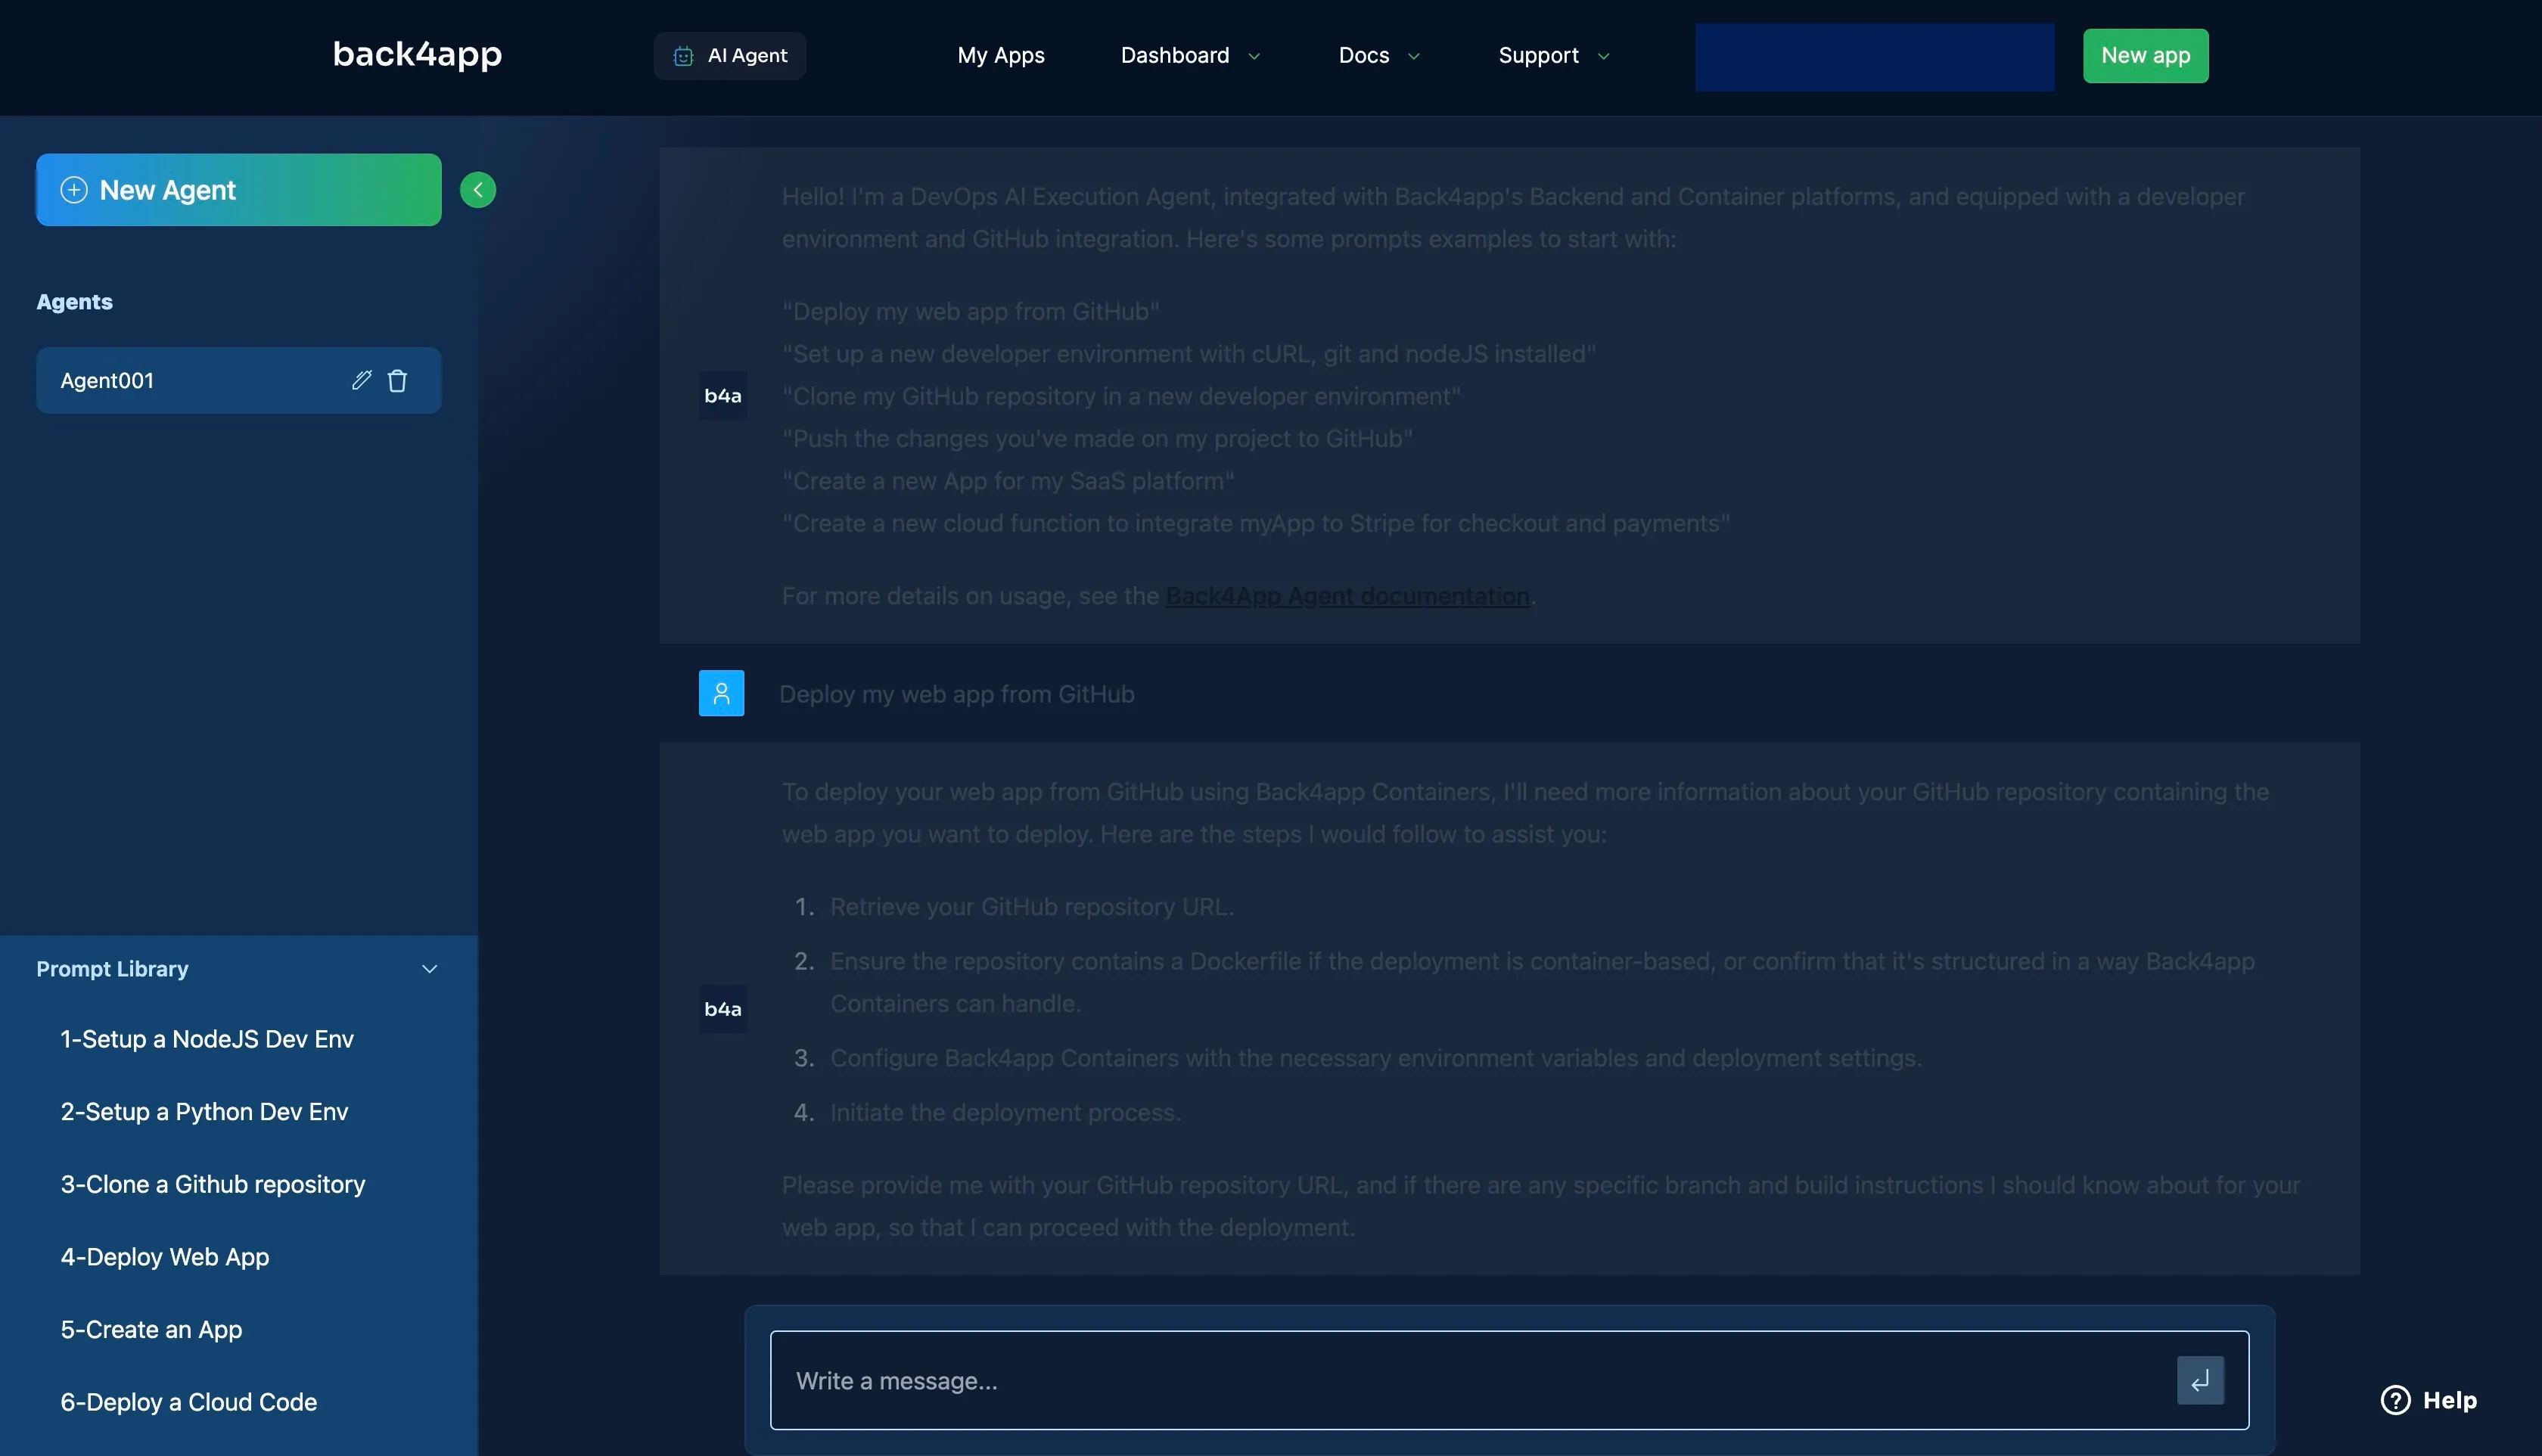
The agent will respond with a list of things to start your deployment process, such as the GitHub repository of the app you want to deploy.
Provide the AI with your GitHub repository URL using the prompt “Here’s the URL to the GitHub Repository: <Your_GitHub_URL>” or similar.
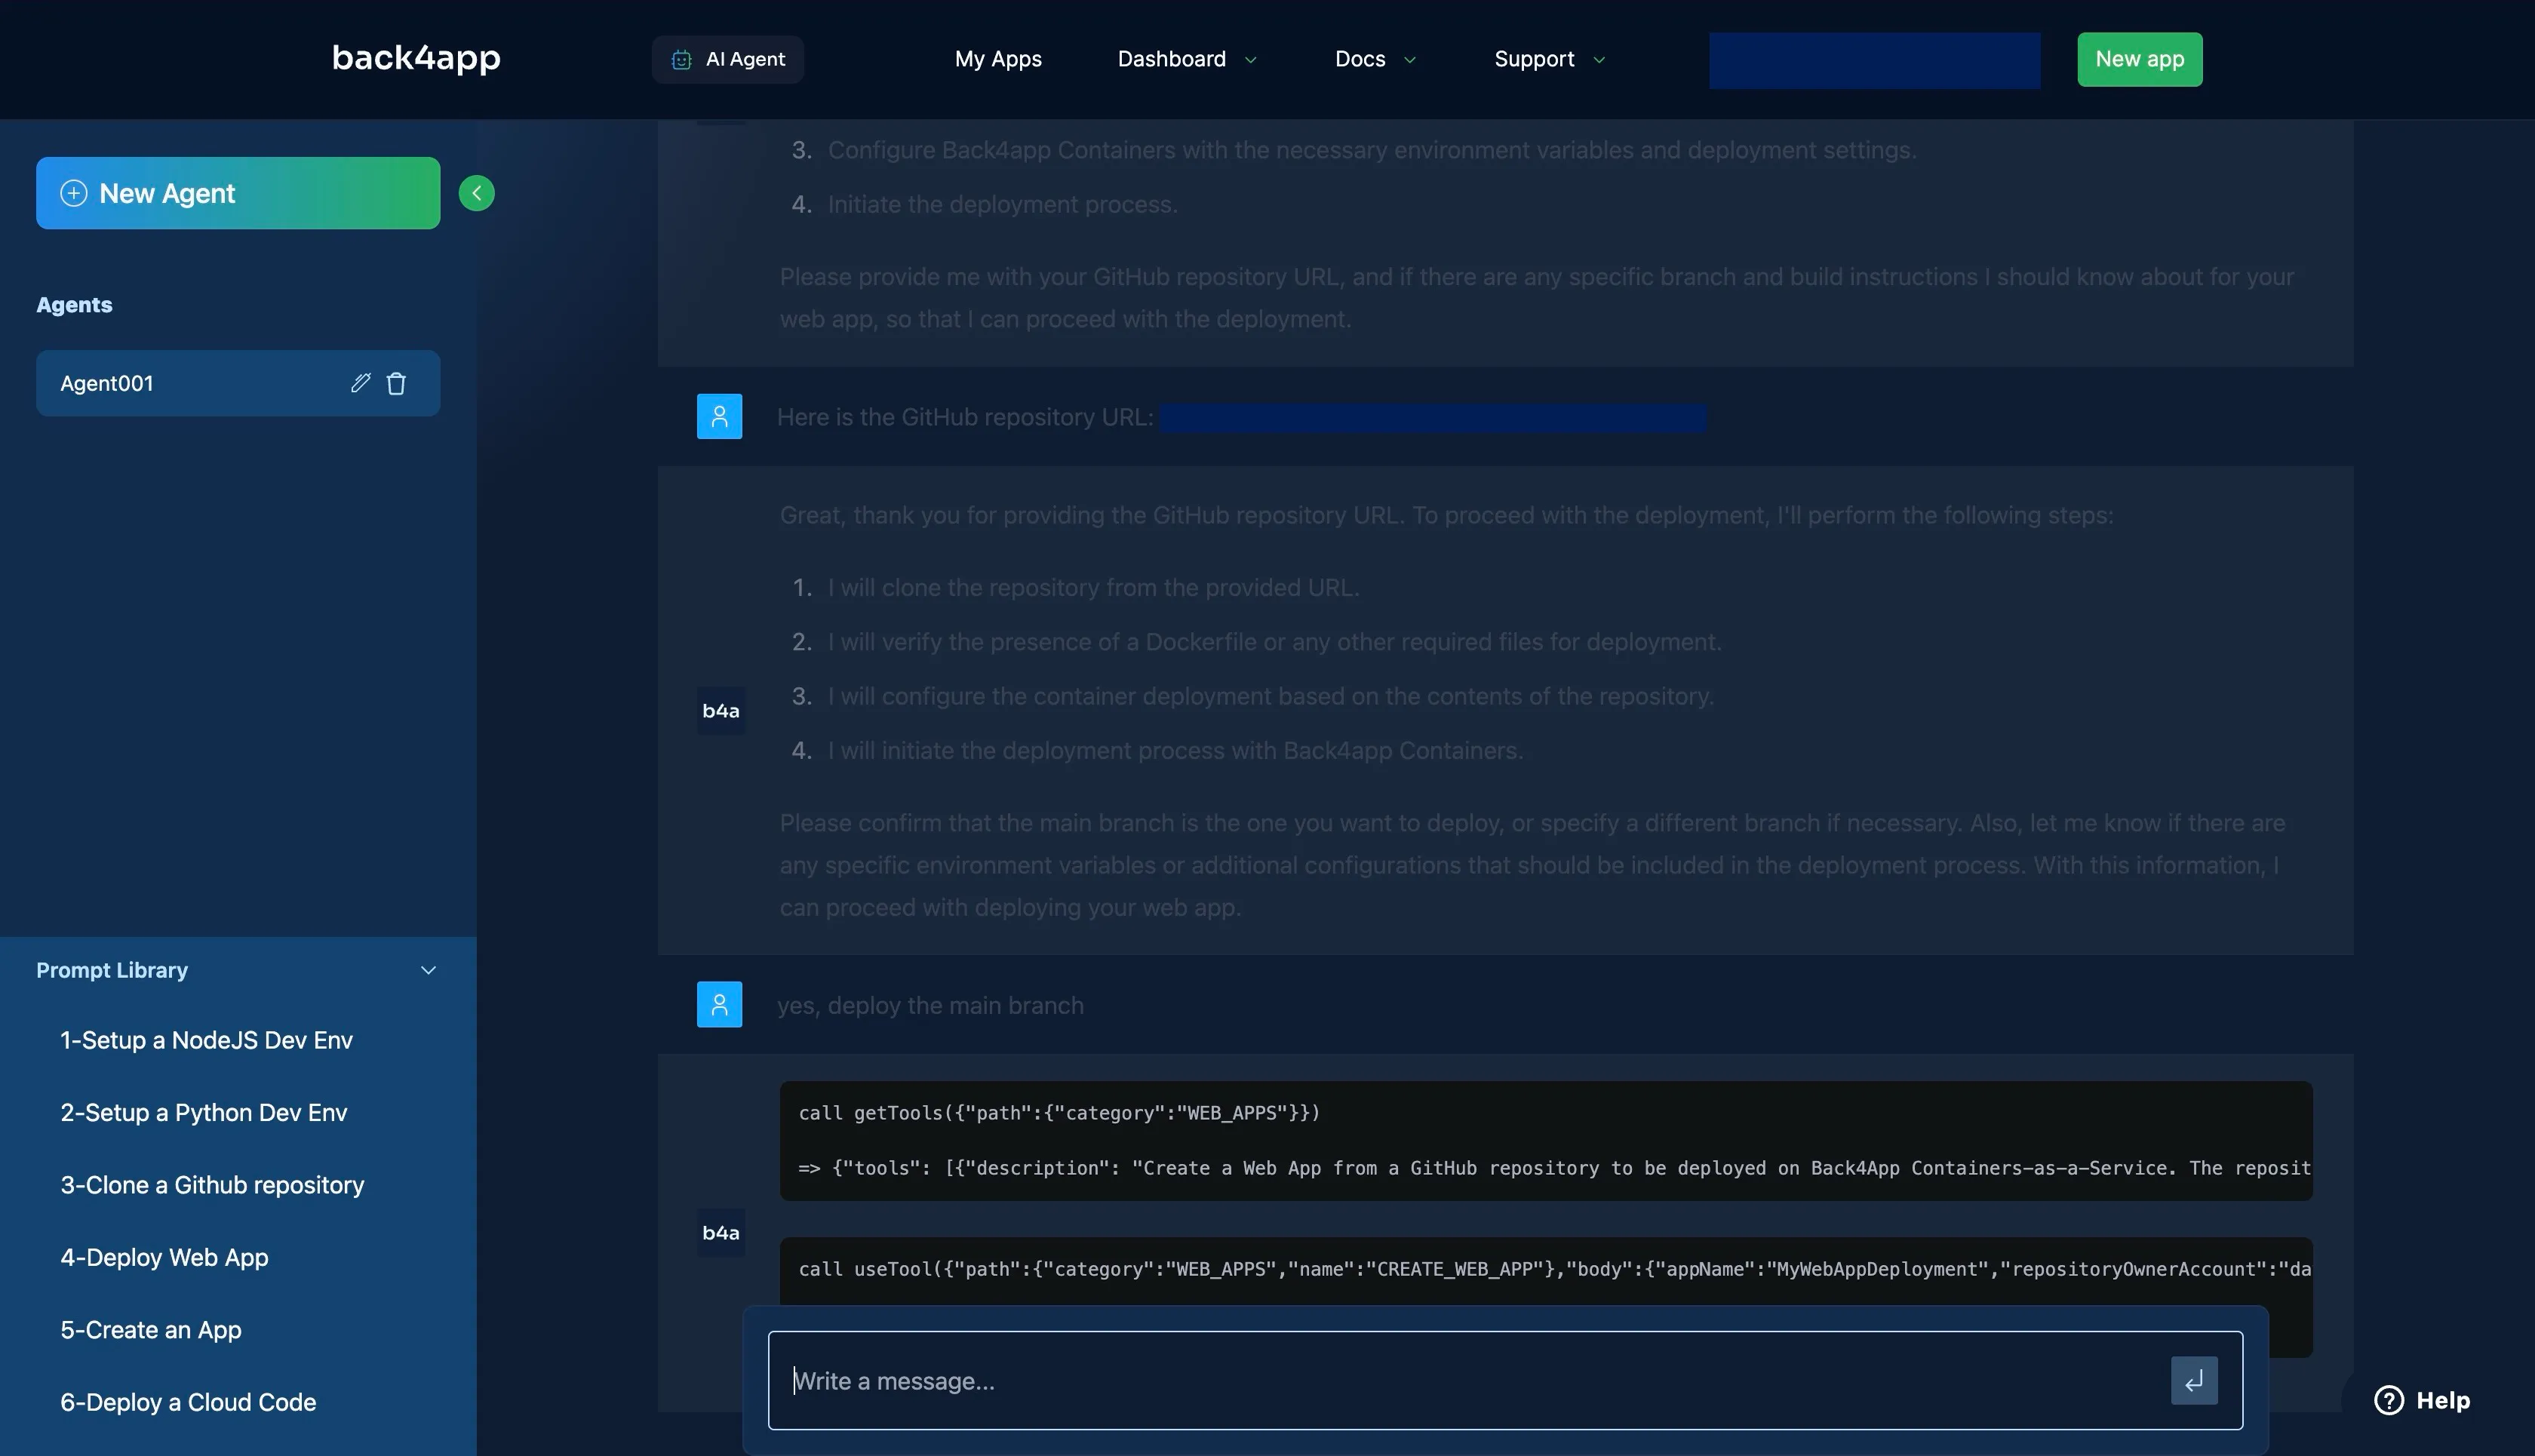
Answer any other questions the agent might have for you, such as “the branch to deploy” to start the deployment process.
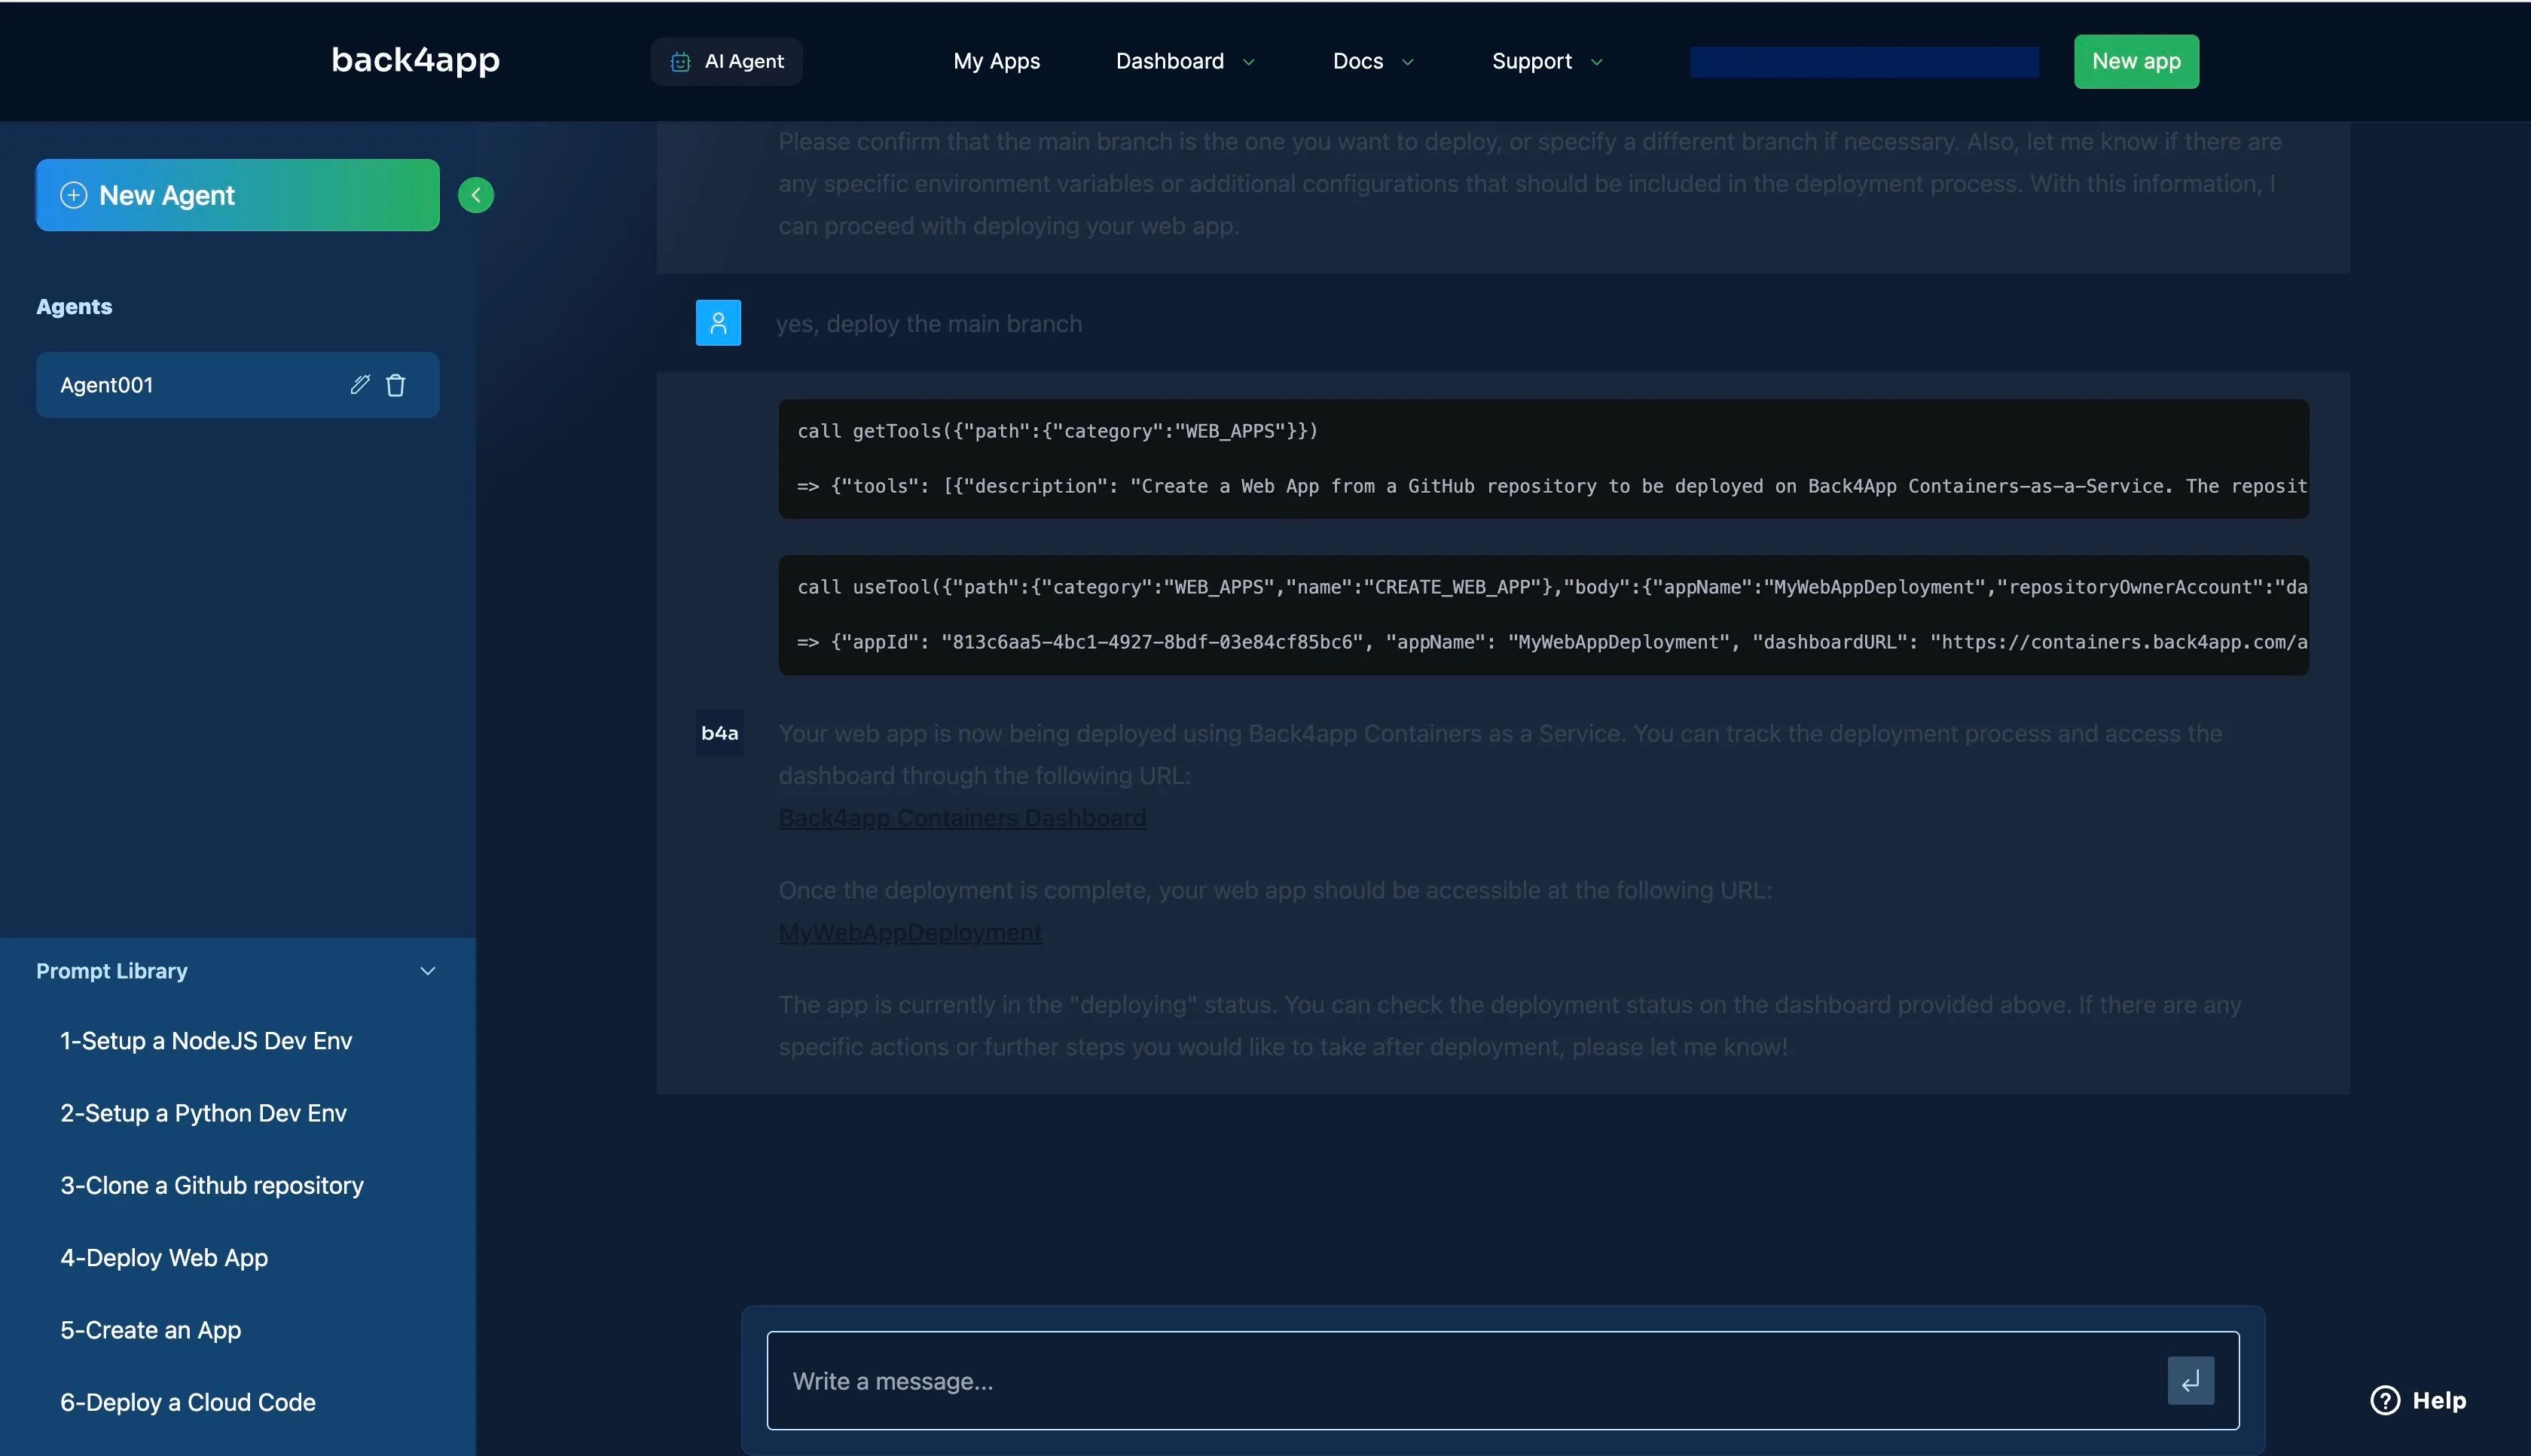
As shown in the image above, the AI agent is currently deploying your React app. After a while, the deployment should succeed, and the URL provided by the AI agent should work.
If the deployment fails, the AI Agent will provide troubleshooting options and possible fixes to ensure your app gets deployed successfully.
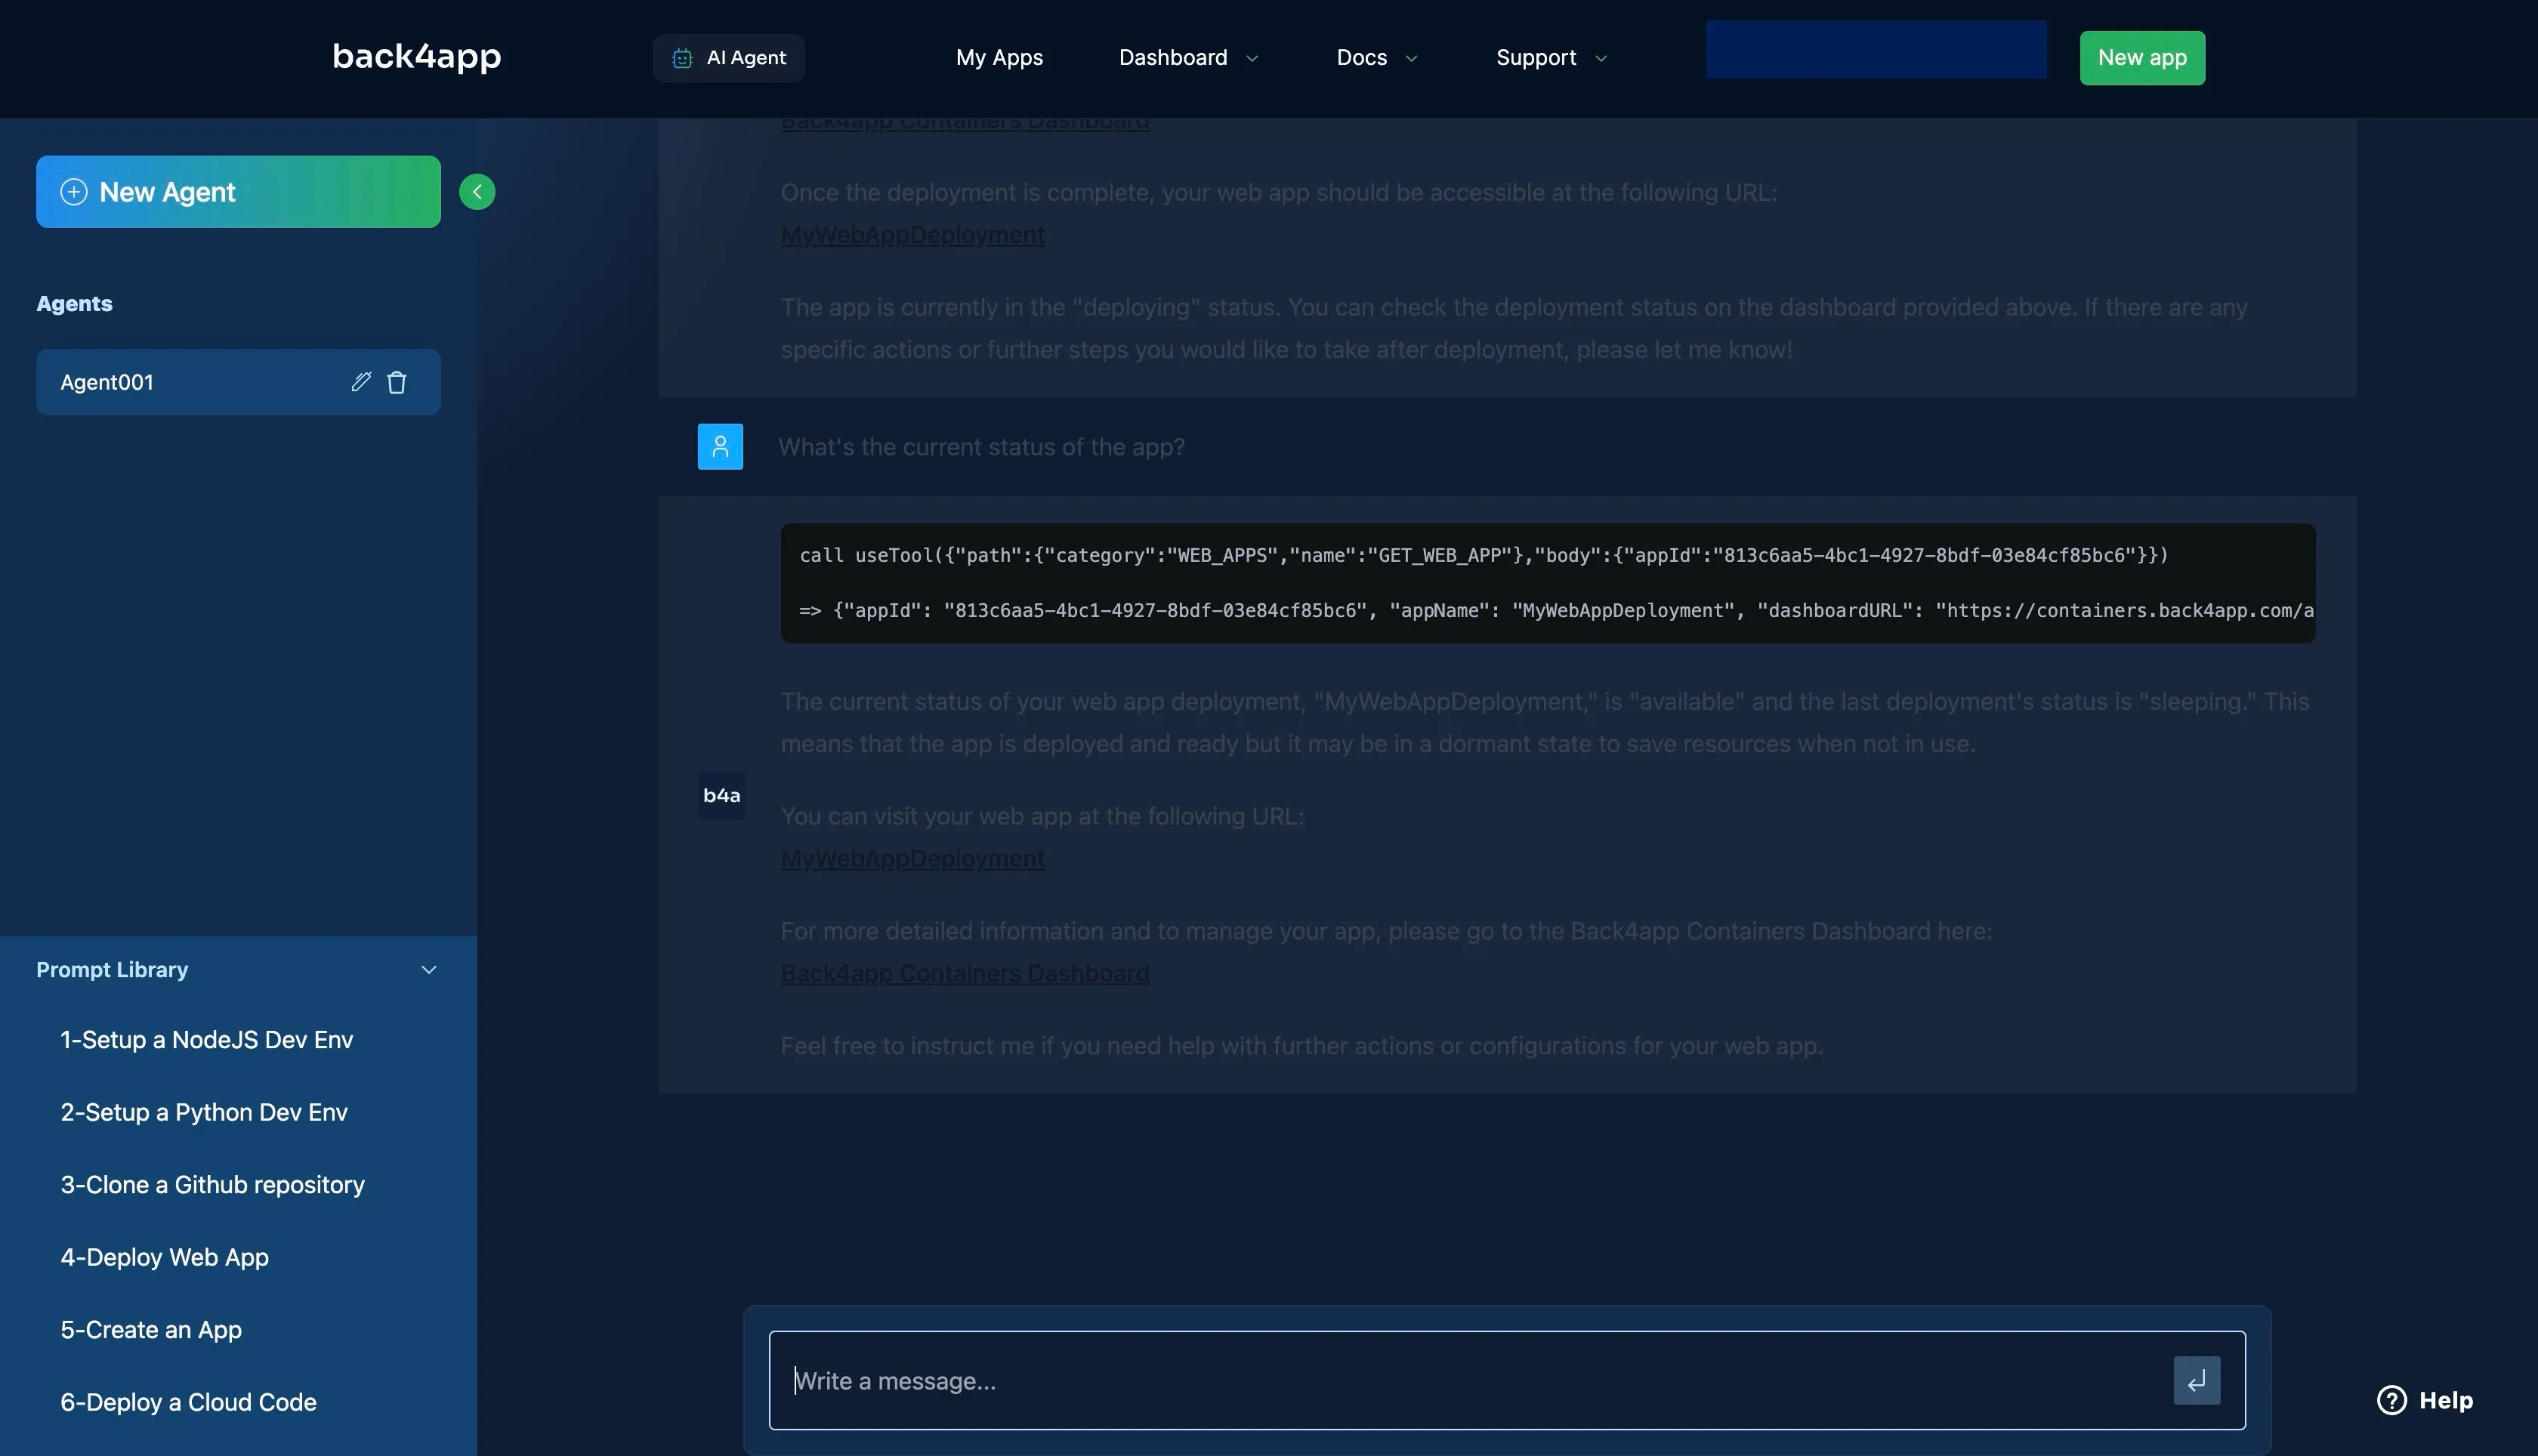
To confirm if your deployment is complete, you can ask the AI Agent for your app’s current deployment status.
Deploy your React App using Netlify’s Drag-and-Drop
Netlify is a cloud computing platform that provides a suite of tools for web development, deployment, and hosting.

It is a popular choice for developers and businesses who want to build and deploy modern web applications without the hassle of managing infrastructure.
Netlify can build your web application from any source code repository, including GitHub, GitLab, and Bitbucket. It supports many static site generators and frameworks like React, Vue.js, and Angular.
With Netlify, you can deploy your web application to a global network of servers and host it for free.
Netlify also offers a variety of paid plans that come with additional features, such as custom domains, private deployments, and team collaboration.
Below are detailed instruction on how to deploy your React App using Netlify’s Drag-and-Drop
To deploy your app with Netlify, visit Netlify’s website and log in to your existing Netlify account. If you’re new to Netlify, click the “Sign Up” button to create an account.
Navigate to your account dashboard and click the “Add new site” dropdown menu. From the dropdown, select the “Deploy manually” option.
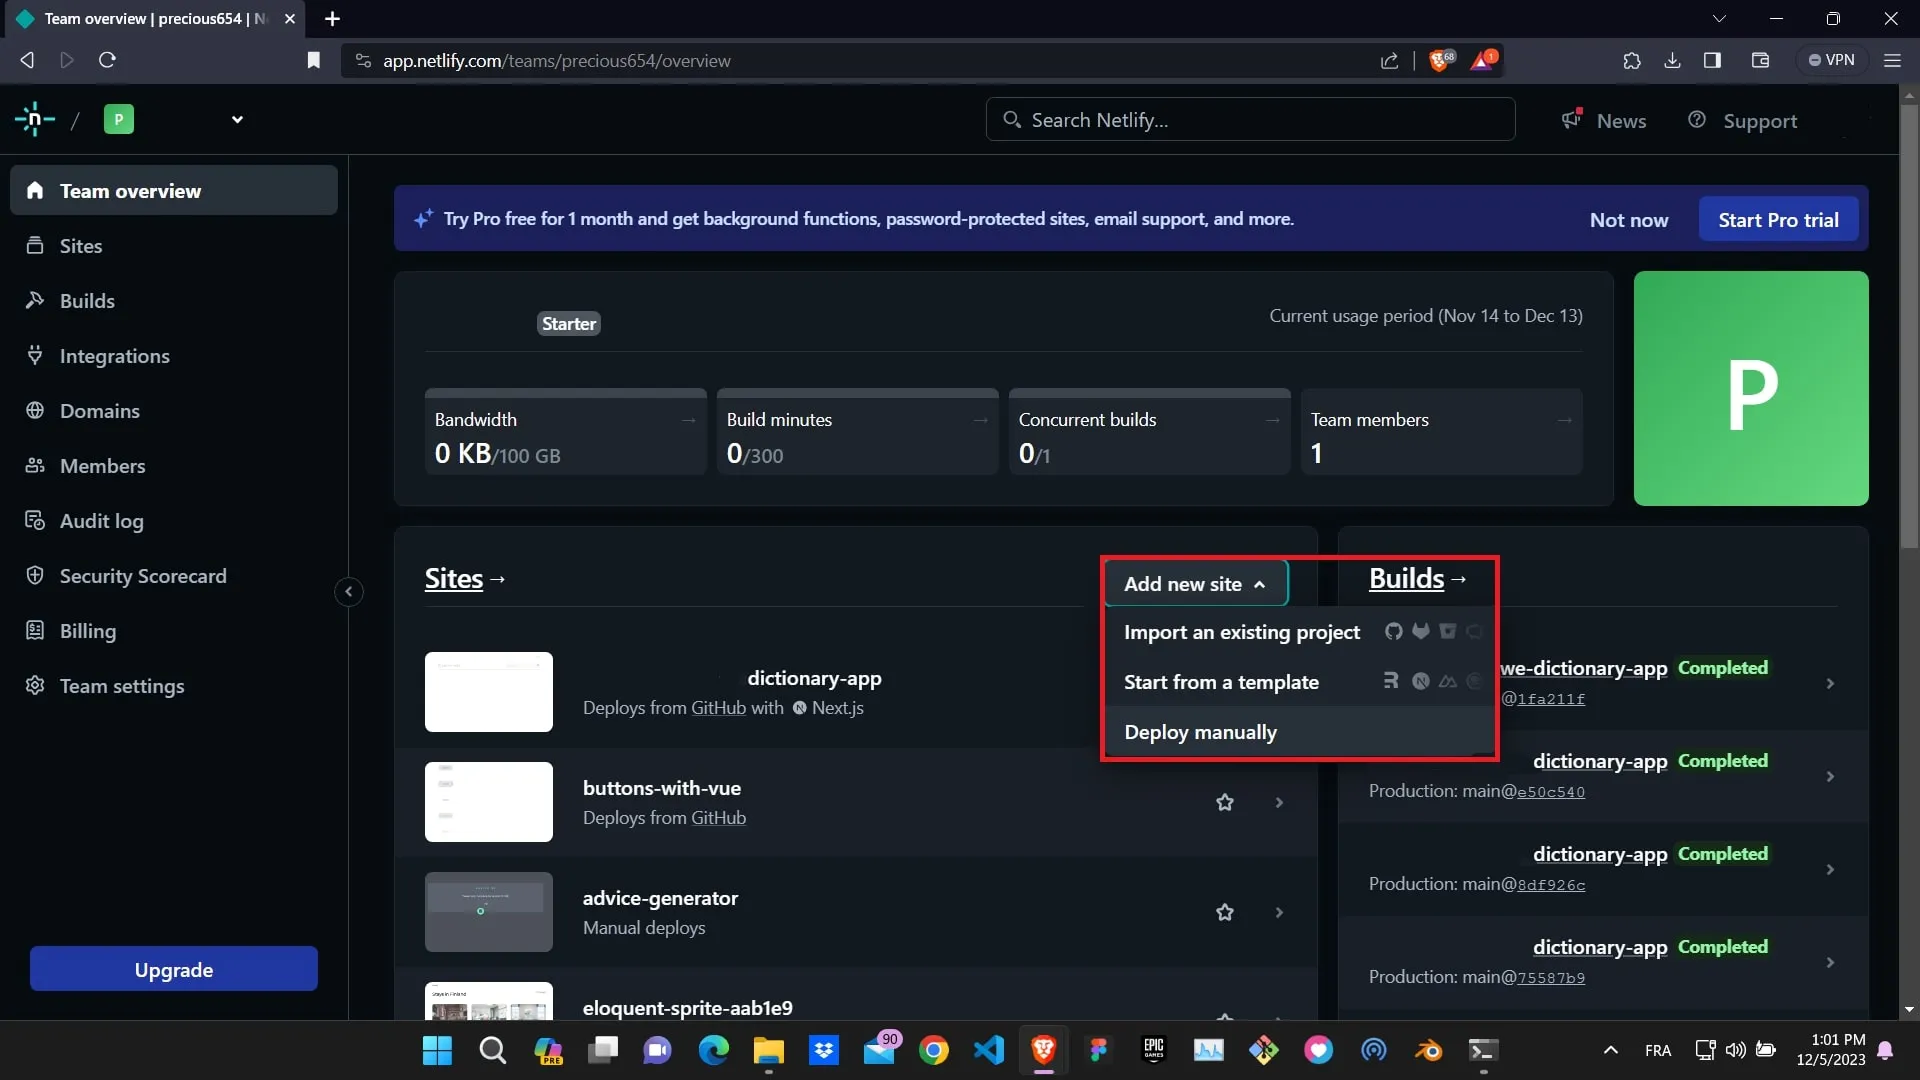
The “Deploy manually” option takes you to a page where you can drag and drop your React app’s build files.
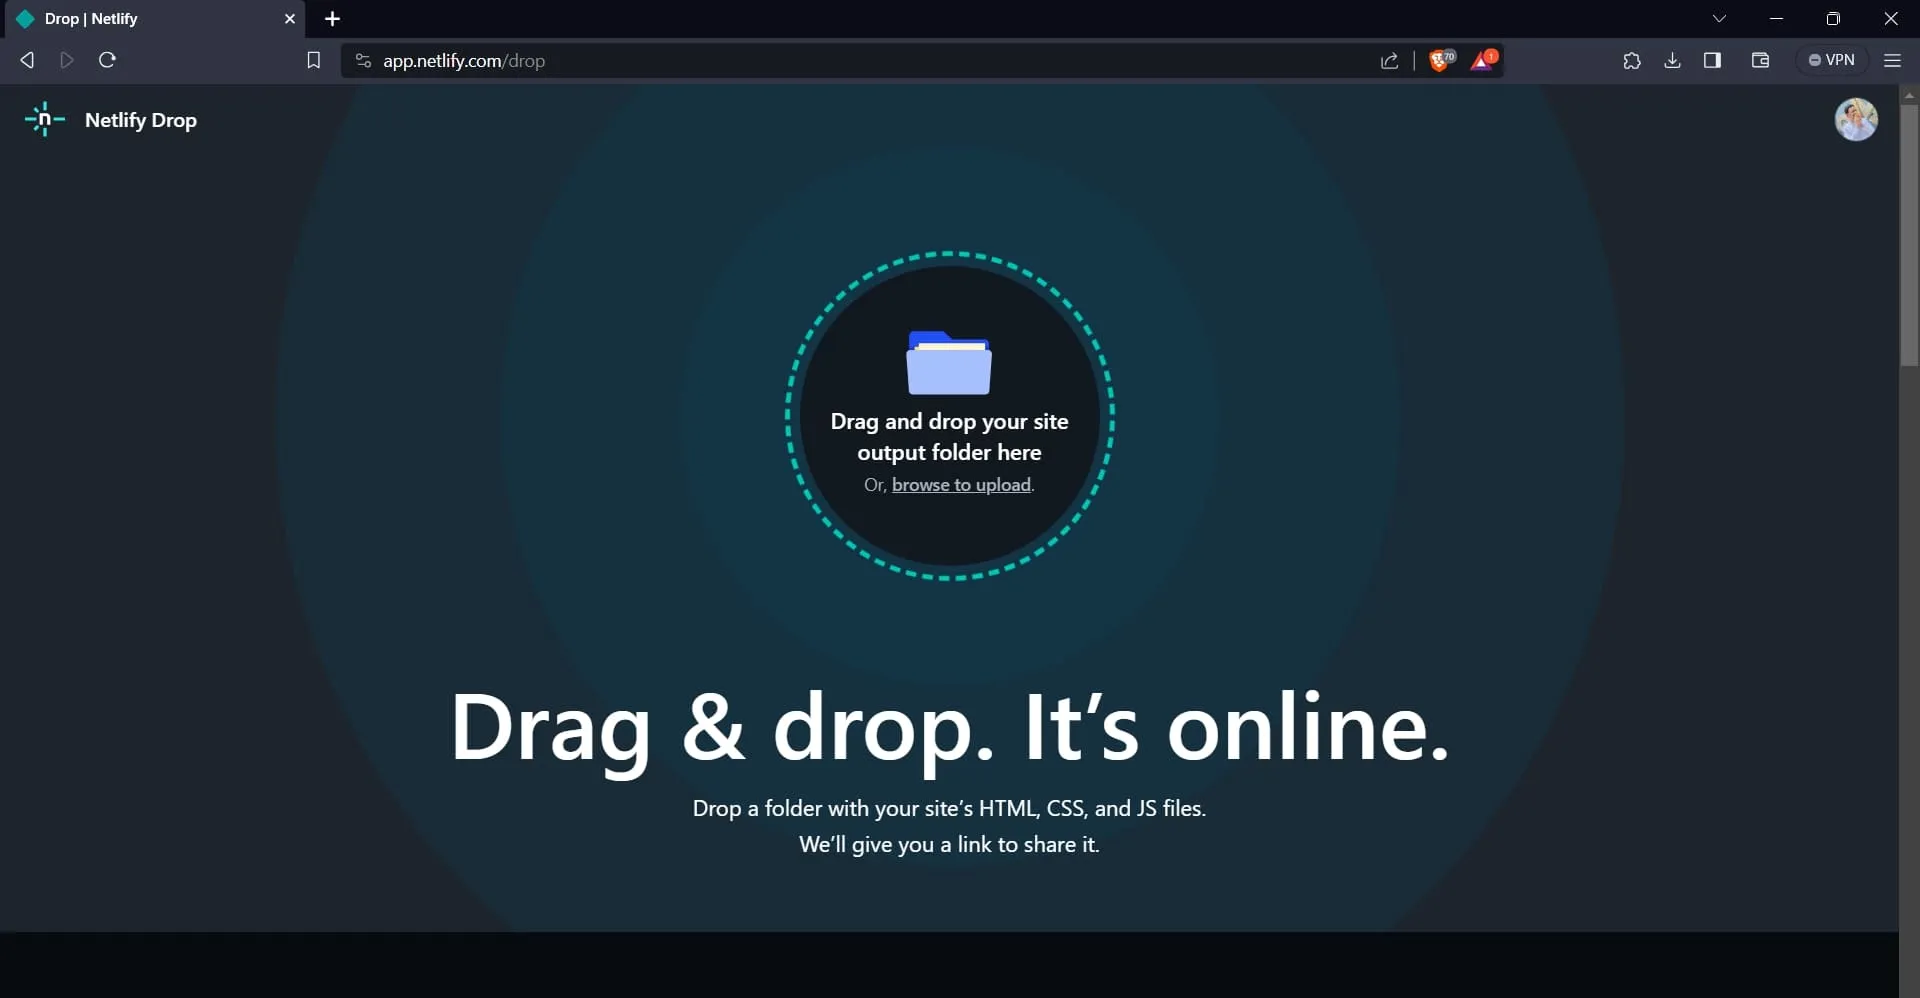
You can get the build files of your React project by running the command below:
npm run build
The command above generates a dist folder in your project. Drag and drop the dist folder on the Netlify page. This starts the deployment process.
Note: If your project was created with create-react-app, the command generates a build folder instead.
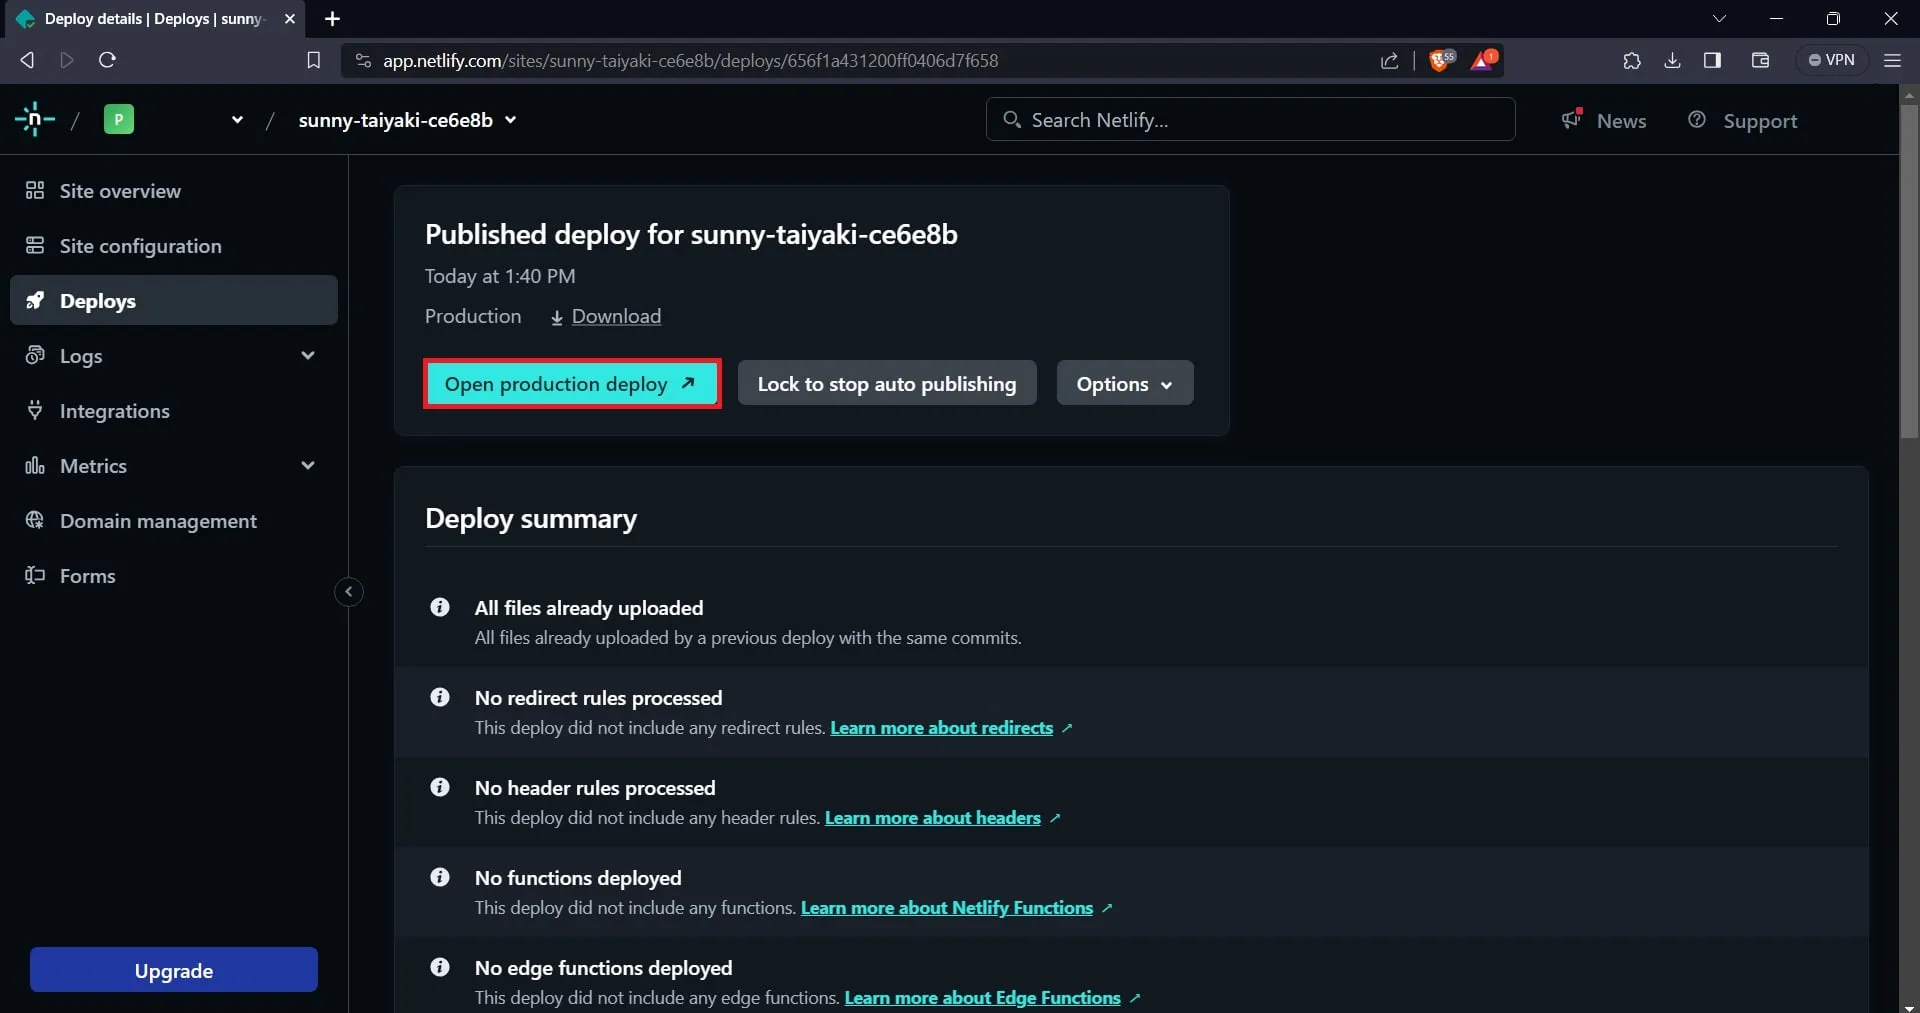
Upon successful deployment, Netlify will redirect you to your application’s dashboard, where you will find your deployed application’s URL.
Deploy your static React App using GitHub Pages
GitHub Pages is a static site hosting service offered by GitHub, a version control and code collaboration platform.
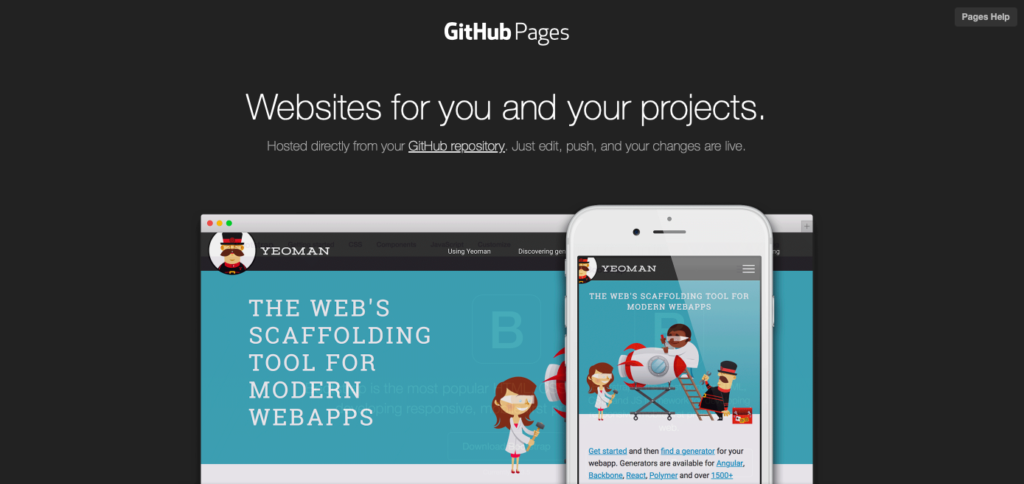
It allows you to host your website directly from your GitHub repository and is designed for hosting static websites that do not require server-side processing.
Below are instruction on how to deploy your React App with GitHub Pages
To deploy your React application with GitHub pages, your project must have a GitHub repository.
If your application doesn’t have a GitHub repository, you need to create one, add your application’s code, commit it, and push it to the repository.
Next, you need to install the gh-pages package in your application. You will use this package to create a production build of your app and push it to the gh-pages branch of your repository.
To install the gh-pages package in your project, run the following command in your terminal:
npm install gh-pages --save-dev
After installing the package, add a homepage property and a redeploy and deploy script to your package.json file, as shown in the code block below.
{
	"homepage": "http://<github-username>.github.io/<your-repository-name>",
	// other fields
}
"scripts": {
	"redeploy": "npm run build",
	"deploy": "gh-pages -d build",
	//other scripts
}
The homepage property should be the link to your repository. Replace github-username and your-repository-name in the code block with your GitHub username and repository name.
Push the changes to your GitHub repository and run the deploy script on your terminal.
Like so:
npm run deploy
After running the command above, GitHub Pages will host your application. You can verify this by accessing your application’s repository on your web browser.
Checking the branches in the repository will reveal a “gh-pages” branch.
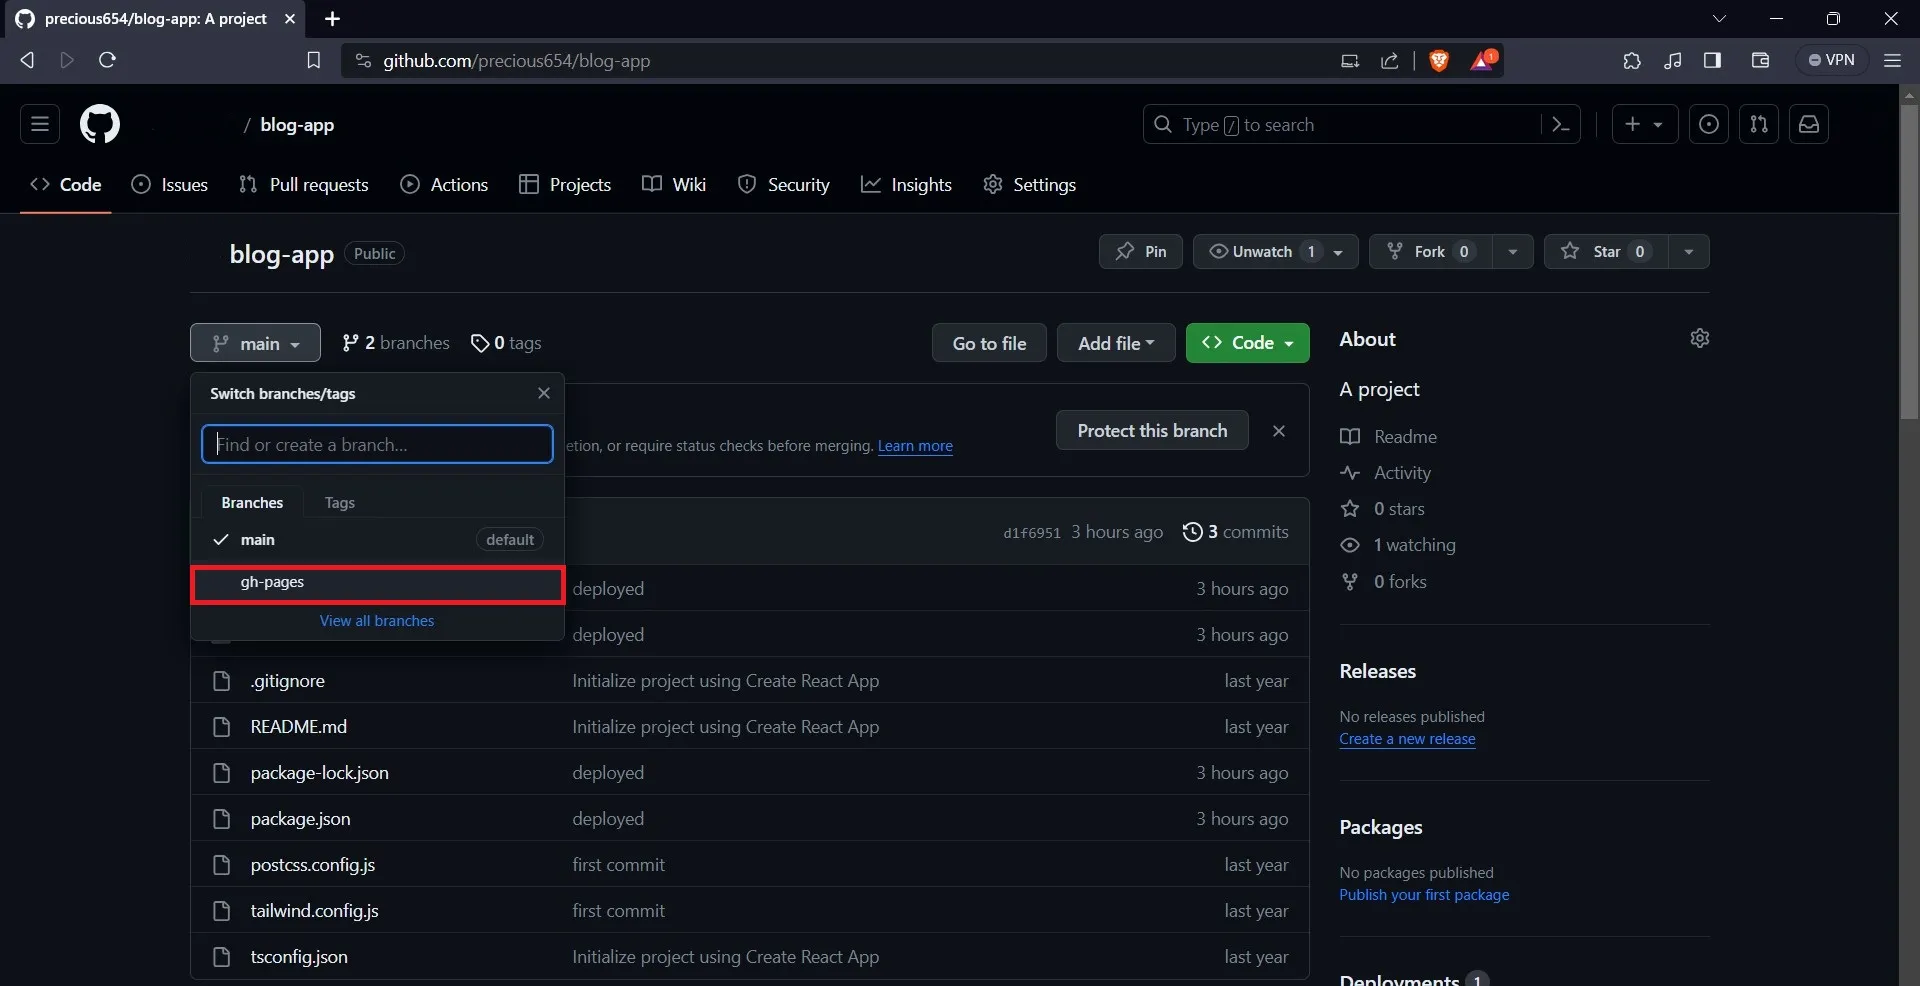
Then select the “Settings” button on the navbar.
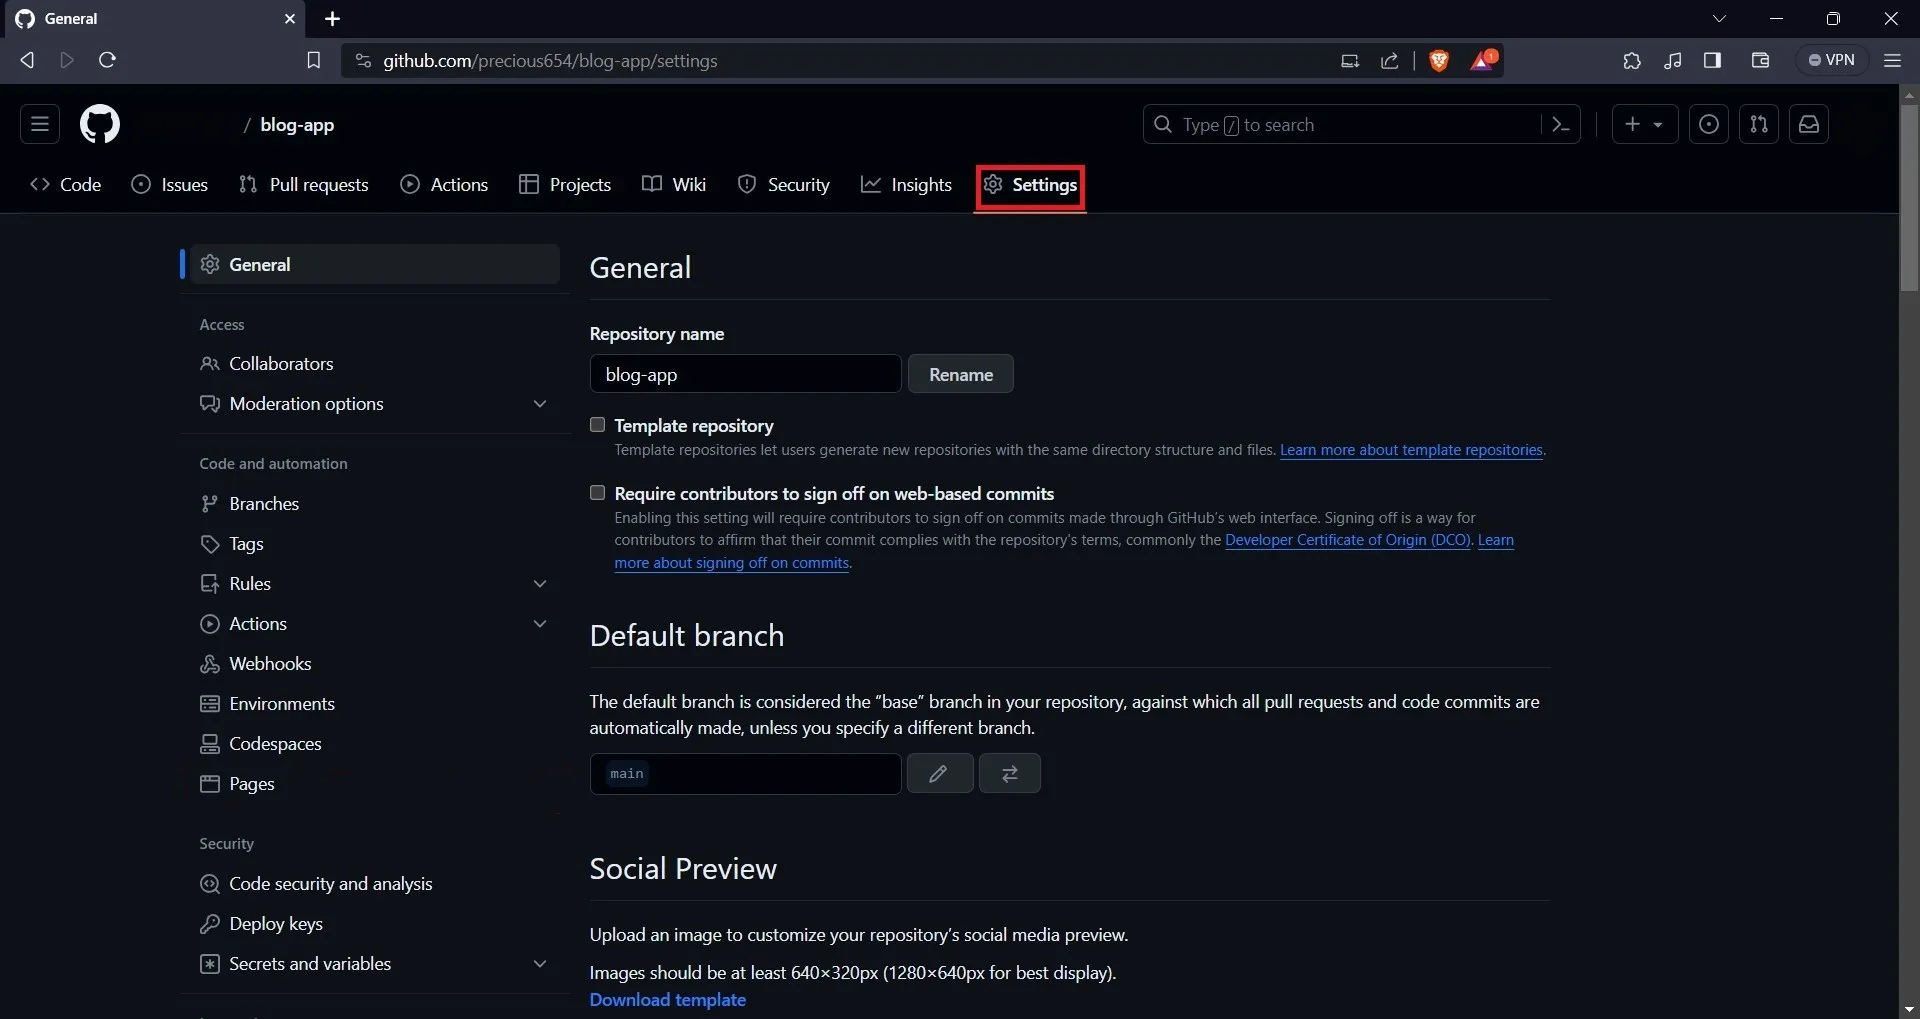
On the “Settings” page, select the “Pages” option on the sidebar. On the Pages tab, you will find your application URL.
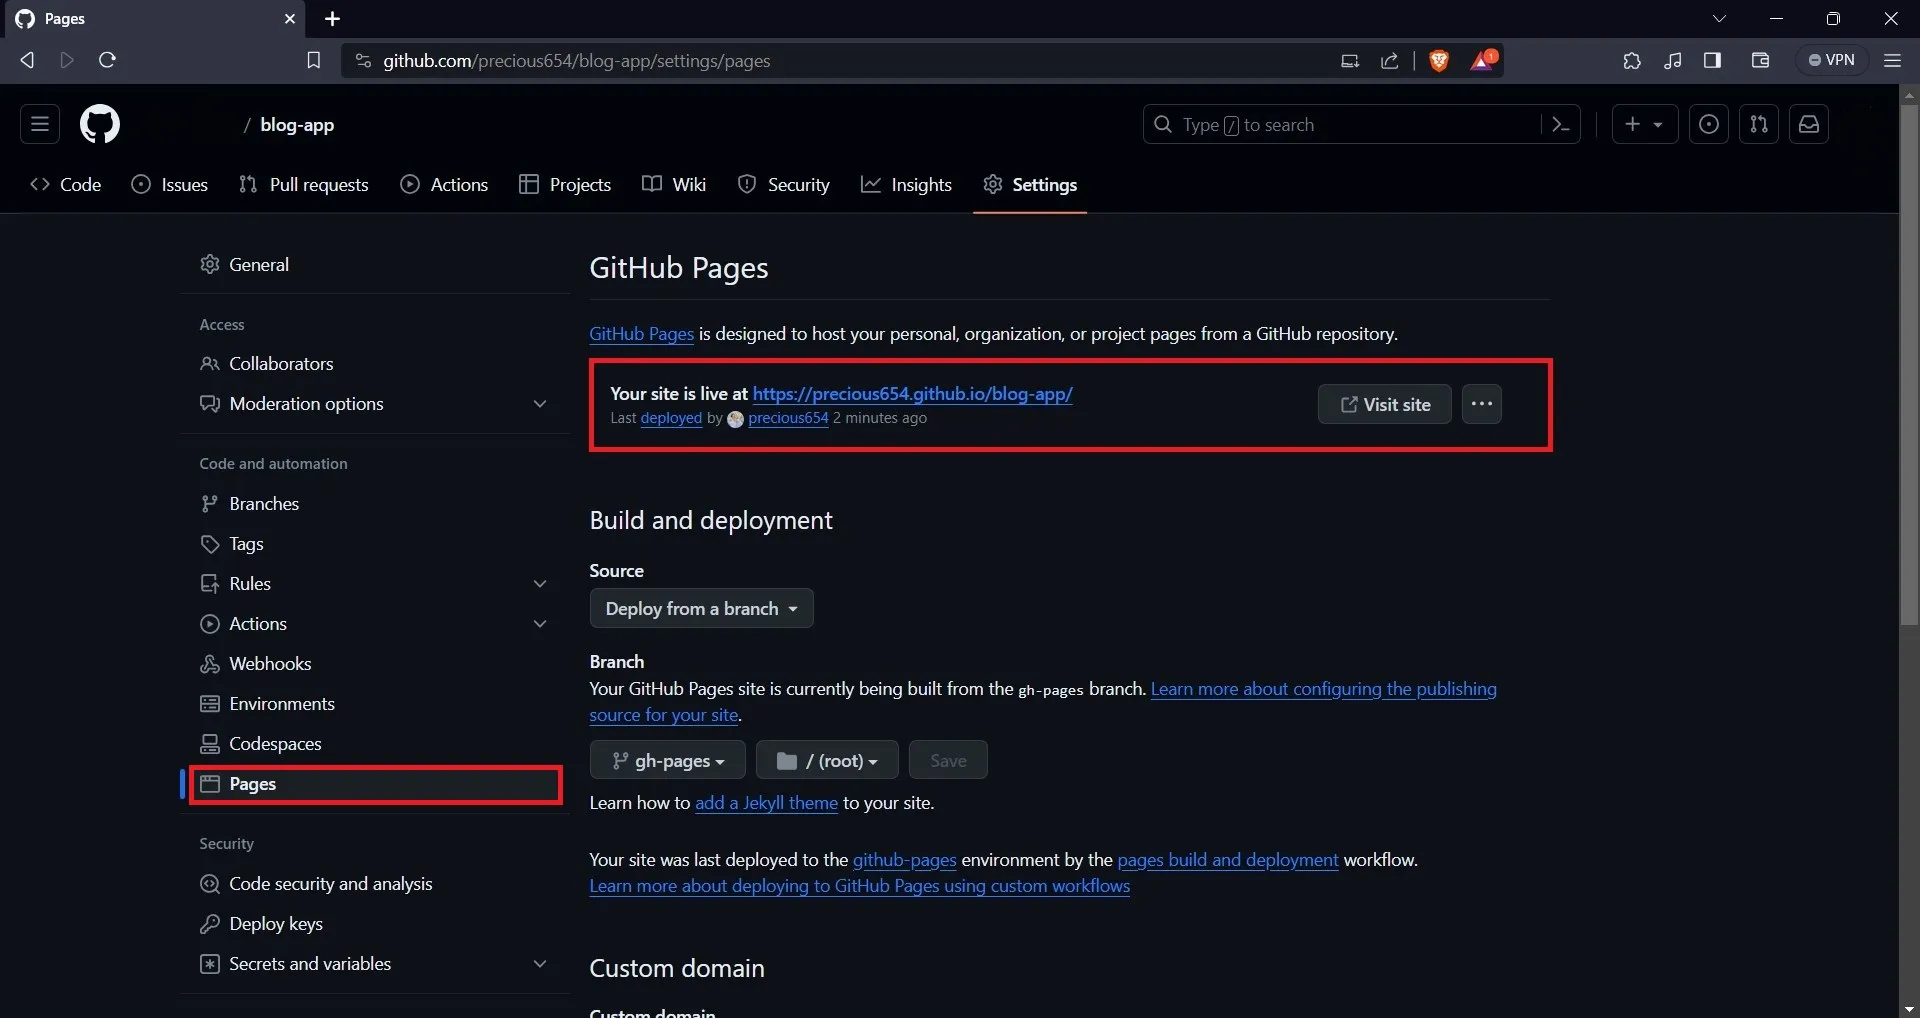
To view your application, navigate to the provided URL on your web browser. Also, note that every time you make changes to your application, you will need to run npm run deploy again to update your GitHub Pages site.
Deploy your React App using Vercel’s CLI
Vercel is a cloud platform that enables you to deploy and host web applications and services with ease.

It’s perfect for those modern web frameworks you might be using, like Next.js, React, Angular, Vue.js, and more.
Vercel provides a range of features, including scalability, serverless functions, global edge networks, etc., that streamline the development and deployment process. It offers an easy-to-use solution for deploying and scaling your front-end applications and static websites.
Below are the instructions on how to deploy your React App using the Vercel CLI.
To deploy your React app using Vercel, you must have a Vercel account. If you don’t have one already, you can visit Vercel’s website and sign up.
You can sign up with your GitHub, GitLab, or Bitbucket account.
Next, you need to install the Vercel CLI on your local machine by running the command below on your terminal:
npm i -g vercel
After installing the CLI, log in to your Vercel account on your machine to deploy your application.
To do this, run the command below in the application directory of the React app you want to deploy:
vercel
The CLI will provide you with some options for logging into Vercel.

You can select the option you used to sign up to Vercel earlier in this section. After you have signed in successfully, you can deploy your application.

Type in “Y” to deploy your app. The Vercel CLI will provide some prompts to help you configure the deployment.
After configuration, the CLI will deploy your application and display a URl that you can use to access your application on your web browser.

Deploy your React App using Firebase Hosting
Firebase is a cloud-based development platform developed by Google that offers a range of tools and services for building and managing mobile and web applications.
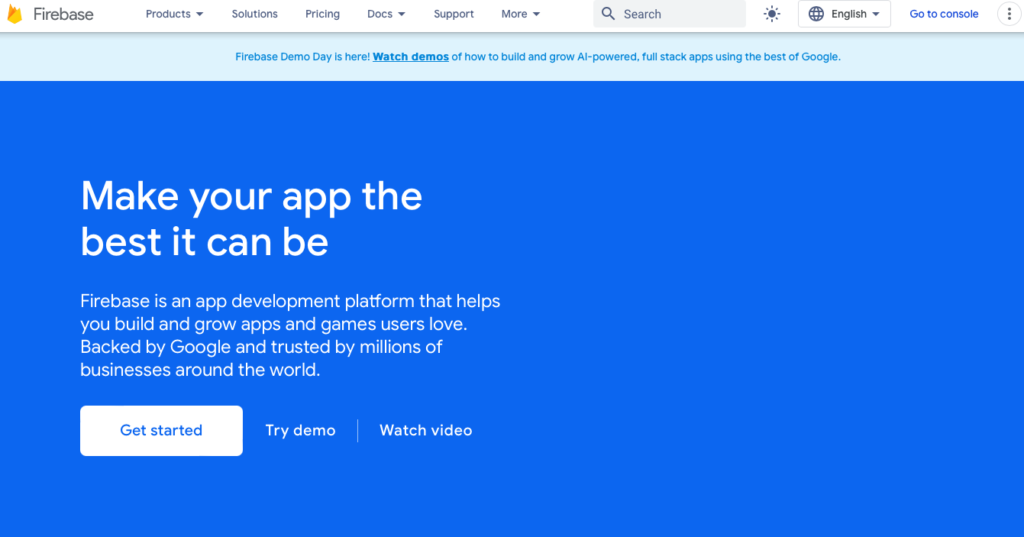
It is a feature-rich platform that provides various tools and services, including a database called Firestore, hosting, and more. Firestore is a flexible, scalable database that enables you to store data for mobile, web, and server development.
Firebase Hosting is a fast and secure web hosting service. It offers easy deployment of web applications and static content with a global CDN, SSL certificates for secure connections, and seamless integration with other Firebase services.
Below are the instructions on how to deploy your React App using Firebase hosting
To access Firebase Hosting’s features, you must have a Firebase account. If you don’t already have one, visit Firebase’s website to create one.
Once you are signed in, click the “Go to console” button, you can find it on the top right area. Create a project on the console page by clicking the “Add project” button.
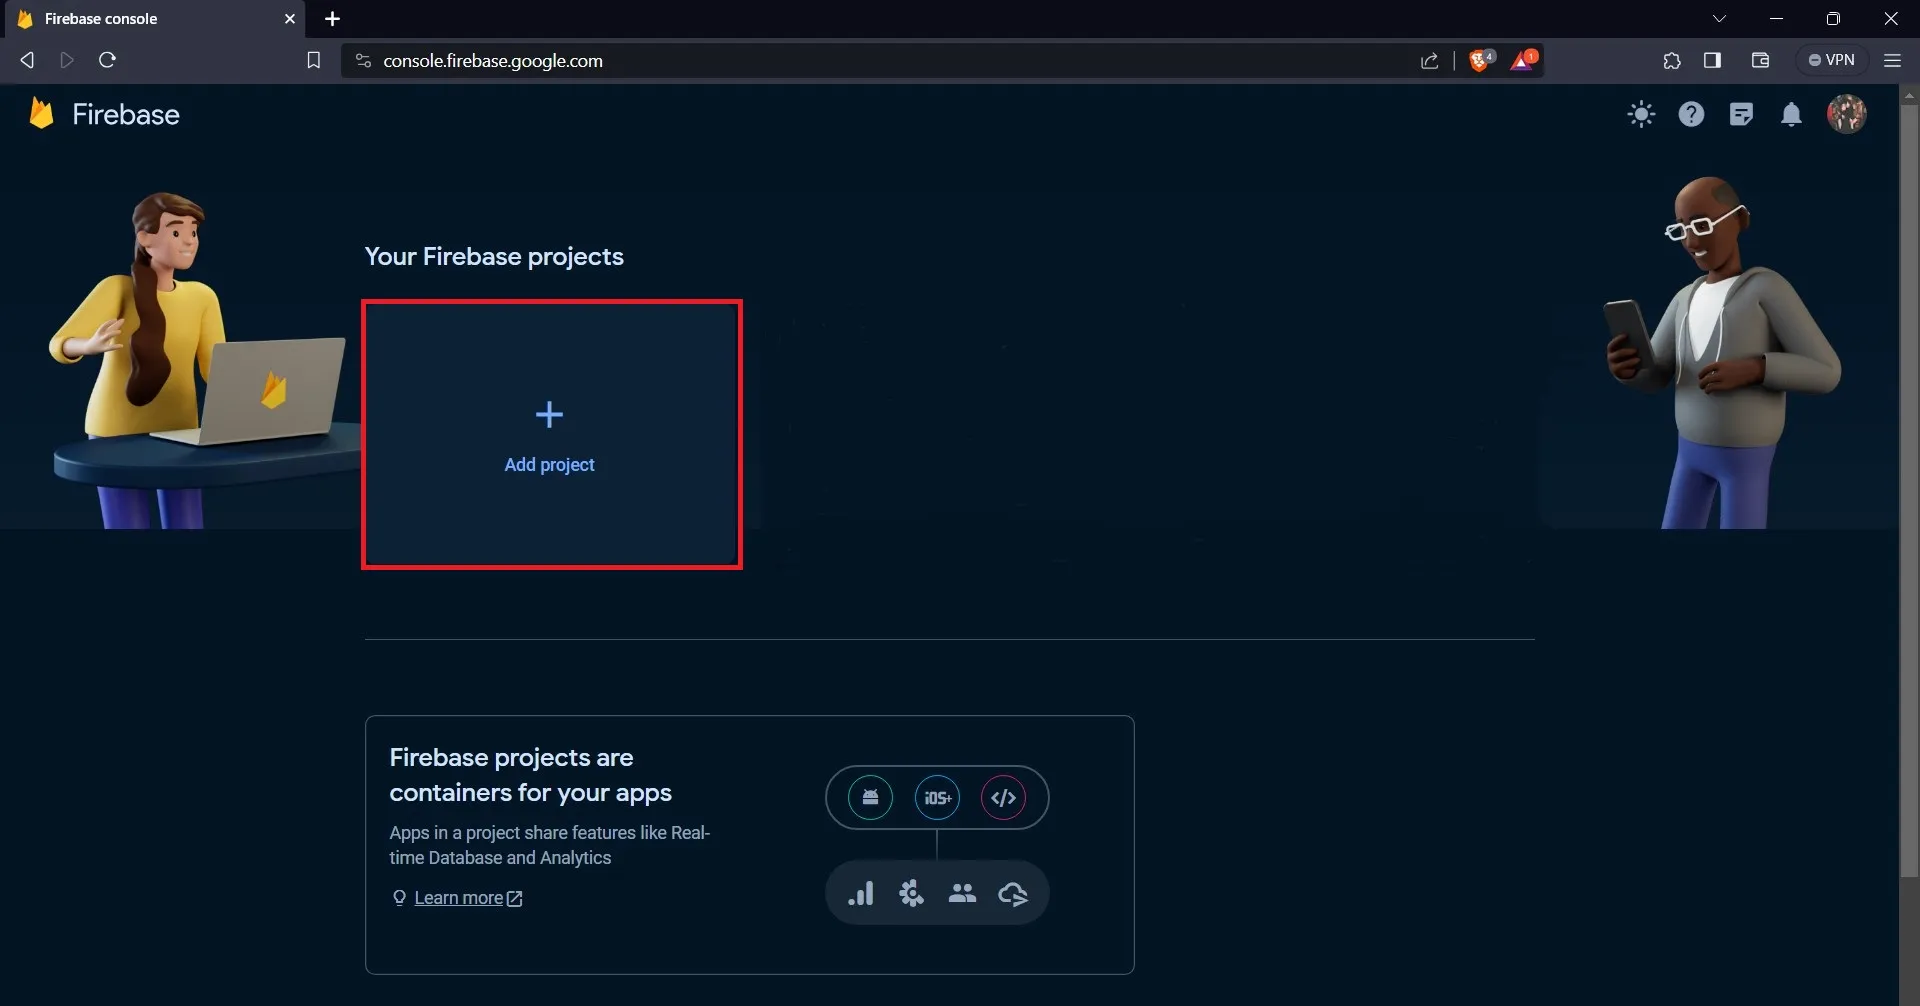
Clicking on the “Add project” button will lead you to a new page, where you will provide your project with a name.

After providing your project with a name, click on the “continue” button. On the next page, you can now create the project.
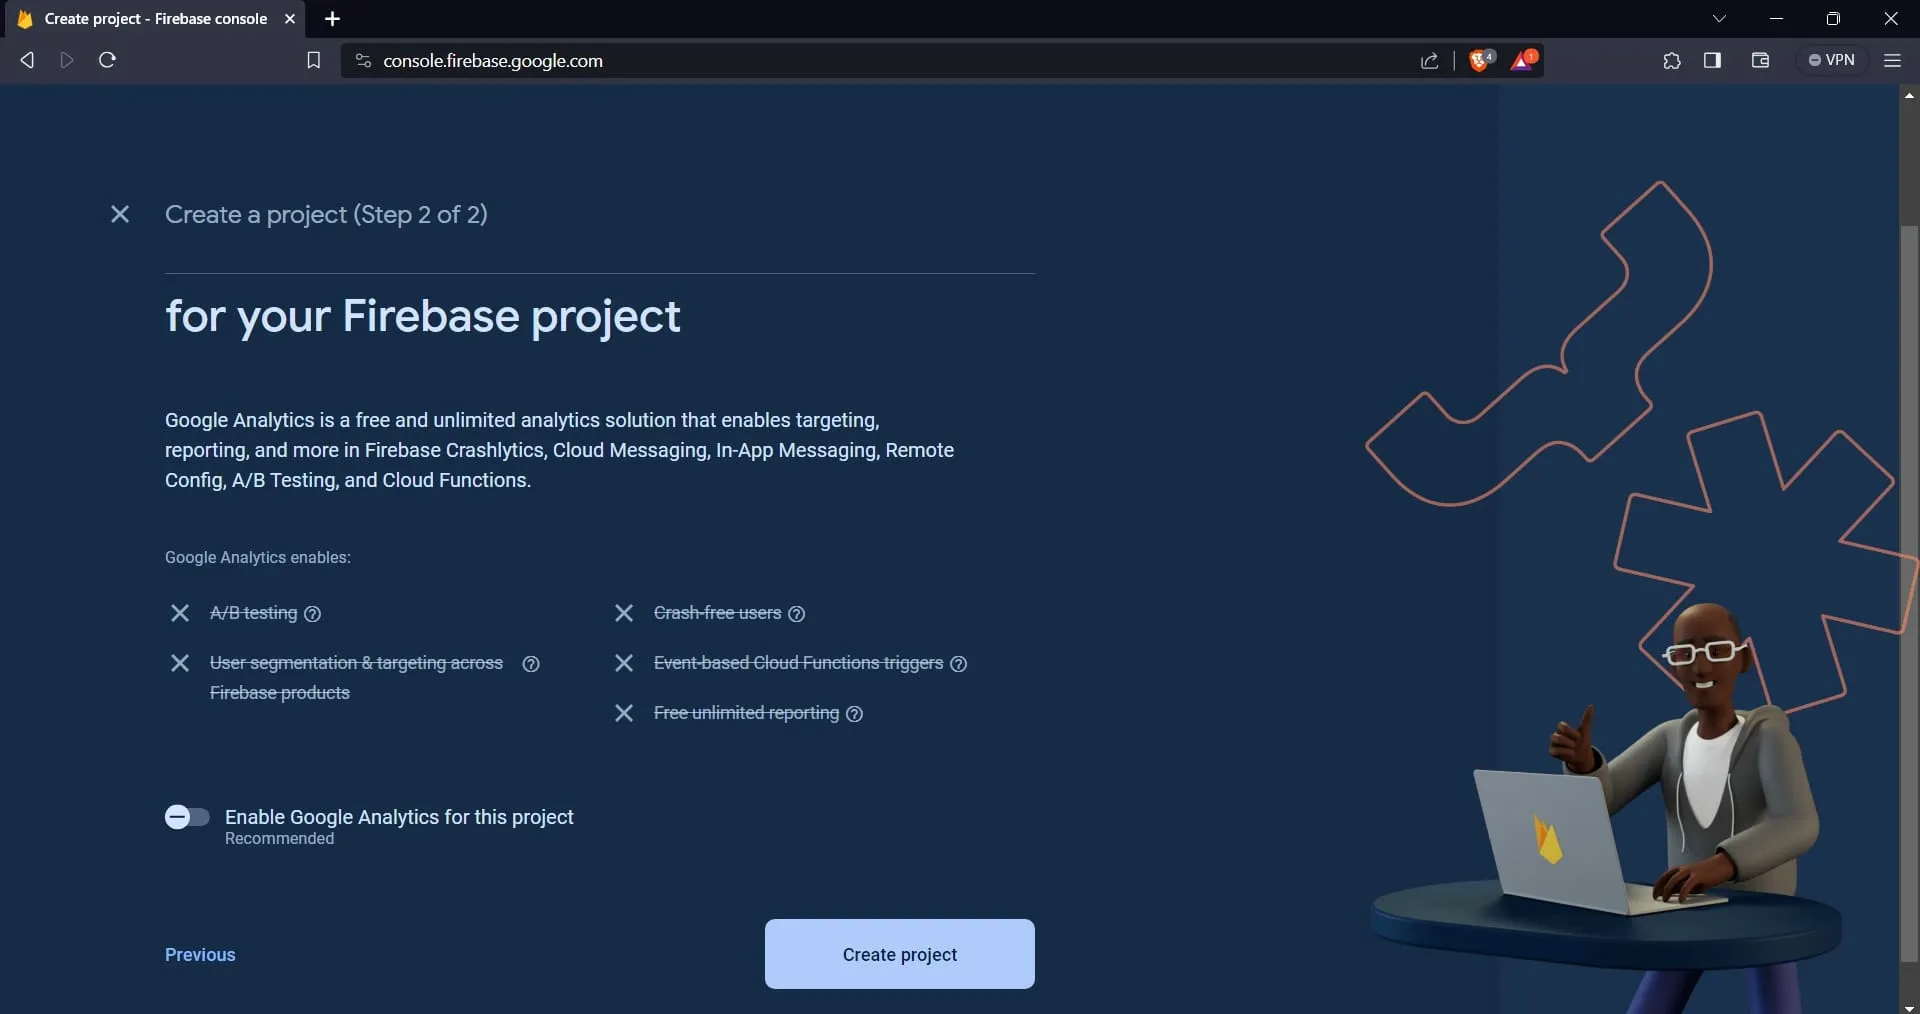
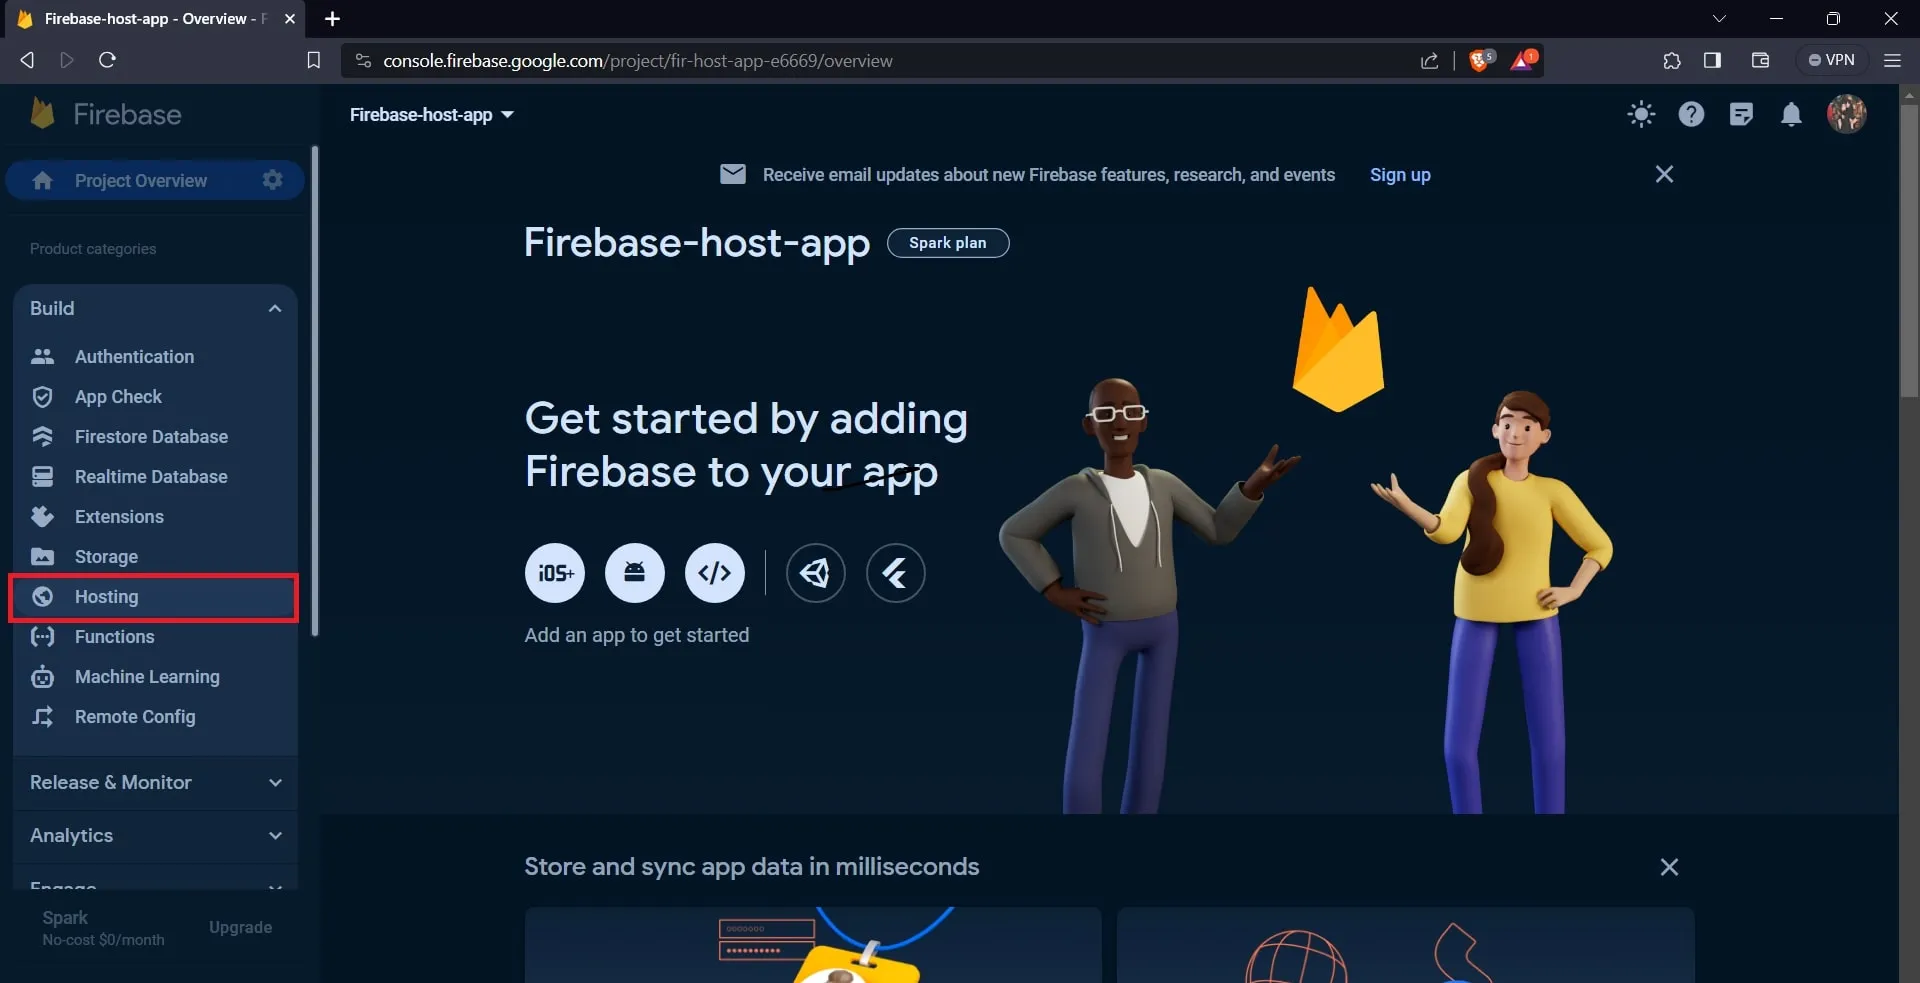
After creating the project, the site will lead you to your project’s dashboard. From there, navigate to the “Build” dropdown menu and select “Hosting.” This will guide you to a different page.
Click on the “Get started” button.
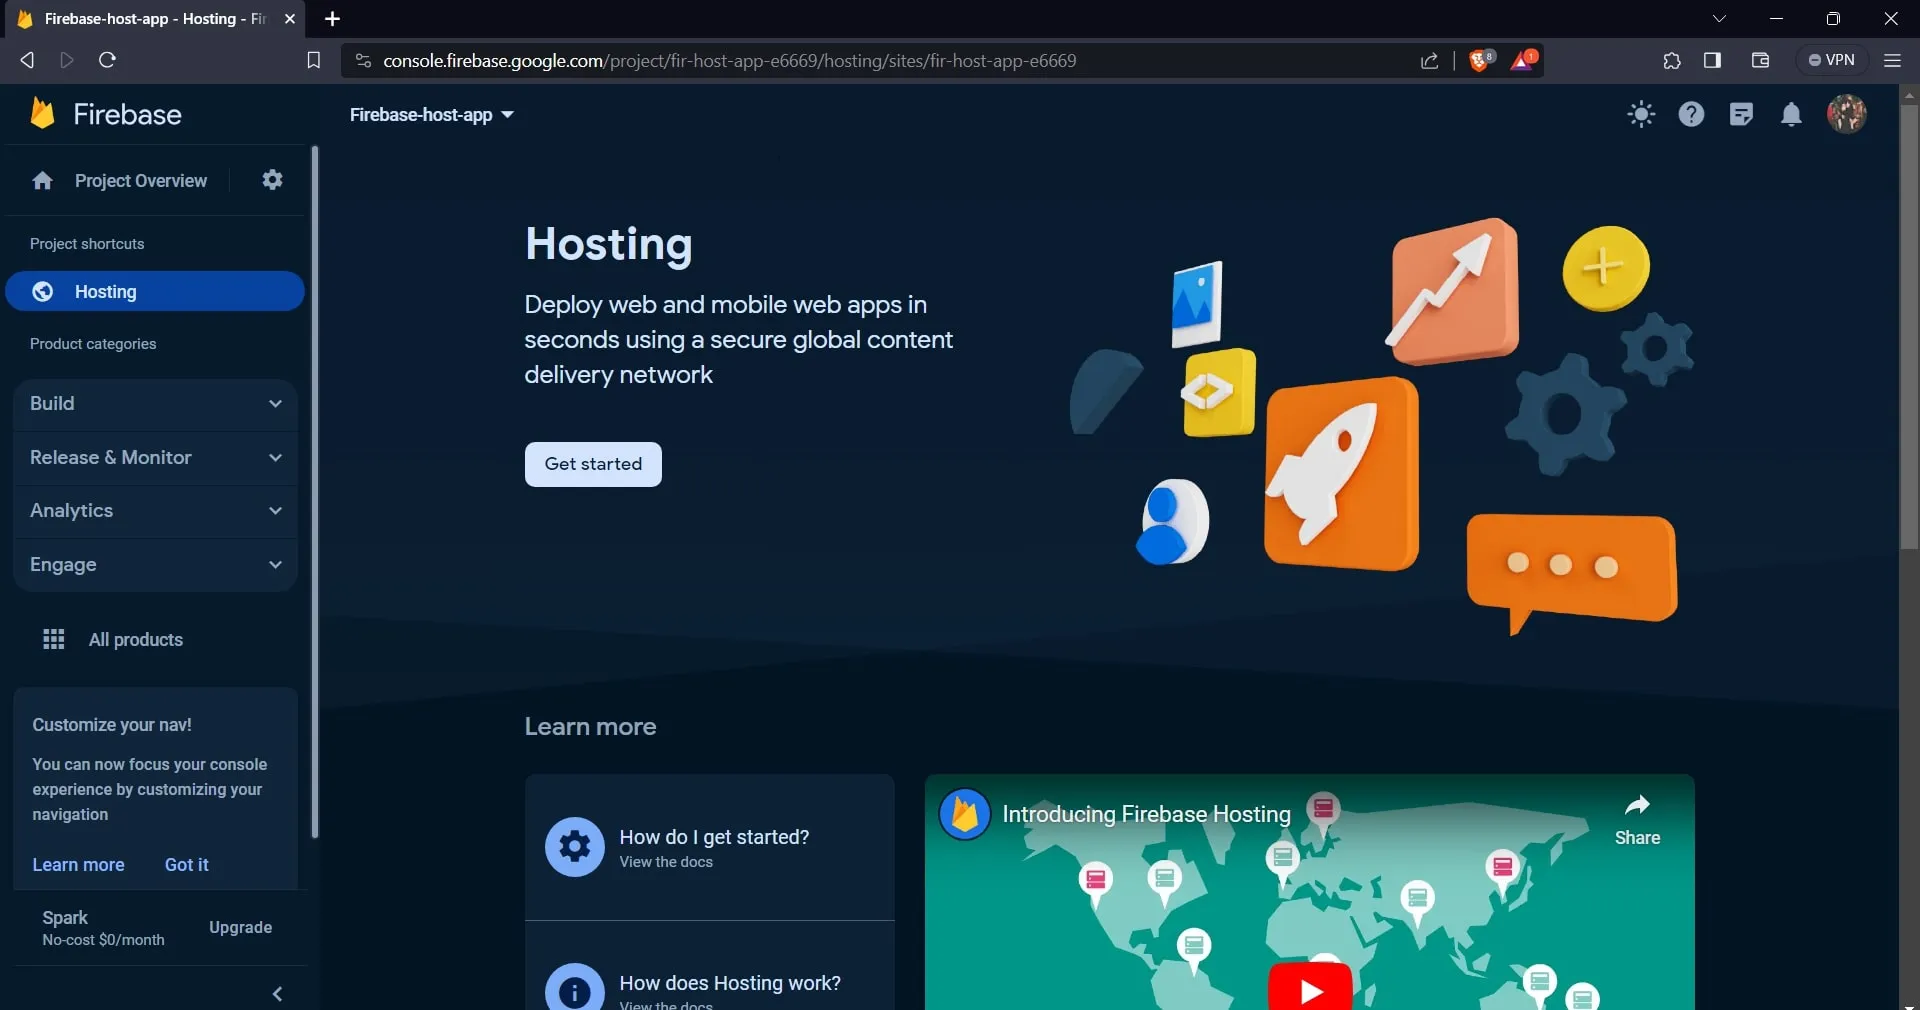
Upon clicking the “Get started” button, the site will guide you to a different page outlining the steps involved in hosting your application with Firebase.
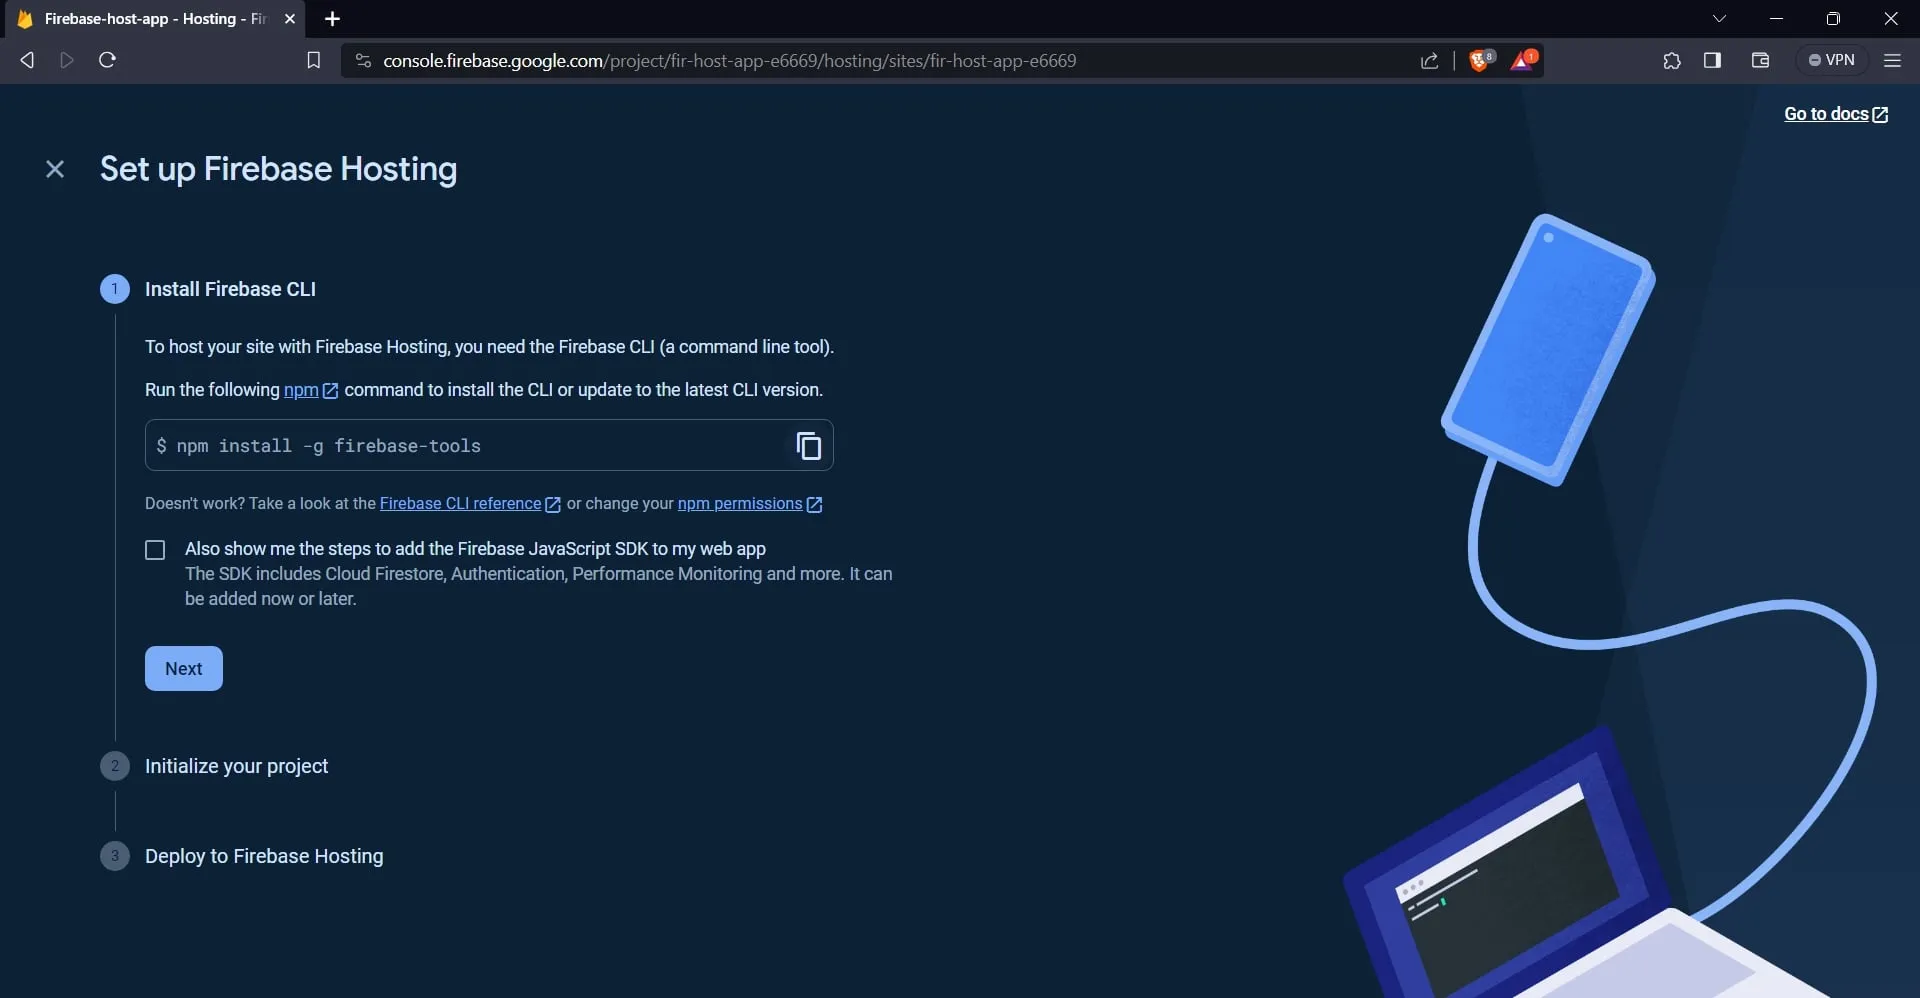
The first step is to install the Firebase CLI. To do this, run the following command in your terminal:
npm install -g firebase-tools
Next, log in to your Firebase account by running the command below:
firebase login
Next, initialize a Firebase project in your application’s root directory by running the command below:
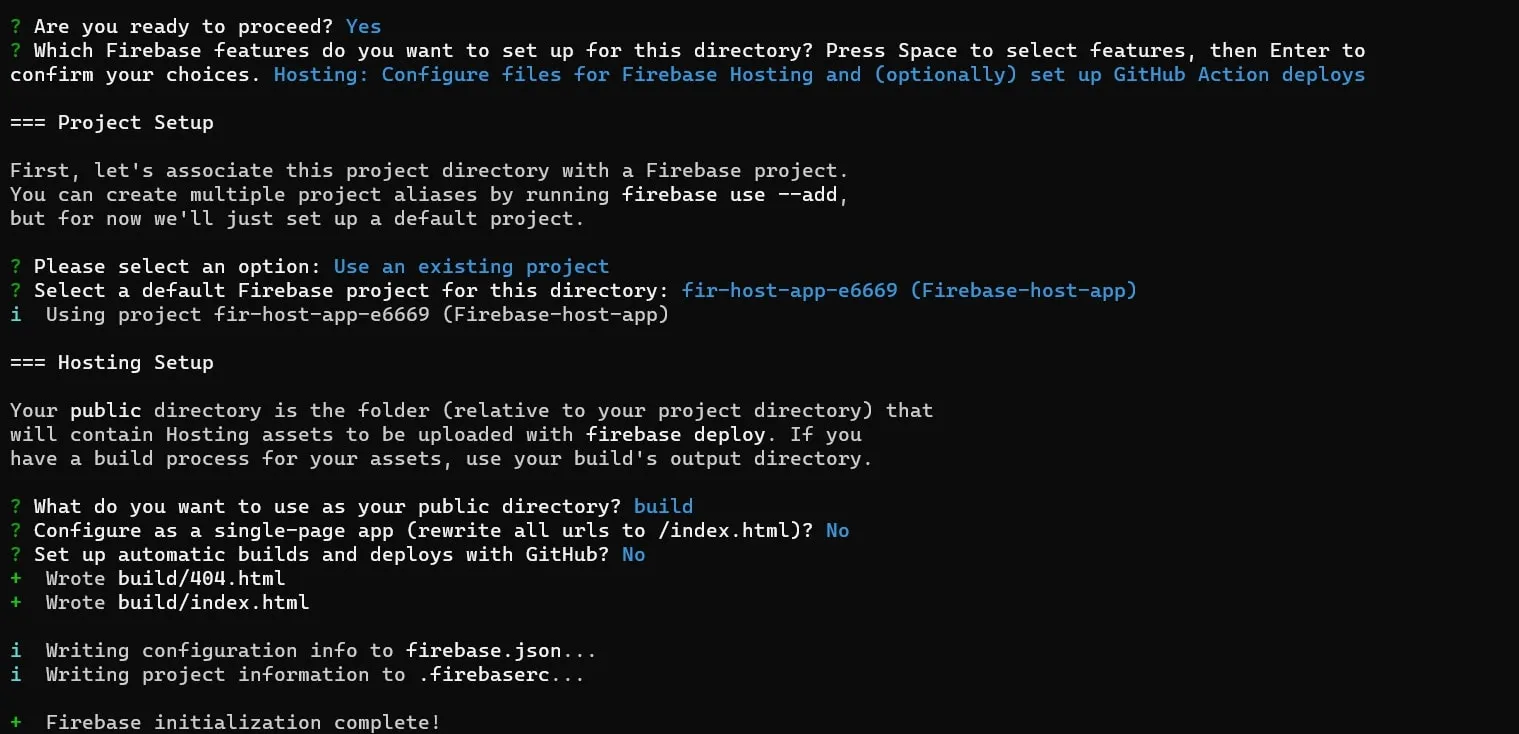
firebase init
This command will help you configure and prepare your project for deployment by guiding you through a series of prompts, as shown in the image below.
After configuring your project, run the following command to build your application:
npm run build
Finally, deploy your application by running the command below:
firebase deploy
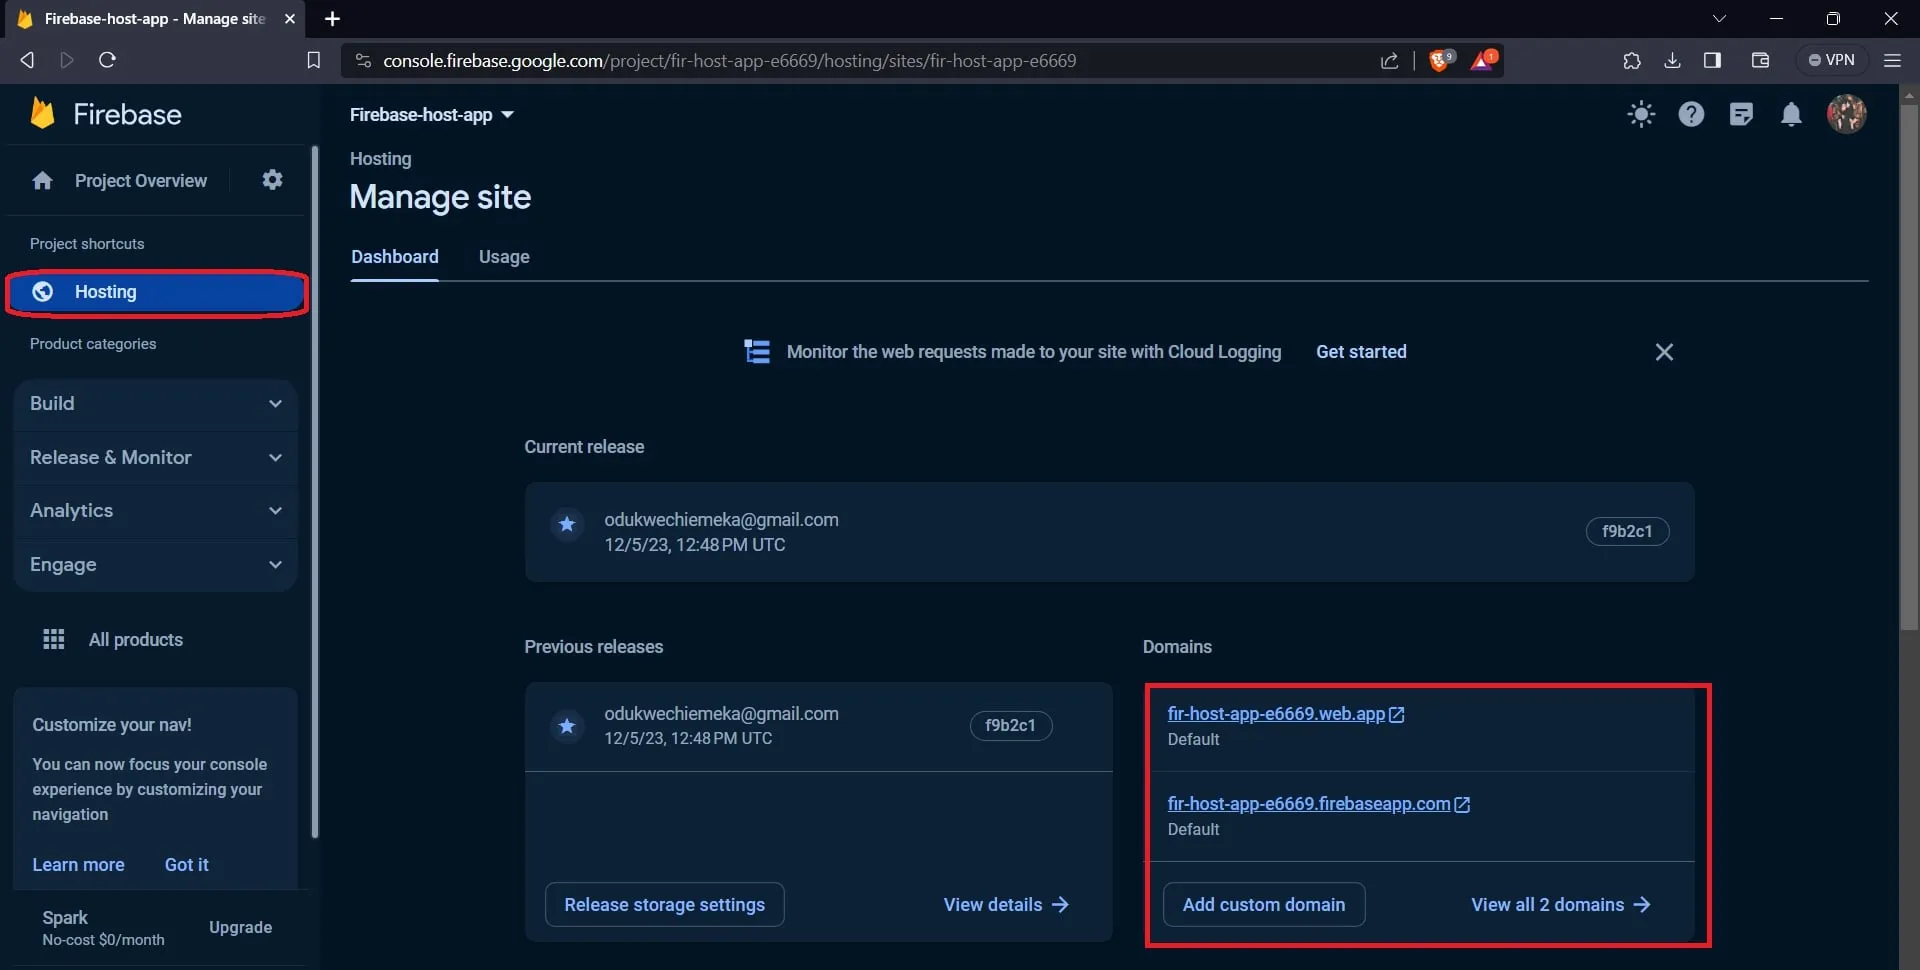
The command above will deploy your application and provide a URL allowing you to access the application on a web browser.

You can also access the application’s URL on your project’s dashboard on the Firebase site, as shown in the image below.
Conclusion
Navigating the deployment landscape for React applications doesn’t have to come with a hefty price tag.
The deployment methods explored in this article offer practical free alternatives for deploying your React app.
However, you might need to switch to one of their budget-friendly paid plans if your apps consume a lot of resources.


