Step-by-step tutorial for Express JS hosting
It is essential to select the most appropriate hosting methods to make sure your app runs smoothly and scales seamlessly when required.
In this article, we shall be considering various options for hosting an Express.js app. We shall zero in on using Back4app for Express.js app hosting.
Contents
- 1 Introducing Express.js
- 2 Benefits of Express.js
- 3 Downsideds of Express.js
- 4 Express.js Hosting Options
- 5 How to Host an Express Using Back4app?
- 6 Requirements
- 7 Make an Express API
- 8 Converting an Express App to a Docker Image
- 9 Host the Dockerized Express App to Back4app Container
- 10 Docker Image Optimization Guide
- 11 A Final Note
- 12 Frequently Asked Questions
- 13 How to host an Express.js application?
Introducing Express.js
Express.js can be described as a simple and light framework that’s made on Node.js. It helps make complicated mobile and web APIs in an easier way.
With Express, routing becomes less complicated because Express helps identify endpoints and manages the routing and mapping to ensure everything works fine.
Apart from its core features, Express also supports middleware that provides additional features like handling errors, authenticating users and managing logs.
Benefits of Express.js
Below are a few excellent features of Express:
- Express.js is designed to be minimalist and user-friendly. It simplifies complex aspects present in Node.js, such as routing, making it easier for developers to manage the paths that data takes within an application. When dealing with requests in the corresponding responses in APIs, Express.js provides a straightforward approach.
- Express.js goes beyond its core features due to its expansive community. This results in a wide-range installable packages as well as extensions. These additional components can seamlessly integrate into your applications, enhancing their capabilities and functionalities.
- The efficiency of Express.js is notably high. This is attributed to its streamlined design and its using Node’s special way of working with tasks that don’t block each other and respond to events. These technical factors contribute to Express being able to handle tasks swiftly and effectively.
Downsideds of Express.js
Here are the features that are more or less drawbacks:
- Not Telling You What to Do: Express.js doesn’t force you to do things a certain way, unlike platforms such as Nest.js. This means you have more choices about how to organize your project. However, this can also be a bit confusing when there are different options.
- Extras Required: Express.js doesn’t come with all the advanced features already included. For tasks like logging, you’ll have to get additional tools by installing extra stuff.
Express.js Hosting Options
IaaS – Infrastructure as a Service
IaaS is a type of cloud solution that offers developers a wide range of services that covers clous storage, network infrastructure and computing power as required.
This type of cloud solution gives you the freedom to create and maintain the infrastructure you need. All the service provider does is to power and manage the machines.
As such, to hosting an app built with Express, simply choose an IaaS service provider, make a virtual machine and set it up to run your app -that’s all.
Going to the details, you must install all the necessary things like nom, node and inject the Express code into the VM.
Once you are through, use the virtual machine to launch your express app and users worldwide can access your app.
Perhaps, the most desirable feature of IaaS is that it allows you to control the machine the way you like. For instance, you can choose to tweak the storage, memory and processor to serve your requirements.
While this level of control and flexibility is great. It does have some drawbacks. Like the tasks of managing and server, monitoring that it works and scaling when required is complicated and eats deep into your time.
CaaS – Container as a Service
CaaS takes the form of a cloud service that simplifies the way you access cloud infrastructure so you can bring your app to live without hassles through containers.
Making your app go live through containers is not complicated at all. You simply need to leverage the power of a tool like Docker to compile your code, it’s runtime and other things it needs to run into a container.
Once that is done, you can proceed to host without hassles. You don’t need to bother about backend hassles.
The CaaS vendor provides the machines and tools required to ensure your container runs flawlessly and also handles the ongoing management.
One of the best things about CaaS platforms is the simplicity, you can host your app without bothering about configuring network and server machines.
Instead you can focus on ensuring your app runs smoothly. Better still a containerized all runs smoothly irrespective of the hosting environment.
How to Host an Express Using Back4app?
Requirements
Here are the requirements you need to use this guide without hassles:
- A computer with recent version of Node.js
- An active account with GitHub
- A working version of Doker on the system. Get the latest version of Docker Desktop here
- Know how to code Express.js
What is Back4app?
Back4app containers is a tool that helps you put your stuff online by providing the cloud services you need to achieve your objectives.
Here are some things Back4app containers can do:
- Connect with GitHub: It can link with your GitHub stuff. So, when you change your code, it puts your app online automatically.
- Use Docker: It leverages the power of Docker, which is like a special box to wrap your app. This makes sure your app works the same no matter where it goes.
- Auto-deploy: When you make changes to your code on GitHub, Back4app puts the new version online without you doing anything.
- Watch in Real-Time: You can see how things are going as your app gets ready to go online.
- Keep an Eye on Things: It can also look at your app while it’s online to make sure it’s doing well.
- No Breaks: When you update your app, it doesn’t have to stop. It keeps going without any breaks.
Project Overview
In this guide, we’re going to learn how to put an Express app on Back4app. We’ll start by making a basic Express REST API with one point.
After that, we’ll use Docker to wrap it up and put it on GitHub. Finally, we’ll send it to a Back4app container to make it live on the internet.
Make an Express API
Do these things to make an Express app:
- Open your computer’s command line.
- Type a special command to start a new Node.js project.
npm init
When you type this command, your computer will ask for information about your app, like its name, version, and more. After providing your answer, it will make a file called “package.json” with these details.
If you want to apply the regular settings, add “-y” like this:
npm init -y- Next, make Express a part of your app by using the command below:
npm install express- Now, in your main project’s folder , make a file called “index.js.”in case you used a different name for the entry point file, write that name instead.
- Edit “index.js” file to make a special copy of Express for your app
const express = require('express');
const app = express();
- After that, put in a handler manage the app call responses.. This is called the “route handler.” It will take care of requests that come to the “/” spot.
app.get("/", (req, res) => {
  res.json({
    message: "Success",
  });
});
When someone uses this special spot, your app will send back a message in a special way called JSON.
- Next, decide on a number for the app’s door (port) and let your app start listening for messages that come through that door.
const port = process.env.PORT || 3000;
app.listen(port, () => {
  console.log(`App listening at <http://localhost>:${port}`);
});
Remember, when you see “process.env.PORT,” it’s like looking for the a setting parameter called PORT. The app will just use the number 3000 if the value is not found inside the .env file.
- Lastly, type this special command to make the Express.js server start working.
node index.js
When you go to http://localhost:3000/api using an internet browser, you will see the following output:
{
  "message": "Success!"
}
The above shows a simple demonstration how Express API works. It may be more advanced in a real app because factors like middleware, having more spots to talk to, and external data will come to play.
While this example is basic, it does serve the purpose of guiding you to dockerize an express all and host it.
Converting an Express App to a Docker Image
Dockerizing an app built with Express means putting it in a special box called the Docker container. This helps the app work the same way no matter where it’s hosted.
Introducing Docker
Docker can be described as a free tool that helps you pack up your app, along with its tools and parts, in a special box called a container. This container can be moved anywhere and still work the same way.
With Docker, you don’t have to worry about the app running on your computer and breaking on the server. You can build and test your Express app on your computer, then put it in a Docker container.
This container can then be used in different places without any trouble about things not working right.
Docker Installation Guide
Docker can work on different types of computers like Linux, , Unix, Windows and MacOS. Get Docker for install files that works with your system from the official website by downloading and installing it.
Express.js App Dockerizing Guide
After installing Docker, you’ll want to put your app inside the Docker container. Here’s how you do it:
- First, in your project’s main place, make a new file called “Dockerfile.” The file has the list of steps to make the Docker container for your Express app.
- Usually, when you start a Dockerfile, you choose a basic starting point called the “base image.” This image already has some basic stuff set up. It’s like starting with a ready-to-use building block.
- Inside Dockerfile, you can opt to add more steps to set up your app in addition to the base image. You may even choose to make your own special base image. However, Docker offers it’s own own ready-to-go images that work well.
- In this exercise, we’re going to use an image called “node base image” as the base. There’s a version of this image called “alpine” that’s has a small size. This is good because it doesn’t take up too much space. You can tell Docker to use the base image you selected through the Dockerfile by writing something like this:
FROM node:20-alpine
In this case, node:20-alpine we have the version 20 of Node.js installed out of the box.
WORKDIR /usr/src/app- Next, you’ll want to copy two important files, “package.json” as well as “package-lock.json,” to the place where you’re working. These files have a list of things your app needs to work, like tools and dependencies. Docker will use this list to install everything correctly.
# A wildcard ensures package.json AND package-lock.json are copied
COPY package*.json ./- After that, you’ll need to give the command that installs all those things listed in the “package.json” and “package-lock.json” files. This command makes sure your app has everything it needs to run smoothly.
RUN npm install- Then, you should copy all the other code from your app to the same place inside the container where you’re working. This way, your app’s code will be inside the container and ready to run.
COPY . .- After that, you’ll want to let the container know which door (port) your Express app is listening at. For this example, it’s the number 3000.
expose 3000- Lastly, you should add the special command that starts your app. This command is like turning on a switch to make your Express app begin running inside the container.
CMD["node", "index.js"]When you put all these steps together, your Dockerfile will be as the one shown below:
FROM node:20-alpine

WORKDIR /usr/src/app

COPY package*.json  ./

RUN npm install

COPY . .

EXPOSE 3000

CMD [ "node", "index.js" ]
Include a .dockerignore file
The function of the “.dockerignore” is that it tells Docker which files to exclude. This is important to make image that Docker makes smaller by leaving out things that aren’t needed. It’s also useful for keeping private files hidden.
To make one, create a new file within the main project’s folder and call it “.dockerignore.” Inside this file, put these things:
.git
.gitignore
.env
README.md
Dockerfile
node_modules/
.github
.vscode
npm-debug.log
npm-debug.log.*
The code in the “.dockerignore” file shown above stops certain things from being put into your Docker image. These things include environment variables, logs, the node modules, and files for git.
Create the Docker Image on Your Machine
In the folder where your project is, type this command to create the Docker image.
docker build -t docker-express-api .This “-t” flag is like a label and lets you specify a unique name for the Docker image. The dot (.) located towards the end instructs Docker to find the Dockerfile in this folder and execute the steps written in it.
Launch a Docker Image on Your Computer
After the image has been created successfully, you can use it to start the Express app with this command:
docker run -p 3000:3000 docker-express-apiThis part, “-p 3000:3000,” links the door number 3000 on your computer to the door number 3000 inside the container. This way, when you go to http://127.0.0.1:3000 in your web browser, you can see the app.
If you want to see the running Docker, type this command:
docker psTo make the instance stop, use this command:
docker stop docker-express-apiHost the Dockerized Express App to Back4app Container
At this stage, we’ve checked that your Docker image works on your computer, the next step is to make it work on Back4app.
Guide for Pushing Express Apps to GitHub
To make your app go online from GitHub, you have to do a few things. Follow these steps:
- First, go to the GitHub website and enter your credentials to gain access.
- Once you’re logged in, click the plus sign “+” at the top right. Once the menu that shows up, choose “New repository.”
- On the page where you make a new repository, choose the name for it. Let’s say we call it “express-api” in this guide. Click the button to create the repository. Keep the repository’s web address (URL) in mind because you’ll use it later to put your local files on GitHub.
Then, back on your computer, find your project’s directory. After that, type a special command to send your app to the online GitHub repository.
git remote add origin <https://github.com/remigathoni/express-api.git>
git branch -M main
git push -u origin main
Now, if you go back to the GitHub website and look at your new repository, you should see all your app’s files there. It’s like putting your app’s stuff in a special online folder.
Hosting the Express App
Here are the things you need to do to make your app go live on Back4app.
- Go to Back4app’s website and create an account if you don’t have one, or just just log in if you have one. After logging in, you’ll see the dashboard.
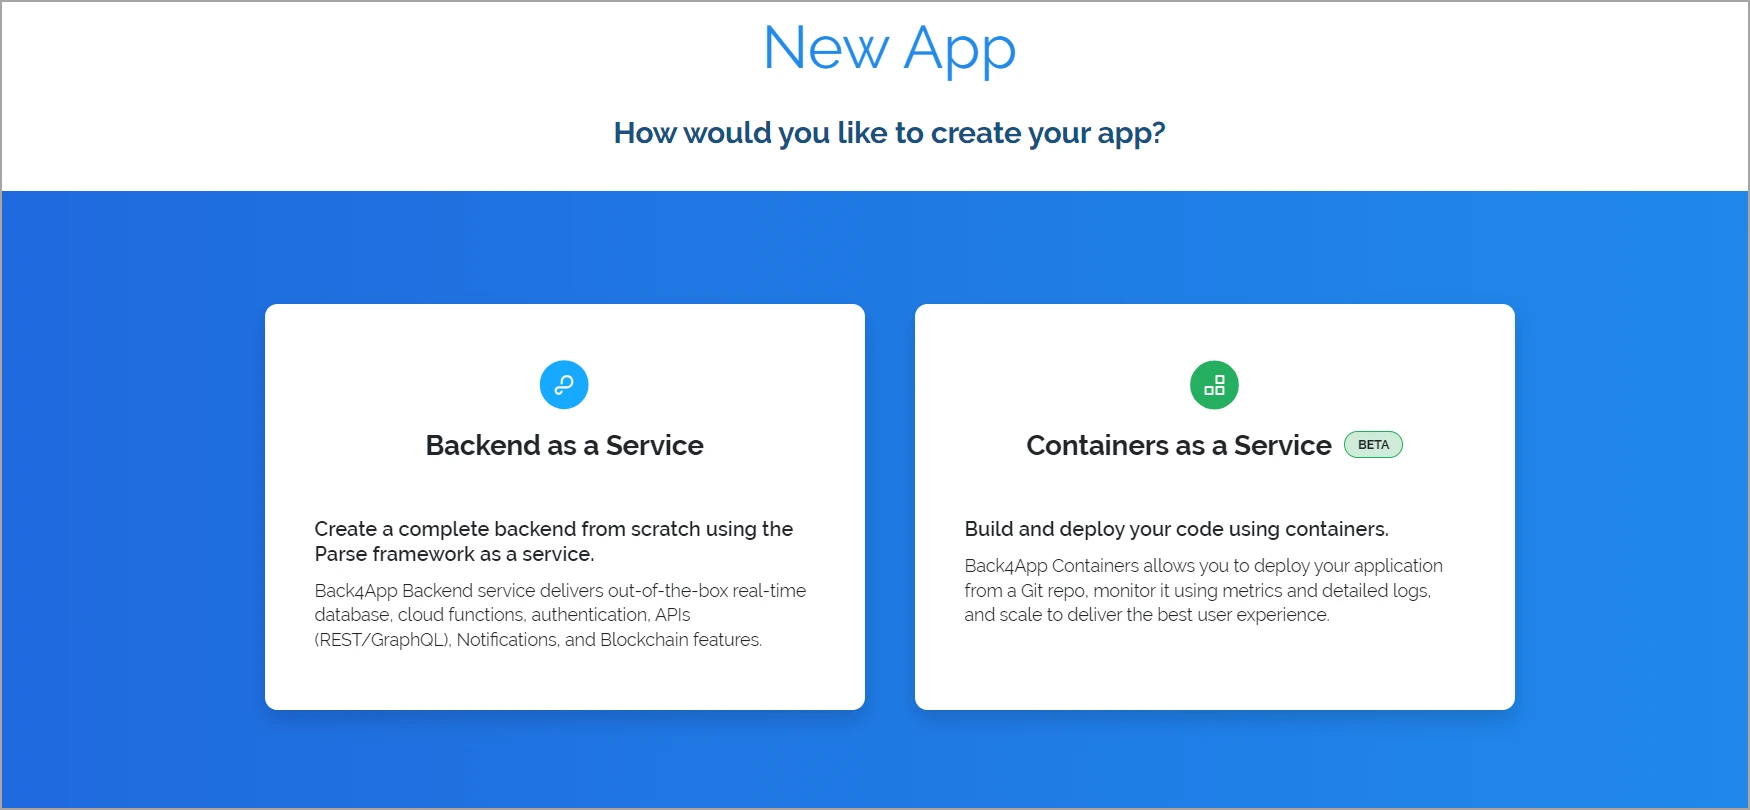
- After logging in, Look for the button named “Build a new app.” And click it. . You’ll have two choices: Container as a Service and Backend as a Service. If you’re only interested in hosting your app, choose Containers as a Service (CaaS).
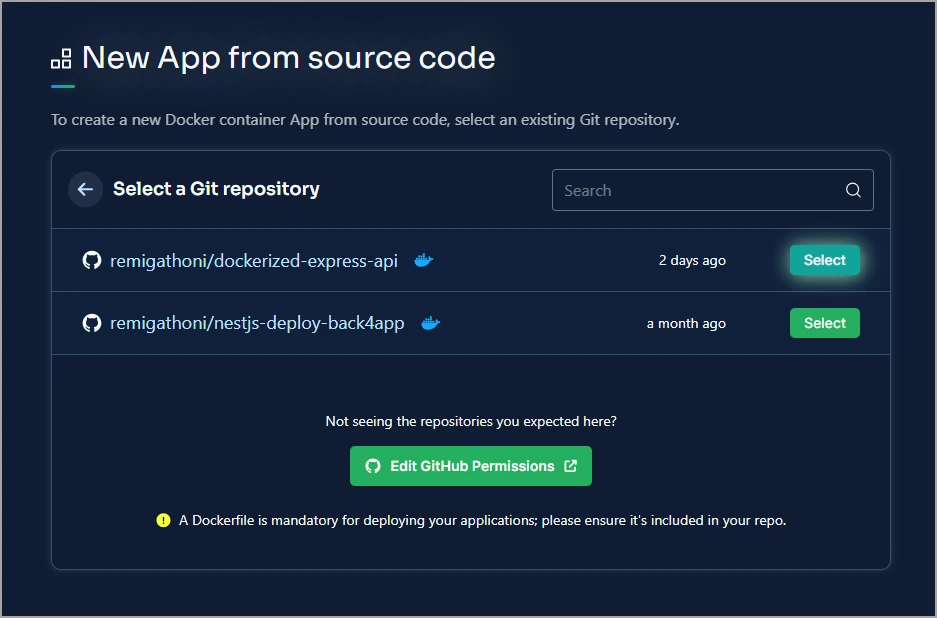
- Next, a message will pop up. It will ask if Back4app can use your account on GitHub. Simply pick your Express repository from the list. This way, Back4app knows which app you’re trying to put in the container.
- Now, give a name to your app that’s going to be hosted. For this study, let’s call it “Hosted Express API.” You may choose more options for how the hosting happens. You can say which main part you want, what folder everything will be, if it should automatically host when the code changes, and even environment stuff if you want.
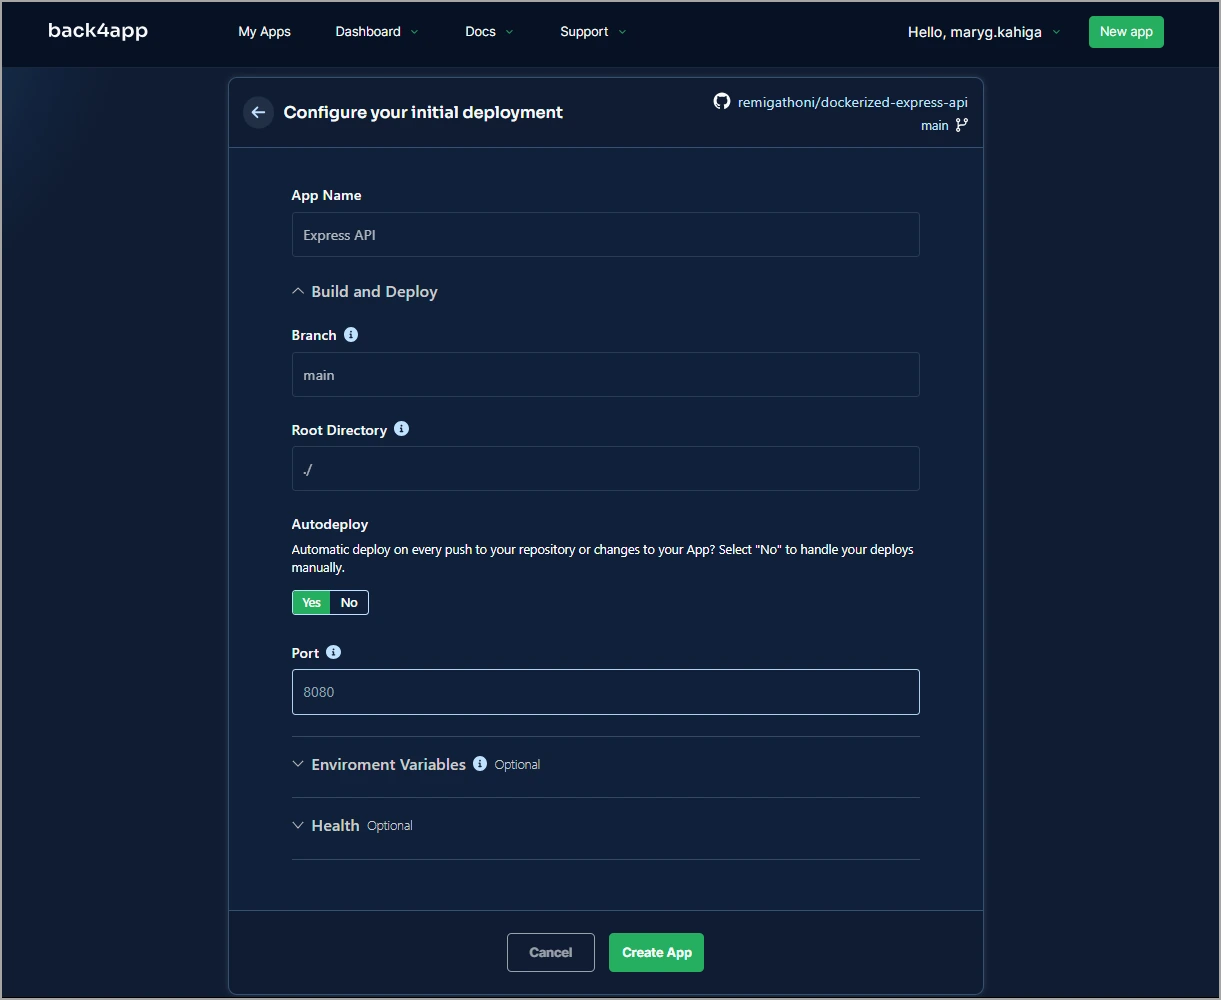
- After you’ve set everything up, click on button labelled “Create App”. This makes everything ready for hosting.
And that’s it! Your Express app is now on Back4app, and you didn’t have to pay anything for it.
Docker Image Optimization Guide
Making a Docker image smaller is really important. Here are some good reasons why:
- Better Performance: When the image is smaller, it starts up quicker because there’s less stuff to get ready.
- Quicker Hosting: A small image get put on servers faster.
- Use Less Resources: Small images use up less space on the computer and don’t need as much memory
- More Secure: Smaller images have fewer chances for bad things to happen.
To make the Express Docker image better, you can opt for something called “multi-stage build.” This lets us make the app in one stage and then just take the important parts to the final stage. This makes things faster and smaller.
So, for the Express app, we’ll have two parts: one for setting up stuff and another for the actual app that runs.
Making the Build Stage
Here’s what you do to set up the first part known as “build stage”:
First, clear out everything in the Dockerfile. Then, start by making your build stage based on the basic image.
FROM node:20-alpine AS buildYou name a stage by adding “AS name-of-stage” after the “FROM” part. And just so you know, alpine images are smaller than the node:<version> ones.
- Also, set up where the work will happen by saying where the files are going to be.
WORKDIR /usr/src/app- Put the package-lock.json and package.json files inside the container.
COPY package*.json ./- Install the stuff needed for development.
RUN npm install --only=development- Take the code of your app and put it into this build part.
COPY . .- Finally, run your app here
CMD ["node", "index.js"]The command you run here depends on your project. For example, if you have used TypeScript to build your application, you may need to transpile your application.
Making the Production Stage
In this next stage, do the following to copy the ready app files only from the build stage:
- Use the Node.js base image & label it as “production”.
# Production Stage
FROM node:20-alpine AS production- Define the working folder.
WORKDIR /usr/src/app- Copy only the needed files from the “Build Stage” by mentioning –from=build in the COPY command. Since there’s no specific build command, we’ll simply copy everything.
COPY --from=build /usr/src/app .- Make the Express app’s port accessible.
EXPOSE 3000- Start the Express application.
CMD ["node", "index.js"]Once you’ve prepared the Dockerfile, send your modifications to GitHub. Back4app will handle the automatic re-deployment of your app.
To access the code associated with this article, visit the GitHub repository for the application.
A Final Note
Express.js, a lightweight and flexible framework derived from Node.js, aids developers in creating efficient and concise APIs for both mobile and web apps.
You can choose to host an Express app through CaaS or IaaS. While IaaS is ideal when you require extensive control over the machines and other stuffs at the backend, it’s costlier to maintain.
On the other hand, CaaS comes handy when you aim to swiftly transition from development to production without manual infrastructure management.
Among the notable CaaS providers, Back4app containers stands out. Back4app expertly handles and oversees application hosting, allowing you to focus on building the application’s core functionalities.
This guide has taught you how to containerize an Express.js application and host it onto a Back4app container. To delve deeper, explore the comprehensive Back4app containers documentation.
Frequently Asked Questions
How to host an Express.js application?
– Build an app with Express
– Convert the Express App to a Docker image:
– Push the Docker image you made to GitHub:
– Create an account with Back4app
– Set Up a Container in your Back4app backend
– Grant GitHub Access to Back4app:
– Choose the Express Repository, then host your app.

