How to host a Remix application?

In this article, you’ll learn everything you need to know to get started with Remix. We’ll look at its pros and cons, demonstrate how to build a Remix app, and lastly, how to deploy Remix.
Contents
What is Remix?
Remix is a modern full-stack web framework for building fast, slick, and resilient apps. It leverages the power of server-side rendering (SSR), enabling faster load times and improved SEO for dynamic web applications.
With Remix, developers can seamlessly integrate client-side and server-side logic within a unified codebase. Compared to other popular React frameworks, Remix does a lot of things differently. That includes:
- File-based routing (a file in the routes directory represents a specific route)
- Traditional form handling (using HTML and HTTP requests, similar to PHP)
- State management (state is only stored on the server)
- Data loading (decoupled from the components)
Remix was created in 2020 and was initially available under a yearly license fee. Later, in October 2021, the Remix team decided to open-source the project. It is now available under the MIT license.
End of 2022, Remix was acquired by Shopify for 2.1 billion dollars.
Benefits of Remix
Let’s look at the main benefits of using the Remix framework.
Remix is built on top of React Router, a powerful client-side routing solution. In fact, Remix was created by the same developer team that created React Router.
The framework utilizes a file-based navigation system, which simplifies the code organization. It allows developers to associate routes, components, and resources with specific files or directories.
Here’s an example:
app/
└── routes/
    ├── $noteId.tsx              // matches: /<noteId>/
    ├── $noteId_.destroy.tsx     // matches: /<noteId>/destroy
    ├── $noteId_.edit.tsx        // matches: /<noteId>/edit
    ├── _index.tsx               // matches: /
    └── create.tsx               // matches: /create
Best of all, it supports nested routing via <Outlet/>. This results in shorter loading times, better error handling, and more!
Server-Side Rendering (SSR)
Remix leverages the power of server-side rendering.
In vanilla React apps, the data is usually fetched on the client side and then injected into the DOM. This is known as client-side rendering (CSR).
Remix, on the other hand, takes a different approach. It first fetches the data on the backend, renders the HTML with the fetched data, and then serves that to the client.
Server-side rendering tends to result in better performance and more SEO-friendly apps.
Form Handling
Remix takes form handling back to the basics.
Instead of using a bunch of controlled components and JavaScript, it uses traditional HTML forms and HTTP requests.
When a form is submitted, it sends an HTTP request to a specific route, which is then processed on the server side using the action() function. It works similarly to good old PHP.
This means that Remix requires absolutely no JavaScript to process forms. While this is great, it might make form validation and error displaying a bit trickier.
State Management
In this context, state refers to synchronizing the server and client data.
Remix makes state management a breeze. It eliminates the need for Redux, Zustand, React Query, Apollo, or any other client-side state management library.
When using Remix all the state is handled by the server. The client holds virtually no state; therefore, the synchronization process is not required.
Data from server to client is passed through various functions such as loader() and action().
Transitions and Optimistic UI
Remix transitions make moving between pages smooth and fast by loading data in advance and using animations.
Optimistic UI instantly reflects user actions, making websites feel more responsive by showing changes before they’re confirmed.
The transitions and optimistic UI greatly enhance the user experience by reducing perceived latency and providing immediate feedback.
Limitations of Remix
Even though Remix is great, it comes with some limitations.
Complex
Remix isn’t the easiest framework to use, and its documentation (at the time of writing) isn’t the best.
The framework also does a lot of things differently from vanilla React. If you’re a React developer, it might take you some time to wrap your head around all the different Remix concepts.
Less Popular
Remix is still a relatively new framework. Its public release only dates back to October 2021. It is less mature and battle-tested compared to some competitors, like Next.js.
Looking at the GitHub stars, we can see that Remix (27k stars) is way less popular than Next.js (120k stars). At the time of writing, Remix hasn’t been adopted by any tech giants except for Shopify.
Tightly Coupled
Remix apps have a tightly coupled frontend and backend. While this approach works for smaller projects, some developers prefer the flexibility of a separate frontend and backend.
Additionally, separating the frontend from the backend can make your code more maintainable and easier to test.
No SSG or ISR
Remix doesn’t support static site generation (SSG) or incremental static regeneration (ISR).
How to deploy a Remix application?
In this section, we’ll build and deploy a Remix application.
Prerequisites
To follow along, you will need:
- Basic understanding of TypeScript
- Experience with Docker (and containerization technology)
- Node.js and a JavaScript IDE installed on your machine
- Docker Desktop installed on your machine
Project Overview
Throughout the article, we will be working on a notes web app. The web app will allow users to create, retrieve, edit, and delete notes.
For the backend, we’ll utilize Back4app BaaS, and for the frontend, we’ll use the Remix framework. Once the frontend is coded, we’ll deploy it to Back4app Containers.
The final product will look something like this:
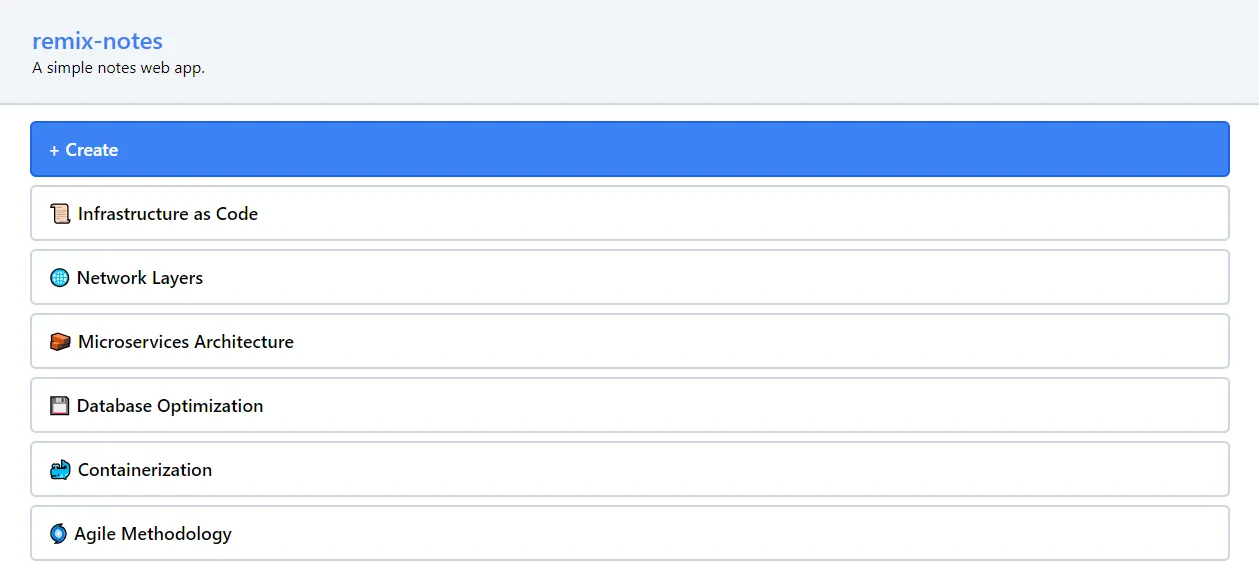
I suggest you first follow along with the notes web app. After the article, you should be able to deploy your own Remix applications.
Backend
In this article section, we’ll use Back4app to build our app’s backend.
Create App
Start by logging into your Back4app account (or creating one if you still need to get it).
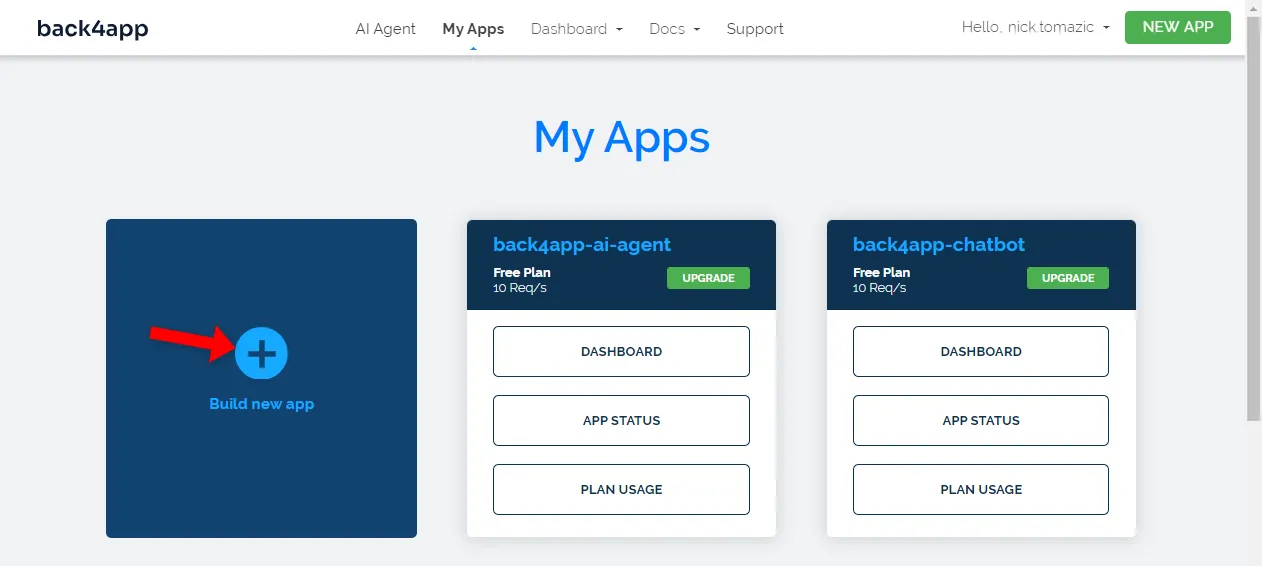
As you sign in, you’ll be redirected to the “My Apps” portal. To create a backend you first need to create a Back4app app. To do that, click “Build new app”.

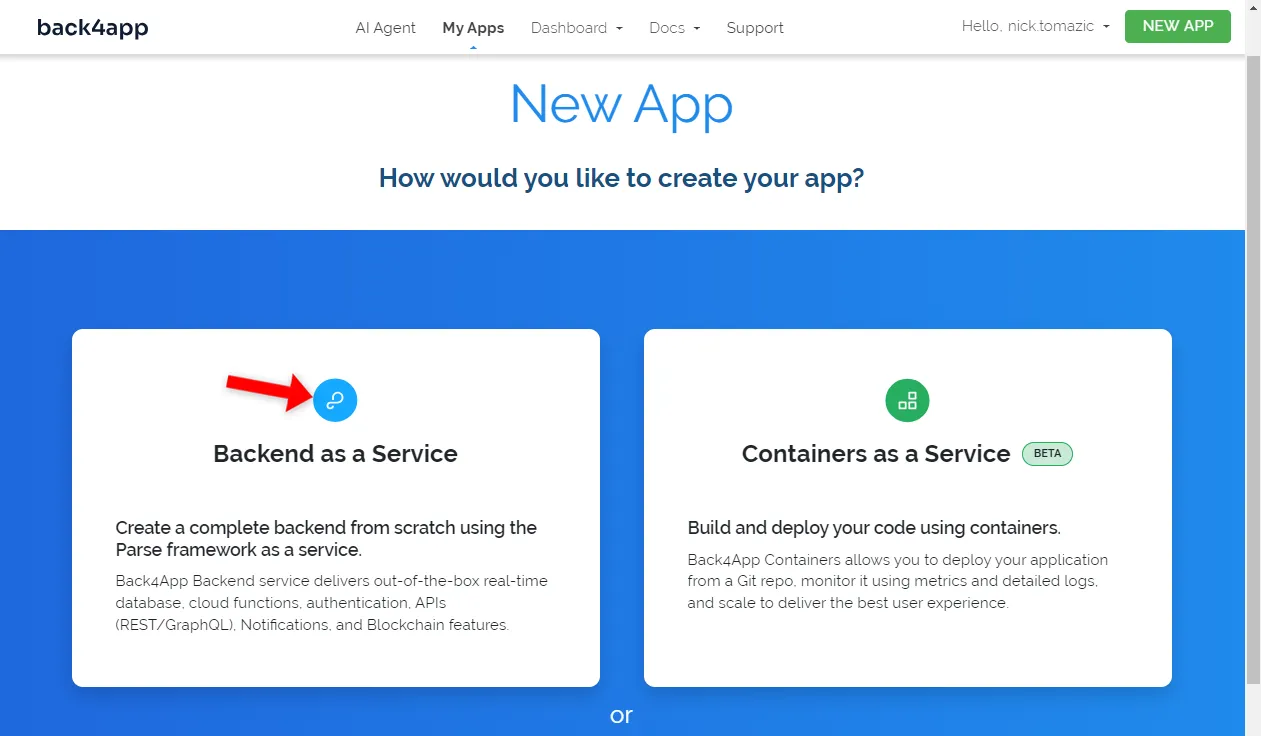
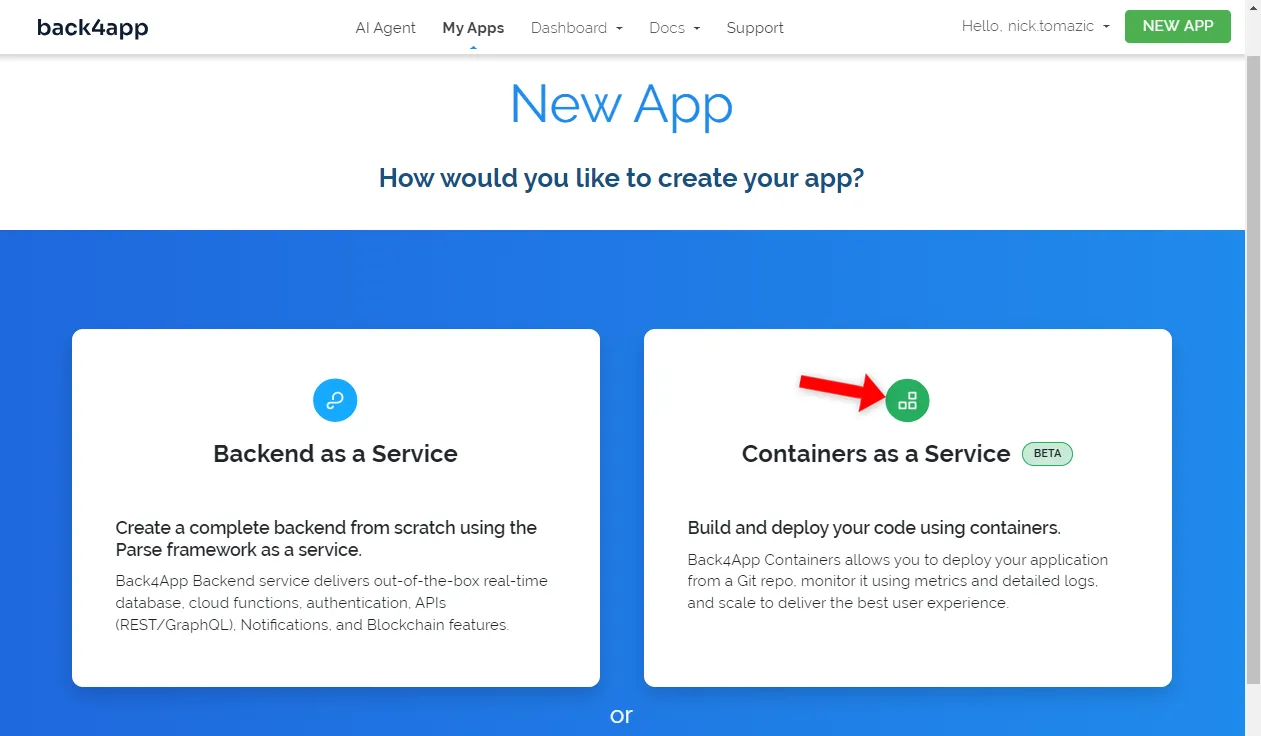
Back4app provides two solutions:
- Backend as a Service (BaaS) — a fully-fledged backend solution
- Containers as a Service (CaaS) — Docker-based container orchestration platform
Since we’re working on a backend, select “Backend as a Service”.
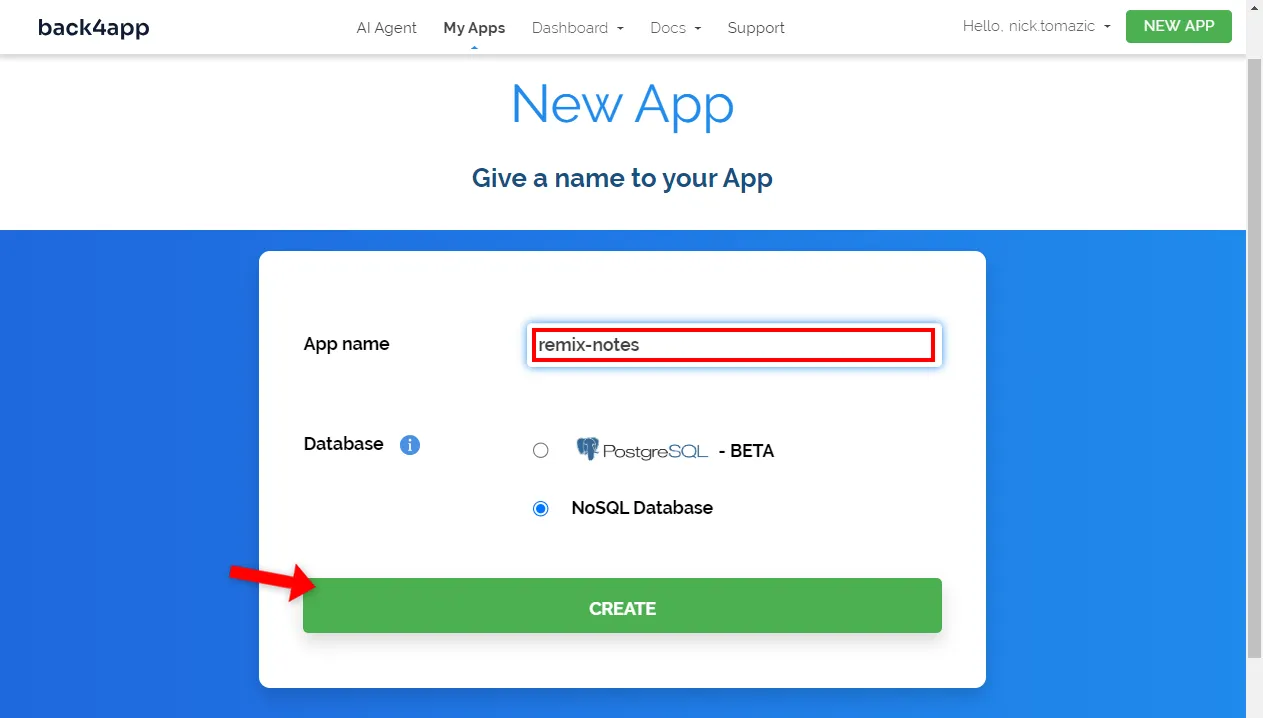
Name your app, leave everything else as default, and click “Create”.
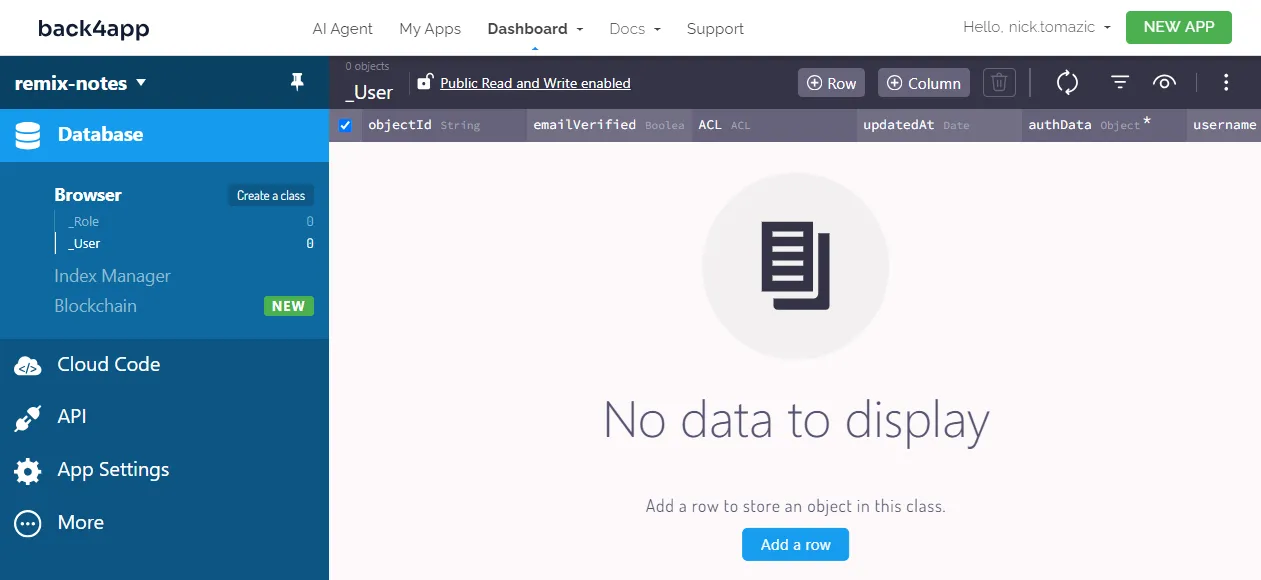
The platform will take a while to setup everything required for your backend. That includes the database, application interface, scaling, security, etc.
Once your app is ready, you’ll be redirected to the app’s real-time database view.
Database
Moving along, let’s take care of the database.
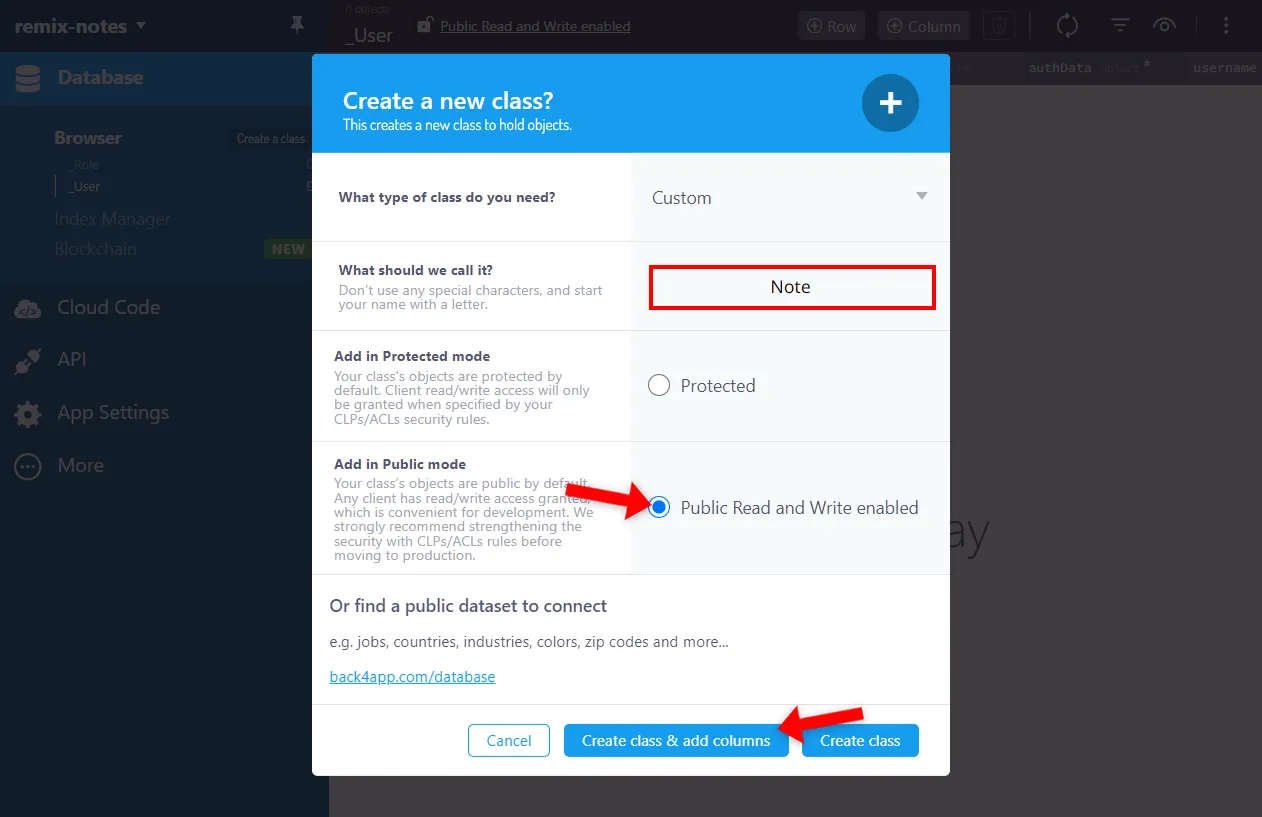
Since we’re building a relatively simple app, we’ll only need one model — let’s name it Note. To create it, click the “Create a class” button at the top left of the screen.
Name it Note, enable “Public Read and Write Enabled”, and click “Create class & add columns”.
Then, add the following columns:
+-----------+--------------+----------------+----------+
| Data type | Name         | Default value  | Required |
+-----------+--------------+----------------+----------+
| String    | emoji        | <leave blank>  | yes      |
+-----------+--------------+----------------+----------+
| String    | title        | <leave blank>  | yes      |
+-----------+--------------+----------------+----------+
| File      | content      | <leave blank>  | no       |
+-----------+--------------+----------------+----------+
Once you’ve created the class, populate the database with sample data. Create a few notes by providing the emojis, titles, and content. Alternatively, import this database export.
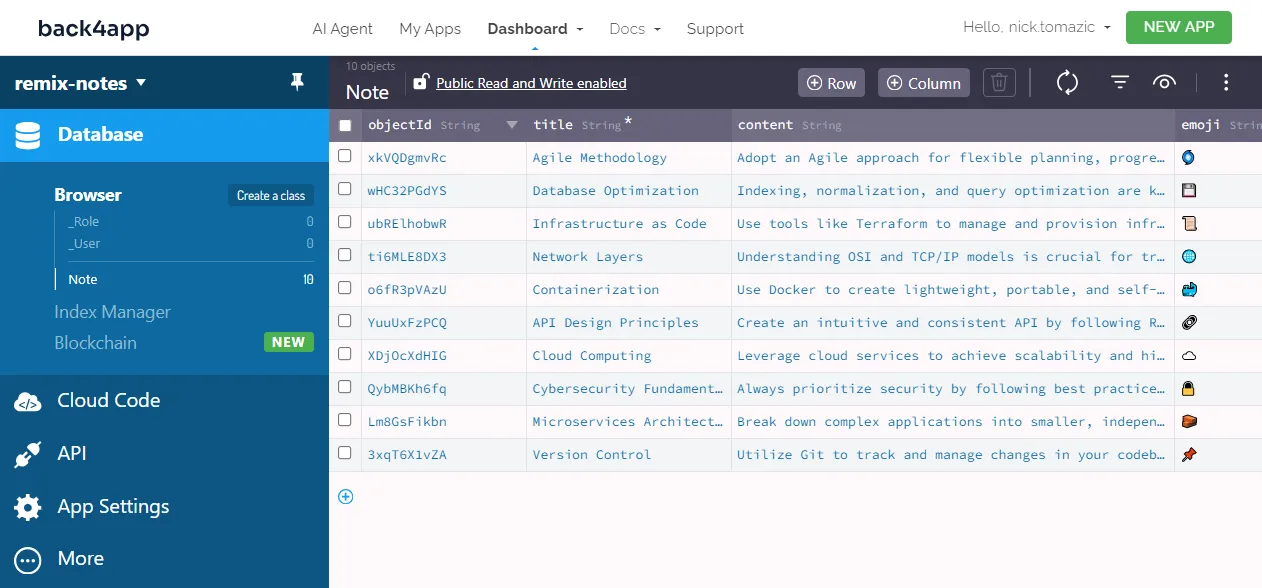
Great, that’s it!
We’ve successfully created a backend without writing any code.
To learn more about Backend as a Service — check out What is Backend as a Service?
Frontend
In this article section, we’ll build our app’s frontend using the Remix framework.
create-remix
The easiest way to bootstrap a Remix project is via the create-remix utility. This tool creates a production-ready Remix project.
It takes care of the directory structure and dependencies, sets up the bundler, etc.
Create a new Remix project by running the following command:
$ npx create-remix@latest remix-notes

Initialize a new git repository? Yes
Install dependencies with npm?   Yes
If you’ve never used
create-remix, it’ll be installed automatically.
Once the project has been created, change your active directory to it:
$ cd remix-notesLastly, start the development server:
$ npm run devOpen your favorite web browser and navigate to http://localhost:5173. The default Remix landing page should pop up on your screen.
TailwindCSS
To make our lives a little bit easier, we’ll use TailwindCSS. TailwindCSS is a utility-first framework that allows you to rapidly build frontends without writing any plain CSS.
First, install it using npm:
$ npm install -D tailwindcss postcss autoprefixerNext, run tailwindcss init:
$ npx tailwindcss init --ts -pThis will configure your project and create a tailwind.config.ts file in the project root.
Modify its content property like so to let Tailwind know in what files utility classes will be used:
// tailwind.config.ts

import type {Config} from "tailwindcss";

export default {
  content: ["./app/**/*.{js,jsx,ts,tsx}"],  // new
  theme: {
    extend: {},
  },
  plugins: [],
} satisfies Config;
Create a new file named tailwind.css in the app directory with the following contents:
/* app/tailwind.css */

@tailwind base;
@tailwind components;
@tailwind utilities;
Lastly, import it in root.tsx via links:
// app/root.tsx

// other imports
import {LinksFunction} from "@remix-run/node";
import stylesheet from "~/tailwind.css?url";

export const links: LinksFunction = () => [
  { rel: "stylesheet", href: stylesheet },
];

// ...
That’s it!
We’ve successfully installed TailwindCSS.
Routes
Our web app will have the following endpoints:
/displays all the notes/createallows users to create notes/<noteId>displays a specific note/<noteId>/deleteallows users to delete a specific note
To define these routes, create the following directory structure in the app folder:
app/
└── routes/
    ├── $noteId.tsx
    ├── $noteId_.destroy.tsx
    ├── $noteId_.edit.tsx
    ├── _index.tsx
    └── create.tsx
As you might’ve guessed, the prefix $ is used for dynamic parameters, and . is used instead of /.
Views
Moving along, let’s implement the views.
To make our code more type-safe, we’ll create an interface named Note that resembles our Note database class.
Create a folder named store, and within it, create NoteModel.ts with the following contents:
// app/store/NoteModel.ts

export default interface NoteModel {
  objectId: string;
  emoji: string;
  title: string;
  content: string;
  createdAt: Date;
  updatedAt: Date;
}
Then paste in the view code for _index.tsx, $noteId.tsx, and create.tsx:
// app/routes/_index.tsx

import {Link, NavLink} from "@remix-run/react";
import NoteModel from "~/store/NoteModel";

const notes = [
  {objectId: "1", emoji: "📝", title: "My First Note"},
  {objectId: "2", emoji: "📓", title: "My Second Note"},
  {objectId: "3", emoji: "📔", title: "My Third Note"},
] as NoteModel[];

export default function Index() {
  return (
        <>
      <Link to={`/create`}>
        <div className="bg-blue-500 hover:bg-blue-600 text-lg font-semibold text-white
         px-4 py-3 mb-2 border-2 border-blue-600 rounded-md"
        >
          + Create
        </div>
      </Link>
      {notes.map(note => (
        <NavLink key={note.objectId} to={`/${note.objectId}`}>
          <div className="hover:bg-slate-200 text-lg font-semibold
            px-4 py-3 mb-2 border-2 border-slate-300 rounded-md"
          >
            {note.emoji} {note.title}
          </div>
        </NavLink>
      ))}
    </>
  );
}
// app/routes/$noteId.tsx
import {Form} from "@remix-run/react";
import NoteModel from "~/store/NoteModel";
const note = {
objectId: "1", emoji: "📝", title: "My First Note", content: "Content here.",
createdAt: new Date(), updatedAt: new Date(),
} as NoteModel;
export default function NoteDetails() {
return (
<>
<div className="mb-4">
<p className="text-6xl">{note.emoji}</p>
</div>
<div className="mb-4">
<h2 className="font-semibold text-2xl">{note.title}</h2>
<p>{note.content}</p>
</div>
<div className="space-x-2">
<Form
method="post" action="destroy"
onSubmit={(event) => event.preventDefault()}
className="inline-block"
>
<button
type="submit"
className="bg-red-500 hover:bg-red-600 font-semibold text-white
p-2 border-2 border-red-600 rounded-md"
>
Delete
</button>
</Form>
</div>
</>
);
}// app/routes/create.tsx
import {Form} from "@remix-run/react";
export default function NoteCreate() {
return (
<>
<div className="mb-4">
<h2 className="font-semibold text-2xl">Create Note</h2>
</div>
<Form method="post" className="space-y-4">
<div>
<label htmlFor="emoji" className="block">Emoji</label>
<input
type="text" id="emoji" name="emoji"
className="w-full border-2 border-slate-300 p-2 rounded"
/>
</div>
<div>
<label htmlFor="title" className="block">Title</label>
<input
type="text" id="title" name="title"
className="w-full border-2 border-slate-300 p-2 rounded"
/>
</div>
<div>
<label htmlFor="content" className="block">Content</label>
<textarea
id="content" name="content"
className="w-full border-2 border-slate-300 p-2 rounded"
/>
</div>
<div>
<button
type="submit"
className="bg-blue-500 hover:bg-blue-600 font-semibold
text-white p-2 border-2 border-blue-600 rounded-md"
>
Create
</button>
</div>
</Form>
</>
);
}There’s nothing fancy going on in this code. All we did was use JSX in combination with TailwindCSS to create the user interface.
As you might’ve noticed, all the components are uncontrolled (we’re not using useState()). On top of that, we’re using an actual HTML form.
This is because the Remix framework handles forms similar to PHP using HTTP requests, unlike React.
Parse
There are multiple ways to connect to your Back4app-based backend. You can use:
- RESTful API
- GraphQL API
- Parse SDK
The easiest and the most robust way is certainly Parse SDK. Parse SDK is a software development kit that provides a number of utility classes and methods for easily querying and manipulating your data.
Start by installing Parse via npm:
$ npm install -i parse @types/parseCreate a .env file in the project root like so:
# .env

PARSE_APPLICATION_ID=<your_parse_app_id>
PARSE_JAVASCRIPT_KEY=<your_parse_js_key>
Ensure to replace
<your_parse_app_id>and<your_parse_js_key>with actual credentials. To obtain the credentials, navigate to your app and select “App Settings > Server & Security” on the sidebar.
Then, initialize Parse at the top of root.tsx file like so:
// app/root.tsx

// other imports
import Parse from "parse/node";

const PARSE_APPLICATION_ID = process.env.PARSE_APPLICATION_ID || "";
const PARSE_HOST_URL = "https://parseapi.back4app.com/";
const PARSE_JAVASCRIPT_KEY = process.env.PARSE_JAVASCRIPT_KEY || "";
Parse.initialize(PARSE_APPLICATION_ID, PARSE_JAVASCRIPT_KEY);
Parse.serverURL = PARSE_HOST_URL;
We’ll create a separate file named api/backend.ts to keep our views clean of the backend communication logic.
Create api/backend.ts with the following contents:
// app/api/backend.ts

import Parse from "parse/node";
import NoteModel from "~/store/NoteModel";

export const serializeNote = (note: Parse.Object<Parse.Attributes>): NoteModel => {
  return {
    objectId: note.id,
    emoji: note.get("emoji"),
    title: note.get("title"),
    content: note.get("content"),
    createdAt: new Date(note.get("createdAt")),
    updatedAt: new Date(note.get("updatedAt")),
  };
}

export const getNotes = async (): Promise<NoteModel[]> => {
  // ...
}

export const getNote = async (objectId: string): Promise<NoteModel | null> => {
  // ...
}

// Grab the entire file from:
// https://github.com/duplxey/back4app-containers-remix/blob/master/app/api/backend.ts
Lastly, modify the views to fetch and manipulate the backend’s data:
// app/routes/index.tsx

import {json} from "@remix-run/node";
import {Link, NavLink, useLoaderData} from "@remix-run/react";
import {getNotes} from "~/api/backend";

export const loader = async () => {
  const notes = await getNotes();
  return json({notes});
};

export default function Index() {
  const {notes} = useLoaderData<typeof loader>();
  return (
    // ...
  );
}
// app/routes/$noteId.tsx
import {getNote} from "~/api/backend";
import {json, LoaderFunctionArgs} from "@remix-run/node";
import {Form, useLoaderData} from "@remix-run/react";
import {invariant} from "@remix-run/router/history";
export const loader = async ({params}: LoaderFunctionArgs) => {
invariant(params.noteId, "Missing noteId param");
const note = await getNote(params.noteId);
if (note == null) throw new Response("Not Found", {status: 404});
return json({note});
};
export default function NoteDetails() {
const {note} = useLoaderData<typeof loader>();
return (
// ...
);
}// app/routes/create.tsx
import {ActionFunctionArgs, redirect} from "@remix-run/node";
import {Form} from "@remix-run/react";
import {createNote} from "~/api/backend";
export const action = async ({request}: ActionFunctionArgs) => {
const formData = await request.formData();
const {emoji, title, content} = Object.fromEntries(formData)
as Record<string, string>;
const note = await createNote(emoji, title, content);
return redirect(`/${note?.objectId}`);
};
export default function NoteCreate() {
return (
// ...
);
}// app/routes/$noteId_.destroy.tsx
import type {ActionFunctionArgs} from "@remix-run/node";
import {redirect} from "@remix-run/node";
import {invariant} from "@remix-run/router/history";
import {deleteNote} from "~/api/backend";
export const action = async ({params}: ActionFunctionArgs) => {
invariant(params.noteId, "Missing noteId param");
await deleteNote(params.noteId);
return redirect(`/`);
};Code rundown:
- We used Remix
loader()function to load the data. Once the data has been loaded, we’ve passed it to the view as JSON via thejson()function.
- We used the Remix
action()function to handle the form submission (e.g.,POST).
- The
noteIdwas passed to views as a parameter.
The app should now be fully working and synced with the Back4app backend. Ensure everything works by creating a few notes, editing them, and then deleting them.
Dockerize App
In this section, we’ll dockerize our Remix frontend.
Dockerfile
A Dockerfile is a plain text file that outlines the steps the Docker engine has to perform to construct an image.
These steps encompass setting the working directory, specifying the base image, transferring files, executing commands, and more.
The instructions are typically depicted in all uppercase and immediately followed by their respective arguments.
To learn more about all the instructions, check out the Dockerfile reference.
Create a Dockerfile in the project root with the following contents:
# Dockerfile

FROM node:20

WORKDIR /app

COPY package*.json ./
RUN npm ci

COPY . .
RUN npm run build

EXPOSE 3000

CMD ["npm", "run", "start"]
This Dockerfile is based on the node:20 image. It first sets the working directory, copies over the package.json, and installs the dependencies.
After that, it builds the project, exposes port 3000, and serves the app.
.dockerignore
When working with Docker, you’ll usually strive to build images that are as small as possible.
Since our project contains certain files that don’t need to be in the image (e.g., .git, build, IDE settings), we’ll exclude them. To do that, we’ll create a .dockerignore file that works similarly to a .gitignore file.
Create a .dockerignore file in the project root:
# .dockerignore

.idea/
.cache/
build/
node_modules/
Adapt the .dockerignore according to your project’s needs.
Build and Test
Before pushing a Docker image to the cloud, it’s a good idea to test it locally.
First, build the image:
$ docker build -t remix-notes:1.0 .Next, create a container using the newly created image:
$ docker run -it -p 3000:3000
    -e PARSE_APPLICATION_ID=<your_parse_app_id>
    -e PARSE_JAVASCRIPT_KEY=<your_parse_javascript_key>
    -d remix-notes:1.0
Ensure to replace
<your_parse_app_id>and<your_parse_javascript_key>with the actual credentials.
Your app should now be accessible at http://localhost:3000. It should behave the same way as before the dockerization process.
Push to GitHub
To deploy an app to Back4app Containers, you must first push your source code to GitHub. To do that, you can follow these steps:
- Log into your GitHub account (or sign up).
- Create a new GitHub repository.
- Navigate to your local project and initialize it:
git init - Add all the code to the version control system:
git add . - Add the remote origin via
git remote add origin <remote_url> - Commit all the code via
git commit -m "initial commit" - Push the code to GitHub
git push origin master
Deploy App
In this last section, we’ll deploy the frontend to Back4app Containers.
Log into your Back4app account and click “Build new app” to initialize the app creation process.
Since we’re now deploying a containerized app, select “Containers as a Service”.
Next, you must link your GitHub account with Back4app and import the repository you have previously created. Once connected, select the repo.
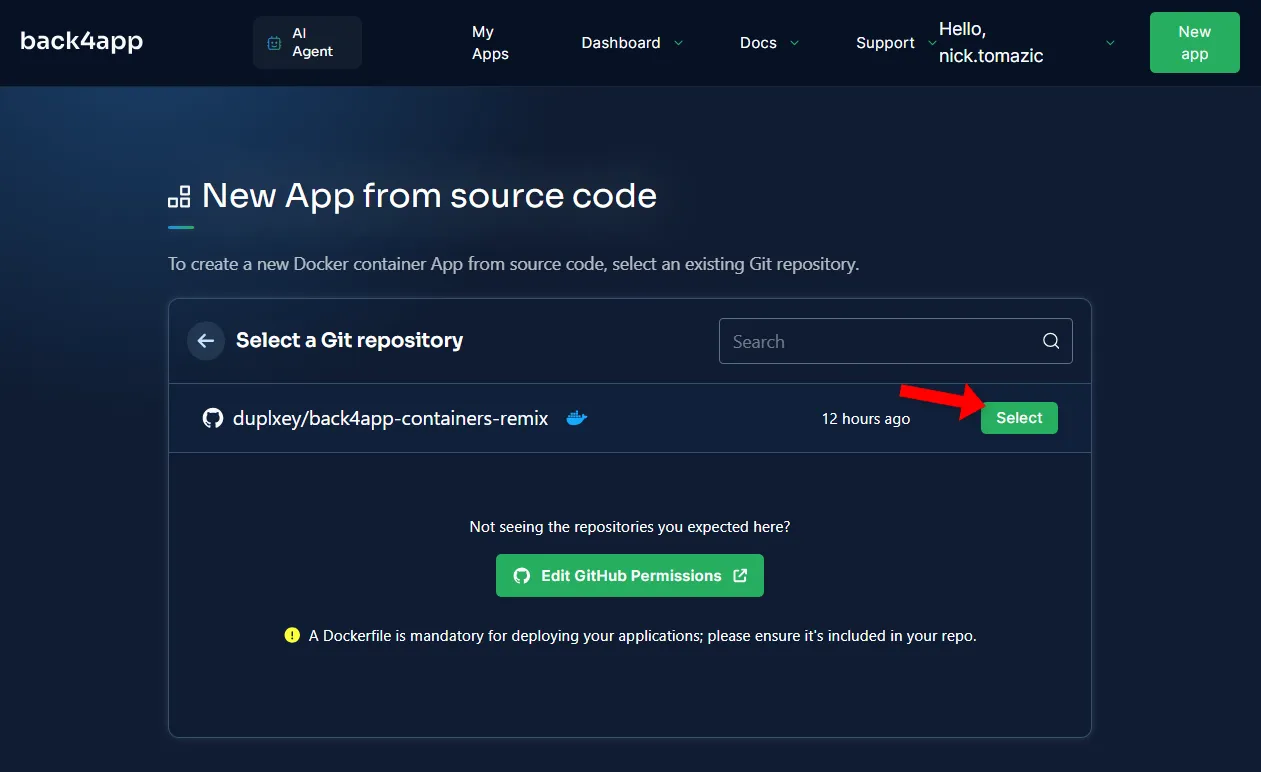
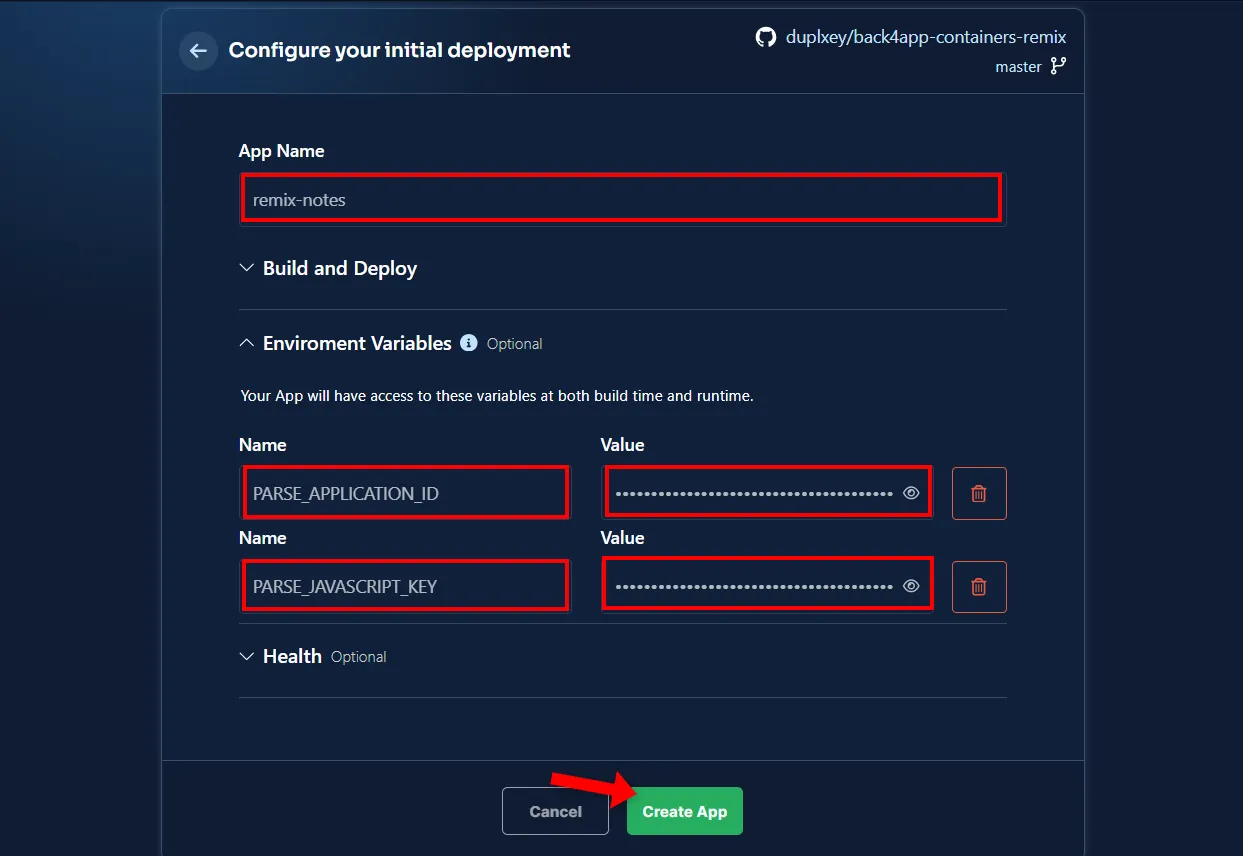
Back4app Containers allows for advanced configuration. Nevertheless, for our simple app, the following settings will suffice:
- App Name: remix-notes (or pick your name)
- Environment Variables:
PARSE_APPLICATION_ID,PARSE_JAVASCRIPT_KEY
Use the values you used in the .env file for the environment variables.
Once you’re done configuring the deployment, click “Deploy”.
Wait for a few moments for the deployment to complete. Once deployed, click on the green link on the left side of the screen to open the app in your browser.
For a detailed tutorial, please check Back4app’s Container Remix Documentation.
That’s it! Your app is now successfully deployed and accessible through the provided link. Additionally, Back4app has issued a free SSL certificate for your app.
Conclusion
Despite being a relatively new framework, Remix allows developers to build powerful full-stack web applications.
The framework addresses many complexities of web applications, such as form handling, state management, and more.
In this article, you’ve learned how to build and deploy a Remix application. You should now be able to utilize Back4app to create a simple backend and Back4app Containers to deploy your containerized applications.
The project source code is available on back4app-containers-remix repo.


