Add User Authentication To Your React App

When building web applications, user authentication is a necessary feature to add to your application. User authentication allows verified users to access features that are available to them in your application and denies unverified users access.
Integrating user authentication in React applications is no easy task and is time-consuming since it involves several complex processes, such as hashing passwords, generating and managing authentication tokens, and many more.
However, with platforms like Back4App, integrating user authentication with your React applications is simple and easy. In this article, you’ll explore how to add user authentication to your React app using Back4App.
Contents
Understanding User Authentication
User authentication is the process of determining the identity of a person who is trying to get access to your application.
It requires that the person trying to gain access to your application provides verifiable credentials, which can be in the form of a username and password, biometric data, access keys/tokens, etc.
If your authentication mechanism deems the credentials valid, it grants the user access to your application, else it rejects the authentication request with the appropriate error message.
Common Authentication Methods
Some common authentication methods include the following:
- Username and Password: This authentication method requires a user to provide a valid username and a password in order to authenticate their identity. After a user provides a username and password, this authentication mechanism compares them with the data stored in the database and only approves the authentication request if they match.
- Multi-Factor Authentication (MFA): MFA refers to the combination of multiple authentication mechanisms to authenticate a user. In an authentication system using MFA, the user is required to validate their identity more than once. For example, a user may be required to enter an authentication code after authenticating their identity using a username and password.
- Biometric Authentication: Biometric authentication refers to authentication mechanisms that depend on biological features such as face, iris patterns, fingerprints, or voice recognition to authenticate a user.
- OAuth: OAuth is an authentication protocol that allows your users to authenticate their identities by granting your application access to their preferred OAuth provider such as Facebook or X (formerly Twitter). When a user tries to authenticate using OAuth, they will be redirected to the OAuth provider’s login screen to authenticate their identity.
- JSON Web Tokens (JWT): JWTs are portable and URI-safe compact token formats that are usually used to transmit authentication and authorization details securely between different parties. Authentication with JWTs involves the user sending the JWT access token in their requests to validate their identity.
Adding User Authentication to your Application with Back4app
Back4app is a cloud platform that offers a wide range of services, including a Backend-as-a-service (BaaS) feature. Back4app’s BaaS option offers various features, including user authentication.
Implementing user authentication with Back4app involves a few steps. For this tutorial, you will build a simple bank management app using React.
This app will integrate the Back4app authentication features, allowing you to create an account, log in to your account, access your current login information, and log out.
Creating a React Application
To create a new React application, start by scaffolding a new React app using Vite. Vite is a web development build tool that provides a faster and more efficient development experience.
Run the following command in your terminal to scaffold the new React app:
npm init vite
After running the command above, a series of prompts will display on your screen, asking you to specify the application’s name, the framework of choice, and the language variant to use.
Like so:

In the image above, the application’s name is react-authentication-app, the selected framework is React, and the language variant is JavaScript.
Next, change your current directory to the application’s directory and install the necessary dependencies by running the commands below:
cd react-authentication-app && npm install
Next, install the React Router in your application by running the command below:
npm install react-router-dom
Next, open your React application on an IDE (Integrated Development Environment) and modify the main.jsx file by replacing the contents with the code block below.
import React from 'react'
import ReactDOM from 'react-dom/client'
import App from './App.jsx'
import './index.css'
import { BrowserRouter } from 'react-router-dom'

ReactDOM.createRoot(document.getElementById('root')).render(
  <React.StrictMode>
    <BrowserRouter>
      <App />
    </BrowserRouter>
  </React.StrictMode>,
)
This code block imports the BrowserRouter component from the react-router-dom package and wraps the App component.
This enables routing in the entire application. In your App component, define the different routes in the application.
Like so:
import { Route, Routes } from "react-router-dom";
import Signup from "./pages/Signup";
import Login from "./pages/Login";
import Home from "./pages/Home";

function App() {

  return (
    <>
      <Routes>
        <Route path="/home" element={<Home />} />
        <Route path="" element={<Signup />}/>
        <Route path="/login" element={<Login />}/>
      </Routes>
    </>
  )
}

export default App
The code block above defines three separate routes, allowing users to navigate between the sign-up, login, and home pages based on the URL paths.
Now, create a components folder in the application’s src directory. In this folder, make an Authnavbar.jsx file. This component will contain a navigation bar that will display on the sign-up and login pages.
In the Authnavbar component, write this code:
import React from "react";
import { Link } from "react-router-dom";

function Authnavbar(props) {
  return (
    <nav>
      <h3>Banka</h3>
      {props.type === "signup" ? (
        <div>
          If you already have an account{""}
          <Link to="/login" className="link">
            Log in
          </Link>
        </div>
      ) : props.type === "login"? (
        <div>
          If you don't have an account{""}
          <Link to="/" className="link">
            Sign Up
          </Link>
        </div>
      ) : null}
    </nav>
  );
}

export default Authnavbar;
The code block above creates a navigation bar with conditional rendering based on the value of the type prop, allowing users to navigate between the sign-up and login pages within the application.
Next, generate a pages folder in the application’s src directory. In this folder, create three components: Home.jsx, Sign-up.jsx, and Login.jsx. These files will serve as the home, sign-up, and login pages.
The Sign-up page will contain a form where the users can input their details, such as a username, email, and password.
For example:
import React from "react";
import Authnavbar from "../components/Authnavbar";

function Signup() {
  const [formData, setFormData] = React.useState({
    username: "",
    email: "",
    password: "",
  });

  const handleChange = (event) => {
    setFormData((prevState) => ({
      ...prevState,
      [event.target.name]: event.target.value,
    }));
  };

  return (
    <>
      <Authnavbar type= "sign-up"/>
      <form>
        <input
          type= "text"
          name= "username"
          placeholder= "Username..."
          onChange={handleChange}
          value={formData.username}
        />
        <input
          type= "email"
          name= "email"
          placeholder= "Email..."
          onChange={handleChange}
          value={formData.email}
        />
        <input
          type= "password"
          name= "password"
          placeholder= "Password..."
          onChange={handleChange}
          value={formData.password}
        />
        <div>
          <button>Sign Up</button>
        </div>
      </form>
    </>
  );
}

export default Sign-up;
This code block represents a sign-up page. It contains a form with input fields, including the user’s username, email, and password.
There is also a formData state that stores the values of the username, email, and password input fields. The handleChange function updates the formData state whenever the user types in the input fields.
In the Login component, write the following lines of code:
import React from "react";
import Authnavbar from "../components/Authnavbar";

function Login() {
  const [formData, setFormData] = React.useState({
    username: "",
    password: "",
  });

  const handleChange = (event) => {
    setFormData((prevState) => ({
      ...prevState,
      [event.target.name]: event.target.value,
    }));
  };

  return (
    <>
      <Authnavbar type= "login"/>
      <form>
        <input
          type= "text"
          name= "username"
          placeholder= "Username..."
          onChange={handleChange}
          value={formData.username}
        />
        <input
          type= "password"
          name= "password"
          placeholder= "Password..."
          onChange={handleChange}
          value={formData.password}
        />
        <div>
          <button>Log In</button>
        </div>
      </form>
    </>
  );
}

export default Login;
The login page is quite similar to the sign-up page, except there is no email input field in the login form, and the formData object state lacks the email property.
Now, style your application by replacing the code in your index.css file with the following lines of code:
*{
  margin: 0;
  padding: 0;
  box-sizing: border-box;
}

body{
  color: #333333;
  background-color: #E8F7F5;
  inline-size: 50%;
  margin: auto;
  font-family: "Montserrat", sans-serif;
}

input{
  padding: 0.7rem 1rem;
  border-radius: 10px;
  border: none;
  outline: none;
  color: #333333;
  background-color: #FFFFFF;
  font-family: "Montserrat", sans-serif;
  inline-size: 100%;
}

input::placeholder{
  font-family: "Montserrat", sans-serif;
  font-weight: 500;
}

button{
  padding: 0.7rem 1rem;
  background-color: #00C3A5;
  color: #FFFFFF;
  font-family: "Montserrat", sans-serif;
  font-size: 14px;
  border-radius: 7px;
  border: none;
}

form{
  margin-block-start: 25%;
  display: flex;
  flex-direction: column;
  gap: 2rem;
  align-items: center;
}

nav{
  display: flex;
  justify-content: space-between;
  align-items: center;
  padding: 1rem 0;
}

.link{
  text-decoration: none;
  color: #00C3A5;
}
After styling your application, run the command below to start your application:
npm run dev
Running the command above will provide you with the link http://localhost:5173/. Navigate to this link on your web browser to view your application.
With the styles you defined, the sign-up page should look like the page below:
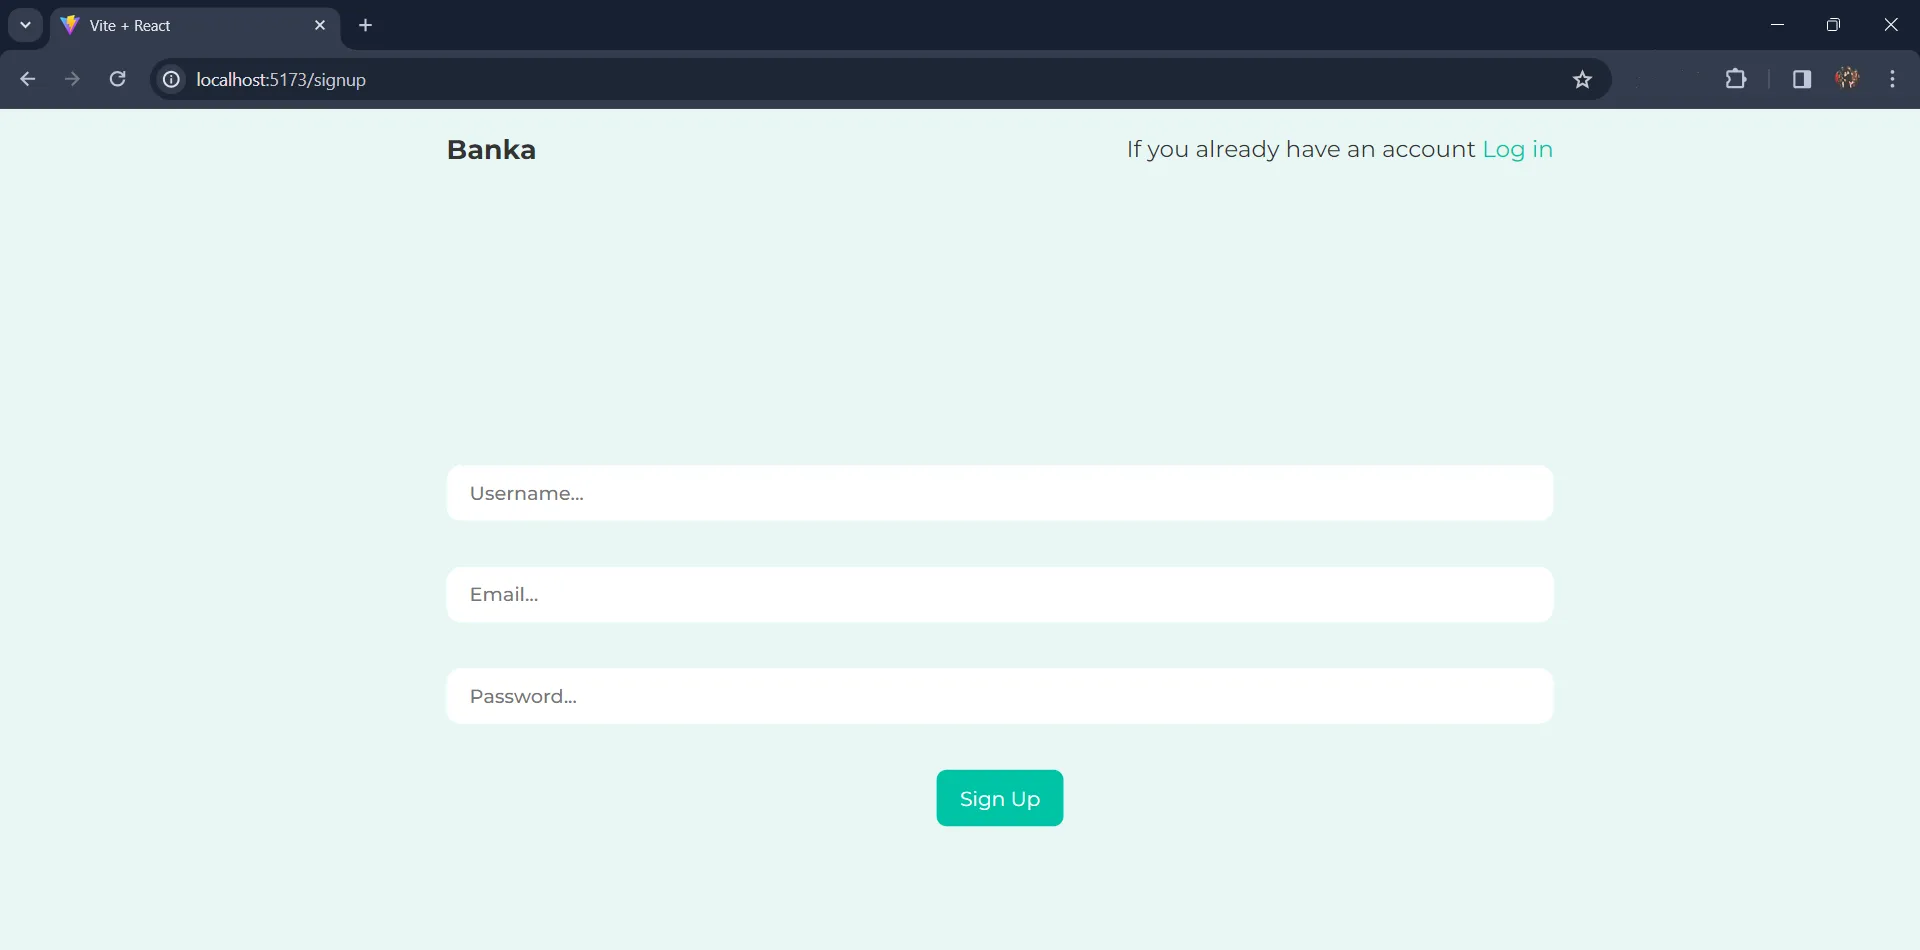
Your login page should look like the image below:
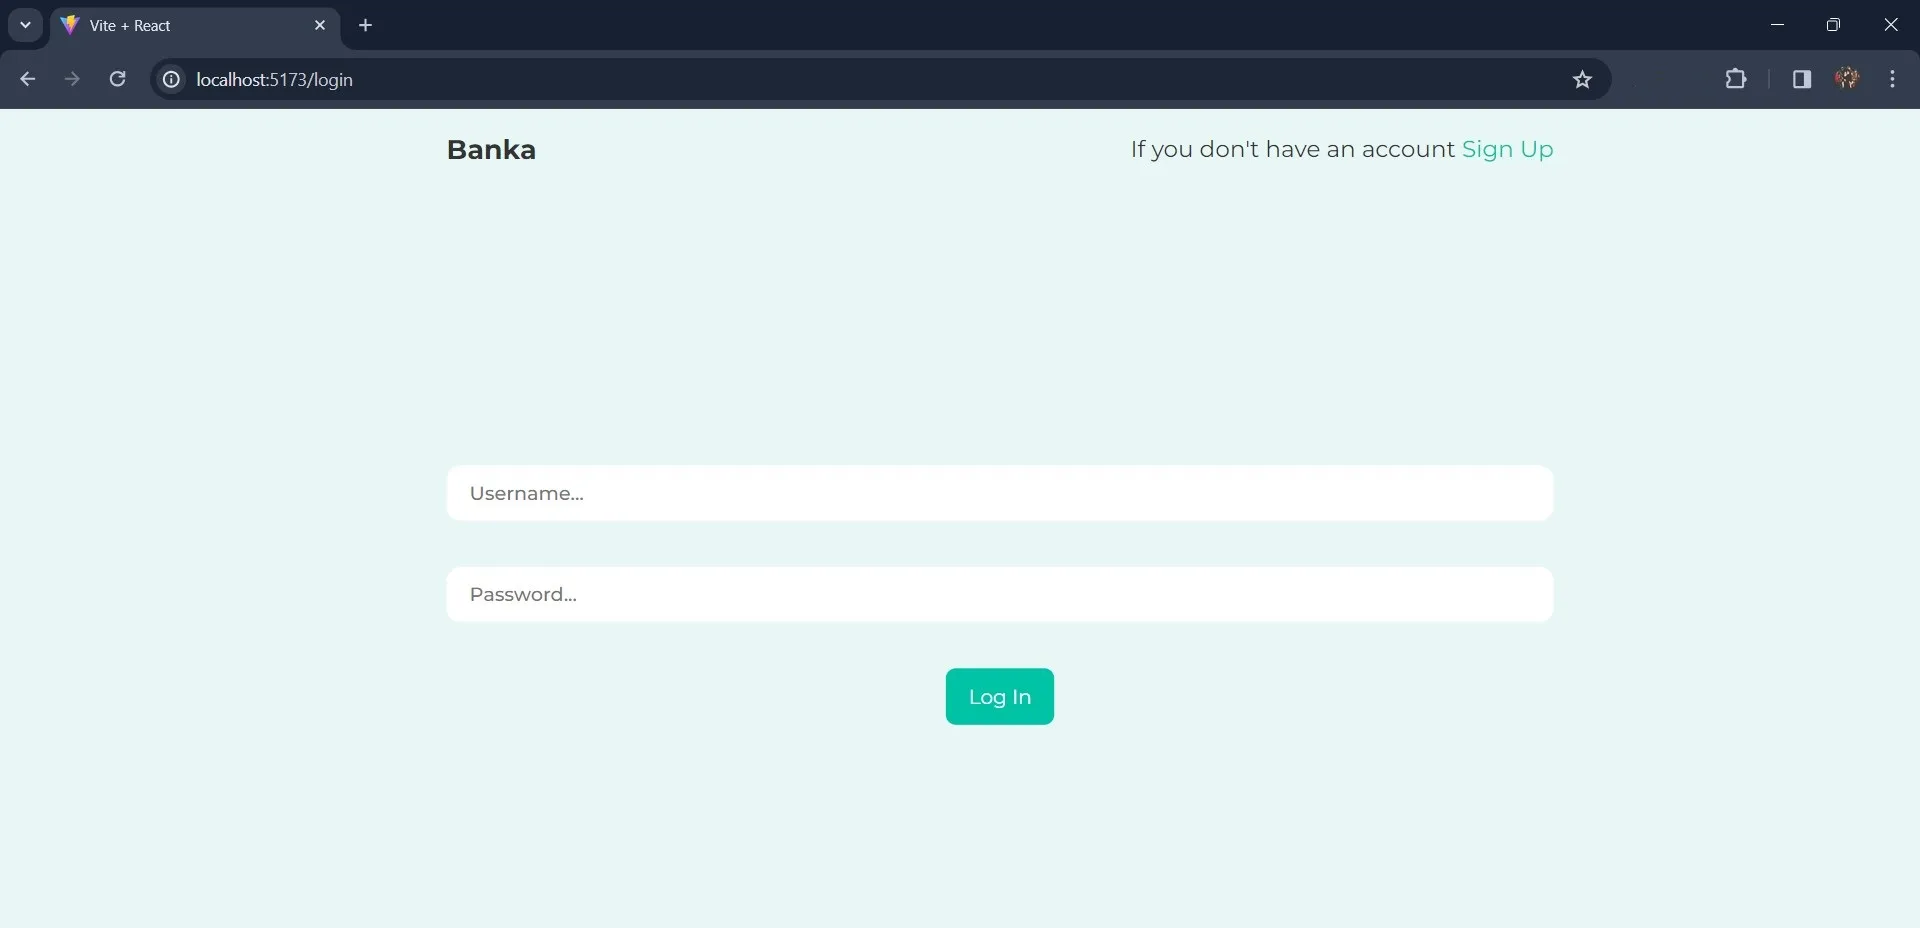
Now that you have created your React application, you need to create a new Back4app application to handle your authentication.
Creating a New Back4App Application
To use Back4app, you need to have an account. You can sign up for free if you do not have one.
For this tutorial, you will create a new Back4app application using the Back4app AI agent. The Back4app AI Agent is an AI helper that helps you execute tasks on Back4app using prompts.
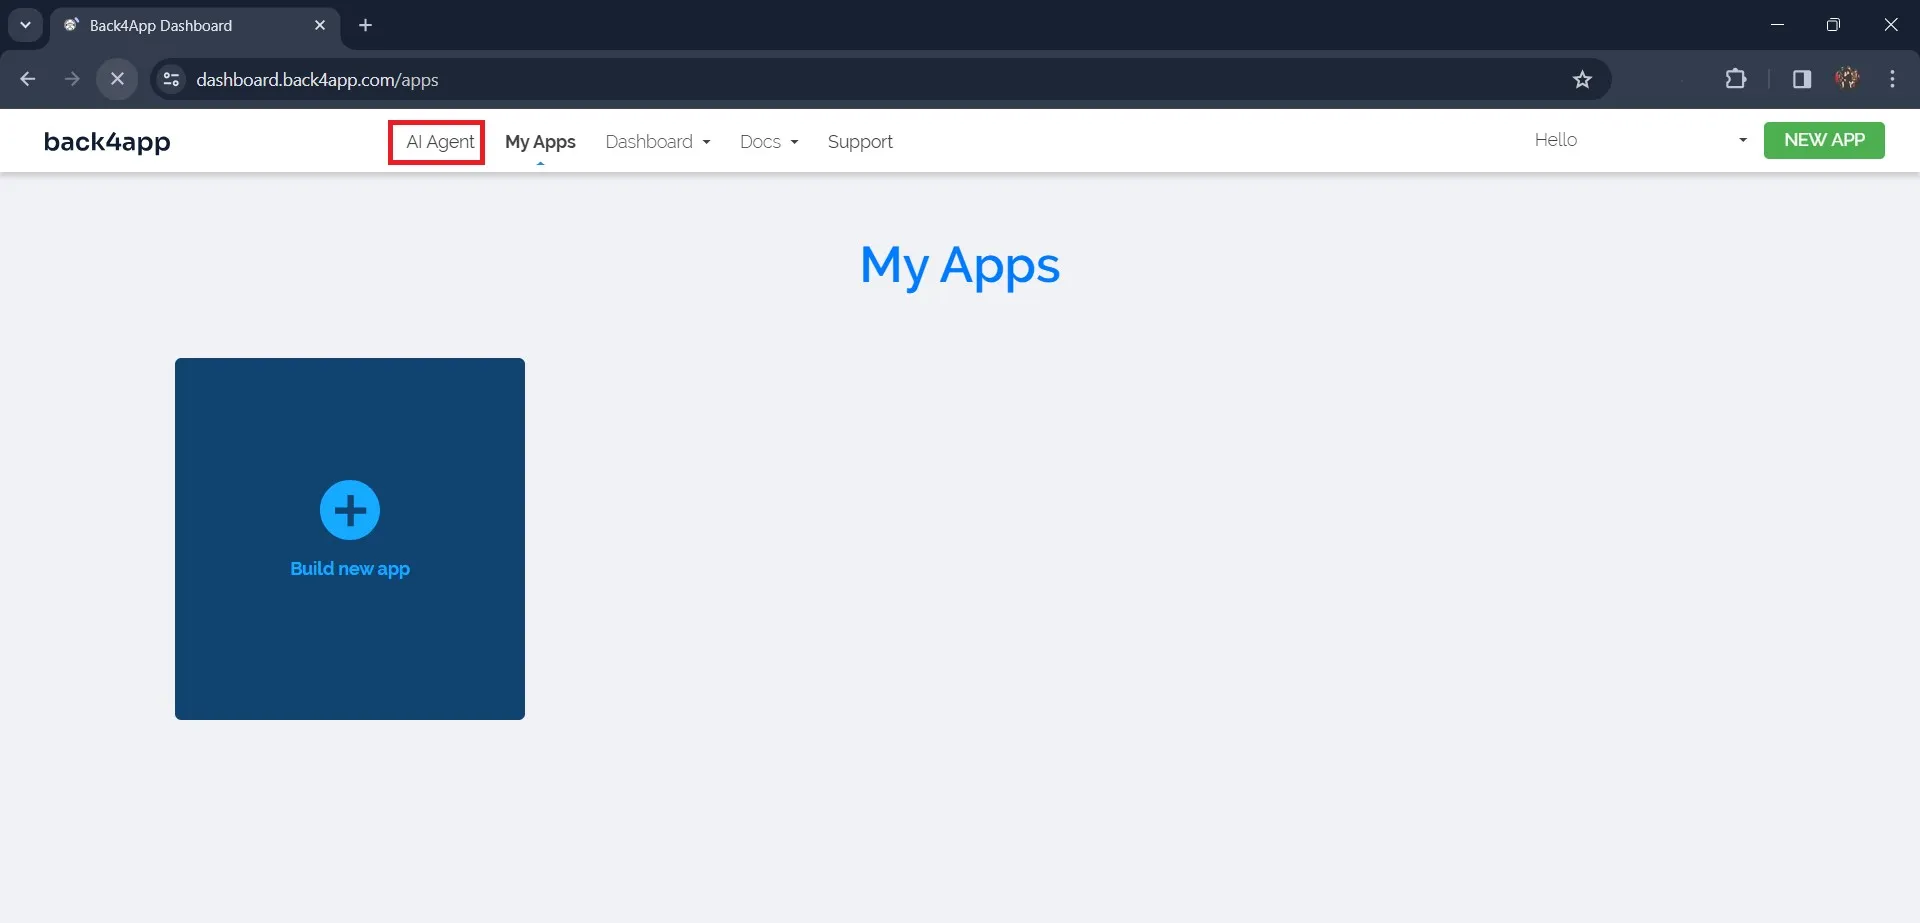
Sign in to your Back4app account and locate and click the “AI Agent” button on your dashboard’s navbar (See image below).
To use the Back4app AI Agent to generate an application, enter the prompt below:
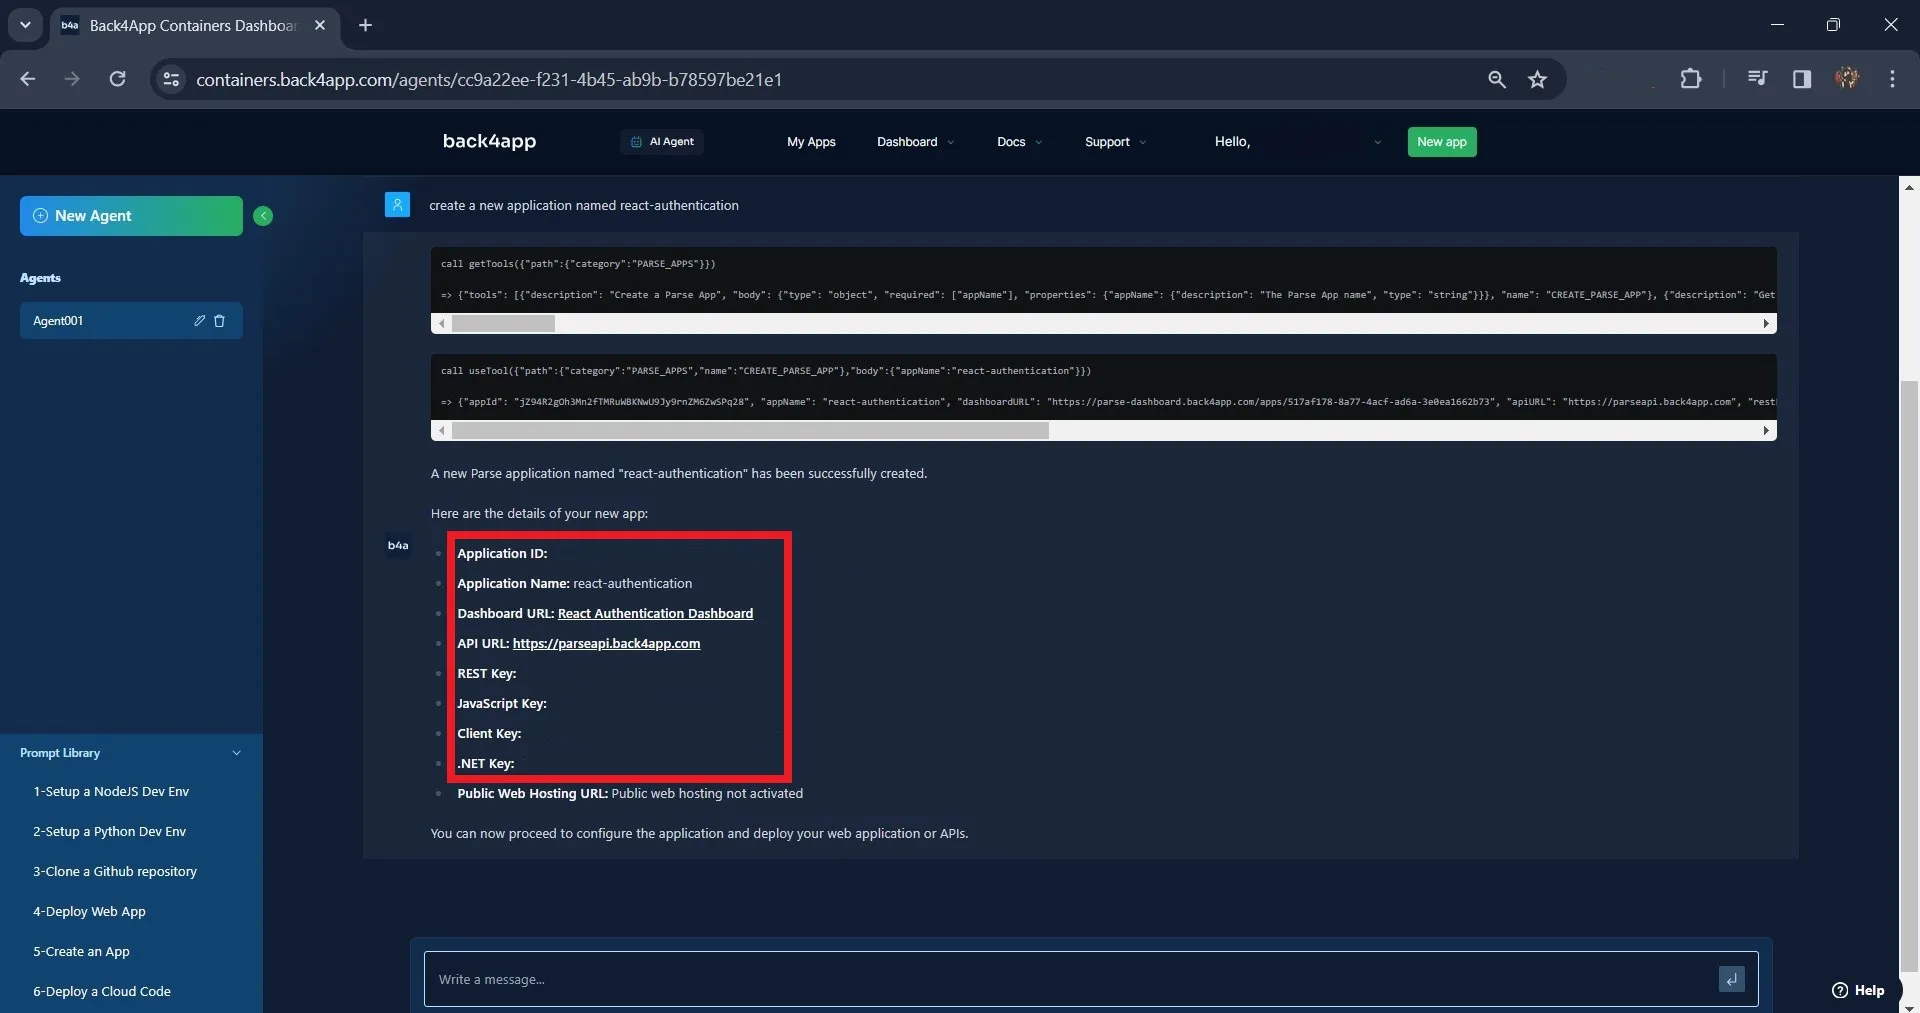
create a new application named react-authenticationYou should get a response similar to the one shown in the image below:
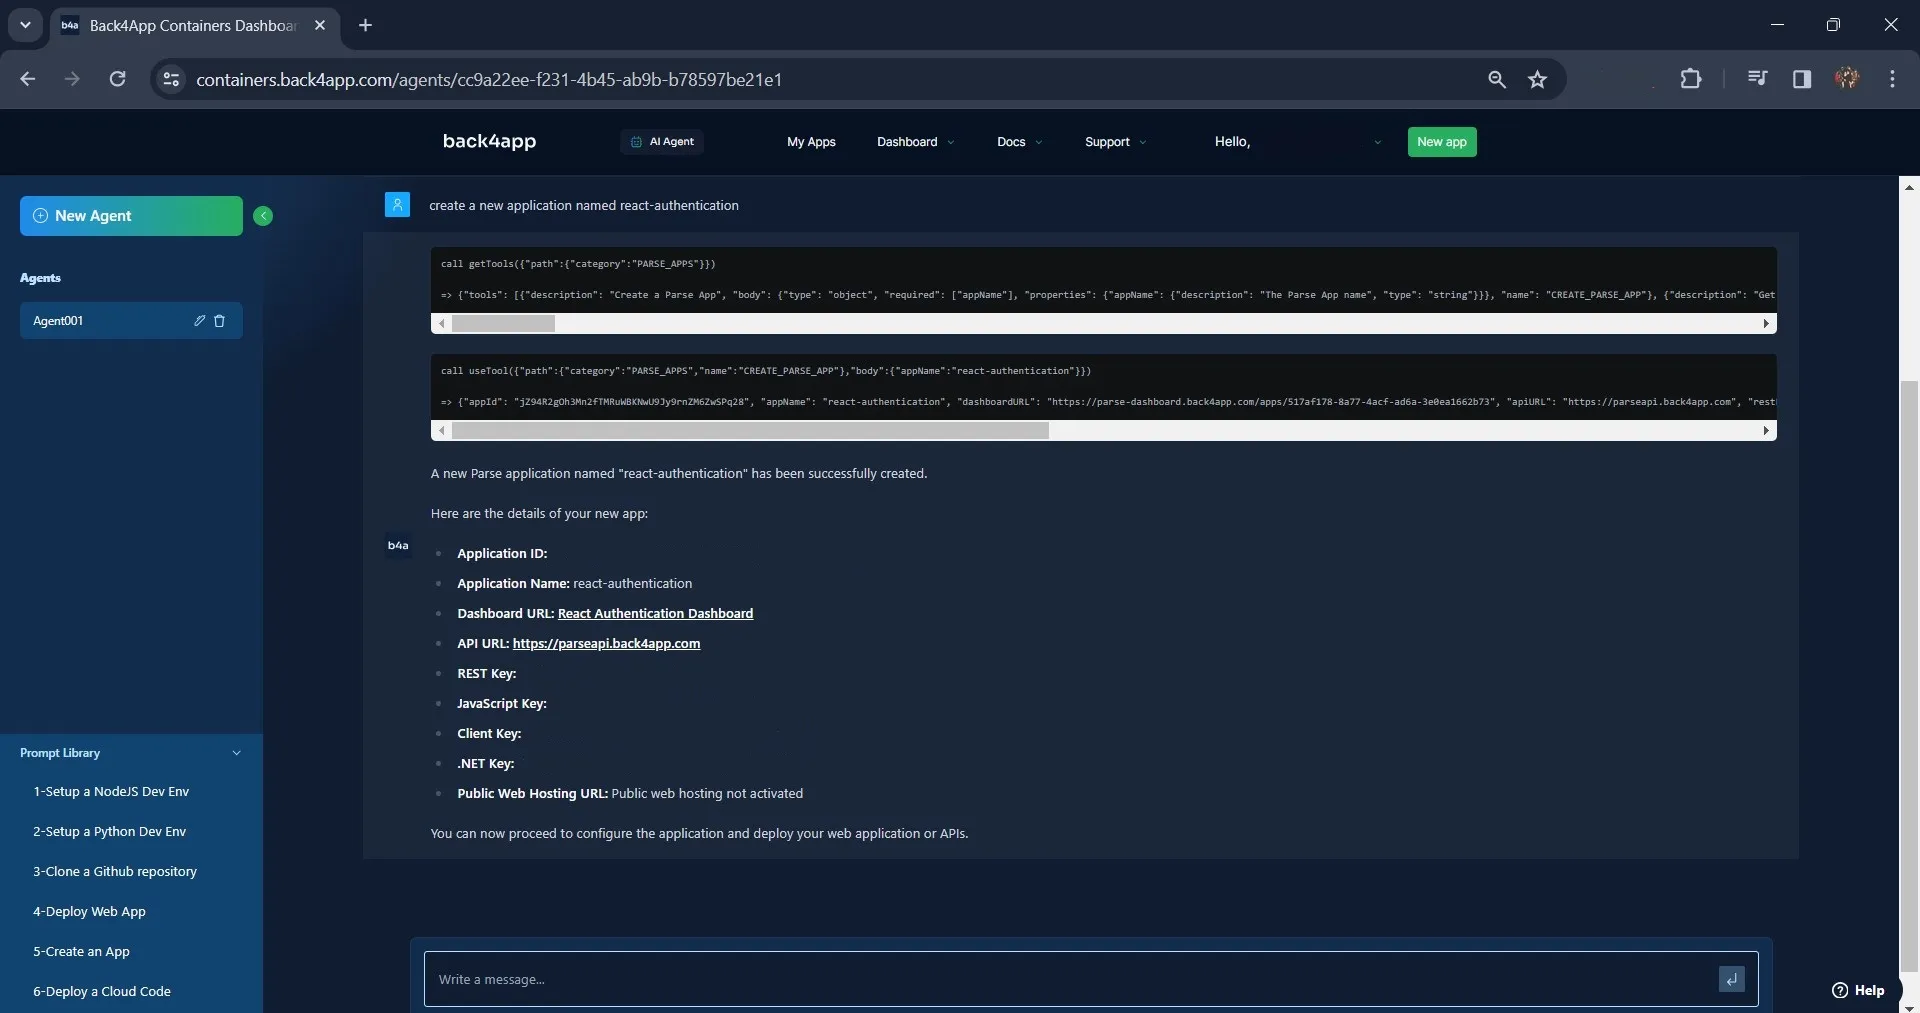
As shown in the image above, the Back4app AI Agent created an application named react-authentication. You can find this application on the “My App” web page.
Alternatively, you can create a new Back4app application using Back4app’s intuitive UI (User Interface).
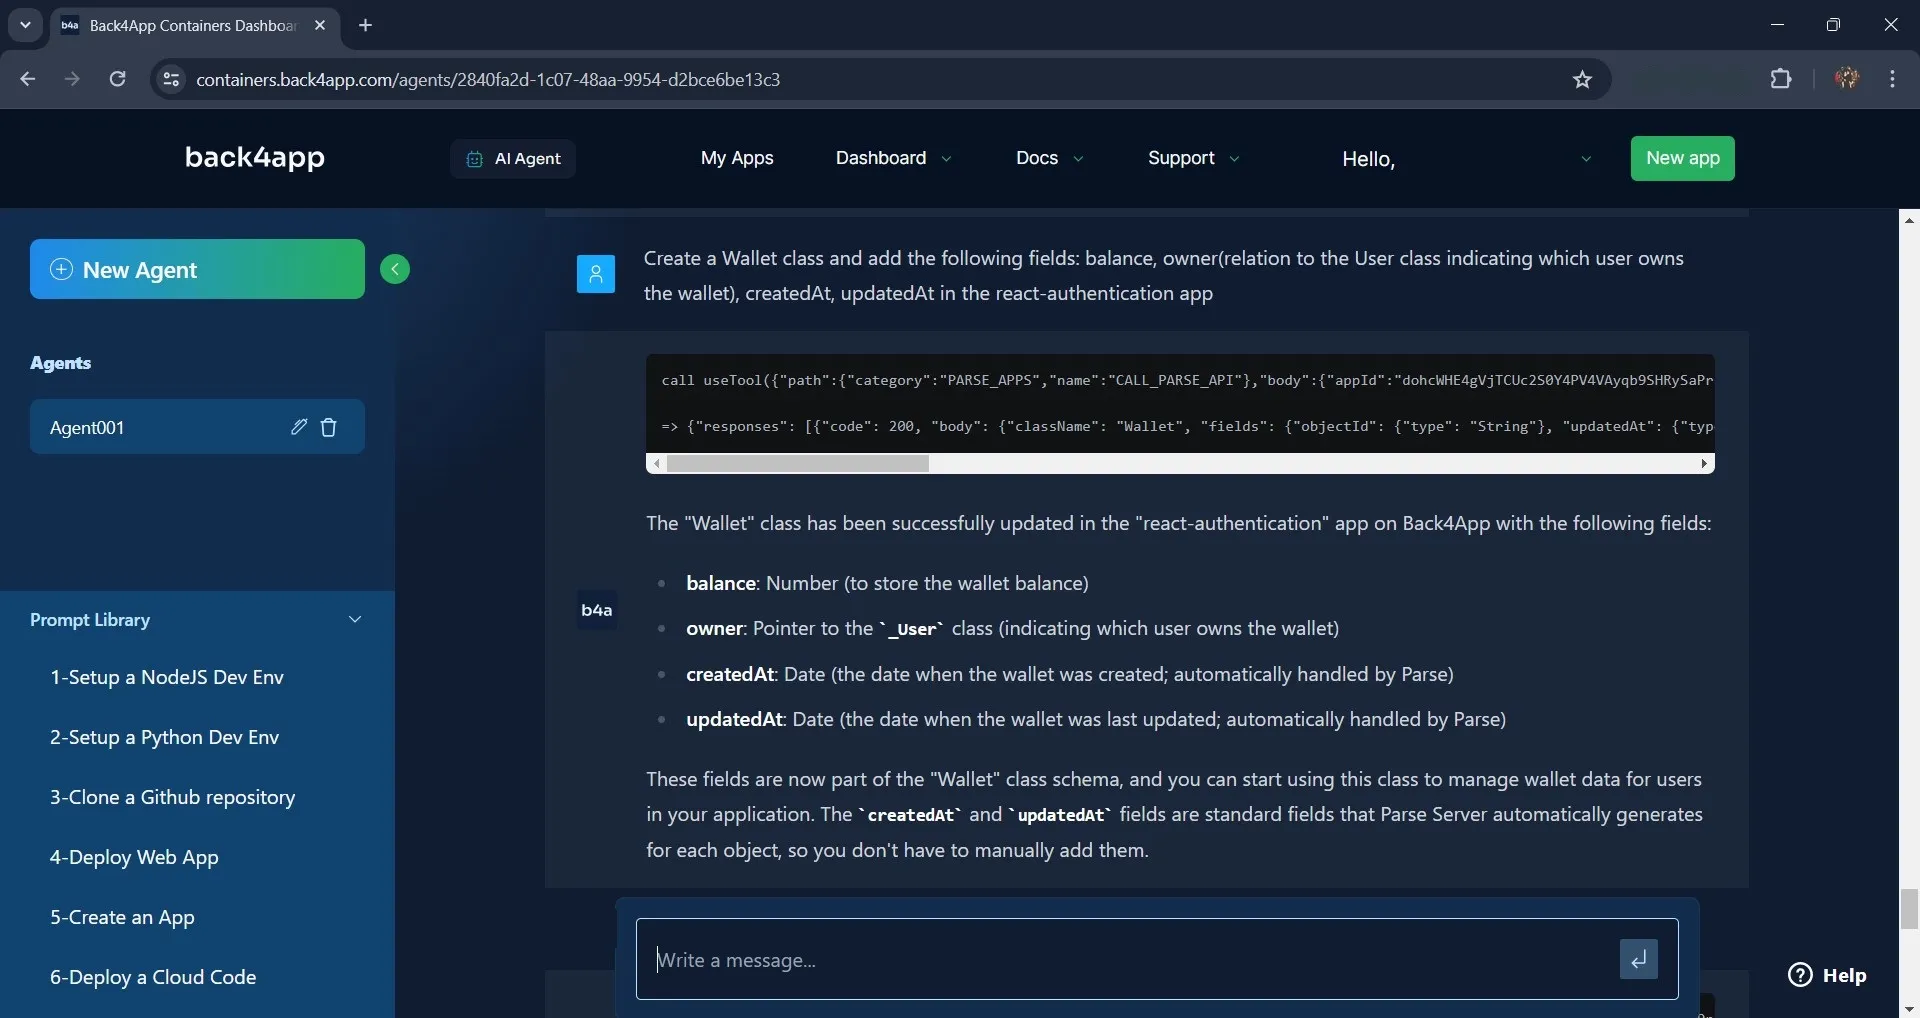
In the react-authentication app on Back4app, create a wallet class. This wallet class will hold valuable information about the user’s wallet.
You can create the class with the AI Agent using the prompt below:
Create a Wallet class and add the following fields: balance, owner(relation to the User class indicating which user owns the wallet), createdAt, and updatedAt in the react-authentication appThe AI Agent will initiate the process of creating the wallet class and add the specified, as shown in the image below.
Connecting Your React App to Back4app
After creating your Back4app application, you need to connect your Back4app application to your React app using the Parse SDK.
Install Parse in your application by running the command below:
npm install parse
Next, initialize it in your application by importing the Parse object in your app component and configuring it with your Back4app application keys.
Like so:
import Parse from 'parse';

Parse.initialize('YOUR_APP_ID', 'YOUR_JAVASCRIPT_KEY');
Parse.serverURL = '<https://parseapi.back4app.com/>';
Replace 'YOUR_APP_ID' and 'YOUR_JAVASCRIPT_KEY' with the respective keys provided by Back4App. You’ll find your app keys on the screen after creating your app with the Back4app AI Agent.
Note that you should always secure the keys properly in your application, preferably using env variables.
Implementing User Authentication using the Parse SDK
With Parse initialized, you can now implement user authentication in your React application.
Back4App automatically provides a User class for user authentication. This class has default fields like username, password, email, etc.
Add the following lines of code to the Sign-up component to implement user sign-up in your React application.
import Parse from "parse"
import { useNavigate } from "react-router-dom";

const navigate = useNavigate();

const signUpUser = async () => {
  try {
    const newUser = new Parse.User();
    newUser.set("username", formData.username);
    newUser.set("email", formData.email);
    newUser.set("password", formData.password);
    const user = await newUser.signUp();

    let Wallet = Parse.Object.extend("Wallet");
    let wallet = new Wallet();

    let userPointer = {
      __type: "Pointer",
      className: "_User",
      objectId: user.id,
    };

    wallet.set("owner", userPointer);
    wallet.set("balance", 100);
    wallet.save();

    console.log(`${user} have successfully signed up`);
    navigate("/login");
  } catch (error) {
    console.log("you encountered an error signing up");
  }
};
The code block above uses the useNavigate hook from react-router-dom to programmatically navigate to different routes. The useNavigate hook returns a navigate function assigned to the variable navigate.
The signUpUser function is responsible for signing up a new user. The function creates a new Parse User object newUser using the Parse.User method and sets the values of its username, email, and password properties to the values of the corresponding properties of the formData object state. It then calls the signUp method asynchronously on the newUser object.
After the code creates a new user, it defines a Parse class named “Wallet” with Parse.Object.extend method.
Then, it creates a userPointer object, which represents a pointer to the user with the class name _User and the newly signed-up user’s object ID. Using the set method, the code sets the wallet’s owner to the userPointer object and sets the wallet’s initial balance to 100.
On a successful sign-up, the function logs a success message and redirects to the login route using the navigate function. If an error occurs during sign-up, it catches it and logs an error message.
Next, create a handleSubmit function that invokes the signUpUser function. Bind this function to the sign-up form using the onSubmit event handler.
This ensures that when a user submits the sign-up form, the handleSubmit function is automatically triggered.
The handleSubmit function should look like this:
const handleSubmit = (event) => {
  event.preventDefault();
  signUpUser();
};
To implement the user login, you will create a logInUser function that holds the logic for logging in a user.
Add the code block below to your Login component:
import Parse from "parse"
import { useNavigate } from "react-router-dom";

const navigate = useNavigate();

const logInUser = async () => {
    try {
      const user = await Parse.User.logIn(formData.username, formData.password);
      console.log("User logged in successfully:", user);
      navigate("/home");
    } catch (error) {
      console.log("Error logging in user:", error);
    }
  };

  const handleSubmit = (event) => {
    event.preventDefault();
    logInUser();
  };
The logInUser function calls the logIn method of the Parse.User class asynchronously, passing in the values of the username and password properties from the formData object state.
The function checks if the username and password the user entered match those stored in Back4App’s User class. If they match, the user will log in successfully.
Bind the handleSubmit function to the login form using the onSubmit event. The handleSubmit function will call the logInUser function and attempt to log the user in.
After login, the Parse SDK manages the user’s session. You can access the current user with the Parse.User.current method. You will make use of this method in the Home component.
Open the Home component and write this code:
import React from "react";
import Parse from "parse";
import { useNavigate } from "react-router-dom";

function Home() {
  const navigate = useNavigate();

  const [balance, setBalance] = React.useState(0);

  const user = Parse.User.current();

  const fetchBalance = async () => {
	  const Wallet = await Parse.Object.extend("Wallet");
	  const query = new Parse.Query(Wallet);
	  query.equalTo("owner", user);
	  const wallet = await query.first();
	  setBalance(wallet.get("balance"));
};

fetchBalance();

  return (
    <>
      <nav>
        <h1 className="title">Banka</h1>
        <button>Log out</button>
      </nav>
      <div className="home">
        <p className="top">Welcome {user.get("username")}</p>

        <div className="balance-card">
          <p>Total Wallet Balance</p>
          <h1>{balance}</h1>
          <button>Top Up</button>
        </div>

        <div className="features">
          <div className="card">
            <p>Pay Bills</p>
          </div>
          <div className="card">
            <p>Airtime/Data</p>
          </div>
          <div className="card">
            <p>Transfers</p>
          </div>
          <div className="card">
            <p>Withdraw</p>
          </div>
        </div>
      </div>
    </>
  );
}

export default Home;
This code block above represents the home page of your application. The fetchBalance function fetches the current user’s wallet balance.
It queries the “Wallet” class with the Parse.Query method and sets a constraint on the query to retrieve the wallet where the owner property equals the current user using the query.equalTo method.
The query.first method executes the query and returns the first result that matches the query constraints.
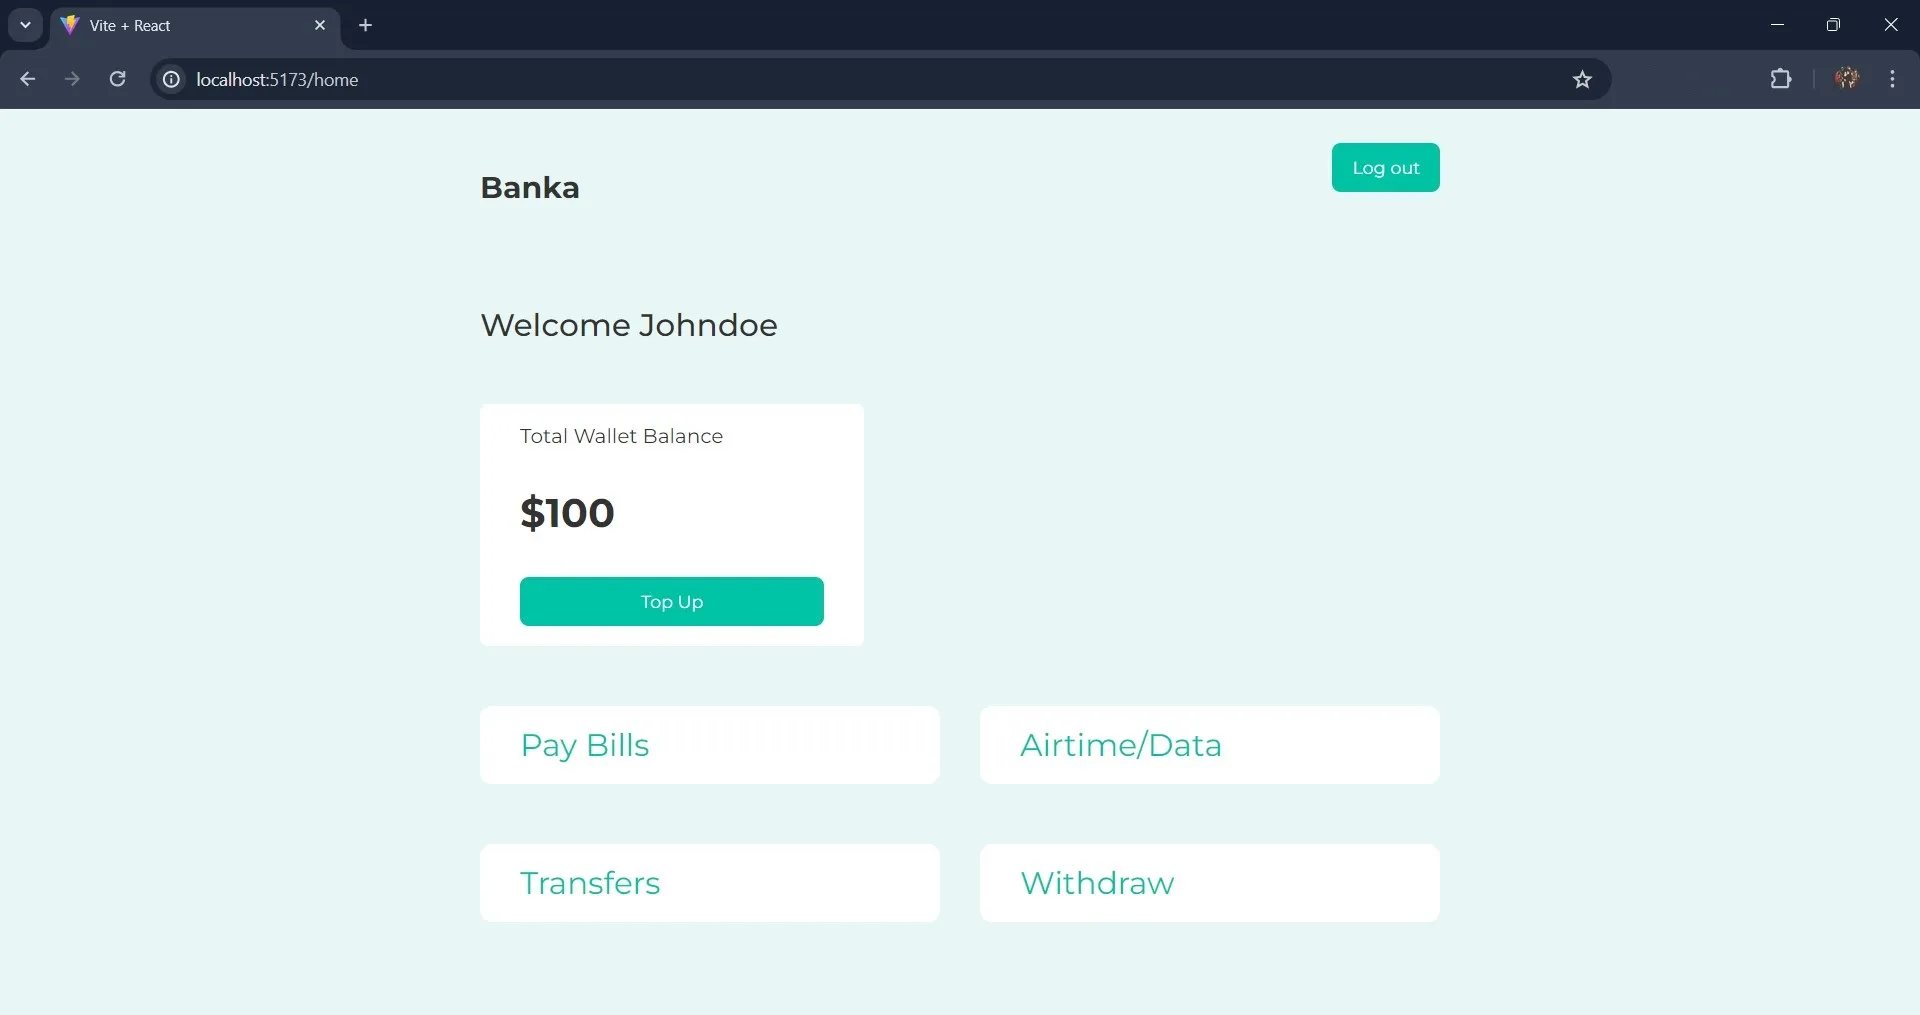
With the setBalance function, the code sets the wallet balance to the balance state. The code displays the user’s name and their wallet balance.
In the JSX section of the code block, you will find the “top up” button in the div tag with the class balance-card.
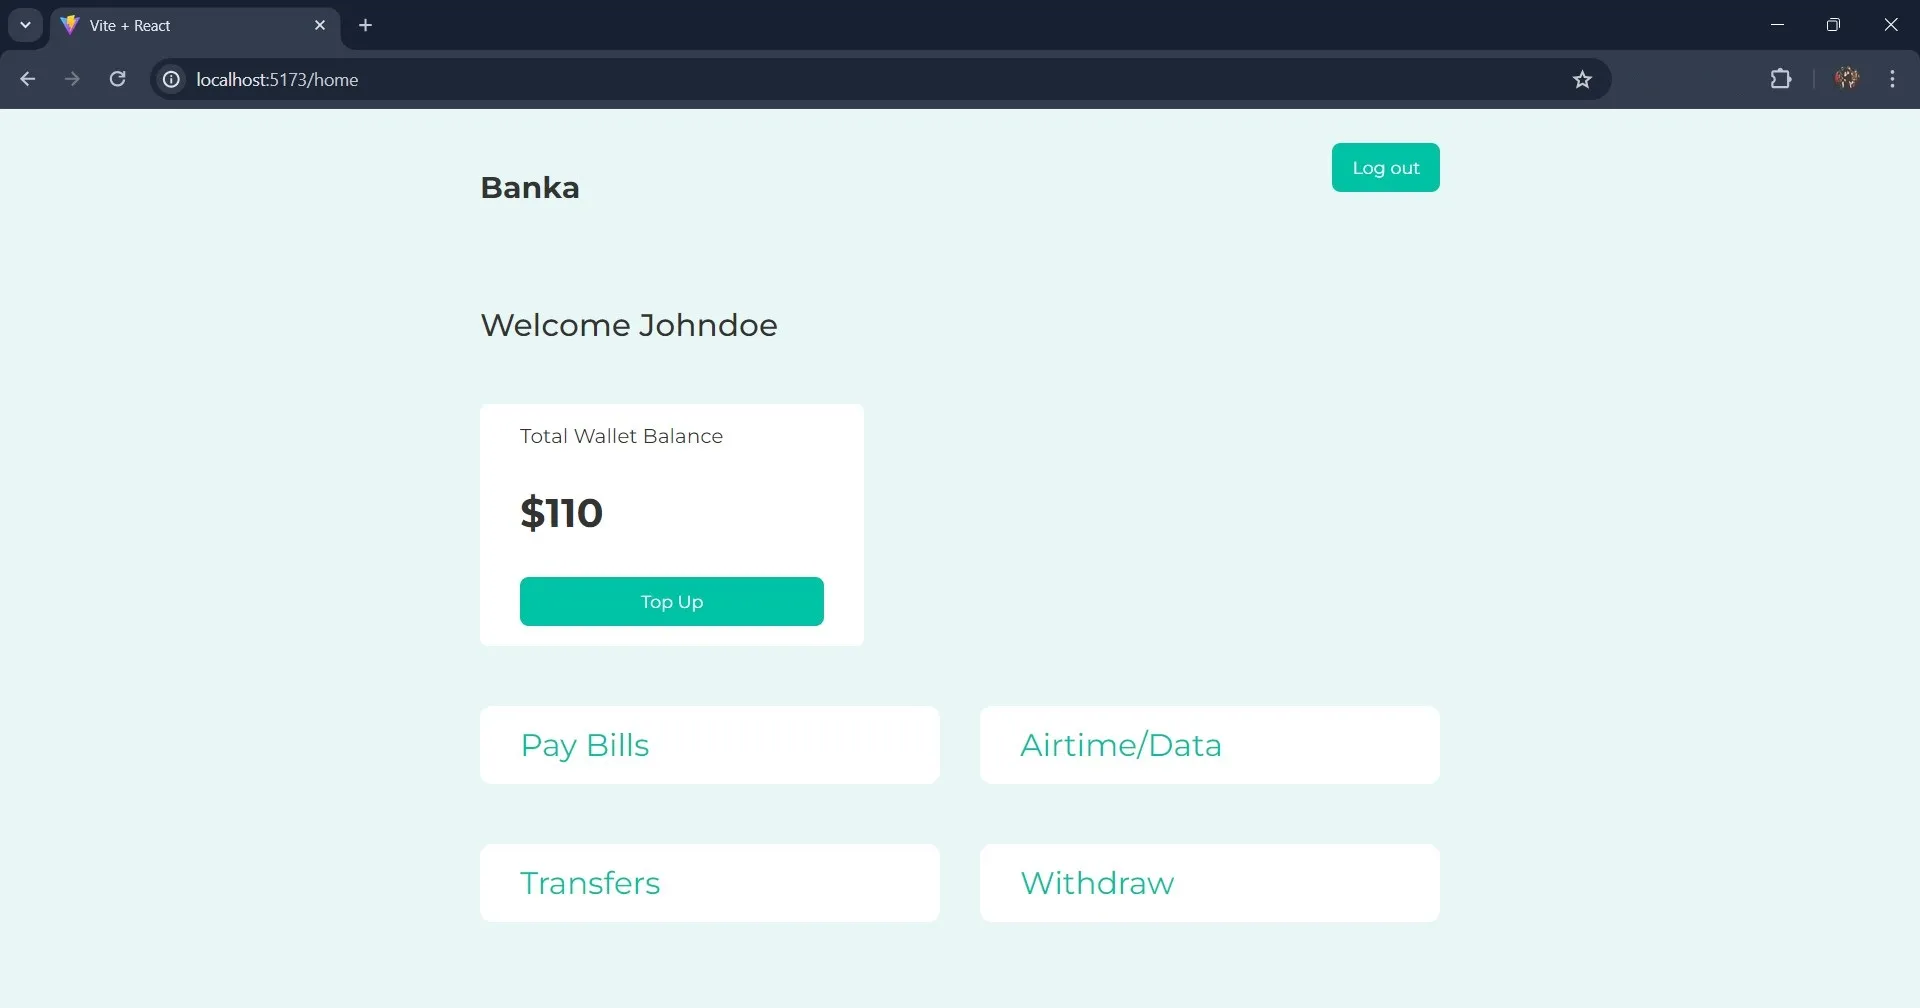
Clicking on this button should increase the wallet balance by 10. To make this possible, you will create a topUp function containing the logic for increasing the balance.
Like so:
const topUp = async () => {
  const Wallet = await Parse.Object.extend("Wallet");
  const query = new Parse.Query(Wallet);
  query.equalTo("owner", user);
  const wallet = await query.first();
  wallet.increment("balance", 10);
  const newBalance = await wallet.save();
  setBalance(newBalance.get("balance"));
};
This code fetches the user’s wallet from the Parse backend, increments the balance by 10 with the increment method, saves the updated wallet back to the backend, and updates the balance state. Bind the topUp function to the “top up” button using the click event handler.
Next, to the Home component, add a logOutUser function responsible for logging out the user. The function should look like this:
const logOutUser = async () => {
  try {
    const user = await Parse.User.logOut();
    console.log("User logged out successfully:", user);
    navigate("/");
  } catch (error) {
    console.error("Error logging out user:", error);
  }
};
The logOutUser function calls the logOut method of the Parse.User class asynchronously to log out the current user. Bind the logOutUser function to the “log out” button in the Home component using the click event.
To style the Home component, add the CSS classes defined below to the index.css file.
.home{
  display: flex;
  flex-direction: column;
  gap: 3rem;
  margin-block-start: 4rem;
}

.title{
  text-align: center;
  margin-block-start: 2rem;
}

.top{
  font-size: 25px;
  font-weight: 500;
}

.balance-card{
  background-color: #FFFFFF;
  inline-size: 40%;
  padding: 1rem 2rem;
  border-radius: 7px;
  display: flex;
  flex-direction: column;
  gap: 2rem;
}

.features{
  display: grid;
  grid-template-columns: repeat(2, 1fr);
  gap: 2rem;
}

.card{
  background-color: #FFFFFF;
  color: #00C3A5;
  margin-block-end: 1rem;
  padding: 1rem 2rem;
  font-size: 25px;
  border-radius: 10px;
}

.card:hover{
  opacity: 0.6;
}
Testing your Application
Once you are done building the React application and implementing the user authentication with Back4app.
The next step is to test the application. To do this, navigate to the link http://localhost:5173/ on your web browser, and the sign-up page will display on your screen.
Fill out the sign-up form and submit it.
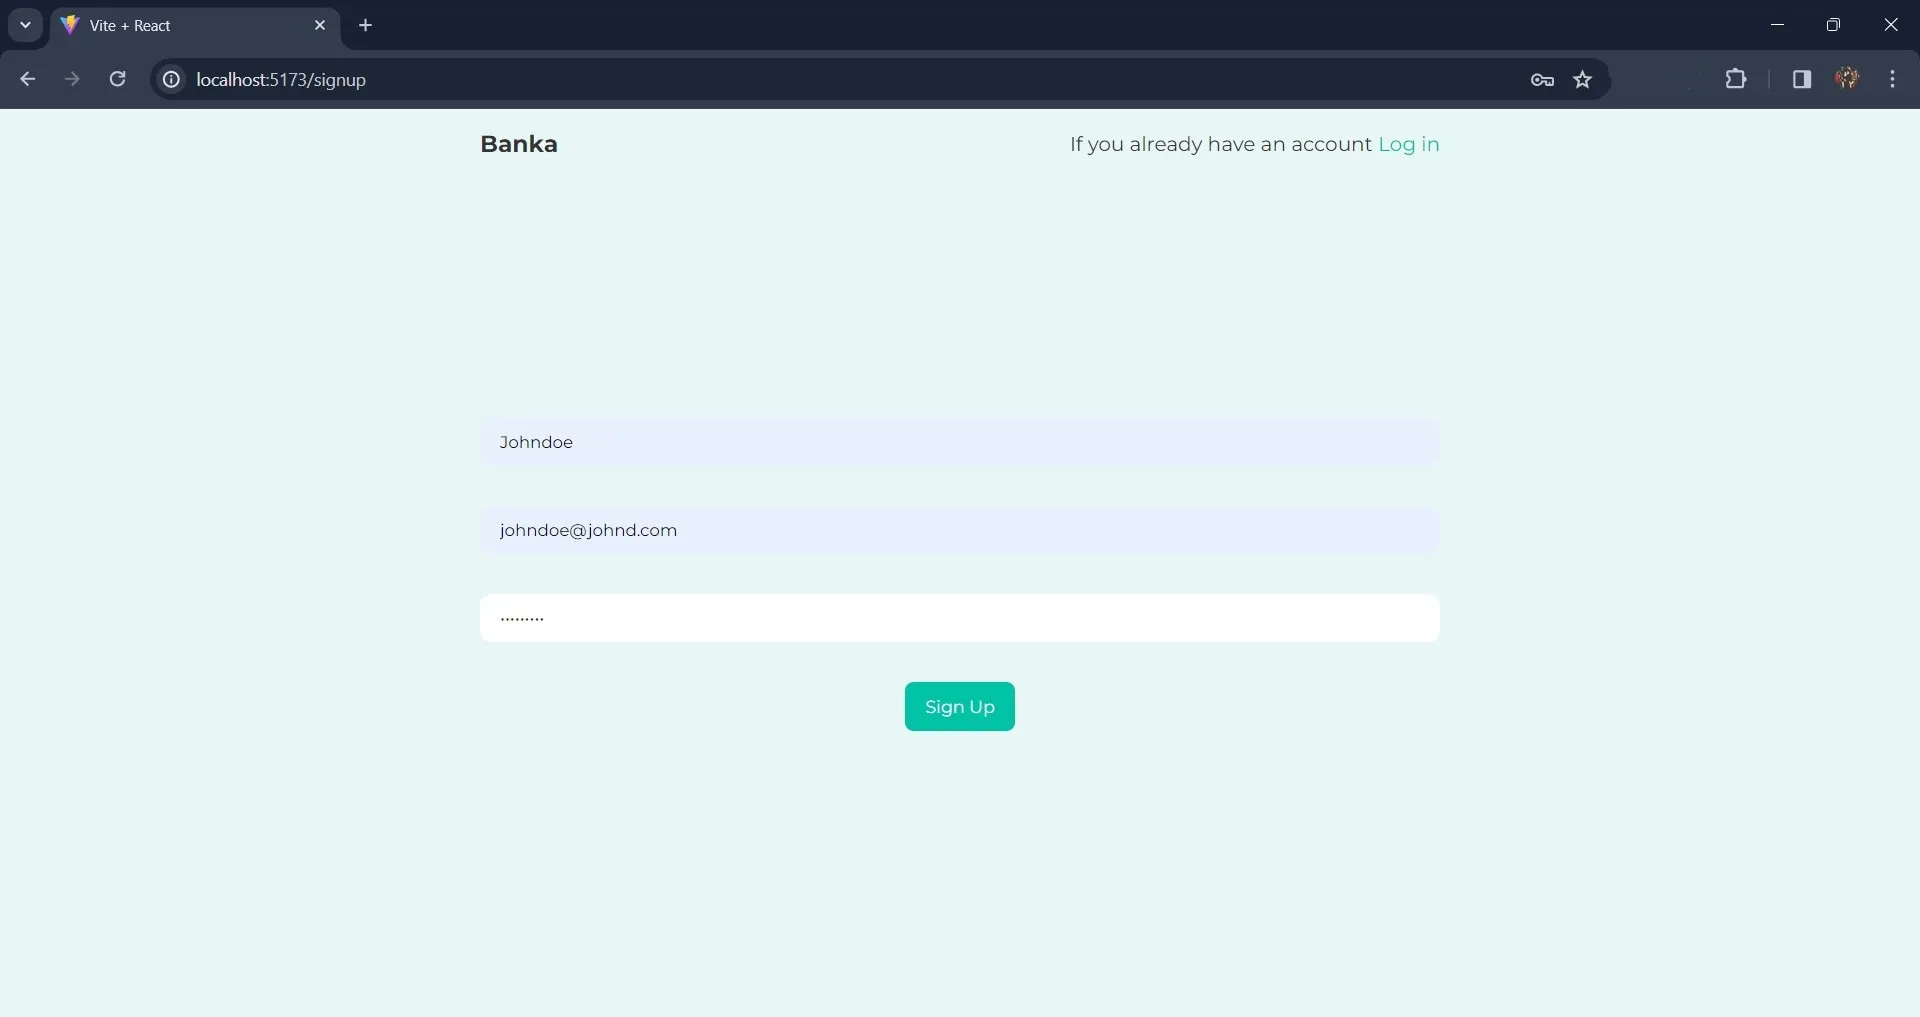
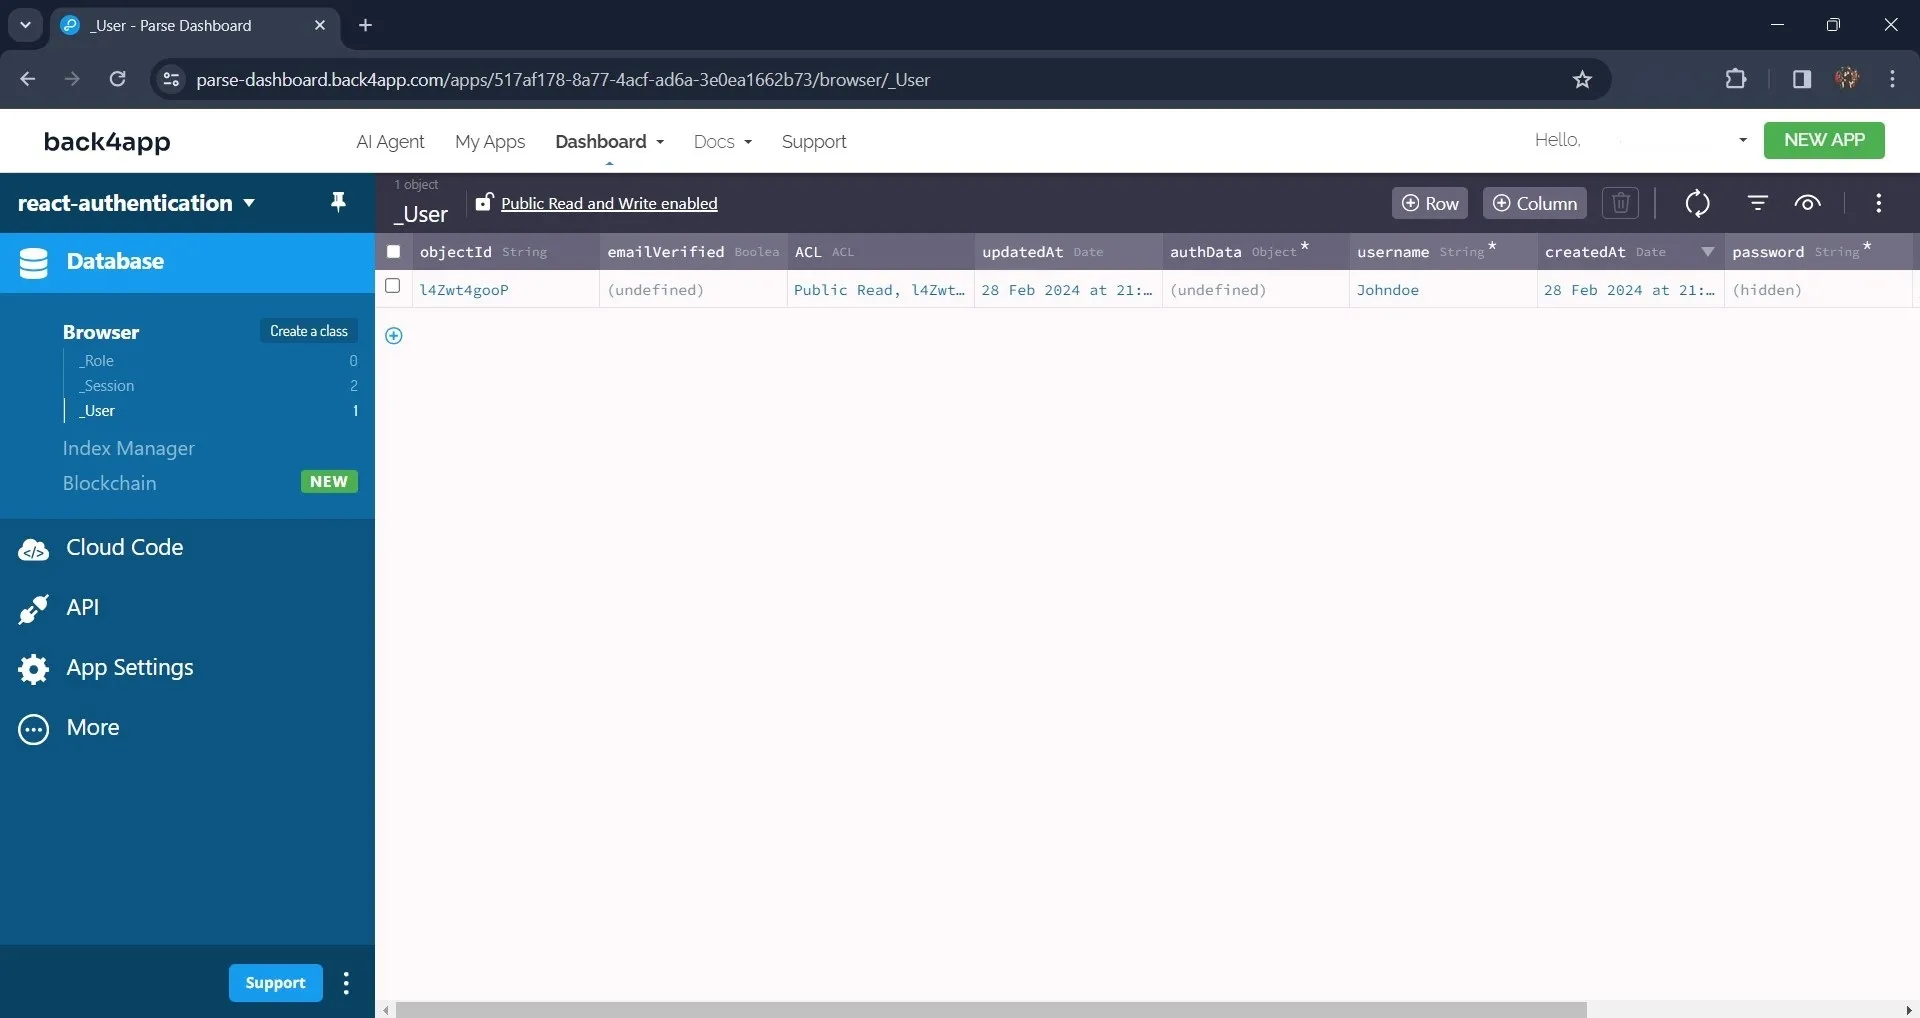
After signing up, you can confirm if the sign-up was successful by visiting your application dashboard on Back4app. If the sign-up is successful, Back4app will add the user details to the User class in your application.
Like so:
After signing up, the application will redirect you to the login page, where you will log in using the username and password you used in the sign-up form.
For example:
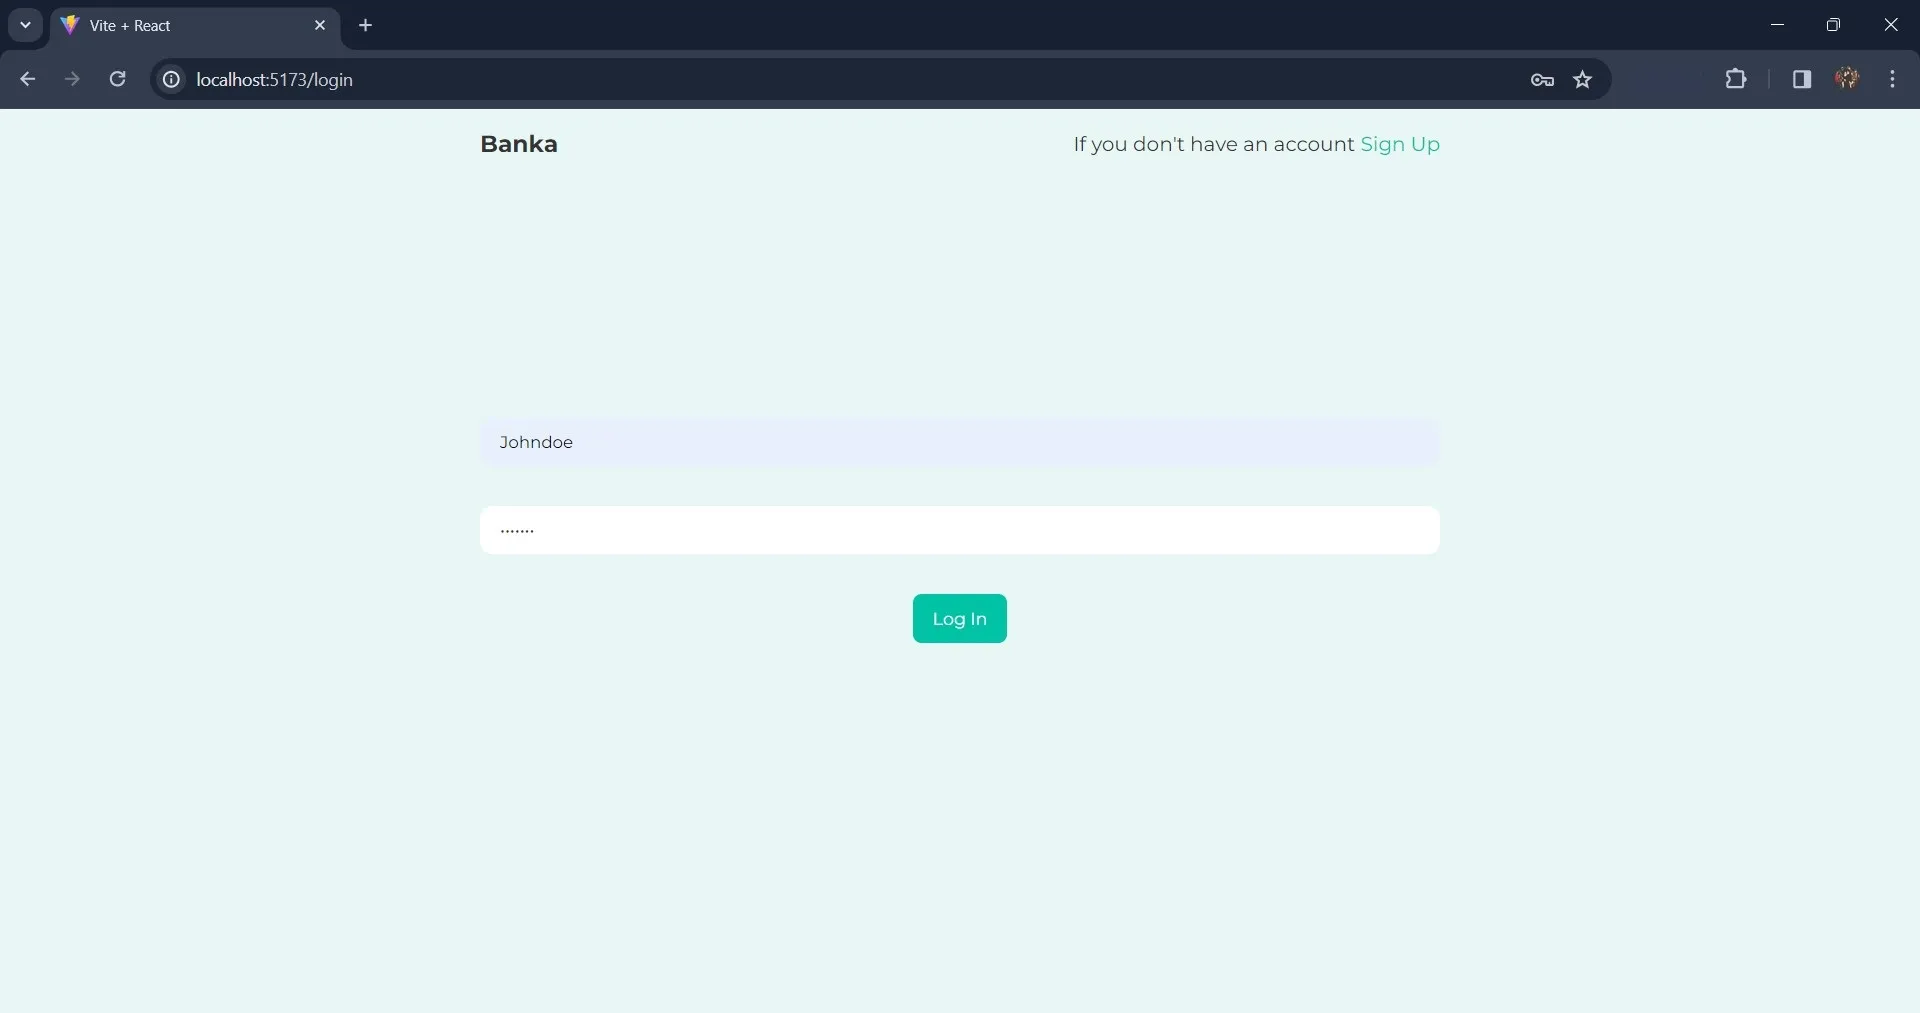
Once you are logged in, the home page will display on your screen, and it should look like this:
Now click on the “top up” button to increase your balance by 10.
Deploying Your React Application on Back4app
To deploy your React application on Back4app, you will use Back4app’s Container as a Service (CaaS) application.
Back4app’s CaaS allows you to deploy and manage Docker containers in the cloud environment provided by Back4App.
Before you can deploy your React application, you first need to dockerize the application. To do this, create a Dockerfile in the root directory of your application and add the following lines of code:
FROM node:16
WORKDIR /app
COPY package*.json ./
RUN npm install
COPY . .
EXPOSE 5173
CMD ["npm", "run", "dev"]
This Dockerfile sets up a Node.js environment, creates a working directory, installs dependencies, copies the application code, exposes a port, and specifies the default command to run the application.
Also, create a .dockerignore file. In the .dockerignore file, add the files and directories excluded from the context when building Docker images.
For example:
#.dockerignore
node_modules
Since you created the React application with Vite, you must update the Vite config file to support Docker. In your vite.config.js file, replace the existing code with the code block below:
import { defineConfig } from 'vite'
import react from '@vitejs/plugin-react'

// <https://vitejs.dev/config/>
export default defineConfig({
  plugins: [react()],
  server: {
    host: true,
    strictPort: true,
    port: 5173,
   },
})
This code block sets the server to use the default host, usually localhost. It sets the port number that the development server will listen on to port 5173 and ensures that Vite will fail to start the server if the specified port is unavailable.
You can now build your application’s docker image by running the following command in your terminal:
docker build -t quote-generator .
Ensure that you push your application to your GitHub account before attempting to deploy the application on Back4app. Once you are done pushing the application, integrate your GitHub account with Back4app.
You can do this with the Back4app Github app. After integrating your GitHub with Back4app, you can now deploy your application using the Back4app AI Agent.
To deploy the application, enter the prompt below:
Deploy my repository <<repository-url>> on Back4app containers
In the code block above, replace the repository-url with your application’s GitHub repository URL.
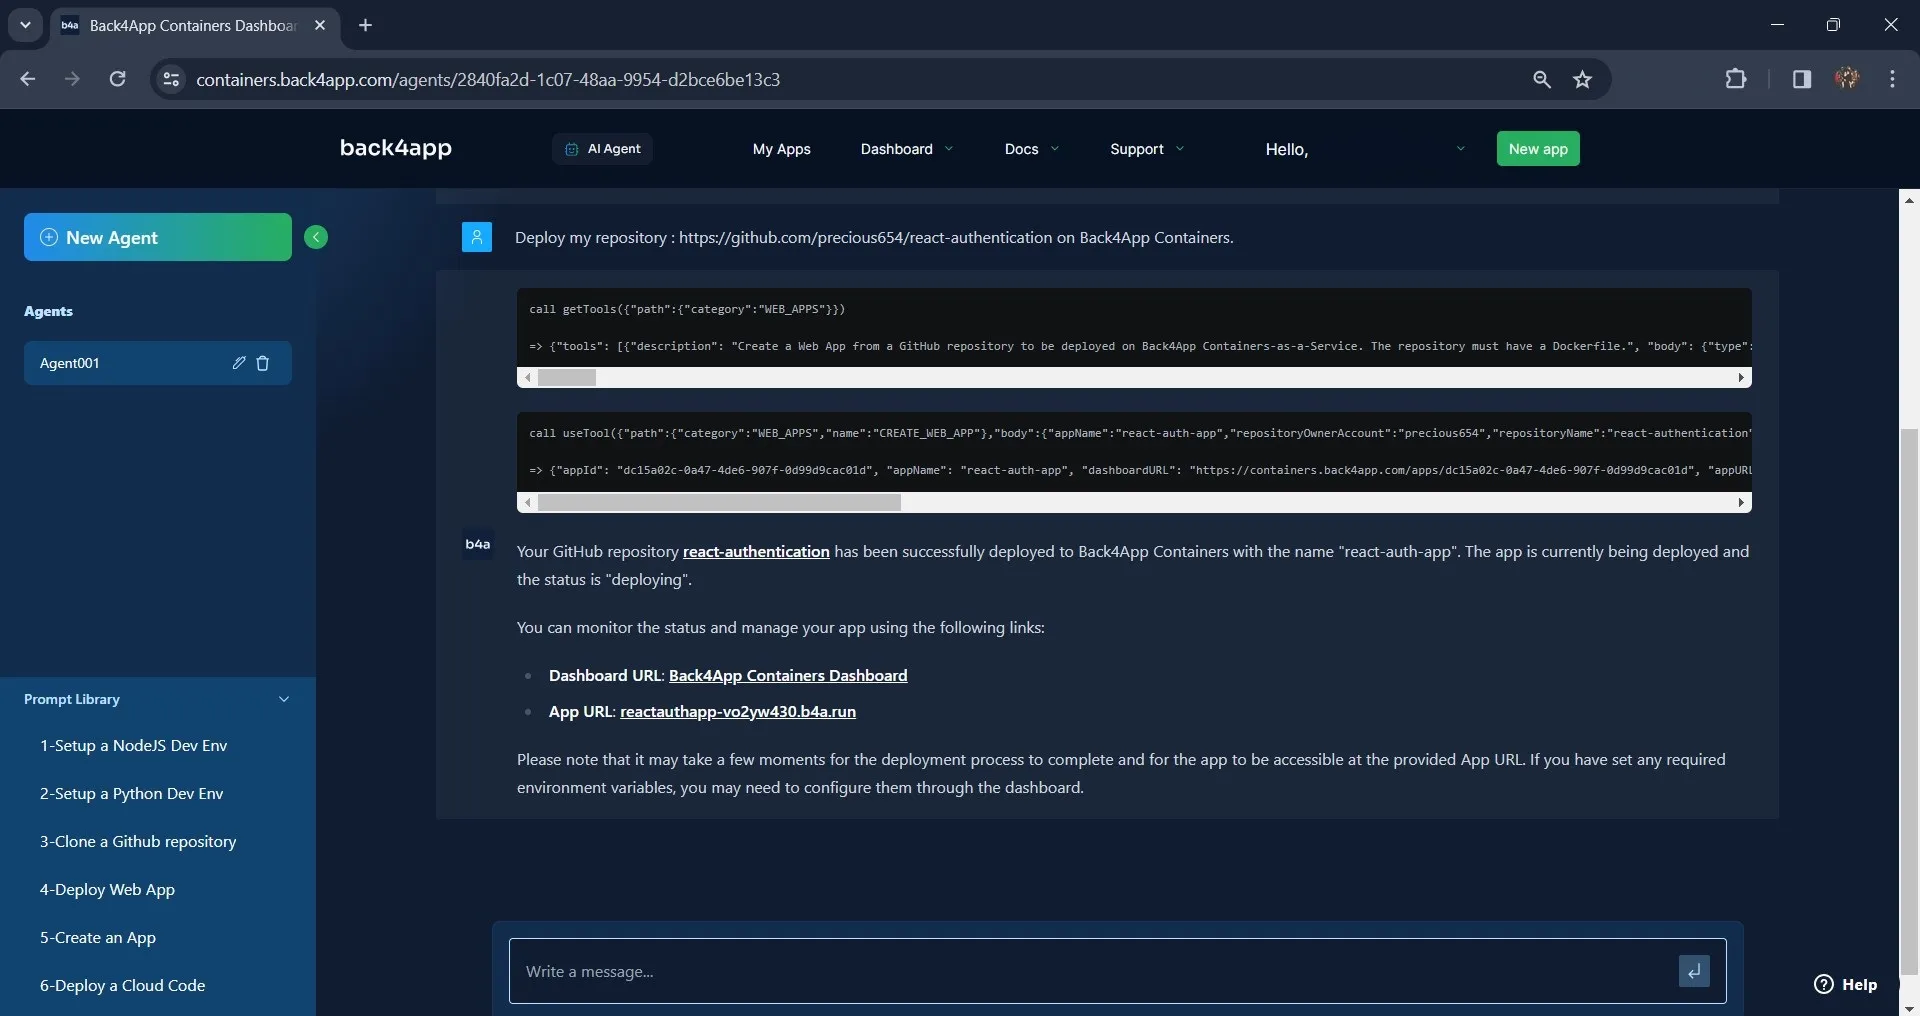
As shown in the image above, when communicating with the AI agent, provide the GitHub repository link of the application you wish to deploy.
After Back4app’s AI Agent initiates the application’s deployment, wait a couple of minutes, then confirm the current status of the deployment.
For example:

Upon successful deployment, the Back4app AI Agent will update the deployment status of the application to “deployed” and provide you with a link to access the application on your browser.
You can find the finished app on this GitHub repository and the live app on this URL.
Conclusion
This article explained how to add authentication to a React app using a backend as a service.
Integrating user authentication into your React app using Back4App is a straightforward process that significantly enhances the security and functionality of your application.
By leveraging Back4App’s services, you can focus on building your web applications with great user experiences while leaving the backend management and authentication tasks to a reliable platform.


