How to build a backend for an Android app?
In this article, we’ll talk about Android — one of the most popular operating systems. We’ll look at the pros and cons of Android development, backend options for mobile applications, and teach you how to build your own mobile backend.
Contents
- 1 Key Takeaways
- 2 What is Android?
- 3 Benefits of Android development
- 4 Limitations of Android development
- 5 Backend options for Android apps
- 6 How to make a backend for an Android app?
- 7 Conclusion
- 8 FAQ
- 9 What is Android?
- 10 What are the benefits of Android development?
- 11 What are the limitations of Android development?
- 12 How to build a backend for an Android app?
Key Takeaways
- Android’s Dominance: Android, as an open-source OS, powers roughly 70% of mobile devices with over three billion active users.
- Backend Options for Apps: For mobile app backends, developers can opt for Infrastructure as a Service (IaaS), Platform as a Service (PaaS), or Backend as a Service (BaaS).
- Steps to build your backend: We will provide a detailed tutorial on how to make an Android backend using a BaaS platform and the source code by the end of the article.
What is Android?
Android is a free and open-source Linux-based operating system. It was primarily designed for mobile devices such as smartphones and tablets but is now also used for smart TVs, embedded systems, gaming consoles, et cetera.
The development of Android started in 2003 by Android Inc. The company initially wanted to create an OS for digital cameras but quickly shifted towards mobile OS development to reach a broader market.
In 2005 the company was acquired by Google along with its employees. The first version of Android was released in 2008.
Even though Android is open-source, most mobile devices run Google’s proprietary version. Their version comes preinstalled with software such as Google Chrome, YouTube, Google TV, and Gmail.
Due to Android’s great customization options, many manufacturers also skin Android to represent their company better. This is why OnePlus Android looks quite different than Pixel Android.
Android has been the most popular operating system since 2013. It is used by roughly 70% of mobile devices and has over three billion monthly active users.
On top of that, Google Play Store provides you with access to more than three million mobile applications. Keep reading to learn how to create a backend for an Android app.
Benefits of Android development
Let’s explore some of the perks of developing for Android.
Cross platform
By developing for Android you can target a wide range of devices. That includes mobile phones, wearables, smart TVs, gaming consoles, and more. If you know how to code a mobile app, you’ll have no problem developing a wearable or smart TV app.
Enormous market
As introduced earlier, Android holds a larger market share at 70%, compared to iOS with 30%. By developing Android apps, you’ll automatically be able to gain access to a broader audience.
On top of that, Android apps are known for their low investment and high return on investment. Unlike iOS, there are also no annual developer fees involved.
Customizability
Android devices are highly customizable compared to other operating systems. They allow you to change practically anything you can imagine.
Additionally, Android allows you to integrate your app with other 3rd-party services easily.
Community
Android is backed by a massive community of open-source developers. Moreover, it comes with many developer-friendly tools like Android Studio, ADB, and Logcat that allow you to code apps easily.
If you ever get stuck, there are several platforms where you can find help, including GitHub, StackOverflow, Reddit, and other Android-centric communities.
Limitations of Android development
Here are some of the cons of Android development.
Security
Android is less secure than iOS and doesn’t follow strict security protocols. Since Android is open-source, security vulnerabilities are detected on a weekly basis. This gives hackers the ability to exploit these vulnerabilities before they’re patched.
Android devices can also be rooted to gain superuser access. While it makes your device more powerful, it is also risky since it disables some built-in security measures.
Complexity
Android devices come in different shapes and sizes, and while that’s great, it can be a huge drawback when developing Android apps for multiple device types.
To ensure your app is compatible with as many devices as possible, you’ll have to incorporate responsive design, think about different devices’ hardware, and so on.
Premium apps
Premium apps are less successful on Google Play Store compared to App Store. It’s no secret that Android users tend to spend less on apps than iOS users. If you’re working on a premium-first application, consider Android your second choice.
Backend options for Android apps
What is the best backend for an Android apps? Backends for mobile applications can be hosted on your own infrastructure or deployed to the cloud services. The most popular cloud computing models for mobile backends include:
- Infrastructure as a Service (IaaS)
- Platform as a Service (PaaS)
- Backend as a Service (BaaS)
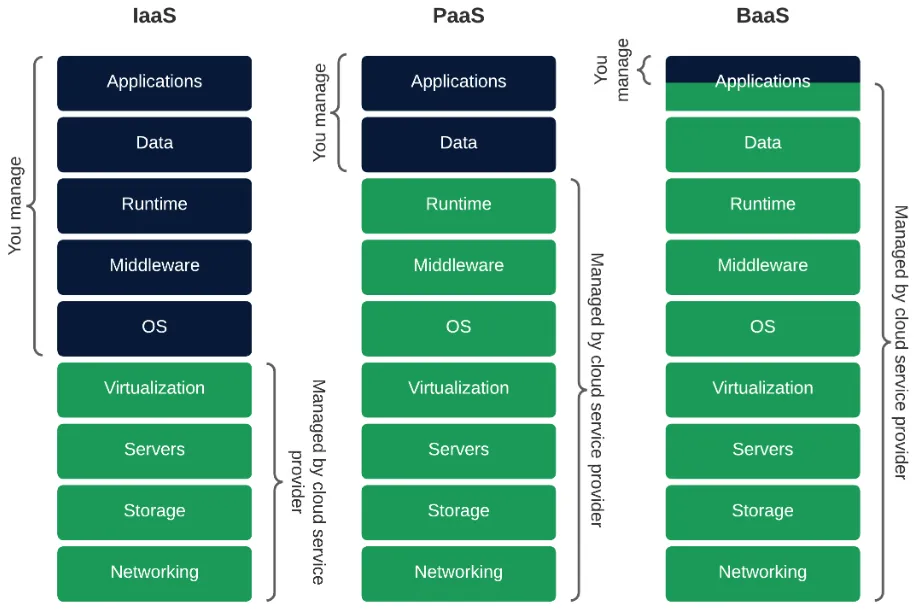
Each option covers different abstraction layers, as depicted in the image below.
Let’s look at each option in detail to help you select the most suitable cloud model for your backend apps.
Infrastructure as a Service (IaaS)
Infrastructure as a Service (IaaS) is the least abstracted cloud computing model. In this model, the vendor offers users virtualized resources, such as servers, networking, storage, and operating systems, through high-level APIs or intuitive dashboards.
The best thing about IaaS is that it gives users complete control over their entire infrastructure. IaaS is the most flexible and scalable model but also the most difficult to manage. If you choose this option, you’ll most likely need a SysAdmin or two.
A few examples of IaaS are Amazon Web Services, Google Cloud Platform, and Azure.
Platform as a Service (PaaS)
Platform as a Service (PaaS) is a cloud computing model designed to help users develop, manage, and deploy applications.
Besides providing infrastructure, PaaS comes with user-friendly tools for developing, customizing, and testing applications.
By utilizing PaaS, you’ll be able to focus on your software and user experience without worrying about the underlying infrastructure.
Additionally, PaaS will ensure your app scales on demand, take care of the backups, et cetera. The downsides of PaaS are lower level of control, risk of vendor lock-in, and comparatively higher costs.
Most popular PaaS platforms include Heroku, Render, and Digital Ocean App Platform.
Backend as a Service (BaaS)
Backend as a Service (BaaS) automates the backend part of development by providing a fully-fledged backend solution.
BaaS features include user management, databases, authentication, social integrations, push notifications, APIs, SDKs, and more.
BaaS gives you all the perks of IaaS and PaaS while providing additional functionalities. Teams who leverage BaaS tend to release their products faster, cut engineering costs, and build better software.
BaaS downsides include a lower control and customization level and the possibility of vendor lock-in for non-open-source platforms.
BaaS examples include Back4app, AWS Amplify, and Firebase.
How to make a backend for an Android app?
In this article section, we’ll look at how to build a Back4app-based backend app and connect to it from an Android application.
Prerequisites
- Experience with Kotlin and Android development.
- Basic understanding of Mobile Backend as a Service.
- Java and Android Studio installed on your local machine.
What is Back4app?
Back4app is an excellent platform for building backends for modern applications and accelerating the development process.
It comes well-equipped with useful server side features such as user management, real-time databases, social integrations, Cloud Code functions, push notifications, APIs, and more!
By using Back4app, you’ll be able to off-source much of the backend work and focus on the critical aspects of your application and accelerate an Android app backend development.
There will be no need to deal with your backend’s underlying infrastructure, backend server, scaling, maintenance, et cetera.
Most importantly, Back4app offers a free tier which is great for experimenting and testing out the platform. As your app grows, you can upgrade to premium plans under a monthly fee.
Project Introduction
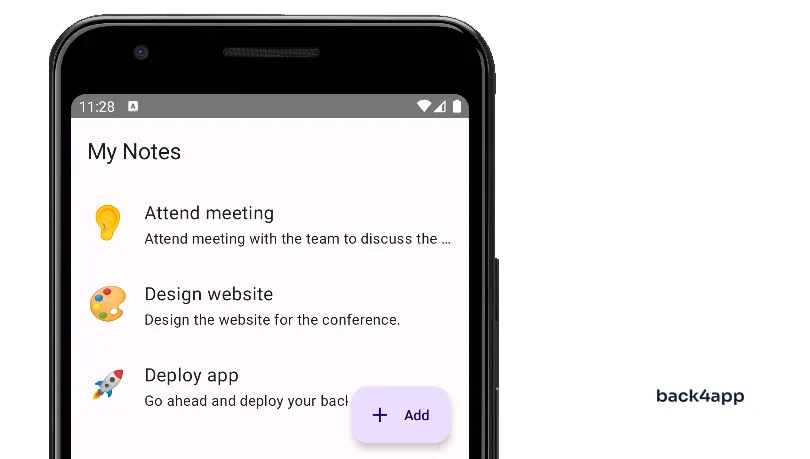
In this article, we’ll be building a simple notes app. The app will allow users to add, edit, and delete notes. The notes will be stored in the Back4app database and manipulated with via Parse SDK.
We’ll use the Kotlin programming language to build the app. For the UI, we’ll utilize Jetpack Compose — Android’s modern toolkit for building native UIs.
Create Back4app App
As the first step to develop a backend for an Android app, you’ll need a Back4app account. If you don’t have one, go ahead and sign up.
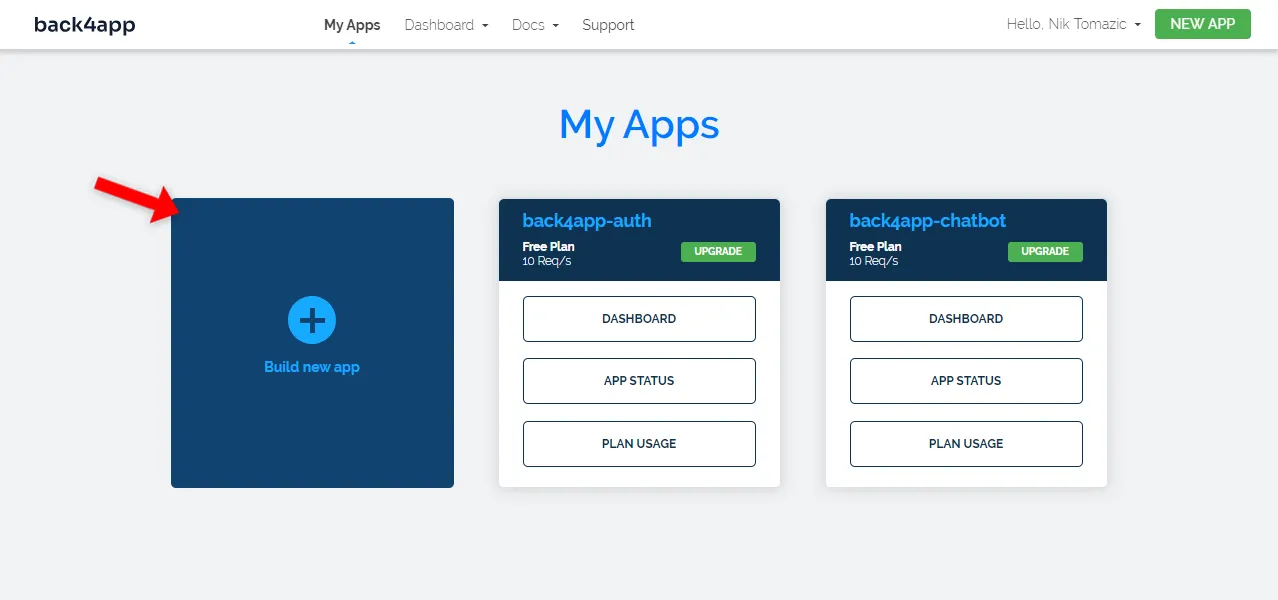
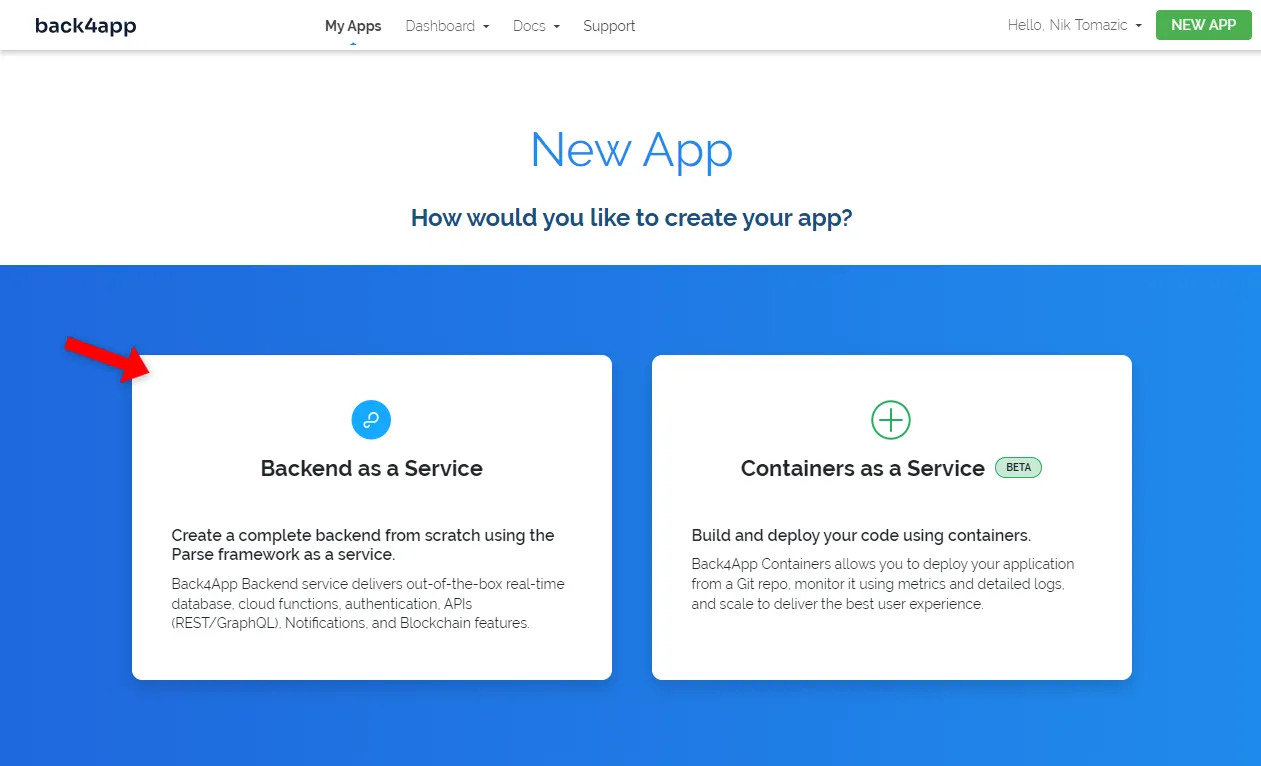
As you log into your Back4app account, you’ll be redirected to the app view. Click “Build new app” to initialize the app creation process.
The Back4app platform offers two solutions:
- Backend as a Service (BaaS) — robust backend solution
- Containers as a Service (CaaS) — platform for managing containers (esp. web applications)
Considering that we’re building a backend for a mobile app, we’ll go with “Backend as a Service”.
Give your app a nice and informative name, select “NoSQL” as the database, and click “Create”. That’s an important step to deploy a backend for an Android app.
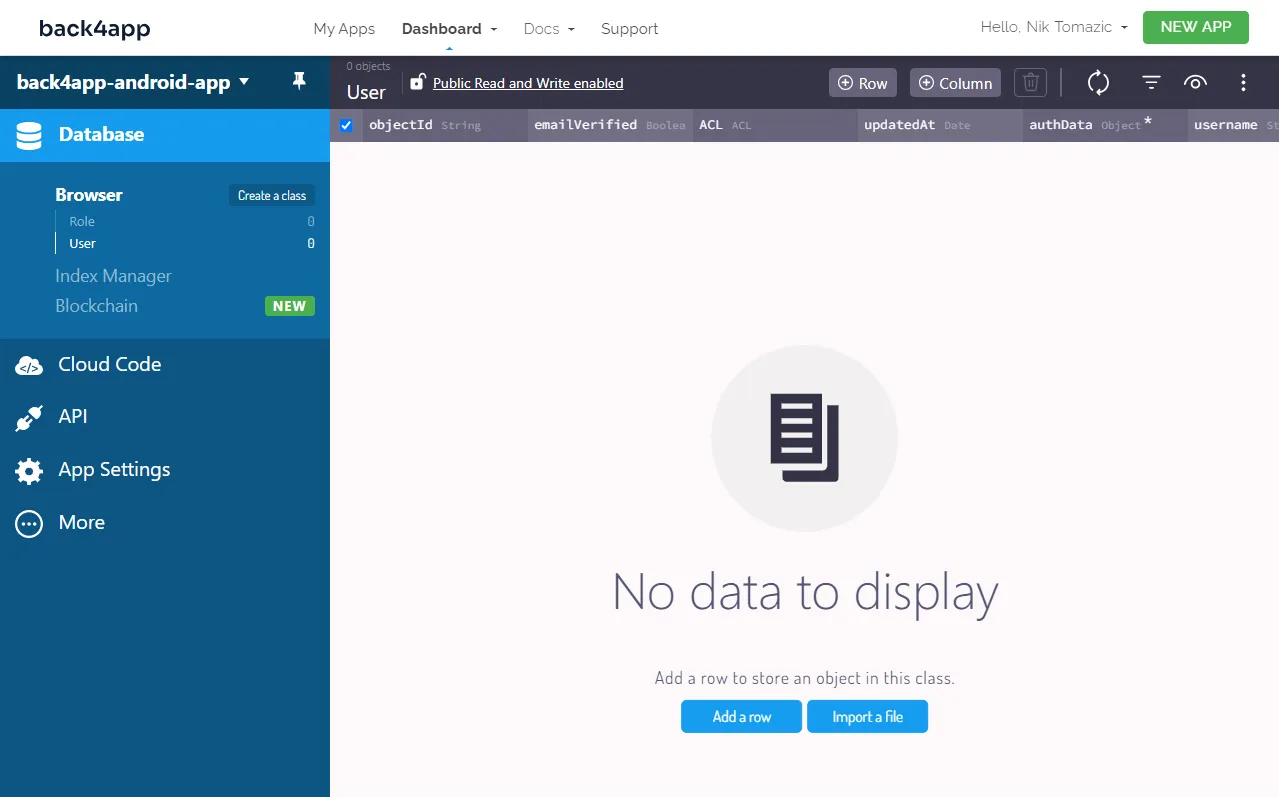
Back4app will take a little while to prepare everything required for your application. That includes the database, user management, scaling, configurations, et cetera. Once your application is ready, you’ll be redirected to your app’s database view.
Design the Database
Moving along, let’s design the database. This is a necessary step to develop a backend for an Android app.
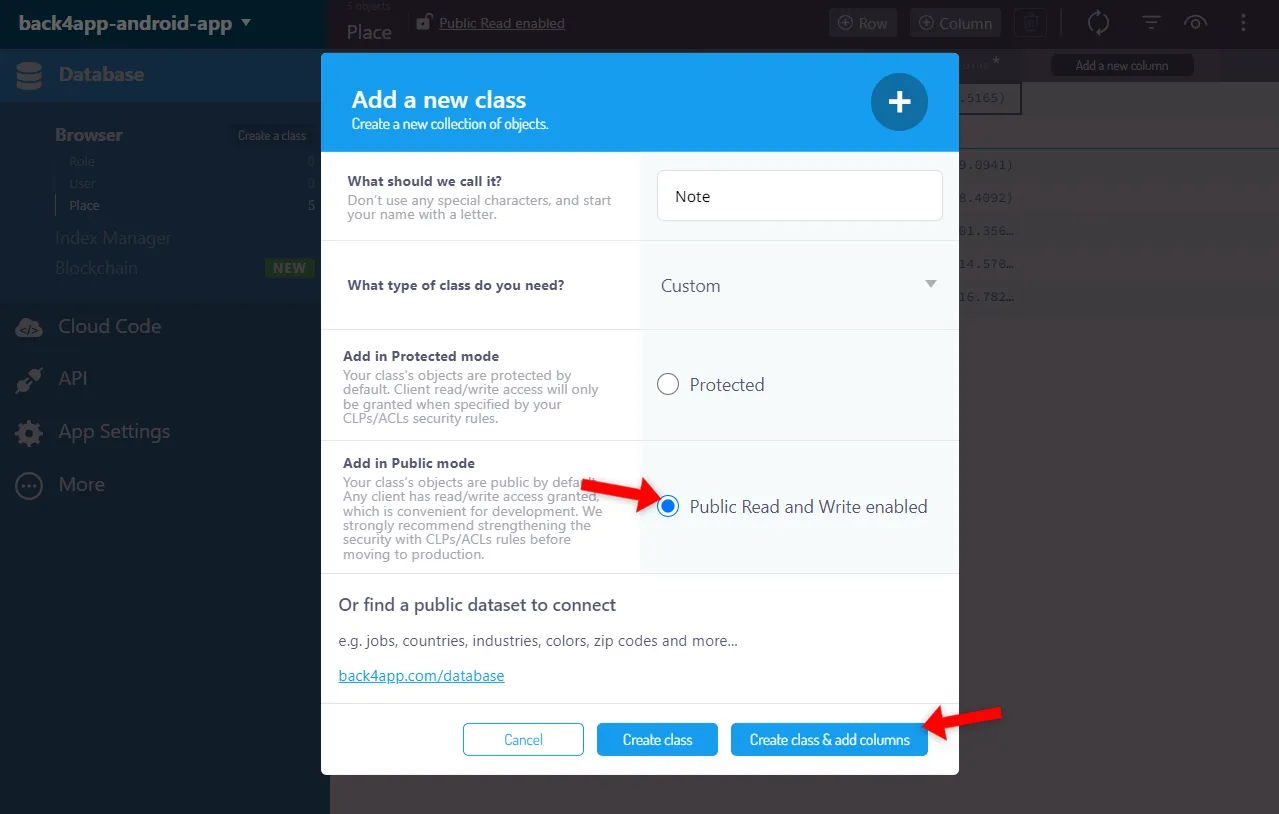
Since we’re building a simple notes app, we’ll only need one class. Go ahead and click “Create a class”, name it Note, enable “Public Read and Write”, and click “Create class & add columns”.
Next, add the following three fields to the newly created class:
+-------------+-------------+--------------------+----------+
| Data type   | Name        | Default value      | Required |
+-------------+-------------+--------------------+----------+
| String      | icon        | <leave blank>      | yes      |
+-------------+-------------+--------------------+----------+
| String      | title       | <leave blank>      | yes      |
+-------------+-------------+--------------------+----------+
| String      | content     | <leave blank>      | yes      |
+-------------+-------------+--------------------+----------+
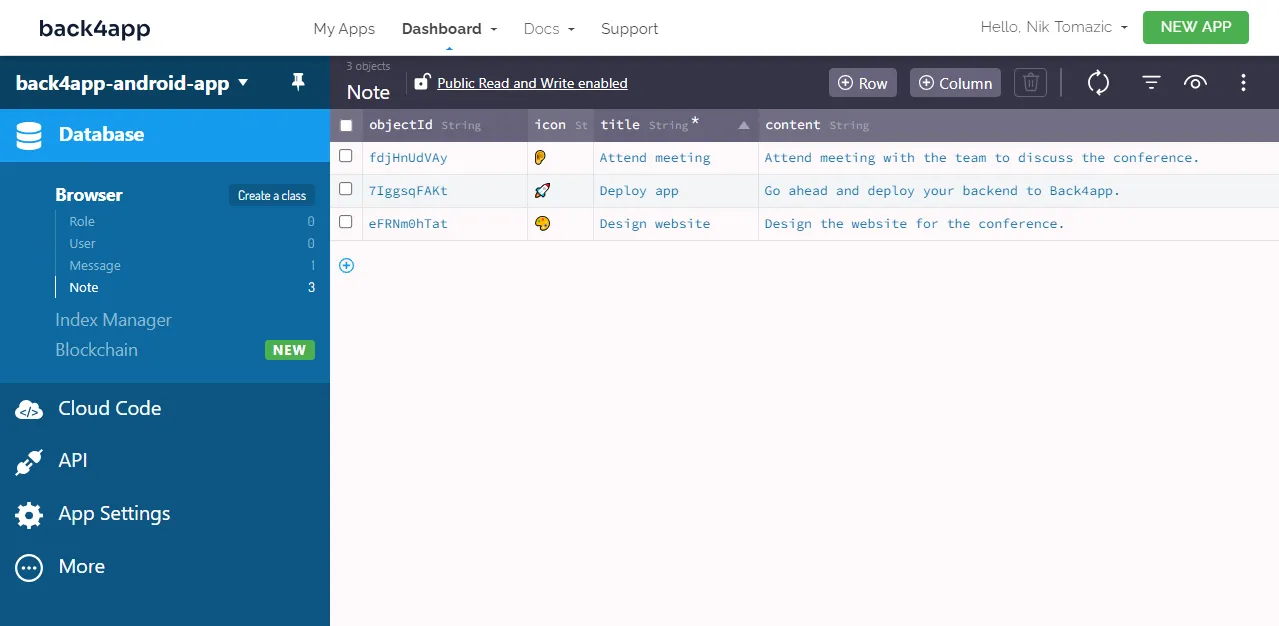
Lastly, click on the “Add row” button and populate your database with some sample data. If you don’t have any ideas, you can also import this data dump.
Great, that’s it for the backend.
Code Frontend
In this article section, we’ll bootstrap a new Android app, setup a ViewModel, implement the UI, install and configure Parse SDK, and lastly fetch data from the Back4app real-time database.
Init Project
As mentioned in the prerequisites section, the following steps will require you to have Android Studio installed. If you don’t have it yet, download it.
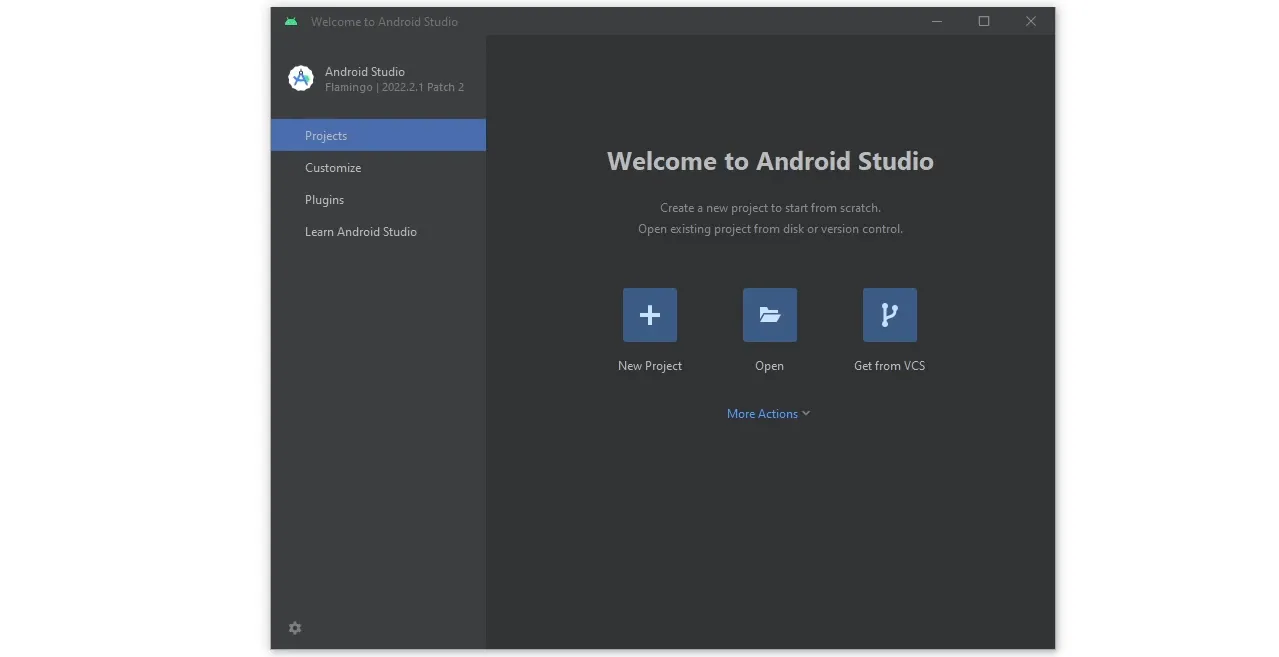
Start by opening Android Studio and clicking the “New Project” button.
Then select “Empty Activity” as your project template, and click “Next”.
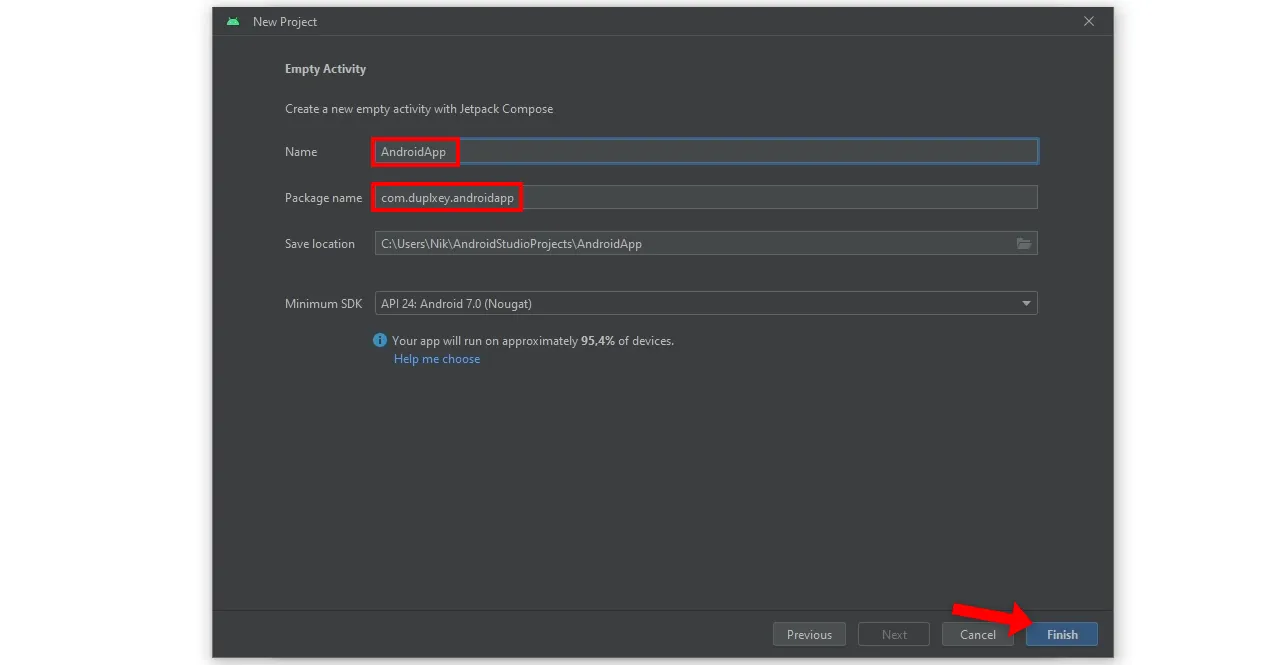
To create your project, you must provide a name and a package name. I suggest you use AndroidApp as your project’s name and reverse domain name as your project’s package.
After you’ve configured everything, click “Finish” to create the project.
Android Studio will take roughly two minutes to prepare everything required. That includes creating the project file structure, setting up Gradle, installing dependencies, etc.
Once your project is ready, use the explorer to navigate to MainActivity.kt and replace its contents:
// app/src/main/java.<your_package_name>/MainActivity.kt

package <your.package.name>

import android.os.Bundle
import androidx.activity.ComponentActivity
import androidx.activity.compose.setContent
import androidx.compose.foundation.layout.fillMaxSize
import androidx.compose.material3.MaterialTheme
import androidx.compose.material3.Surface
import androidx.compose.material3.Text
import androidx.compose.ui.Modifier
import androidx.compose.ui.unit.sp

class MainActivity : ComponentActivity() {
    override fun onCreate(savedInstanceState: Bundle?) {
        super.onCreate(savedInstanceState)
        setContent {
            MaterialTheme {
                Surface(
                    modifier = Modifier.fillMaxSize(),
                    color = MaterialTheme.colorScheme.background,
                ) {
                    Text(text = "Back4app rocks!", fontSize = 18.sp)
                }
            }
        }
    }
}
Make sure to always replace
<your_package_name>with your actual package name.
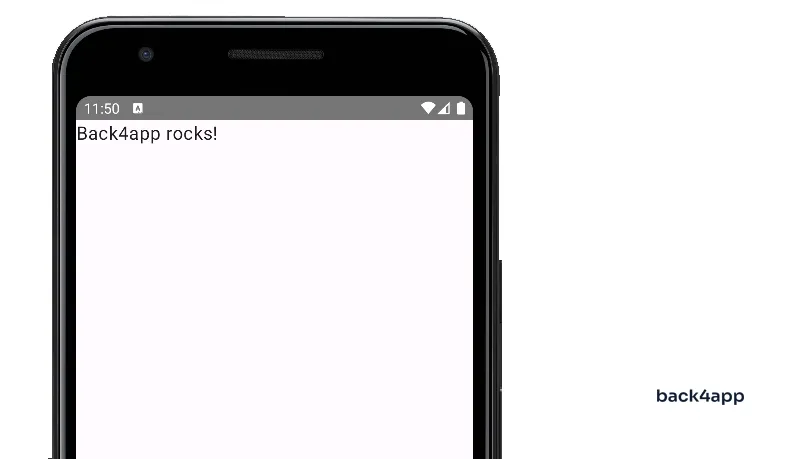
Lastly, try running the app by clicking the green play button or Shift + F10 on your keyboard. If everything goes well, the emulator should start, and you should see the Back4app rocks message on the screen.
ViewModel
To manage our app’s global state, we’ll utilize a ViewModel. But before that, we have to create a Note data class with the same attributes as the one in our Back4app database.
Create a data class named Note:
// app/src/main/java.<your_package_name>/Note.kt

package <your.package.name>

data class Note(
    var objectId: String? = null,
    var icon: String,
    var title: String,
    var content: String,
) {
    companion object {
        fun generateObjectId(): String {
            val chars = ('a'..'z') + ('A'..'Z') + ('0'..'9')
            return (1..10).map { chars.random() }.joinToString("")
        }
    }
}- We defined the static
generateObjectId()method to generate Parse-like object IDs. objectIdis nullable since we’ll later assume that ifobjectId == null, the object hasn’t been saved to the database yet.
Next, create an AppViewModel class with the following contents:
// app/src/main/java.<your_package_name>/AppViewModel.kt

package <your.package.name>

import androidx.compose.runtime.MutableState
import androidx.compose.runtime.mutableStateOf
import androidx.lifecycle.ViewModel

class AppViewModel : ViewModel() {
    val notes: MutableState<Map<String, Note>> = mutableStateOf(mapOf(
        "7IggsqFAKt" to Note(
            objectId = "7IggsqFAKt",
            icon = "\uD83D\uDE80",
            title = "Deploy app",
            content = "Go ahead and deploy your backend to Back4app.",
        ),
        "eFRNm0hTat" to Note(
            objectId = "eFRNm0hTat",
            icon = "\uD83C\uDFA8",
            title = "Design website",
            content = "Design the website for the conference.",
        ),
        "uC7hTQmG5F" to Note(
            objectId = "uC7hTQmG5F",
            icon = "\uD83D\uDC42",
            title = "Attend meeting",
            content = "Attend meeting with the team to discuss the conference.",
        ),
    ))

    companion object {
        @Volatile
        private var instance: AppViewModel? = null

        fun getInstance(): AppViewModel {
            return instance ?: synchronized(this) {
                instance ?: AppViewModel().also { instance = it }
            }
        }
    }
}- We used Compose’s
MutableStateto trigger UI updates in case of data change. - The
MutableStateholds aMapofobjectIds andNotes, which we populated with data. - To ensure that there’s only a single instance of
AppViewModel, we used the singleton pattern.
We can now access the AppViewModel instance in our activities via AppViewModel.getInstance().
Main Activity
Moving along, replace MainActivity.kt contents with the following code to display the notes:
// app/src/main/java.<your_package_name>/MainActivity.kt

package <your.package.name>

import android.content.Context
import android.content.Intent
import android.os.Bundle
import androidx.activity.ComponentActivity
import androidx.activity.compose.setContent
import androidx.activity.viewModels
import androidx.compose.foundation.clickable
import androidx.compose.foundation.layout.Box
import androidx.compose.foundation.layout.Column
import androidx.compose.foundation.layout.Row
import androidx.compose.foundation.layout.Spacer
import androidx.compose.foundation.layout.fillMaxWidth
import androidx.compose.foundation.layout.height
import androidx.compose.foundation.layout.padding
import androidx.compose.foundation.layout.size
import androidx.compose.foundation.layout.width
import androidx.compose.foundation.lazy.LazyColumn
import androidx.compose.foundation.lazy.items
import androidx.compose.material.icons.Icons
import androidx.compose.material.icons.filled.Add
import androidx.compose.material3.ExtendedFloatingActionButton
import androidx.compose.material3.Icon
import androidx.compose.material3.MaterialTheme
import androidx.compose.material3.Scaffold
import androidx.compose.material3.Text
import androidx.compose.material3.TopAppBar
import androidx.compose.runtime.Composable
import androidx.compose.ui.Alignment
import androidx.compose.ui.Modifier
import androidx.compose.ui.text.style.TextOverflow
import androidx.compose.ui.unit.dp
import androidx.compose.ui.unit.sp

class MainActivity : ComponentActivity() {
    private val viewModel = AppViewModel.getInstance()

    override fun onCreate(savedInstanceState: Bundle?) {
        super.onCreate(savedInstanceState)
        val context = this as Context

        setContent {
            MainActivityContent(
                viewModel = viewModel,
                onNoteListItemClick = {
                    // TODO: Open note edit form
                },
                onNoteAddClick = {
                    // TODO: Open note create form
                },
            )
        }
    }
}

@Composable
fun MainActivityContent(
    viewModel: AppViewModel,
    onNoteListItemClick: (note: Note) -> Unit,
    onNoteAddClick: () -> Unit,
) {
    val notes = viewModel.notes.value
    MaterialTheme {
        Scaffold(
            topBar = { TopAppBar(title = { Text("My Notes") }) },
            floatingActionButton = {
                ExtendedFloatingActionButton(
                    onClick = { onNoteAddClick() },
                    icon = { Icon(Icons.Filled.Add, contentDescription = "Add") },
                    text = { Text("Add") }
                )
            },
        ) { contentPadding ->
            Box(modifier = Modifier.padding(contentPadding)) {
                NoteList(notes, onNoteListItemClick = { onNoteListItemClick(it) })
            }
        }
    }
}

@Composable
fun NoteListItem(note: Note, onNoteListItemClick: (note: Note) -> Unit) {
    Row(
        modifier = Modifier
            .fillMaxWidth()
            .clickable(onClick = { onNoteListItemClick(note) })
            .padding(16.dp),
        verticalAlignment = Alignment.CenterVertically,
    ) {
        Text(text = note.icon, fontSize = 32.sp, modifier = Modifier.size(48.dp))
        Spacer(modifier = Modifier.width(8.dp))
        Column {
            Text(text = note.title, fontSize = 18.sp)
            Spacer(modifier = Modifier.height(4.dp))
            Text(
                text = note.content,
                fontSize = 14.sp,
                maxLines = 1,
                overflow = TextOverflow.Ellipsis,
            )
        }
    }
}

@Composable
fun NoteList(notes: Map<String, Note>, onNoteListItemClick: (note: Note) -> Unit) {
    LazyColumn {
        items(notes.entries.toList()) { (_, note) ->
            NoteListItem(note = note, onNoteListItemClick = onNoteListItemClick)
        }
    }
}- The
notesare now being fetched from theAppViewModel. - Instead of defining the click events in composables, we passed them down as arguments.
- We used Compose to design the UI. To make it slicker, we incorporated
MaterialThemewith theScaffoldlayout.
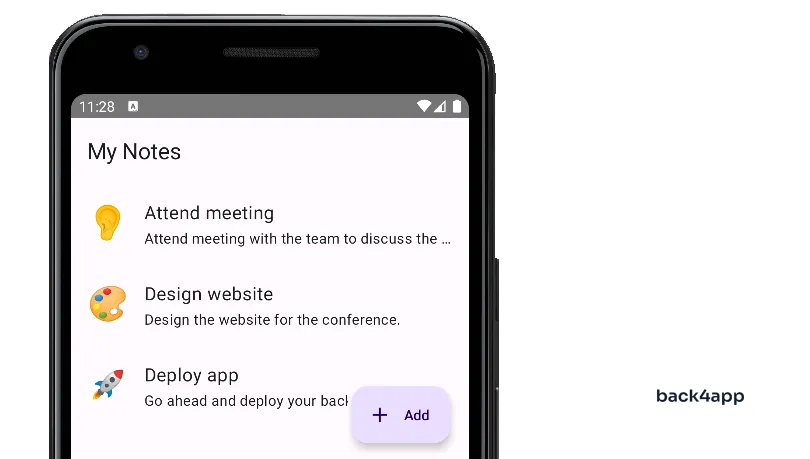
If you rebuild the app now, you should see the list of the “hard-coded” notes on the screen.
Note Form Activity
In this section, we’ll add a new activity that will allow users to add and edit notes.
Start by creating a new class named FormActivity with the following contents:
// app/src/main/java.<your_package_name>/FormActivity.kt

package <your.package.name>

import android.os.Bundle
import androidx.activity.ComponentActivity
import androidx.activity.compose.setContent
import androidx.compose.foundation.layout.Box
import androidx.compose.foundation.layout.Column
import androidx.compose.foundation.layout.Spacer
import androidx.compose.foundation.layout.fillMaxSize
import androidx.compose.foundation.layout.fillMaxWidth
import androidx.compose.foundation.layout.height
import androidx.compose.foundation.layout.padding
import androidx.compose.material.icons.Icons
import androidx.compose.material.icons.filled.Delete
import androidx.compose.material3.Button
import androidx.compose.material3.ExtendedFloatingActionButton
import androidx.compose.material3.Icon
import androidx.compose.material3.MaterialTheme
import androidx.compose.material3.Scaffold
import androidx.compose.material3.Text
import androidx.compose.material3.TextField
import androidx.compose.material3.TopAppBar
import androidx.compose.runtime.Composable
import androidx.compose.runtime.getValue
import androidx.compose.runtime.mutableStateOf
import androidx.compose.runtime.remember
import androidx.compose.runtime.setValue
import androidx.compose.ui.Modifier
import androidx.compose.ui.text.input.TextFieldValue
import androidx.compose.ui.unit.dp

class FormActivity : ComponentActivity() {
    private val viewModel = AppViewModel.getInstance()

    override fun onCreate(savedInstanceState: Bundle?) {
        super.onCreate(savedInstanceState)
        val objectId = intent.getStringExtra("objectId")
        val note = if (objectId !== null) viewModel.notes.value[objectId] else null

        setContent {
            FormActivityContent(
                note,
                onNoteAddClick = { icon: String, title: String, content: String ->
                    if (note !== null) return@FormActivityContent
                    val newNote = Note(
                        icon = icon,
                        title = title,
                        content = content,
                    )
                    newNote.objectId = Note.generateObjectId()
                    viewModel.notes.value += (newNote.objectId!! to newNote)
                    finish()
                },
                onNoteSaveClick = { icon: String, title: String, content: String ->
                    if (note === null) return@FormActivityContent
                    val updatedNote = note.copy()
                    updatedNote.icon = icon
                    updatedNote.title = title
                    updatedNote.content = content
                    viewModel.notes.value += (updatedNote.objectId!! to updatedNote)
                    finish()
                },
                onNoteDeleteClick = {
                    if (note === null) return@FormActivityContent
                    viewModel.notes.value = viewModel.notes.value.filter {
                        it.value.objectId != note.objectId
                    }
                    finish()
                },
            )
        }
    }
}

@Composable
fun FormActivityContent(
    note: Note?,
    onNoteAddClick: (icon: String, title: String, content: String) -> Unit,
    onNoteSaveClick: (icon: String, title: String, content: String) -> Unit,
    onNoteDeleteClick: () -> Unit,
) {
    MaterialTheme {
        Scaffold(
            topBar = {
                TopAppBar(title = { Text(note?.let { "Edit Note" } ?: ("Add Note")) })
            },
            floatingActionButton = {
                if (note !== null) {
                    ExtendedFloatingActionButton(
                        onClick = { onNoteDeleteClick() },
                        icon = { Icon(Icons.Filled.Delete, "Delete") },
                        text = { Text("Delete") },
                    )
                }
            },
        ) { contentPadding ->
            Box(modifier = Modifier.padding(contentPadding)) {
                NoteForm(note = note, onNoteSave = { icon, title, content ->
                    if (note === null) {
                        onNoteAddClick(icon, title, content)
                    } else {
                        onNoteSaveClick(icon, title, content)
                    }
                })
            }
        }
    }
}

@Composable
fun NoteForm(
    note: Note?,
    onNoteSave: (icon: String, title: String, content: String) -> Unit
) {
    var icon by remember { mutableStateOf(TextFieldValue(note?.icon ?: "")) }
    var title by remember { mutableStateOf(TextFieldValue(note?.title ?: "")) }
    var content by remember { mutableStateOf(TextFieldValue(note?.content ?: "")) }
    Column(
        modifier = Modifier
            .fillMaxSize()
            .padding(16.dp)
    ) {
        TextField(
            label = { Text(text = "Icon") },
            value = icon,
            onValueChange = { icon = it },
            modifier = Modifier.fillMaxWidth()
        )
        Spacer(modifier = Modifier.height(16.dp))
        TextField(
            label = { Text(text = "Title") },
            value = title,
            onValueChange = { title = it },
            modifier = Modifier.fillMaxWidth()
        )
        Spacer(modifier = Modifier.height(16.dp))
        TextField(
            label = { Text(text = "Content") },
            value = content,
            onValueChange = { content = it },
            modifier = Modifier.fillMaxWidth()
        )
        Spacer(modifier = Modifier.height(16.dp))
        Button(
            onClick = { onNoteSave(icon.text, title.text, content.text) },
            Modifier.fillMaxWidth()
        ) {
            Text(text = "Save")
        }
    }
}- This form is used for both adding and editing notes. To determine the action, we compare
objectId == null. In the case ofnull, it is an add action, otherwise an edit action. - If
objectId !== null, we fetch thenotefrom the state and populate the form. - For
MutableStateto work correctly we had to treat its contents as immutable. This is why we sometimes copied the contents instead of modifying them. - We handled Compose form state via
mutableStateOf().
Next, register the FormActivity at the bottom of application in AndroidManifest.xml:
<?xml version="1.0" encoding="utf-8"?>
<manifest xmlns:android="http://schemas.android.com/apk/res/android"
    xmlns:tools="http://schemas.android.com/tools">

    <application>
        <!-- ... -->
        <activity android:name=".FormActivity"/>
    </application>

</manifest>
Lastly, create a new Intent on onNoteListItemClick and onNoteAddClick in MainActivity.kt:
// app/src/main/java.<your_package_name>/MainActivity.kt

class MainActivity : ComponentActivity() {
    // ...

    override fun onCreate(savedInstanceState: Bundle?) {
        // ...

        setContent {
            MainActivityContent(
                viewModel = viewModel,
                onNoteListItemClick = {
                    // triggers the edit action, since `objectId` is provided
                    val intent = Intent(context, FormActivity::class.java)
                    intent.putExtra("objectId", it.objectId)
                    context.startActivity(intent)
                },
                onNoteAddClick = {
                    // triggers the add action, since no `objectId` is present
                    val intent = Intent(context, FormActivity::class.java)
                    context.startActivity(intent)
                },
            )
        }
    }
}
Don’t forget to import Intent at the top of the file:
import android.content.IntentIf you rebuild the application, you’ll notice that we now have a working application. The app allows us to add notes, edit them, and delete them.
The only problem is that restarting the app resets its state (to the “hard-coded” notes).
In the next section, we’ll connect the app to the Back4app backend. That will allow us to persist state and sync it between multiple devices.

Install Parse SDK
As you might know, Back4app is based on the Parse platform. If we want to interact with the Back4app database or Back4app in general, we have to install the Parse SDK.
Start by adding the JitPack repository to settings.gradle:
// settings.gradle

pluginManagement {
    repositories {
        // ...
        maven { url "https://jitpack.io" }
    }
}
dependencyResolutionManagement {
    repositoriesMode.set(RepositoriesMode.FAIL_ON_PROJECT_REPOS)
    repositories {
        // ...
        maven { url "https://jitpack.io" }
    }
}
Next, add the Android Parse SDK to the app-level’s build.gradle:
// app/build.gradle

dependencies {
    // ...
    implementation "com.github.parse-community.Parse-SDK-Android:parse:4.2.0"
}
Sync the Gradle settings and make sure there are no errors.
Configure Parse SDK
To connect to the Back4app backend, you’ll have to provide Parse SDK with your application ID and client key. To obtain your credentials navigate to your Back4app app and select “App Settings > Security & Keys” in the sidebar.
Then add them to your strings.xml like so:
<!-- app/src/main/res/values/strings.xml -->

<resources>
    <string name="app_name">back4app-android-app</string>
    <string name="back4app_server_url">https://parseapi.back4app.com/</string>
    <string name="back4app_app_id">your_parse_app_id</string>
    <string name="back4app_client_key">your_parse_client_key</string>
</resources>
Make sure to replace
your_parse_app_idandyour_parse_client_keywith your credentials.
Next, modify your AndroidManifest.xml to enable internet access and attach credentials metadata:
<!-- app/src/main/AndroidManifest.xml -->

<?xml version="1.0" encoding="utf-8"?>
<manifest xmlns:android="http://schemas.android.com/apk/res/android"
    xmlns:tools="http://schemas.android.com/tools">

    <!-- these two permissions enable internet access -->
    <uses-permission android:name="android.permission.ACCESS_NETWORK_STATE" />
    <uses-permission android:name="android.permission.INTERNET" />

    <application>
        <!-- ... -->

        <!-- newly added metadata -->
        <meta-data
            android:name="com.parse.SERVER_URL"
            android:value="@string/back4app_server_url" />
        <meta-data
            android:name="com.parse.APPLICATION_ID"
            android:value="@string/back4app_app_id" />
        <meta-data
            android:name="com.parse.CLIENT_KEY"
            android:value="@string/back4app_client_key" />
    </application>

</manifest>
The last thing we have to do is initialize Parse. To make sure Parse is initialized before any activities, we’ll create a new class named App, which inherits from the Application class.
Create App.kt and initialize Parse like so:
// app/src/main/java/<your_package_name>/App.kt

package <your.package.name>

import android.app.Application
import com.parse.Parse

class App : Application() {
    override fun onCreate() {
        super.onCreate()

        Parse.initialize(
            Parse.Configuration.Builder(this)
                .applicationId(getString(R.string.back4app_app_id))
                .clientKey(getString(R.string.back4app_client_key))
                .server(getString(R.string.back4app_server_url))
                .build()
        )
    }
}
Then register the App class in AndroidManifest.xml:
<!-- app/src/main/AndroidManifest.xml -->

<application
    android:name=".App"
    ...
>
    <!-- ... -->
</application>
Rebuild the app once again and check the Logcat window for any errors. If there are no errors the connection to Back4app has been successful.
Load Notes from Back4app
The last thing we have to do before our app is complete is to load the notes from the Back4app database and look at how to use Parse in practice.
Start by navigating to the AppViewModel. Remove the data from the map and add the init block:
// app/src/main/java/<your_package_name>/AppViewModel.kt

package <your.package.name>

import androidx.compose.runtime.MutableState
import androidx.compose.runtime.mutableStateOf
import androidx.lifecycle.ViewModel

class AppViewModel : ViewModel() {
    val notes: MutableState<Map<String, Note>> = mutableStateOf(mapOf())

    init {
        val query = com.parse.ParseQuery.getQuery<com.parse.ParseObject>("Note")
        query.orderByDescending("createdAt")
        query.findInBackground { notes, e ->
            if (e == null) {
                for (parseNote in notes) {
                    val note = Note(
                        objectId = parseNote.objectId,
                        icon = parseNote.getString("icon")!!,
                        title = parseNote.getString("title")!!,
                        content = parseNote.getString("content")!!,
                    )
                    this.notes.value += (note.objectId!! to note)
                }
            } else {
                println("Error: ${e.message}")
            }
        }
    }

    companion object {
        // ...
    }
}
This code uses Parse SDK to fetch the notes from the databases, transforms them into the Note data class, and saves them to the map.
Next, add the following three methods to Note:
// app/src/main/java/<your_package_name>/Note.kt

package <your.package.name>

import com.parse.ParseObject
import com.parse.ParseQuery

data class Note(
    var objectId: String? = null,
    var icon: String,
    var title: String,
    var content: String,
) {
    fun addToParse(callback: (objectId: String) -> Unit) {
        if (objectId !== null) throw Exception("Note is already saved to Parse!")

        val parseNote = ParseObject("Note")
        parseNote.put("icon", icon)
        parseNote.put("title", title)
        parseNote.put("content", content)

        parseNote.saveInBackground {
            if (it !== null) throw Exception("Error: ${it.message}")
            objectId = parseNote.objectId
            callback(parseNote.objectId)
        }
    }

    fun updateToParse(callback: (objectId: String) -> Unit) {
        if (objectId === null) throw Exception("Note hasn't been saved to Parse yet!")

        val query = ParseQuery.getQuery<ParseObject>("Note")
        val parseNote = query.get(objectId)
        parseNote.put("icon", icon)
        parseNote.put("title", title)
        parseNote.put("content", content)

        parseNote.saveInBackground {
            if (it !== null) throw Exception("Error: ${it.message}")
            callback(parseNote.objectId)
        }
    }

    fun deleteFromParse(callback: () -> Unit) {
        if (objectId === null) throw Exception("Note hasn't been saved to Parse yet!")

        val query = ParseQuery.getQuery<ParseObject>("Note")
        val parseNote = query.get(objectId)
        parseNote.deleteInBackground {
            if (it !== null) throw Exception("Error: ${it.message}")
            callback()
        }
    }
}addToParse()adds a new note to the Parse server with its details. If successful, it stores the note’s unique identifier and notifies when it’s done.updateToParse()updates an existing note’s information on the Parse server. If successful, it signals completion after making the changes.deleteFromParse()removes a saved note from the Parse server. If successful, it confirms the deletion when it’s finished.
Lastly, modify the click methods in FormActivity to invoke the newly defined methods:
// app/src/main/java/<your_package_name>/NoteFormActivity.kt

class FormActivity : ComponentActivity() {
    // ...

    override fun onCreate(savedInstanceState: Bundle?) {
        // ...

        setContent {
            FormActivityContent(
                note,
                onNoteAddClick = { icon: String, title: String, content: String ->
                    if (note !== null) return@FormActivityContent
                    val newNote = Note(
                        icon = icon,
                        title = title,
                        content = content,
                    )
                    newNote.addToParse {
                        viewModel.notes.value += (it to newNote)
                        finish()
                    }
                },
                onNoteSaveClick = { icon: String, title: String, content: String ->
                    if (note === null) return@FormActivityContent
                    val updatedNote = note.copy()
                    updatedNote.icon = icon
                    updatedNote.title = title
                    updatedNote.content = content
                    updatedNote.updateToParse {
                        viewModel.notes.value += (it to updatedNote)
                        finish()
                    }
                },
                onNoteDeleteClick = {
                    if (note === null) return@FormActivityContent
                    viewModel.notes.value = viewModel.notes.value.filter {
                        it.value.objectId != note.objectId
                    }
                    note.deleteFromParse {
                        finish()
                    }
                },
            )
        }
    }
}
That’s it!
The application is now fully working and synced to the Back4app backend. Try playing around with the app by changing the data and checking if the changes are reflected in the database view.
Conclusion
In this article, we’ve successfully built a mobile backend and connected to it from our Android app. We used Back4app’s BaaS solution for the backend, and on the frontend, we utilized Kotlin with Jetpack Compose.
By now, you should have a decent understanding of how mobile backends work and be able to build your own. View the final source code on the back4app-android-app repo.
FAQ
What is Android?
Android is a free and open-source Linux-based operating system. It was primarily designed for mobile devices but is now also used for smart TVs, gaming consoles, and more. It has a mobile market share of 70% and more than 3 billion monthly active users.
What are the benefits of Android development?
– Cross platform
– Enormous market
– Customizability
– Community
What are the limitations of Android development?
– Security
– Complexity
– Premium apps
How to build a backend for an Android app?
1. Sign up for a free Back4app account.
2. Create a BaaS-based application.
3. Design the database classes.
4. Bootstrap an Android app via Android Studio.
5. Install Parse SDK and connect to Back4app.
6. Implement the UI/UX and app functionality.


