Building a Flutter App with a Serverless Backend

Flutter is a widely used open-source framework that is known for its fast development cycle and visually appealing user interfaces. In this article, we will delve into the process of constructing a flutter application. However, building an entire app requires more than just front-end development.
A robust and secure backend is also necessary to store and manage data. To meet this requirement, we will utilize Back4App, a comprehensive platform that empowers developers to effortlessly create and manage the backend of their app without having to deal with server management and scalability issues.
With this approach, you can concentrate on developing the core functionality of your app, freeing up time and resources while leaving the backend in the capable hands of experts.
Contents
What is Flutter?
Flutter is an open-source framework for building cross-platform mobile applications that offers high-performance and visually appealing user experiences. Developed by Google and launched in 2017, it allows developers to write code in Dart and create natively compiled mobile, web, and desktop apps from a single codebase.
One of the standout features of Flutter is its fast development cycle, which allows for quick bug fixing and iteration. Furthermore, its rich libraries and customizable widgets make designing beautiful and responsive user interfaces simple. With its increasing popularity and support from Google, Flutter has become a favored choice among developers for building cross-platform mobile apps.
Why is Dart Important for Flutter?
Dart plays a crucial role in Flutter as it serves as the primary language for creating Flutter apps. Dart is known for its simplicity and user-friendly nature, making it a popular choice for developers. Here are some reasons why Dart is important for Flutter:
- Speed
Dart is a fast language, and its statically typed nature results in quicker execution times and improved performance, which is ideal for building high-performance mobile apps.
- Robust Type System
Dart’s strong type system helps catch errors early in the development phase, reducing the chance of runtime errors and facilitating codebase maintenance and scalability.
- Asynchronous Programming
Dart enables concurrent programming through its asynchronous programming model, making it easier to build responsive and scalable apps.
- Versatility
Dart can easily integrate with other technologies and can also be used to build server-side applications, making it a versatile choice for constructing complex interconnected systems.
Advantages of Using Flutter
Flutter is a widely used framework for building cross-platform mobile apps due to its many benefits. Some of the key advantages of Flutter include:
- Rapid Development: Flutter’s quick development cycle enables developers to make modifications quickly and see the results in real-time, streamlining the process and facilitating iteration on designs and features.
- Attractive User Interfaces: It offers a vast collection of customizable widgets, enabling developers to create visually appealing and responsive user interfaces that enhance the user experience.
- Immediate Feedback: Flutter’s hot reload feature permits developers to alter the code and view the changes instantly without having to restart the app. This speeds up the development process and makes resolving issues and refining features easier.
- Cross-Platform Capability: Flutter allows developers to write code and deploy it to multiple platforms, including iOS and Android, reducing the time and resources required to develop separate versions for each platform.
- Open-Source Community: Flutter is open-source, giving developers access to a large, thriving community of contributors and developers who constantly improve and expand the framework.
- Google Support: Flutter is developed and maintained by Google, offering developers the assurance that the framework is dependable and secure and will continue to be developed and maintained in the future.
Integrating Flutter with Serverless Backend Back4App: A Step-by-Step Guide:
- Sign Up for a Back4app Account
In the start, create an account on the Back4app platform for backend integration using the following URL: https://www.back4app.com

- Create a New App
After logging in to Back4app, create a new app with a suitable naming convention and database selection, either relational or non-relational. Click on the “NEW APP” button.

Select the “Backend as a Service” approach while creating the app.

Enter the app’s name and select the database provider according to your needs.

The “CMS” app has been created successfully.

- Choose a Suitable Development Framework
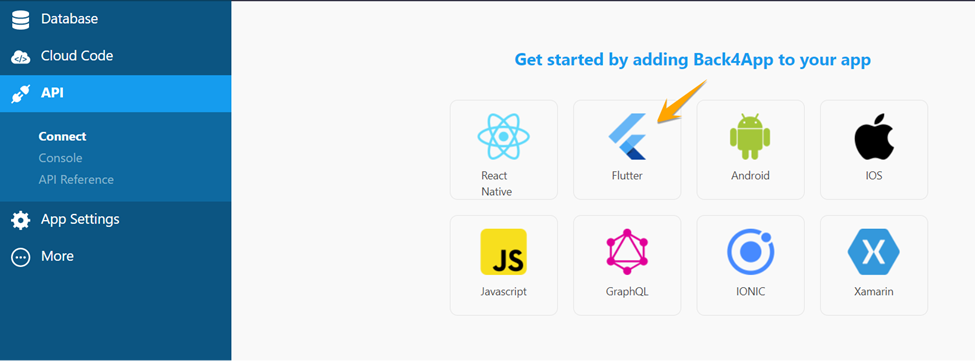
Click on the “API” from the menu tab and select your desired platform to build an app. In this case, we will select the “Flutter” development framework.

Clicking the Flutter icon will move to the new screen with the Flutter environment setup documentation for integrating with Back4App.

- Download and Install Dart and Flutter Framework
To run the Flutter application, we have to download the Dart Programming Language and Flutter Framework.
Dart Installation
For Dart, we need to download the Dart SDK from the following URL :https://dart.dev/get-dart/archive

After downloading, extract the zip folder into your C:\ drive.

Now copy the path of the bin folder from dart-sdk.

Paste the copied path into the “Environment Variables” under the user’s path.

Verify that Dart has been successfully installed in your local machine by running the following command in CMD.

Flutter Installation
For Flutter Framework, we have to download the required SDK from the following website URL: https://docs.flutter.dev/get-started/install/windows

After downloading, extract the zip folder into the “src” folder in C:\ drive.

Now copy the path of the bin folder from Flutter.

Paste the copied path into the “Environment Variables” under the user’s path.

Verify that Dart has been successfully installed in your local machine by running the following command in CMD.

- Create a New Flutter Project
Create a new repository in which you want to create a flutter project in your local drive.

Now open “Visual Studio Code,” click on the “Terminal,” and open a new Terminal.

Move into the project folder in the “Terminal.”

Run the following command, “flutter create project_name,” to create a new flutter project.

Now open the project by clicking “Open Folder” and choose your project folder.


The project has been successfully initialized in “Visual Studio Code.”

- Setup Parse Dependency and Build Code for Integration
Add the following parse server dependency into the project in the “pubspec.yaml” file and save it.

Install the added parse dependency into the project by running the following command “flutter pub get” in the Terminal.

Now open the “main.dart” file present inside the “lib” folder.

Clear the existing code from the file and write the following code snippets for importing the parse server package into the project.

To integrate with Back4App, add the following code to the “main.dart” file.

Now we have to provide the “App ID” and “Client Key” in the above code, and we will get those keys from our Back4App project.
For this, go to the “CMS” Back4App project and copy these keys from the “Security & Keys” section. These keys are sensitive, so keep them private.

Now paste the copied keys into the above code.

- Testing Flutter App Integration with Back4App
To test the Flutter App with Back4App, we have to add a code module in our Flutter application to create a table class named “Products” and add a few columns and data to it. So insert the following code into your “main.dart” file.

Now run the following “flutter run” command in the Terminal to test the integration.

Here, it will ask you to select which platform you want to run your application. In this case, we have selected “Chrome,” so press “2”.

After a successful run, it automatically opens the Chrome browser on localhost.

To verify the creation of the class and columns, go to the “CMS” App in the Back4App platform. Here, you can see that the “Products” class has been successfully created along with columns.

Conclusion
In conclusion, combining Flutter and Back4App offers an efficient solution for building modern, scalable mobile apps. Flutter offers fast development, beautiful UI, and cross-platform capabilities, while Back4App provides a serverless Flutter backend.
This combination allows developers to focus on the app’s core features while leaving backend management to the experts, saving time and resources. Building a Flutter app with Back4App is a smart choice for delivering reliable, cutting-edge mobile experiences.
FAQ
What is Flutter?
Flutter is an open-source UI toolkit by Google, enabling developers to create fast, natively compiled applications for mobile, web, and desktop from a single codebase.
What are the advantages of Flutter?
– Rapid development
– Cross Platform
– Open Source
How to build a Flutter backend using a backend as a service?
– Create an account on Back4app
– Set up a new project on Back4app
– Integrate Back4app into the Flutter app
– Configure the Parse Server settings for the Flutter app
– Create a data model on Back4app
– Save, query, update, and delete data from the serverless backend


