Steps To Build and Deploy a Discord Bot
In this article, you will build and deploy a Discord bot using Node.js, the official discord.js library, and Back4app containers.
Discord bots are programs that perform automated tasks on Discord. These bots can interact with users, manage community conduct, and provide extra functionality unavailable on Discord by default, such as playing music, moderating content, organizing polls, and integrating with external services or APIs.
Contents
Setting up your Development Environment
This article will feature a Discord bot that gives users trivia questions to answer based on their preferred difficulty level and question type on a Discord server.
To follow along with this tutorial, you need to have the following:
- A Discord account: You can sign up for free if you do not have one.
- Node.js v20 or higher: You can download and install it on your system if you do not have it.
Set up your project directory by running the command below:
mkdir discord-bot && cd discord-bot && npm init -y
The command above creates a discord-bot directory and initializes npm in it.
Next, navigate to your package.json file and add the start script below:
"start": "node server.js"
Then, install the required dependencies for your project by running the command below:
npm install discord.js axios dotenv
The dependencies you installed above include the following:
- discord.js: This library will allow you to interact with the Discord API from your Node.js application.
- dotenv: This package will help you manage sensitive data like your bot’s token.
- axios: This package will allow you to request the Trivia API.
Now, you have set up your development environment and installed the required dependencies. Next, you will create a Discord bot account.
Creating a Discord Bot Account
A Discord Bot account is a Discord account created to run a bot. Unlike regular user accounts that human users control, software controls bot accounts.
This account will act as a gateway, granting your bot the necessary permissions to access server resources, respond to events, and execute actions within your Discord community.
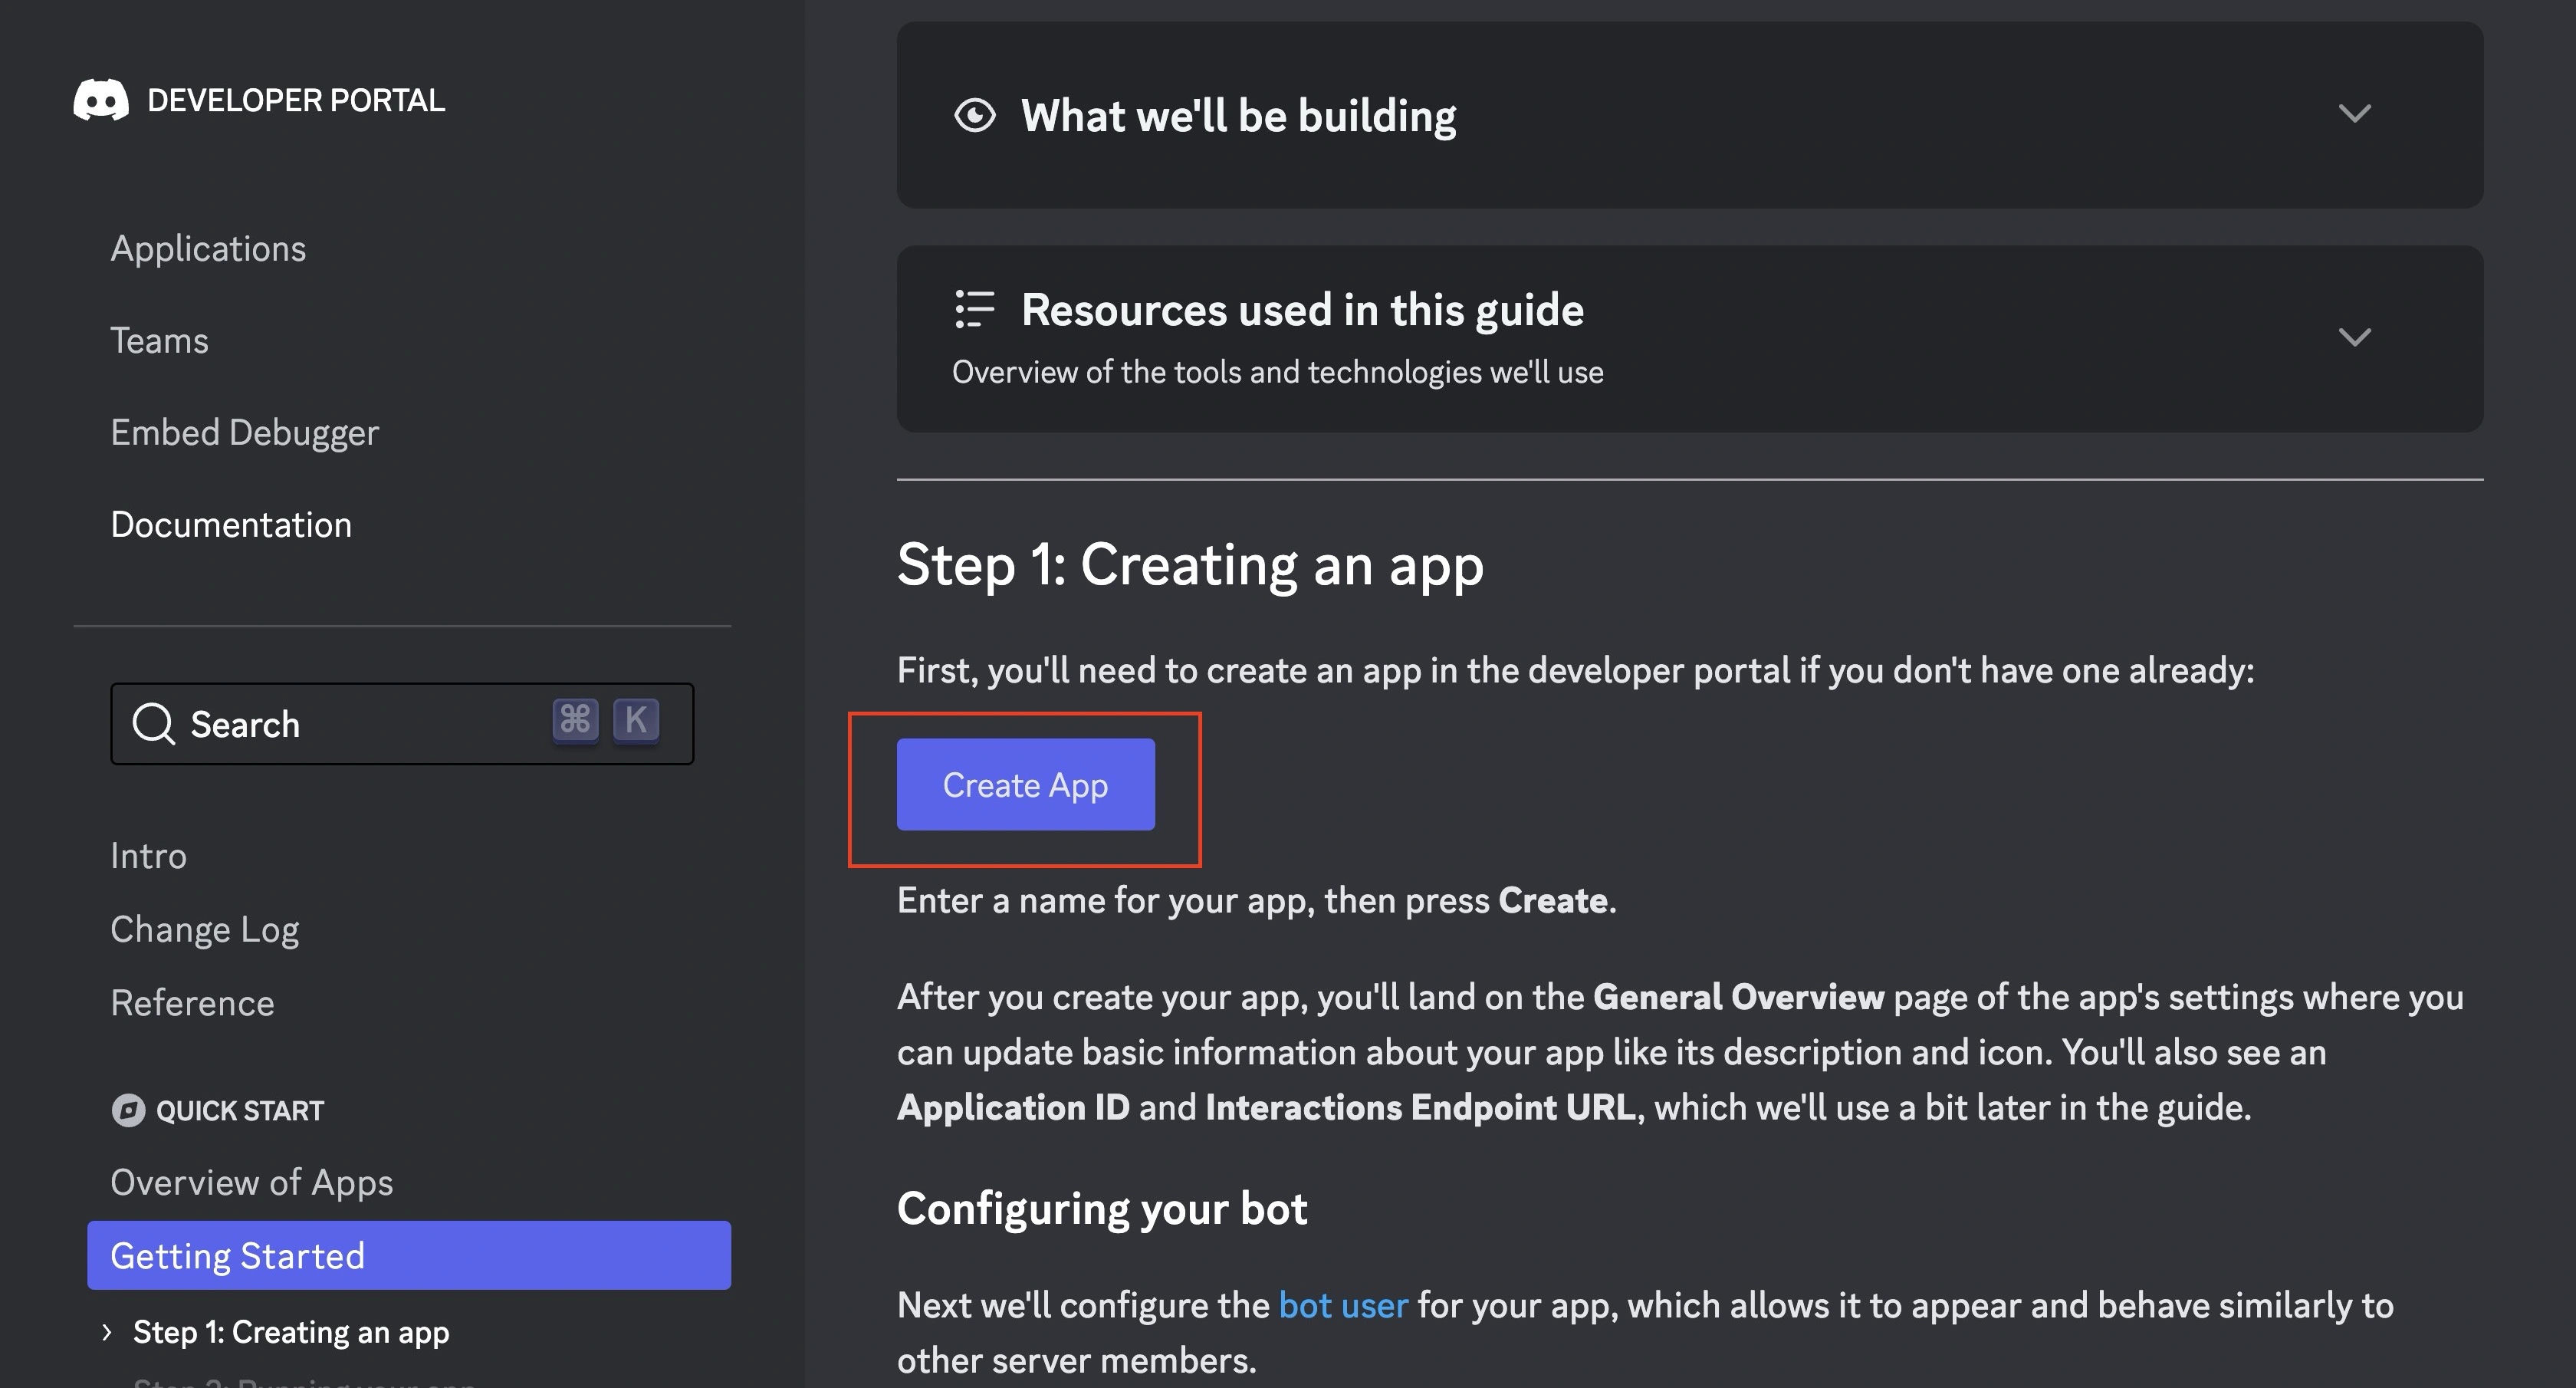
You must first create a Discord application to create a Discord bot account. To make one, navigate to Discord’s developer portal and click the “Create App” button, as shown in the image below.
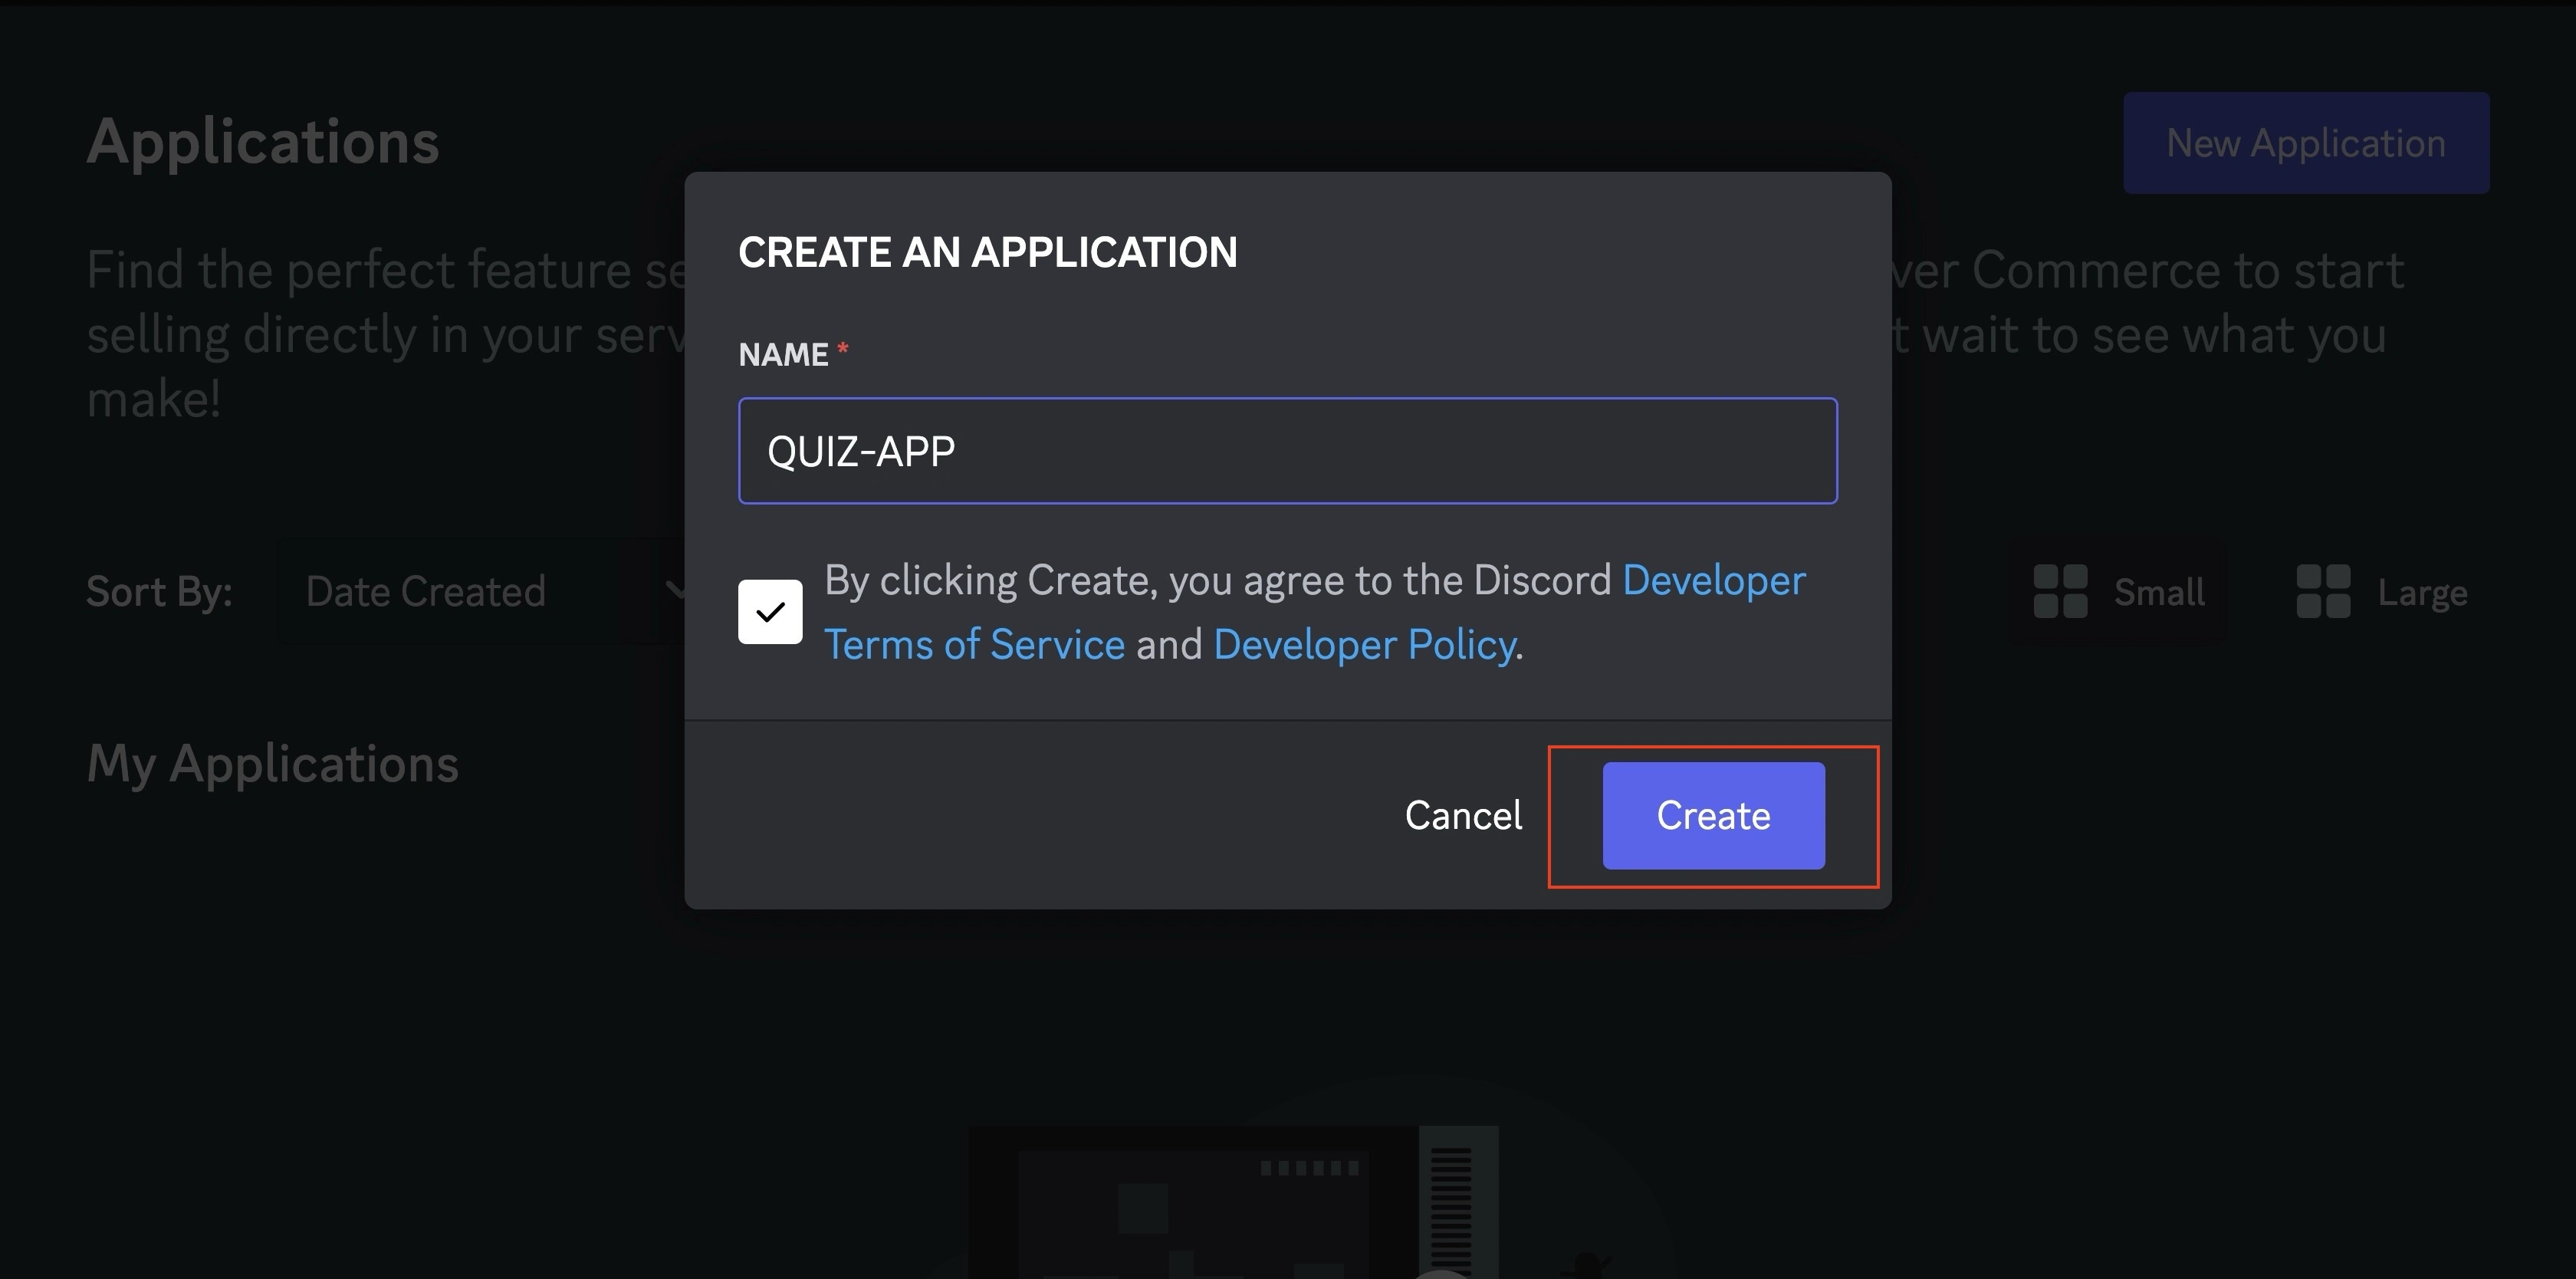
Clicking the button will prompt you to log in to your Discord account. After logging in, give your app a name and click the “Create” button, as shown in the image below.
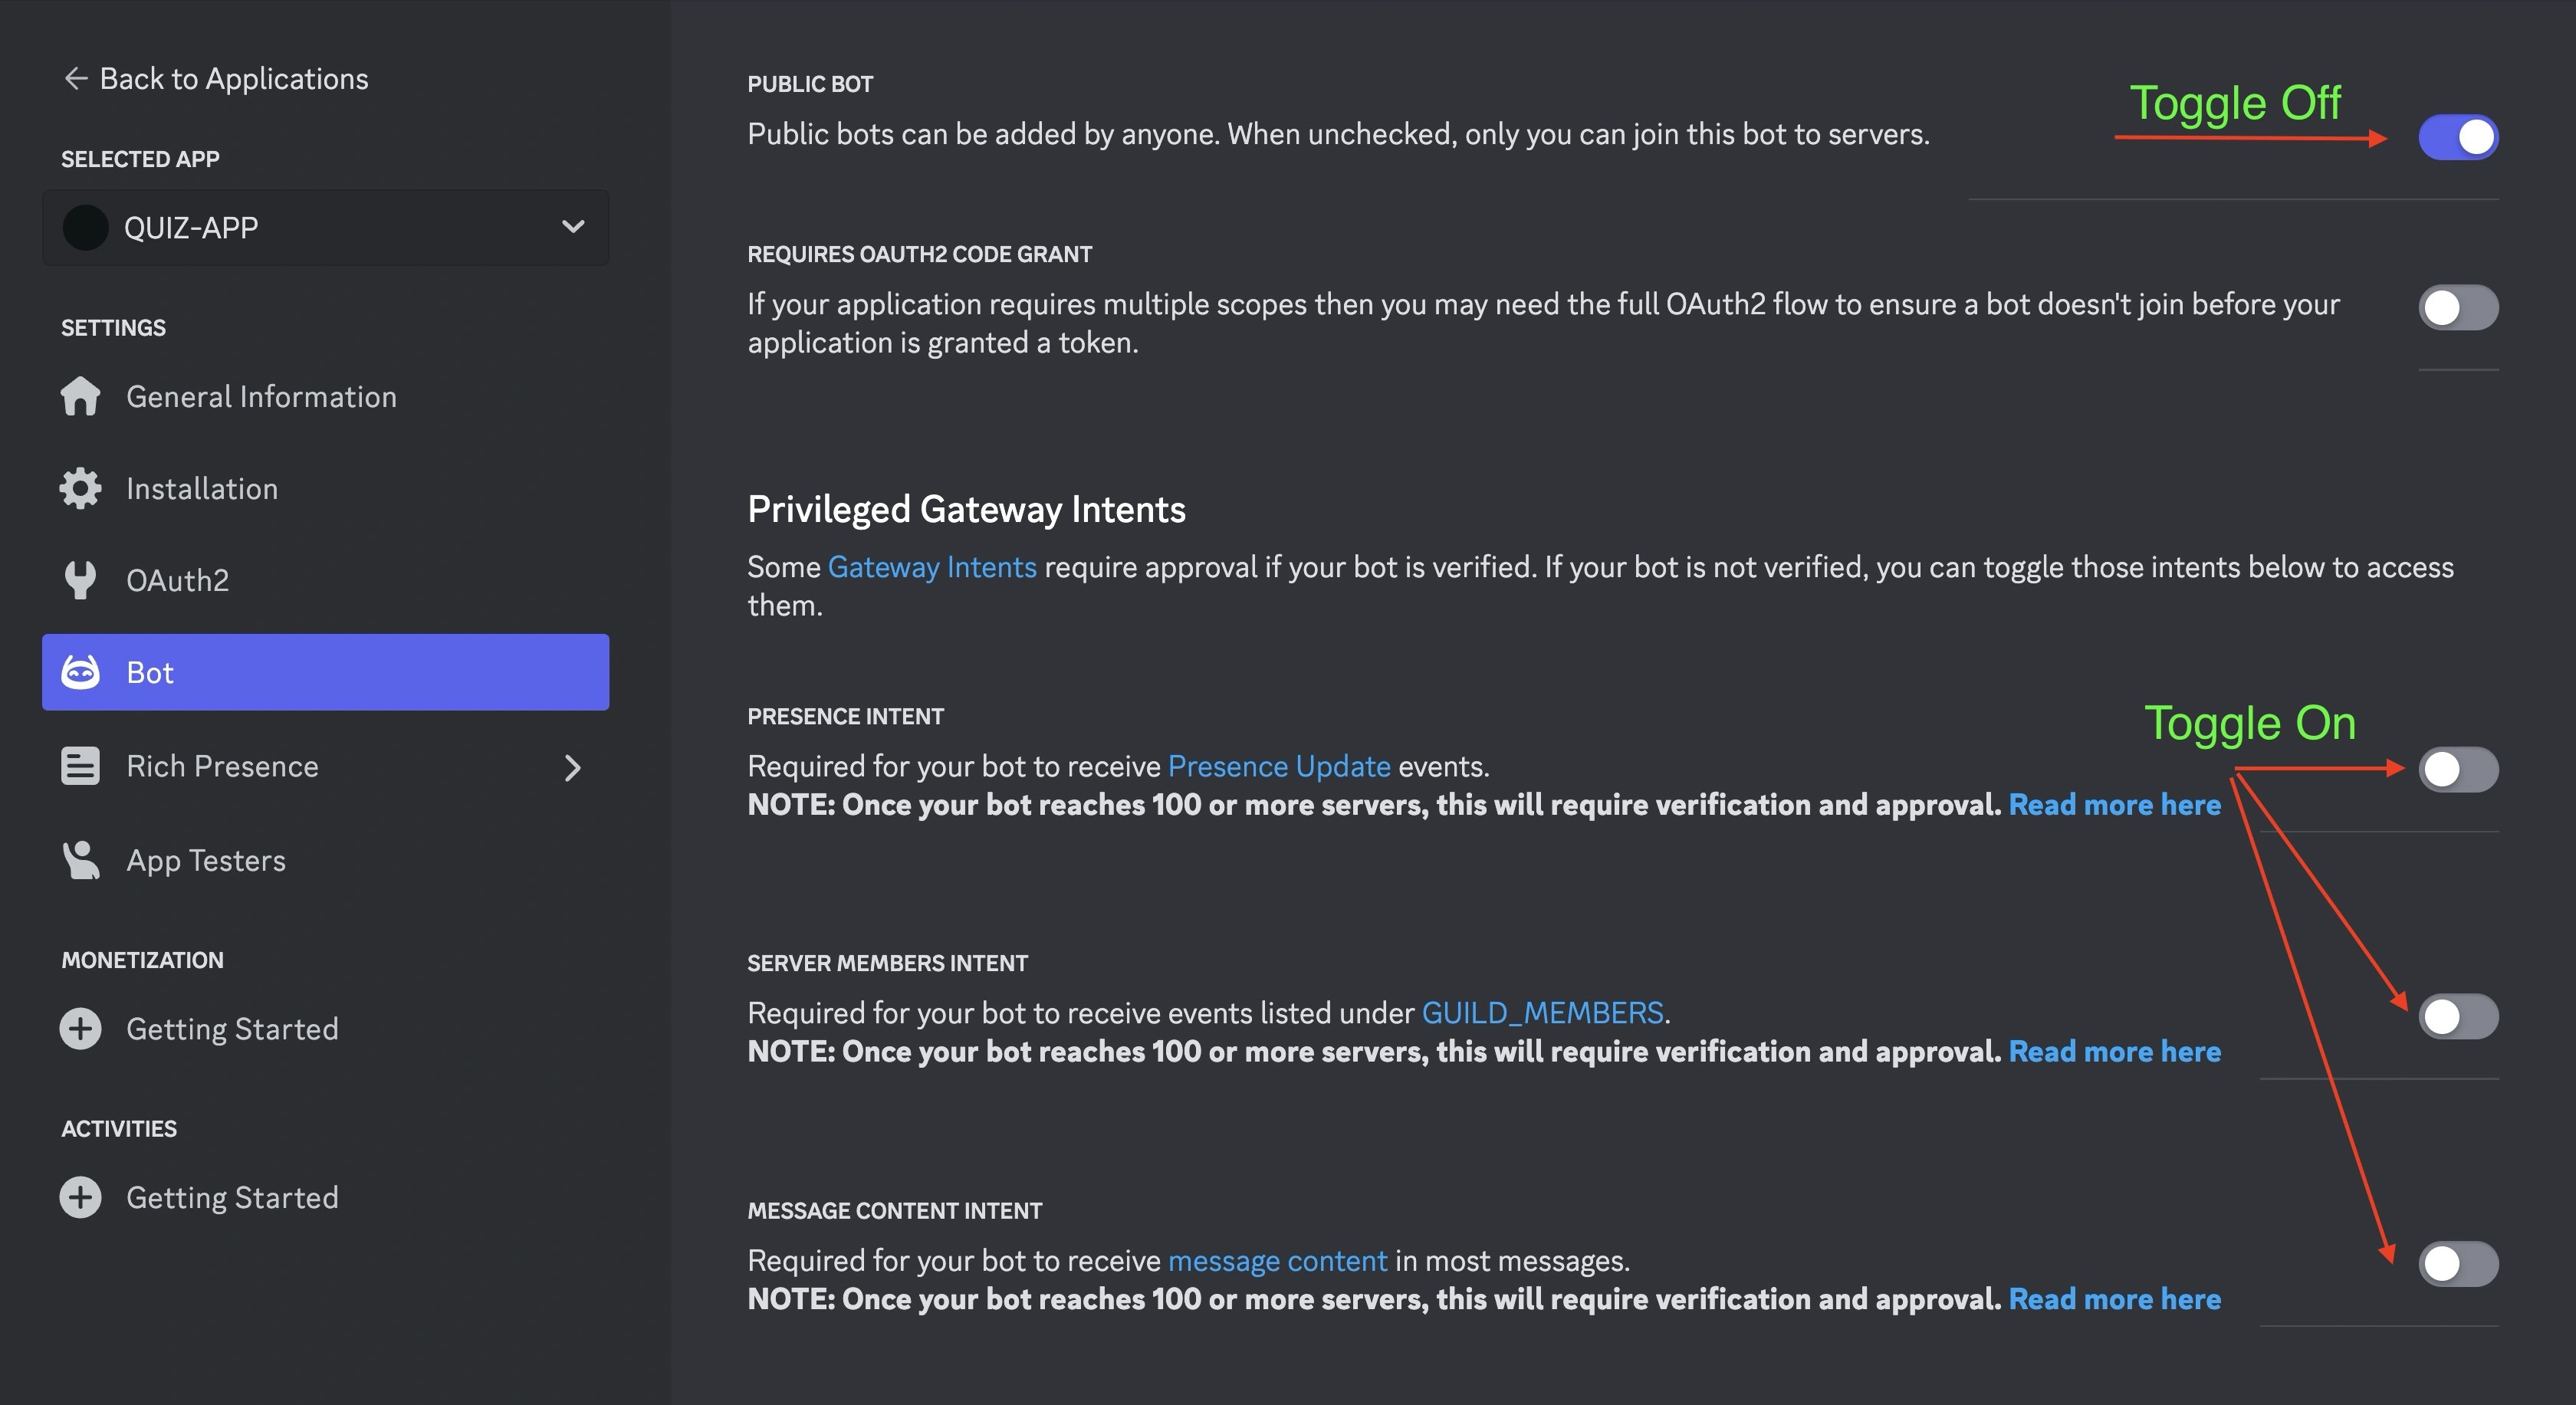
Next, toggle the public bot switch off to ensure only you can add your bot to servers.
Then, configure the bot’s permissions by toggling all “Privileged Gateway Intents” to ensure it has access to real-time updates on server activity like member presence.
Next, navigate to the “OAuth2” tab on your left sidebar. Under the “SCOPES” section, tick the bot and application.commands checkboxes, as shown in the image below.
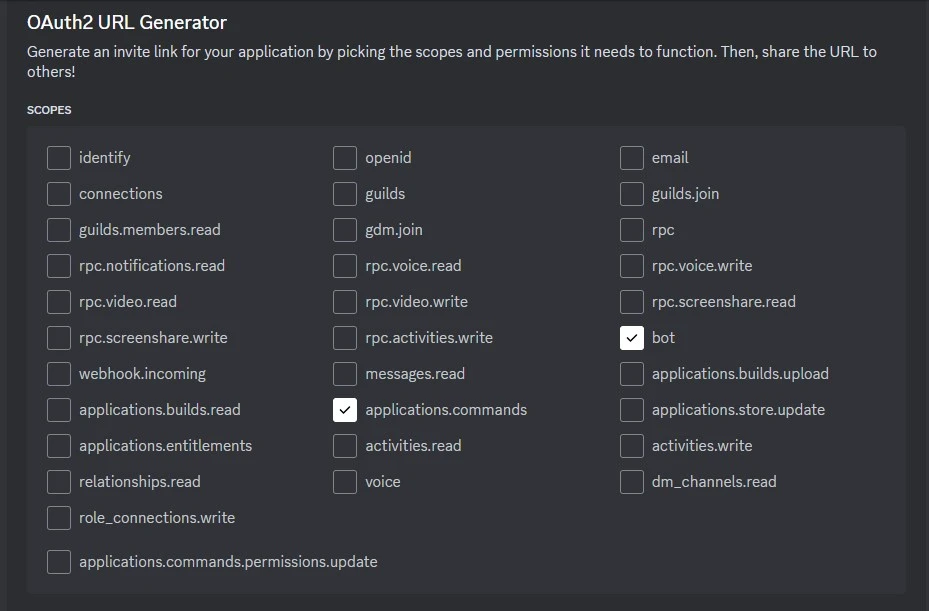
Selecting the bot scope allows Discord to recognize your application as a bot while the application.commands scope enables you to create slash commands that your bot will listen to.
A “BOT PERMISSIONS” section will open when you tick the bot checkbox. In the “BOT PERMISSIONS” section, tick the Administrator checkbox, as shown in the image below.
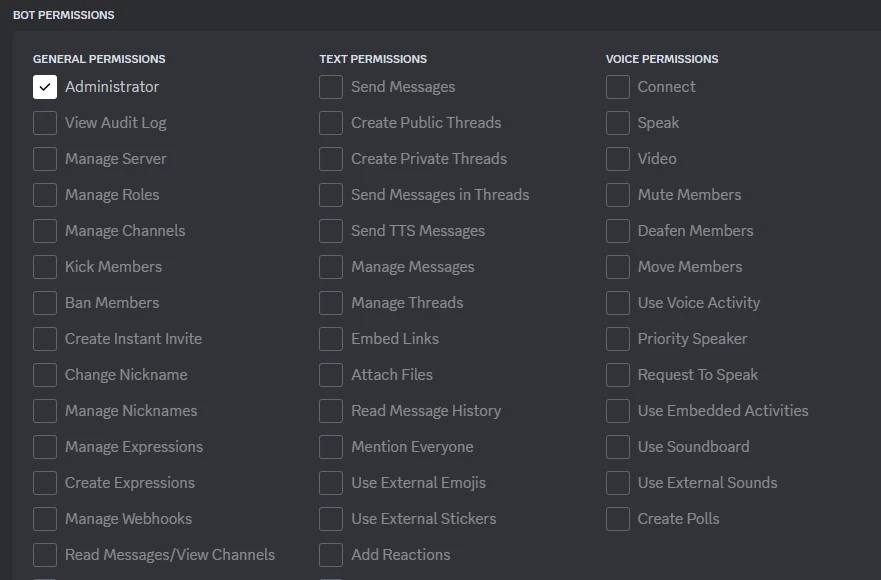
Ticking this checkbox grants the bot all possible permissions within the server. These permissions include the ability to manage messages and channels.
Below the “BOT PERMISSIONS” section, Discord will generate a URL for you to add this bot to a server. Paste the URL in your web browser and choose which server to add your bot.

Next, get your bot token in the “bot” tab by clicking the “Reset Token” button, as shown in the image below.
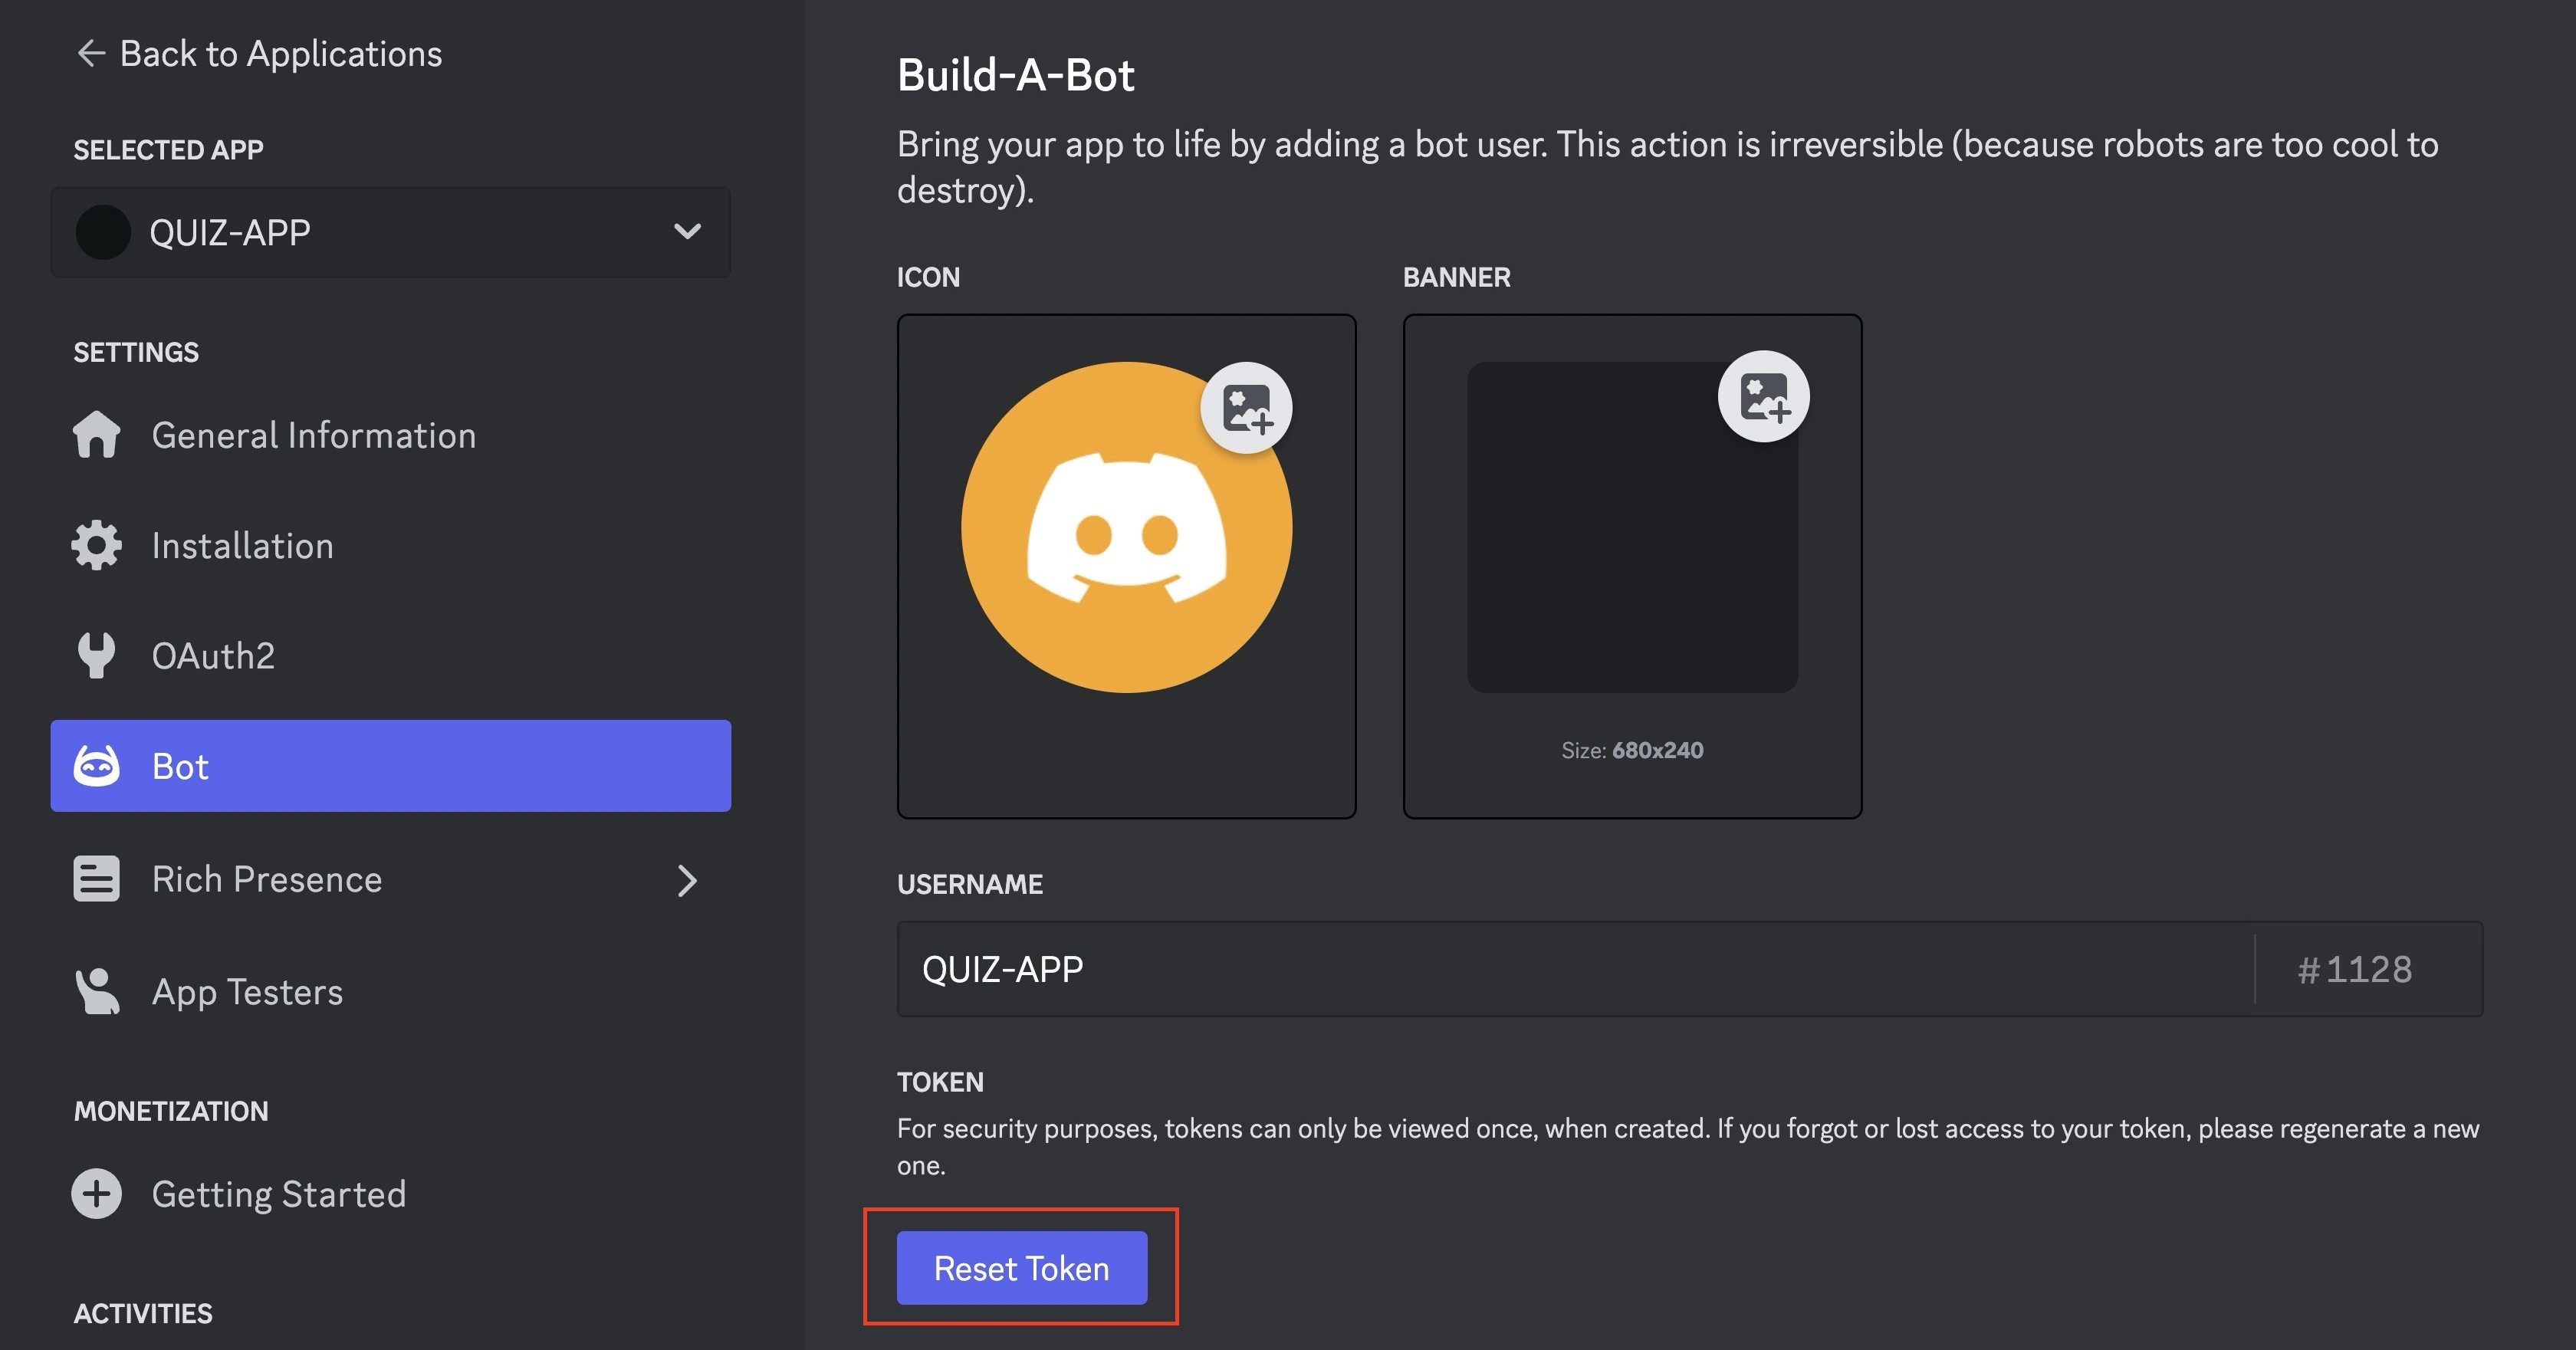
Clicking the button for the first time will reset your bot’s default token and provide you with a new token. Copy and store the token securely. If you loose the token, you have to reset it again, as it is shown only once.
Create a .env file to add your environment variables, like your bot token, along with other data, such as the guild ID to which you added the bot and your bot’s client ID:
TOKEN = "<BOT TOKEN>"
GUILD_ID = "<GUILD ID>"
CLIENT_ID = "<BOT'S CLIENT ID>"
Now you have set up your Discord Bot account. Next, you will build your Discord bot.
Building your Discord Bot Project with Node.js
This section will walk you through creating your Discord quiz bot and integrating packages you installed to register bot slash commands with Discord and handle your bot’s interaction with a guild member.
Structure your project’s directory similarly to the one below to follow along with this tutorial.
quiz-bot/
│
├── src/
│   ├── register-commands.js   # Script to register slash commands with Discord
│   └── quiz-bot.js                # Script for message handling and fetching questions
│
├── server.js                  # Entry point for your bot and script for running a server
├── node_modules/              # Node.js modules
│
├── .env
├── .gitignore
├── package.json
└── package-lock.json
Registering Bot Commands
Bots require users to input a command. With Discord bots, you define commands you want your bot to listen to with the slash (/) prefix.
To register your bot’s /quiz command on your Discord server, first, add the following imports from discord.js to your register-commands.js file:
// register-commands.js
const { REST, Routes, ApplicationCommandOptionType } = require('discord.js');
The classes you imported above include the following:
REST: This class allows you to make REST API calls to the Discord API.Routes: This class provides utility functions that generate Discord API endpoints.ApplicationCommandOptionType: This class allows you to define the data types for the options the command will accept.
Next, you need to define an array of command objects that contain all your bot’s commands. A command object contains a name, description, and an array of options.
These options allow users to customize the bot’s command. In this case, the options array will allow users to specify the difficulty and type of question the quiz bot should ask.
Add the code block below to your register-commands.js file to create your commands array:
// register-commands.js
const commands = [
  {
    name: 'quiz',
    description:
      'Select difficulty and question type to tailor the quiz experience.',
    options: [
      {
        type: ApplicationCommandOptionType.String,
        name: 'difficulty',
        description: "Options include 'easy', 'medium', or 'hard'.",
        required: true,
      },
      {
        type: ApplicationCommandOptionType.String,
        name: 'type',
        description:
          " Choose 'multiple' for multiple choice or 'boolean' for true/false",
        required: true,
      },
    ],
  },
];
The code block above defines the quiz command in the commands array. The quiz object contains two options the user needs to input along with the /quiz command, such as the difficulty level and question type for the question the bot will ask.
Next, you need to register your /quiz command to make it accessible through your bot. To register the command, first, you have to create an instance of the REST class with your discord bot token and your preferred REST version.
To register your /quiz command and make it accessible through your bot; begin by creating an instance of the REST class using your Discord bot token and specifying your preferred REST version.
Like so:
// register-commands.js
const rest = new REST({ version: '10' }).setToken(process.env.TOKEN);
Discord regularly updates its API, leading to changes in endpoints, response structure, and behavior.
Defining a specific REST version for your Discord project enables you to manage the features available to your project effectively. The code block above uses v10 of the Discord API.
Next, you need to define an asynchronous function to register bot commands with a guild’s server using the applicationGuildCommands method from the Routes class.
Like so:
// register-commands.js
(async () => {
  try {
    console.log('Started refreshing SLASH (/) commands.');
    await rest.put(
      Routes.applicationGuildCommands(
        process.env.CLIENT_ID,
        process.env.GUILD_ID
      ),
      { body: commands }
    );
    console.log('Successfully reloaded SLASH (/) commands.');
  } catch (error) {
    console.error(error);
  }
})();
The code block above performs a PUT request to the Discord API endpoint with the commands array as the request body.
It constructs the API endpoint using the applicationGuildCommands method, taking in the bot’s client ID and the target guild ID.
After registering the commands, you will need to manage the interaction flow between your bot and a guild member.
Handling User Interaction With the Discord Bot
To handle the interaction flow between your bot and a guild member, first, add the following imports to your quiz-bot.js file:
// quiz-bot.js
const { Client, IntentsBitField } = require('discord.js');
const axios = require('axios');
You need to use the Client class to create a new Discord bot instance, while you will use the IntentsBitField class to specify the intents (events) your bot will receive from the Discord API.
Next, add the code block below in your quiz-bot.js file to create a new client instance for your bot and specify particular intents for your bot application:
// quiz-bot.js
const client = new Client({
  intents: [
    IntentsBitField.Flags.Guilds,
    IntentsBitField.Flags.GuildMembers,
    IntentsBitField.Flags.GuildMessages,
    IntentsBitField.Flags.MessageContent,
  ],
});
The code block above defines specific intents the bot needs to function, which include:
IntentsBitField.Flags.Guilds: This intent allows the bot to receive information about guilds (servers) it’s a member of, including their names, icons, and roles.
IntentsBitField.Flags.GuildMembers: This intent enables the bot to receive information about guild members, such as their usernames, statuses, and roles.
IntentsBitField.Flags.GuildMessages: This intent grants the bot access to messages sent in the guilds it’s in, allowing it to respond to commands or events triggered by messages.
IntentsBitField.Flags.MessageContent: This intent allows your bot to access the actual content of messages sent in the guilds. Without this intent, the message content will be empty.
You will create an event listener for the ready event. This event triggers when your Discord bot has successfully connected to the Discord servers and is ready to function.
Add the code block below to your quiz-bot.js file to create your ready event listener:
// quiz-bot.js
client.on('ready', () => {
  console.log(`✅ Bot is online and ready`);
});
Next, you need to create an event listener for the interactionCreate event. This event occurs when a user performs an interaction that your bot can handle, such as using a slash command.
When emitted, your event listener will receive the interactionCreate event along with an interaction object.
This object includes all the details about the interaction, such as the type of interaction and the data provided by the user.
Add the code block below to your quiz-bot.js file to create your interactionCreate event listener:
// quiz-bot.js
client.on('interactionCreate', async (interaction) => {
 if (!interaction.isChatInputCommand()) return;

 if (interaction.commandName === 'quiz') {
  // Rest of the code goes here...
 }
});
The code block above sets up an interactionCreate event listener.
The event listener checks if the interaction between a user and the bot is a chat input command (slash command) and filters out other types of interactions.
It then checks if the commandName is quiz and proceeds to handle the quiz session between the bot and the user.
If the commandName is quiz, make a GET request with Axios to the Trivia API’s URL to get the question and its answers (correct and incorrect).
Shuffle the answers to randomize the options, then render them to the user.
Like so:
// quiz-bot.js

await interaction.deferReply();

const difficulty = interaction.options.getString("difficulty");
const type = interaction.options.getString("type");

try {
  const url = `https://opentdb.com/api.php?amount=1&difficulty=${difficulty}&type=${type}`;
  const response = await axios.get(url);
  const data = response.data.results[0];
  const question = data.question;
  const correctAnswer = data.correct_answer;
  const options = [...data.incorrect_answers, correctAnswer];

  // Shuffle the options
  for (let i = options.length - 1; i > 0; i--) {
    const j = Math.floor(Math.random() * (i + 1));
    [options[i], options[j]] = [options[j], options[i]];
  }

  await interaction.editReply({
    content: `Question: ${question}\\nOptions: ${options.join(", ")}`,
  });
} catch (error) {
  console.error(error);
  // Notify the user in case of an error after deferring
  await interaction.followUp("Failed to fetch the question. Please try again.");
}
The code block above first defers the bot’s reply with the deferReply method to allow the bot some time interval to handle the GET request.
The code block then retrieves the user’s selected difficulty and question type from the interaction object using interaction.options.getString().
Subsequently, the bot extracts the question, correct answer, and incorrect answers from the fetched data.
After shuffling the correct and incorrect answers to randomize the choice order, it edits the initial deferred reply with the quiz question and options.
Next, you need to handle the user’s response to the question by checking it against the correct answer and informing the user if they were correct or wrong.
Collecting User Responses
To collect the user’s response to the question, you will use the createMessageCollector method on the interaction’s channel (interaction.channel).
This method allows you to filter out messages not sent by the user who initiated the /quiz command, set a time limit for the user’s response, and specify the maximum number of messages to collect.
When the user sends a response, the createMessageCollector method triggers a collect event.
You need to add a listener to this event; the listener will check the user’s response against the correct answer to the question and send an appropriate message.
On the other hand, if the user does not send an appropriate response within the specified time limit, the createMessageCollector method will trigger an end event.
You need to add a listener that responds to the user to notify them that their time is up to this event.
Like so:
// quiz-bot.js
const filter = (m) => m.author.id === interaction.user.id;

const collector = interaction.channel.createMessageCollector({
  filter,
  time: 15000,
  max: 1,
});

collector.on("collect", async (m) => {
  if (m.content.toLowerCase() === correctAnswer.toLowerCase()) {
    await m.reply("Correct answer! 🎉");
  } else {
    await m.reply(`Wrong answer! The correct answer was: ${correctAnswer}`);
  }
});

collector.on("end", (collected) => {
  if (collected.size === 0) {
    interaction.followUp("Time is up! No answer was provided.");
  }
});
The code block above creates a message collector for the channel where the interaction took place (collector). collector will filter messages based on the author’s ID, ensuring only the user who initiated the quiz can provide an answer within a 15-second time limit.
The code block then creates two event listeners for collector. The first event listener, collect, will trigger a callback to check the user’s answer and reply to the user accordingly.
The second event listener, end, will trigger a callback to notify the user that they did not provide an answer within the time limit.
Next, establish a connection between your bot and Discord by adding the line of code at the end of your quiz-bot.js file:
// quiz-bot.js
client.login(process.env.TOKEN);
Creating an Entry File
You will create an entry file, which is a single file that will initialize your entire bot application. It will serve two functions:
- Importing Bot Logic: The entry file will run the bot’s logic by requiring the JavaScript files, which handle registering your bot command with the Discord server and responding to user messages.
- Starting the Server: The entry file will set up a server that will allow your bot to run on a Back4app container. Back4app containers require exposed ports for your application’s deployment to be successful.
Add the code block below to the server.js file to create a server:
// server.js
require('dotenv').config();
const http = require('http');
require('./src/register-commands.js');
require('./src/quiz-bot.js');

http
  .createServer((req, res) => {
    res.writeHead(200, { 'Content-Type': 'text/plain' });
    res.end('Bot is running!');
  })
  .listen(3000, () => {
    console.log('Server is ready.');
  });
The code block above sets up your Discord bot to run by creating a simple HTTP server. This server acts as an entry point, allowing the bot to function within the container’s environment.
The code block above imports your bot’s core logic and specifies a Back4app port to allow your bot to deploy on a Back4app container.
After creating the entry file, you can test your Discord bot locally before deploying it to a Back4app container.
Testing your Discord Bot
Start your Discord bot by running the code block below in your application’s terminal:
node server.js
The command will log messages showing you have successfully registered your bot and your bot is ready and online.
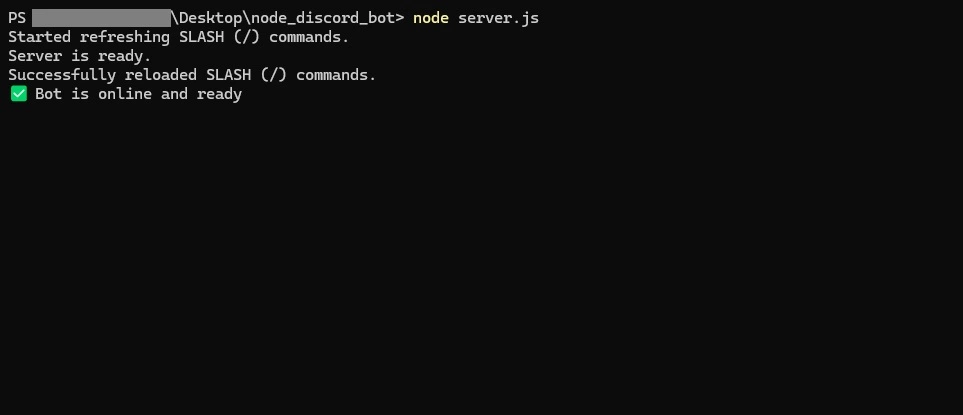
Go to the server to which you added your bot. You should notice that it is online now.
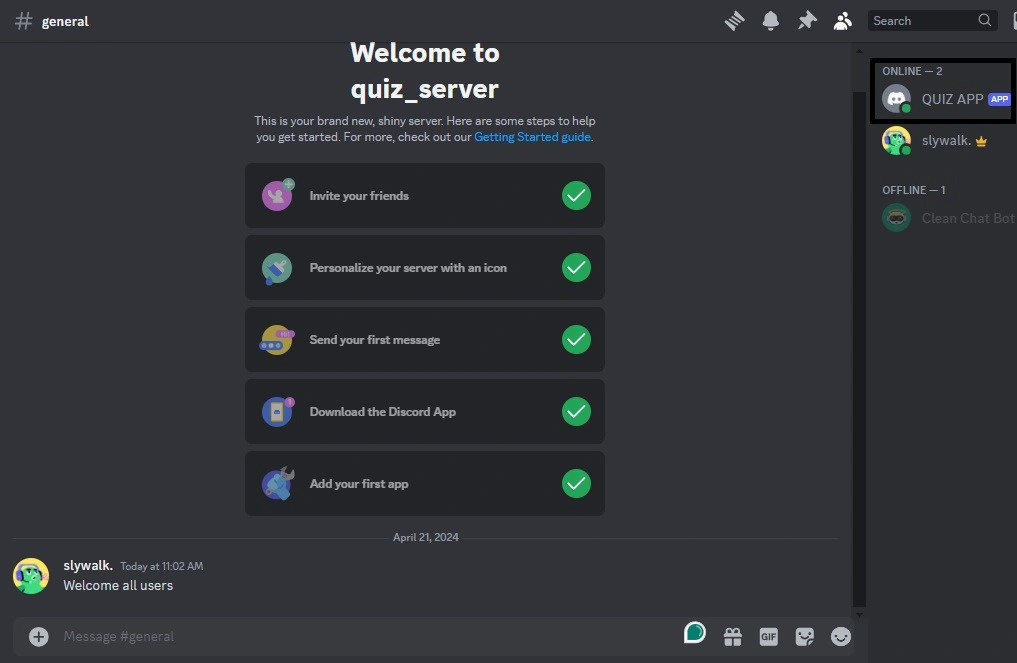
To interact with your bot, send the /quiz command. The bot should respond with options detailing how you want your quiz question to look.

Choose your desired options (e.g., selecting a quiz category or difficulty level) and hit Enter. The bot will reply with a question and set a 15-second time limit for your answer.
If you submit your answer within the time limit, the bot will compare your answer against the correct answer and respond to notify you if your answer is right or wrong.
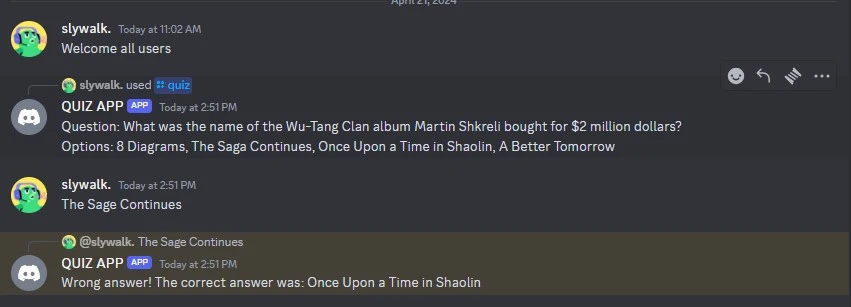
You have determined that your bot can handle all the features you designed it to handle; next, deploy your Discord bot to a Back4app container.
Deploying the Discord Bot on Back4app Containers With the AI Agent
In this section, you will deploy your Discord bot on Back4app containers with the Back4app AI agent.
To deploy an app on Back4app containers, you need the following:
- A Dockerfile in your project
- GitHub Repository: Your project should be uploaded to a GitHub repository.
- Back4app GitHub App: Install and grant necessary permissions to the Back4app GitHub app for your repository
First, create a Dockerfile in your project’s root directory and add the code block below to it:
# Dockerfile
FROM node:18-alpine

WORKDIR /app

COPY package*.json ./

RUN npm install

COPY . .

EXPOSE 3000

CMD ["npm", "start"]
Next, you need to upload your code to a GitHub repository to make it accessible for deployment.
Before following the next step, ensure you have the Back4App Containers GitHub App installed on your GitHub account and ensure that it has the necessary permissions required to access the app you want to deploy.
Navigate to the Back4app homepage and click the “New App” button at the top right corner of your screen.
This will take you to an initialization screen, where you will need to pick the type of app you want to create.
Select the Back4app Agent option, as shown in the image below.
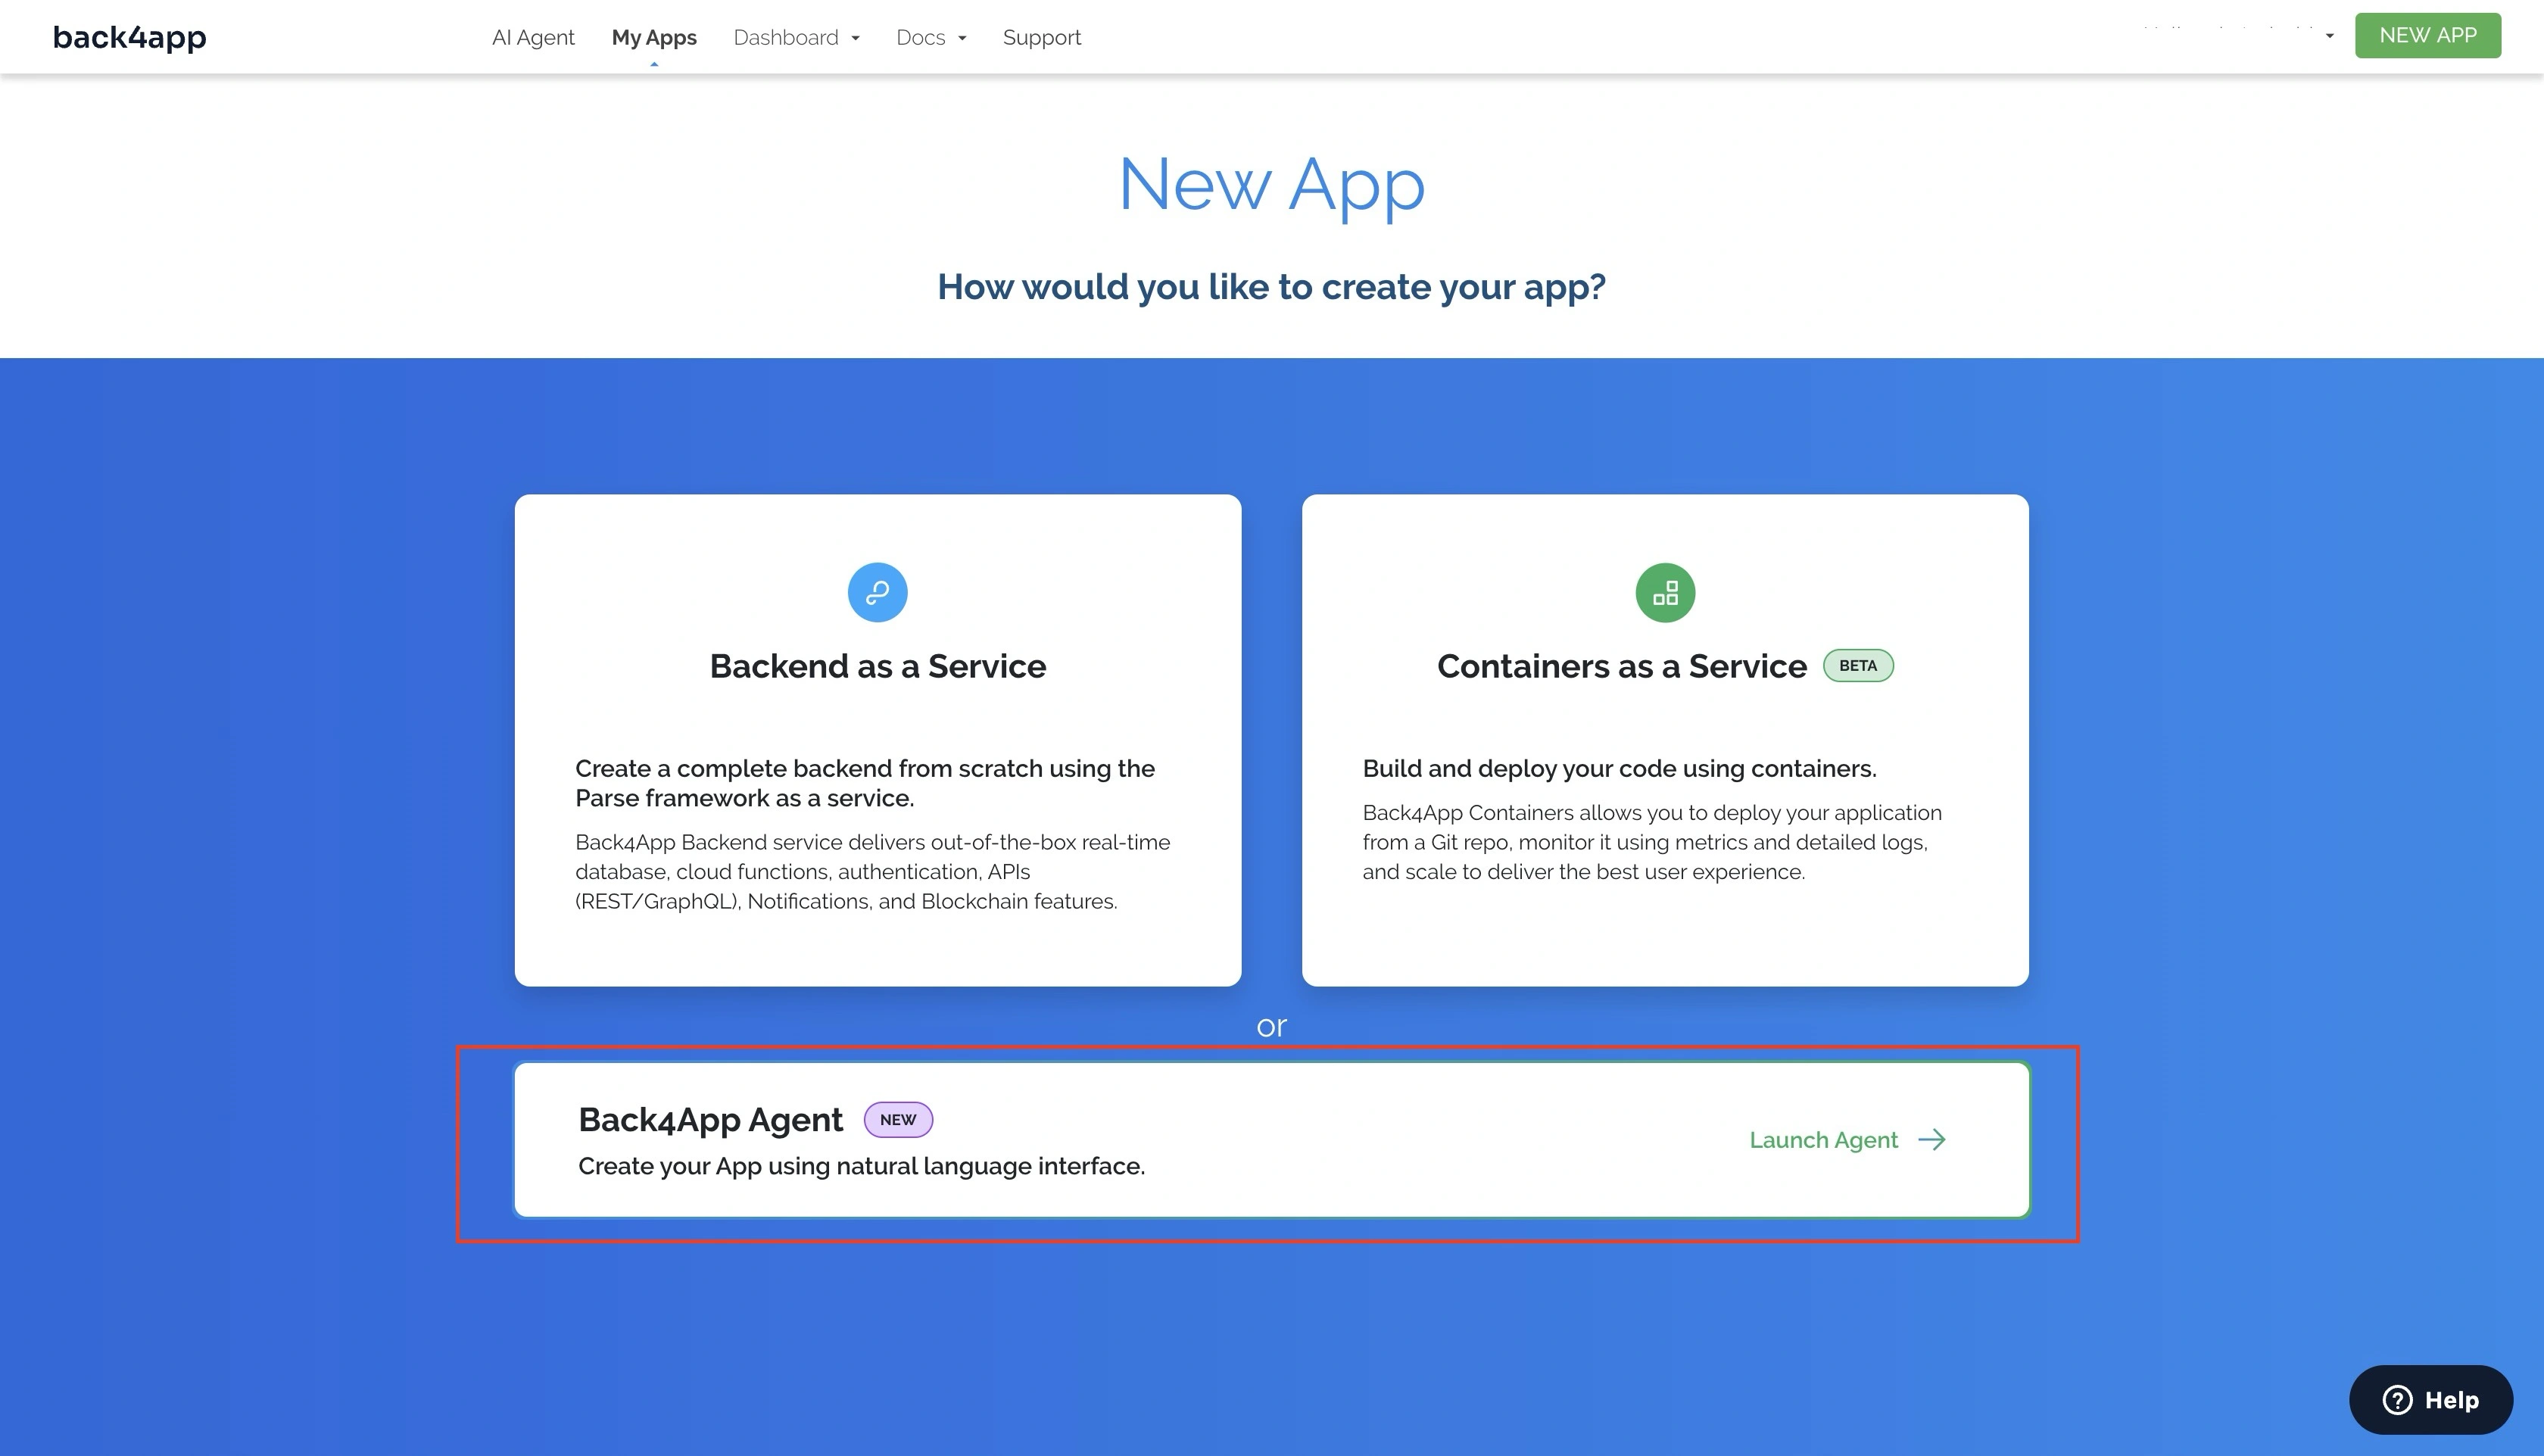
When you select the Back4app Agent option, you will be redirected to the Back4app AI agent page.
Give the AI agent the prompt below to deploy your app:
Deploy my "YOUR_REPOSITORY_URL" repository on GitHub to a Back4App Container.
Here are the required environmental variables:
TOKEN = "YOUR_DISCORD_BOT_TOKEN"
GUILD_ID = "YOUR_GUILD_ID"
CLIENT_ID = "YOUR_CLIENT_ID"
Replace the placeholders in the prompt above with their actual values.
You should get a response similar to the one below:
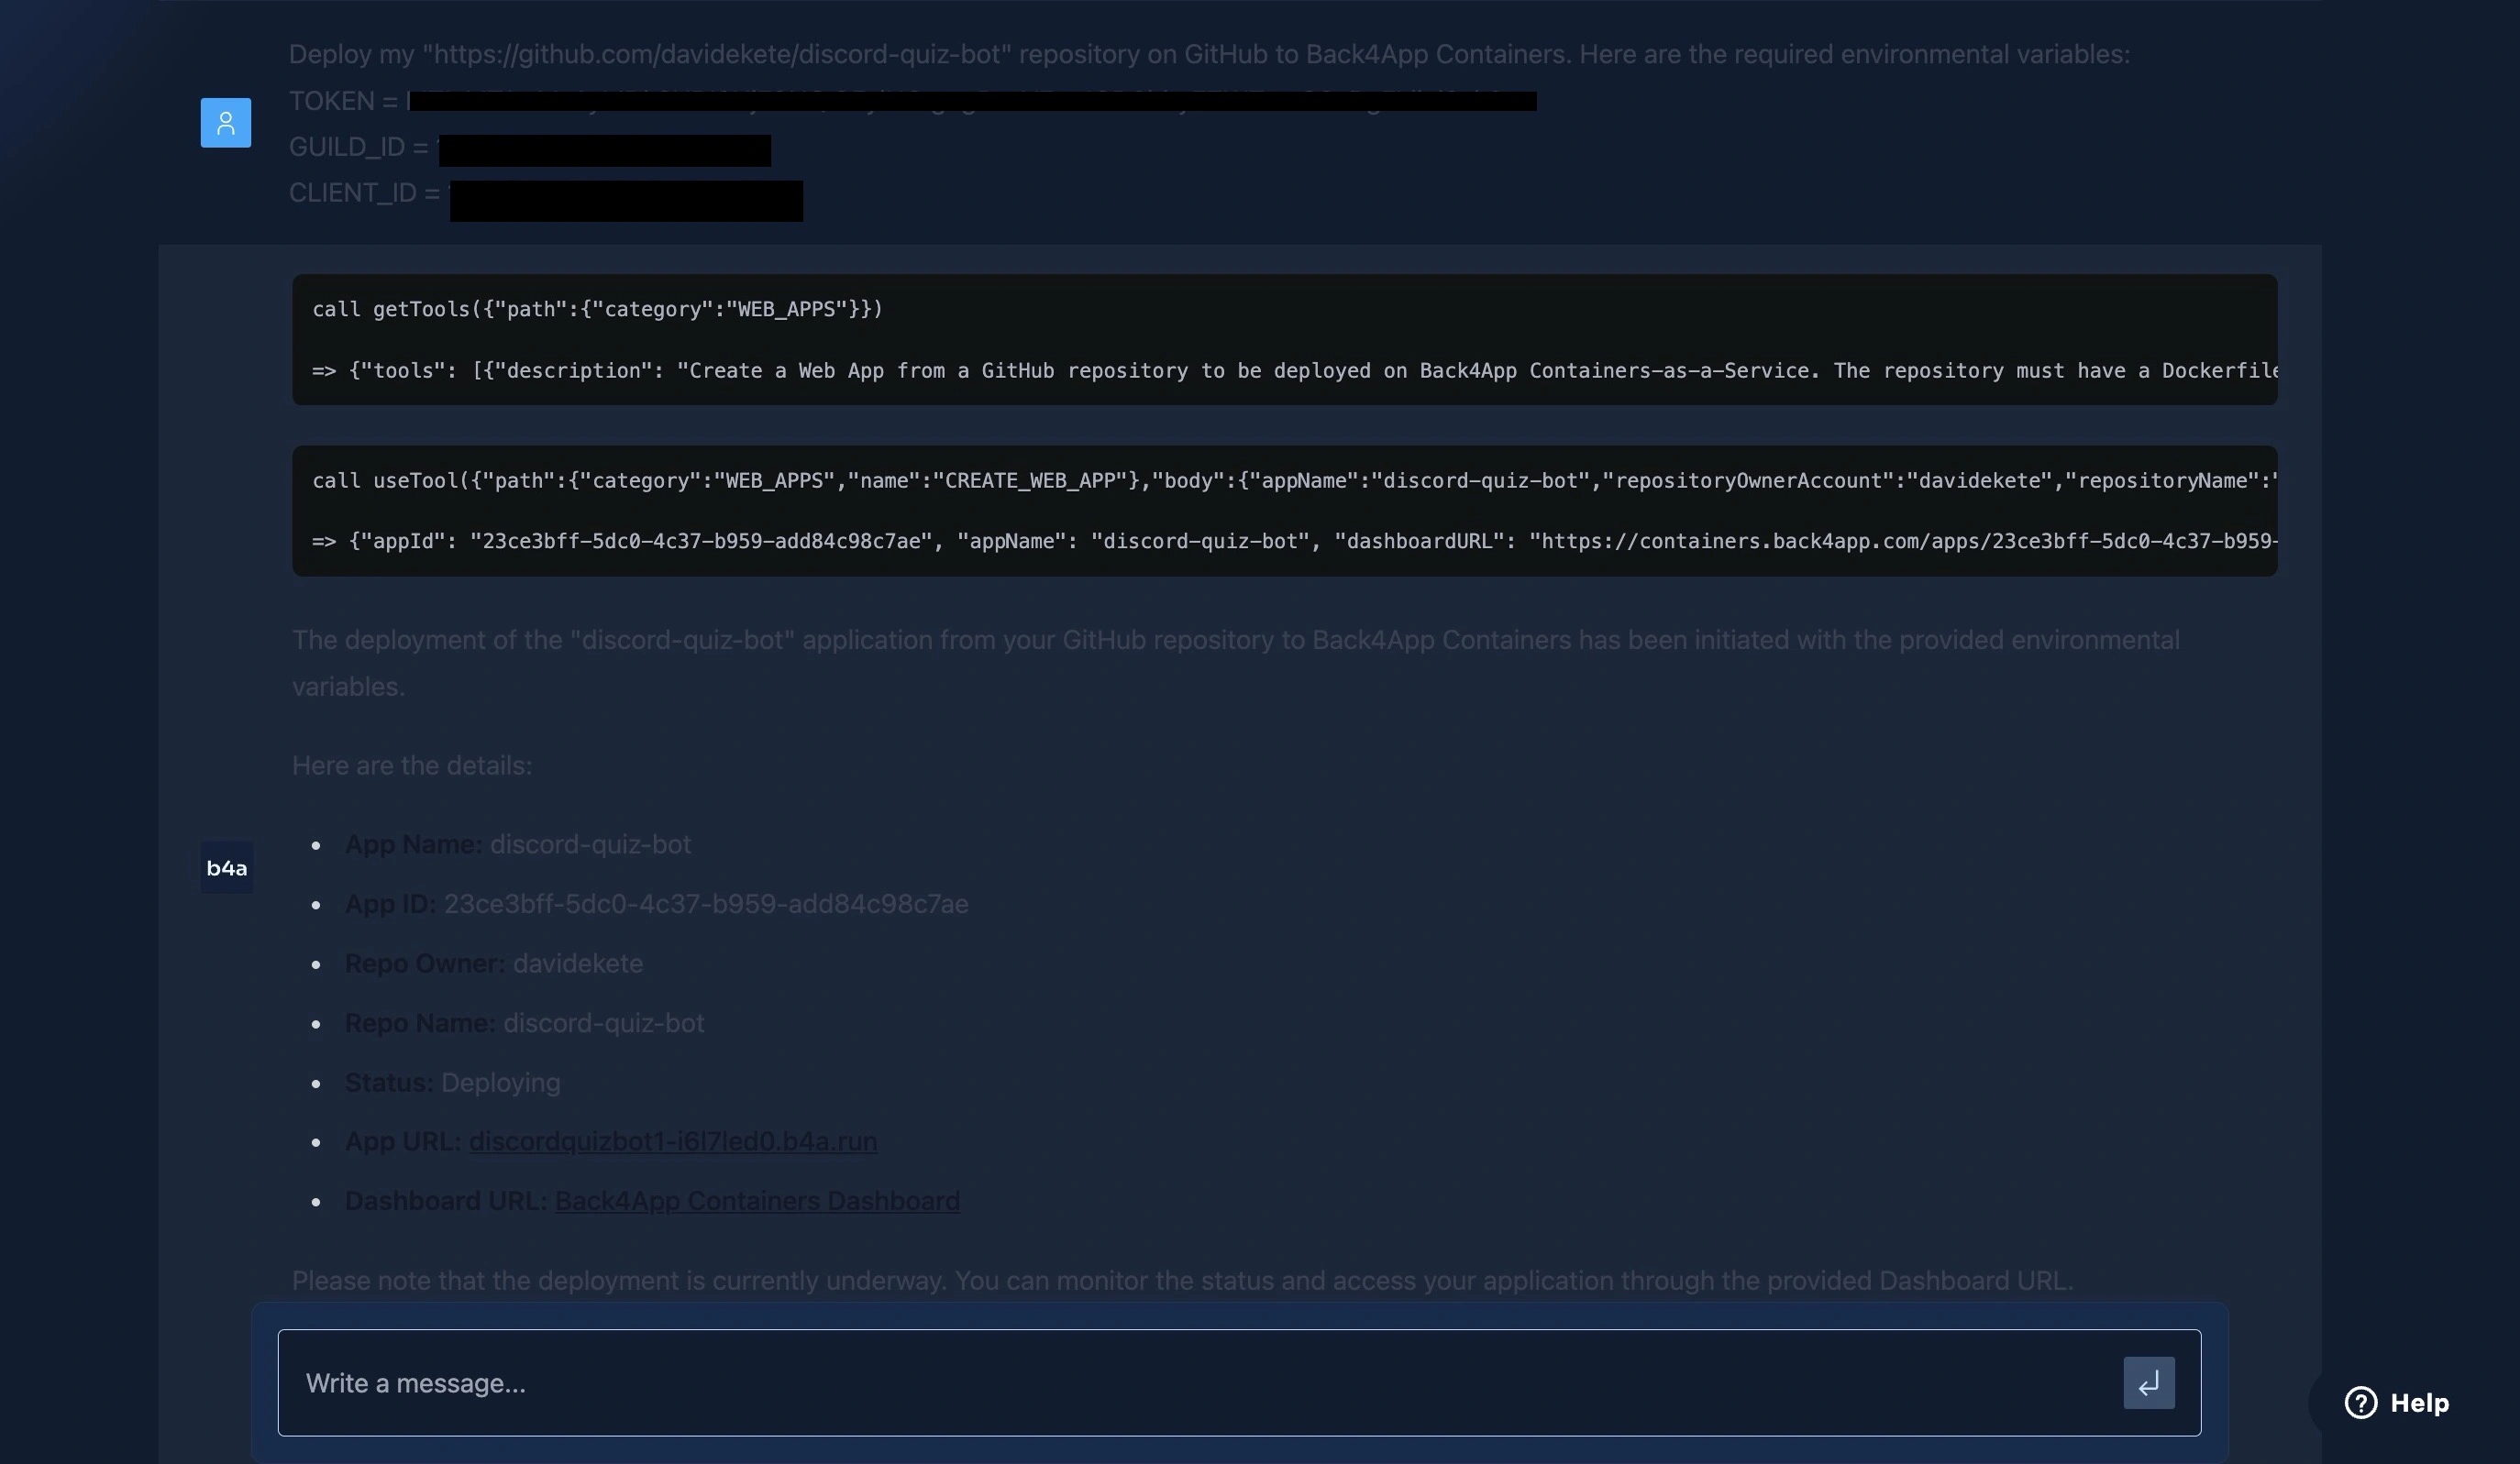
The response above shows that the deployment process is ongoing and that your application will be online and available in the provided URL.
You can monitor the deployment process on your Back4app containers dashboard, or you can give the AI agent the prompt below after a while to confirm the current deployment status.
What is the current deployment status of my web app?You should get a response similar to the one below:
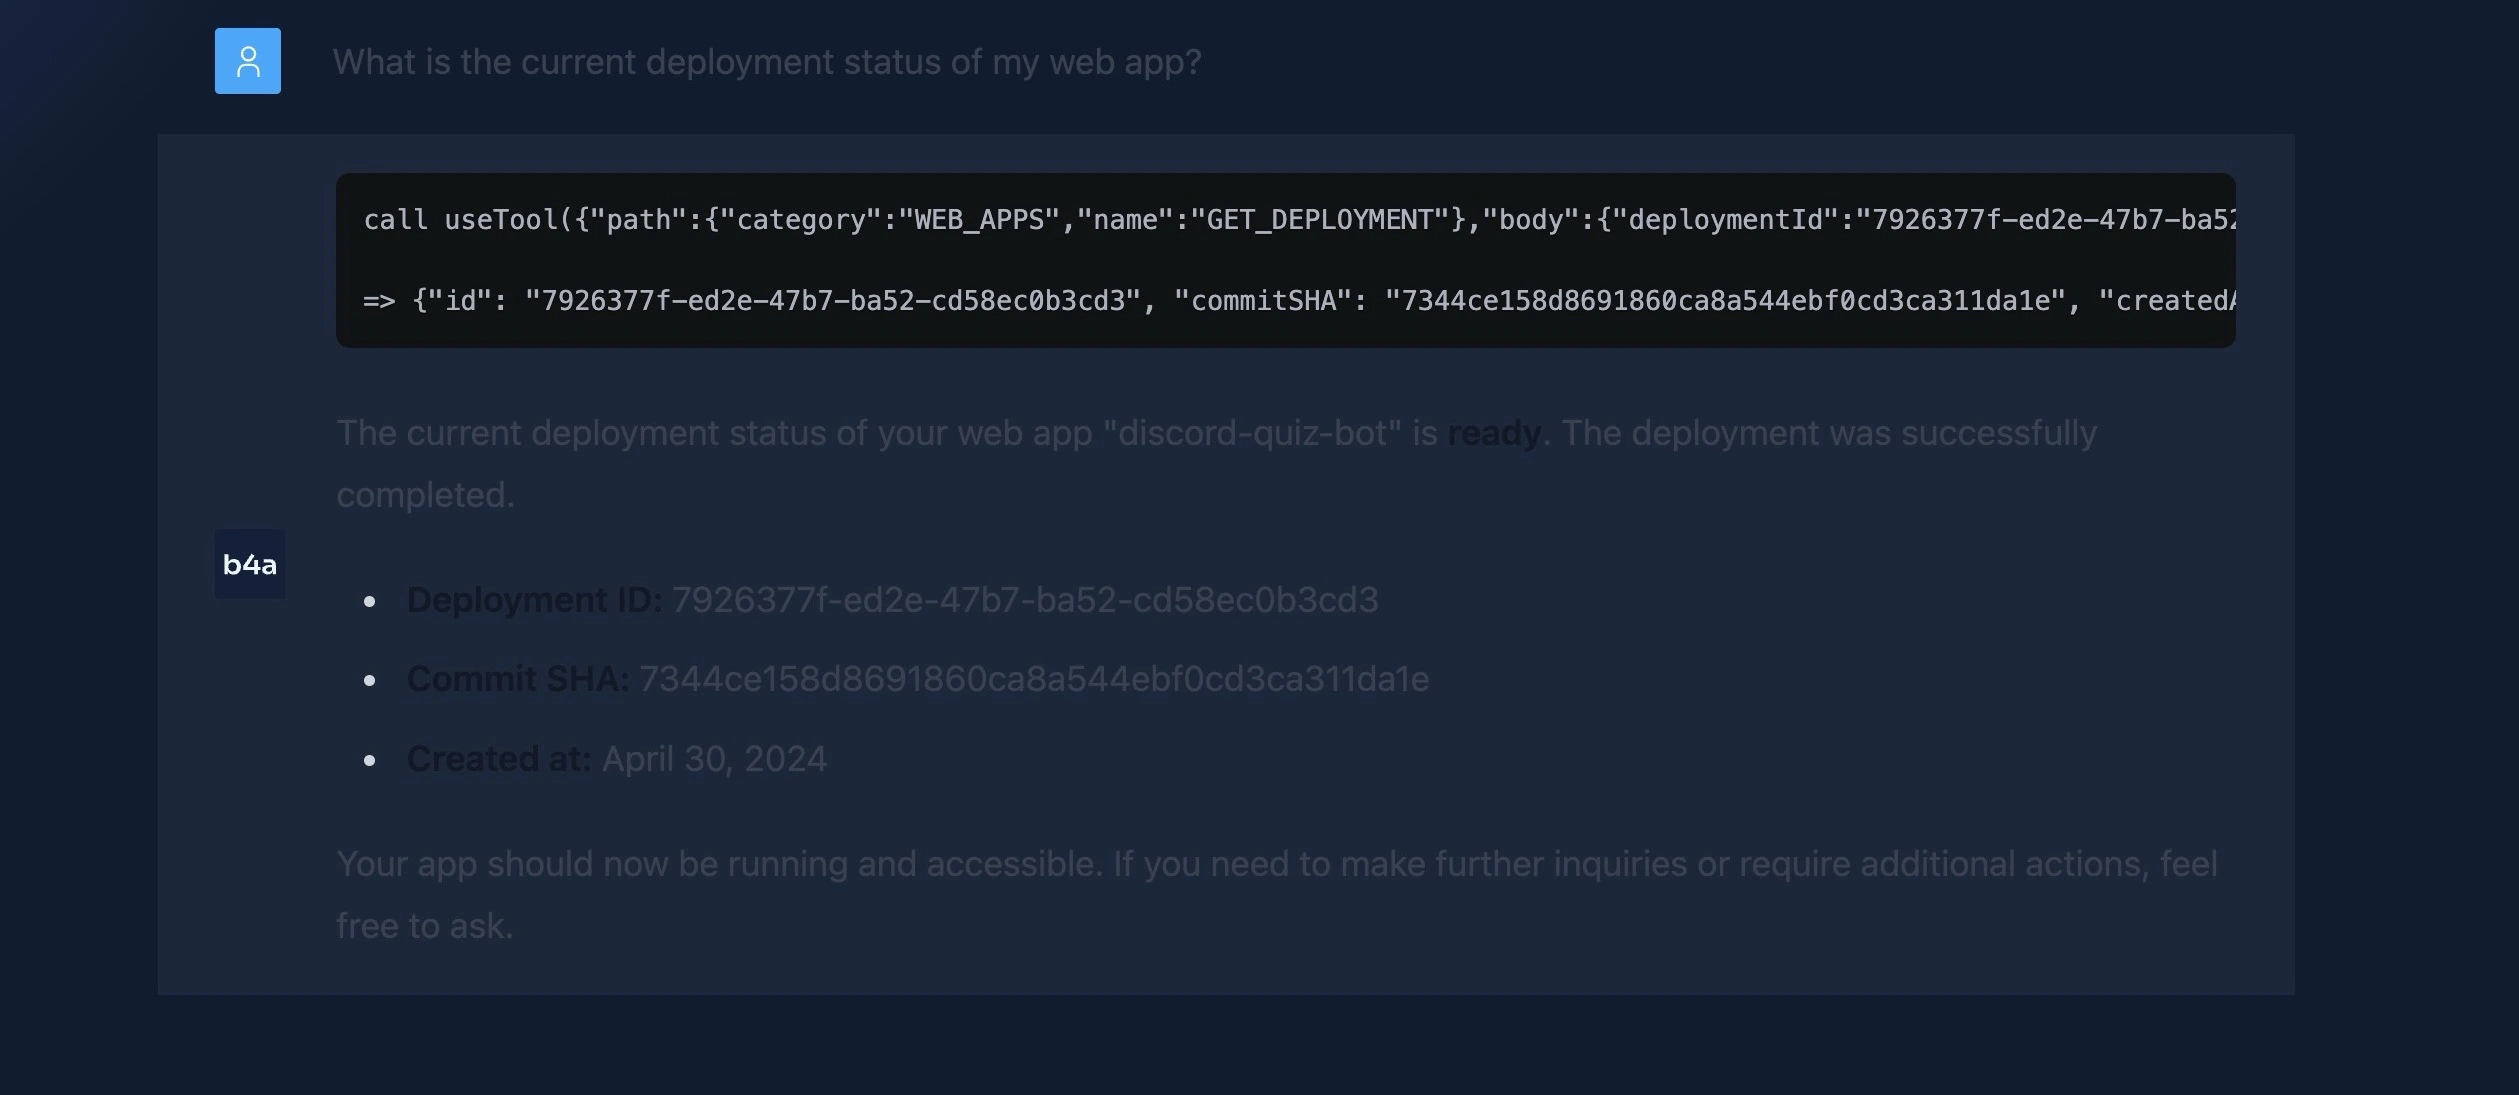
Alternatively, you can choose to deploy your app on Back4App manually.
Conclusion
In this article, you learned how to build a Discord bot with Node.js. You explored how to create a Discord bot account, register bot commands, and handle user responses.
Additionally, you tested your Discord bot and deployed it on a Back4app container with the help of the AI agent.
Discord bots can be very useful in automating tasks, providing entertainment, etc, and based on your use case, you can tweak the bot to perform specific functions that meet your needs.
The full code used in this tutorial is available on this GitHub repository.


