Deploy Your Node.js Backend for Free
Deploying your application backend makes it accessible to your intended users. However, the journey from localhost to the cloud can be difficult without the proper knowledge and tools.
In this article, you will learn how to deploy your Node.js backend on various platforms, each with a free tier or free credits that allow you to explore their platform first without the hassles of payment.
Contents
1. Back4app Containers
Back4app is a Platform-as-a-Service (PaaS) cloud platform that enables you to create and host web applications of various stacks through an intuitive UI, a dedicated CLI tool, and an AI agent.
The platform offers various services, including a Containers-as-a-Service (CaaS) platform known as Back4app Containers.
Back4app containers is a CaaS service offered by Back4app that allows you to manage and deploy your web app using Docker containers.
Back4app containers offer real-time application monitoring featuring crucial metrics such as CPU, RAM, Bandwith, and application logs to help you identify bottlenecks and optimize your application performance.
It also offers automatic deployments, which have zero downtime on updates. They achieve this by ensuring that new containers are ready to work when you deploy a new commit or change your container configuration, barring any service interruptions during deployments.
Deployment with Back4app containers is a straightforward process that involves connecting the GitHub repository of your app (Dockerfile included) to the Back4app Github app, adding your environmental variables, and clicking the deploy button.
How to Deploy Your Node.js Backend on Back4app Containers?
To deploy your Node.js application on Back4app containers, you need
- A Back4app account, you sign up for free if you don’t have one.
- The Back4App Containers GitHub App installed on your GitHub account.
Once you have logged into your Back4app account and installed the GitHub app on your GitHub account, grant the Back4app app access to the repository you want to deploy.
Ensure that your repository contains a Dockerfile; below is a sample Dockerfile you can use for your Node.js app:
# Specify base image
FROM node:18-alpine

# Specify working directory
WORKDIR /app

# Copy package.json and package-lock.json
COPY package*.json ./

# Install dependencies
RUN npm install

# Copy source code
COPY . .

# Expose port 8080
EXPOSE 8080

# Run the app
CMD ["npm", "start"]
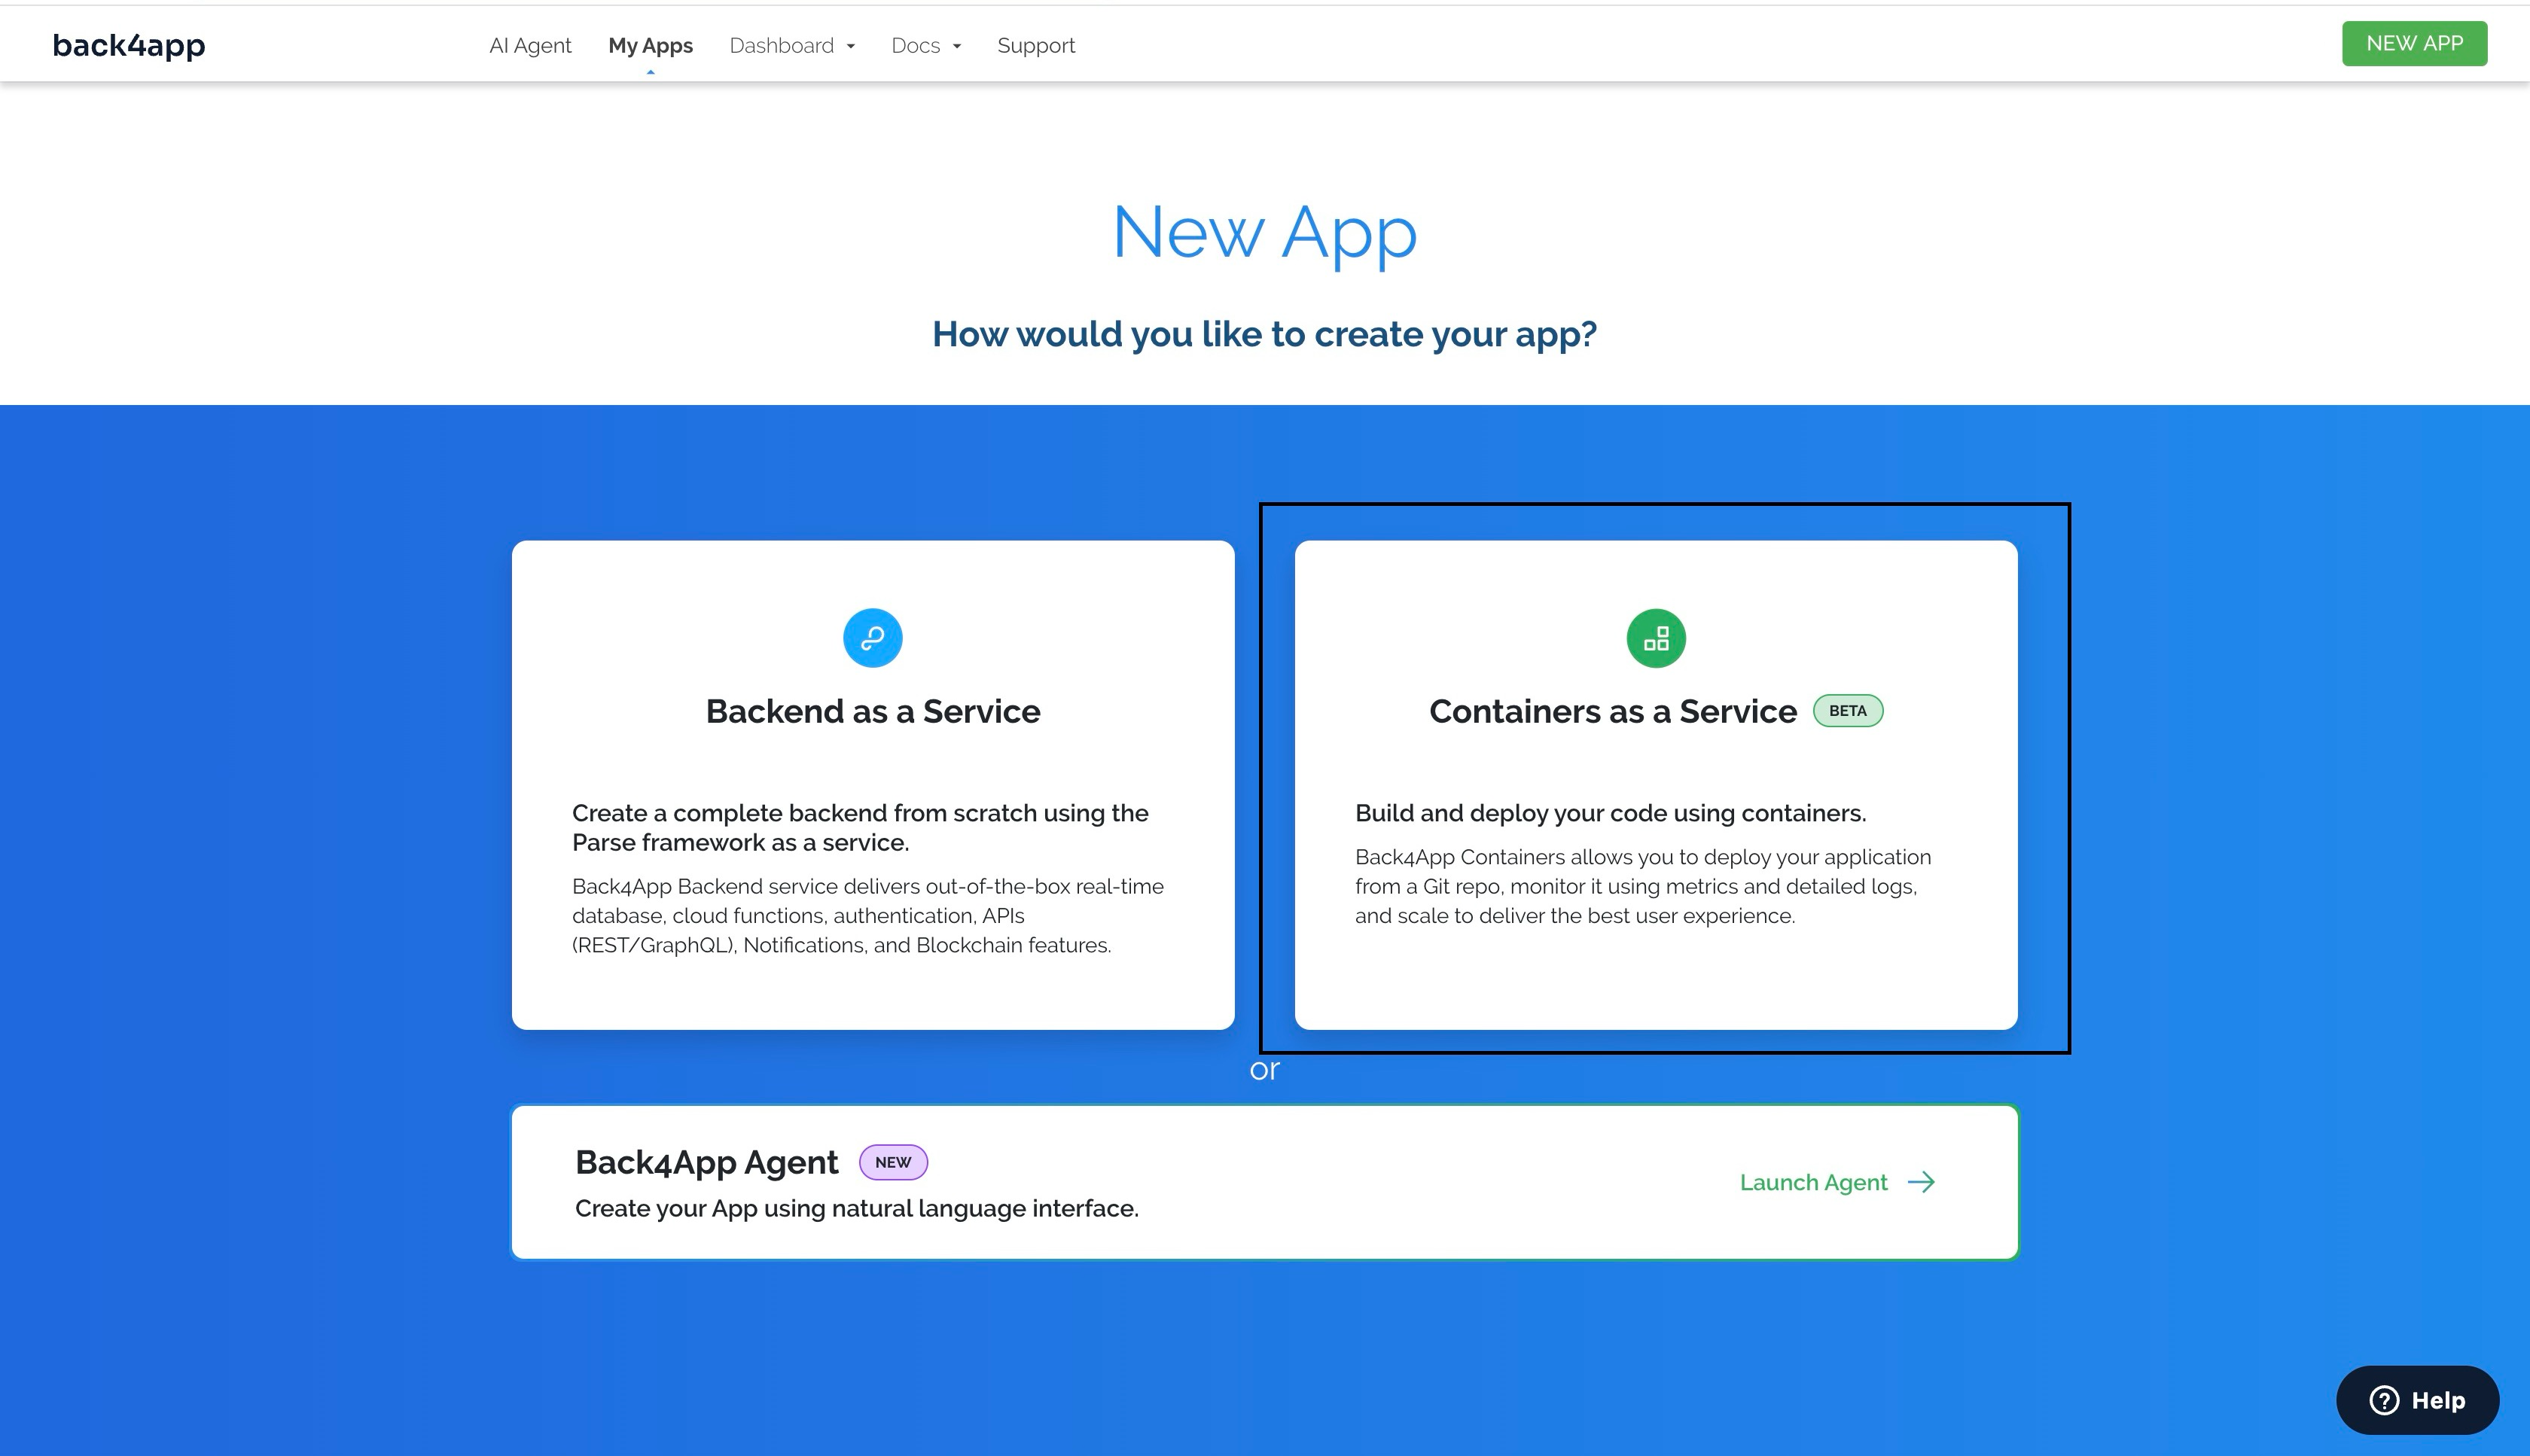
Next, create a new Back4app application by clicking the “NEW APP” button at the top right corner of your screen. Then, select the Containers as a Service option, as shown in the image below.
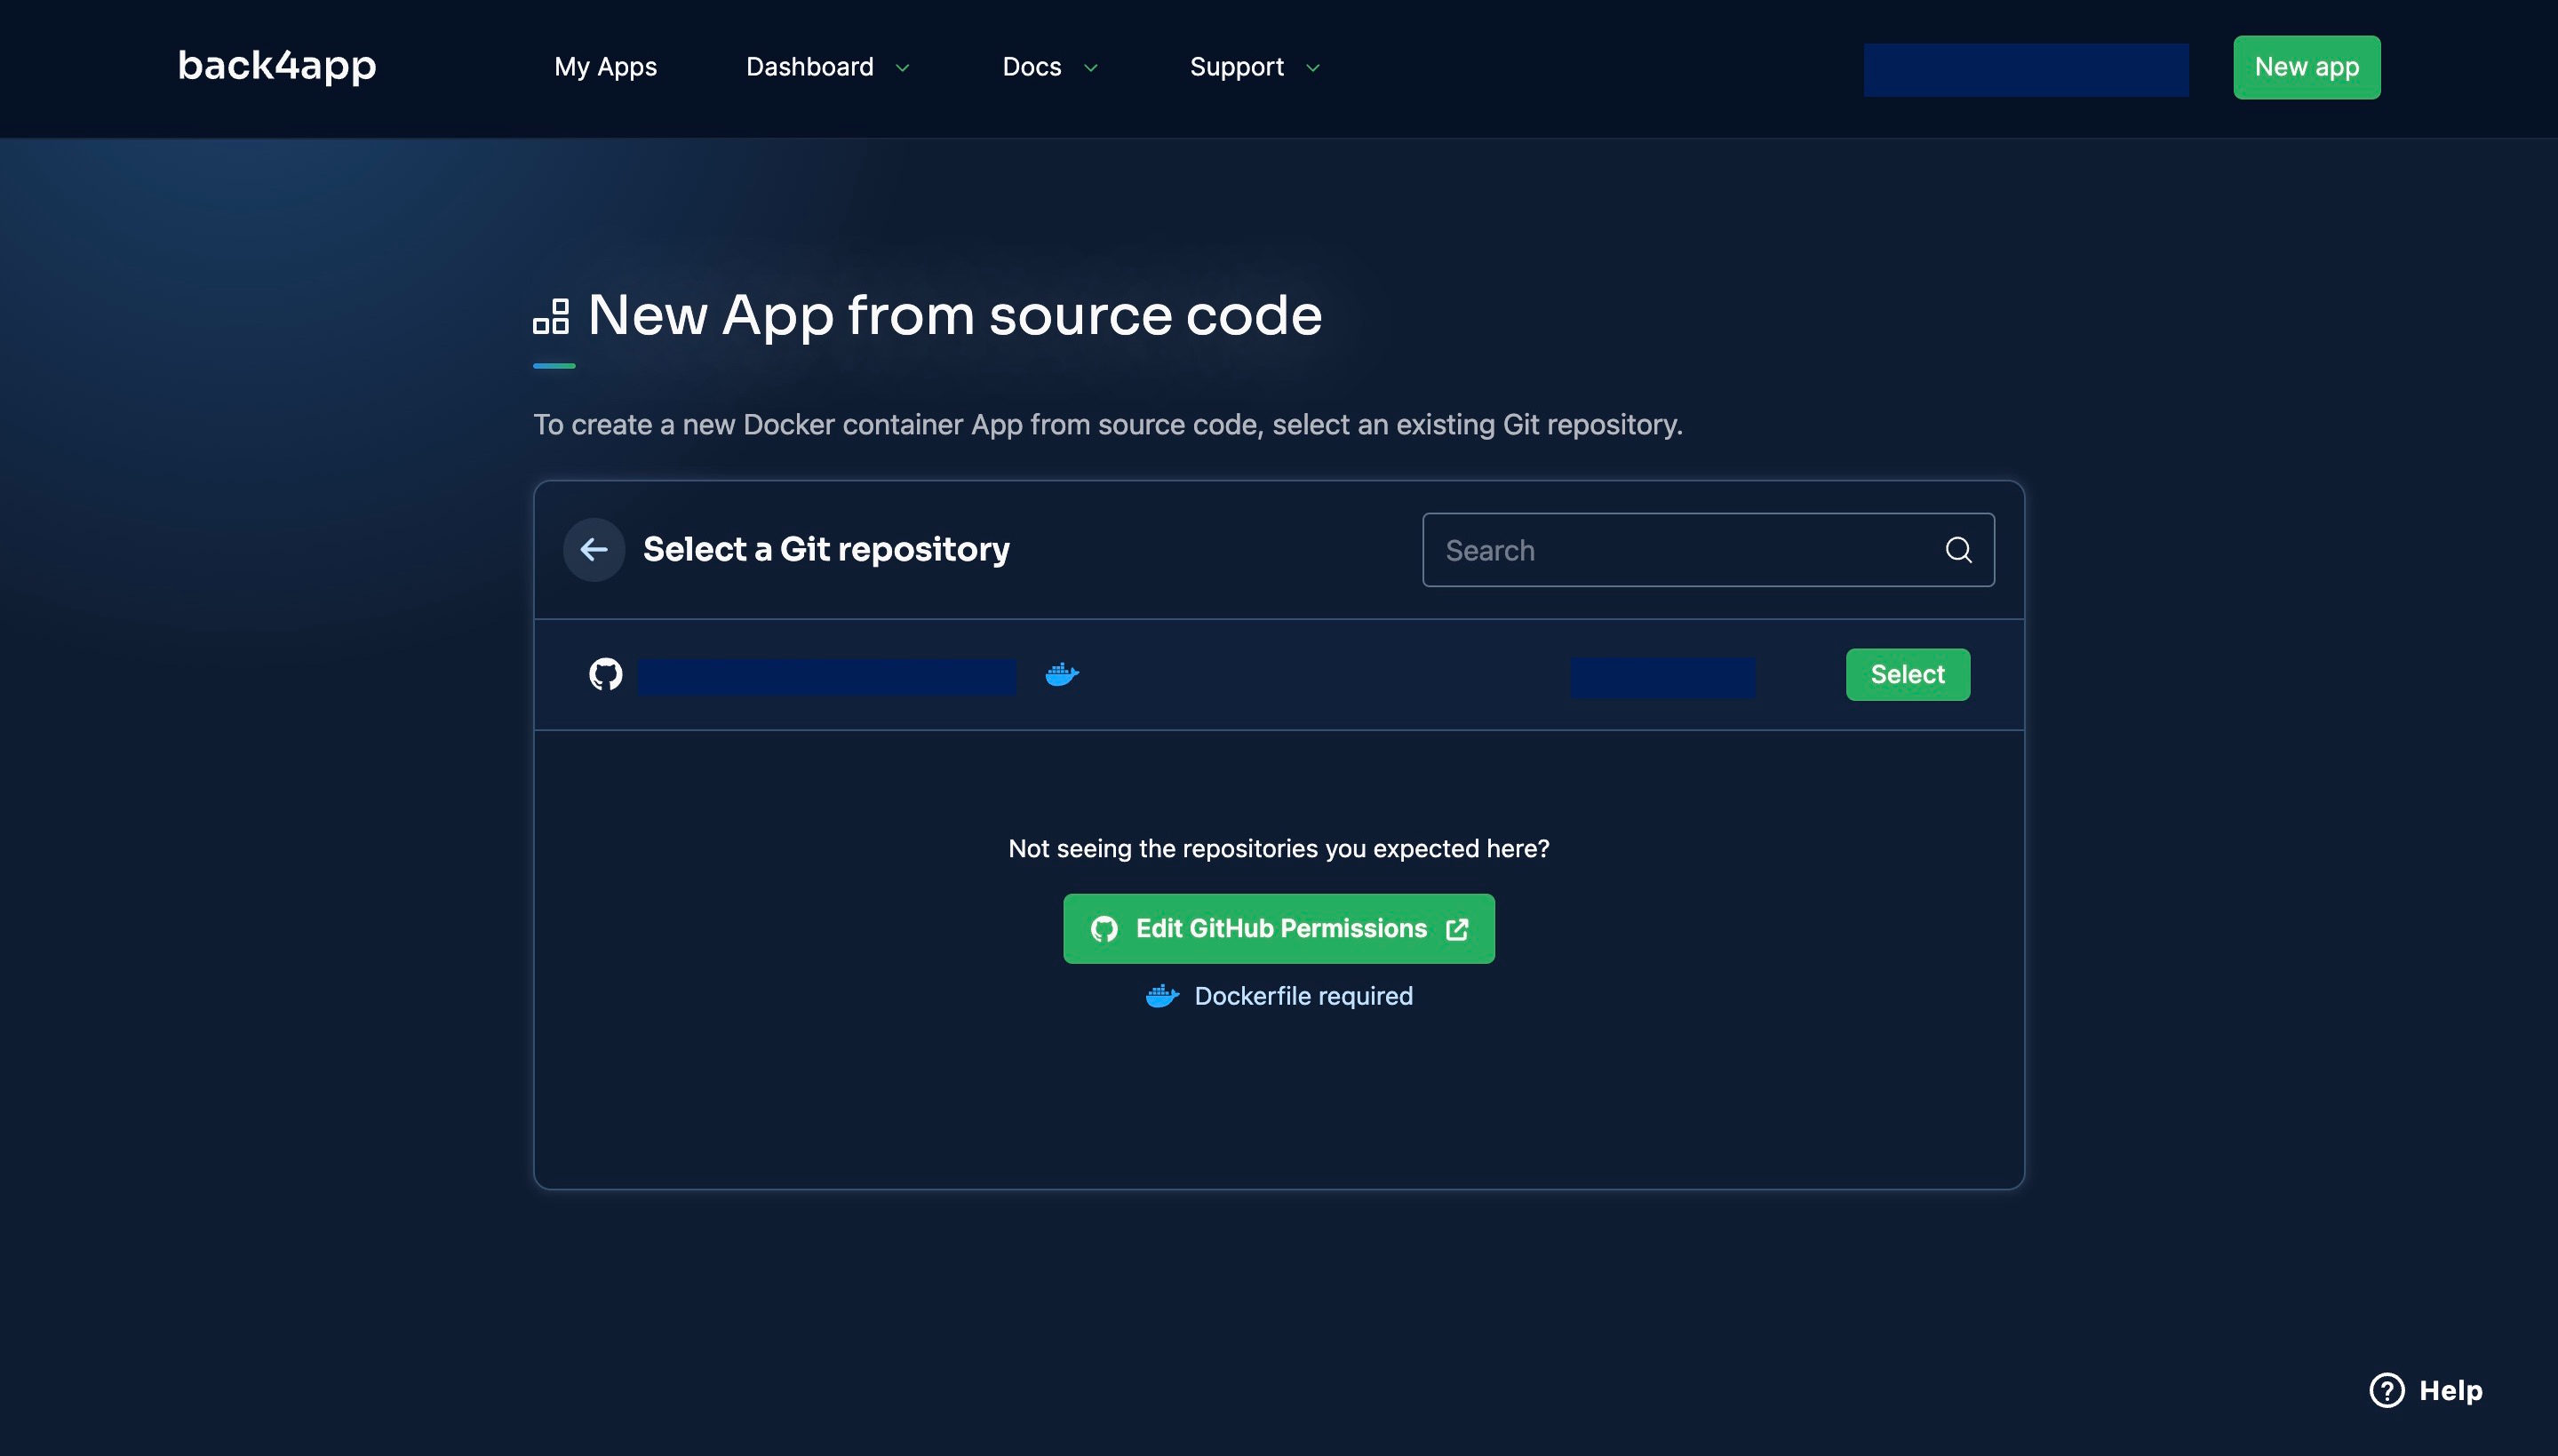
Select the app you want to deploy from the list of applications you granted the Back4app GitHub app access to.
Fill in the environmental variables associated with your application, and click the Create App button.
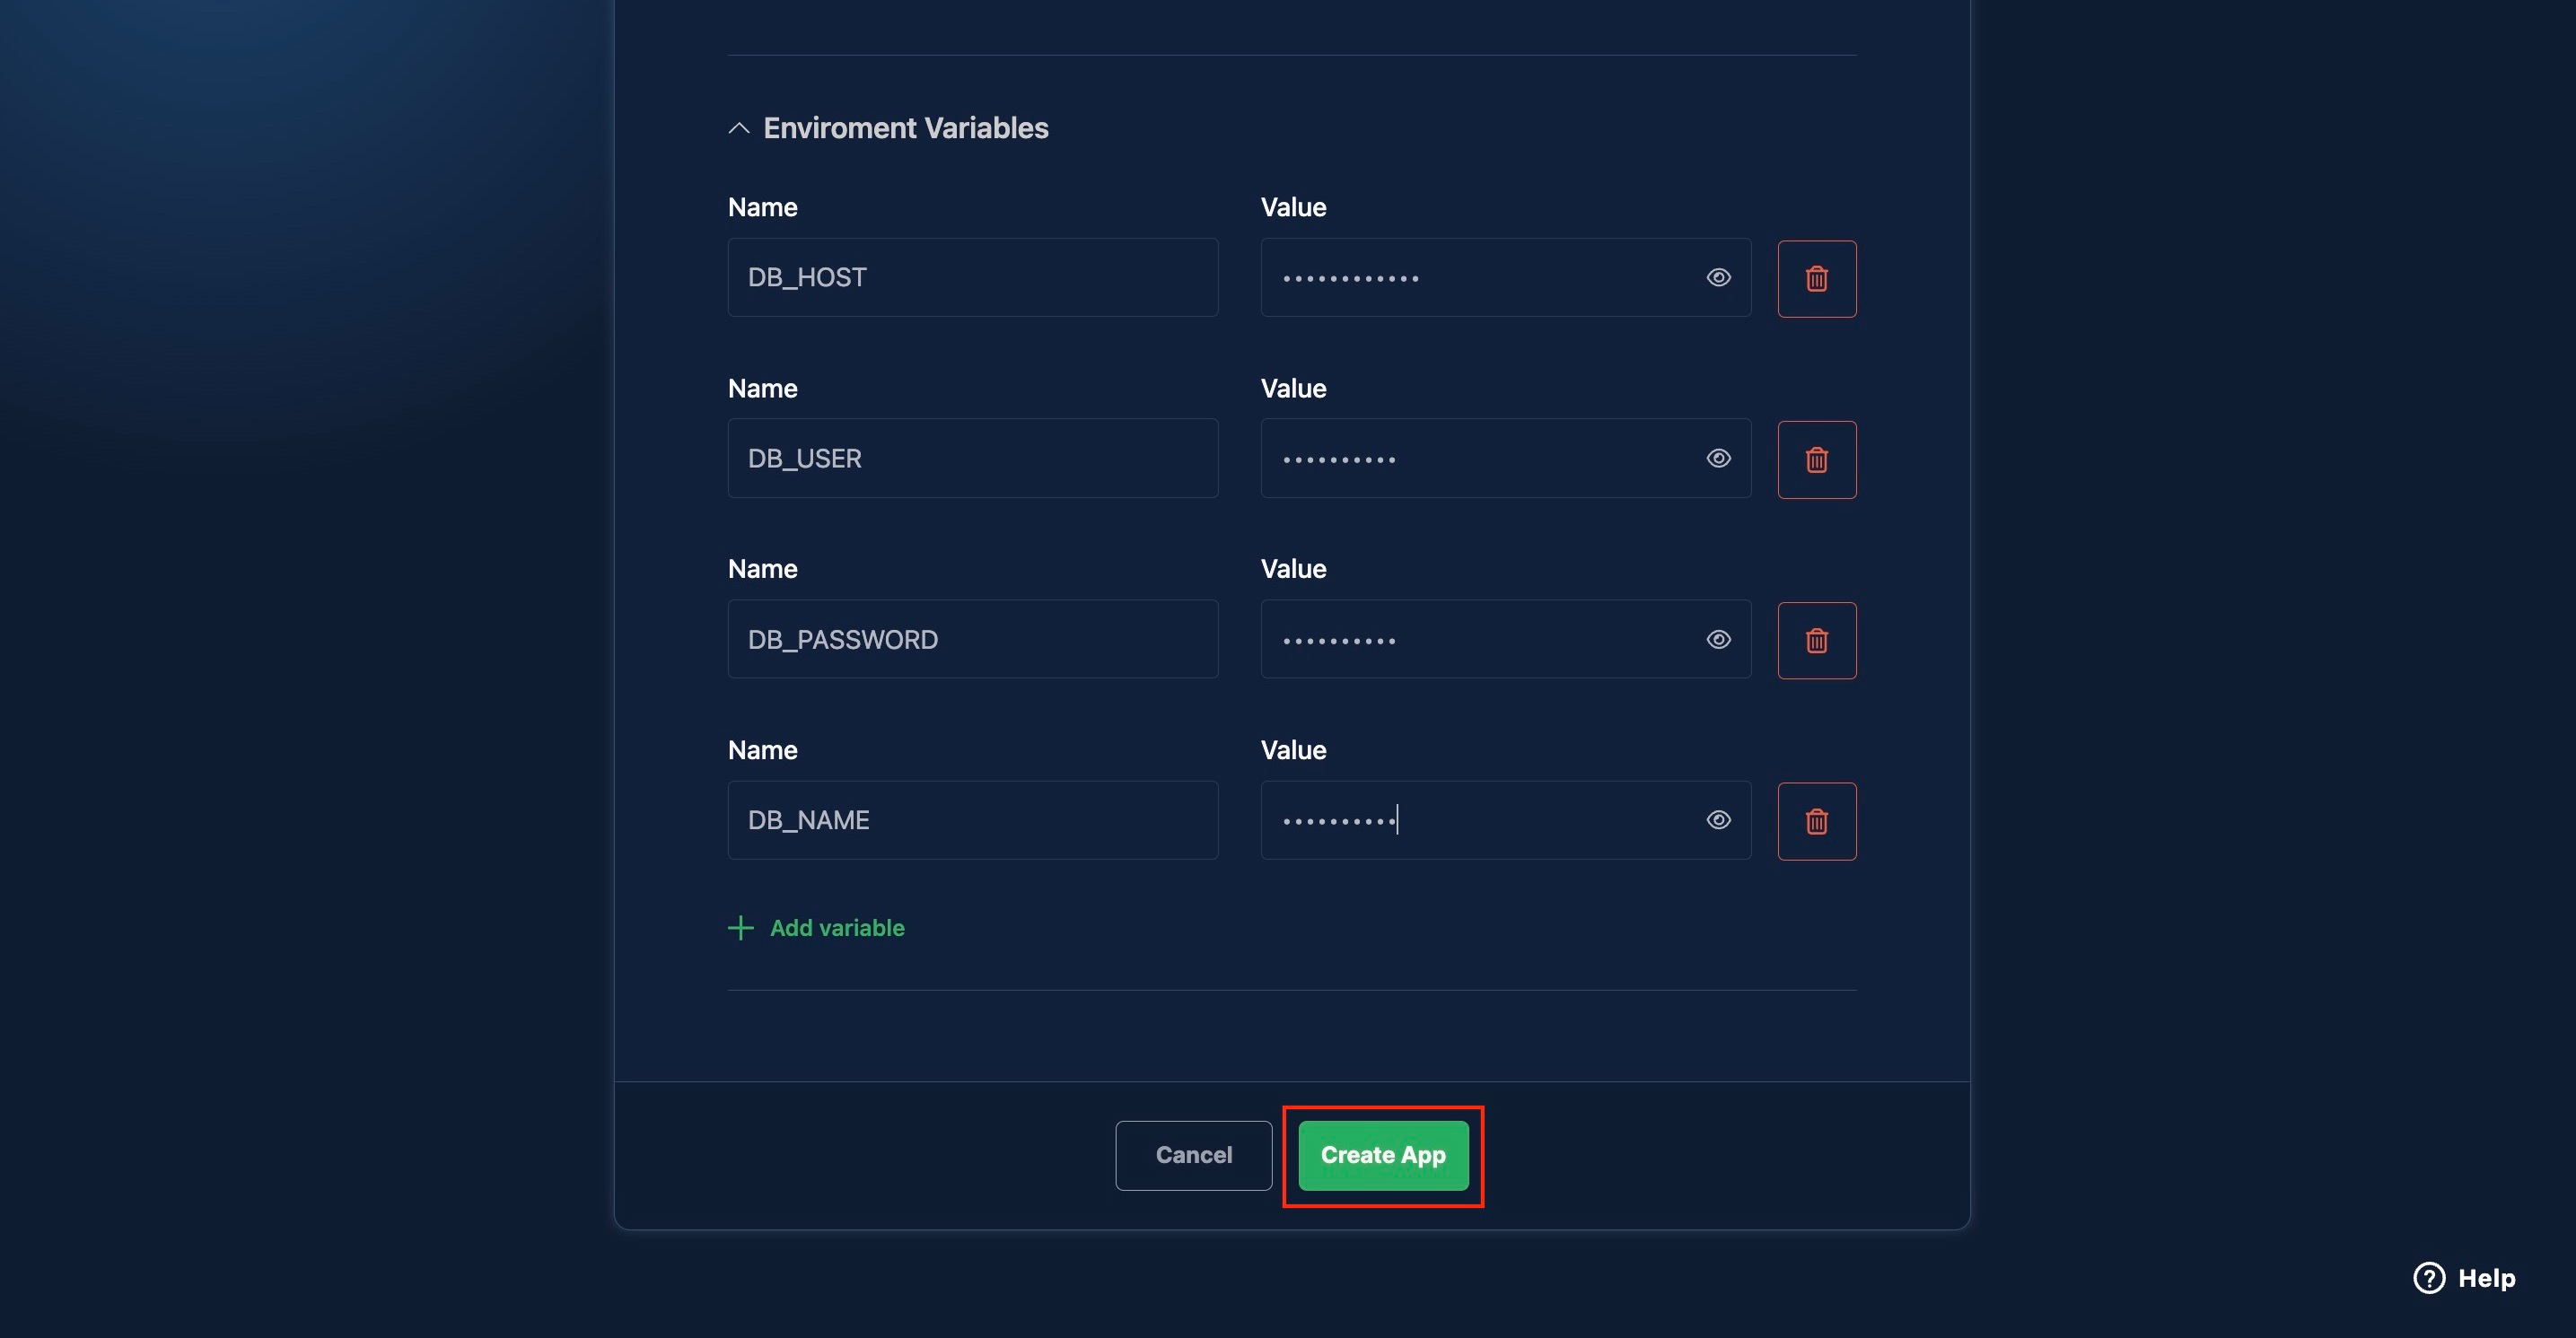
Clicking the Create App button will start your deployment process and show you real-time deployment logs to help you monitor the deployment process.
If an error occurs during your deployment process, you can allow the Back4app AI agent to analyze the errors from the logs and offer possible solutions. Alternatively, you can consult Back4app’s troubleshooting guide.
Once your app deploys, you can access it with the live URL on the top left corner of your dashboard.
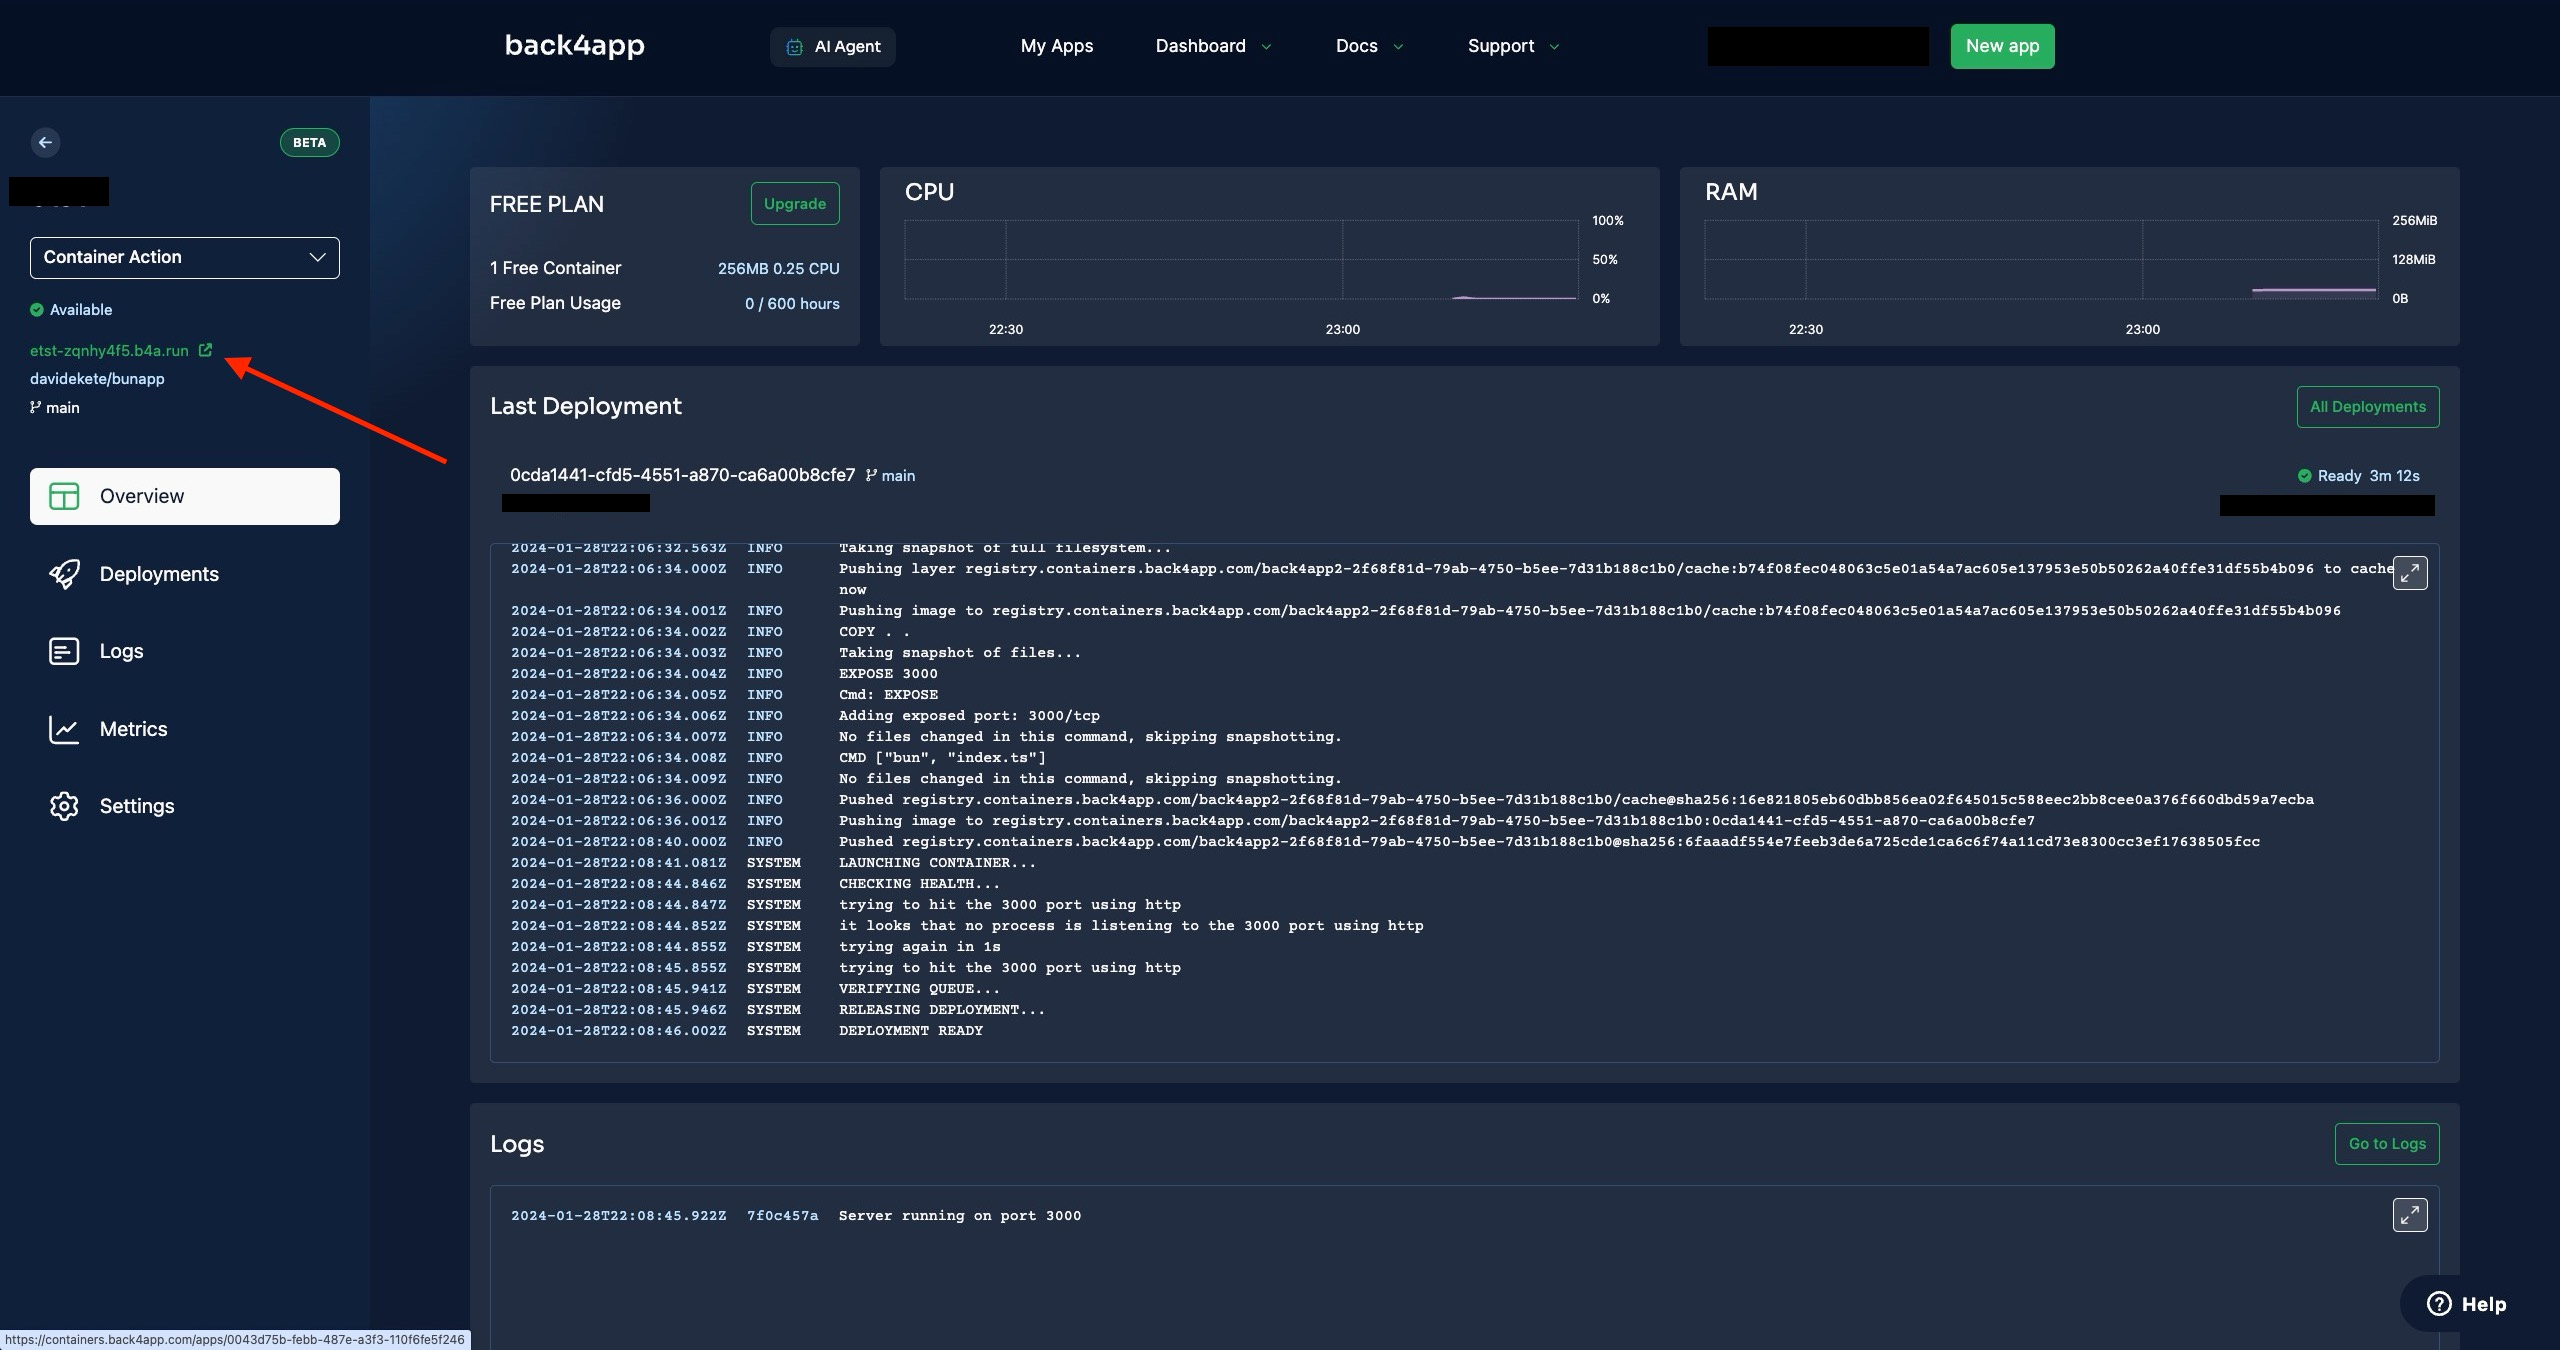
The Back4app container’s free tier offers you 0.25 CPU, 256 MB of RAM, and 100GB Transfer, which is ideal for developing and learning. For production apps, it would be ideal to upgrade to one of the available paid plans.
2. Render
Render is a cloud platform that provides a platform-as-a-service (PaaS) solution for deploying web applications of various development stacks, including Node.js.
With Render, your services are scaled up or down based on your average CPU and/or memory usage, removing the need to predict or overprovision services to serve high traffic.
Render also supports zero downtime deploys, ensuring your application never goes down, even when your build breaks.
It achieves this by doing health checks each time you deploy a new version of your app and only replaces the old version if your new version passes the health check.
Render also includes many features, some of which include preview environments, a dedicated REST API, persistent disks, private networking, and many more.
Deploying your app on Render involves connecting your GitHub/GitLab account to the platform and configuring the deployment details, including environmental variables for your app.
How to Deploy Your Node.js Backend on Render
To deploy your application on Render, you need an active account; you can sign up for free if you do not have one.
Login to your account and navigate to your dashboard. On your dashboard, click “Web Services”.
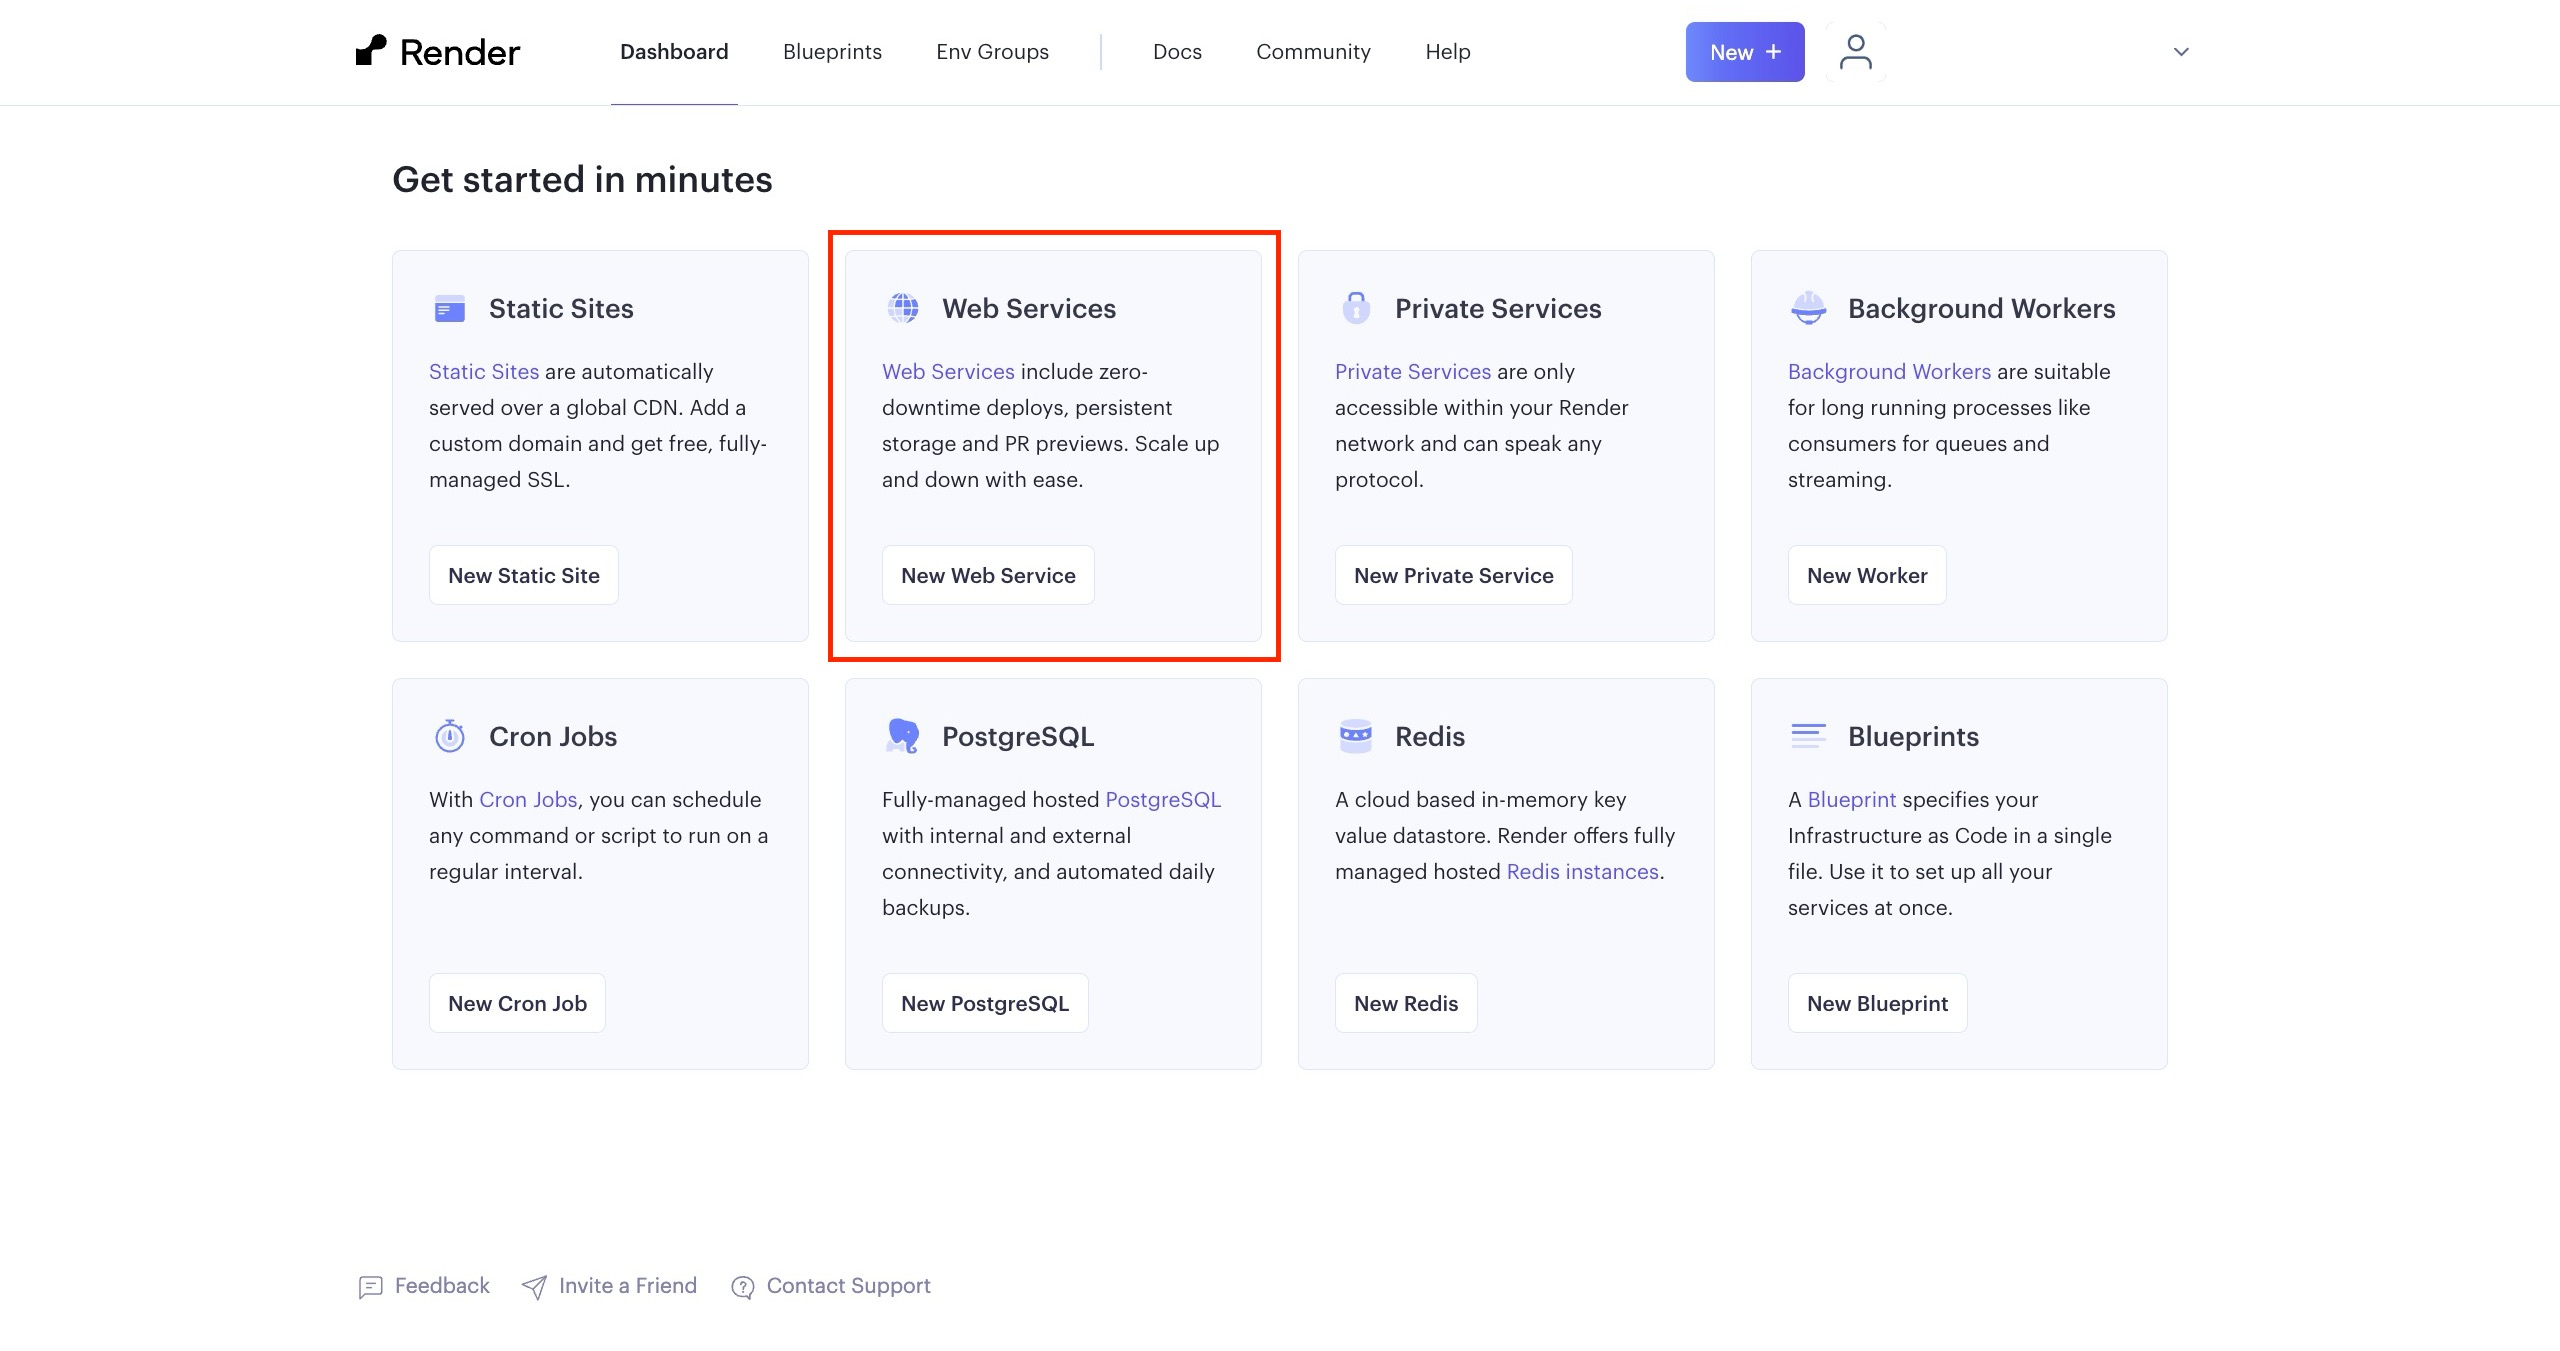
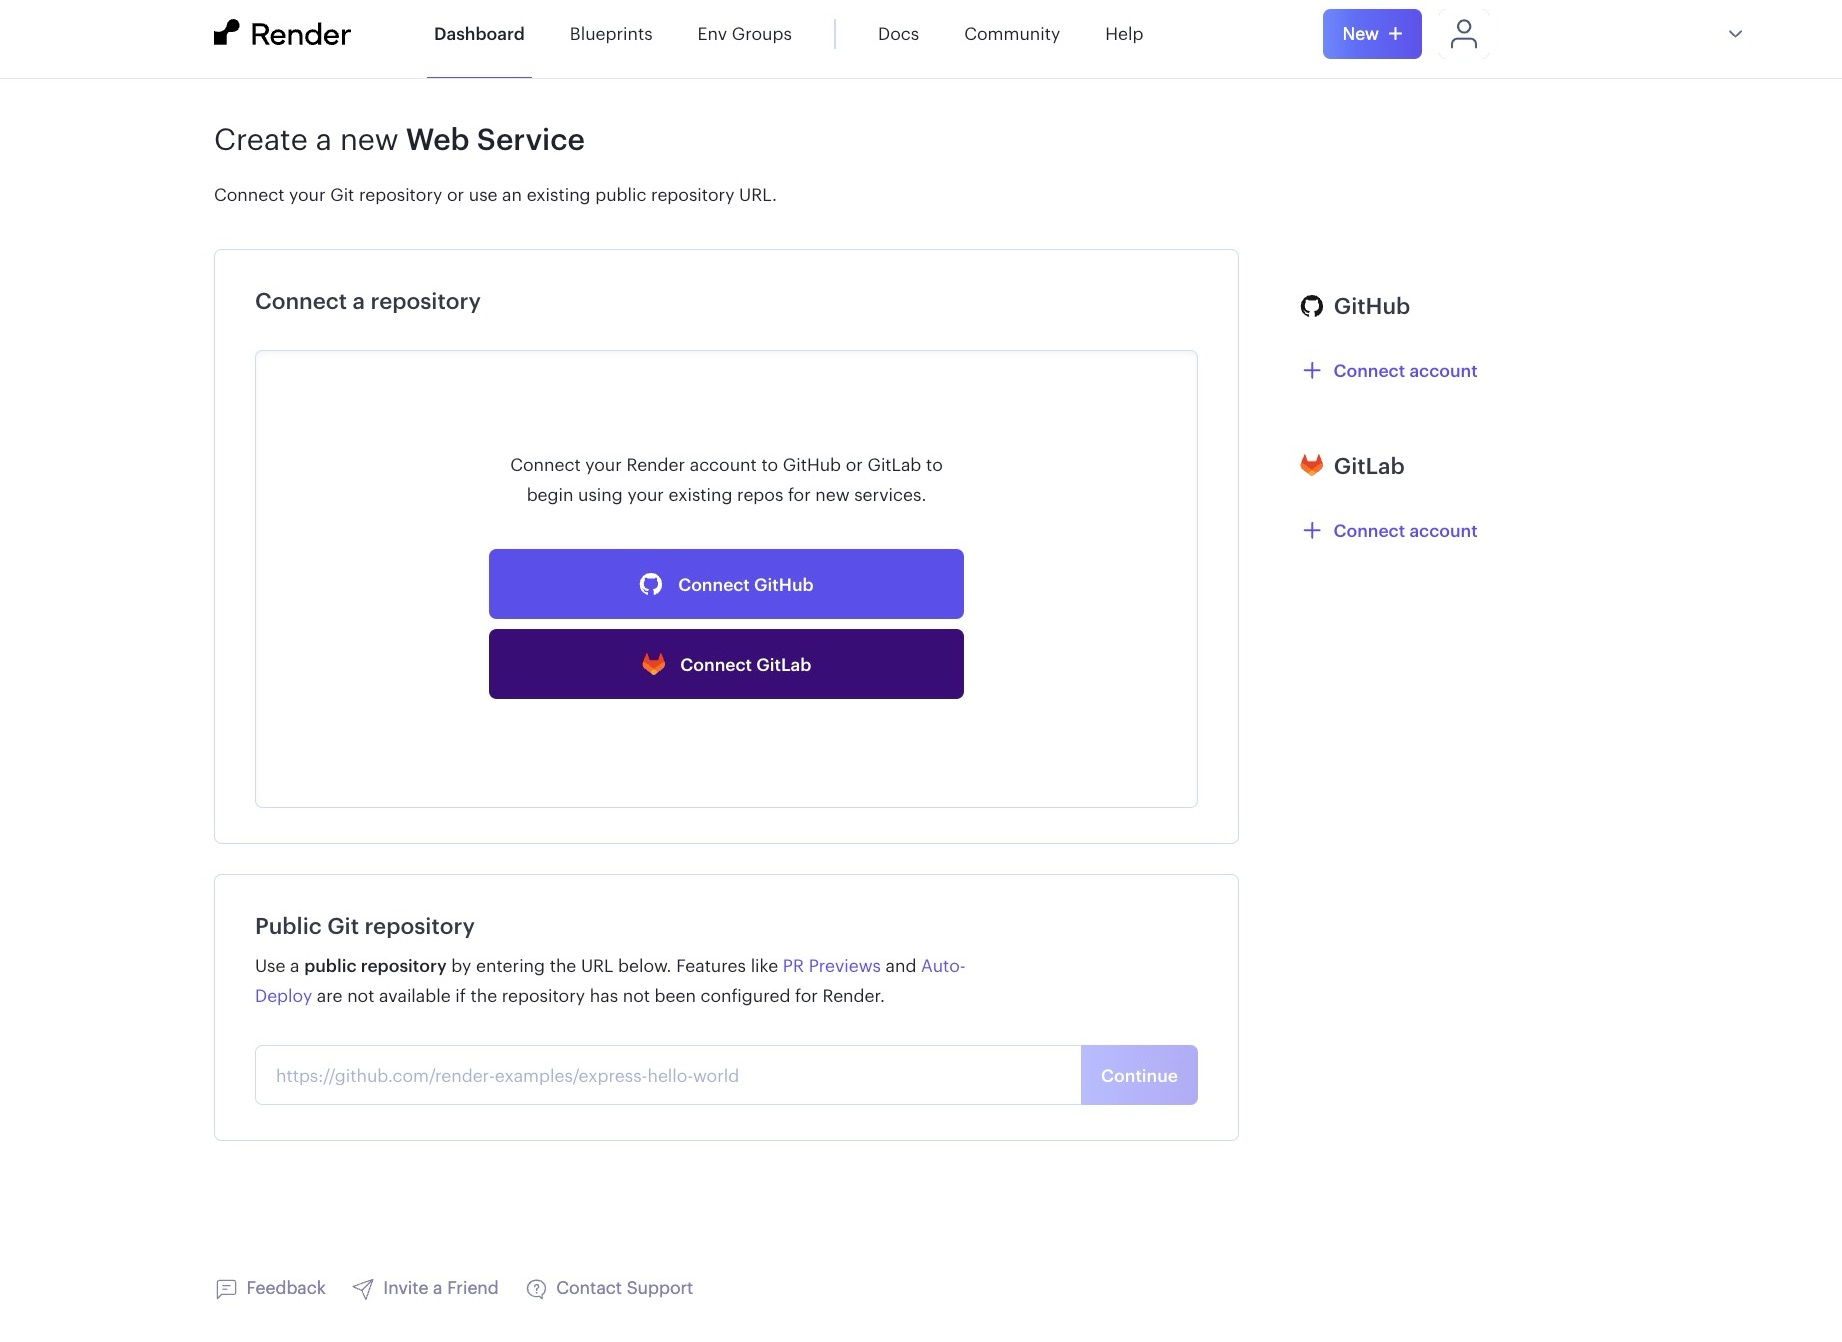
Next, you’ll be asked to connect your GitHub/GitLab account to Render or provide a public Git repository.
After you connect your GitHub account and select the repository you want to deploy, you’ll be directed to a configuration form, where you will be required to enter details like your app name, build command, environmental variables, etc.
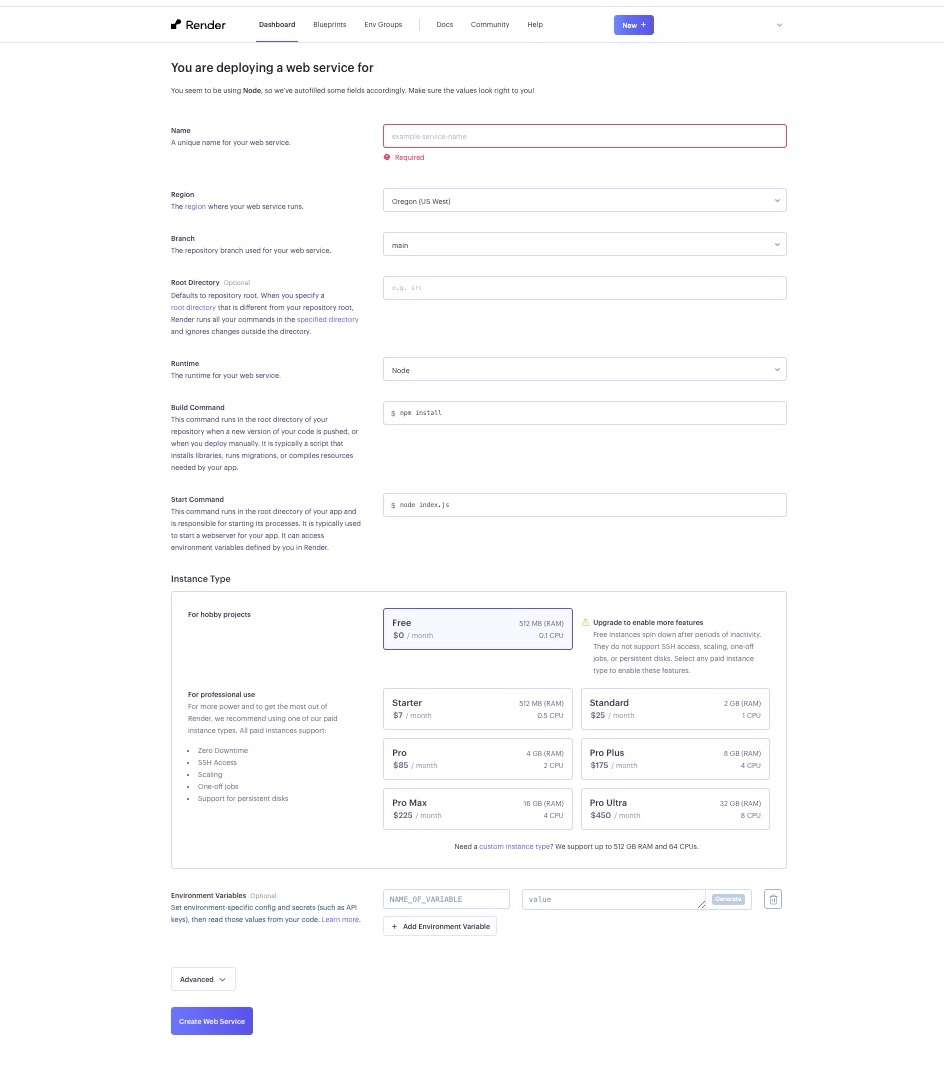
Fill in the required details and click the “Create Web Service” button. This starts your deployment process and takes you to a screen where you can monitor your deployment status and application logs in real-time.
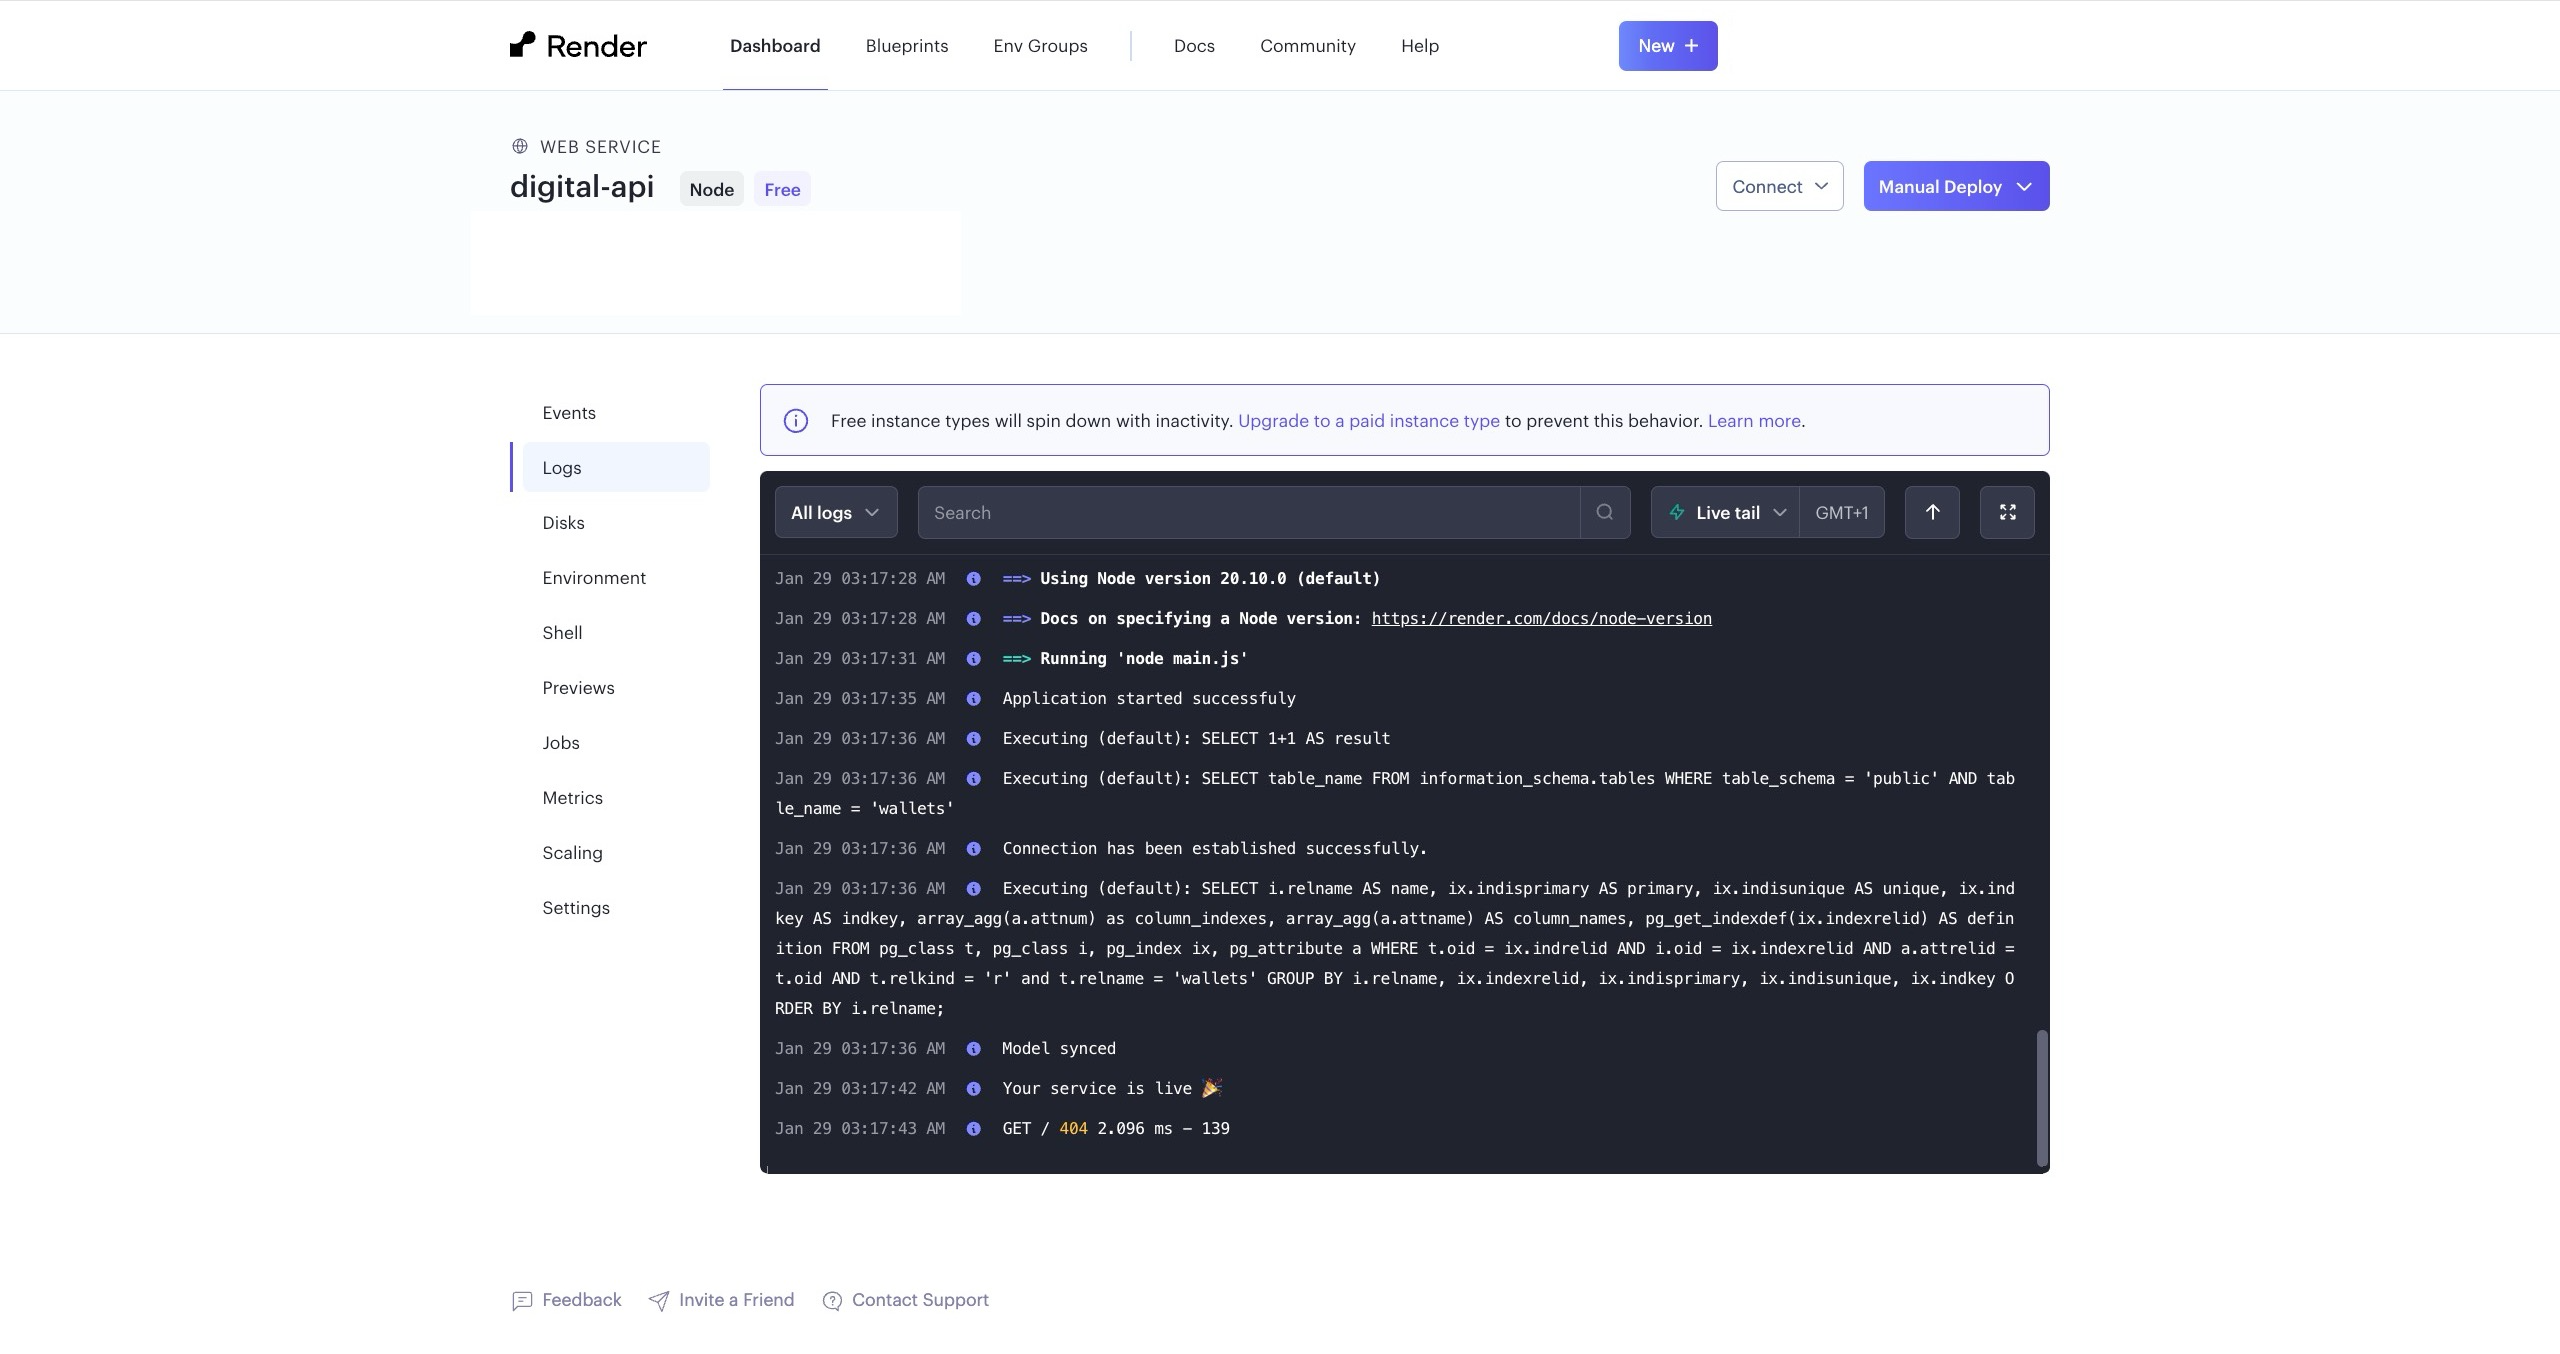
If any error occurs during your deployment, you can analyze the error from your deployment logs and troubleshoot for a successful deployment.
Render’s free plan offers 512 MB of RAM and 0.1 CPU for your web services. If your application requires more resources, you can consider their paid plans.
3. Fly
Fly is a cloud platform that provides a global application delivery network.
It allows you to deploy and run applications close to your users worldwide by leveraging a distributed network of servers, thus significantly reducing latency and improving your server’s performance.
Fly offers full Linux micro-VMs known as “Fly Machines”. Fly machines have a relatively fast boot time of around 300ms. You can also pause your machines when they are dormant, ensuring you only pay for services you consume.
Deploying your application on Fly involves running a few commands with their dedicated CLI tool.
How to Deploy Your Node.js Backend on Fly?
To deploy your Node.js app on Fly, you’ll need:
- A Fly account, you can sign up for free if you don’t have one.
- The
flyctlcommand line tool installed on your local machine.
If you don’t have the flyctl CLI tool installed on your system, you can install it using the command below:
#macOS/Linux
curl -L https://fly.io/install.sh | sh

#windows
pwsh -Command "iwr https://fly.io/install.ps1 -useb | iex"
Next, log in to your Fly account by running the command below:
fly auth login
Running the command above will open up your default browser and prompt you to log in to your Fly account.
After you log in successfully, navigate to the directory of the application you want to deploy and run the command below:
fly launch
When you run the command above, Fly will automatically detect that you are trying to deploy a Node.js app and set up your deployment.

The CLI tool will display the app configuration for your approval before deploying the app. If you are satisfied with the configurations, you can proceed by replying “Y” to the prompt, or else you can reply “N”.
Replying N will open your browser and take you to a page where you can configure your application past the default configuration provided by Fly, as shown in the image below.
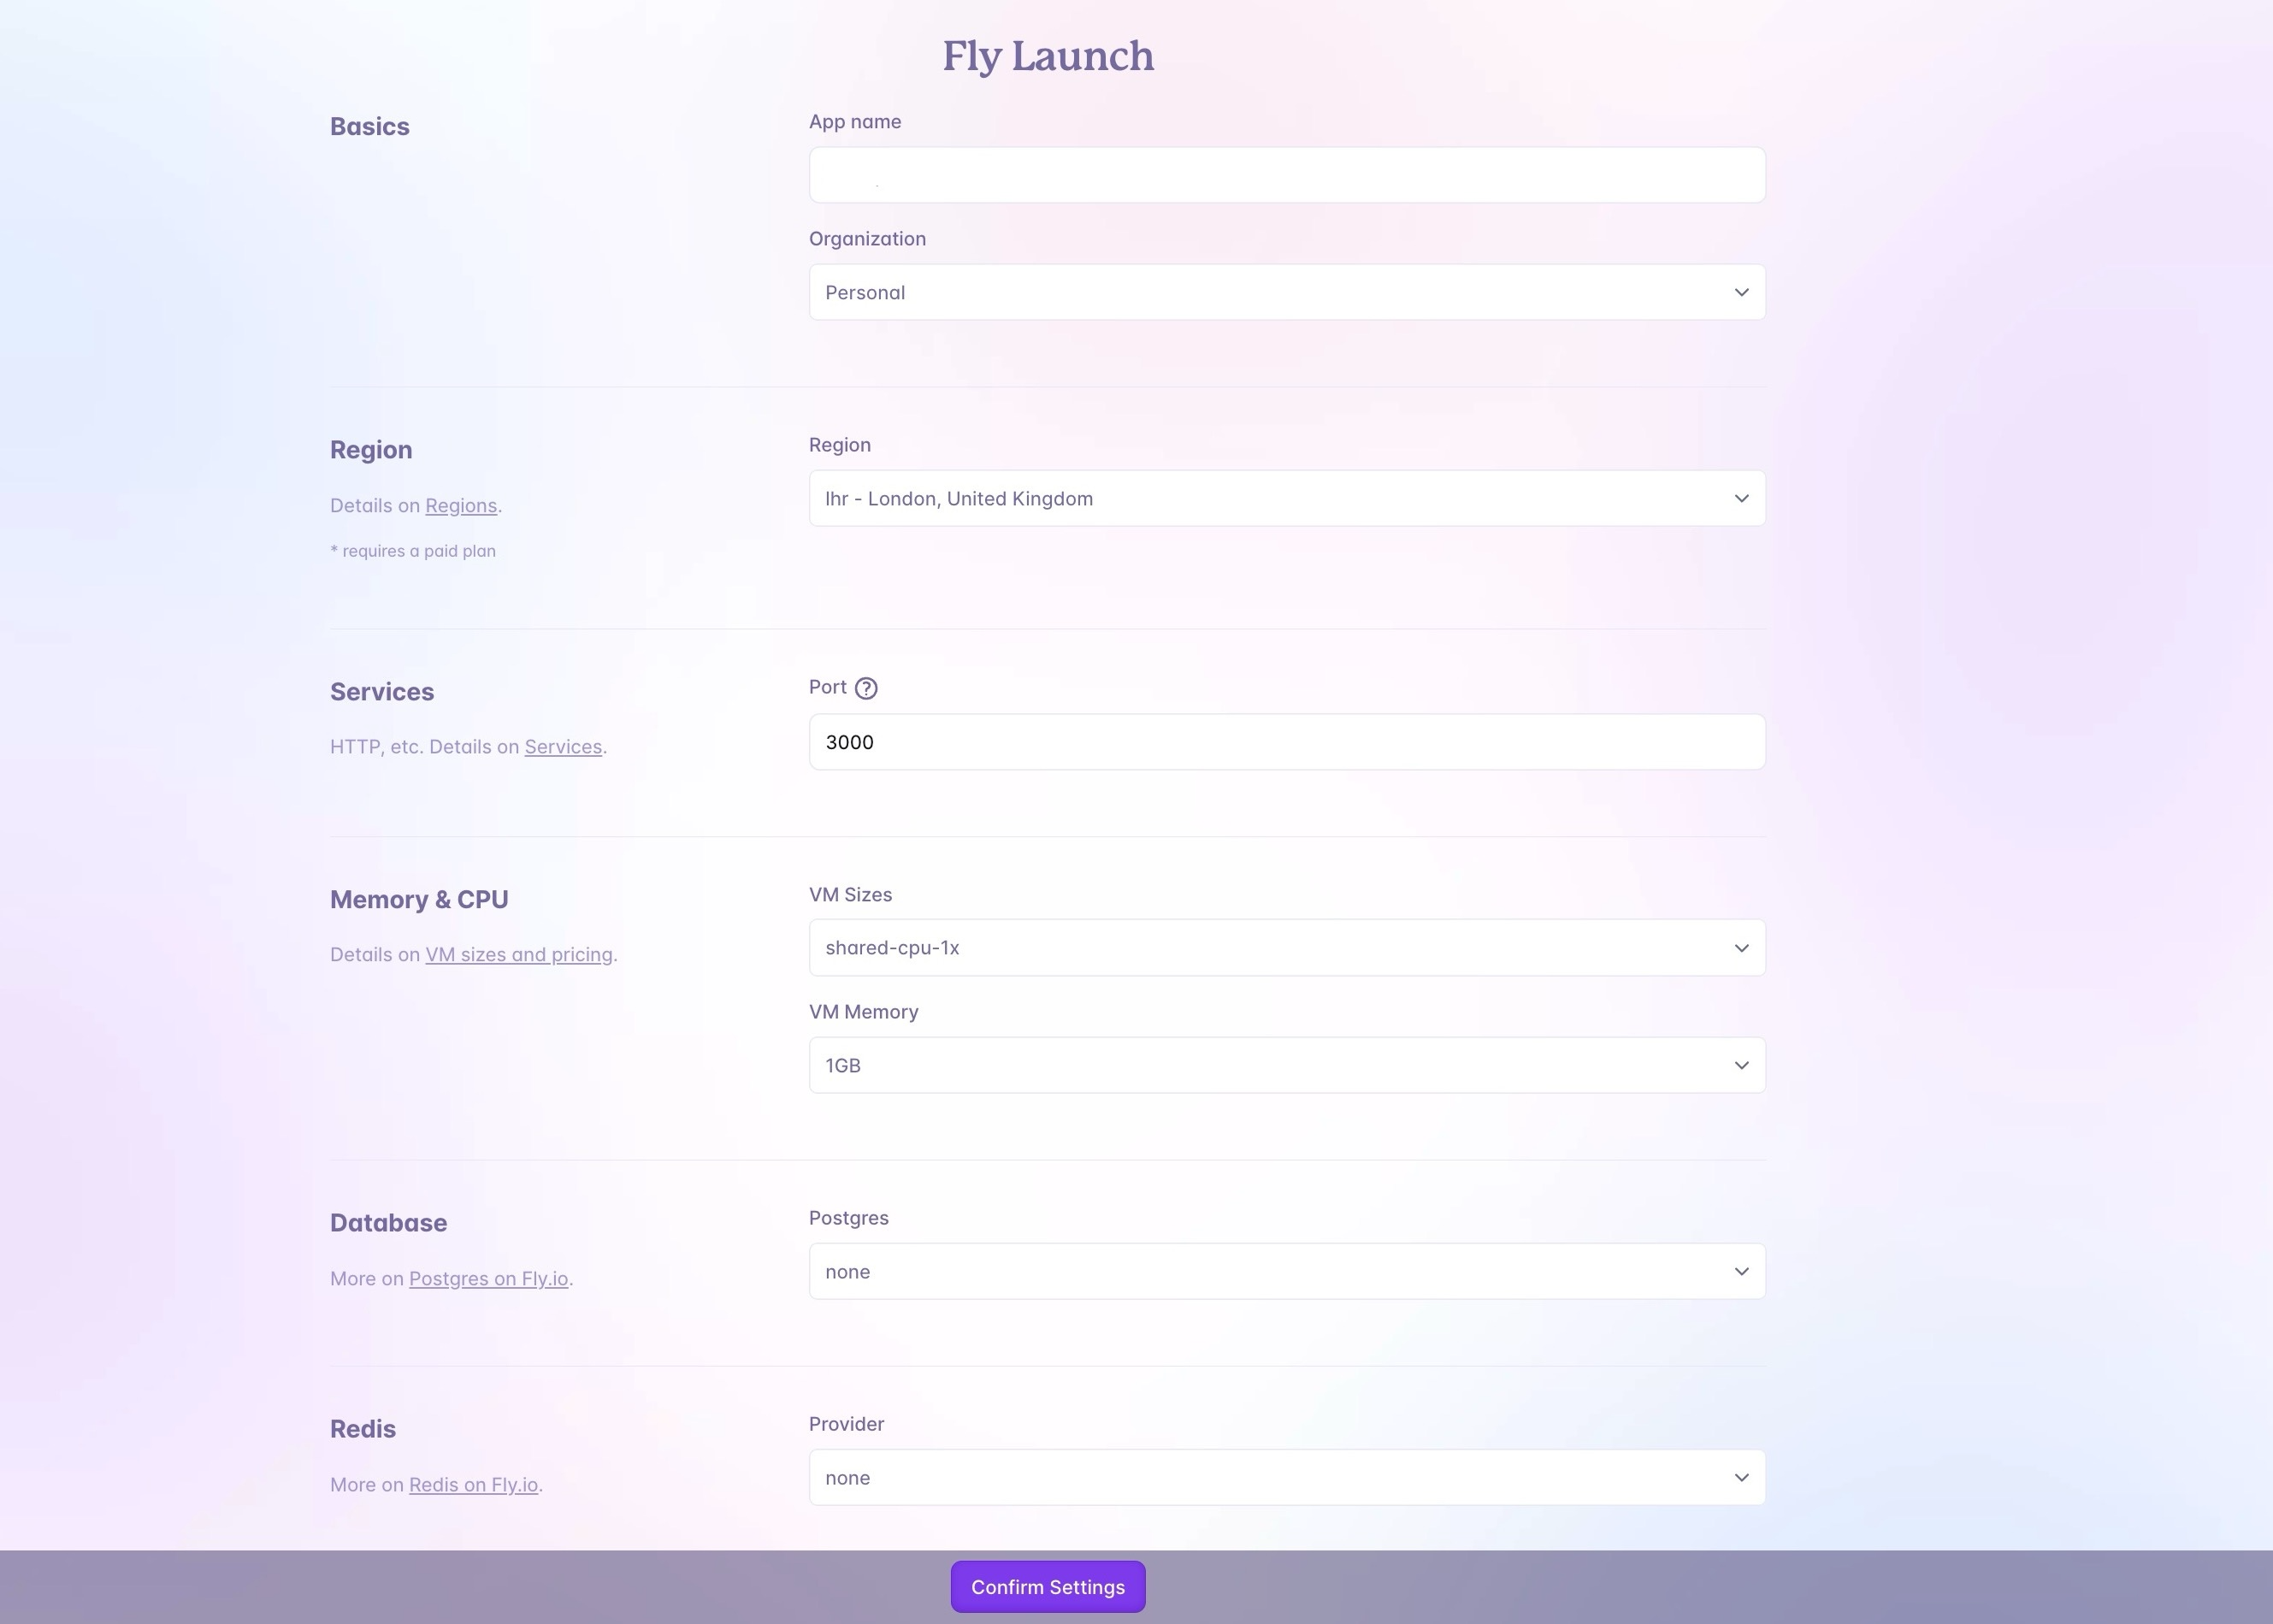
However, unlike some other options covered in this article, Fly requires you to add your card information before deploying your application. Still, you won’t get charged until you exceed $5 worth of resources.
4. Amazon Web Services (AWS)
Amazon Web Services (AWS) is an Infrastructure as a Service (IaaS) provider that delivers fundamental computing infrastructure components over the Internet.
AWS allows you to build and manage virtualized environments without investing in and maintaining physical hardware.
AWS has the most functionality among other cloud service providers, from infrastructure technology like computing and databases to emerging technology like AI and ML.
It is also the most secure cloud computing environment available, backed by a deep set of cloud security tools, with over 300 security, compliance, and governance services and features, as well as support for 143 security standards and compliance certifications.
Additionally, AWS is a mature platform with a proven track record (17 years) of reliability, security, and performance.
However, deploying your application on AWS is more complex than on other platforms like Back4app and Render.
You can achieve this in various ways; however, this tutorial will cover the most popular, Amazon Elastic Compute Cloud (Amazon EC2).
How to Deploy Your Node.js Backend on AWS?
EC2 is a web service provided by Amazon that allows you to rent virtual servers, known as instances, in the cloud.
To create an EC2 instance, you need an AWS account; you can sign up for free if you do not have one.
After logging into your Amazon account, create an EC2 Instance (You can skip the last step in the article linked above, which requires you to connect to your EC2 instance using SSH).
You can check your newly created instance on your EC2 dashboard under “instances”.
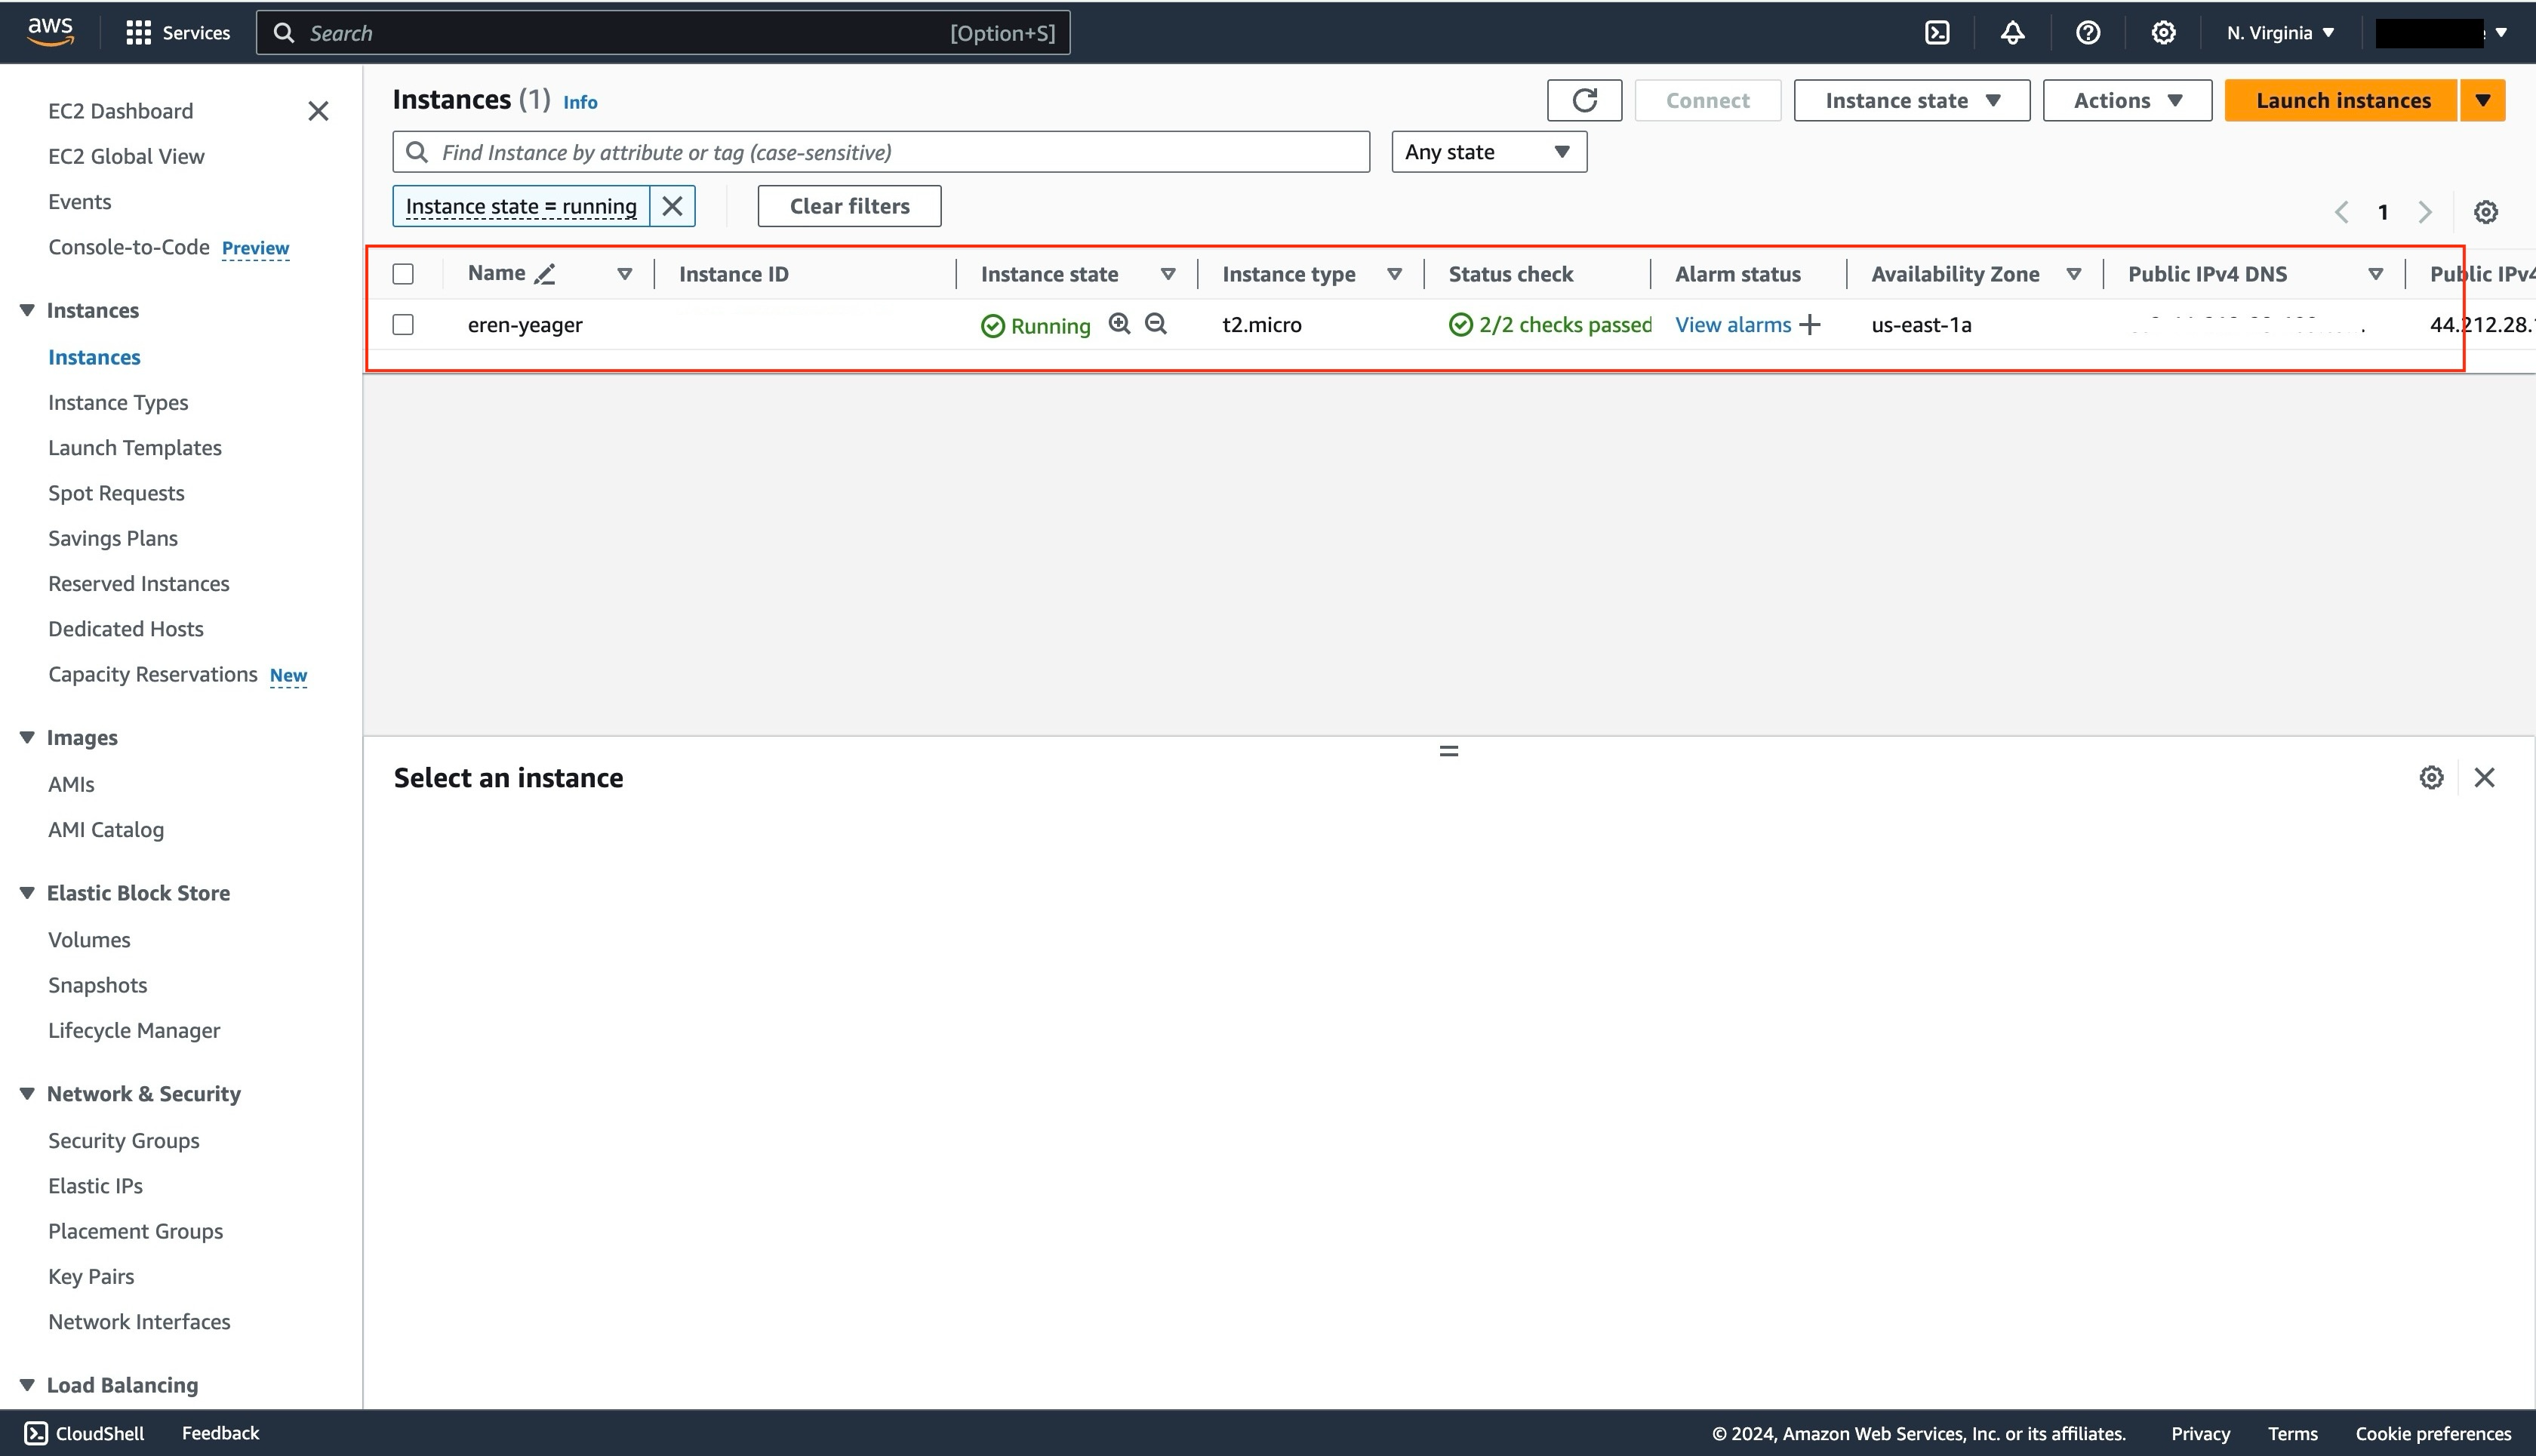
Next, connect to your EC2 instance using the EC2 Instance Console. After you follow the steps in the instructions linked above, a web terminal should open in your browser.
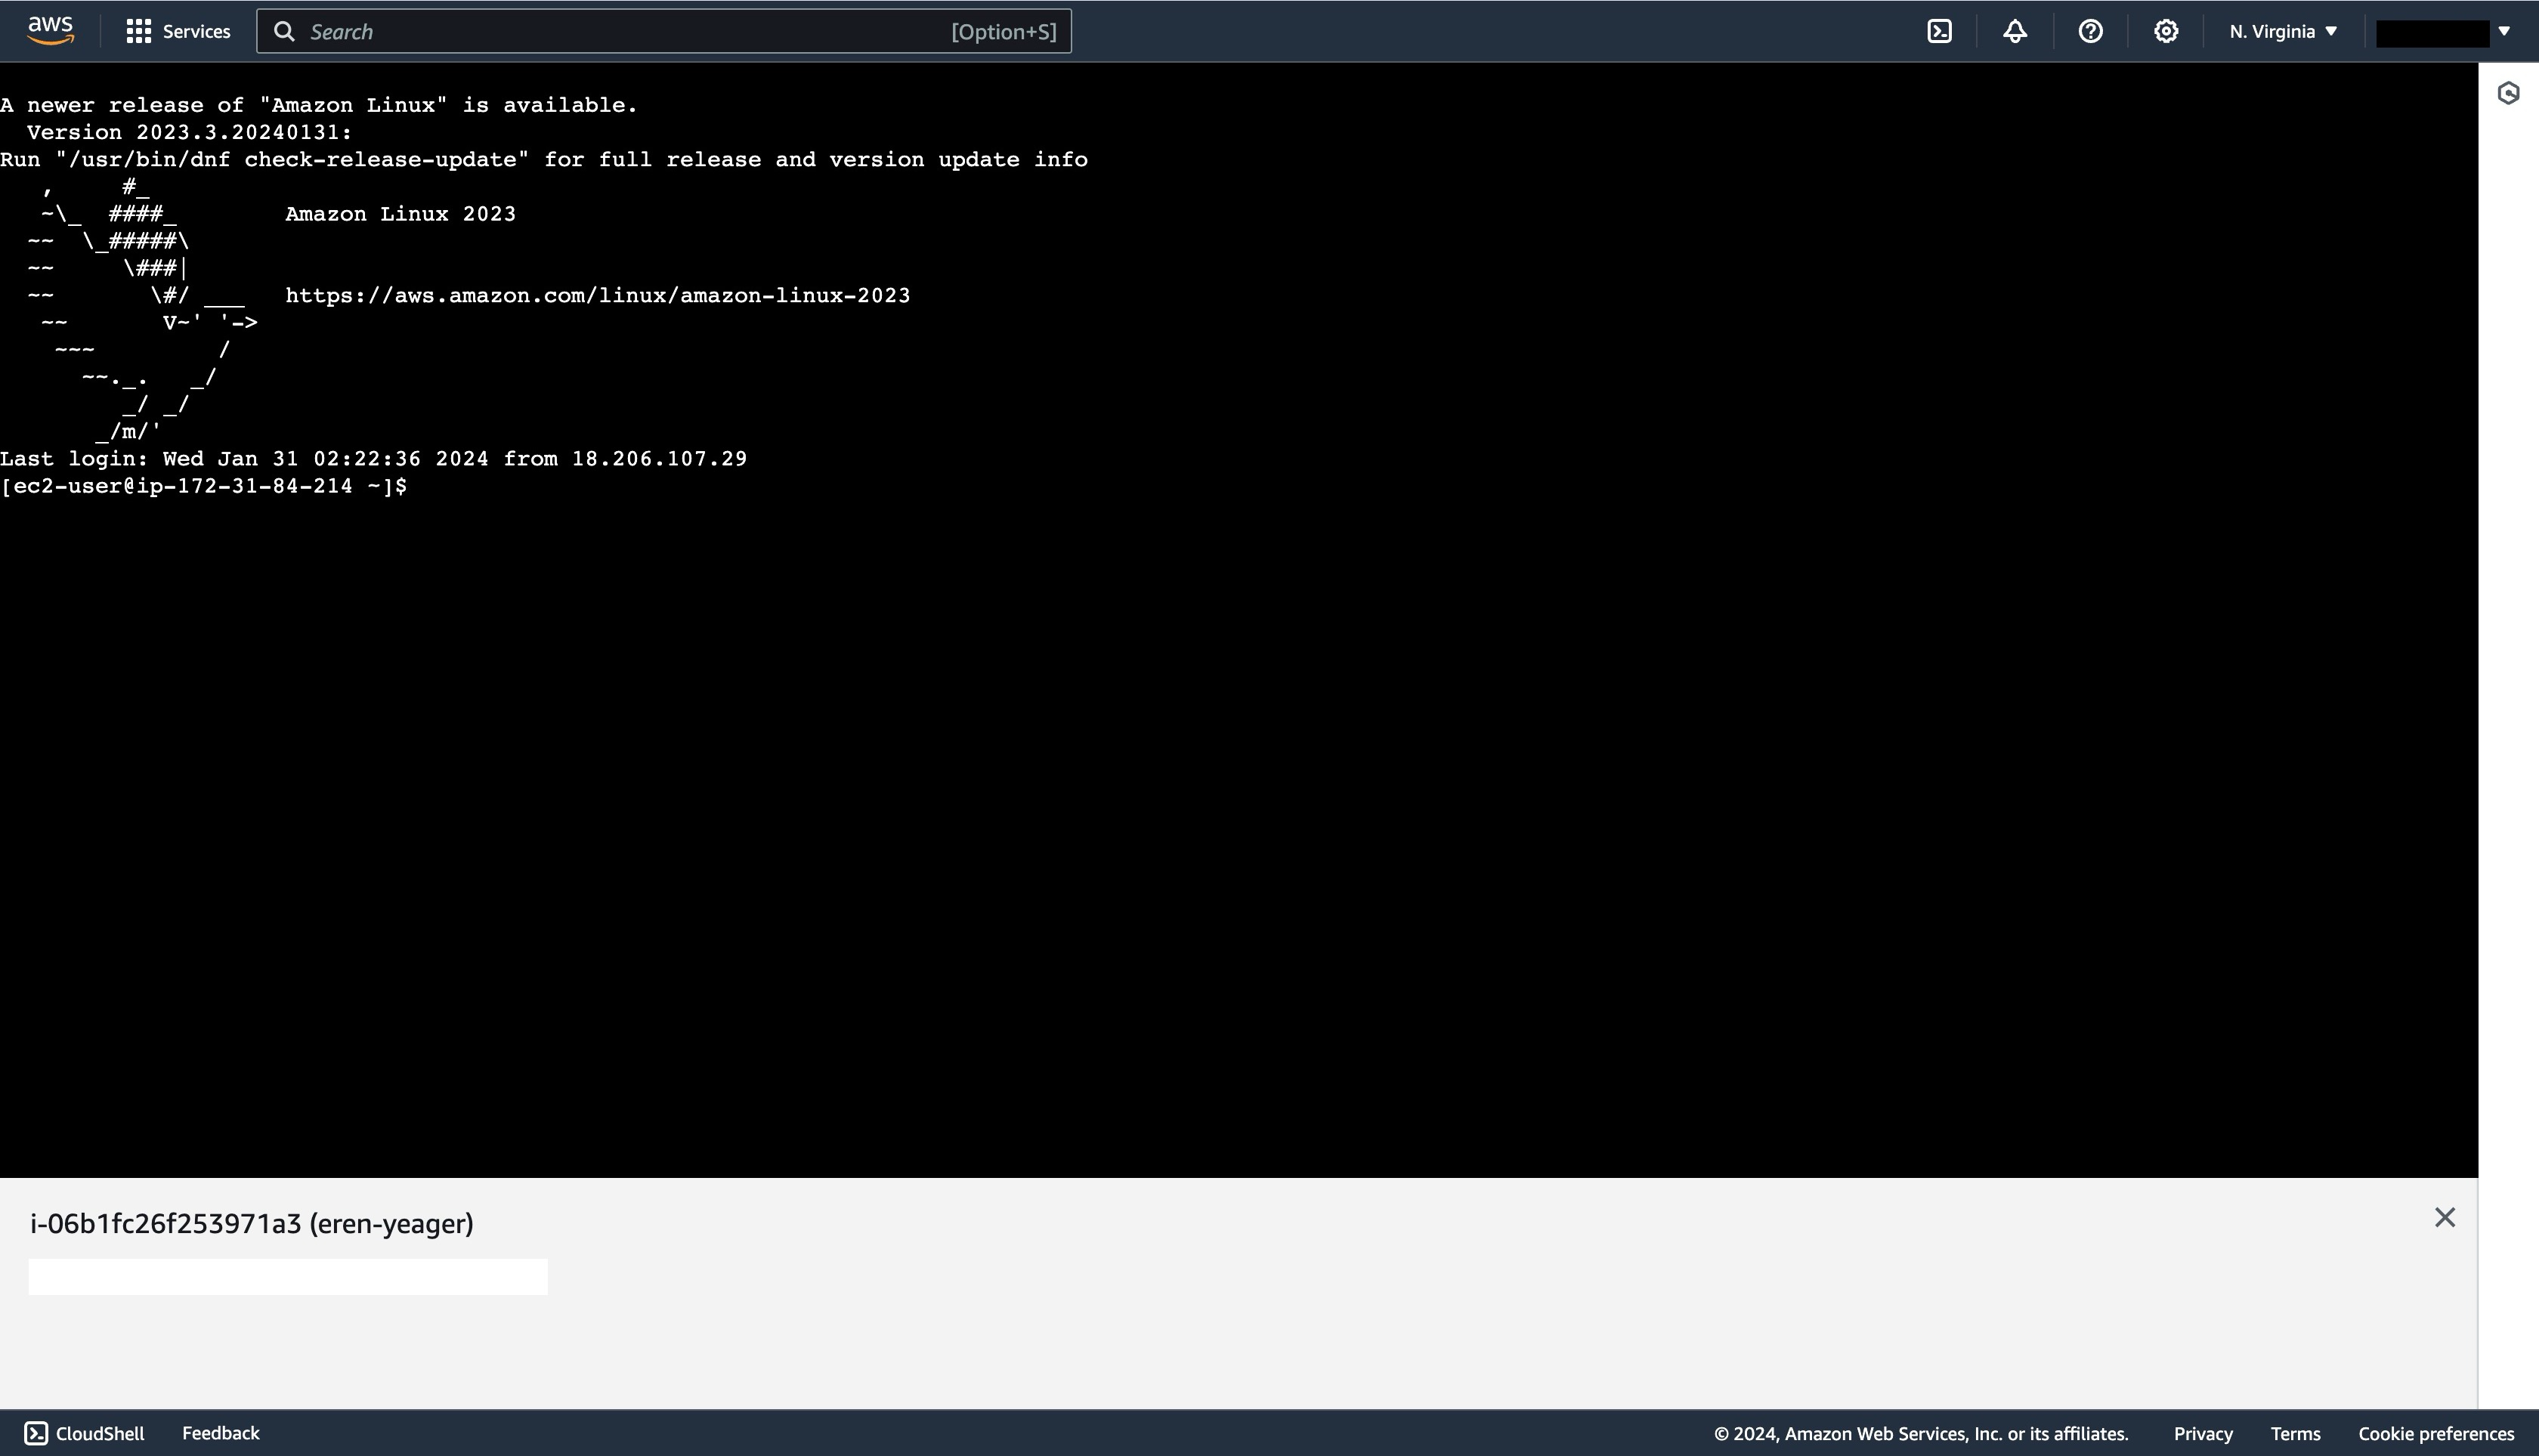
Next, change to the root user by running the command below:
sudo su -
Running the command above will switch the user context to the root user with elevated privileges.
This command, comprising “sudo” for superuser capabilities, “su” for user switching, and the hyphen (“-“), ensures that the root user’s environment variables and configurations are loaded.
Next, install the Node Version Manager (NVM) by running the command below:
curl -o- https://raw.githubusercontent.com/nvm-sh/nvm/v0.34.0/install.sh | bash
Next, activate NVM in the current terminal session by running the command below:
. ~/.nvm/nvm.sh
Then, install Node.js using NVM by running the command below:
nvm install node
Next, install Git by running the command below:
sudo yum update
sudo yum install git
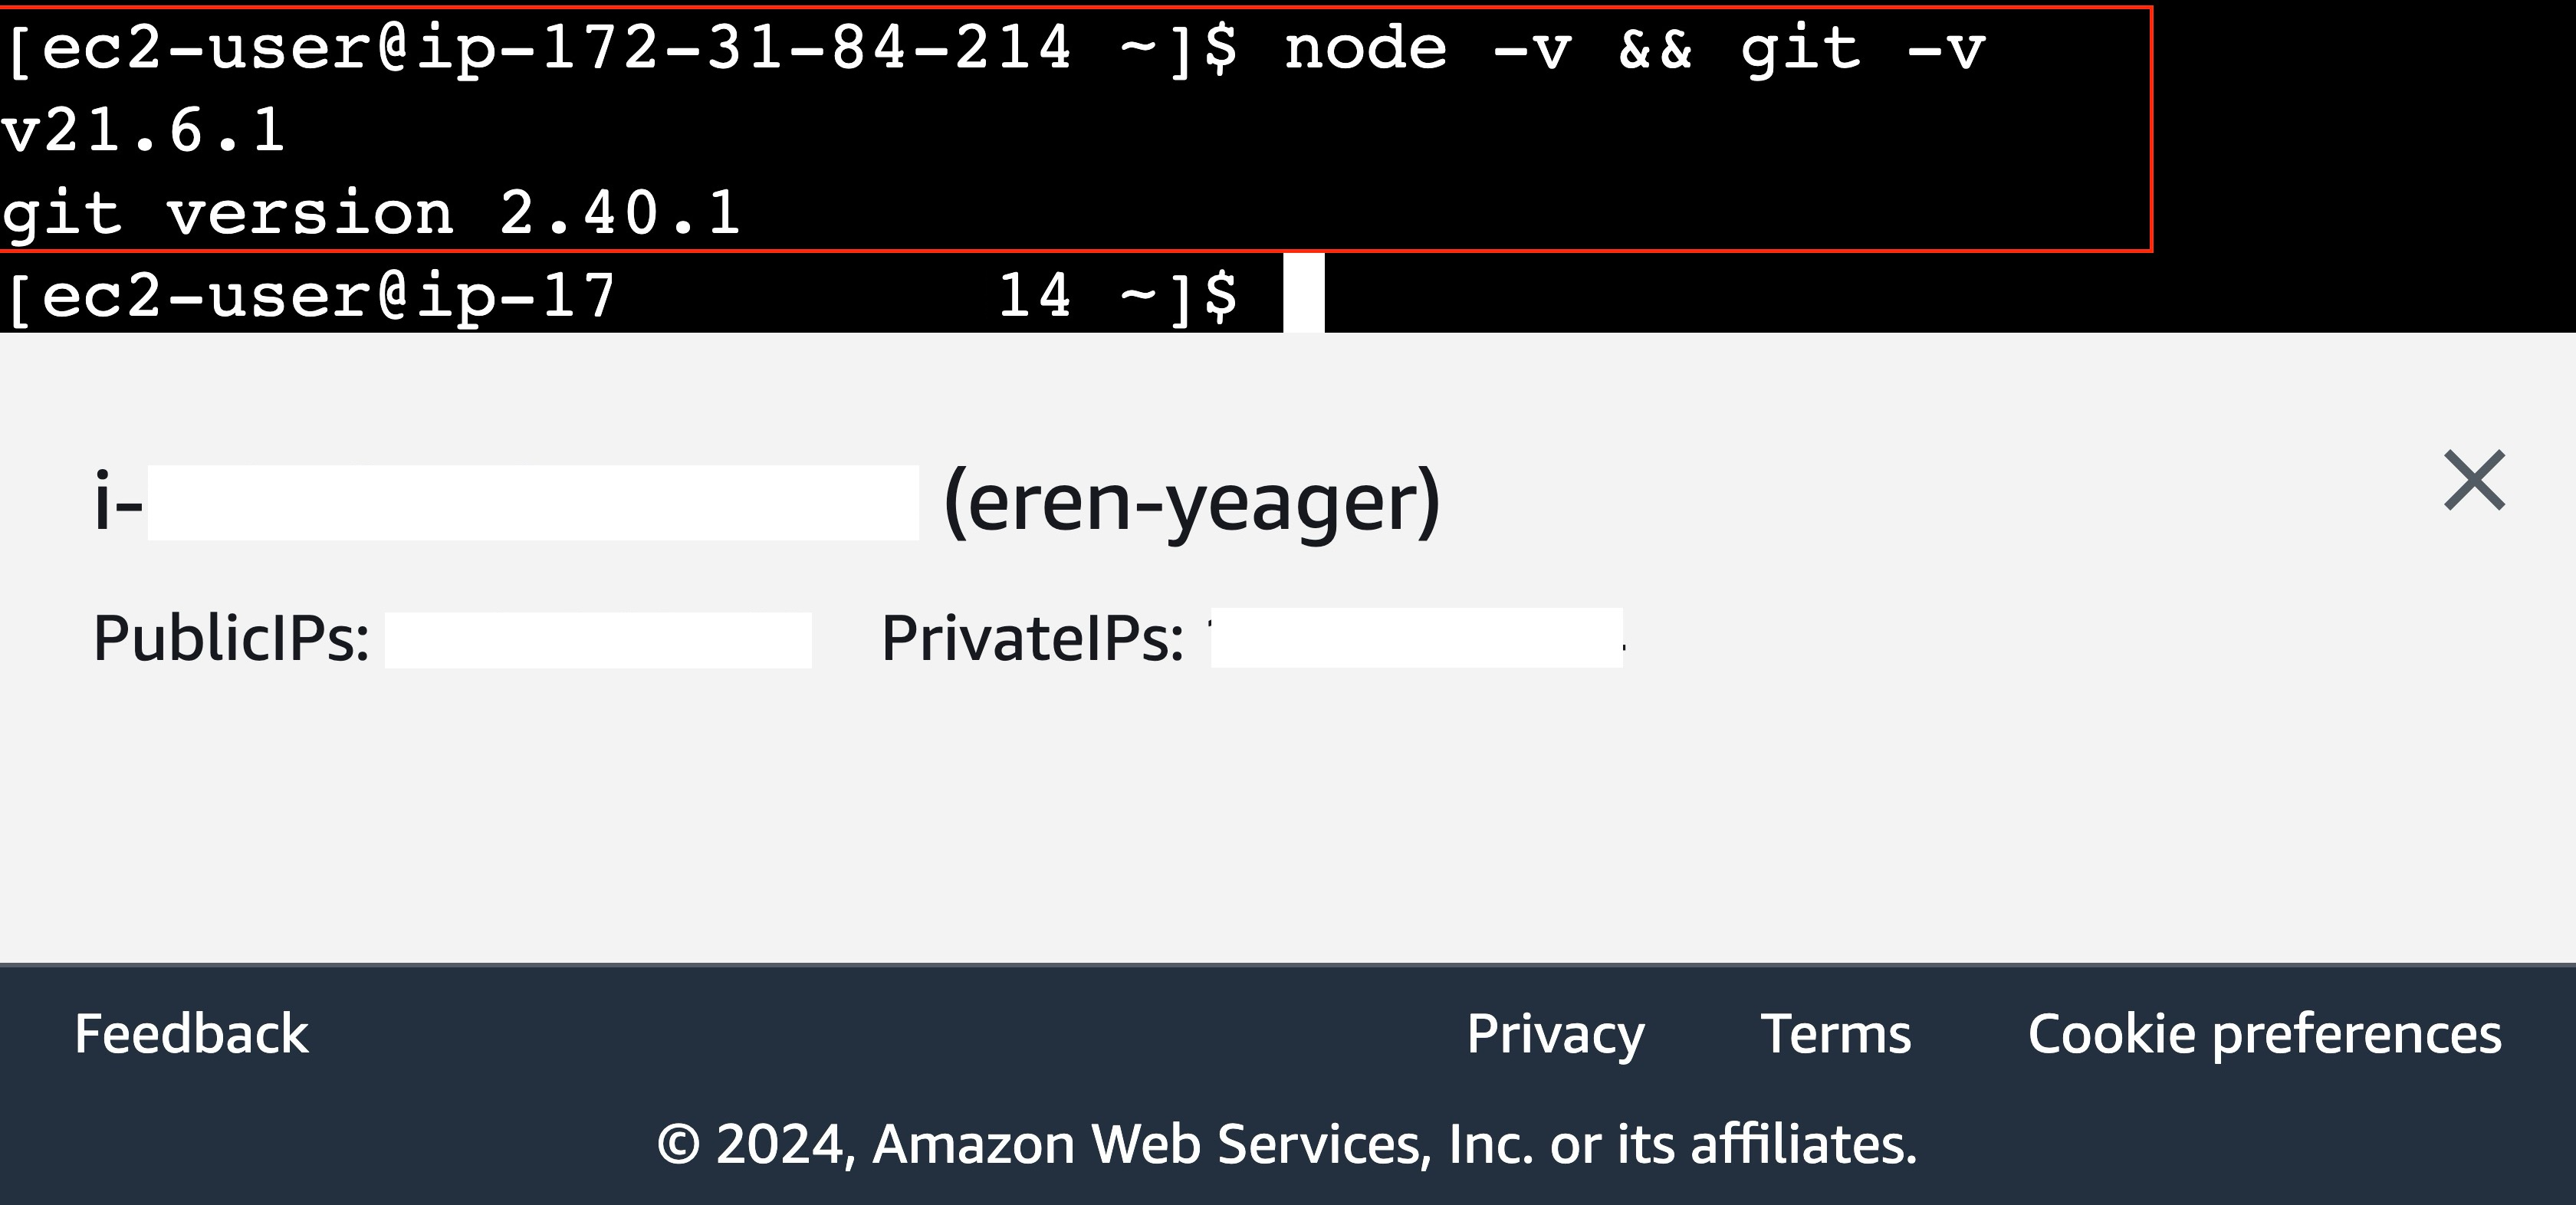
You can confirm that Node.js and Git were installed successfully on your EC2 instance by running the command below:
node -v && git -v
If the installation was successful, you should see version numbers printed on your console, as shown in the image below.
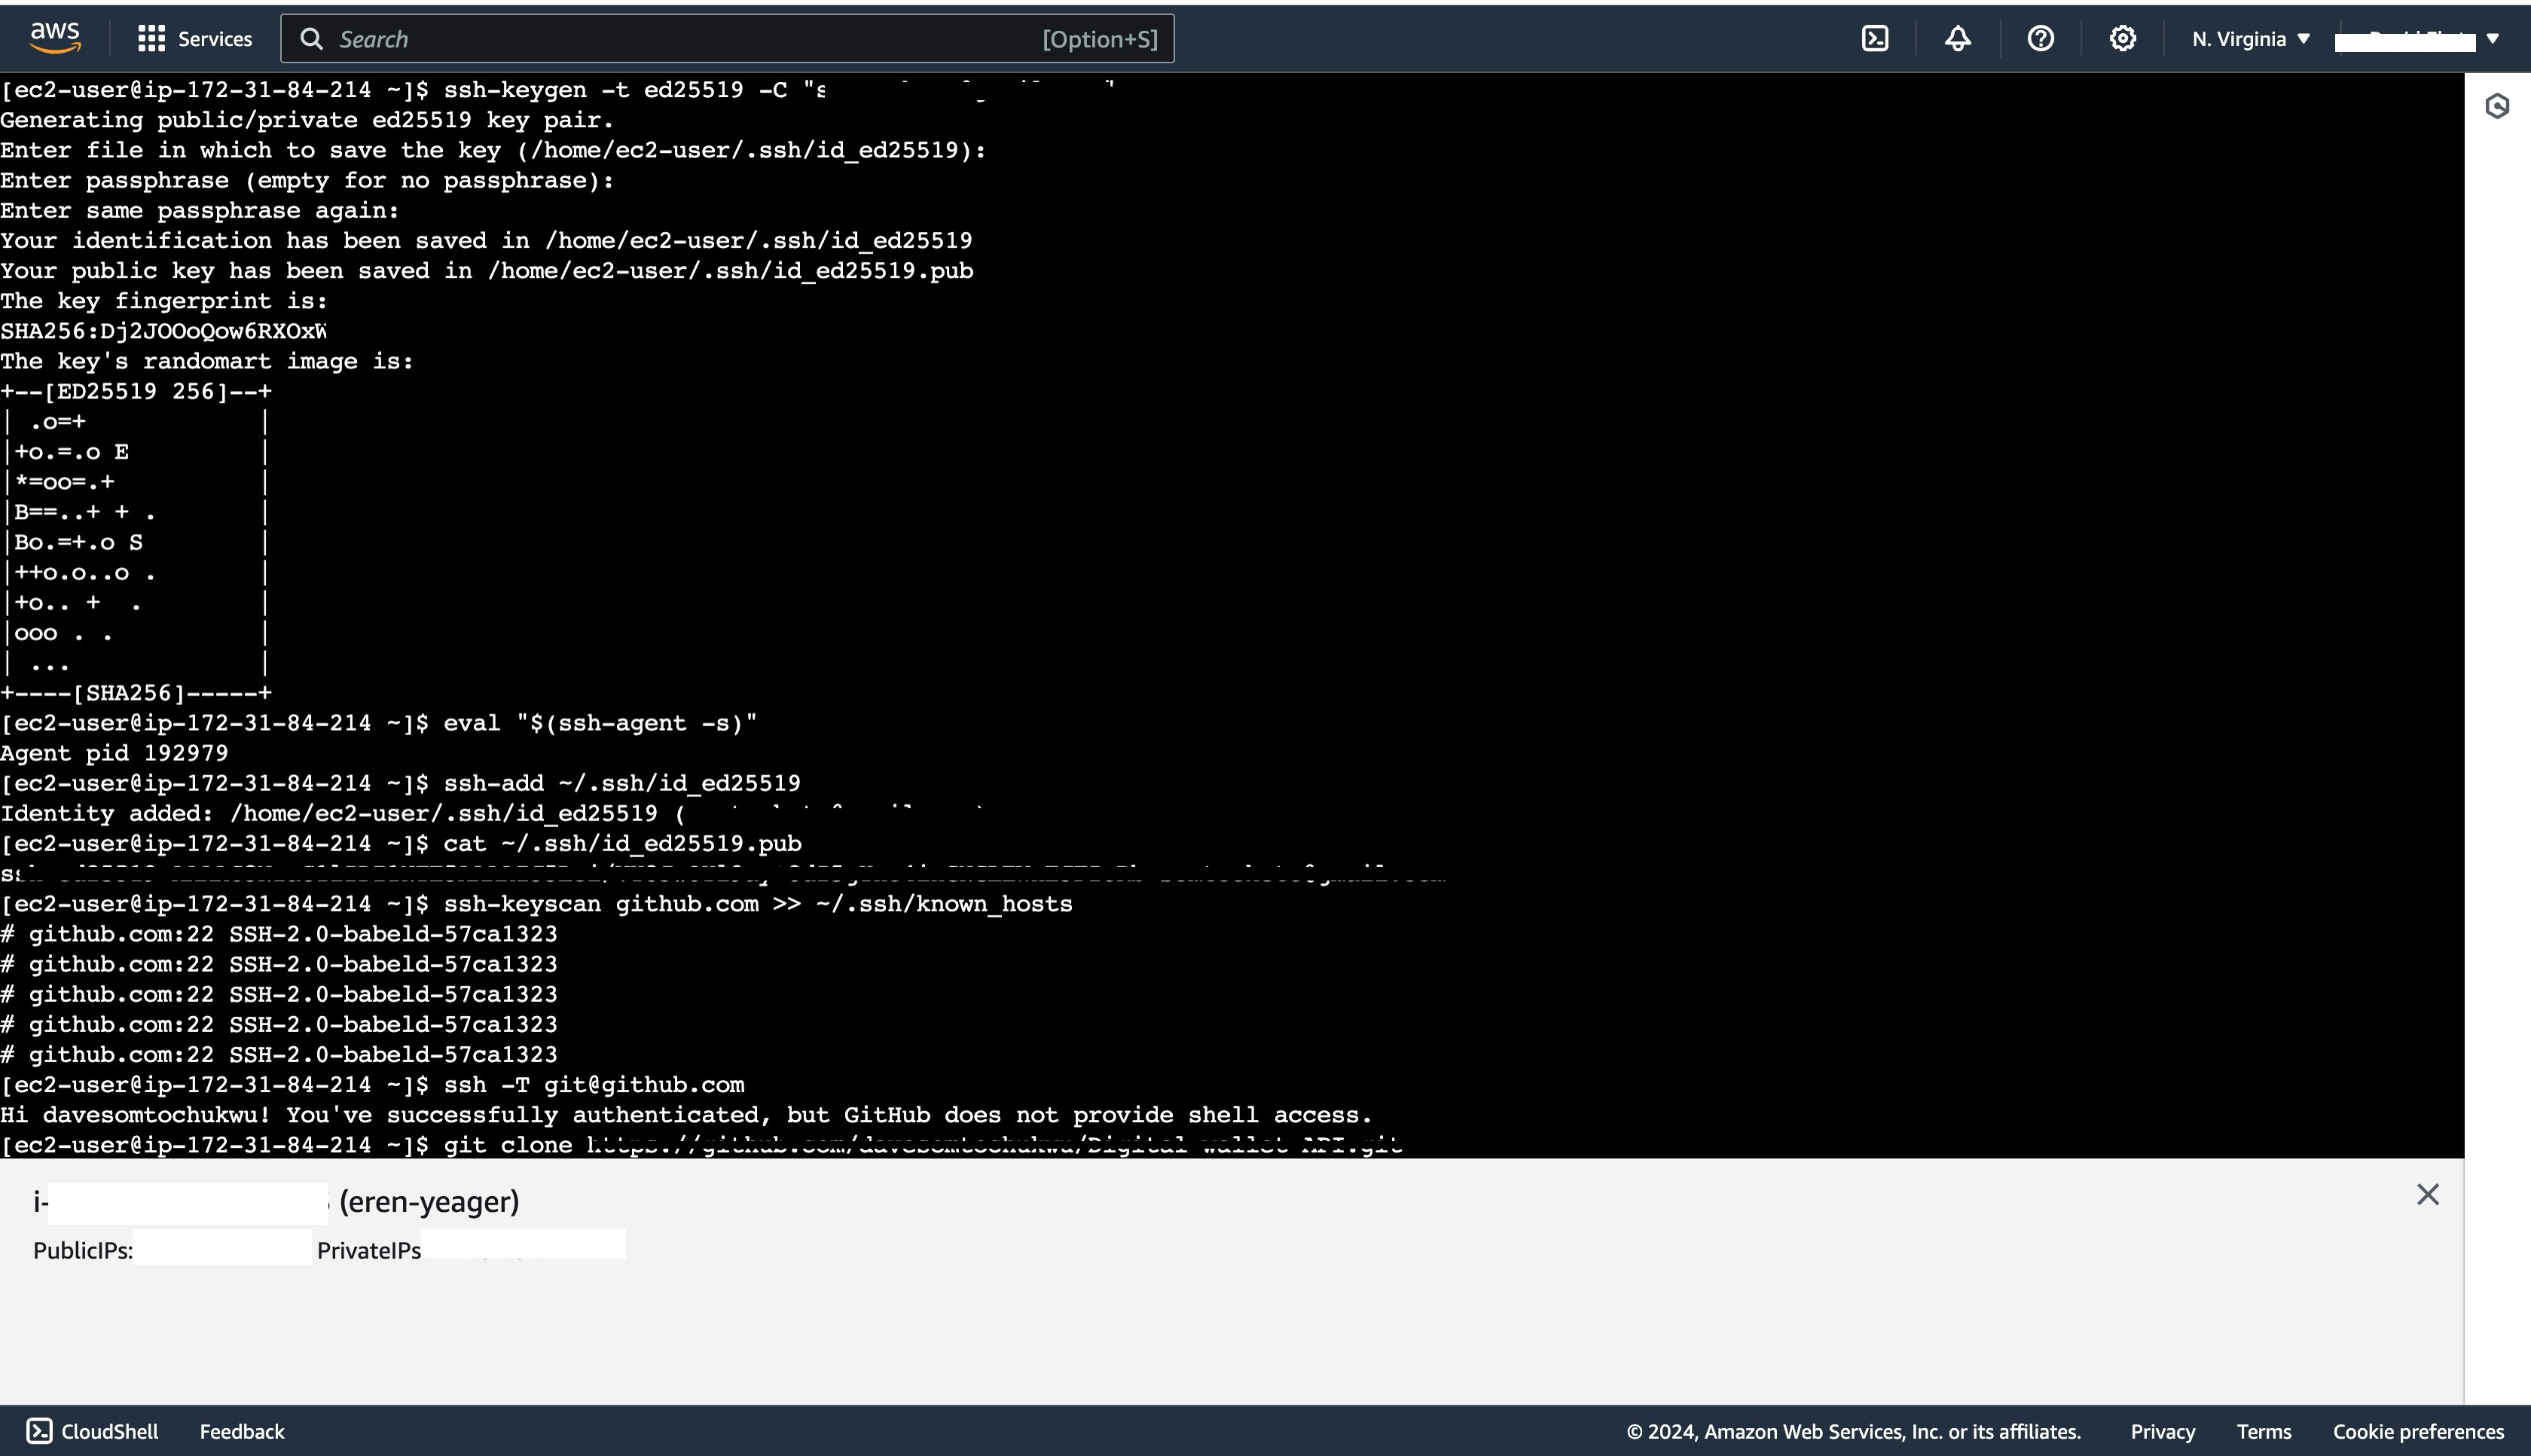
Next, connect your GitHub SSH Key to your EC2 instance. After you have successfully configured and added your SSH key, run the command below to clone your repository into your EC2 instance:
git clone <YOUR_APPLICATION_URL>
The command above will clone your application into your EC2 instance.
cd into your application directory on your EC2 and run the command below to install all your project dependencies.
npm install
Next, add your environment variables by running the command below:
nano .env
The command above will create and open an empty .env file, copy your environmental variables, paste them into the file, and press control + X, then Y to save and close the file.
Finally, run your application’s start script, which should typically be the command below:
npm start
Running the command above should start up your application. You can access your deployed application using your public DNS address, which you can find on your instance dashboard.
The free tier for EC2 instances in AWS provides 750 hours monthly for t2.micro or t3.micro instances running Linux, RHEL, or SLES, depending on the region.
Similarly, for Windows instances, it offers 750 hours per month for t2.micro or t3.micro instances based on the region.
Additionally, regardless of the instance type, it includes 750 hours per month for a public IPv4 address.
However, the free tier is only available to new AWS customers for 12 months following your AWS sign-up date.
5. DigitalOcean
DigitalOcean is an Infrastructure as a Service (IaaS) platform that offers access to the underlying VMs that support your applications, allowing you to configure your disk space, allocate memory, and set up your network.
DigitalOcean provides various cloud computing products like droplets, which are Linux virtual machines. In addition to droplets, they offer a managed Kubernetes service and serverless functions.
DigitalOcean also provides network security with cloud firewalls, load balancers, a virtual private cloud, floating IPs, DNS, IPv6, and DDoS protection.
Deploying your Node.js application on DigitalOcean is a relatively simple process compared to other IaaS options.
It involves creating a Droplet, configuring it, setting up your virtual Linux machine, and a reverse proxy to fit your needs.
Deploying Your Node.js Backend on a DigitalOcean Droplet?
You need a DigitalOcean account to deploy your Node.js app on the platform; you can sign up for free if you don’t have one.
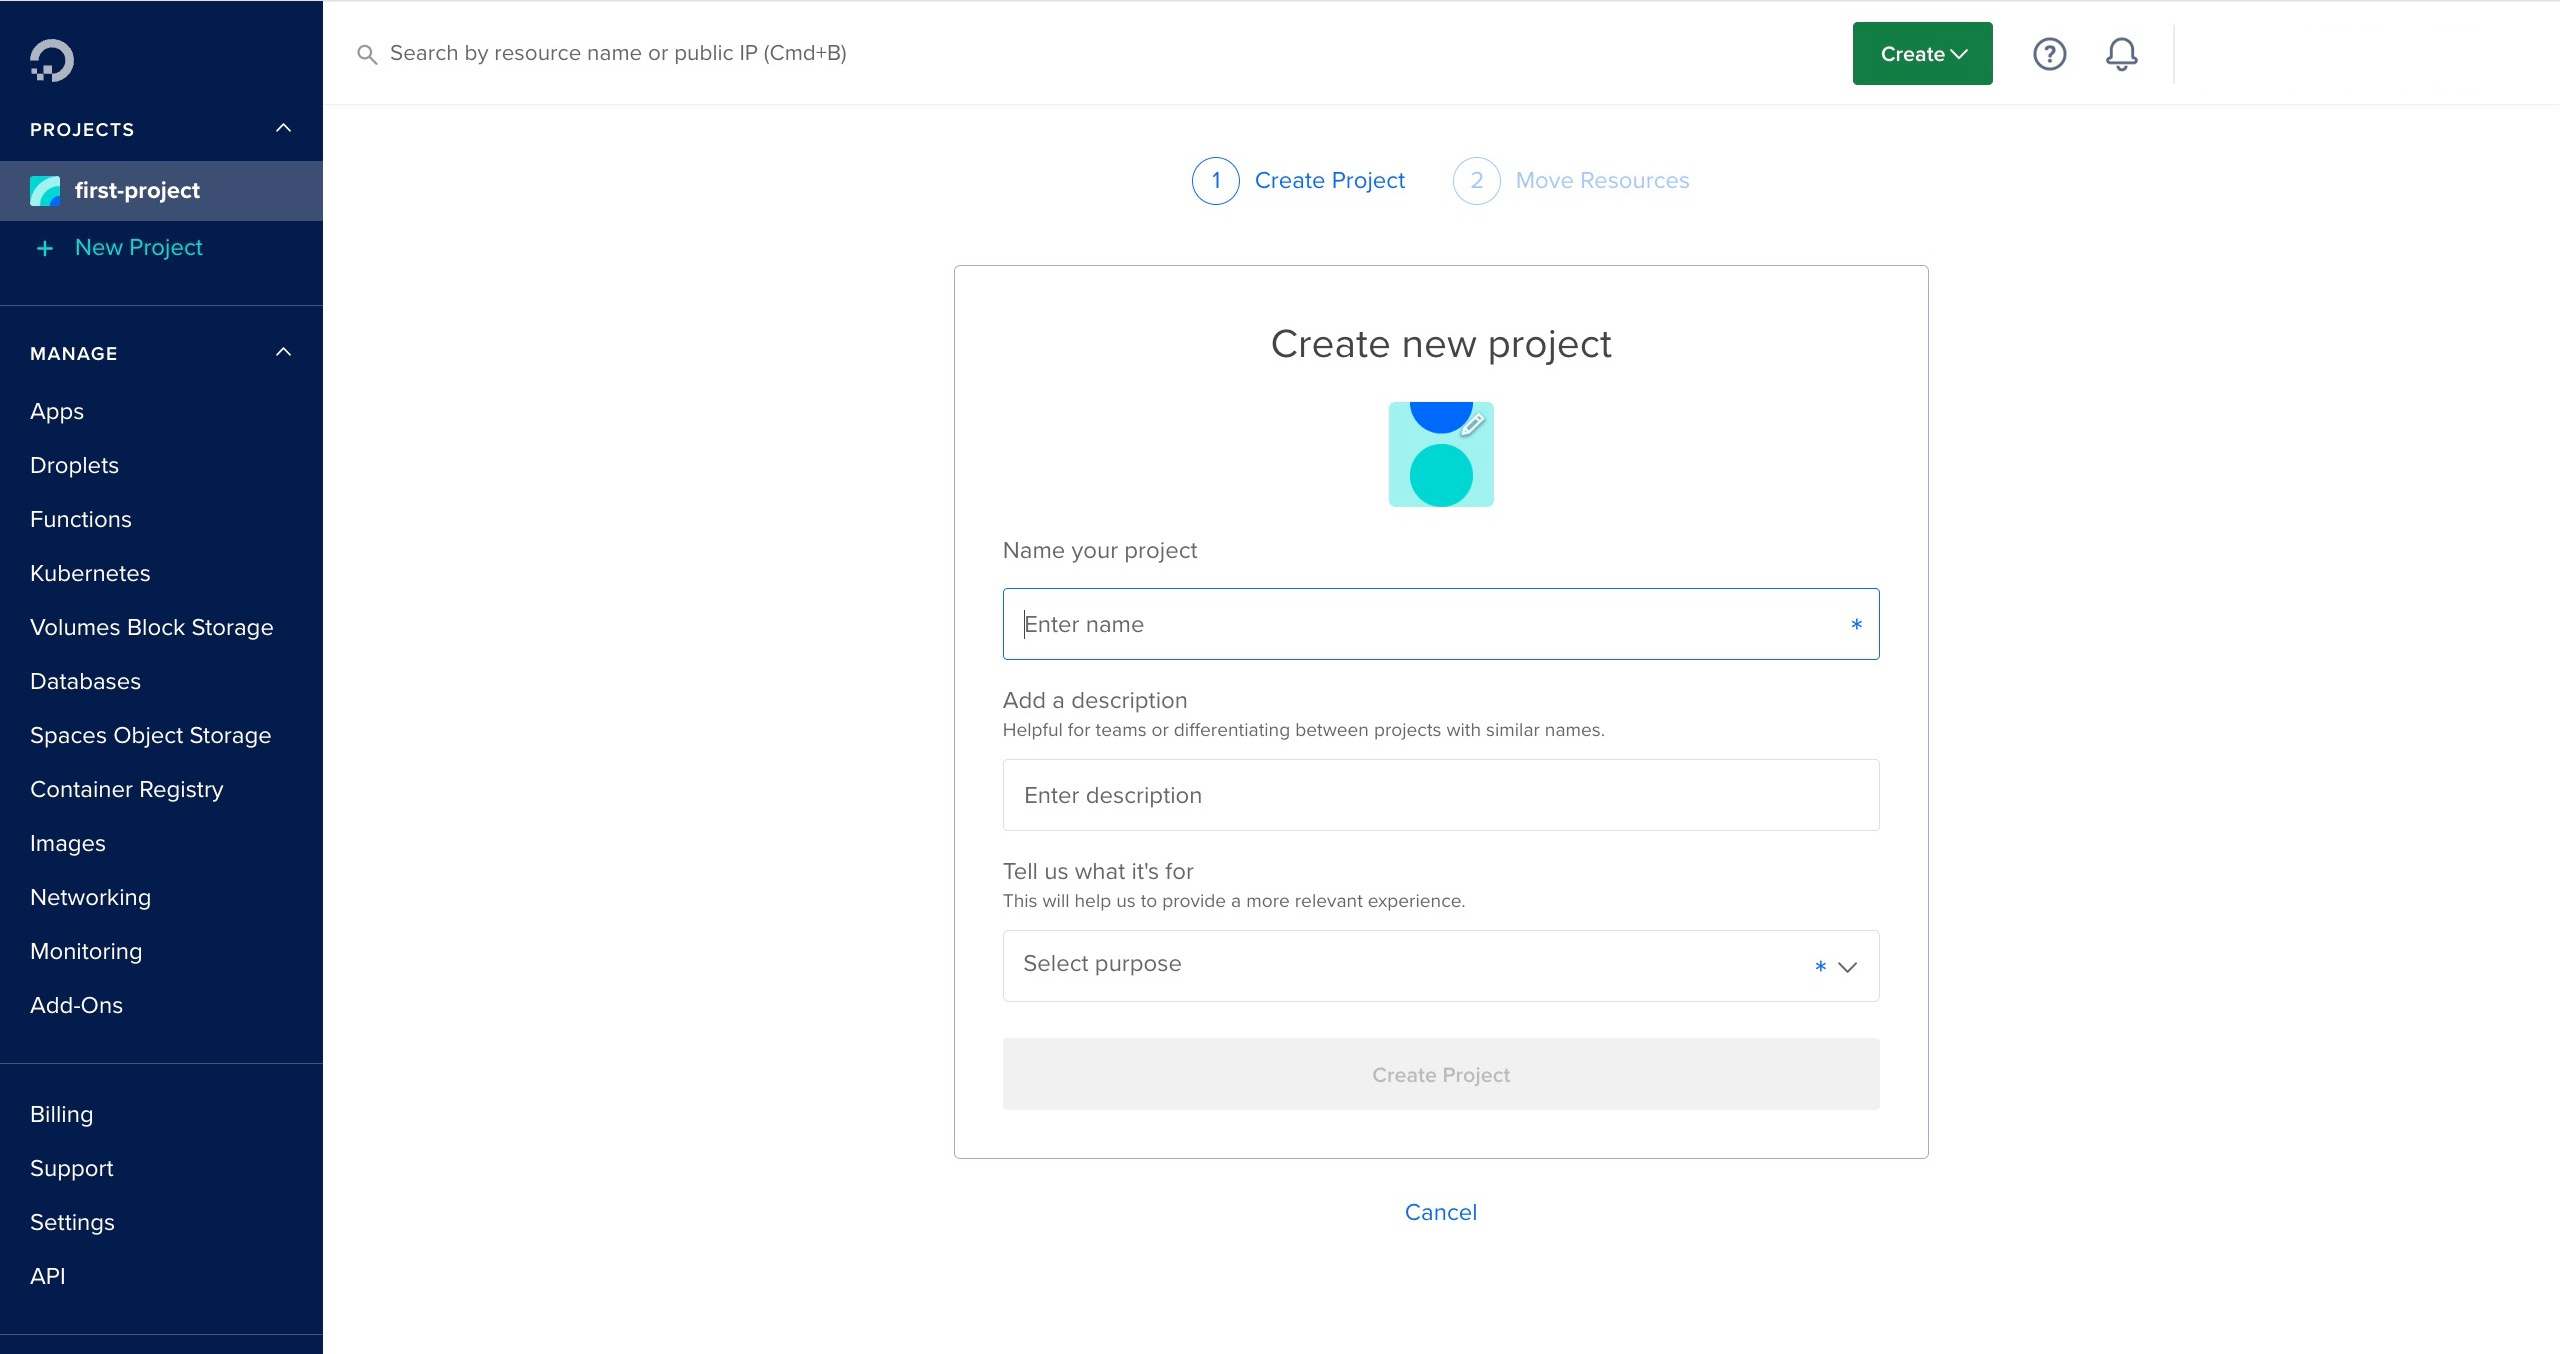
Next, log in and create a new project (or use an existing project).
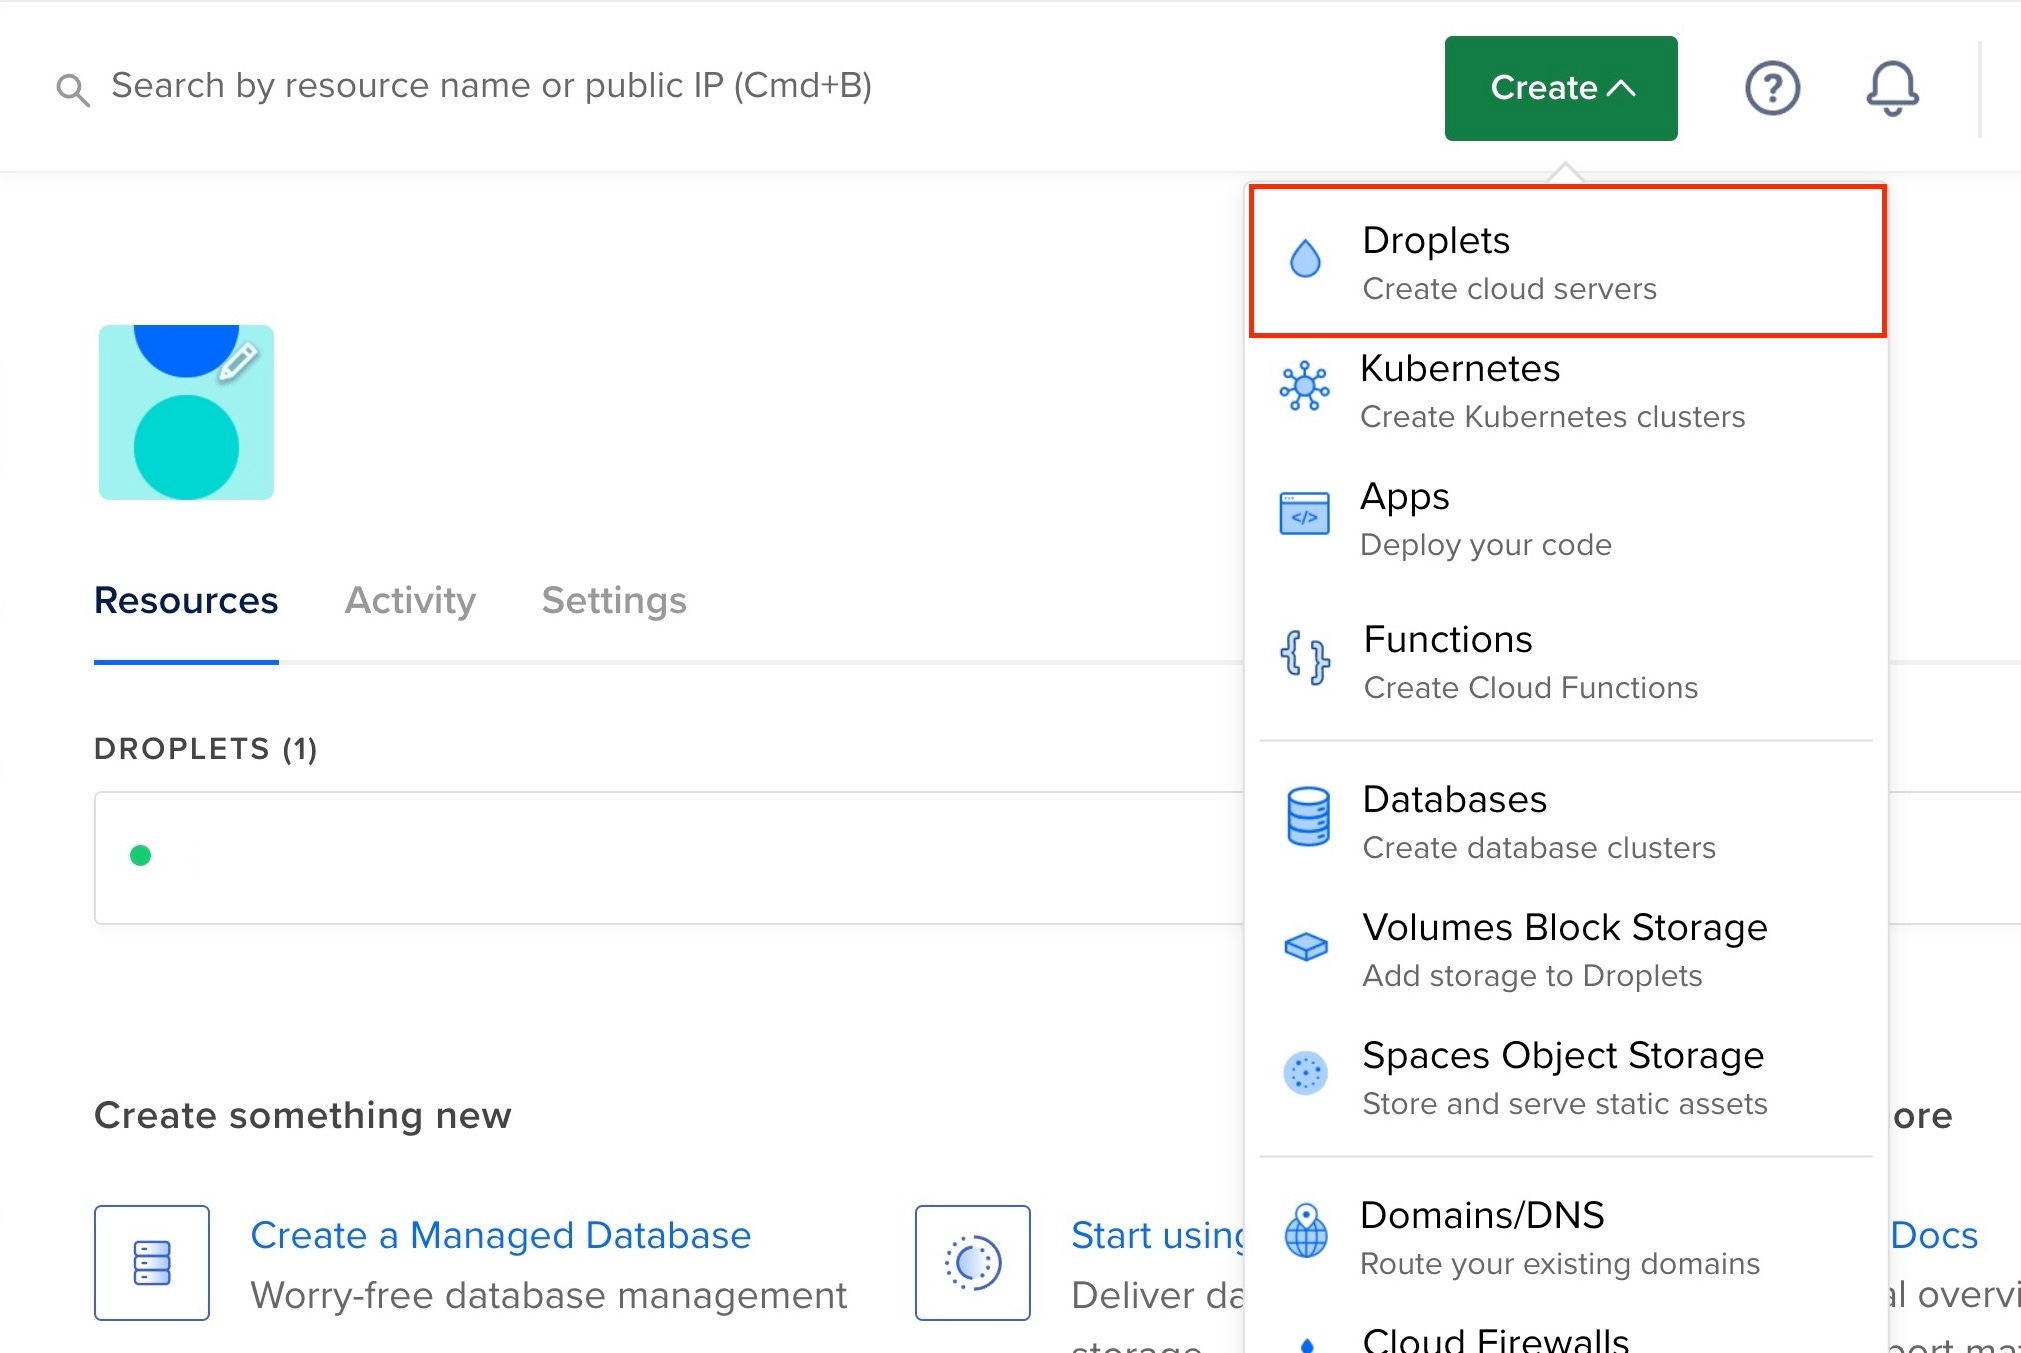
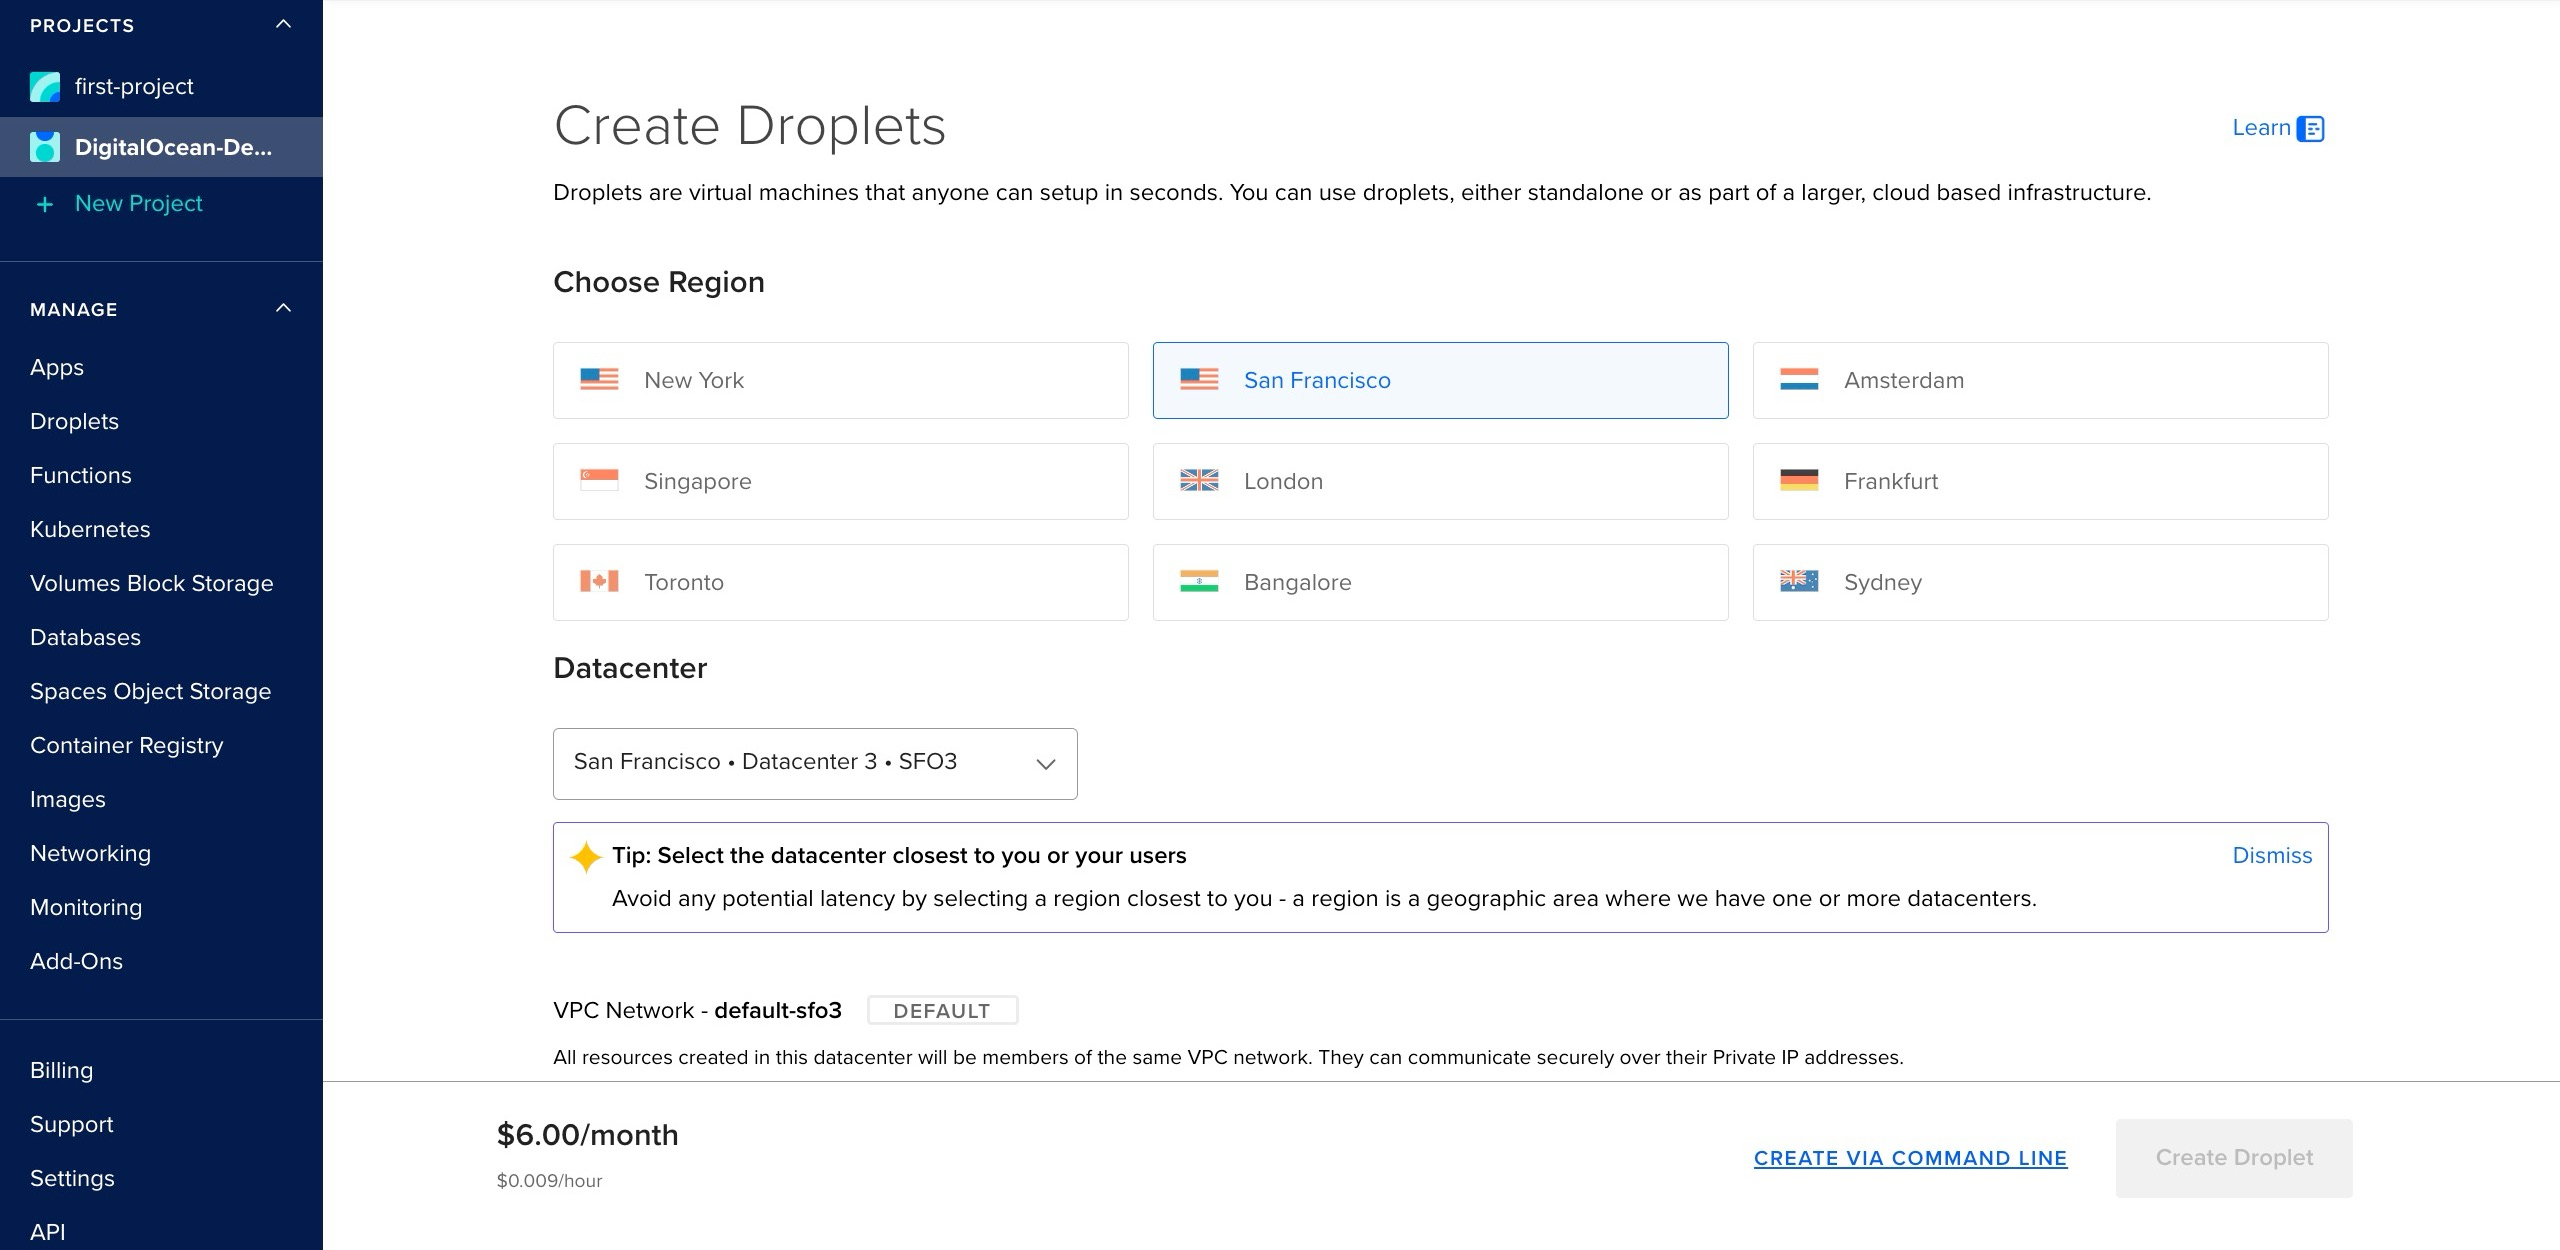
On your project dashboard, click the “Create” dropdown at the top right corner of your screen and select “Droplets” to create a new droplet.
Next, select the deployment region closest to you for your droplet.
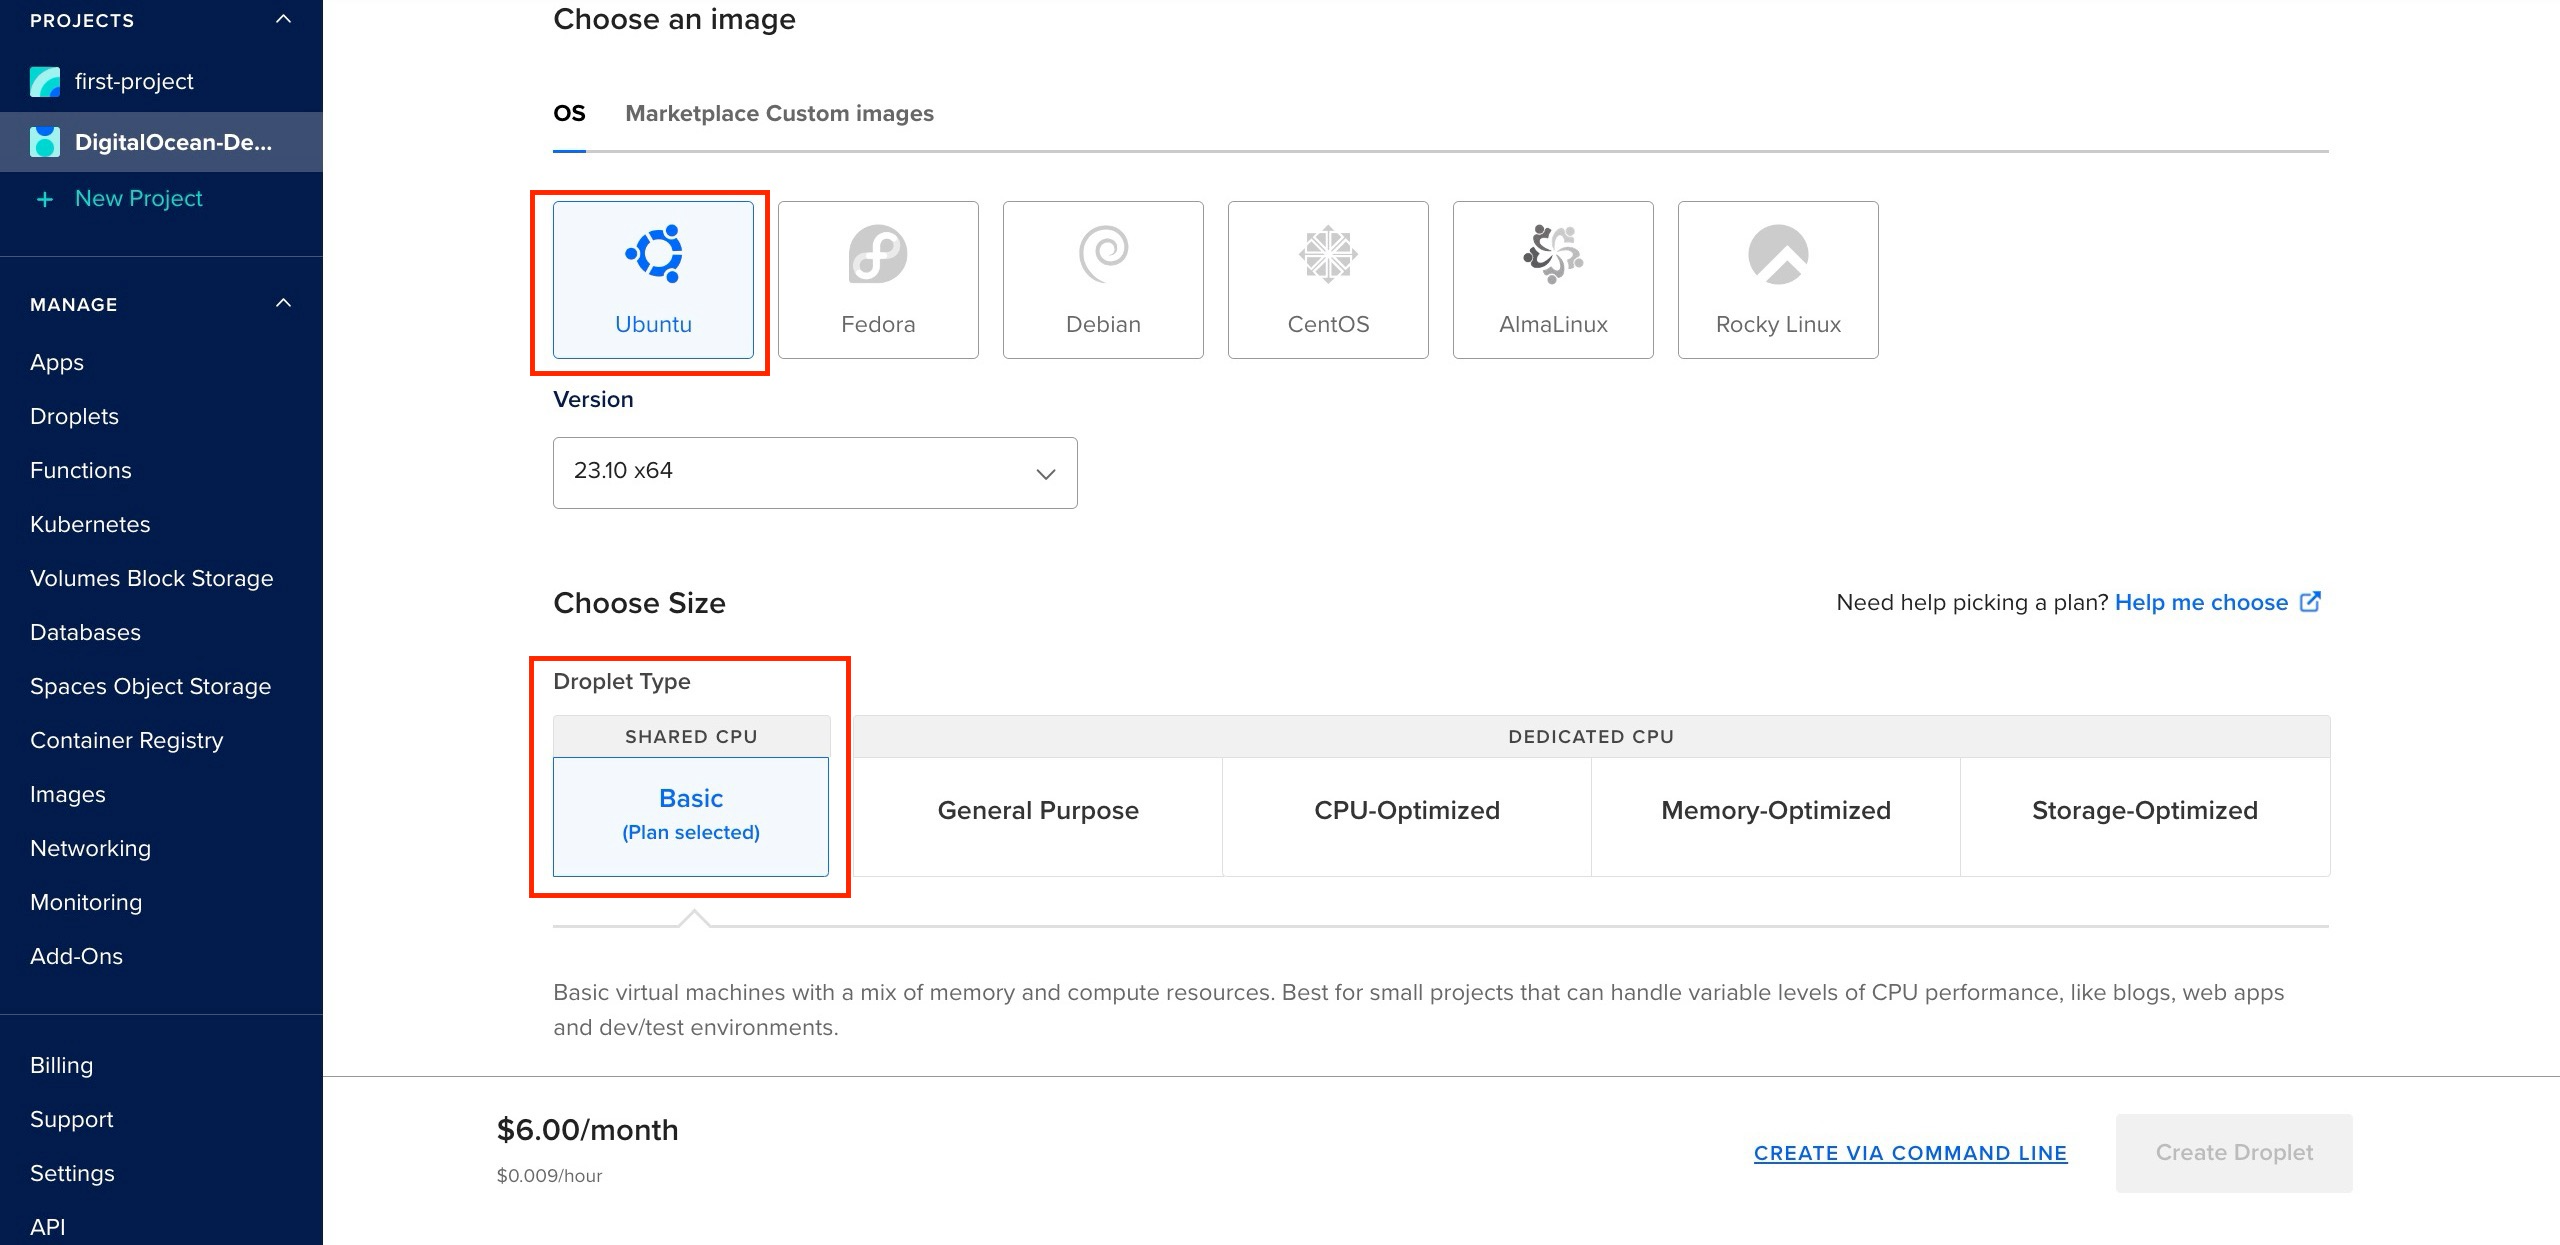
Next, select the “Ubuntu” OS as your image and “Basic” as your droplet type.
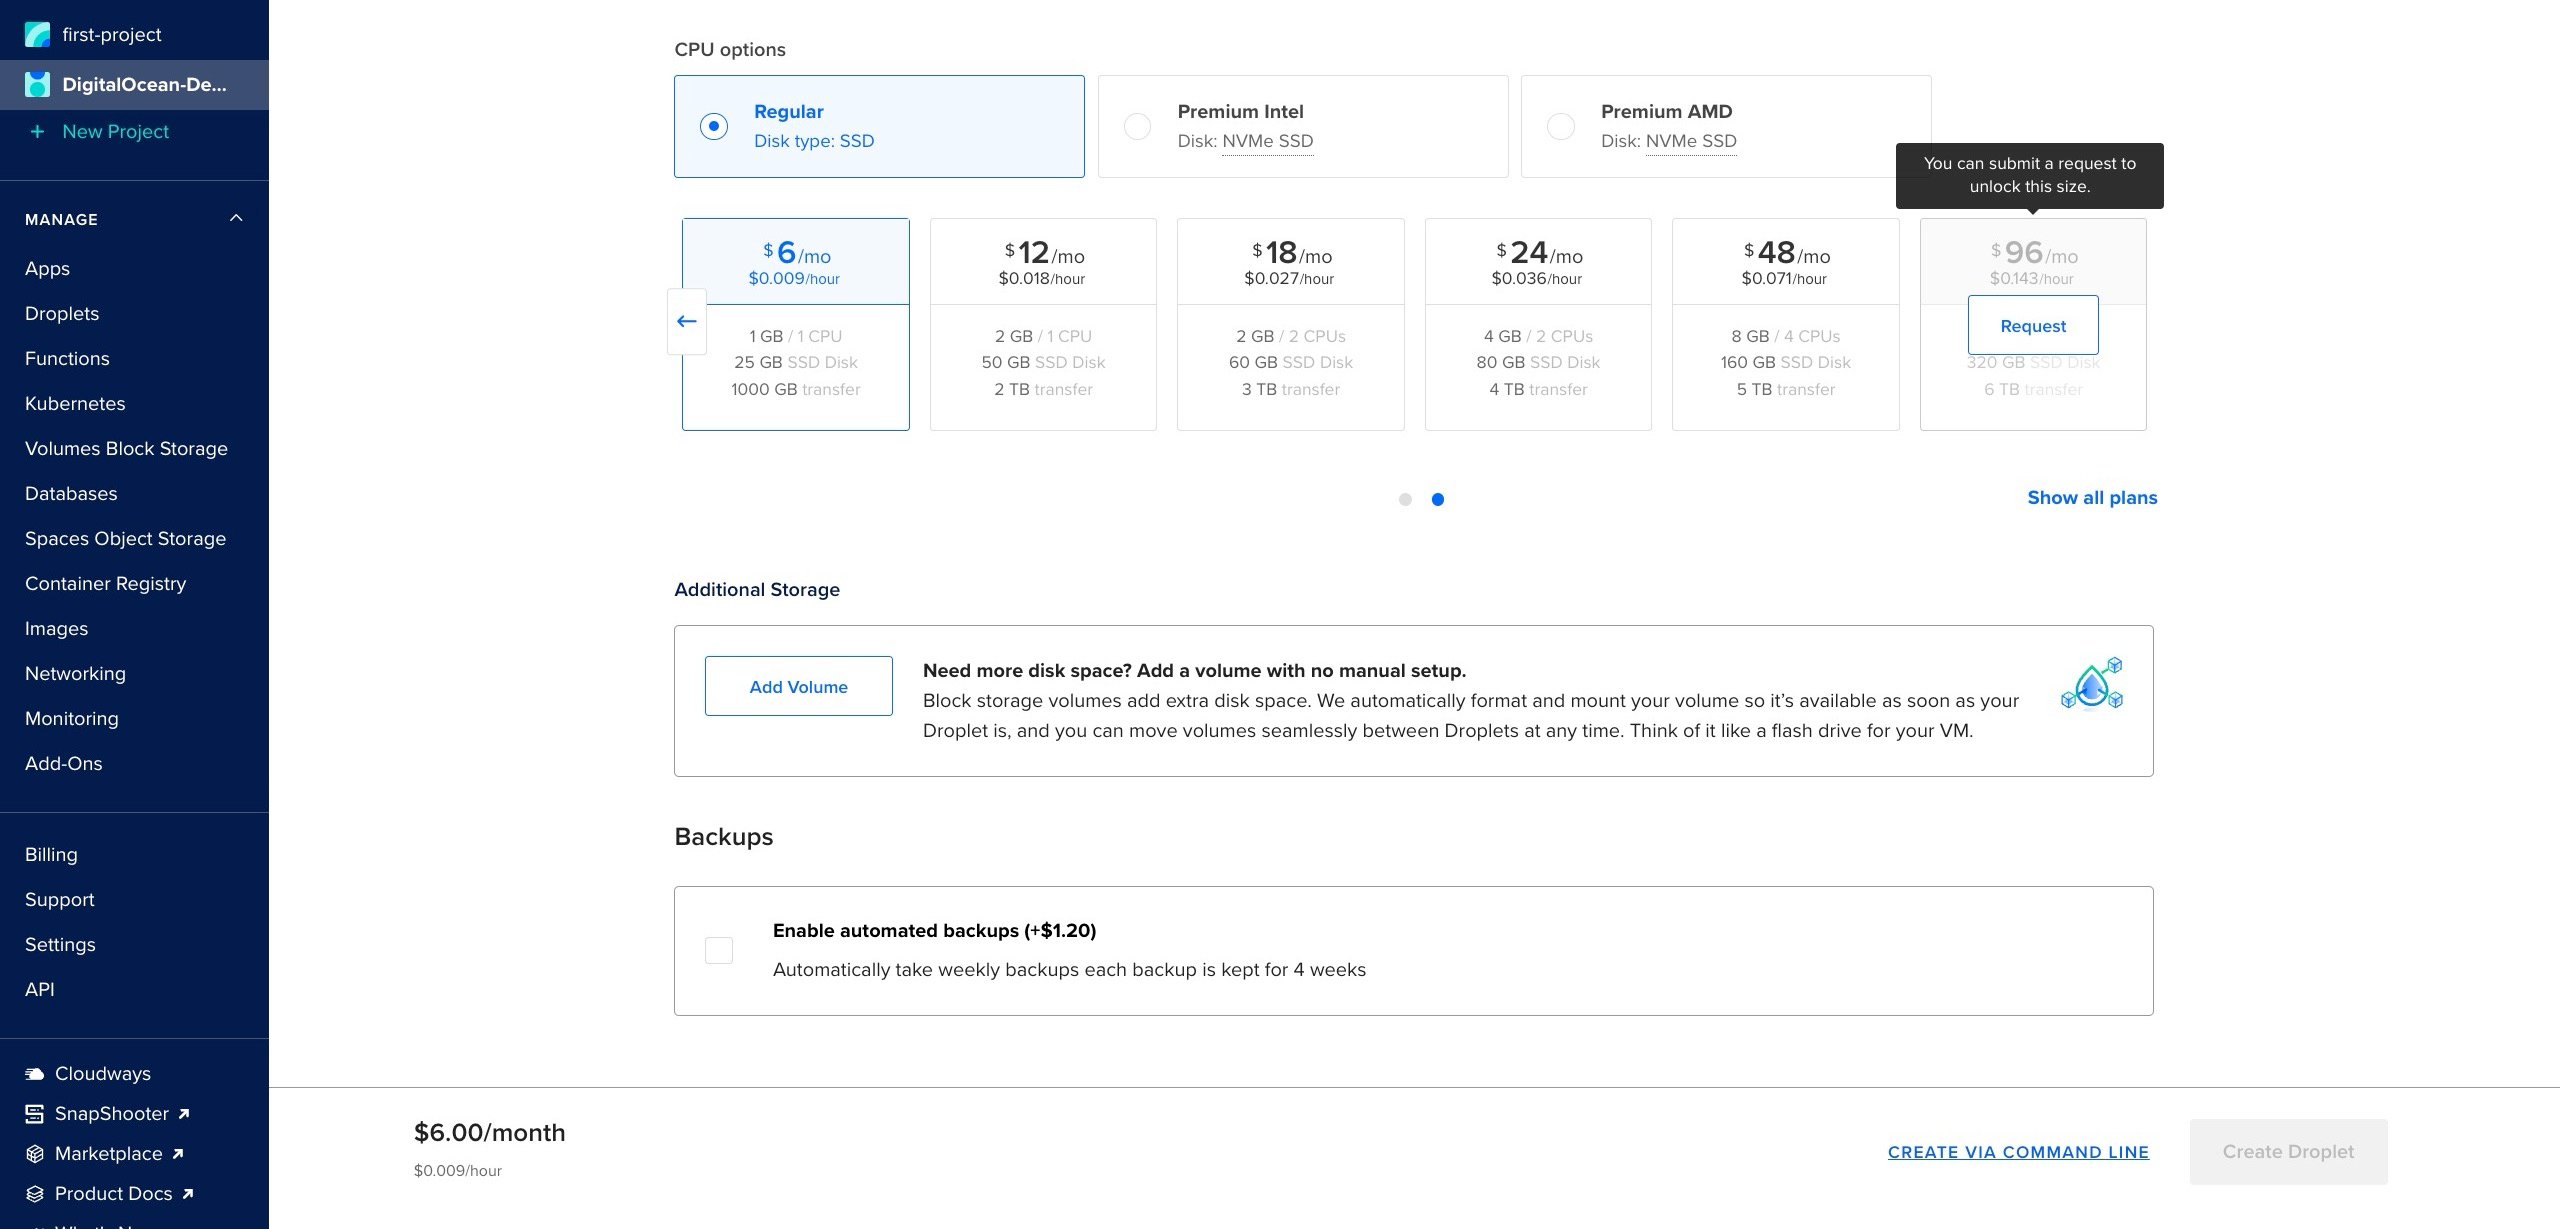
Next, select your preferred CPU options.
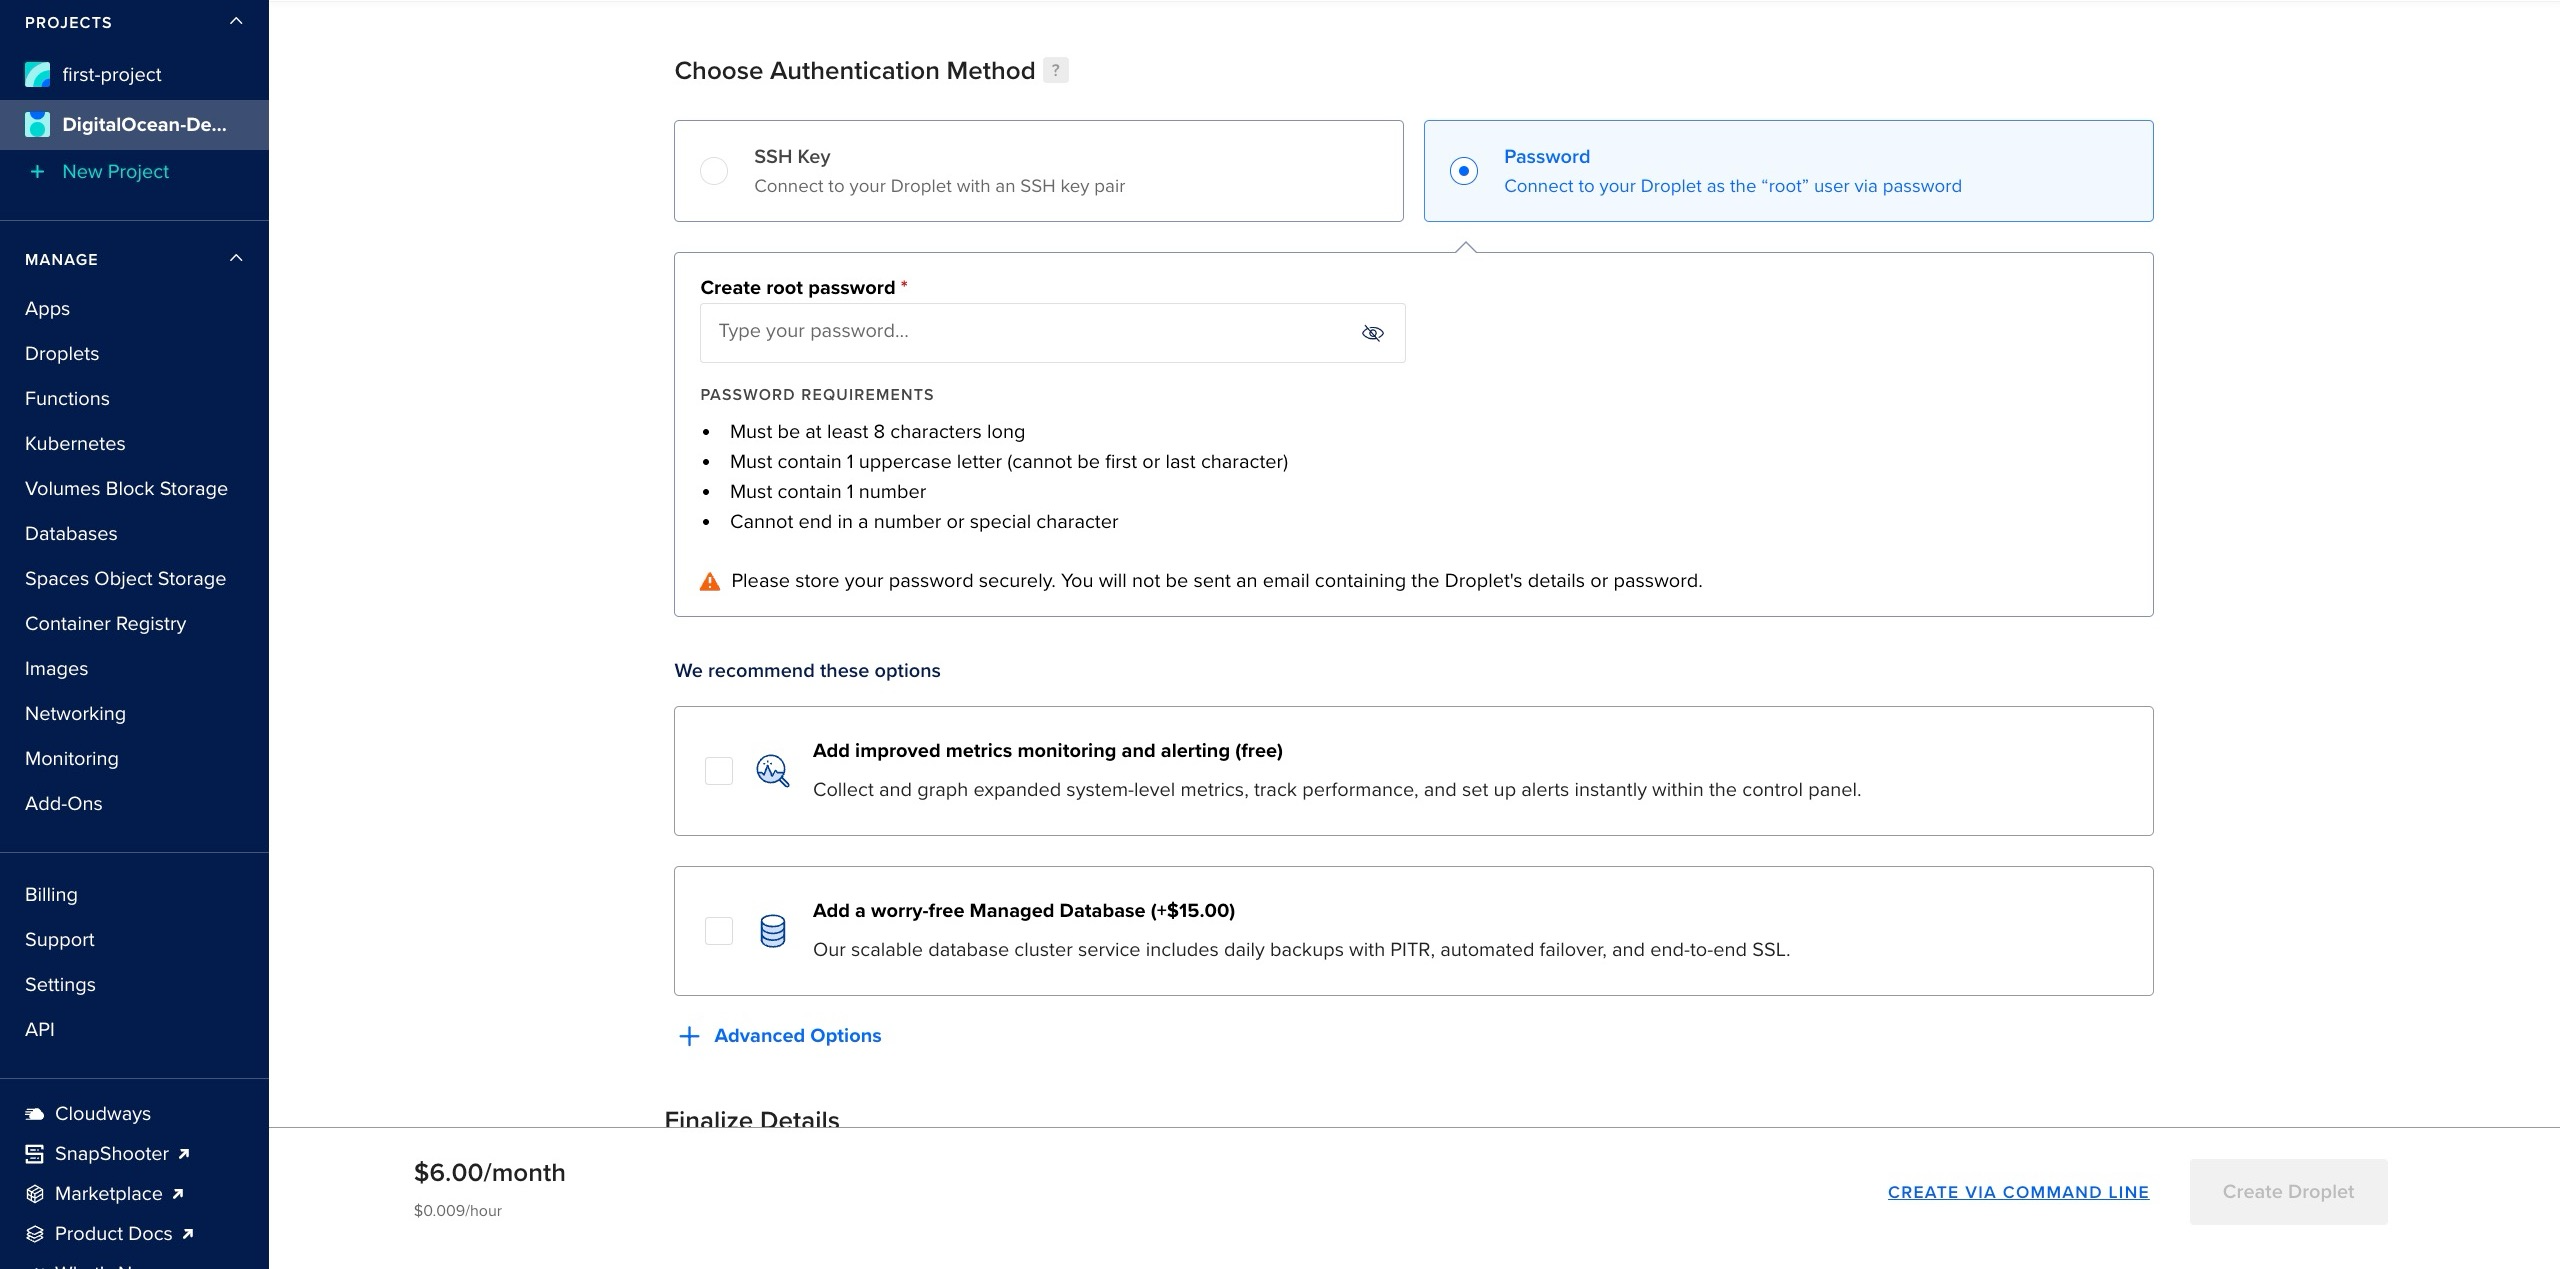
Then, select “password” as your authentication method. Alternatively, you can choose SSH as your authentication method.
Finally, select “1” as your droplet number and give it a hostname.
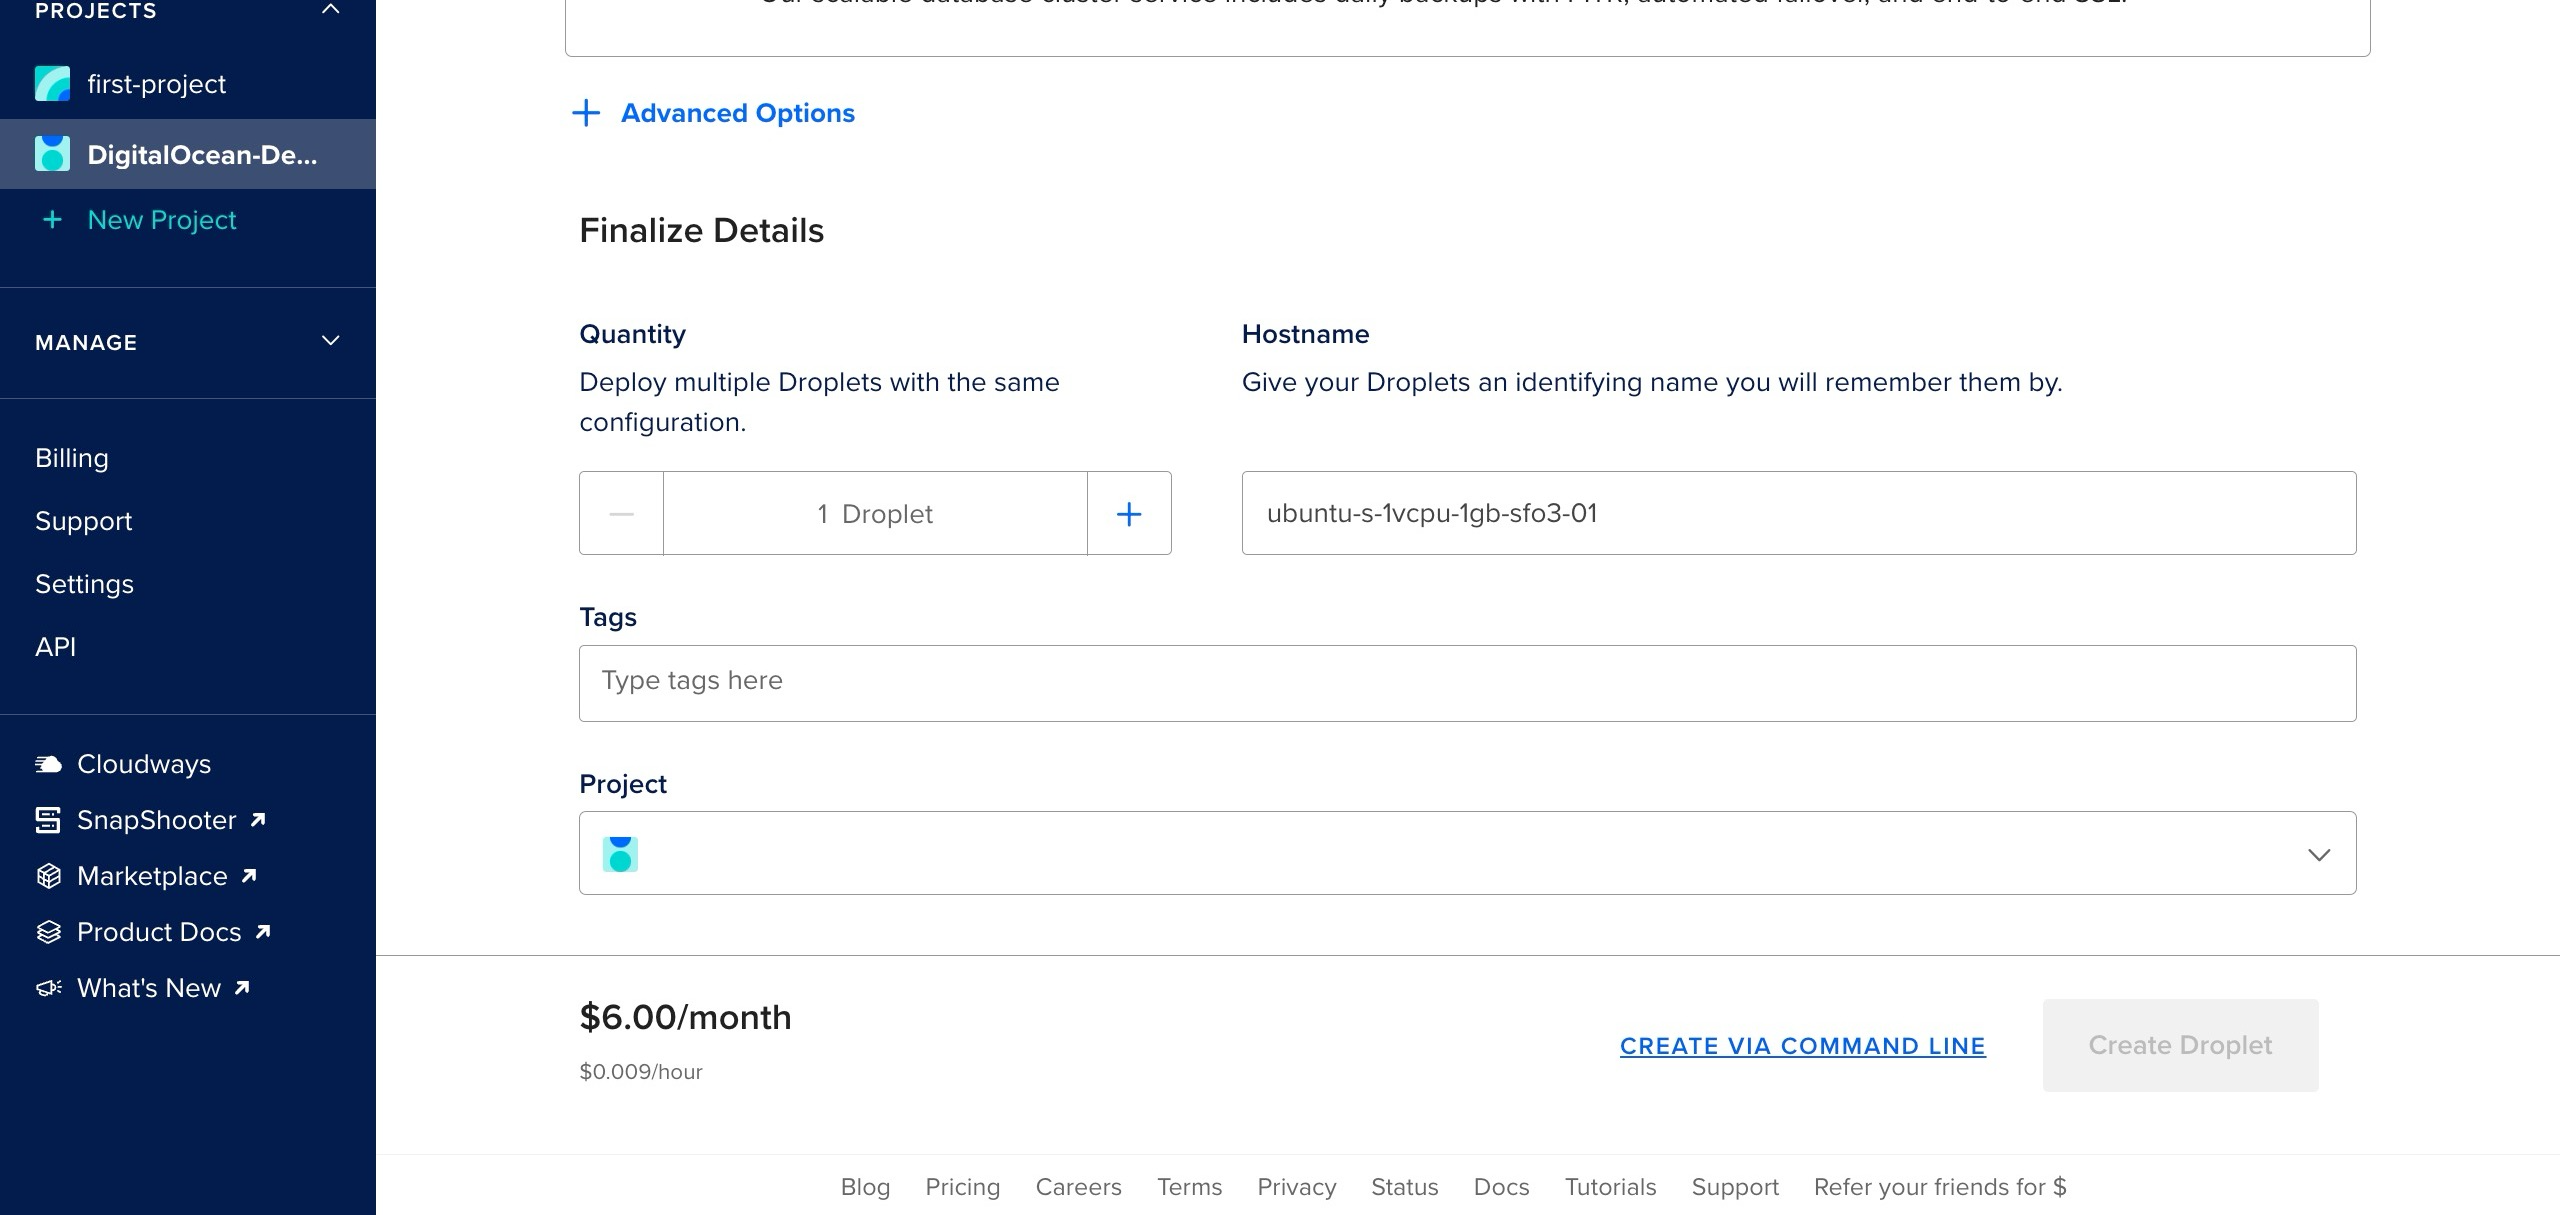
After filling in the required details, click the “Create Droplet” button. This will redirect you to your dashboard.
On the dashboard, select the droplet you just created and launch your droplet console droplet, as shown in the image below.
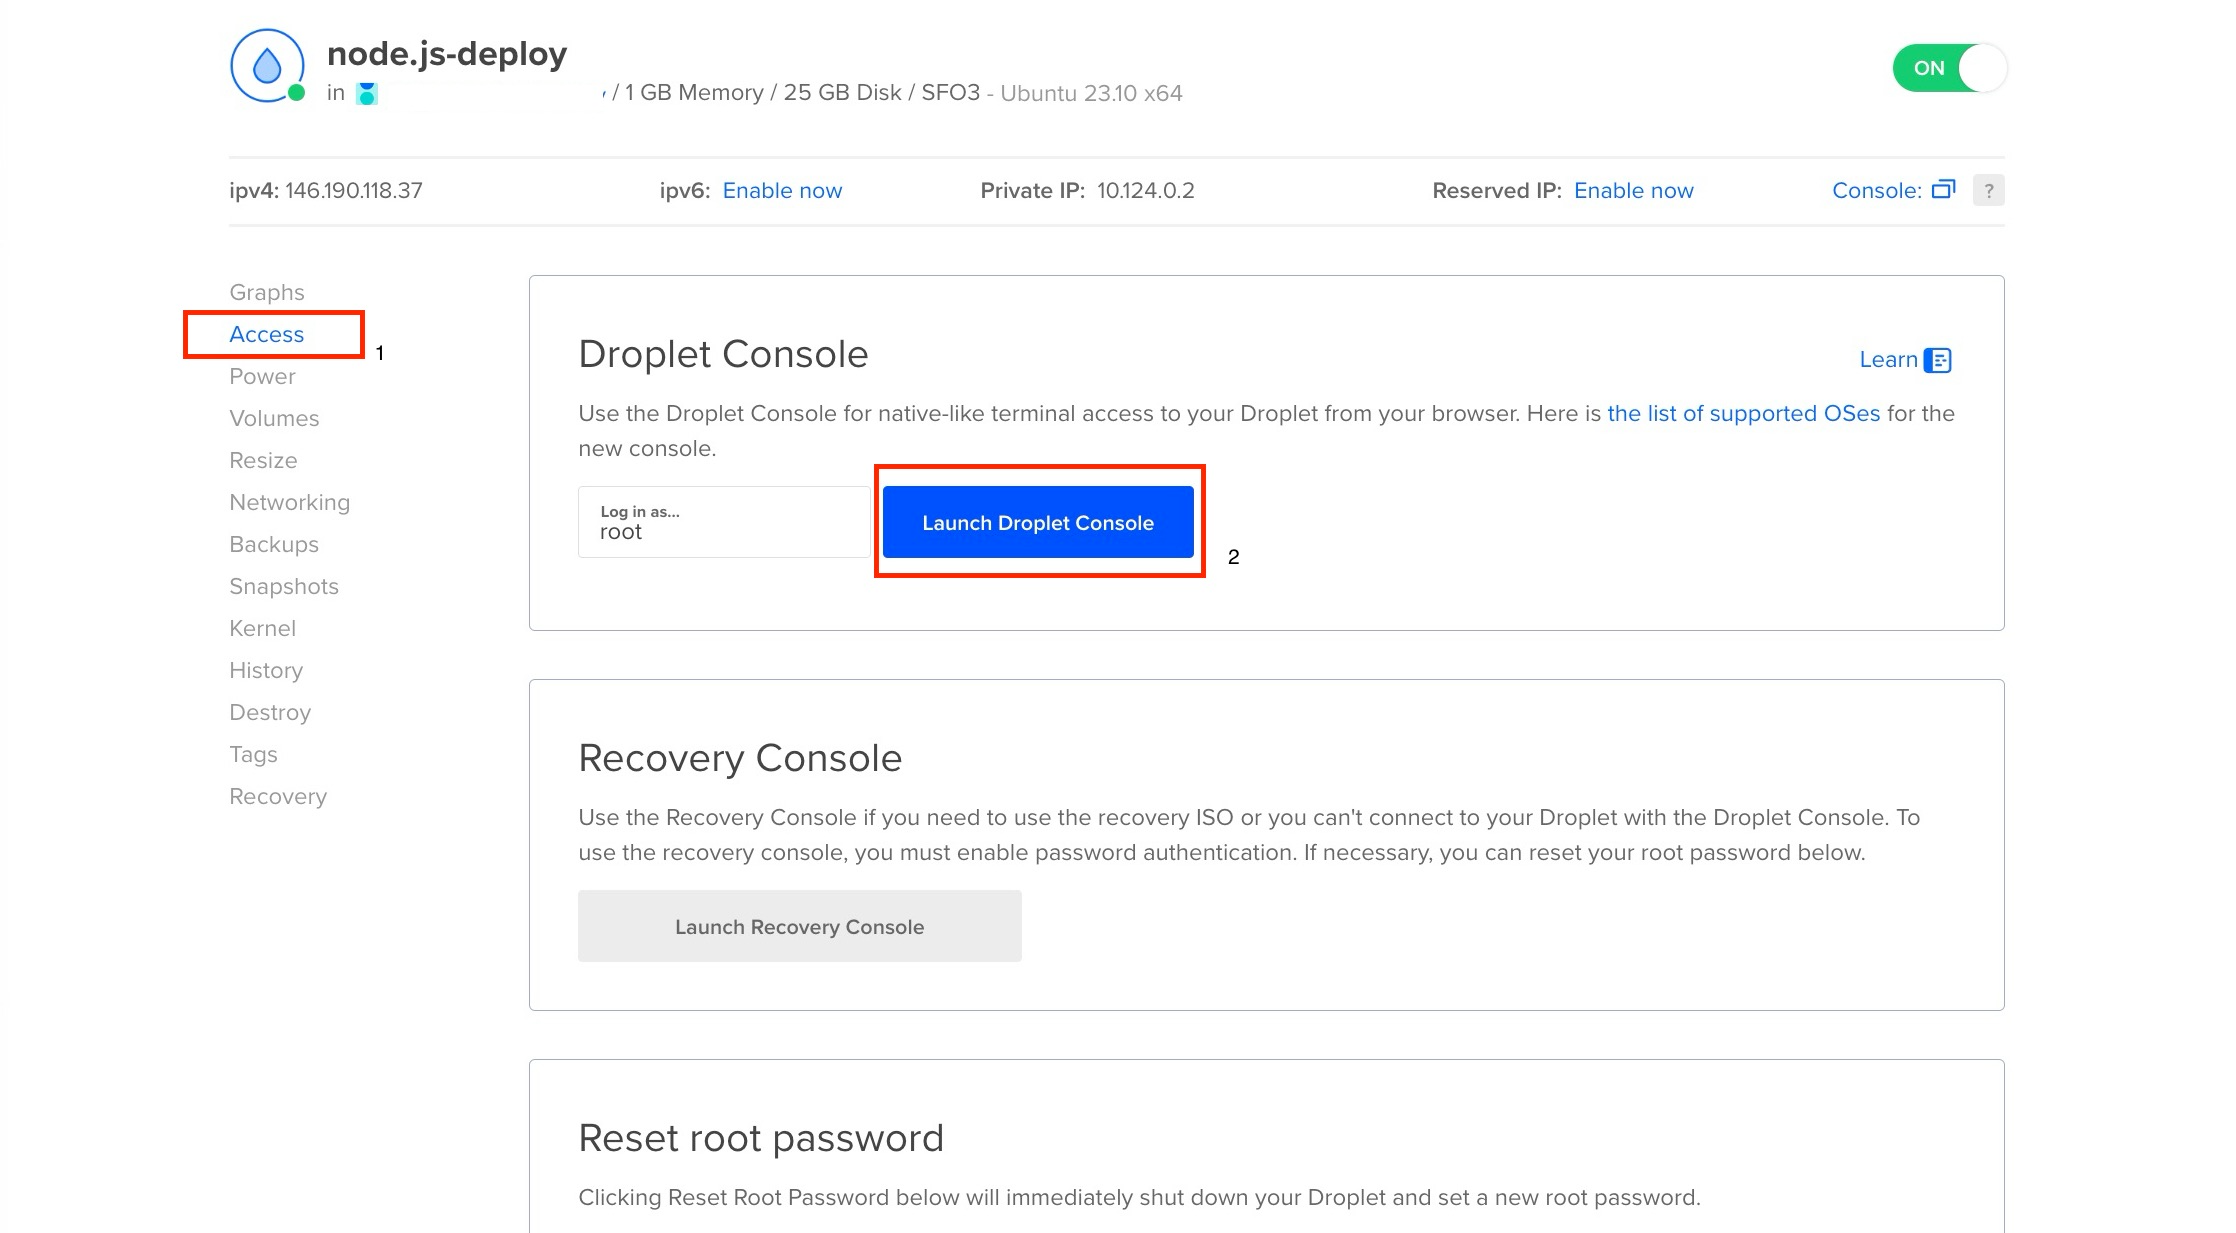
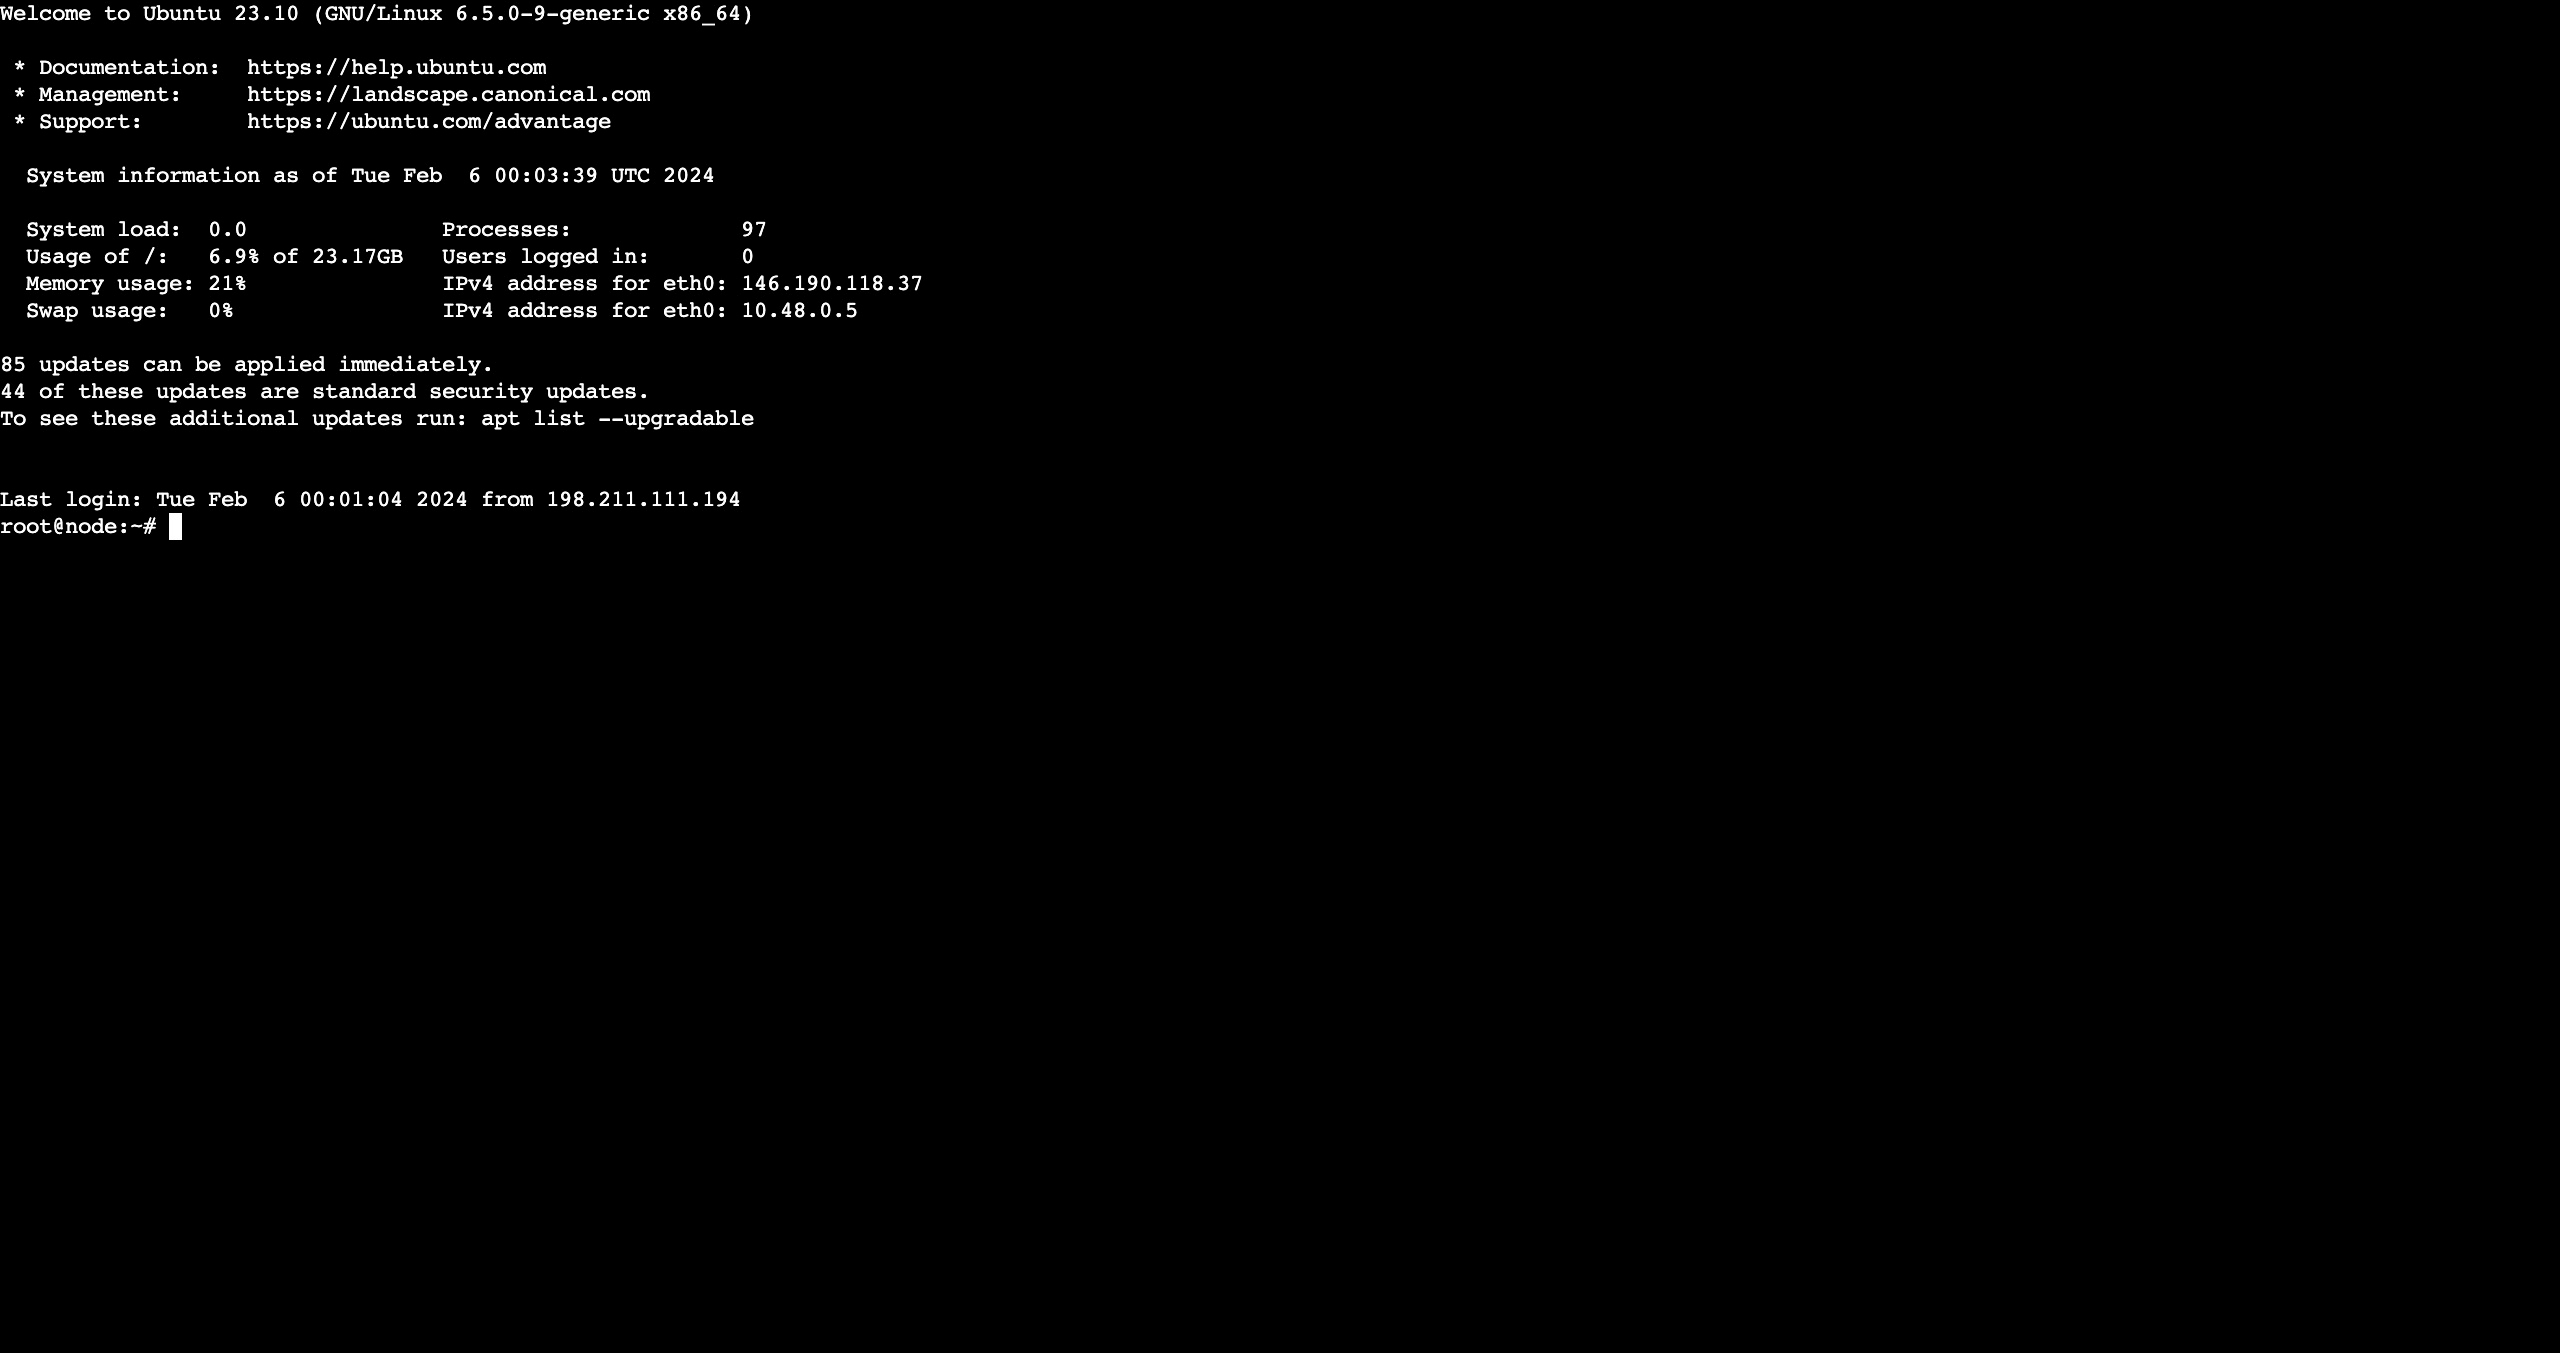
Launching the droplet console will open an Ubuntu web terminal on your browser, as shown in the image below.
Next, install the Node.js setup script by running the command below:
curl -sL https://deb.nodesource.com/setup_20.x | sudo -E bash -
Then, install Node.js by running the command below:
apt-get install nodejs -y
Next, clone your GitHub repository using the command below:
git clone <YOUR_GITHUB_REPOSITORY_LINK>
Install your project dependencies by running the command below:
npm install
Next, add your environment variables by running the command below:
nano .env
The command above will create and open an empty .env file, copy your environmental variables, paste them into the file, and press control + X, then Y to save and close the file.
Next, install PM2 to keep your server running in the background:
sudo npm i pm2 -g
Then, start your server with PM2 by running the command below:
pm2 start main.js
Next, run the command below to ensure your server restarts each time the app restarts:
pm2 startup ubuntu
Now your application is running and listening on your droplet (localhost). To make it publicly available, you will set up Nginx as a reverse proxy.
Run the command below to install Nginx:
sudo apt install nginx
Before using Nginx, you must adjust the Ubuntu ufw (Uncomplicated Firewall) to secure your application and ensure that only authorized traffic can reach your web server.
Run the command below to enable the ufw:
ufw enable
Then, run the command below to allow SSH, HTTP, and HTTPS:
ufw allow ssh && ufw allow http && ufw allow https
The command above enables the firewall (UFW) on your Ubuntu server to allow incoming connections on ports 22 (for SSH), 80 (for HTTP), and 443 (for HTTPS).
Next, run the command below to open the default Nginx configuration file:
sudo nano /etc/nginx/sites-available/default
Inside the configuration file, find the location object and replace it with the code block below:
location / {
    try_files $uri $uri/ =404;
    proxy_pass http://localhost:5050;#Replace with the port your app is running on
    proxy_http_version 1.1;
    proxy_set_header Upgrade $http_upgrade;
    proxy_set_header Connection 'upgrade';
    proxy_set_header Host $host;
    proxy_cache_bypass $http_upgrade;
}
Note: For proxy_pass, you can replace the value with any port your app runs on.
Close and save the file (control + X, Y, ENTER). Editing the configuration file with the code block above sets up your reverse proxy so that when you make requests to port 80 (for HTTP), your app running on port 5050 (or your default port) will handle the requests.
Next, run the command below to test if your Nginx config file is correctly set up.
sudo nginx -t
If your config file was set up properly, you should get the response in the image below.

Finally, restart Nginx by running the command below to ensure that your changes to the config file take effect:
sudo service nginx restart
You can now make requests to your app using your droplet’s public IPv4 address.
DigitalOcean’s free tier features $200 in credits for new users to access all their available services.
Comparing Deployment Options
This article covered five deployment options for your Node.js application. Below is a tabular comparison of all the platforms covered.
| Platform | Category | Development Tools | Free Tier Resources | Payment Information |
| Back4app Containers | PaaS | Docker, GitHub App, Back4app AI Agent. | – 0.25 CPU – 256 MB of RAM – 100GB Transfer | Not Required |
| Render | PaaS | GitHub/GitLab App, Public Repository Link | – 512 MB of RAM – 0.1 CPU | Not Required |
| Fly | PaaS | Fly CLI tool | $5 worth of resources/usage | Required |
| Amazon Web Services (AWS) | IaaS | AWS EC2 Instance | – 750 hours per month of Linux, RHEL, or SLES t2.micro or t3.micro instances. – 750 hours per month of Windows t2.micro or t3.micro instance, dependent on region. – 750 hours per month of public IPv4 address. | Required |
| DigitalOcean | IaaS | Digital Ocean Droplet | $200 free credits for new users. | Required |
Overall, PaaS platforms such as Back4app, Render, and Fly are best suited for applications that require scalability, flexibility, and rapid development and deployment cycles.
On the other hand, IaaS platforms such as DigitalOcean and AWS are best suited for applications that require greater control over the underlying infrastructure, customized configurations, and scalability without the need to manage physical hardware.
Conclusion
In this article, you explored and learned how to deploy a Node.js application using Back4app containers, Render, Fly, AWS, and DigitalOcean.
Each of the options discussed has its advantages and tradeoffs. For the PaaS platforms, the deployment process is easier.
However, you lose most control of the underlying infrastructure. On IaaS platforms, the deployment process is complicated; however, you have full control of the underlying infrastructure without having physical servers.
Whichever option you end up choosing, you’ll need to buy and connect a custom domain name to make it truly accessible to your users.
If you liked this article, please learn also How to create a web application with a PostgresSQL database.


