How to build and deploy a web application with a PostgreSQL database?
In this article, you will learn how to build and deploy a web application with a Postgres database using AI technologies.
Adding AI to your development workflow can be beneficial to your productivity. You can reduce development time and save costs by automating repetitive tasks and using AI features like code generation.
Contents
Advantages of using AI in Web Development
Some advantages of integrating AI into your web development include the following.
Automation of Repetitive Tasks
Introducing AI into your development workflow can help you automate repetitive tasks, such as generating dummy data and boilerplate code.
It can also help in testing to generate unit and integration tests.
However, while AI can automate many tasks, it’s important to note that it’s not a foolproof solution and still requires human supervision.
Always review and validate the outputs of AI tools to ensure that they are accurate.
Code Generation
AI tools can assist you in writing code snippets or even entire functions. This automation speeds up your coding process, allowing you to focus on higher-level design and problem-solving.
However, AI-generated code can be misleading and lead to hard-to-find bugs further down the software development lifecycle; as such, it should be vetted before pushing the code to production.
Improved Code Optimization
AI tools can help you optimize your code for speed by suggesting parts of your code you can rewrite or refactor to produce more efficient and maintainable solutions.
This may involve simplifying complex logic, eliminating redundant code, or using language features better.
AI tools can also help you choose more efficient algorithms and data structures to improve the overall performance of your code and the efficiency of operations on the data.
Bug Detection and Correction
AI tools can help you debug your code faster by analyzing your errors and providing viable solutions to your errors.
For example, when you deploy an application using Back4app containers, the Back4app AI analyzes errors created by mistakes in your Dockerfile and provides suggestions that could solve the errors and help you deploy your application successfully.
Building a Backend using the Back4app AI Agent and PostgreSQL
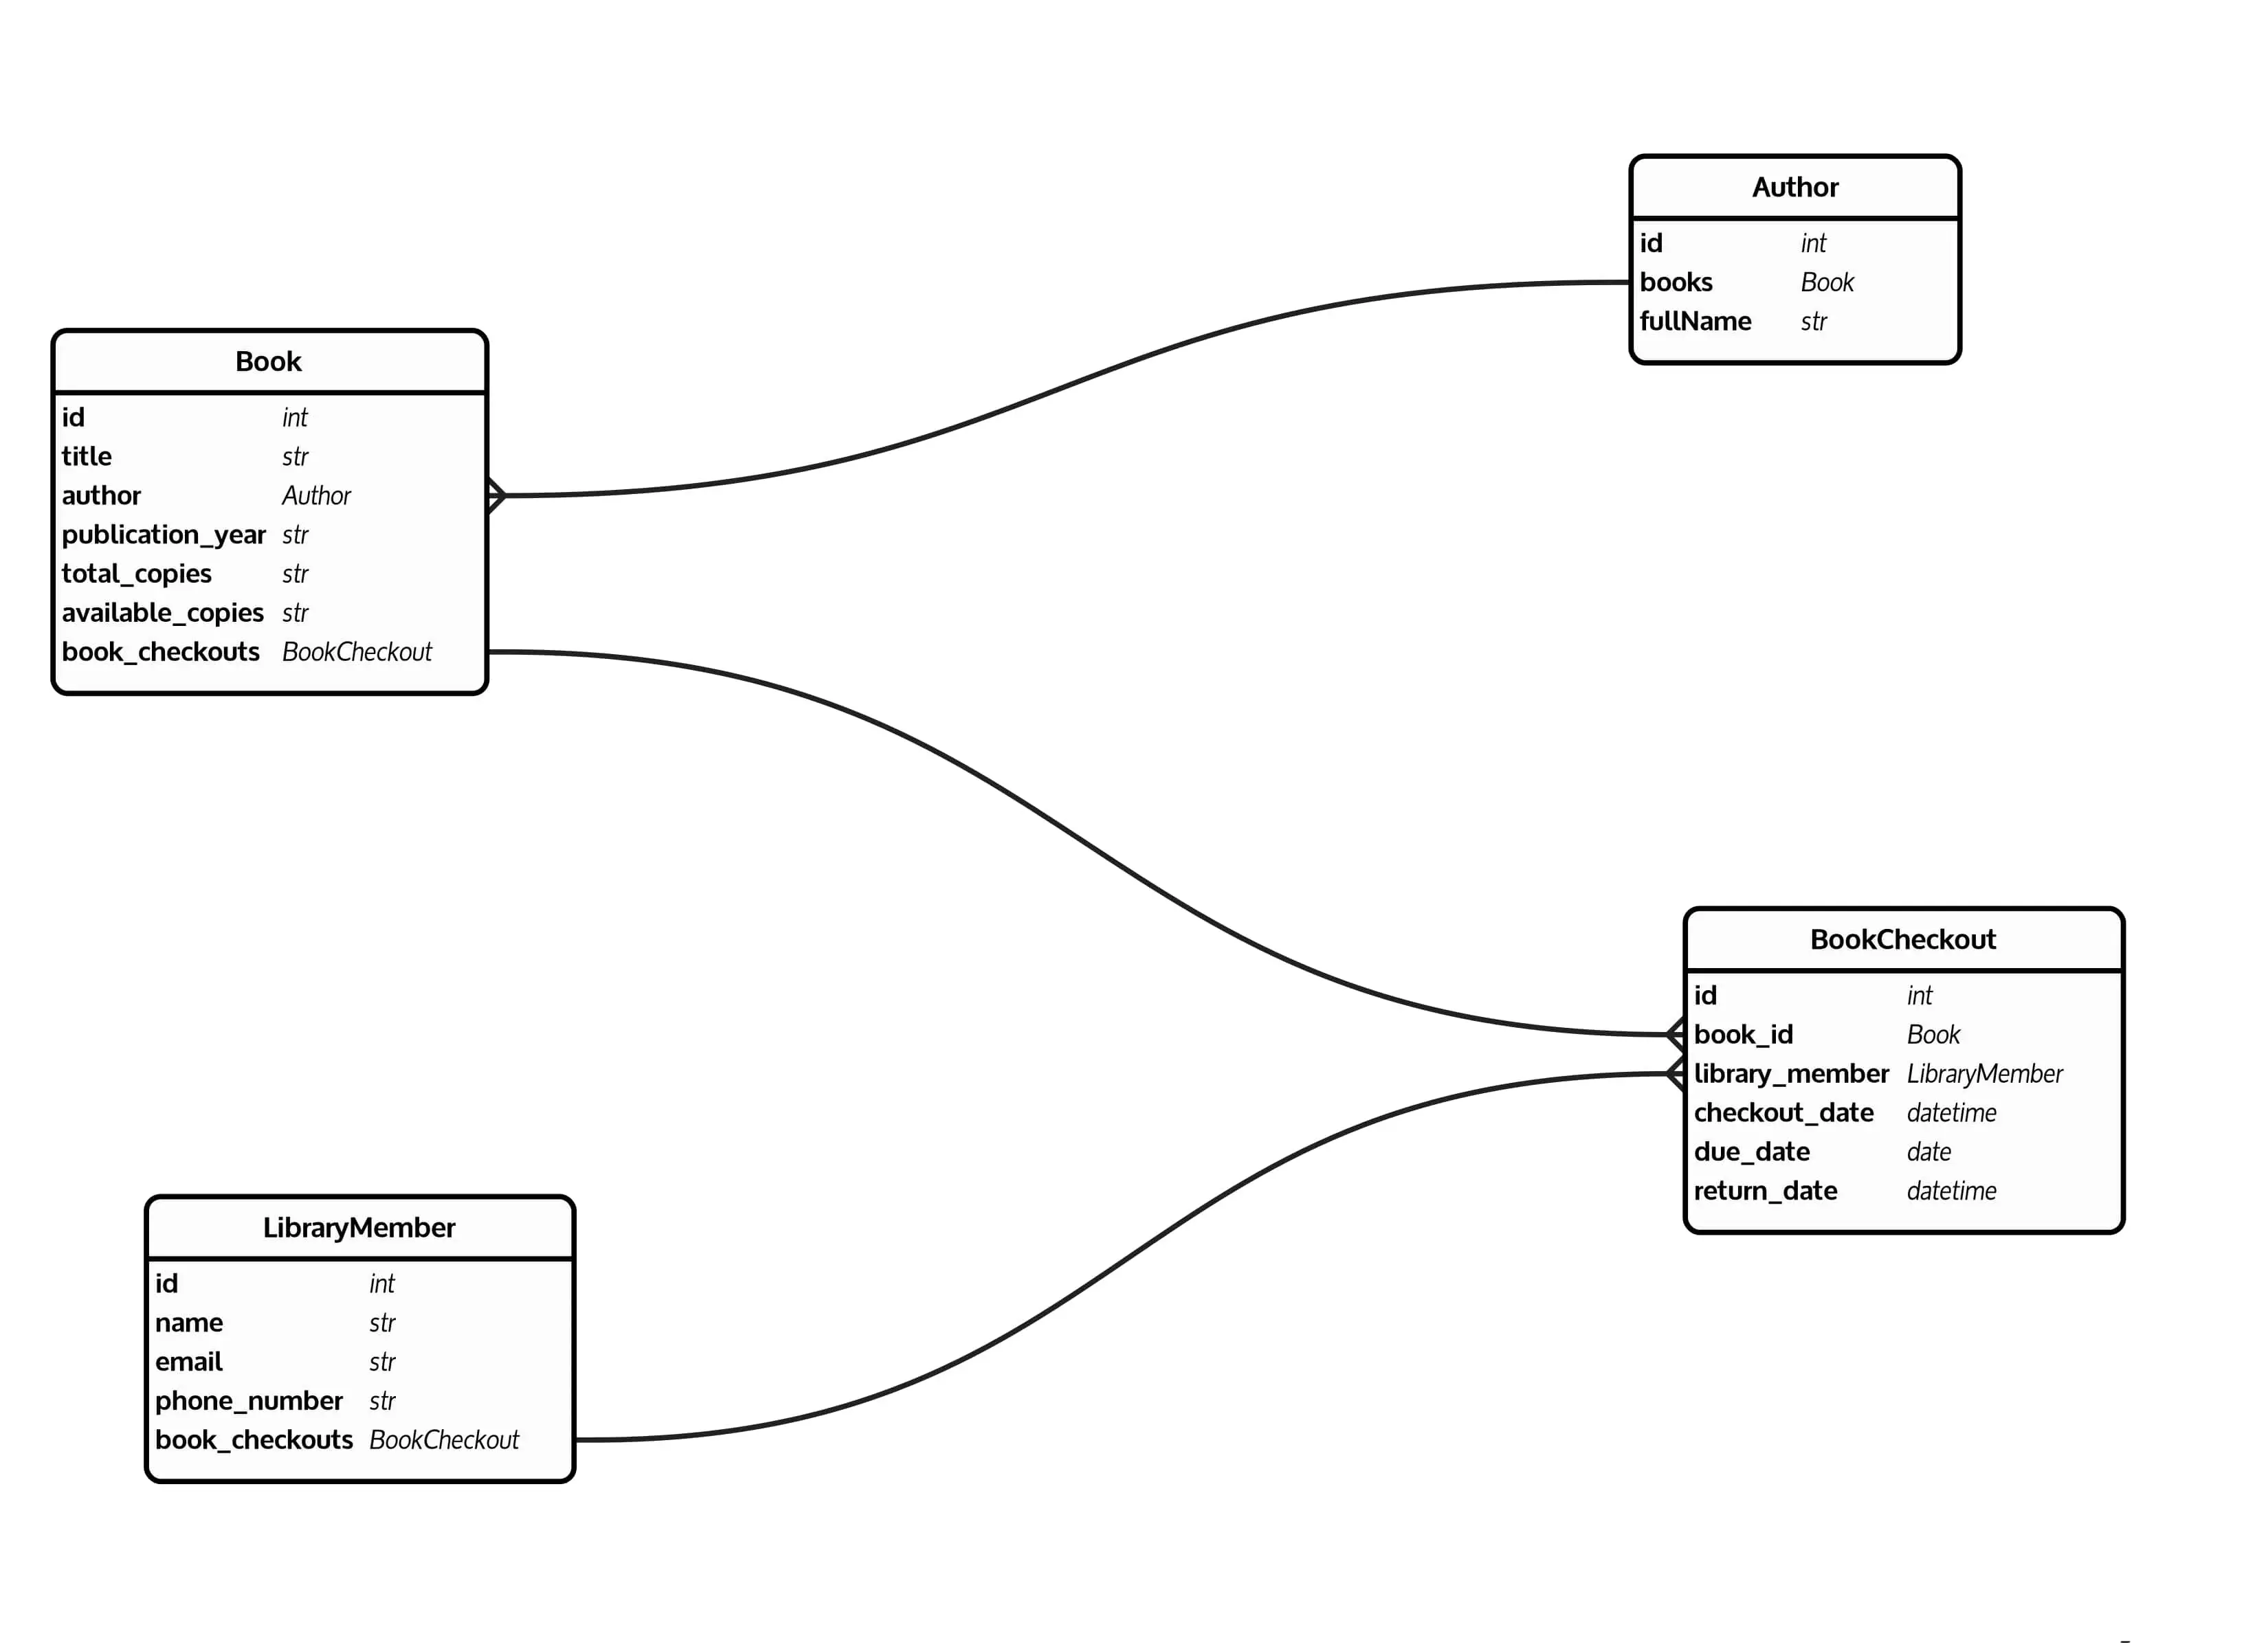
For this tutorial, you will build a Library API. You will interact with a PostgreSQL database with the following tables: Book, Author, BookCheckout, and LibraryMember.
Database Structure and Design
The Book table contains the most information about a book, such as the title, author, publication_year, total_copies, and available_copies.
The Author table has a one-to-many relationship with the Book table, i.e., one author can have many books, but each book can only have one author. It also contains minute details about the author, such as the author’s full name.
The LibraryMemeber table contains information about the library members, such as name, email, phoneNumber.
The BookCheckout table acts as a junction table between the Book and the LibraryMemeber tables to establish a many-to-many relationship between them.
I.e., a member can borrow multiple books, and multiple members can borrow a book. It references the book and the member who borrowed it along with the checkout_date, due_date, and return_date.
Here’s a database model diagram for the database.
Creating the Database on Back4app
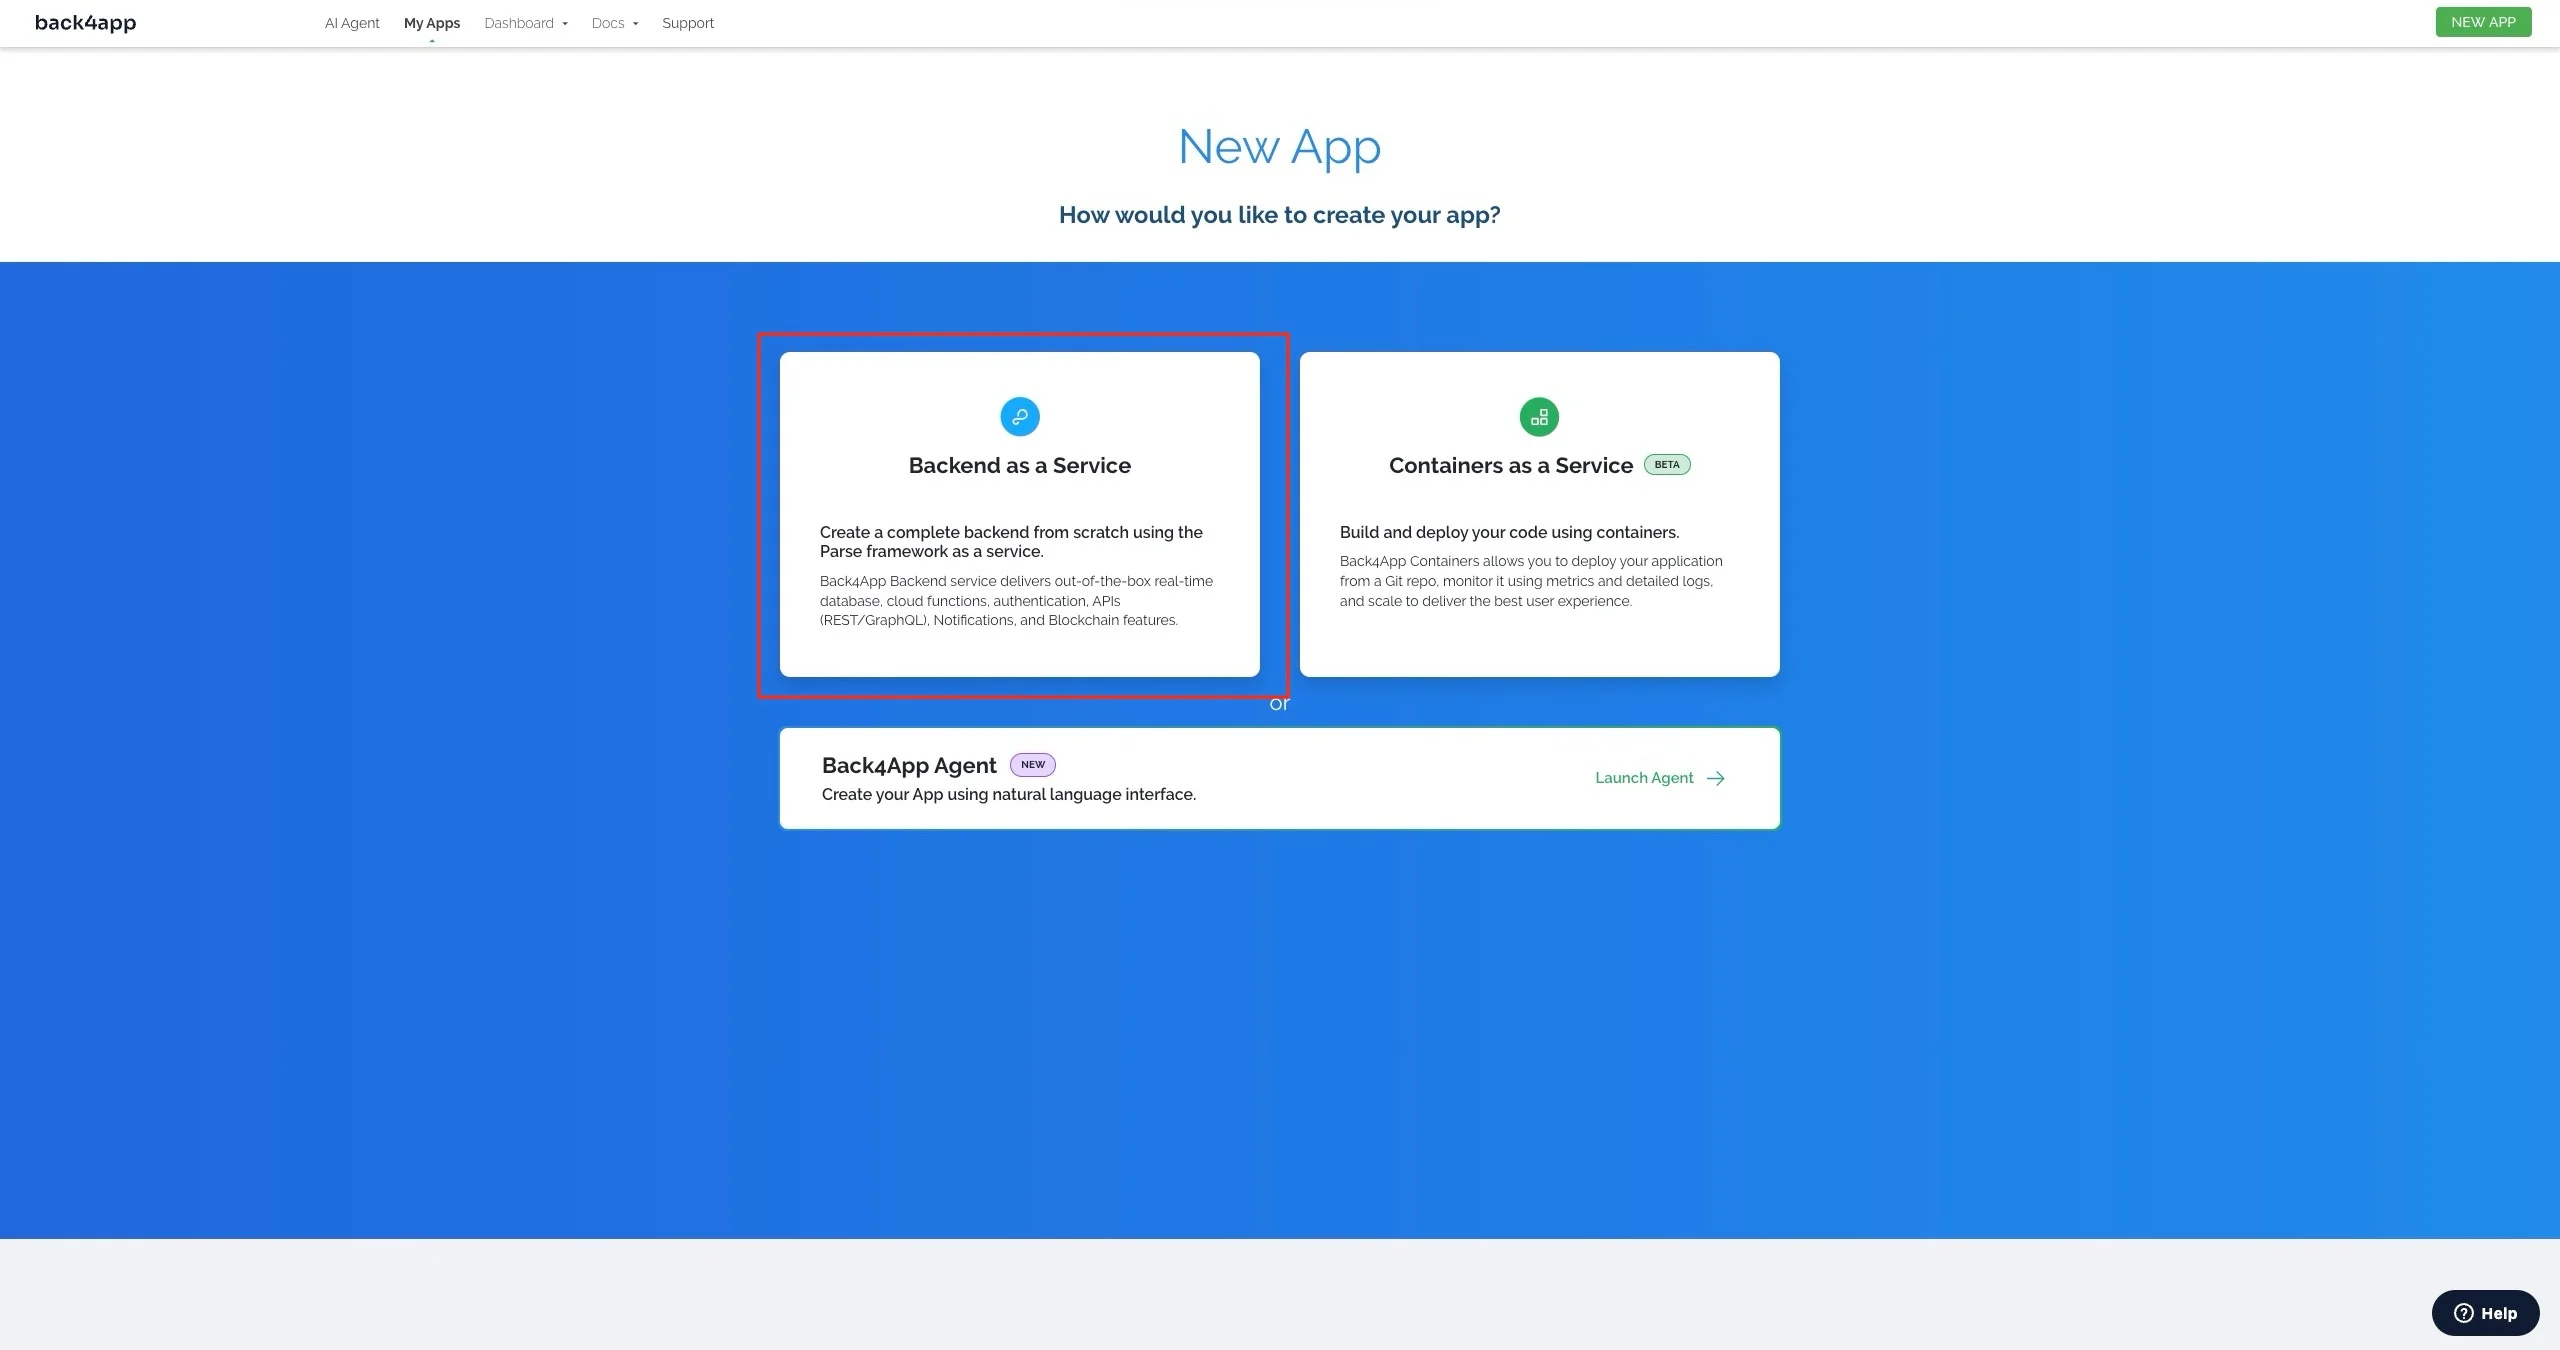
Navigate to back4app.com, log in (create an account if you don’t have one), and click the “New App” button at the top right corner of your screen.
Select the Backend as a Service option, as shown in the image below.
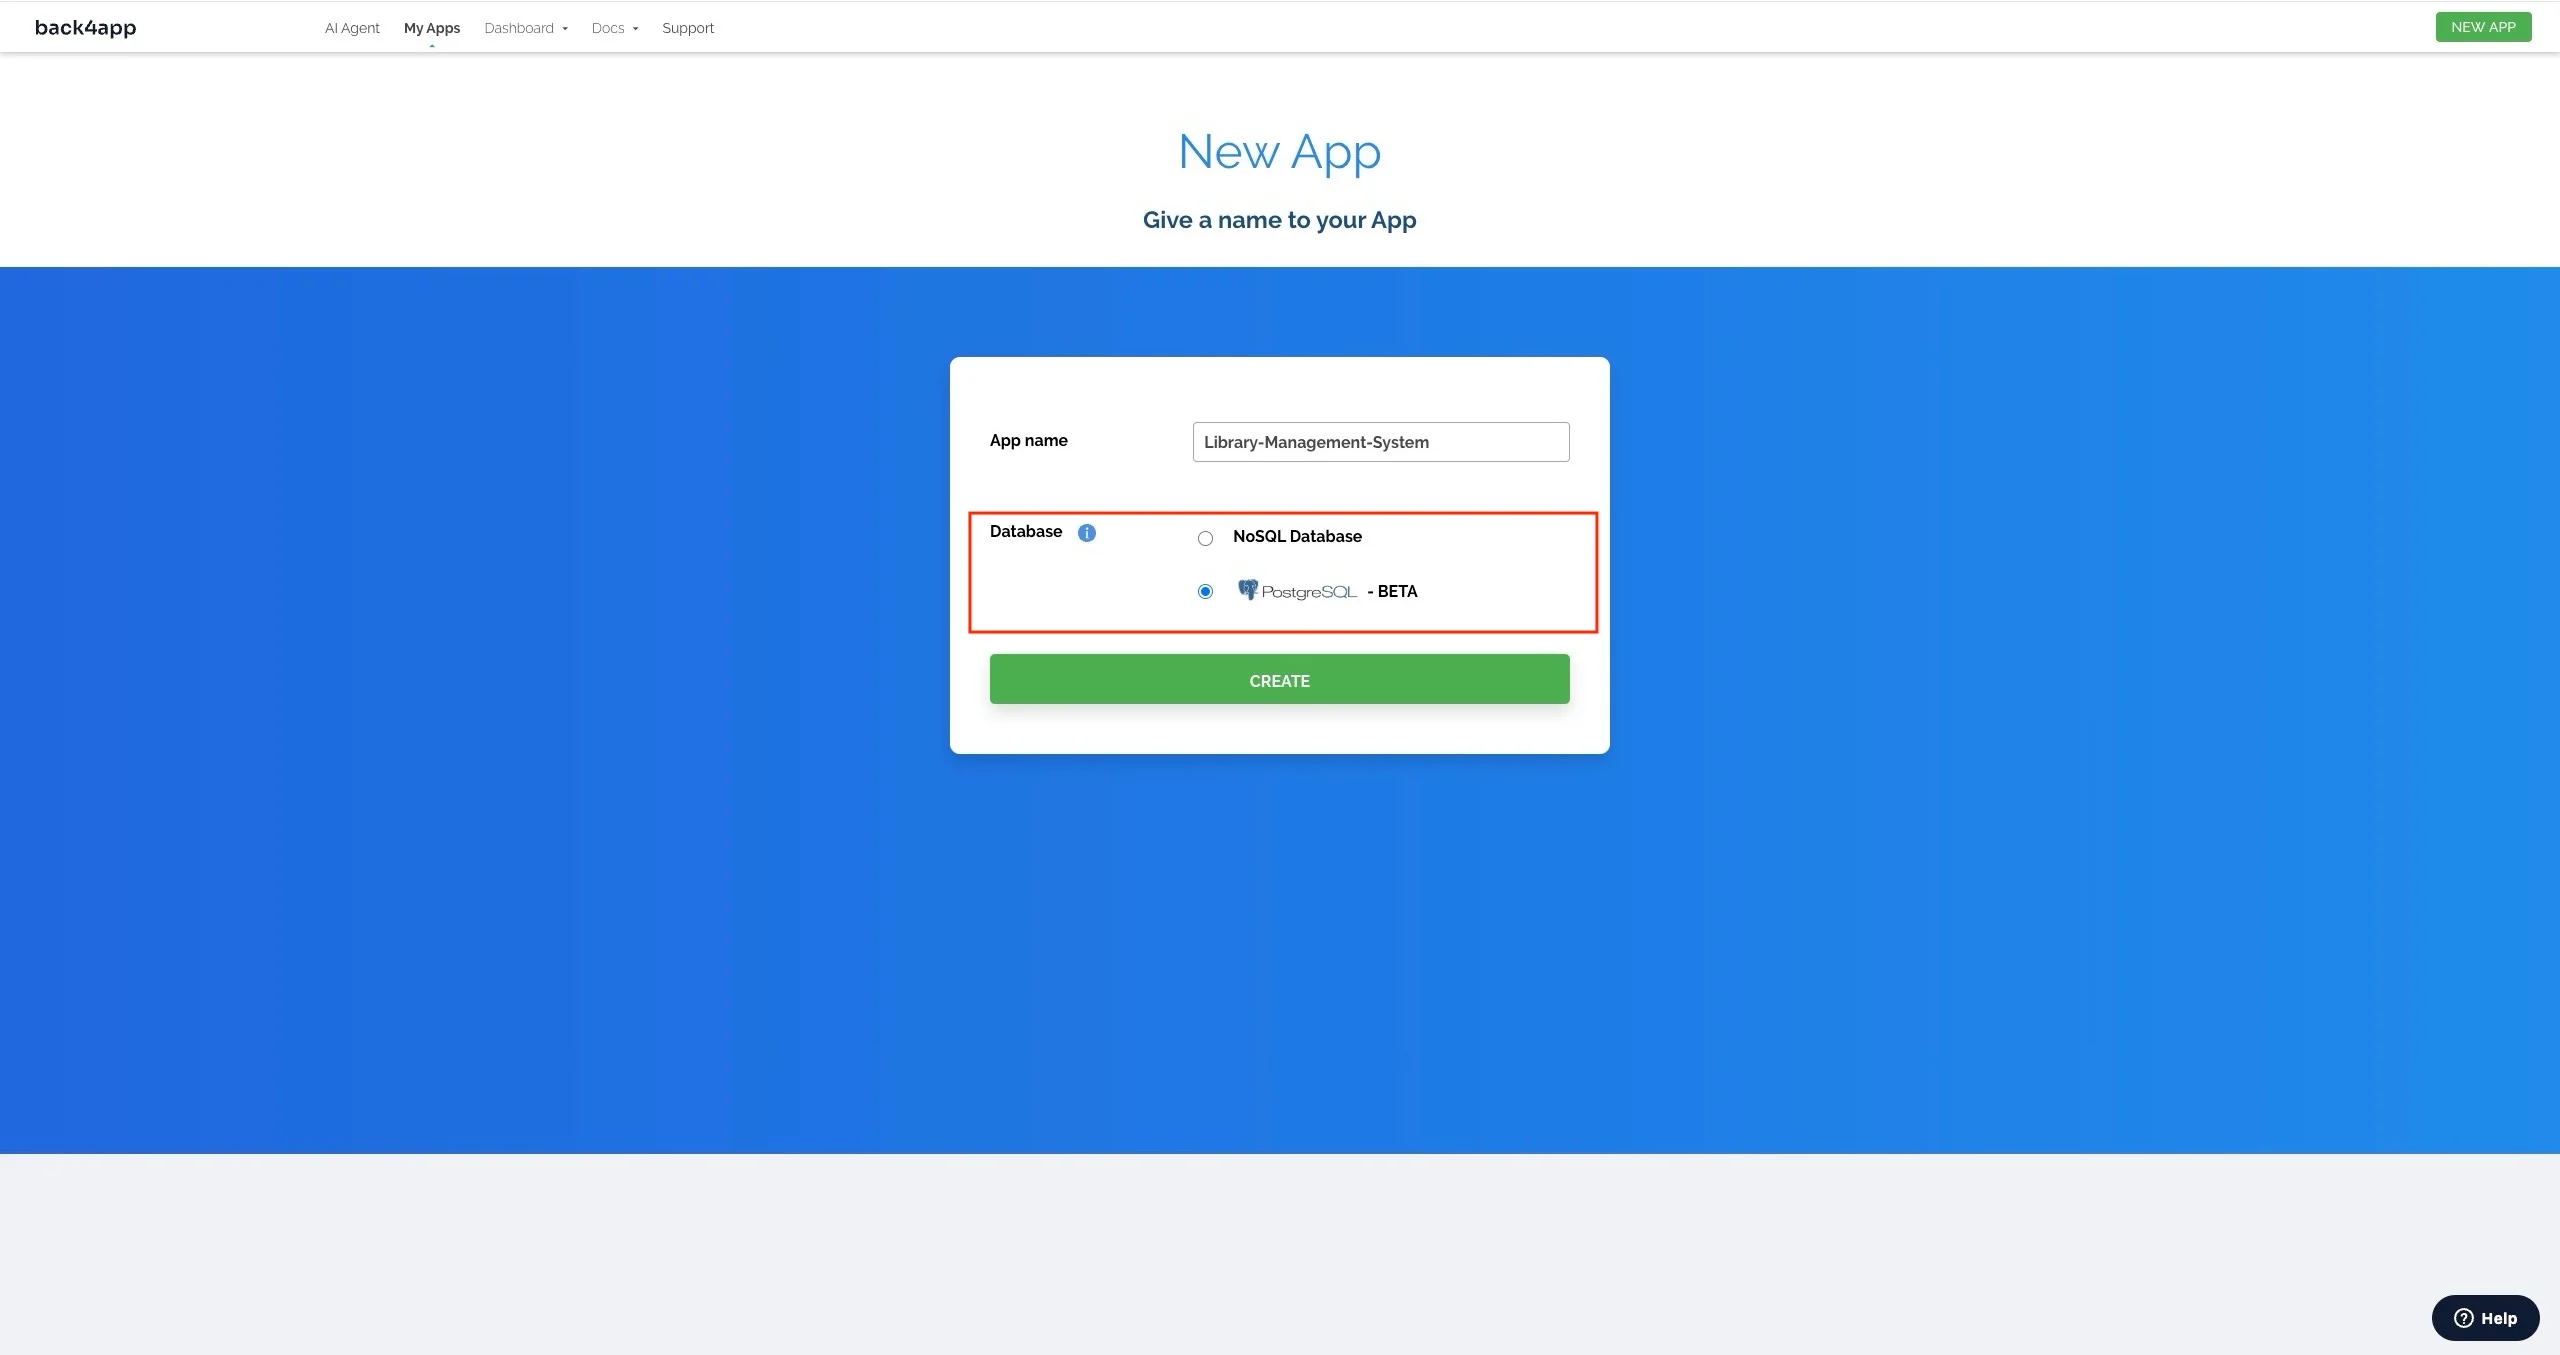
Name your app and select the PostgreSQL option, as shown in the image below.
Navigate to the Back4app AI Agent and enter the prompt below:
"I need you to create database tables in my Back4app app; what do you need me to provide?"
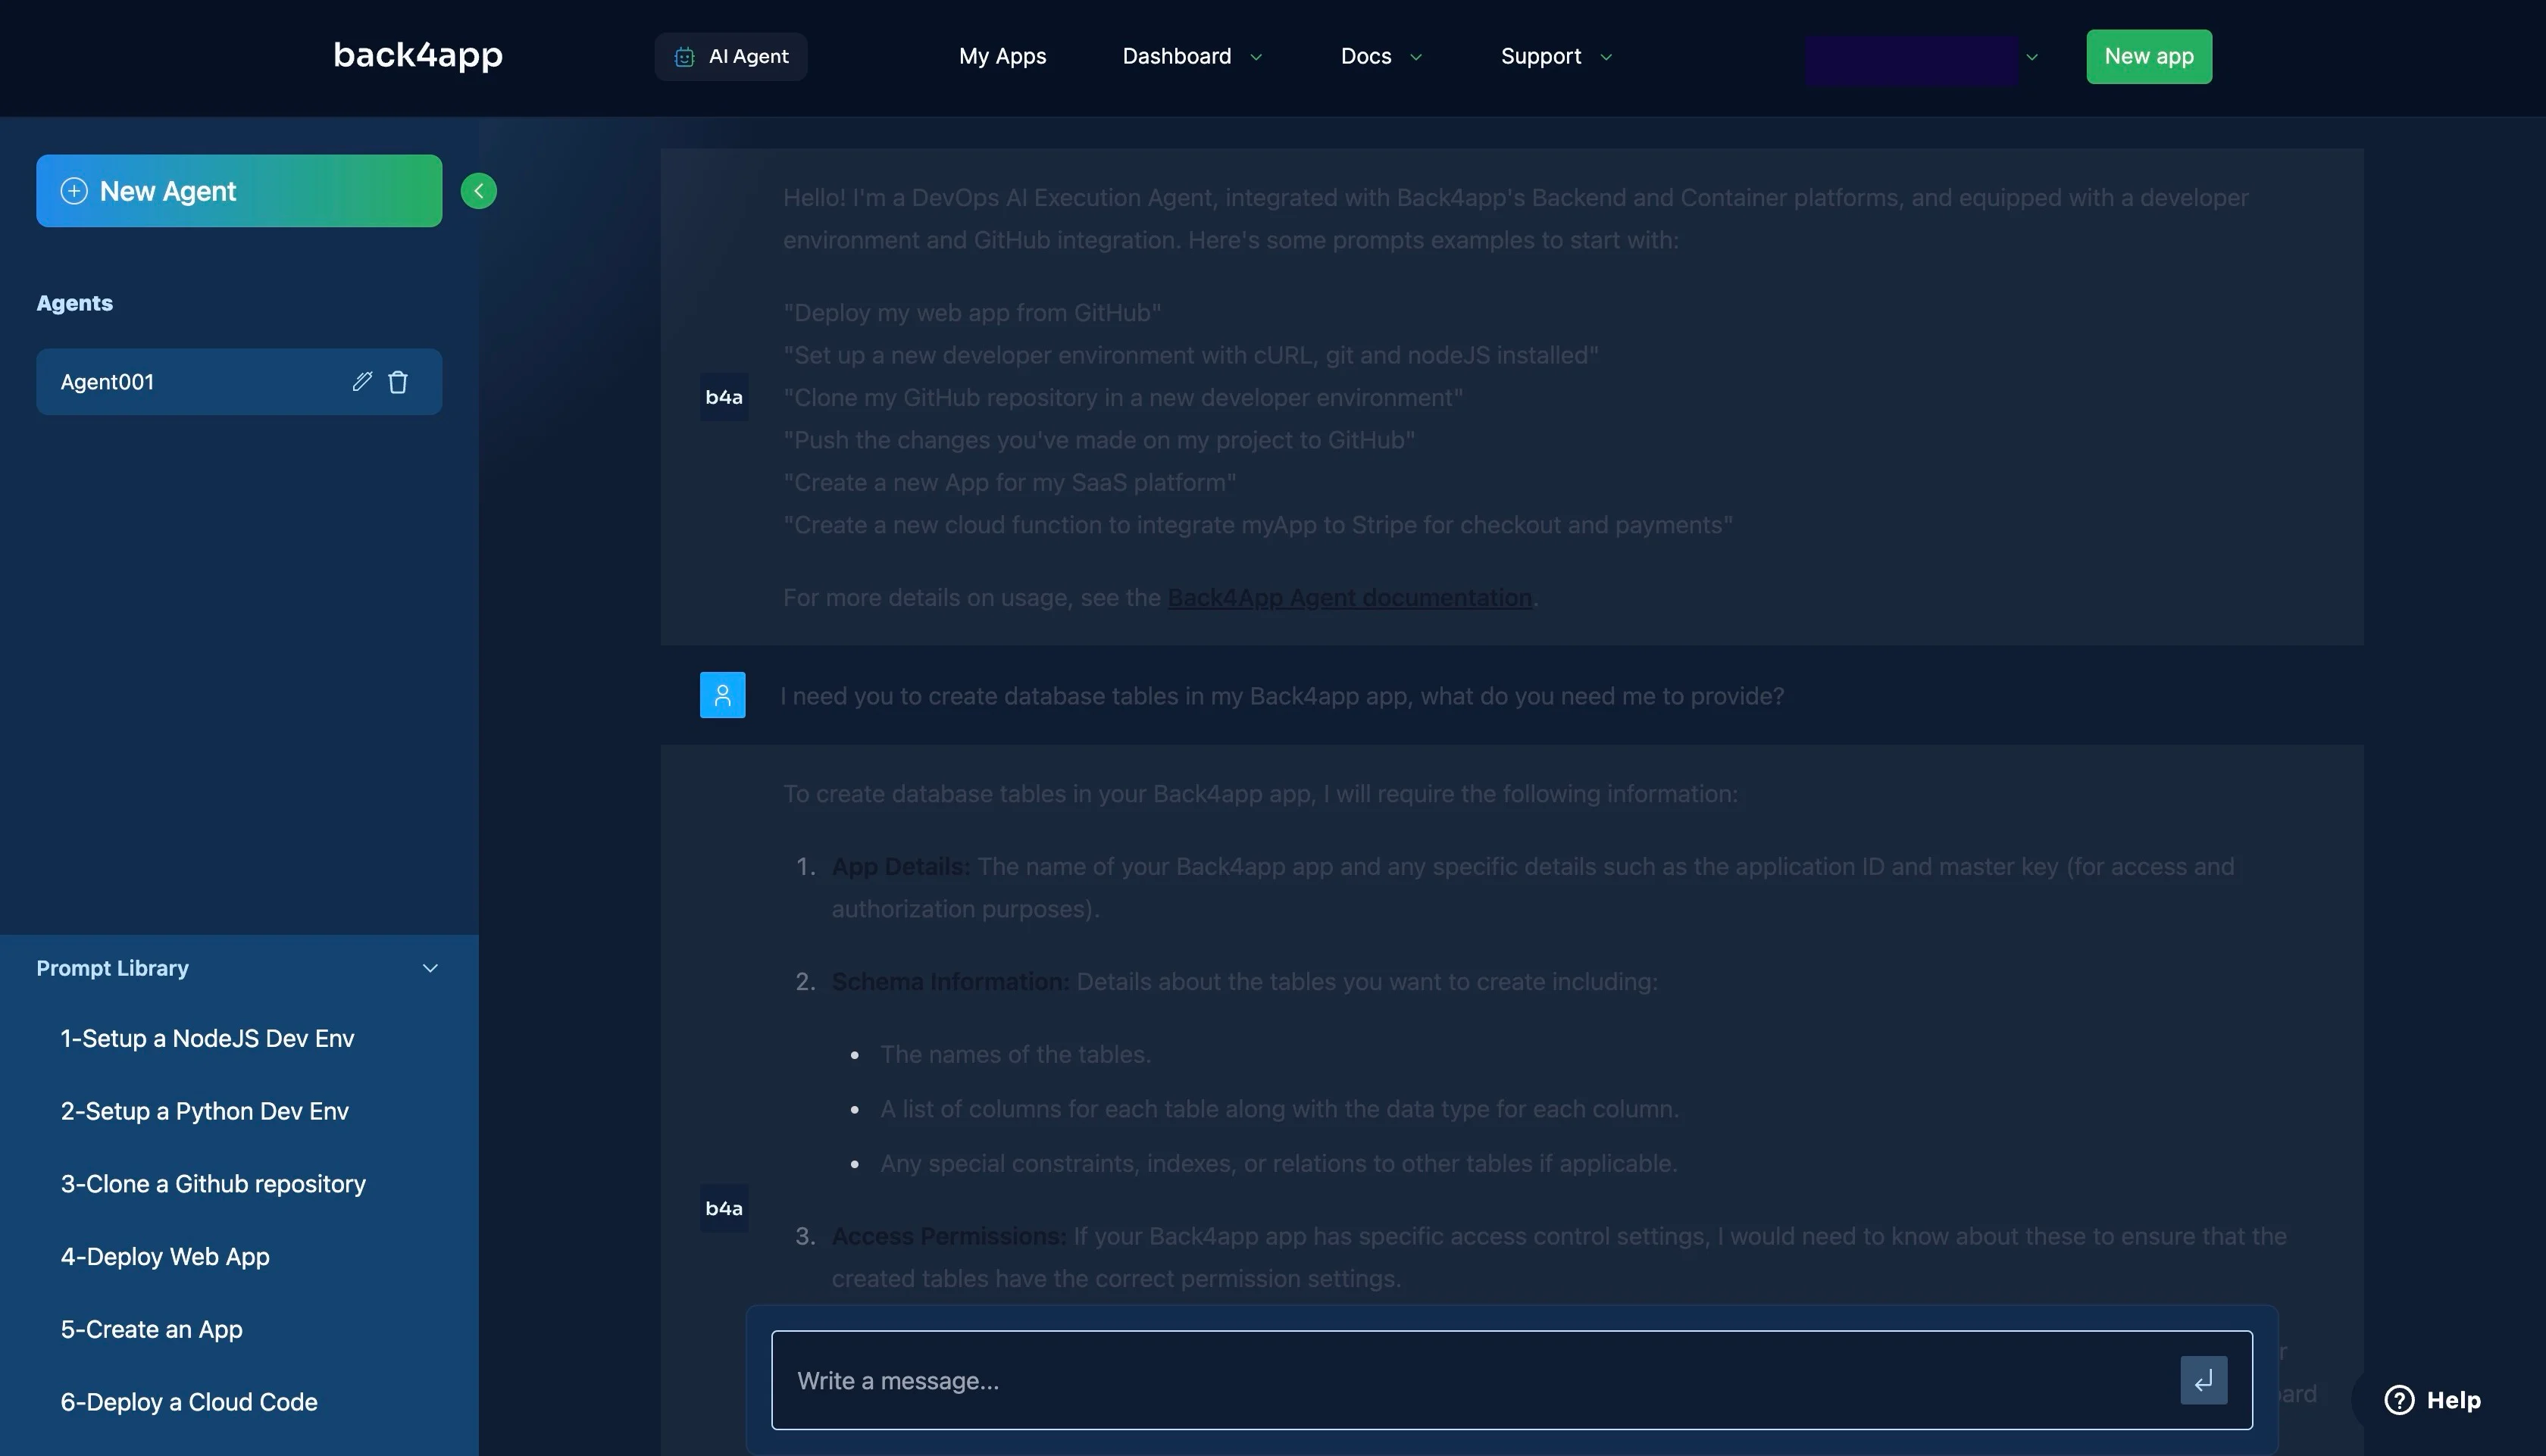
This AI agent will return a list of things it needs to create the database tables for you. These should include your application keys and your schema definition.
Based on the database design in the previous section, your schema definition should be similar to the code block below:
1. **Authors Class:**
    - Class Name: `Authors`
    - Fields:
        - `authorId` (Auto-generated, Primary Key)
        - `authorName` (String, Required)
2. **Books Class:**
    - Class Name: `Books`
    - Fields:
        - `bookId` (Auto-generated, Primary Key)
        - `title` (String, Required)
        - `author` (Pointer to the `Authors` class)
        - `publicationYear` (Number)
        - `availableCopies` (Number)
        - `totalCopies` (Number)
3. **LibraryMembers Class:**
    - Class Name: `LibraryMembers`
    - Fields:
        - `memberId` (Auto-generated, Primary Key)
        - `name` (String, Required)
        - `email` (String, Required)
        - `phoneNumber` (String)
4. **BookCheckouts Class:**
    - Class Name: `BookCheckouts`
    - Fields:
        - `checkoutId` (Auto-generated, Primary Key)
        - `book` (Pointer to the `Books` class)
        - `member` (Pointer to the `LibraryMembers` class)
        - `checkoutDate` (Date)
        - `dueDate` (Date)
        - `returnDate` (Date)
The code block above describes your database schema in a way that allows the AI to create your database accurately by describing the data types and relationships correctly.
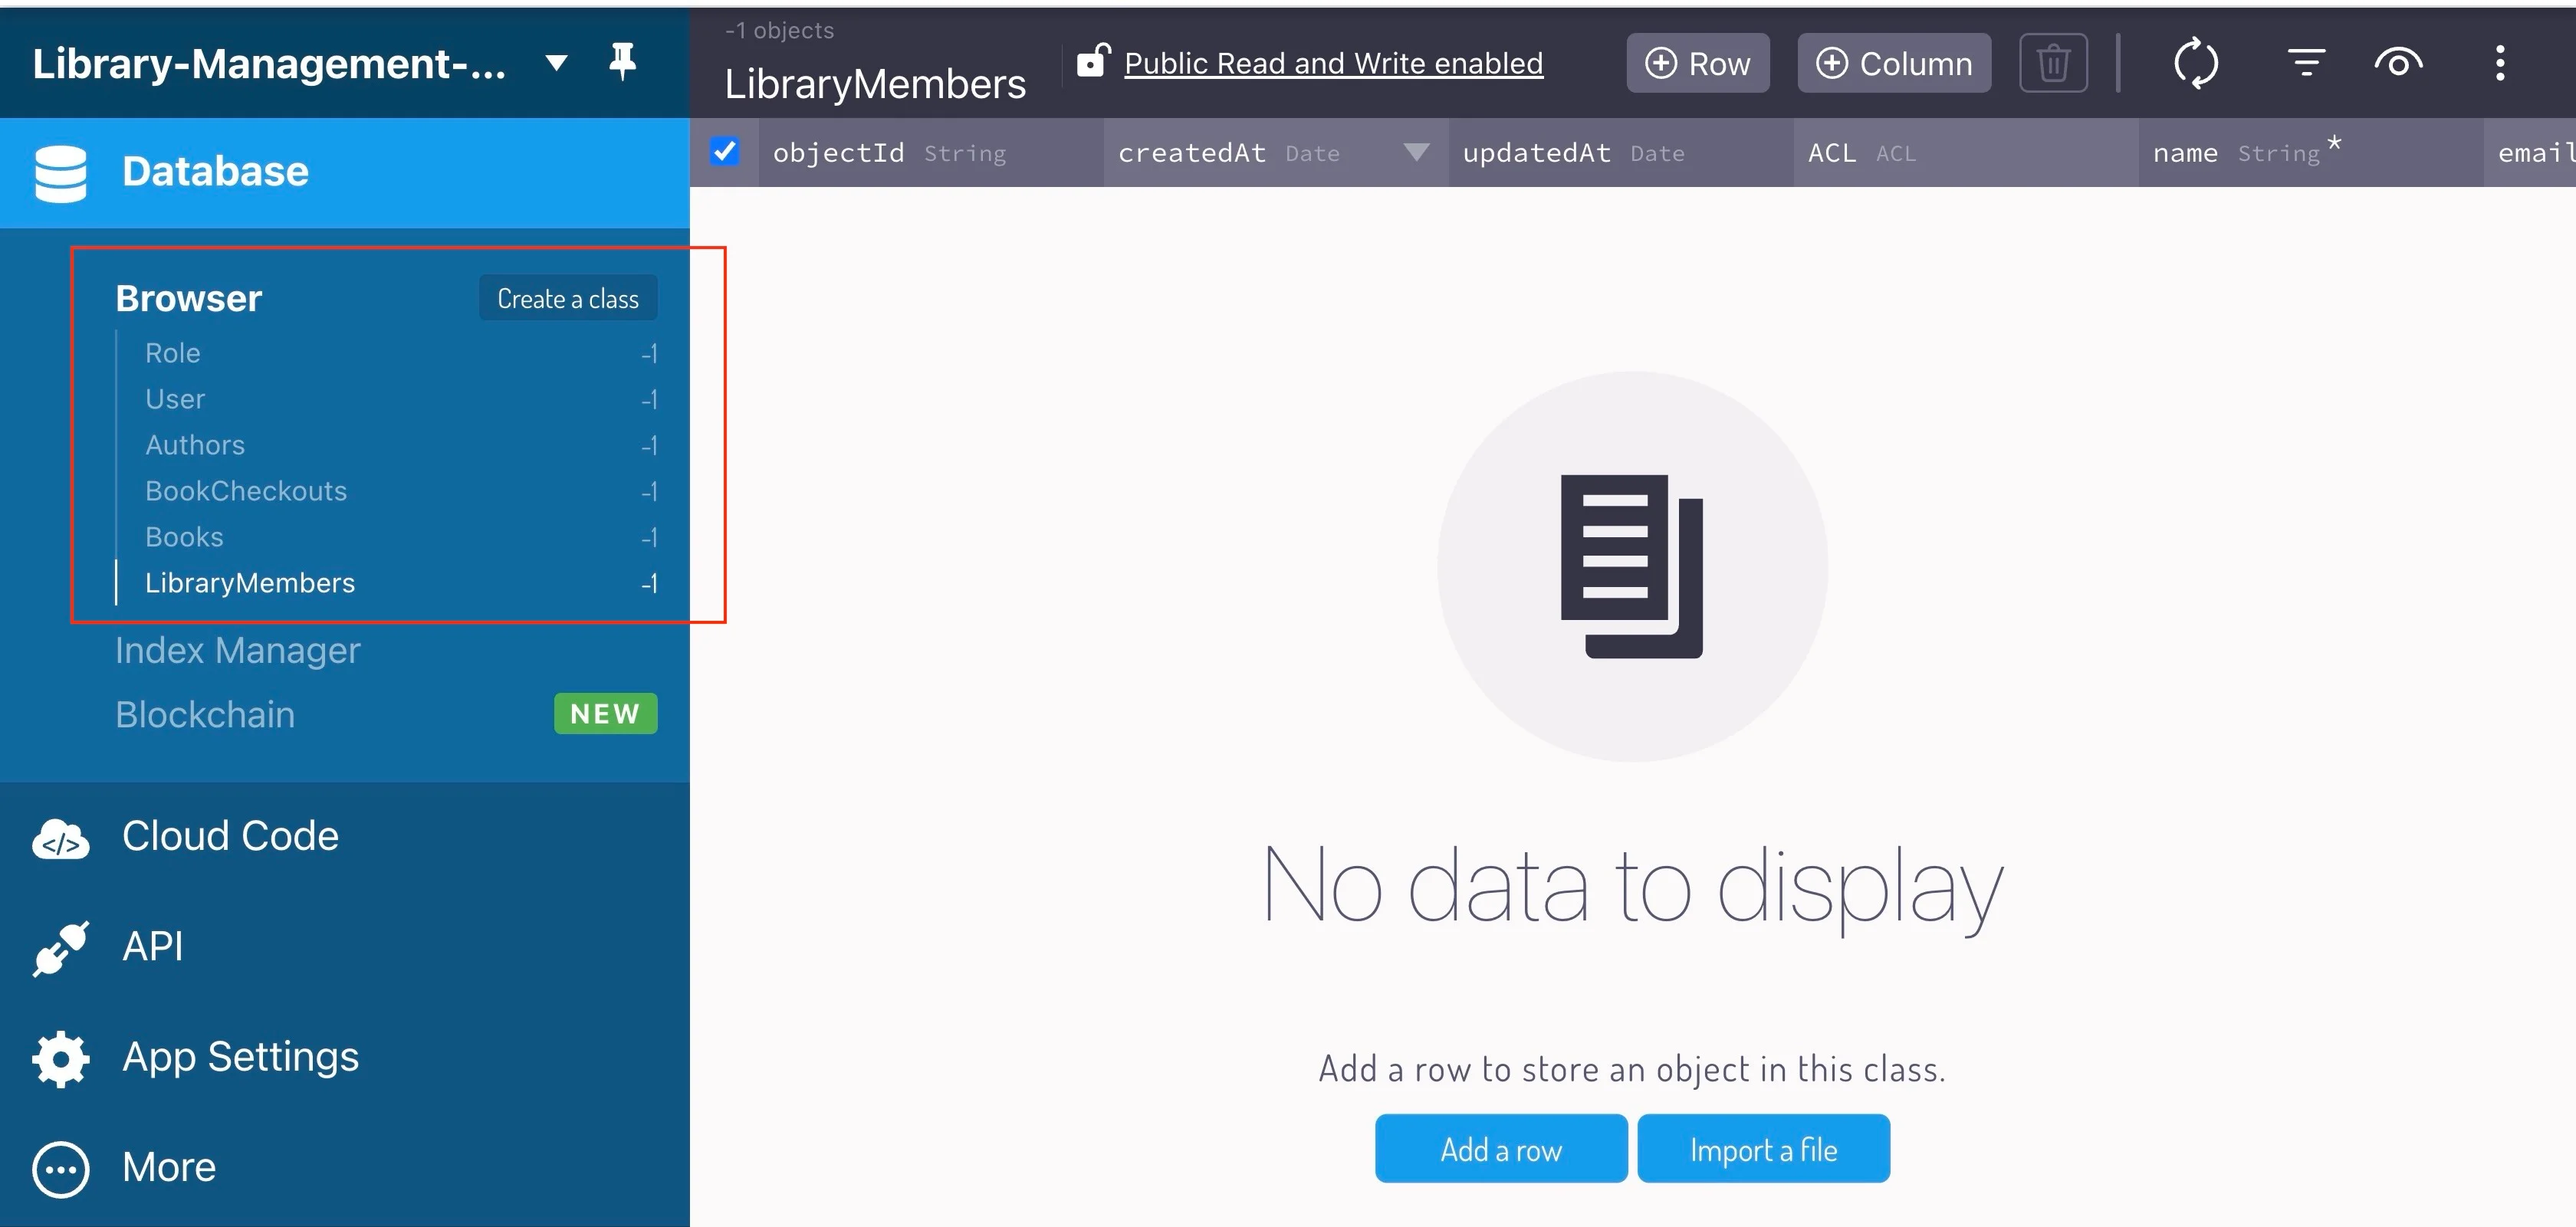
After providing the details to the AI agent and the agent confirms that it has successfully created your database, you can check your application dashboard to verify that the database was created.
Next, ask the AI agent to populate your database with test data using the prompt below.
Populate my database with test data for the Authors, their books,
and some library members who have checked out books from the library.
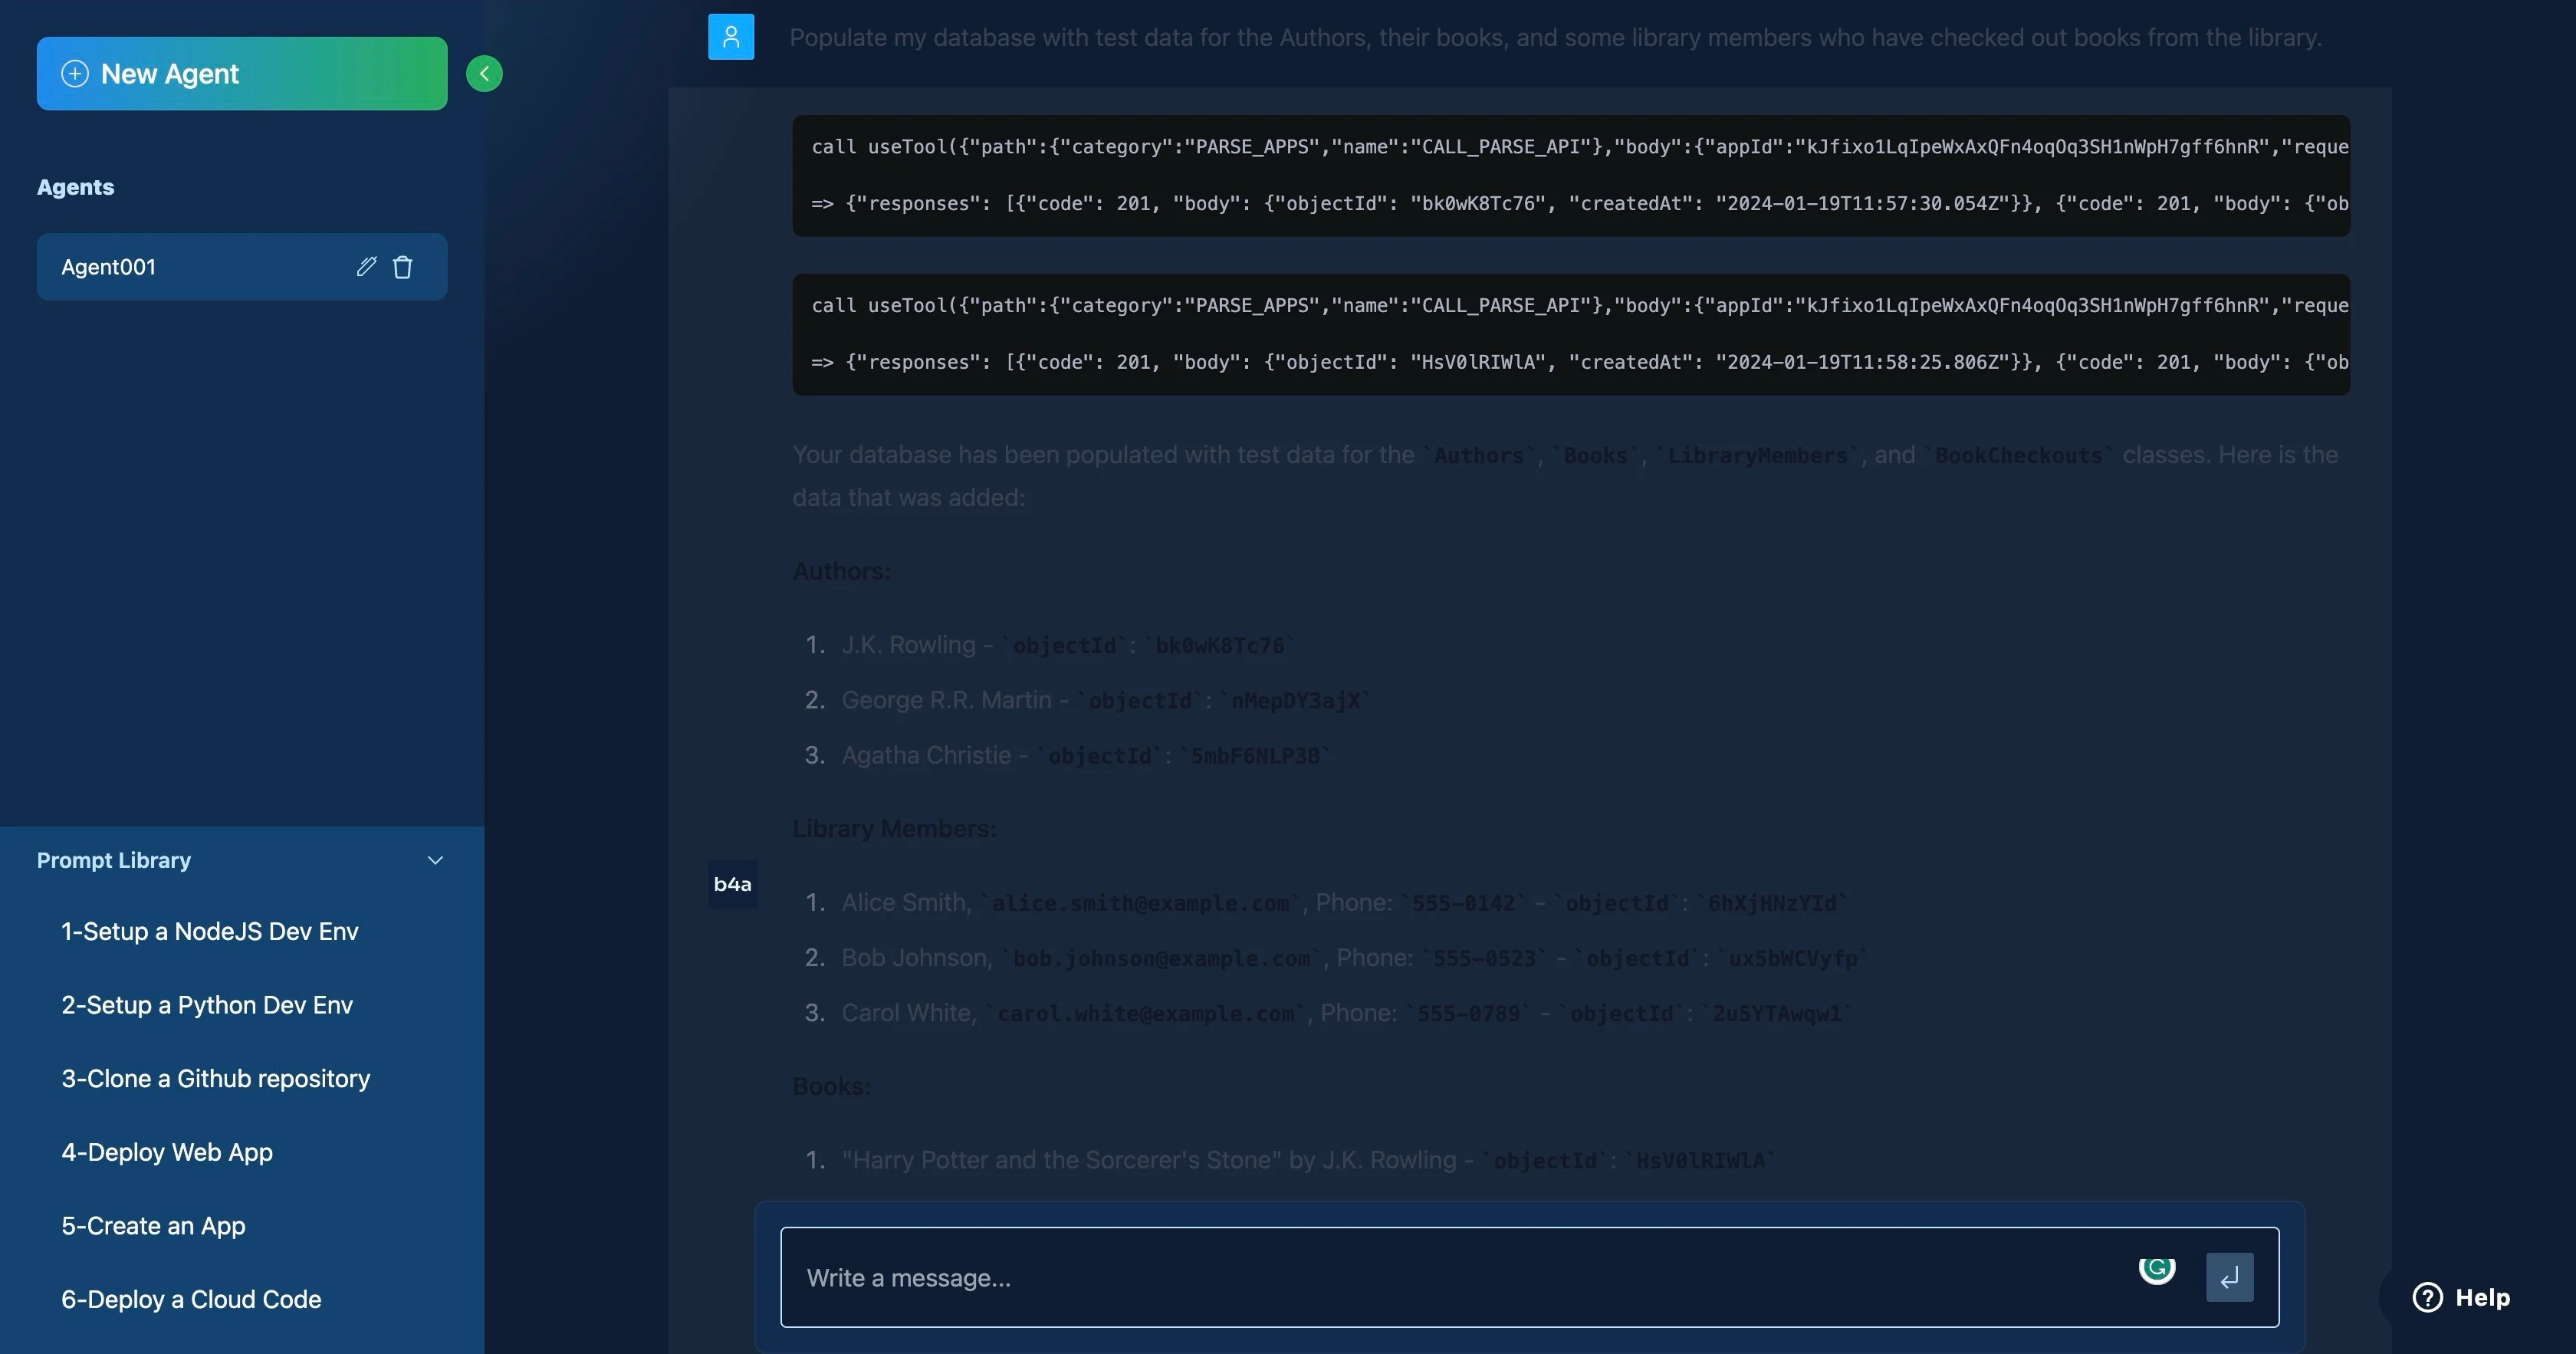
Now, you have test data on your database to work with.

Creating Cloud Code
Now that you have test data to work with, you will need to implement functionality for your library management system.
For this tutorial, your app will have the following functionality.
- Get all the books in the library.
- View a specific book in the library.
- View all the books by a specific author.
- Borrow a book from the library.
- Return a borrowed book to the library.
You can implement this functionality using Back4app’s cloud code functions, which allow your application to run JavaScript functions on Back4app in response to events triggered by HTTP requests.
You can create custom cloud code functions using the Back4app AI agent to simplify your development process.
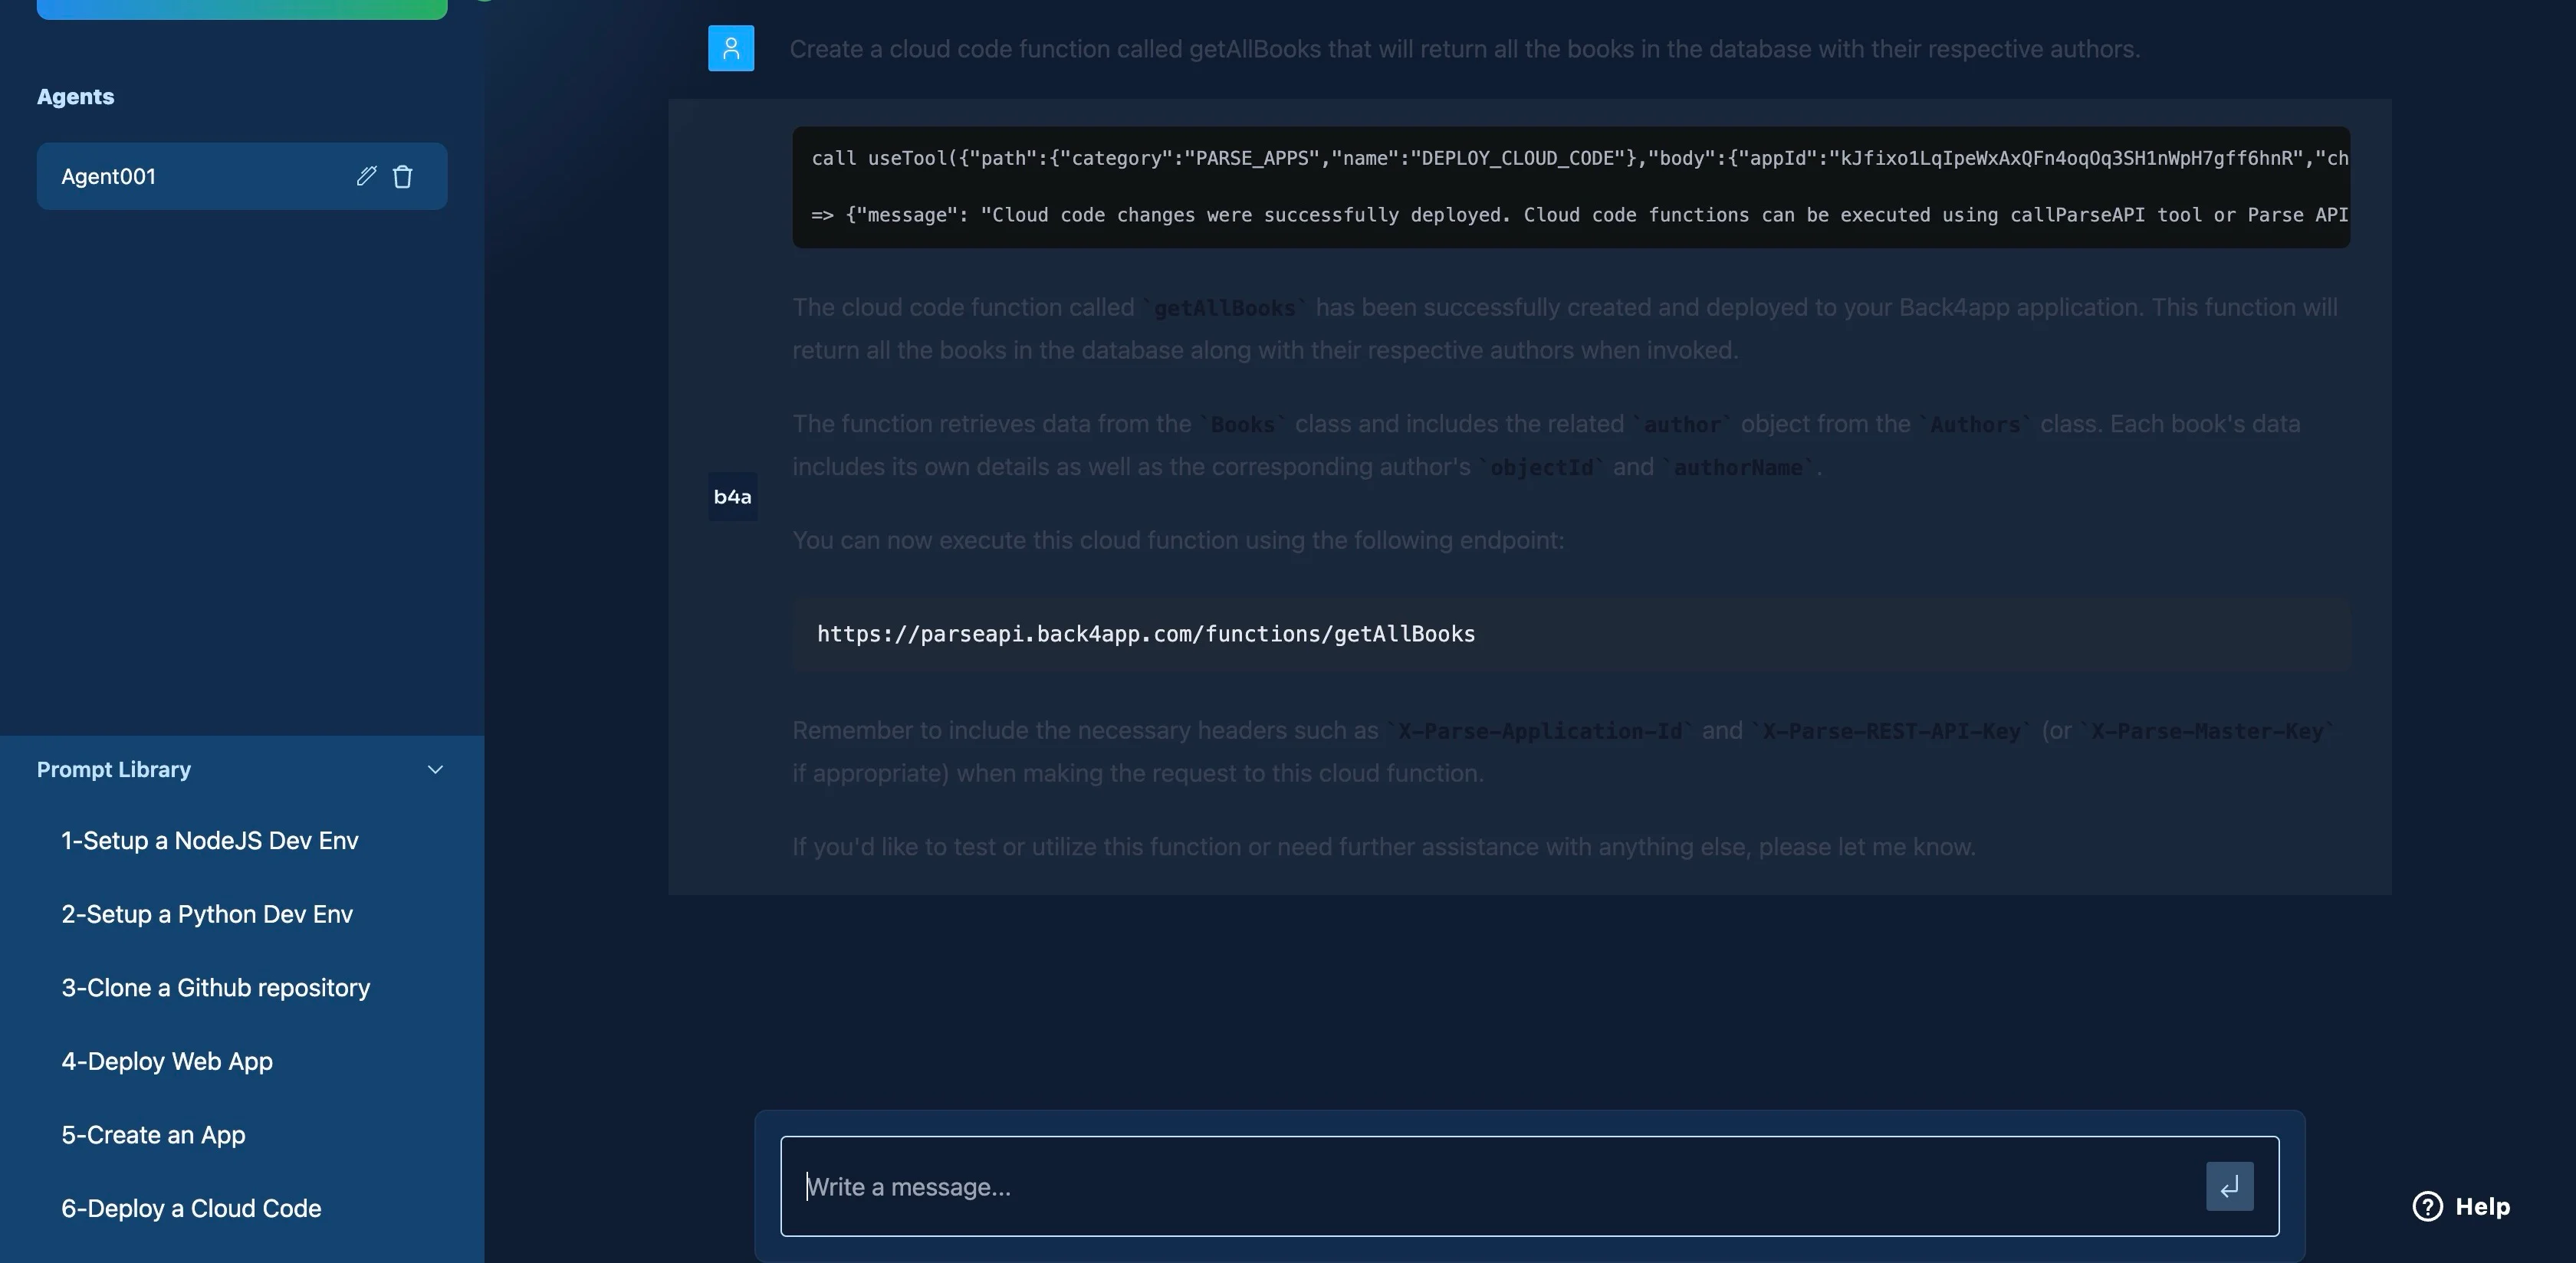
Give the Back4app AI agent the prompt below to generate the cloud code for getting all the books in the library.
Create a cloud code function called `getAllBooks`
that will return all the books in the database with their respective authors.
Next, give the Back4app AI agent the prompt below to generate the cloud code for fetching a book on the ID.
Create a cloud code function called `viewBook(bookId)`
that allows me to provide a book ID and return a book with the matching ID.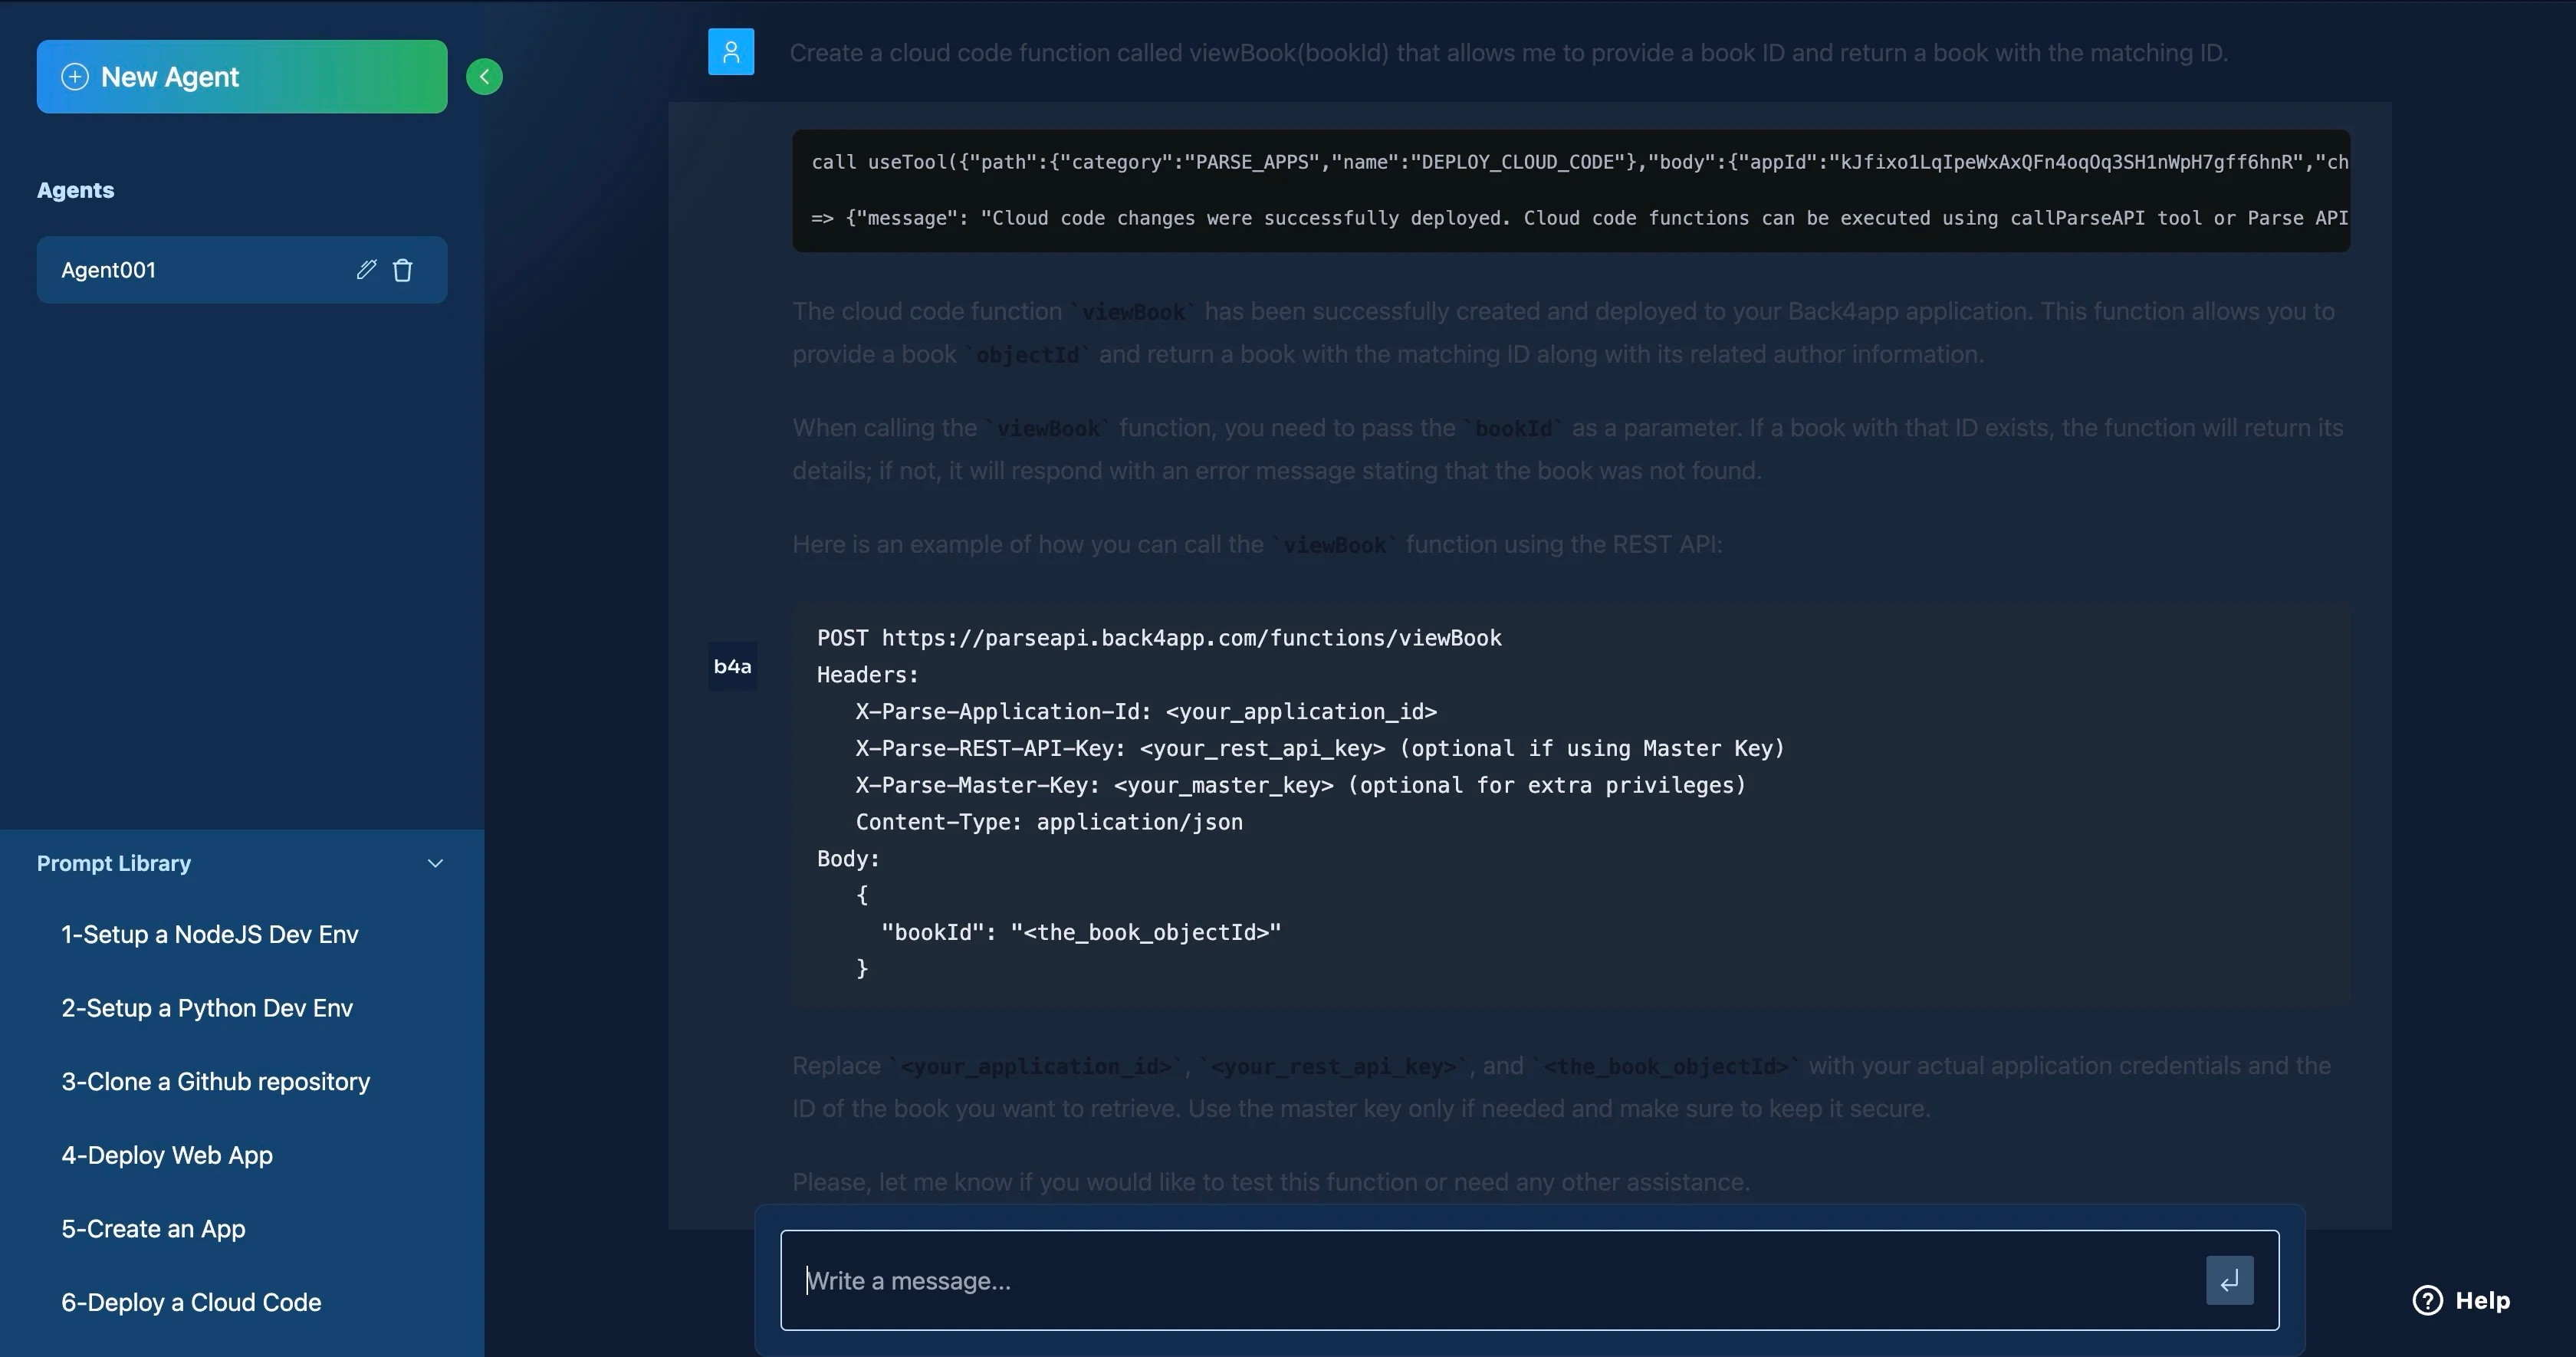
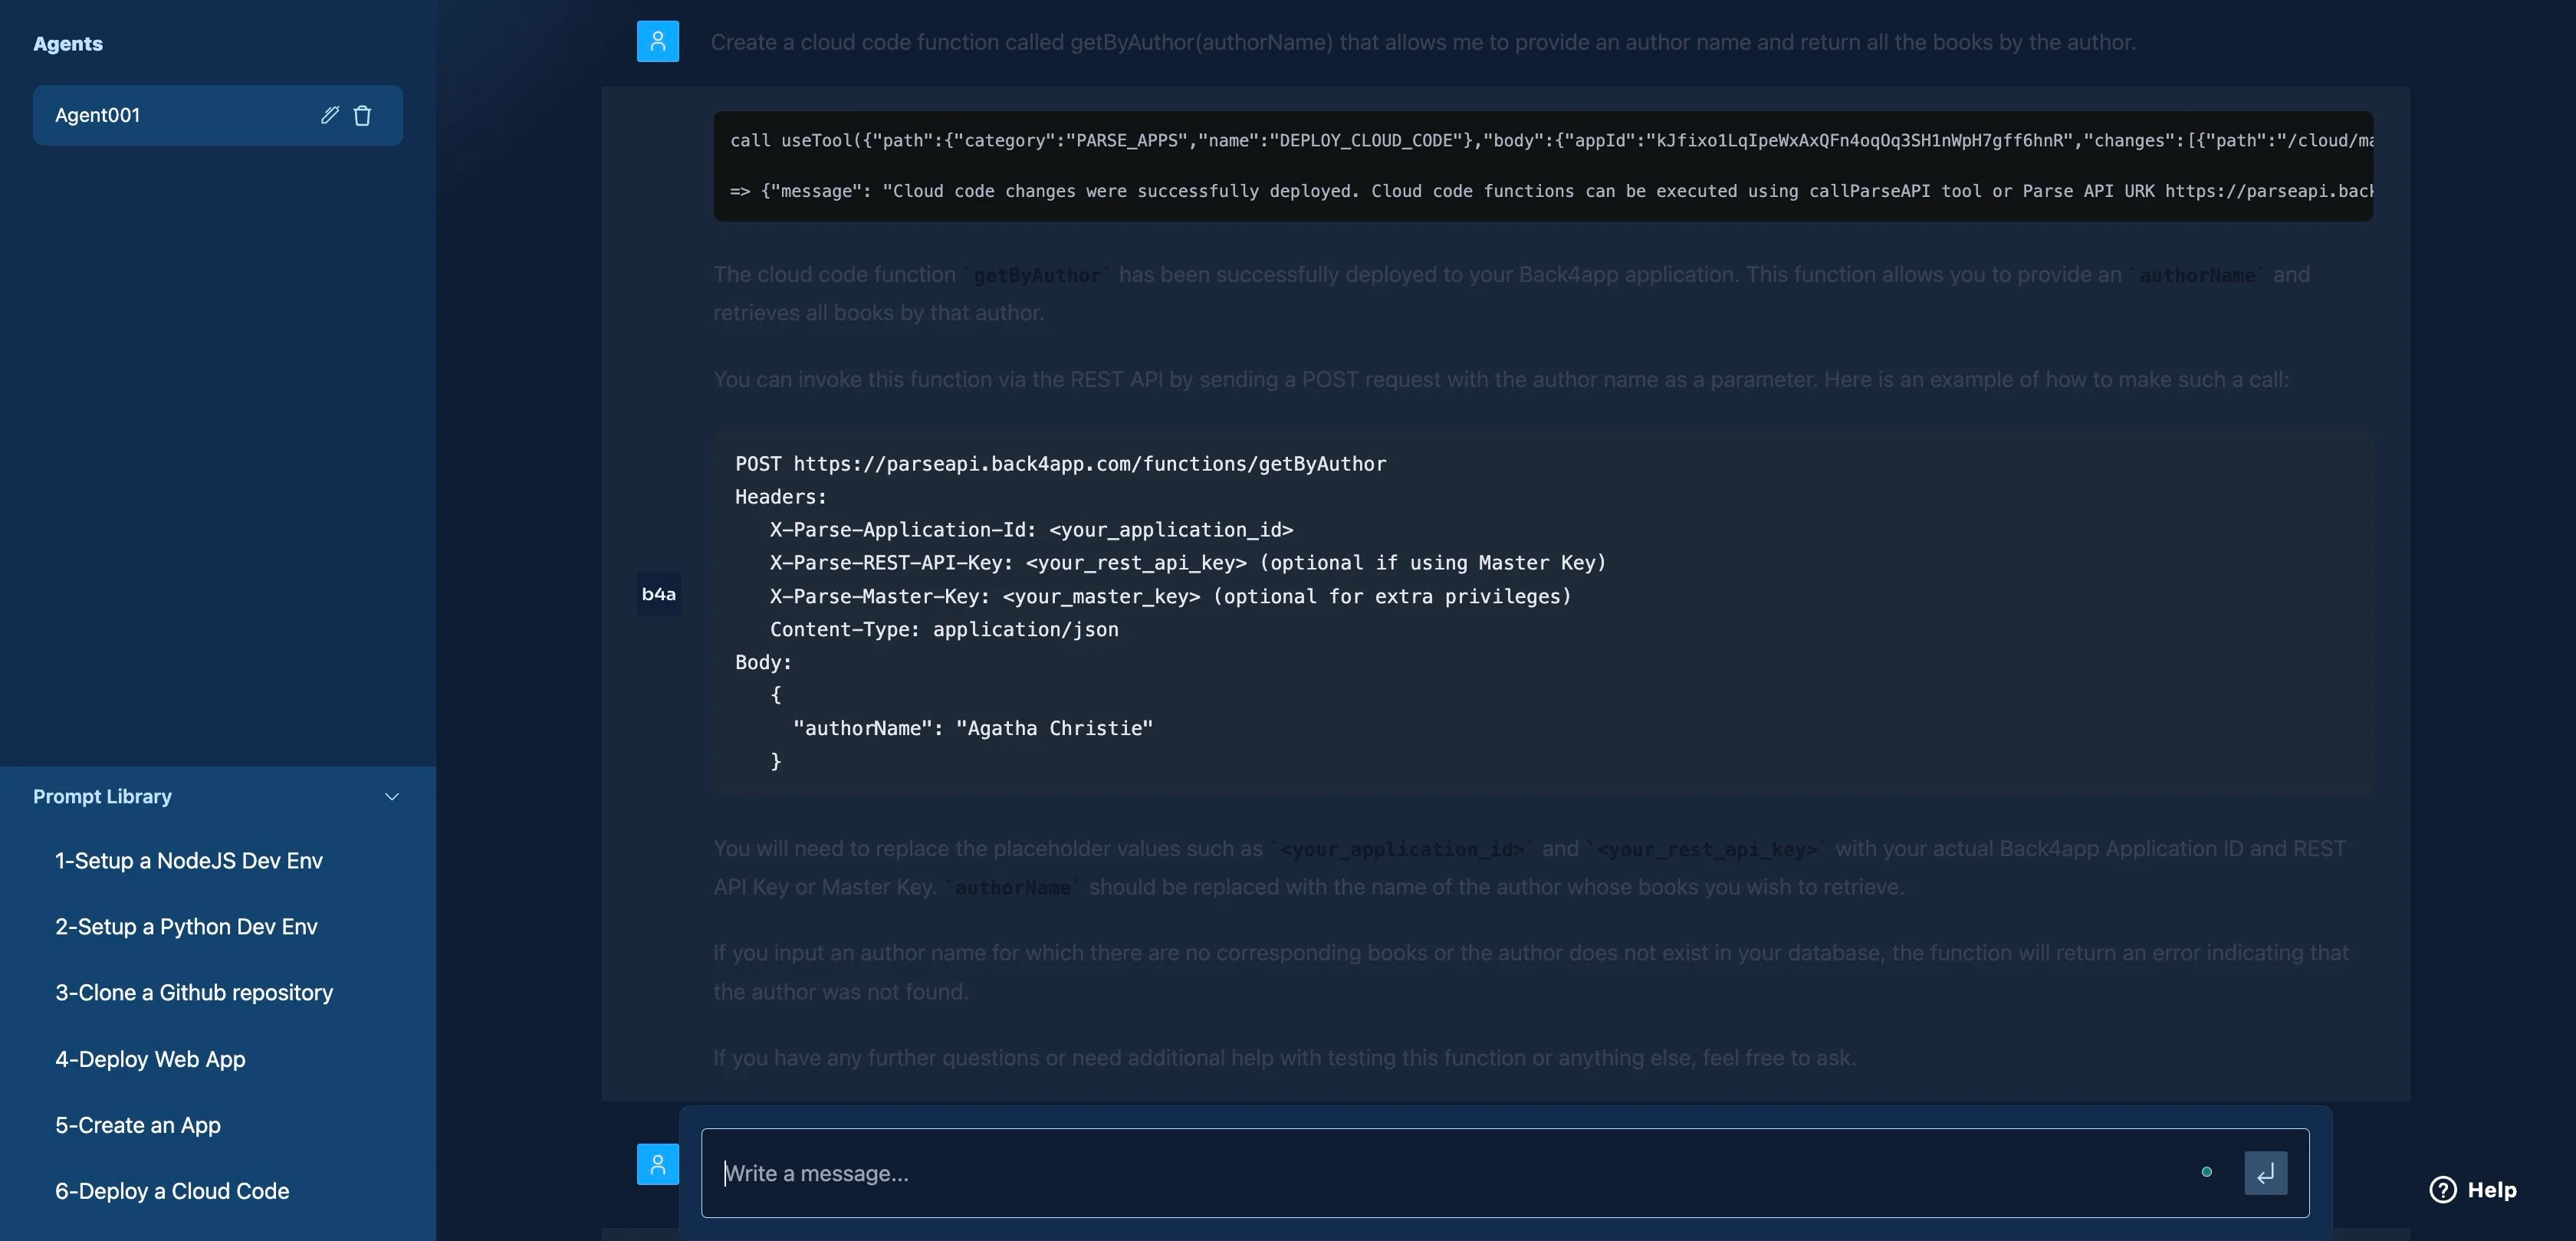
Then, give the Back4app AI agent the prompt below to generate the cloud code for getting all the books by a particular author.
Create a cloud code function called `getByAuthor(authorName)` that allows me to provide an author name and return all the books by the author.
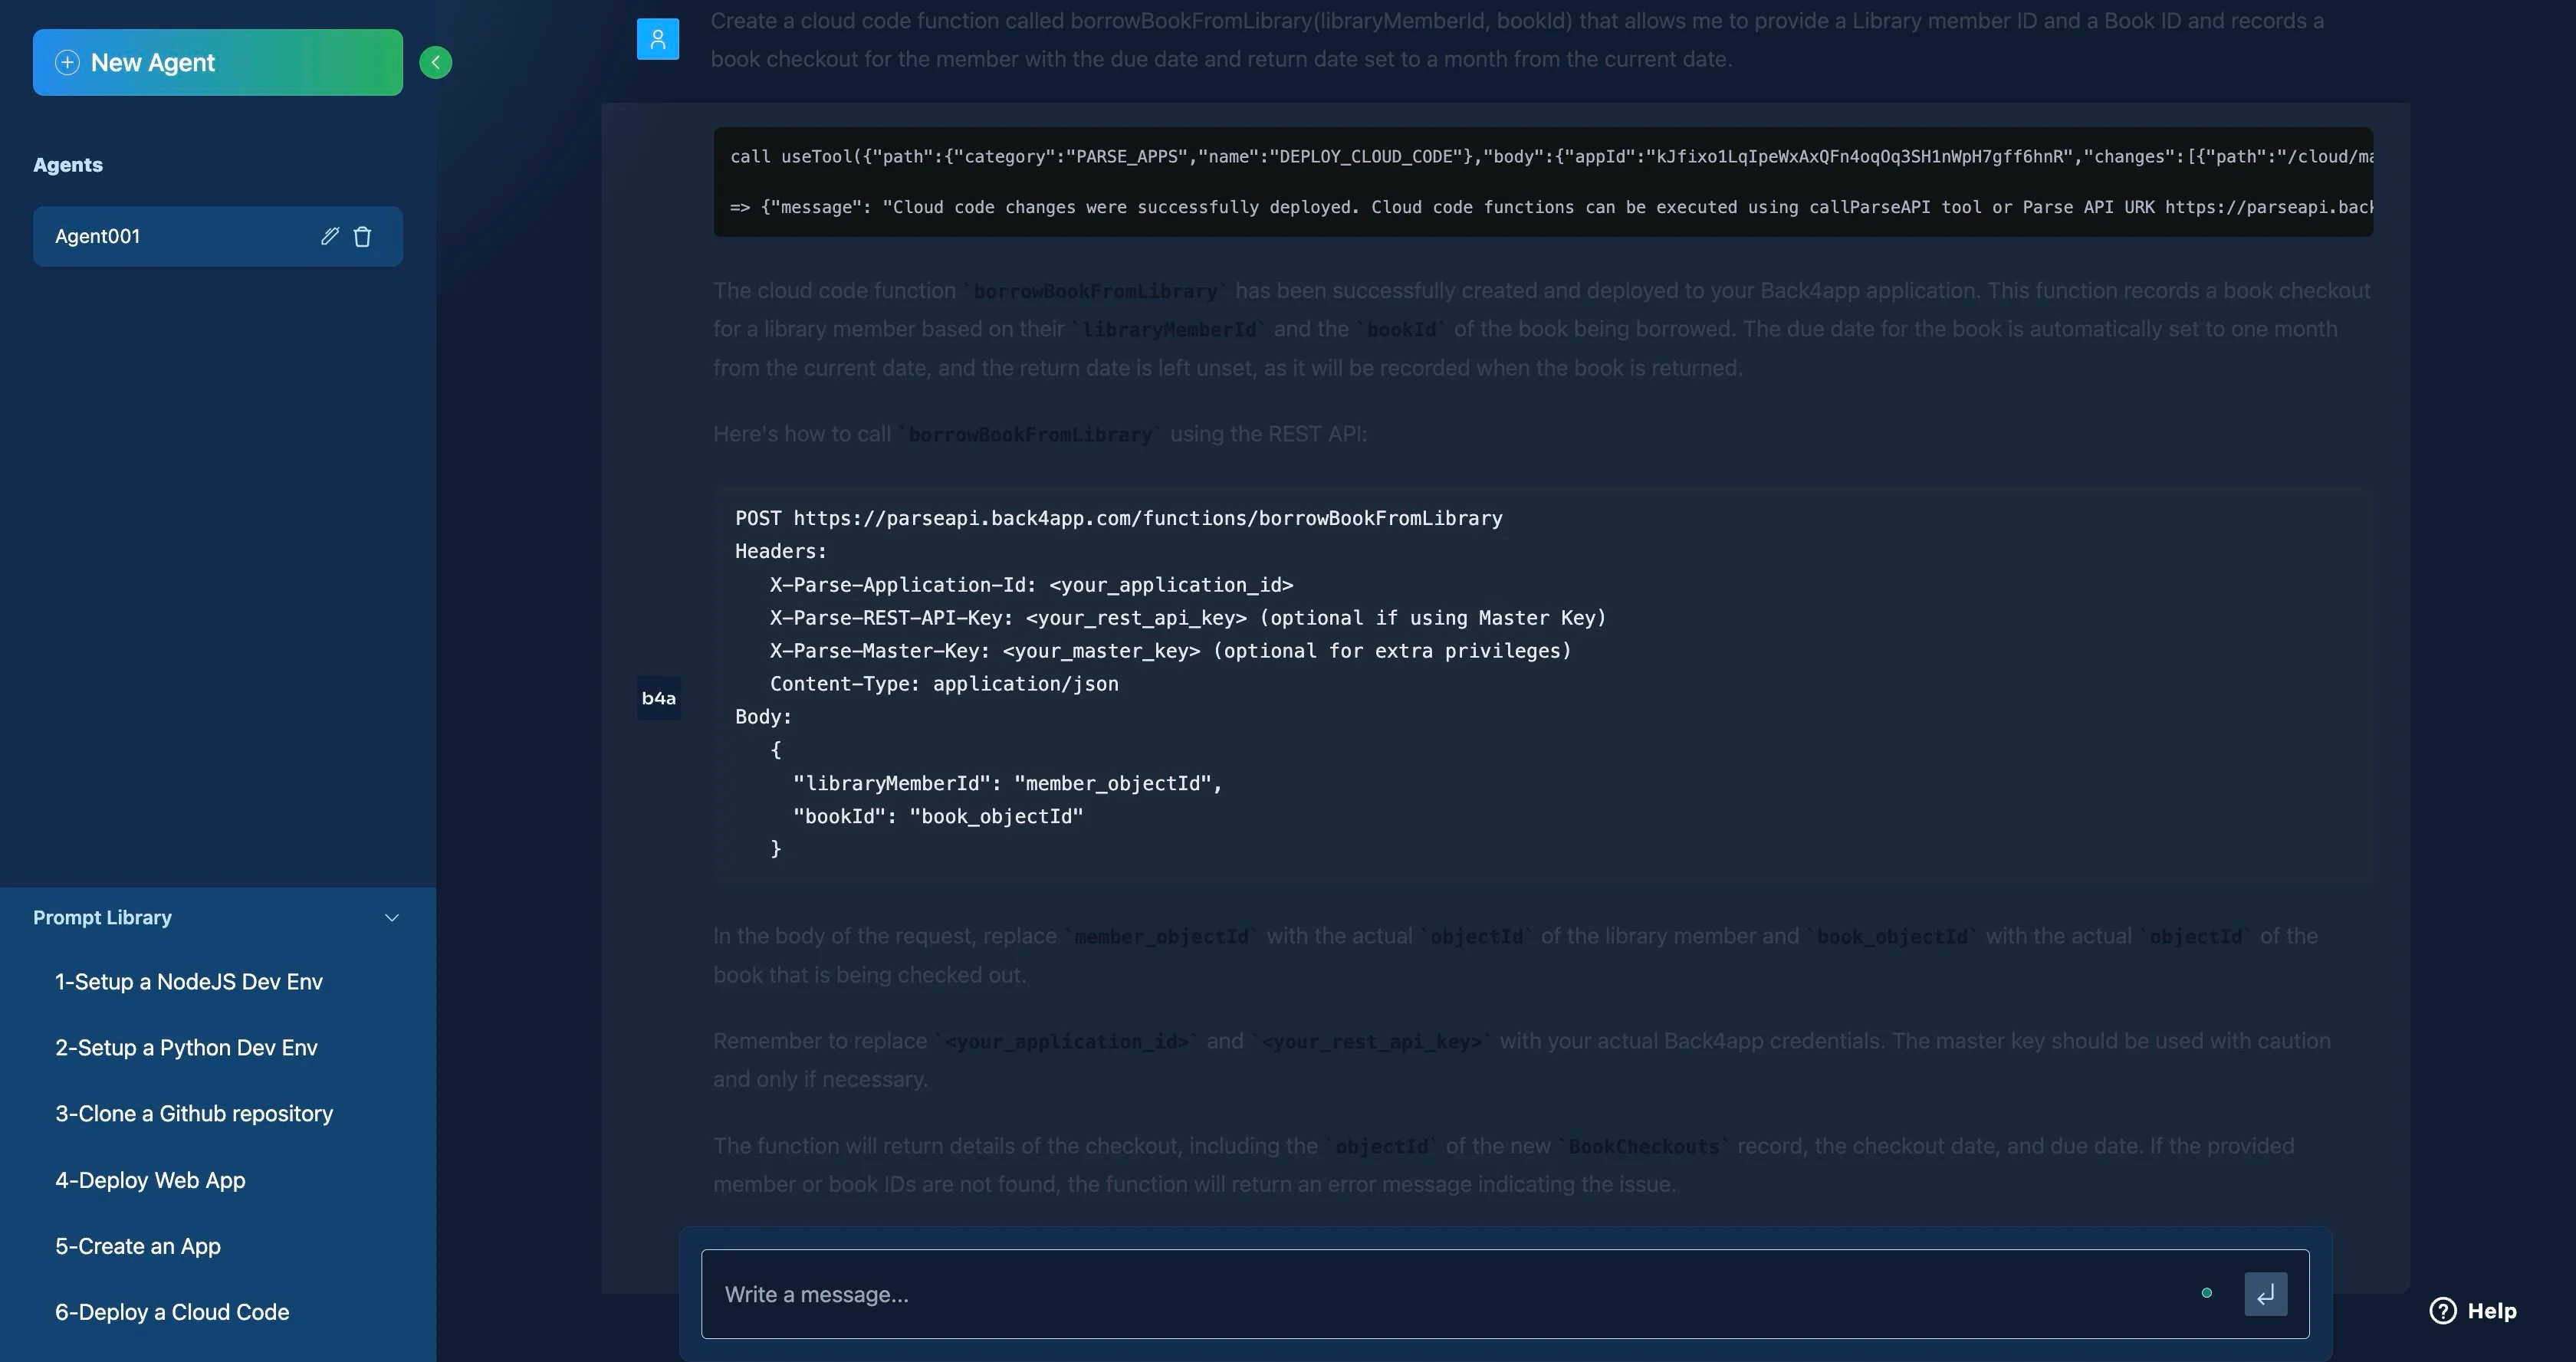
Next, give the Back4app AI agent the prompt below to generate the cloud code for borrowing a book from the library.
Create a cloud code function called `borrowBookFromLibrary(libraryMemberId, bookId)` that allows me to provide a Library member ID and a Book ID  and records a book checkout for the member with the due date and return date set to a month from the current date.

The function should also check if the book is available (ie `availableCopies` != 0). The book should display a proper error message if it is unavailable.
Finally, give the Back4app AI agent the prompt below to generate the cloud code for returning a book to the library.
Create a cloud code function called `returnBookToLibrary(libraryMemberId, bookId)` that allows me to provide a Library member ID and a Book ID.

The function should fetch the BookCheckout record  with the libraryMemberId and bookId provided and update  the return date of the BookCheckout record to the current date.

The function should also increment the book's `availableCopies` by 1.
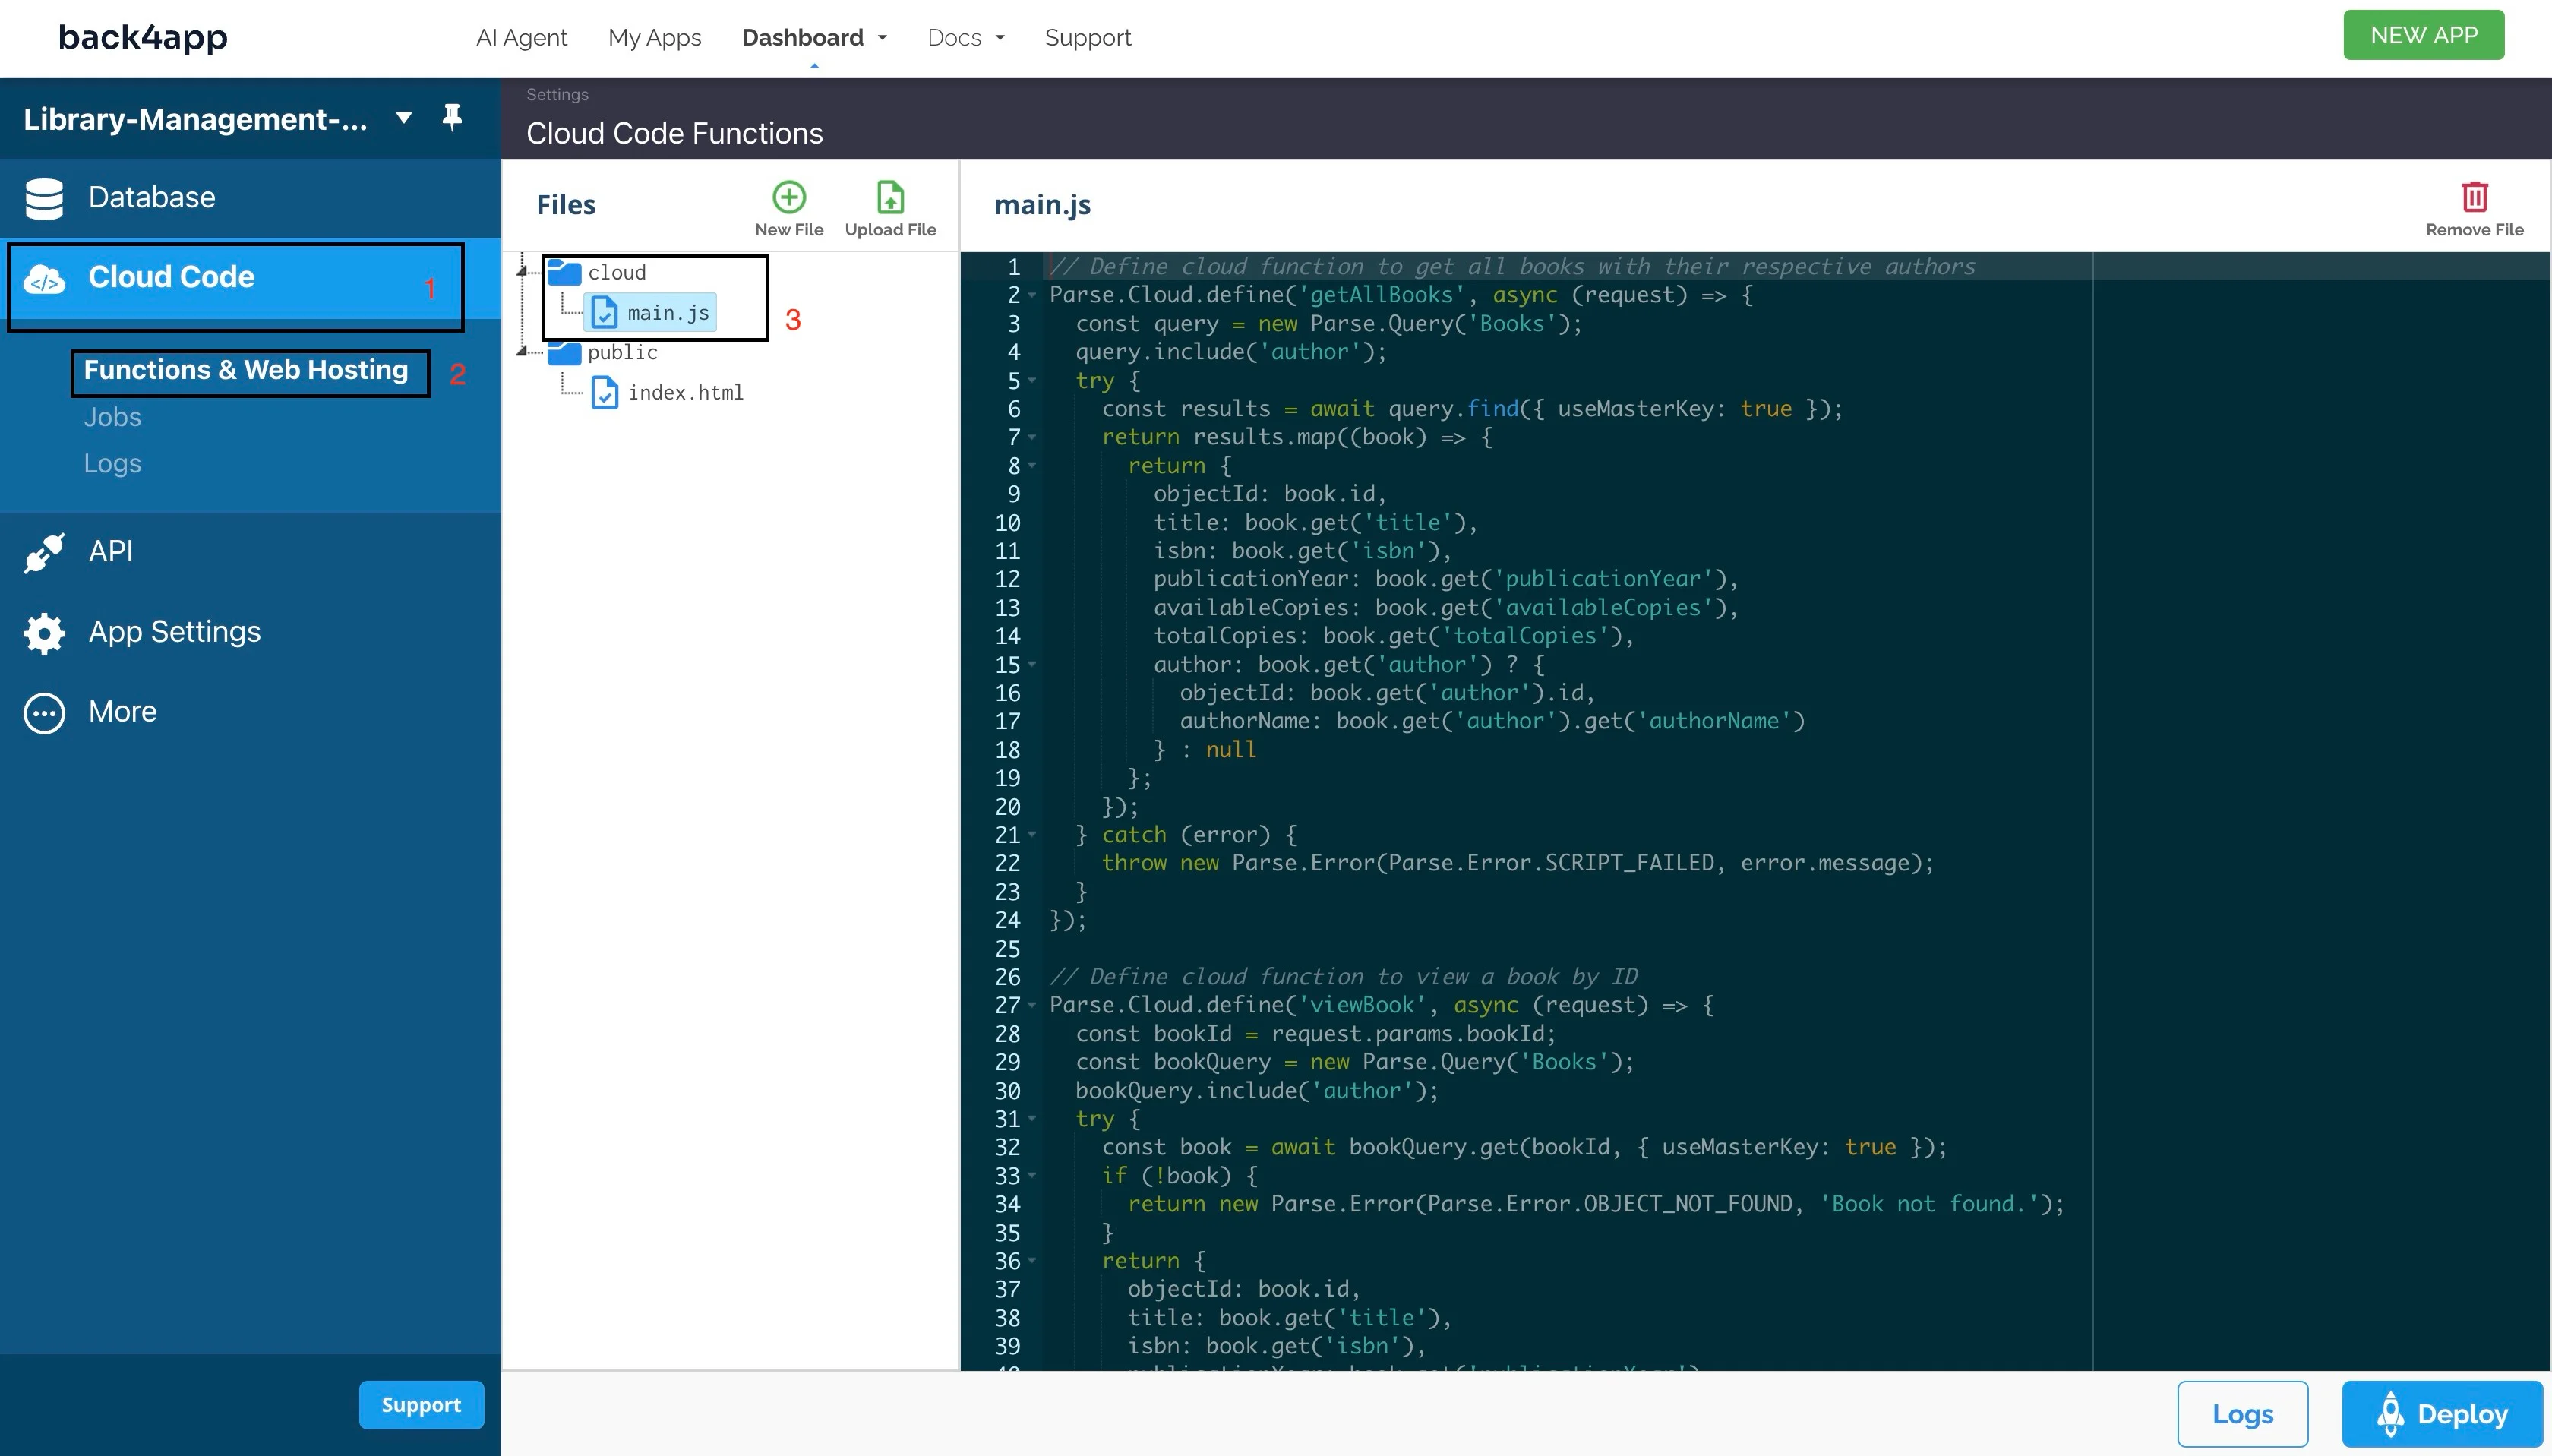
You can check if the AI agent created your cloud functions correctly by reviewing them on your Back4app dashboard → Cloud Code → Functions & Web Hosting → cloud → main.js.
Now, you have a functional backend created from a few prompts. Next, you will build a UI that allows you to interact with your backend.
Building a Frontend with the Back4app AI Agent
In this section, you will build the UI of your web application using React.
First, give the AI agent the prompt below for a high-level overview of the steps required to create a UI for your application.
Describe the steps required to build a React Frontend for my backend. I want the app to have the following routes
1. `/books` to display all the books in the library
2. `/books/:bookId` to view a specific book
3. `/books/authors/:authorName` to view all books by a specific author
4. `/books/:bookId/borrow` allows a member to borrow a book
5. `/books/:bookId/return-to-library` allows a member to return a book to the library
I also want the app to be created using vite
The agent should respond with a few steps, which may differ from the ones below but ultimately lead to the same result. If any of the steps outlined by the AI aren’t clear enough, you can ask the AI to clarify in another prompt.
Step 1: Initialize a new Vite Project and Install Dependencies
Run the command below in your terminal to scaffold a new React app with Vite:
npm create vite@latest library-app -- --template react
Navigate to the project directory and run install dependencies by running the command below:
cd library-app && npm install
Install React Router for routing and the Parse SDK for interacting with Back4app by running the command below:
npm install react-router-dom parse
Step 2: Initialize the JavaScript Parse SDK
Add the code block below to your main.jsx file to initialize Parse in your application.
import Parse from "parse";

const PARSE_APPLICATION_ID = "YOUR_APPLICATION_ID";
const PARSE_HOST_URL = "<https://parseapi.back4app.com/>";
const PARSE_JAVASCRIPT_KEY = "YOUR_JAVASCRIPT_KEY";

Parse.initialize(PARSE_APPLICATION_ID, PARSE_JAVASCRIPT_KEY);
Parse.serverURL = PARSE_HOST_URL;
Remember to replace “YOUR_APPLICATION_ID” and “YOUR_JAVASCRIPT_KEY” with their actual values, which you can find on your Back4app dashboard → App Settings → Security and Keys.
Step 3: Set up Routing
Replace the code in your App.jsx file with the code block below:
import React from 'react';
import { BrowserRouter as Router, Routes, Route } from 'react-router-dom';
import Books from './components/Books';
import BookDetails from './components/BookDetails';
import BooksByAuthor from './components/BooksByAuthor';
import BorrowBook from './components/BorrowBook';
import ReturnBook from './components/ReturnBook';

const App = () => {
  return (
    <Router>
      <Routes>
        <Route path="/books" element={<Books />} />
        <Route path="/books/:bookId" element={<BookDetails />} />
        <Route path="/books/authors/:authorName" element={<BooksByAuthor />} />
        <Route path="/books/:bookId/borrow" element={<BorrowBook />} />
        <Route path="/books/:bookId/return-to-library" element={<ReturnBook />} />
      </Routes>
    </Router>
  );
};

export default App;
Step 4: Build and Style Components
According to the AI agent, your app should have five components:
- The
Bookscomponent - The
BooksDetailscomponent - The
BooksByAuthorcomponent - The
BorrowBookcomponent - The
ReturnBookcomponent
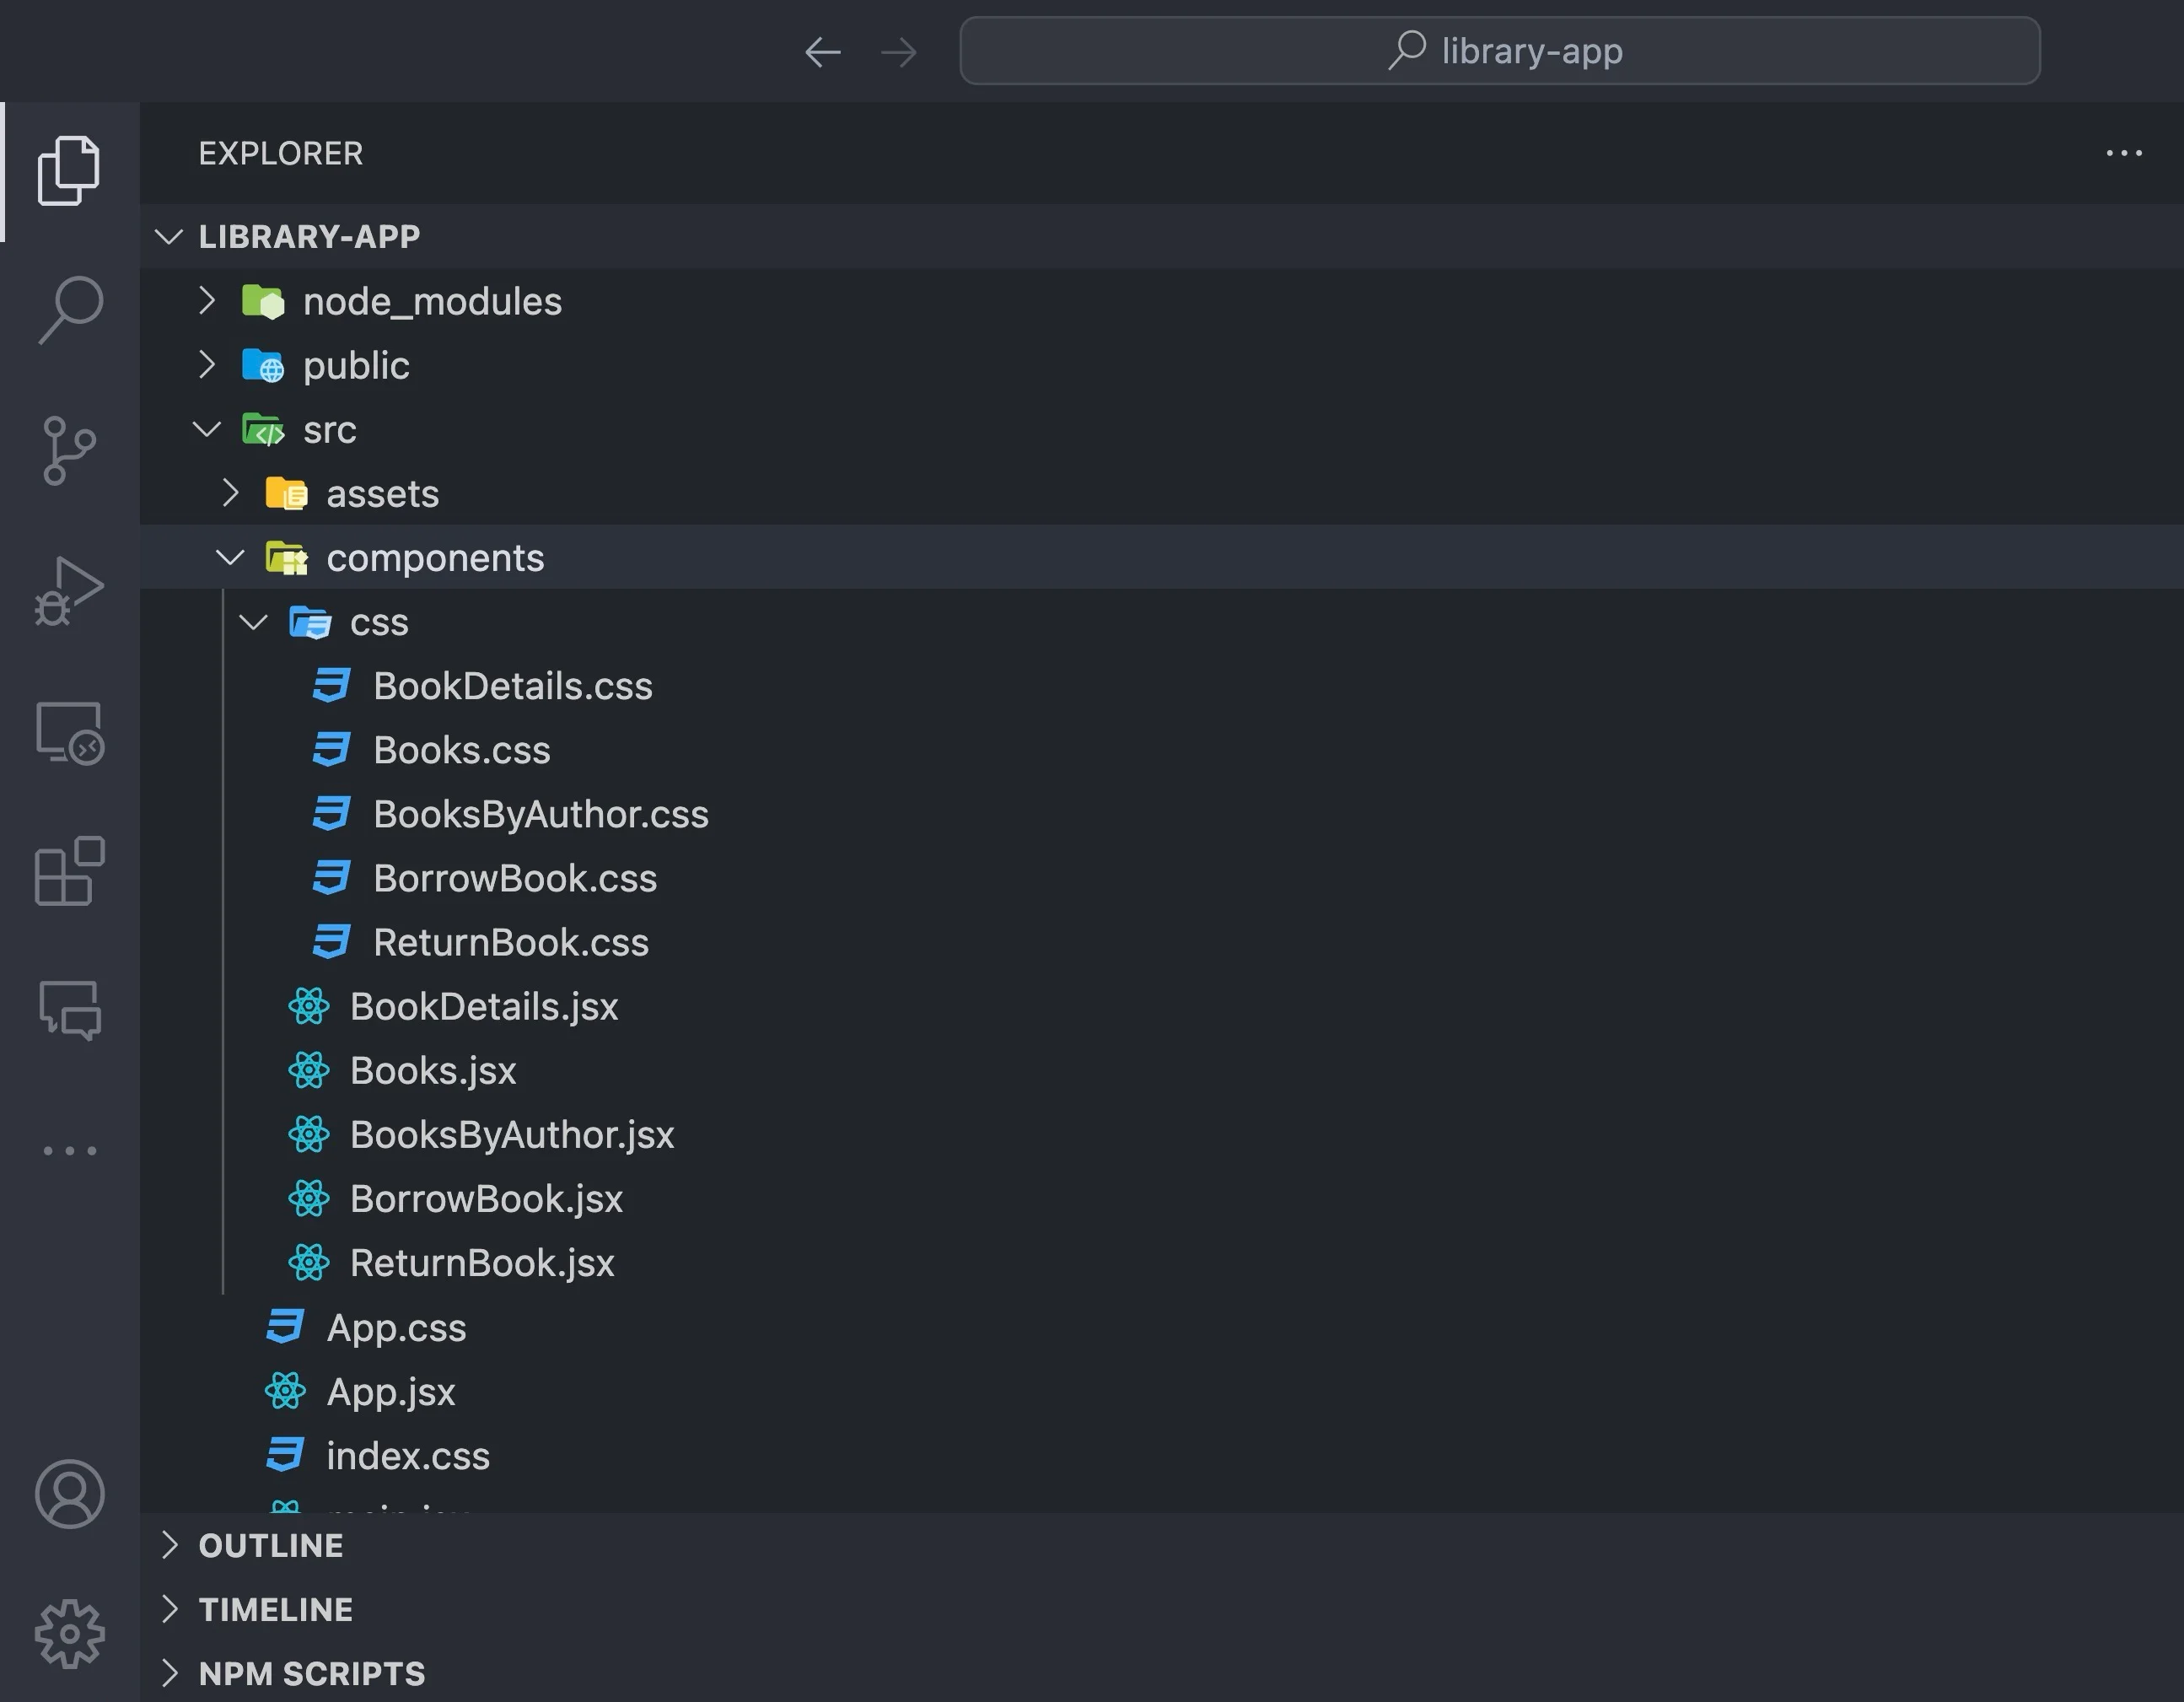
First, create a “components” folder in your project directory and create each of the files for your components. Then, create a CSS folder in your “components” folder and create CSS files for each of the components.
Your components folder should look like the image below:
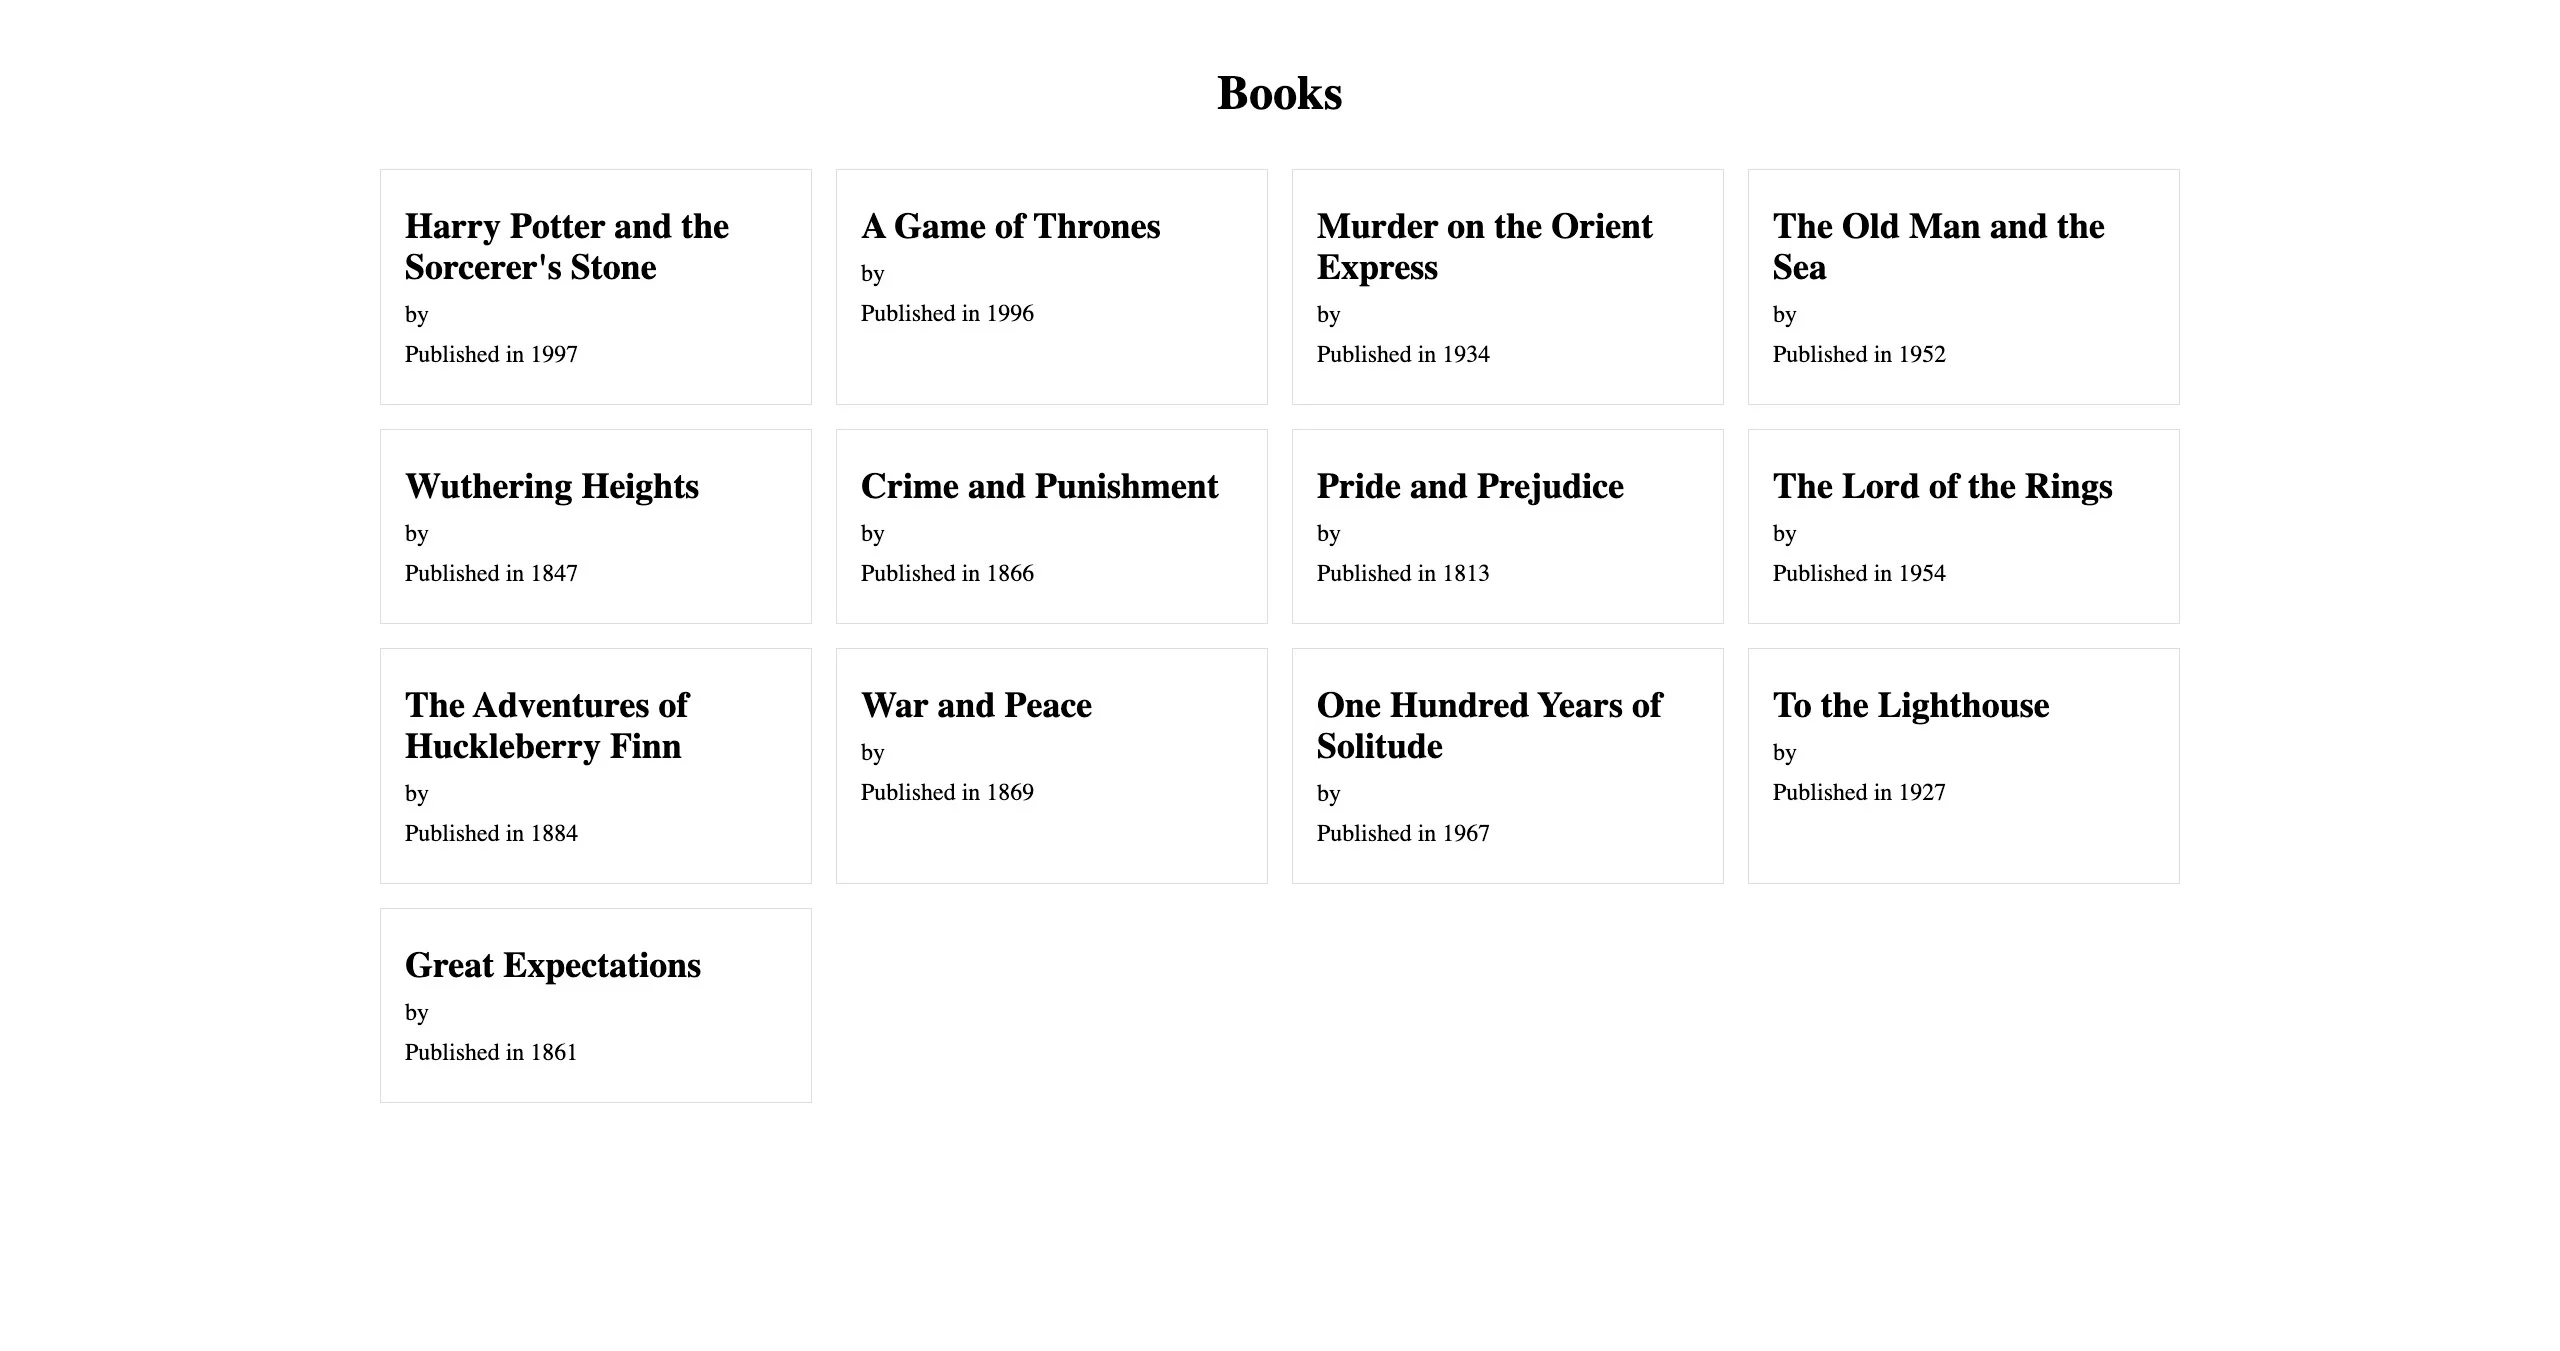
Next, give the AI the prompt below to create and style your Books component:
Create the component for the `books` route.
Be sure to add proper class names for styling and ensure that you are accessing the correct properties returned by the Parse server (Plain JavaScript Objects).
When the book card is clicked, I want to go to the route /books/:bookId using the bookId of the bookcard I clicked.
For the styling, the books should be displayed in a grid at the center of the webpage, taking the full width of the browser.
The component should also have a proper header like "Books".
The AI should respond with a stylesheet for your Books.css file and a jsx code snippet for your Books.jsx.
Add the code blocks to their respective files and import your Books.css into your main.jsx file.
Like so:
//main.jsx
import "./components/css/Books.css";
Note: Disable your index.css file to prevent the styles from overriding your custom styling.
Give the AI the prompt below to create and style your BookDetails component.
Create a component for the `books/:bookId` route. The component should have a button that takes you to the `books/:bookId/borrow` route to allow the user to borrow the book.

The component should also have a button that takes you to the `books/:bookId/return-to-library` route that allows a user to return a book.

The component should also include a link to the author names of the book that takes the user to the `/books/authors/:authorName` route, allowing them to view books from other authors.

Be sure to add proper class names for styling and ensure that you are accessing the correct properties returned by the Parse server (Plain JavaScript Objects).
The AI should respond with a stylesheet for your BookDetails.css file and a jsx code snippet for your BookDetails.jsx. Add the code blocks to their respective files.

Give the AI the prompt below to create your BooksByAuthor component:
Create a component for the `books/authors/:authorName` route.
Be sure to add proper class names for styling and ensure you are accessing the correct properties returned by the Parse server (Plain JavaScript Objects).
When the book card is clicked, I want to go to the route /books/:bookId using the bookId of the bookcard I clicked.
For the styling, the books should be displayed in a grid at the center of the webpage, taking the full width of the browser.
The component should also have a proper header, such as `AuthorName's Books` for example "Jane Austen's Books".
Add the generated code to the proper files.

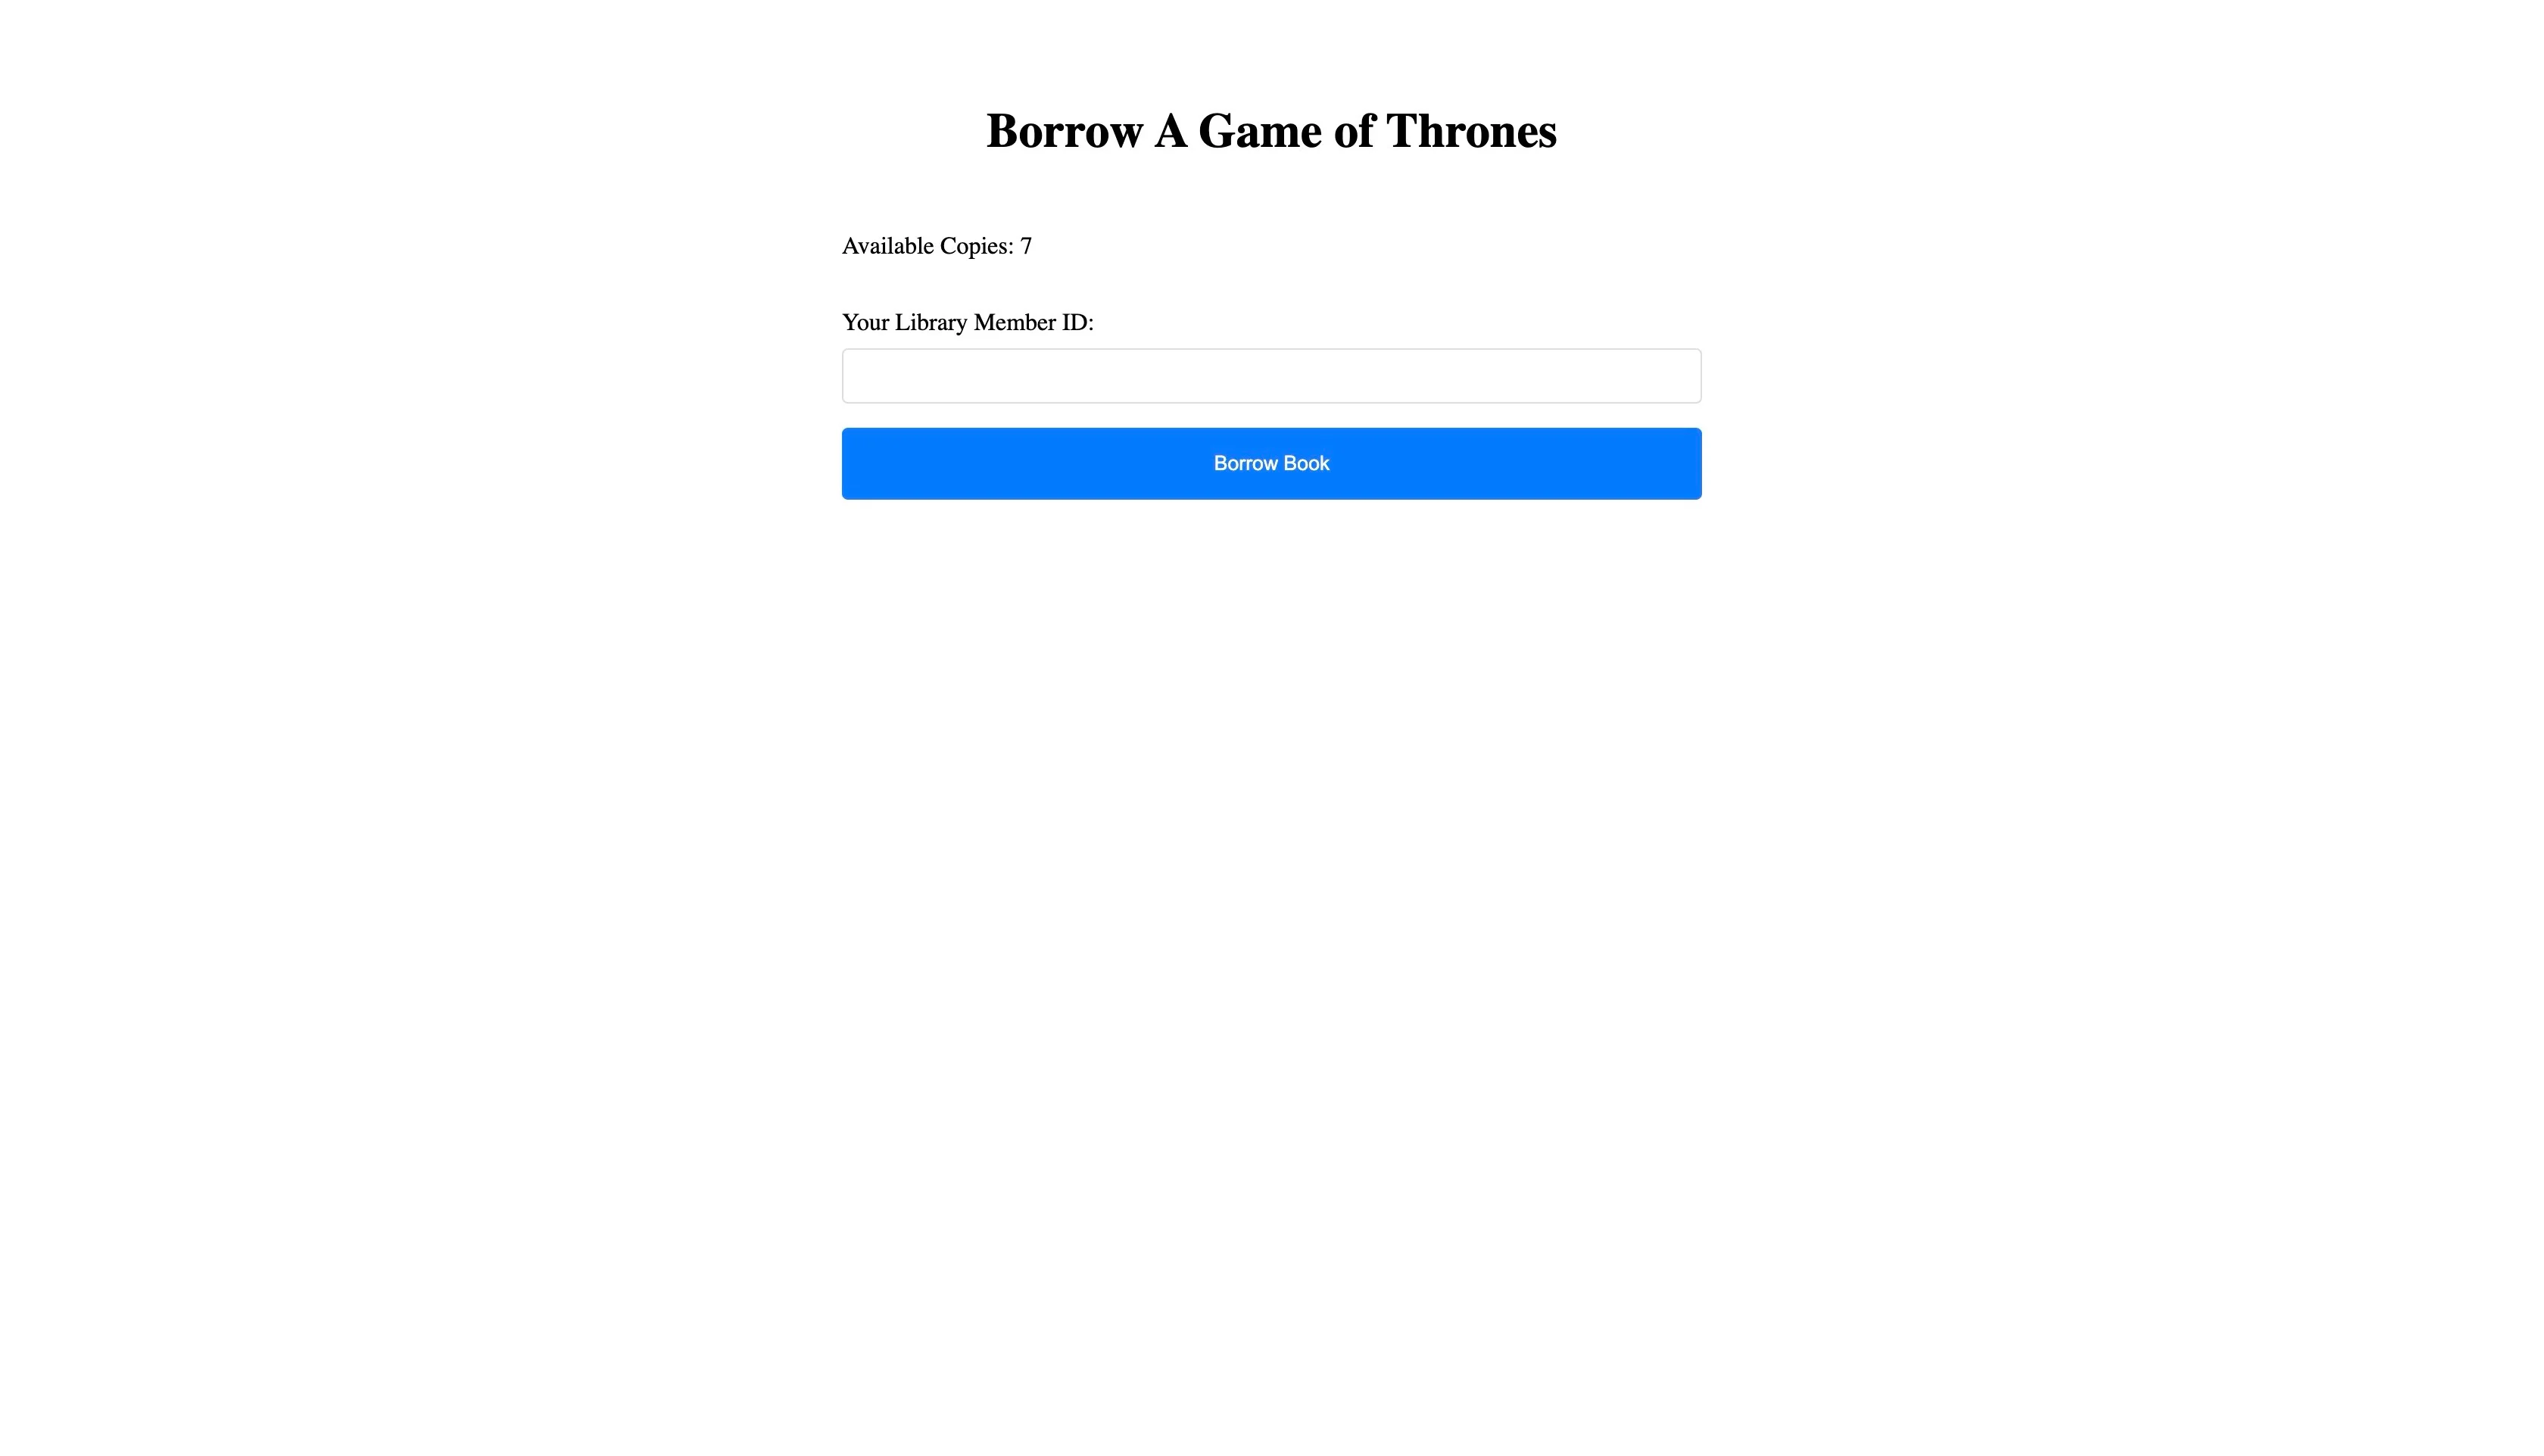
Give the AI the prompt below to create your BorrowBook component:
Create a component for the `/books/:bookId/borrow`.

The component should display a form that allows users to enter their `libraryMemberId` and borrow the book.

Be sure to add proper class names for styling and ensure you are accessing the correct properties returned by the Parse server (Plain JavaScript Objects).

For the styling, the elements should be properly spaced and have a proper header like "Borrow <NAME_OF_BOOK>".
The form should be at the center of the webpage, taking the full width of the browser.

The component should also display the number of remaining books.
Add the generated code to the proper files.
Give the AI the prompt below to create your ReturnBook component:
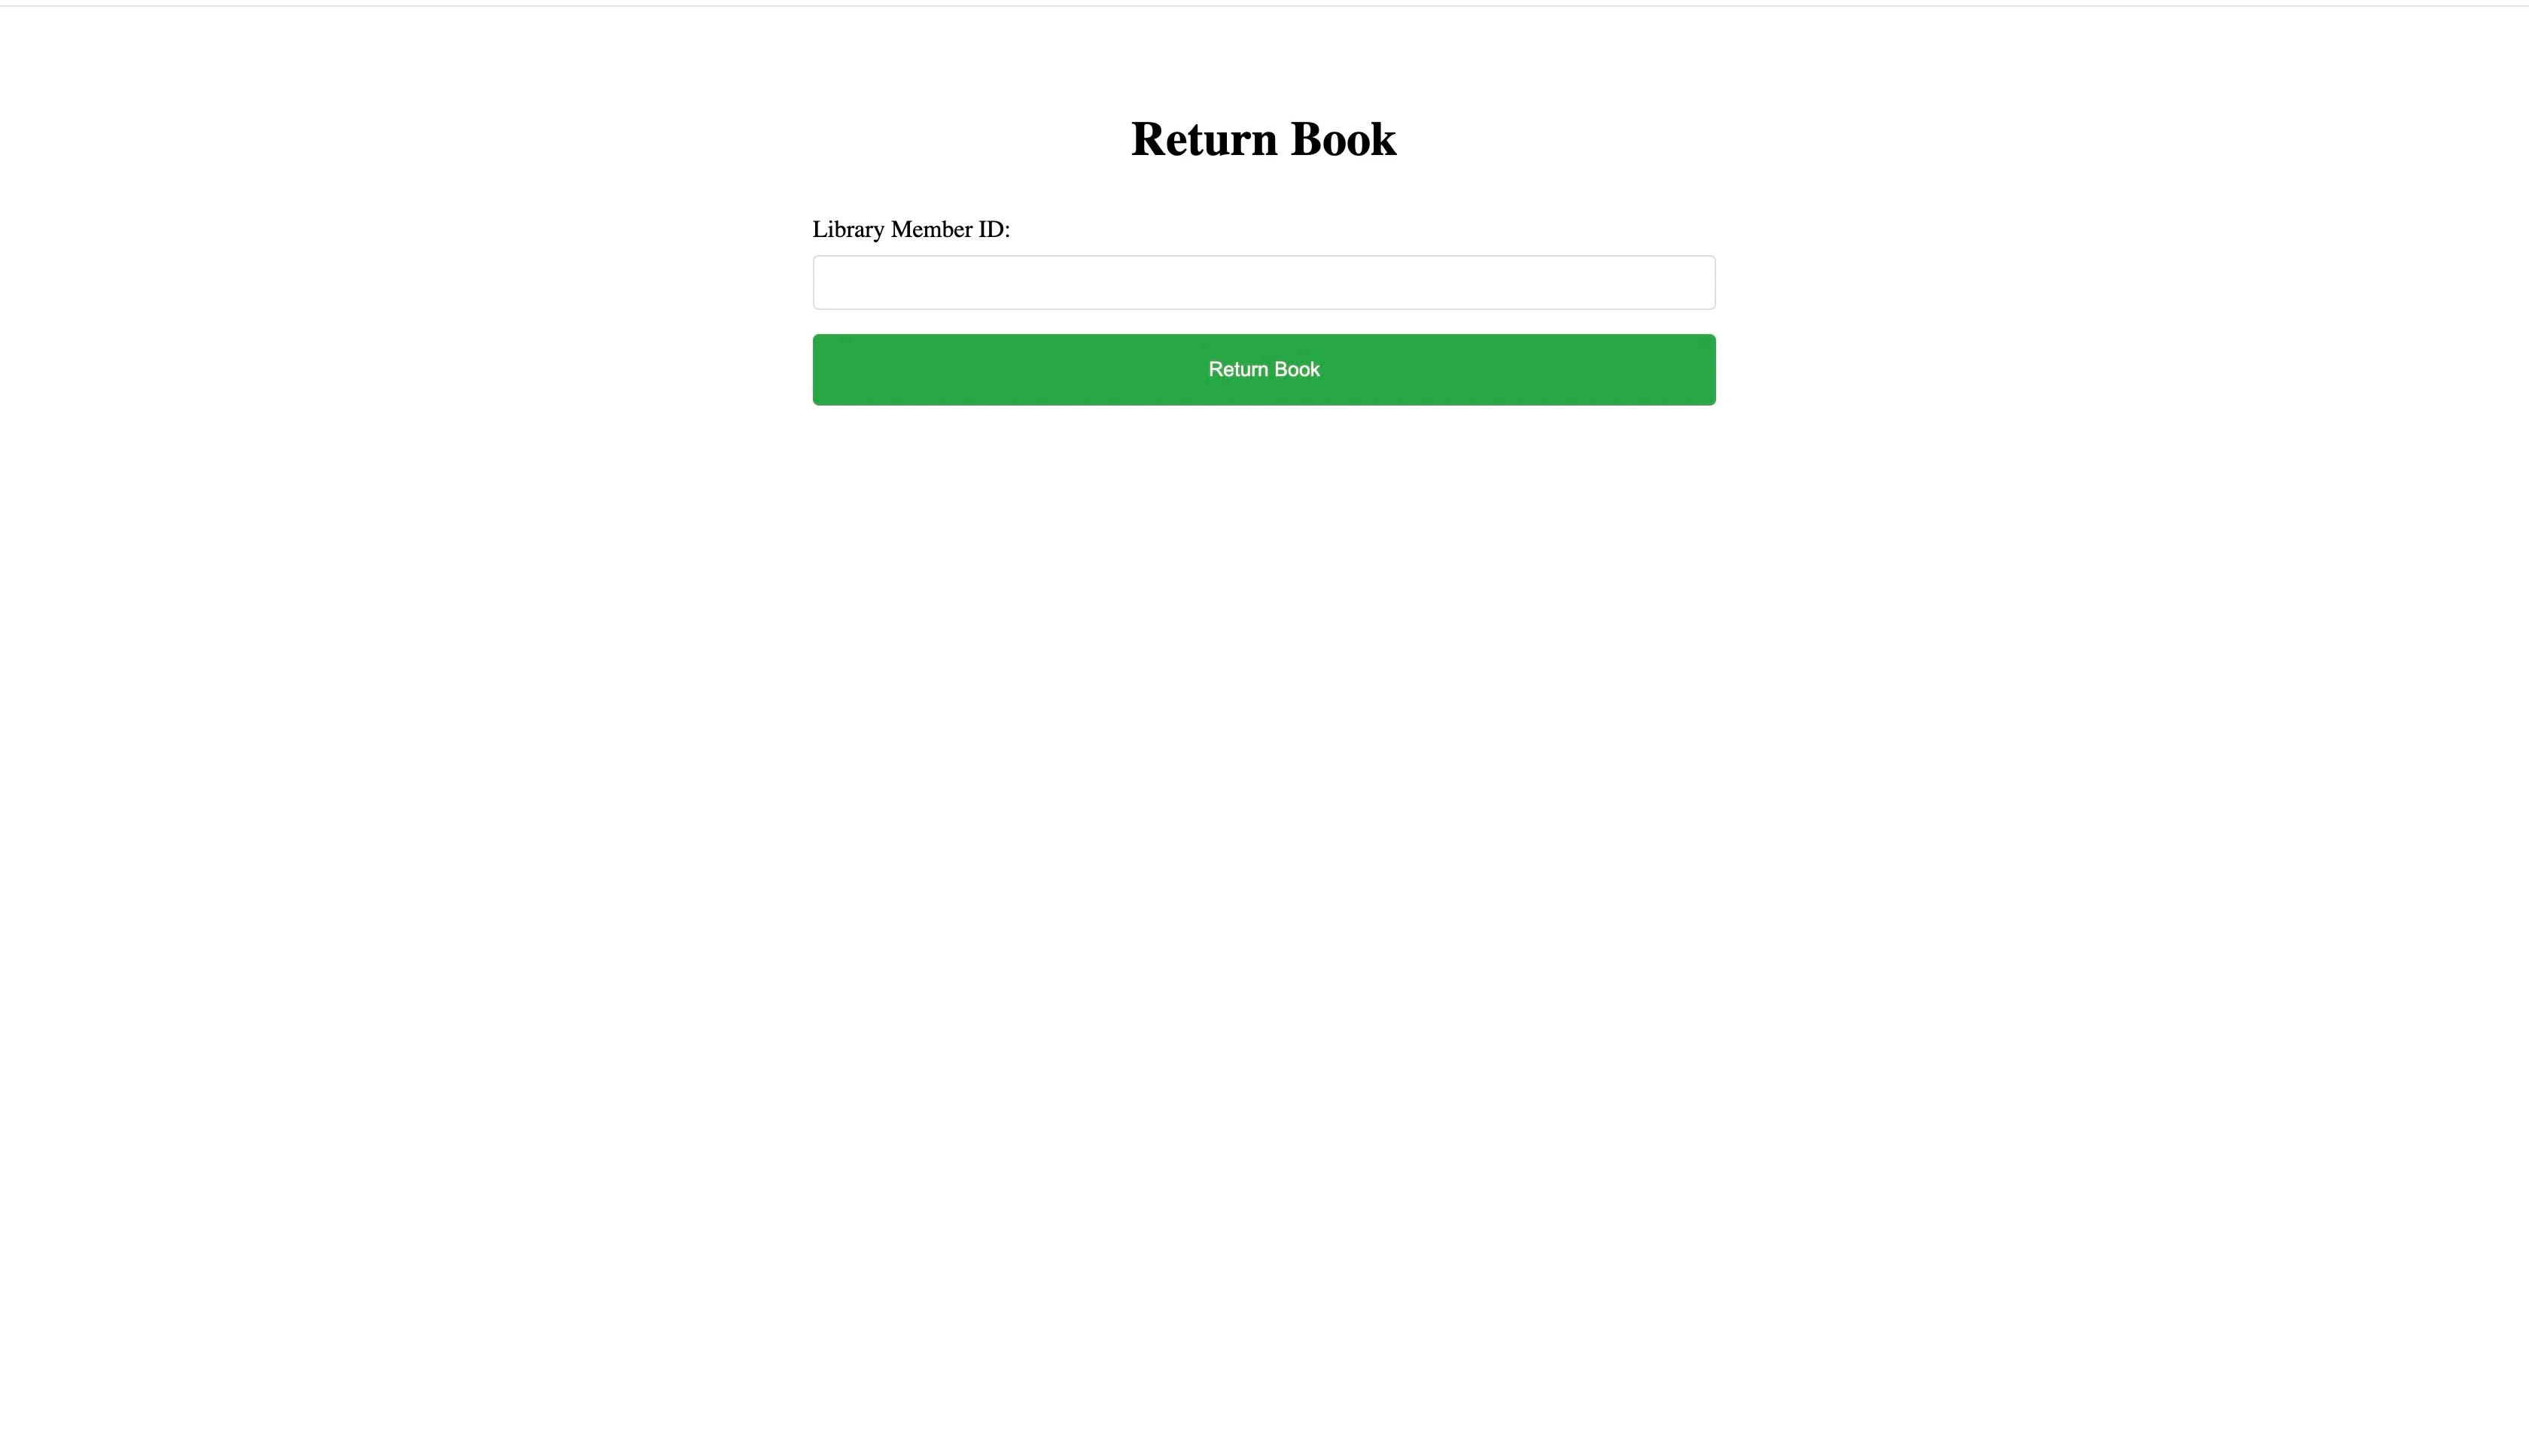
Create a component for the `/books/:bookId/return-to-library`.

The component should display a form that allows users to enter their `libraryMemberId` and `bookId` of the book they want to return.

For the styling, the elements should be properly spaced and have a proper header like "Return Book".

The form should be at the center of the webpage, taking the full width of the browser.
Add the generated code to the proper files.
Deploying your Web app on Back4app Containers
Now that you have finished building your application, you’ll need to deploy it to make it publicly available. For this tutorial, you will deploy your app using Back4app containers.
Give the prompt below to the AI agent:
What steps do I need to follow to deploy my app on Back4app containers?
The AI should respond with steps similar to the following:
- Create a Dockerfile
- Push your code to a public repository
- Connect your public repository to back4app
- Deploy
Give the prompt to the AI agent:
Generate a dockerfile for my application
Create a Dockerfile file in your application’s root directory and add the generated code.
Next, push your code to a public repository and give the prompt below to your AI agent:
Connect to my "YOUR_REPOSITORY_URL" repository on GitHub and deploy it to Back4app Containers.
For the prompt above to work, Back4app’s GitHub app must be integrated appropriately with your GitHub account. Alternatively, you can manually deploy your React app with Back4app containers.
Conclusion
The Back4app AI Agent streamlines the entire development lifecycle, from creating database tables to generating cloud code functions to building a React frontend UI and even deploying the application.
This approach allows you to develop both the back end and front end of your app with minimal manual effort.
However, it’s important to review the outputs of AI tools to ensure accuracy and address any potential issues.


