How to deploy a PHP application?
This article will discuss PHP, one of the most popular scripting languages that power the world wide web. We’ll explore its advantages, disadvantages, and deployment options.
By the end of this article, you’ll be able to bootstrap a simple PHP application, dockerize it, and deploy it to Back4app Containers.
Contents
PHP Overview
PHP (short for “PHP: HyperText Processor”) is a popular free general-purpose scripting language. It was created in 1993 by Rasmus Lerdorf and later released in 1995.
PHP was initially designed for web development but is now also used for server-side scripting, command-line scripting, and desktop application writing.
The great thing about PHP is that it can be directly embedded into HTML. There’s no need to use lengthy commands to output HTML (as seen in C or Perl). Here’s a quick example:
<!DOCTYPE html>
<html lang="en">
    <head>
        <title>My first PHP website</title>
    </head>
    <body>
        <?php
            $cool_scripting_language = "PHP";
            echo "$cool_scripting_language is a cool scripting language!";
        ?>
    </body>
</html>
PHP will be executed when a user requests this site, and only the processed HTML output will be returned. In our case, a message saying, “PHP is a cool scripting language!”. The PHP gets executed on the server side instead of in the browser (like JavaScript).
It is debatable whether PHP is a fully object-oriented language. It does support standard object-oriented features such as namespaces, classes, and objects, though.
At the time of writing, the most recent stable version of PHP is 8.2, but many PHP applications are staying on older releases.
Some developers claim that PHP is dying, but that isn’t the case. According to W3Techs survey, PHP currently powers 77.4% of all websites whose server-side programming language is known.
The scripting language is also used by high-traffic websites such as Facebook, Wikipedia, Mailchimp, various CMS software, and was even used by YouTube in the past.
Benefits of PHP
Good Performance
PHP is more performant than other server-side scripting languages such as ASP.NET, JSP, and Python. Some benchmarks show PHP being up to three times faster than Python.
PHP is best at handling web-related tasks, such as generating HTML pages, handling form submissions, and interacting with the database.
On the contrary, there are more optimal choices than PHP for heavy computation tasks or complex algorithms.
Cross-platform
PHP is platform-independent. It runs on various platforms, including Windows, Linux, Unix, and Mac. Additionally, it is compatible with almost every popular web server, such as Apache HTTP, Caddy, Nginx, LiteSpeed, and so on.
The popular scripting language can also be used for developing desktop applications thanks to Czarek Tomczak’s phpdesktop. You can think of this library as Electron but for PHP. Phpdesktop applications can run on Windows and Linux, but not Mac OS X (yet).
Database Support
The scripting language supports a variety of databases, including SQL and NoSQL databases. The most popular database to use with PHP is MySQL (LAMP stack), but nothing is stopping you from using PostgreSQL, or any other type of database.
You can see all the PHP abstraction layers and vendor-specific database extensions on their official website.
Vibrant Ecosystem
PHP is as popular as it is, thanks to its vibrant ecosystem. Many awesome PHP frameworks significantly speed up the development process, simplify the codebase, and guide you to write cleaner/more standardized code.
The most popular PHP frameworks at the time of writing are:
For more awesome frameworks and resources, check out awesome-php on GitHub.
There are also a lot of CMS that utilize PHP, such as WordPress, Joomla, Drupal, and Magento.
Easy to Learn
PHP is a beginner-friendly language with a simple syntax. It is relatively easy to learn if you’re familiar with the basics of the world wide web (WWW), HTML, CSS, and JavaScript. Many developers can write PHP, but only a few can write maintainable PHP that follows clean code conventions.
Limitations of PHP
Limited Debugging Tools
PHP is bad at handling errors and lacks debugging tools compared to other popular programming languages. If your project requires advanced debugging, you’ll most likely have to use 3rd-party software such as Xdebug, Krumo, or Kint.
Some popular IDEs such as PhpStorm and Visual Studio also have built-in PHP debugging tools.
Loosely Typed
As mentioned above, PHP is a scripting language, not a programming language. One of the most common characteristics of scripting languages is that they are loosely typed.
That means the variable type doesn’t have to be explicitly declared before using it. On top of that, it can also change at any time during runtime.
This results in PHP applications being more error-prone and difficult to debug.
Security Flaws
Over the years, PHP applications have been a target of various hacker attacks. That is primarily due to PHP’s open-source nature and low-entry cost for new developers.
Some of the most well-known PHP vulnerabilities include SQL injections, cross-site scripting (XSS), cross-site request forgery (CSRF), and remote code execution (RCE).
Remember that these vulnerabilities can be prevented by following secure coding practices. Make sure to always sanitize input and never execute user-provided input.
Vanilla PHP is Outdated
Vanilla PHP (meaning PHP without any libraries or frameworks) can be pretty outdated for building modern applications. To build secure apps fast, you’ll have to utilize a framework.
PHP Deployment Options
PHP apps can be deployed to different platforms. The most common cloud models for deploying PHP applications are:
- Infrastructure as a Service (IaaS),
- Platform as a Service (PaaS),
- Containers as a Service (CaaS).
The best cloud model for deploying PHP applications does not exist. Ultimately, the choice depends on your project requirements, budget, and level of wanted abstraction.
Usually, developer teams opt for PaaS or CaaS since they’re easier to manage and not much more expensive than IaaS. Let’s look at some of the best PHP hosting vendors.
Back4app Containers
Back4app Containers is an excellent Containers as a Service (CaaS) offering by Back4app. The platform allows developers to build, scale, and quickly deploy dockerized applications.
Deploying an application to Back4app Containers is as easy as importing your GitHub repository and clicking a button. The platform has great continuous integration and deployment system, supports no-downtime deployments, real-time deployment tracking & more!
Another benefit of Back4app Containers is its free tier, which is great for hosting small applications. As your app scales, you can upgrade to premium tiers following a simple and predictable pricing plan.
Google Cloud Run
Google Cloud Run is a fully automated Containers as a Service (CaaS) platform for deploying and scaling containerized apps. It became publicly available in 2019 and has since gained much popularity.
Cloud Run is relatively easy to use, especially if you’re familiar with other GCP products. Some benefits of Cloud Run include free SSL certificates, good integration with other GCP solutions, and scaling to zero.
At the time of writing, Google offers $300 free credits for new users.
Heroku
Heroku is one of the pioneering Platform as a Service (PaaS) solutions. It was established in 2007 and remains highly popular today.
It offers extensive support for various programming languages, including PHP, Java, Node.js, Go, Scala, and Python. The platform has a slick and user-friendly UI, allows for great scalability, and provides a vast selection of add-ons.
Heroku used to provide a free plan and complimentary PostgreSQL and Redis instances, but they’ve decided to cancel them in 2022 due to concerns related to fraud and bots. Nevertheless, Heroku remains an excellent platform for deploying apps.
AWS Elastic Beanstalk
AWS Elastic Beanstalk (EB) is a great Platform as a Service (PaaS) solution. It is a mature and well-tested platform that was established back in 2011. EB natively supports Go, Java, Node.js, PHP, Python, Ruby and allows deploying dockerized applications.
The best thing about Elastic Beanstalk is that you can combine it with other AWS solutions, such as AWS S3, AWS RDS, AWS CloudFront, and so on. AWS offers a free tier to new customers.
PHP Deployment Process
In this section, we’ll look at how to bootstrap and deploy a simple Laravel web app to Back4app Containers.
Prerequisites
- Basic understanding of PHP.
- Basic understanding of Docker and containerization technology.
- Composer along with Node.js and Docker installed on your local machine.
If you’re unfamiliar with containerization technology, check out What are containers?
What is Laravel?

Laravel is a great PHP framework that allows you to build apps using an expressive and elegant syntax rapidly. As a result, you end up with clean and concise code.
The framework is based on the model-view-controller (MVC) architectural pattern. Best of all, Laravel is entirely free and open-source.
It was initially released in 2011 and is currently one of the most popular PHP frameworks. Due to its flexibility, it can be used to build any type of web application.
Laravel Advantages
- Performant & flexible.
- Simplifies working with the database (via Eloquent ORM).
- Built-in authentication & authorization.
- Integrated security measures (CSRF, XSS).
Some Laravel alternatives include Symfony, CodeIgniter, CakePHP, and Laminas Project.
Create App
The following steps will require you to have Composer installed. If you don’t have it, download it from the official website.
Start by creating a new Laravel project via the Composer command line interface:
$ composer create-project laravel/laravel sample-appFeel free to replace
sample-appwith a custom name.
This command will create a new Laravel project and the default directory structure. On top of that, it will install all the dependencies via composer install. The command should take at most three minutes.
Once it’s done, you’ll notice the following directory structure:
sample-app/
├── app/                   contains the core code of your application
│   ├── Console
│   ├── Exceptions
│   ├── Http
│   ├── Models
│   └── Providers
├── bootstrap              is used to bootstrap the framework
├── config                 contains all your configuration files
├── database               contains database factories, migrations, seeders
├── public                 contains your index.php and static assets (JS, images, CSS)
├── resources              contains all your views and templates (along with raw assets)
├── routes                 is used to define all your application endpoints
├── storage                contains logs and other auto-generated stuff
├── tests                  can be utilized for automatic testing
└── vendor                 contains your Composer dependencies
Next, run the development server via the following command:
$ php artisan serve

INFO  Server running on [http://127.0.0.1:8000].
Press Ctrl+C to stop the server.
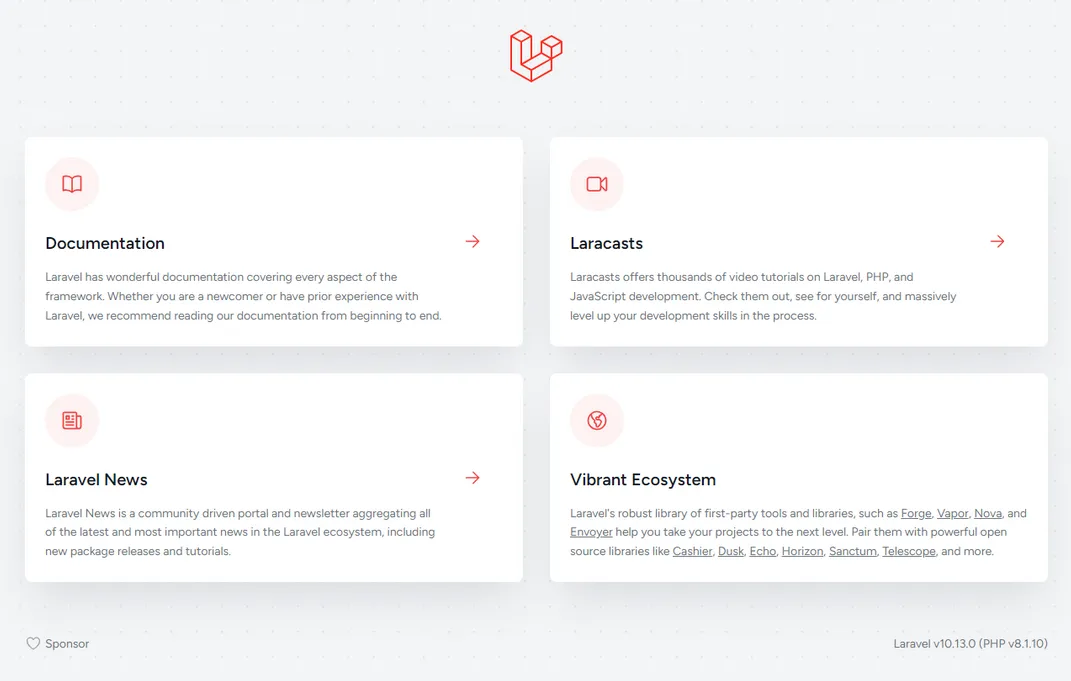
Lastly, open your favorite web browser and navigate to http://localhost:8000/. You should see the default Laravel index page.
Modify App
In this section, we’ll slightly modify the app by registering a new API endpoint.
As mentioned in the previous section, all the routes are defined in the routes folder. The routes folder contains the following files:
routes/
├── api
├── channels
├── console
└── web
The web directory defines end-user routes, api for API routes, console for defining console commands, and finally, channels for event broadcasting channels.
Before Laravel 5.3, there was just one routes file located at app/Http/routes.php.
Navigate to routes/api.php and register a new API endpoint like so:
<?php

// routes/api.php

use Illuminate\Http\Request;
use Illuminate\Support\Facades\Route;

Route::middleware('auth:sanctum')->get('/user', function (Request $request) {
    return $request->user();
});

// new endpoint
Route::get('/', function () {
    return response()->json([
        'detail' => 'Back4app Containers rocks!',
    ]);
});
Great, that’s it.
Start the development server again (if it isn’t running yet) and navigate to http://localhost:8000/. You should still be able to see the default Laravel page, but if you navigate to /api/, you should see the following message:
{
    "detail": "Back4app Containers rocks!"
}
Dockerize App
In this section, we’ll dockerize our Laravel app using a Dockerfile.
Dockerfile
A Dockerfile is a plain text file containing all the instructions the Docker Engine has to perform to build and run a Docker image. The instructions are usually written in all uppercase and are followed by a custom amount of arguments. Example:
INSTRUCTION arg1 arg2 ... argnGo ahead and create a Dockerfile in the project root with the following contents:
FROM php:8.1-apache

# Set the working directory
WORKDIR /var/www/html

# Install the necessary libraries
RUN apt-get update && apt-get install -y \
    libonig-dev \
    libzip-dev

# Install PHP extensions
RUN docker-php-ext-install \
    mbstring \
    zip

# Copy over the Laravel project
COPY . .

# Install Composer along with the dependencies
COPY --from=composer:latest /usr/bin/composer /usr/bin/composer
RUN composer install

# Change ownership of our applications
RUN chown -R www-data:www-data /var/www/html

# Copy over the .env file and generate the app key
COPY .env .env
RUN php artisan key:generate

# Expose port 80
EXPOSE 80

# Adjusting Apache configurations
RUN a2enmod rewrite
COPY apache/apache-config.conf /etc/apache2/sites-available/000-default.conf
This Dockerfile uses php:8.1-apache as the base image, installs the required OS dependencies, and copies over the project. It then installs PHP dependencies via Composer, generates a Laravel key, exposes port 80, and finally copies over the Apache config.
To learn more about Dockerfiles, check out the Dockerfile reference.
.dockerignore
We can use a .dockerignore file to reduce the image size. This file works similarly to a .gitignore file. It allows us to omit specific files and directories we don’t want to be included in the image.
Create a .dockerignore file in the project root with the following contents:
/.phpunit.cache
/node_modules
/public/build
/public/hot
/public/storage
/storage/*.key
/vendor
.phpunit.result.cache
auth.json
npm-debug.log
yarn-error.log
/.fleet
/.idea
/.vscode
Feel free to modify the .dockerignore file according to your needs.
Build, Run, and Test
Before trying to build an image, make sure you have Docker installed:
$ docker --version

Docker version 20.10.22, build 3a2c30b
Once you’ve verified that you can build the image:
$ docker build -t laravel-sample:1.0 .Command rundown:
docker buildis used to build the image.-t laravel-sample:1.0tags the image (image names usually havename:versionstructure)..specifies the build context. That is the project root in our case.
Next, use the newly created image to spin up a container:
$ docker run -p 80:80 --name laravel-sample-container -d laravel-sample:1.0Command rundown:
docker runis used to spin up a container.-p 80:80binds port80on the host to80in the container.--name laravel-sample-containerspecifies the container name.-druns the image in detached mode, that is, without occupying the terminal.laravel-sample:1.0tells the Docker engine what image should be used.
If you now check the running containers, you should see laravel-sample-container:
$ docker ps

CONTAINER  IMAGE               COMMAND          CREATED  PORTS
b0bfbd     laravel-sample:1.0  "docker-php..."  2s ago   0.0.0.0:80->80/tcp  laravel
Lastly, check if you can see the app by visiting http://localhost/ in your favorite web browser.
Push to GitHub
To deploy your app to Back4app Containers, you must first upload your source code to GitHub. Back4app Containers uses a CI/CD system that automatically deploys when you commit your code to a specific branch.
The following steps will require you to have a GitHub account (and Git installed).
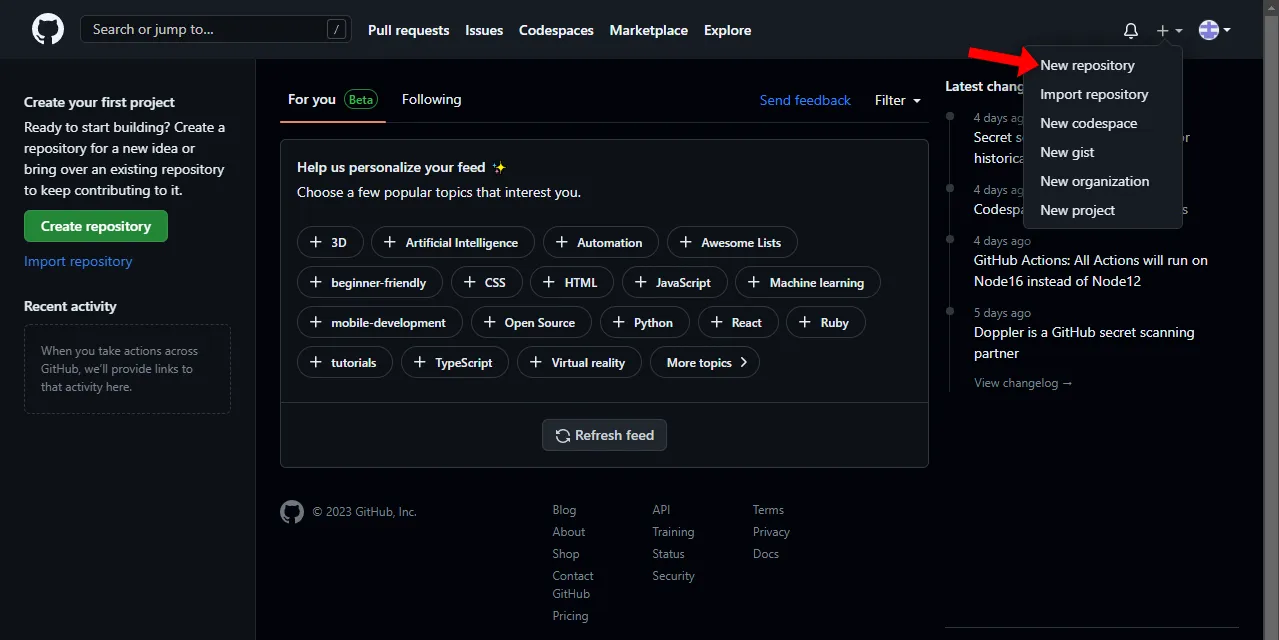
Start by navigating to https://github.com and creating a new repository:
Next, pick a suitable name and leave everything else as default. Then click on the “Create repository” button to create the repository:
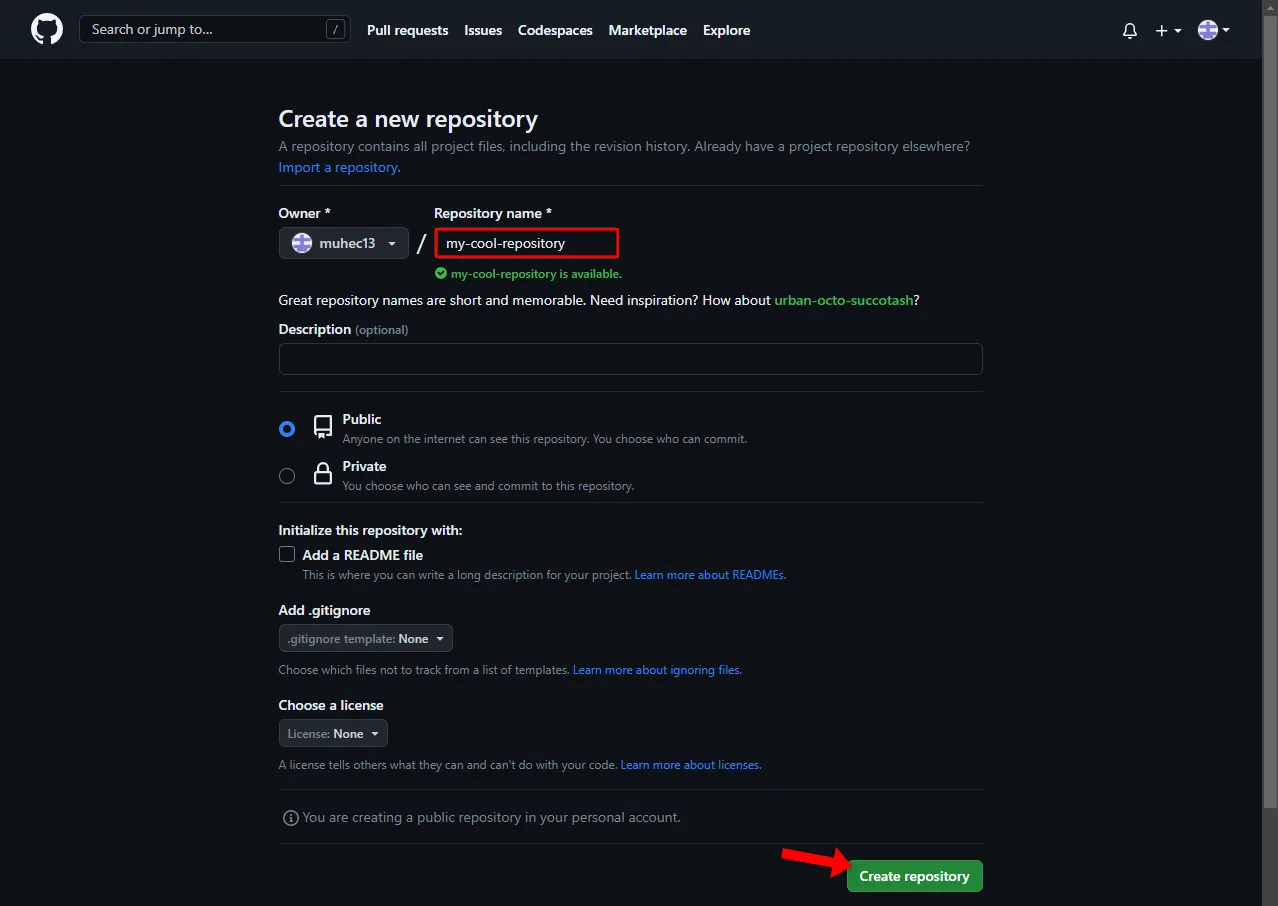
Once your repository is created, grab the remote URL:
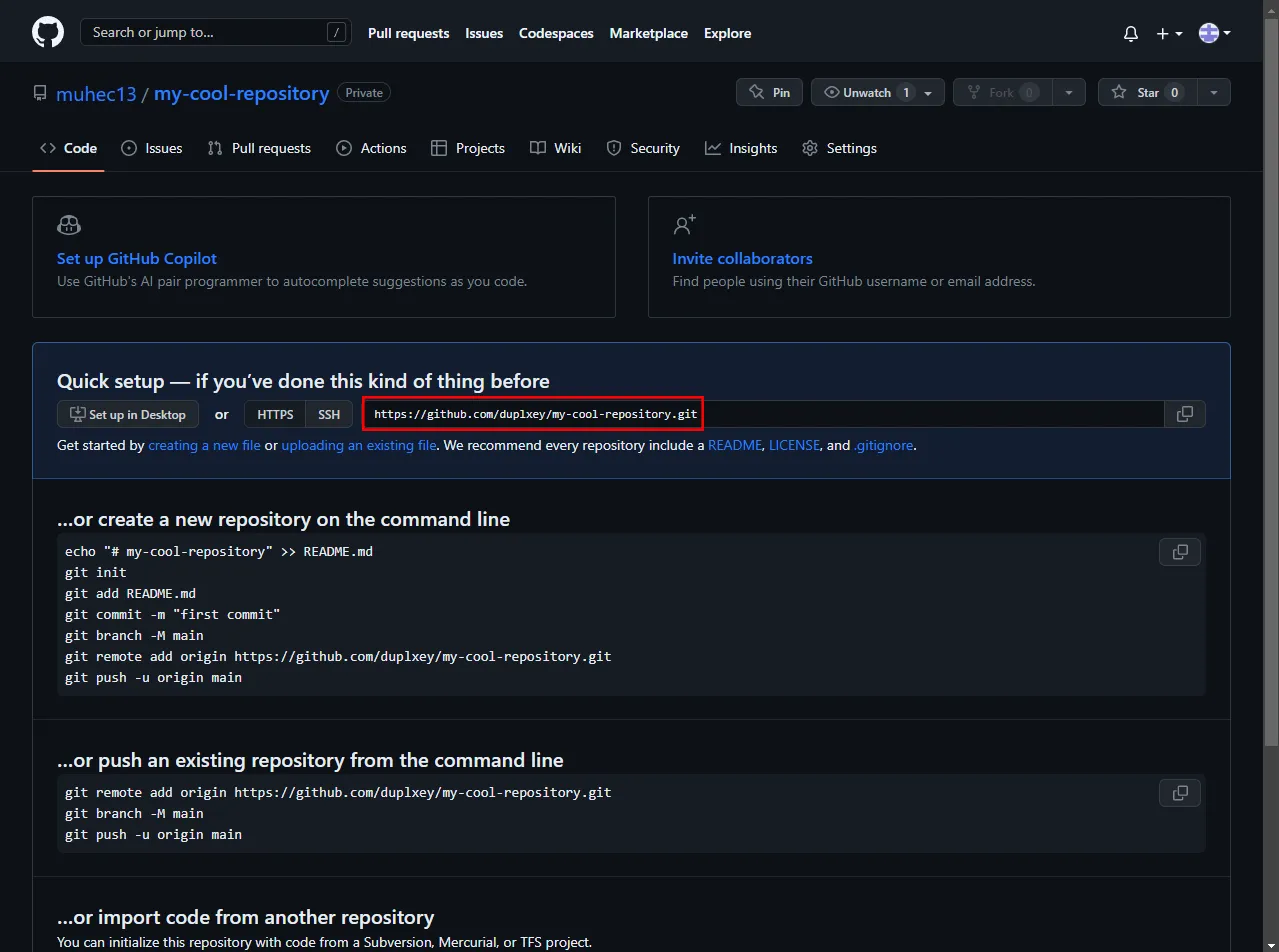
Now navigate back to your local project and open the command line. To push the code to GitHub, you first have to initialize a local Git repository via the following:
$ git initNext, VCS all the files and create a new commit:
$ git add .
$ git commit -m "init"
Lastly, push the code to the remote:
$ git push origin masterThat’s it! If you refresh the GitHub repository page, you should see that all the files have been successfully pushed to the remote Git repository.
Deploy App
To deploy an app to Back4app Containers, you first need to login (or sign up if you don’t have an account yet). You’ll then get redirected to the app dashboard page as you log in.
Then use the “Build new app” button to start the app creation process:
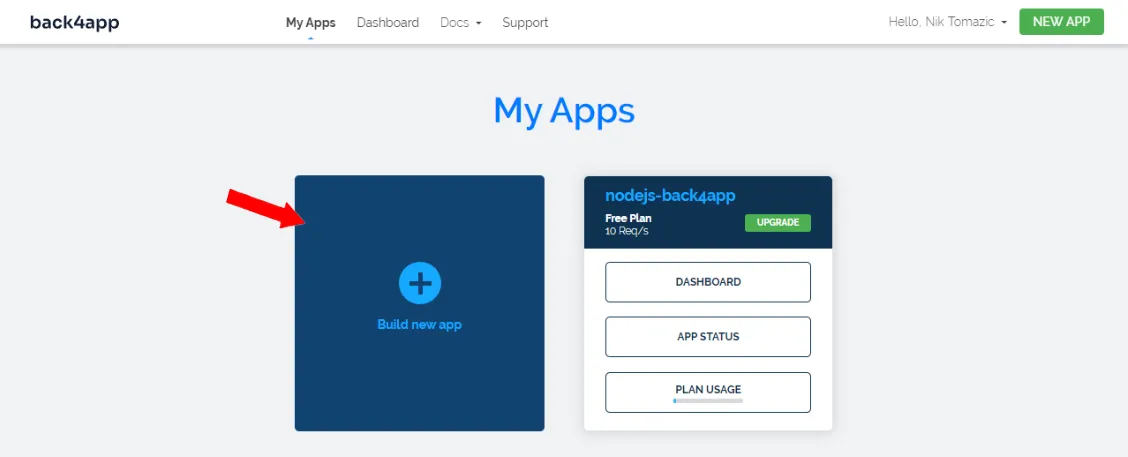
Select “Containers as a Service” since we’re deploying a containerized app:
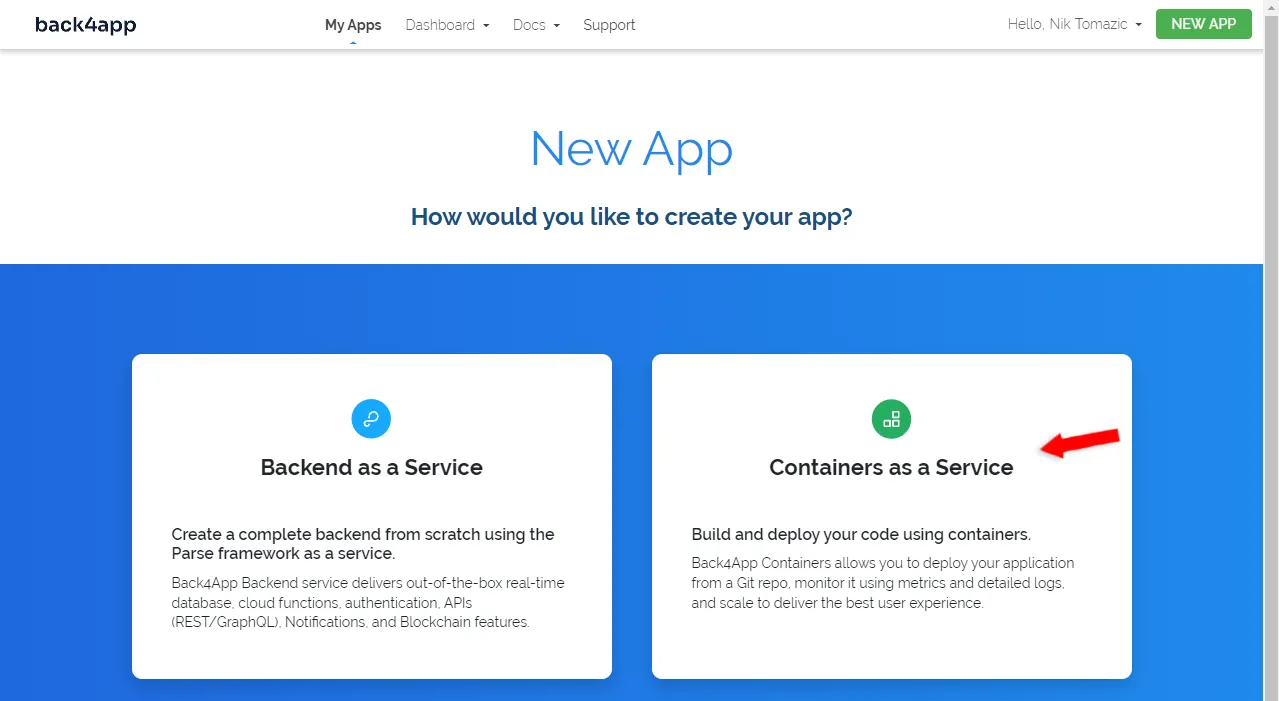
Next, connect your GitHub to your Back4app account and import the repository we’ve created in the previous step.
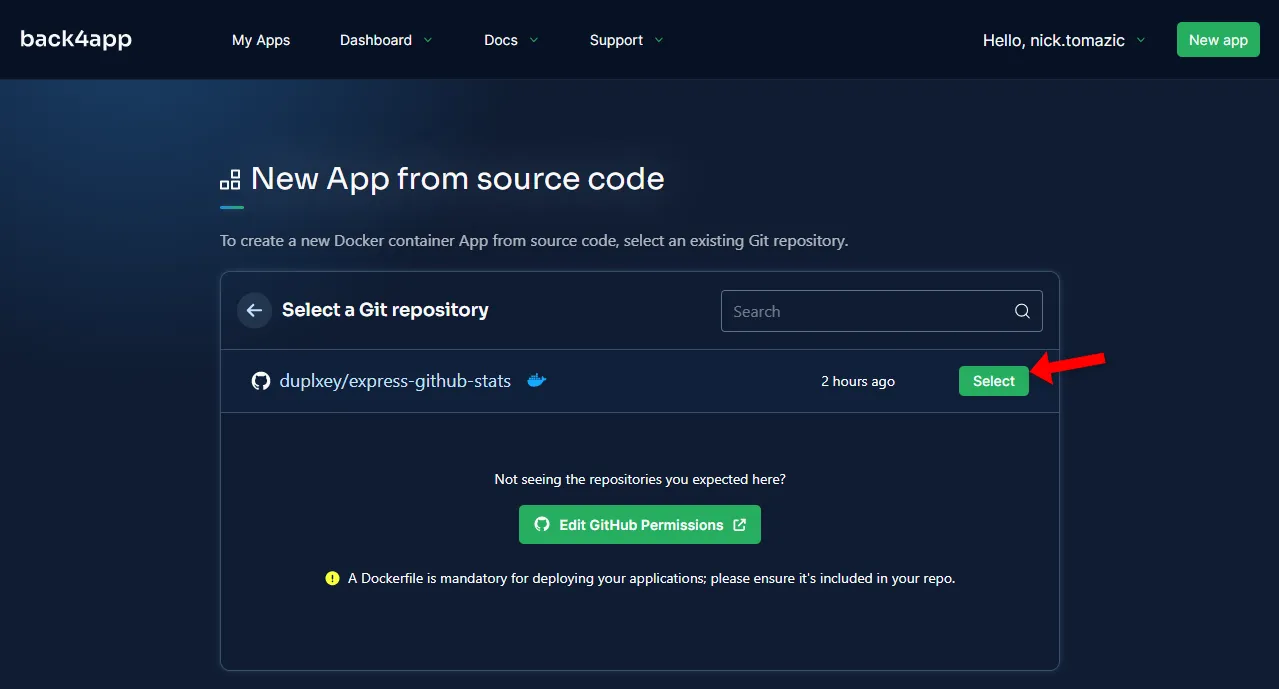
Give your app a custom name and leave everything else as default.
To create an app, click on “Create App”. Back4app will automatically pull the source code from GitHub and start the docker image-building process as you click it. After a few minutes, the app status will change to “Ready”.
Once that happens, use the link on the left to open the page in your browser.

That’s it!
Conclusion
In conclusion, you’ve learned about PHP, its advantages, disadvantages, and deployment options. You now know how to bootstrap and deploy a Laravel application to Back4app.
The topics we looked at throughout the tutorial barely scratched the surface of the Laravel framework. You can always learn more by checking out the Laravel documentation.
The source code is available on the back4app-containers-php GitHub repository.
Future steps
- Look into Laravel Architecture Concepts and Eloquent ORM.
- Spin up a managed MySQL database and connect your Back4app Containers app with it.
FAQ
What is PHP?
PHP is a popular free general-purpose scripting language. It was designed for the web but can also be used for server-side scripting, command-line commands, and desktop applications. PHP currently powers roughly 80% of the web and is used by many high-traffic sites such as Facebook, Wikipedia, Slack, et cetera.
What are the advantages of PHP?
– Good performance
– Cross-platform
– Database support
– Vibrant ecosystem
– Easy to learn
What are the disadvantages of PHP?
– Limited Debugging Tools
– Loosely Typed
– Security Flaws
– Vanilla PHP is Outdated
How to deploy a PHP app?
1. Code your PHP application.
2. Dockerize your app and test it locally.
3. Push the source code to GitHub.
4. Create a Back4app Containers account.
5. Import your GitHub repository and click deploy!


