What are Containers in cloud computing?
Ever since Docker hit the scene in 2013 containers have been exploding in popularity. A lot of companies have already integrated containers into their workflows because it allows them to easily deploy, distribute, manage, and scale their software.
In this article, we’ll explain what are containers in cloud computing. We’ll talk about the benefits of using containers, their use cases, compare them to virtual machines, and look at Docker and Kubernetes. Lastly, we’ll teach you how to code, dockerize and deploy a web application to Back4app Containers — for absolutely free!
Contents
- 1 Container Definition
- 2 Benefits of using Containers
- 3 Containers Use Cases
- 4 Containers vs. Virtual Machines
- 5 Docker and Kubernetes
- 6 Developing an App using Container-based Architecture
- 7 Conclusion
- 8 FAQ
- 9 What is a container?
- 10 What are the benefits of using containers?
- 11 What’s the difference between containers and virtual machines?
- 12 What is the difference between Docker and Kubernetes?
- 13 How to develop an app using container-based architecture?
Container Definition
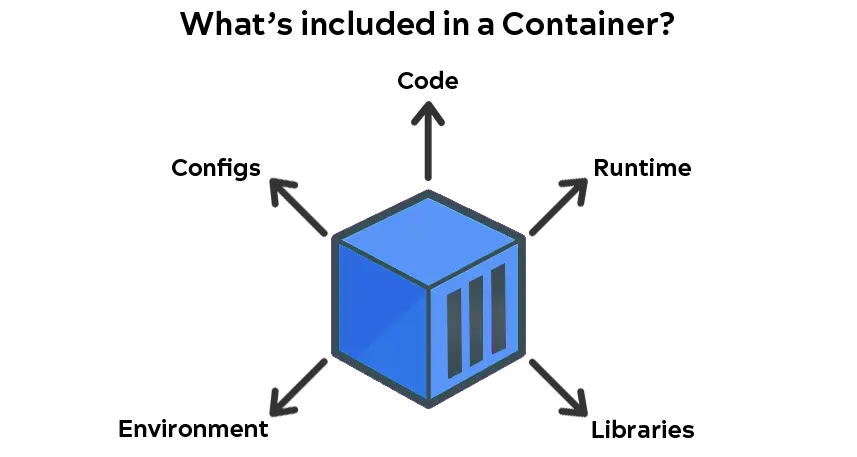
A container is a standalone executable package that includes everything needed to run an application: code, runtime, libraries, environment variables, and config files. The awesome thing about containerized apps is that they can run anywhere from your local development environment to public clouds and so on. Containers are small in size, efficient and allow for effective isolation.
Benefits of using Containers
Using containers has several benefits. Let’s look at some of them.
Efficiency
Containers require fewer system resources than traditional servers or VMs because they don’t include an operating system image. That makes them extremely efficient, small in size (usually measured in MBs) and allows you to run a significant number of apps on one server.
Application Isolation
Containers isolate the application and its dependencies from the host system. At the same time, they’re able to share the OS kernel and system resources like the CPU, memory, storage, and network.
Portability
Containerized software can run and behave the same way on practically any machine that has the container engine installed. This makes it easy to deploy and move apps between different environments and eliminates the “it works on my machine” problem.
Separation of Responsibility
Containers enable the separation of responsibility by dividing tasks and responsibilities between developers and IT operations teams. Developers are responsible for creating and maintaining application code and dependencies, while IT operations teams focus on deploying and managing the containers and the underlying infrastructure.
Faster Application Development
Containerization makes it easier to develop, test, manage, and distribute software. Containers can be easily integrated with CI/CD systems, which can greatly accelerate the software development and shipping process.
Easy Scaling
Containerized applications in combination with an orchestration platform like Kubernetes can easily scale on demand. This allows your business to accommodate high workloads while minimizing costs.
Containers Use Cases
Container technology has a lot of use cases for developers as well as for IT operations teams.
Container-Native Development
Container-native development is a software development approach that leverages containers as a primary building block. In container-native development, applications are packaged as containers and run in a containerized environment. This development approach gives you all the cool perks containers have to offer.
Continuous Integration and Continuous Delivery (CI/CD)
In a CI/CD pipeline, containers are used to package applications and run automated tests, making it possible to test and deploy applications in a consistent and repeatable manner. Containers can be easily created, tested, and deployed as part of the CI/CD pipeline, reducing the risk of errors and improving the overall efficiency of the software development process.
Microservices
Containers can be used to develop apps that follow a microservice architecture. With containers, you can easily split your monolithic app into a collection of loosely-coupled, fine-grained services that run in different containers.
Development Environment
Containers make it easy for developer teams to quickly set up their development environments. They provide consistent development environments regardless of their host operating system and host libraries.
Batch Processes
Batch processes can be easily containerized and deployed to the cloud. Each task is packaged as an individual container image and executed as a separate container instance. This allows for efficient resource utilization, as each task runs in its own environment and does not interfere with other tasks.
Containers vs. Virtual Machines
Containers and virtual machines are two different approaches to virtualization. Although they have some similarities, they’re quite different.
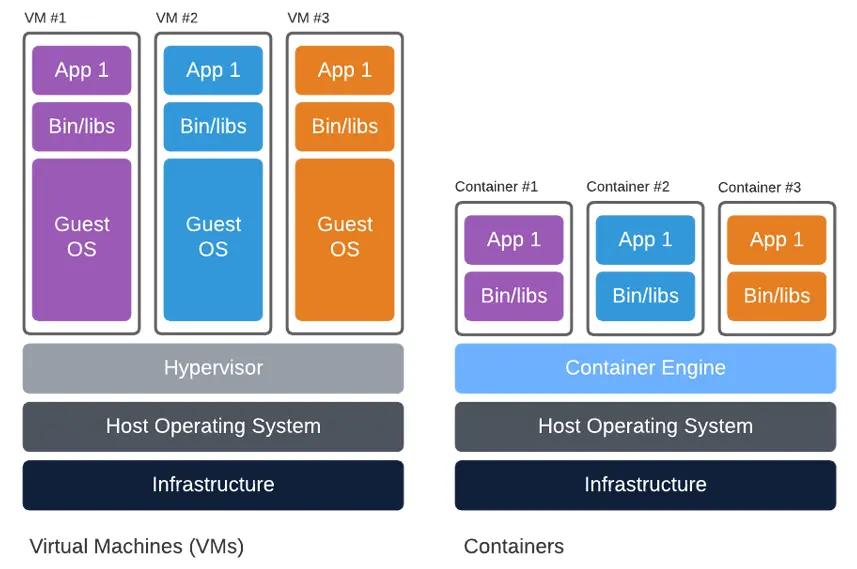
Virtual machines (VMs) are an abstraction of physical hardware. They allow us to turn one server into multiple servers. Each of the VMs has its own operating system and is usually managed by a hypervisor. VMs are suitable for running multiple applications (on the same server), monolithic applications, and apps that require a high degree of isolation and security. Their drawback is that they tend to take up a lot of space and can be quite slow to boot.
Containers on the other hand are virtualized at the operating system level. They take up less space since they share the same Linux kernel, are more efficient, boot faster, are highly scalable, and can handle more applications. Containers are managed by a Container Engine. Their main use cases in contrast to VMs are microservices and applications that need to be portable, lightweight, and scalable.
It is also possible to combine containers and VMs to get the benefits of both.
Docker and Kubernetes
Two of the most popular tools for working with containers are Docker and Kubernetes. Let’s explain how they work and look at their differences.
Docker is a Linux-based open-source project that is used to automate the deployment and management of applications in lightweight containers. This allows containerized apps to work efficiently in different environments. These days Docker can be found almost anywhere from Linux machines to big cloud providers and so on.
Most popular Docker alternatives are Podman, LXD and containerd.
Kubernetes (K8s) is an open-source container orchestration system for automating the deployment, scaling, and management of containerized apps. Since its release in 2014, it has become the de facto standard for deploying and operating containerized applications in cloud environments. The benefits of Kubernetes include scalability, high availability, automated operations, infrastructure abstraction, and health monitoring.
Other orchestration platforms include: AWS ECS, Nomad and Red Hat OpenShift.
So what’s the difference between Docker and Kubernetes? Well, in simple terms Docker allows us to package and distribute applications inside containers, while Kubernetes makes it easy for multiple containers to work in harmony with one another.
Developing an App using Container-based Architecture
In this section of the tutorial, we’ll create, dockerize and deploy a simple REST API to Back4app Containers.
What is Back4app Containers?
Back4app Containers is a free open-source platform for deploying and scaling apps on globally distributed containers in a cloud infrastructure.
It allows you to focus on your software and ship it faster without needing to worry about DevOps. The platform is closely integrated with GitHub, has a built-in CI/CD system, and allows you to get your app up and running in minutes!
Why use Back4app Containers?
- Integrates well with GitHub
- Zero-downtime deployments
- Easy to use & has a free tier
- Excellent customer support
Project Introduction
We’ll be building a simple REST API that will serve as a movie watchlist. The web app will allow basic CRUD operations like adding a movie, deleting a movie, and so on. To create the API we’ll use the Flask framework. Lastly, we’ll Dockerize the project and demonstrate how easy it is to deploy it to Back4app Containers.
Prerequisites
- Experience with the Flask framework
- Basic understanding of Docker and containers
- Ability to use Git and GitHub
Code App
The following steps will require you to have Python installed. If you don’t have Python installed yet, go ahead and download it.
Project initialization
First, create a dedicated directory for your app and navigate to it:
$ mkdir flask-watchlist
$ cd flask-watchlist
Next, create a new virtual environment and activate it:
$ python3 -m venv venv && source venv/bin/activateSince we’re going to be using Flask as our framework we have to install it:
$ (venv) pip install Flask==2.2.2Create app.py with the following contents:
# app.py

from flask import Flask

app = Flask(__name__)
app.config['JSON_SORT_KEYS'] = False


@app.route('/')
def index_view():
    return {
        'detail': 'Hello world!'
    }
This code initializes Flask and creates a simple endpoint that returns a message.
Run the server with:
$ flask runNavigate to http://localhost:5000/ and you should see a message saying Hello world!.
Database
For the database, we’re going to be using SQLite. SQLite is an embedded, server-less relational database management system. To simplify working with the database we’ll install Flask-SQLAlchemy — an extension for Flask that adds support for SQLAlchemy to your app.
Go ahead and install it by running:
$ (venv) pip install Flask-SQLAlchemy==3.0.3Next, navigate to the top of app.py and change it like so to initialize the database:
# app.py

db = SQLAlchemy()
app = Flask(__name__)
app.config['JSON_SORT_KEYS'] = False
app.config['SECRET_KEY'] = '5b3cd5b80eb8b217c20fb37074ff4a33'
app.config['SQLALCHEMY_TRACK_MODIFICATIONS'] = False
app.config["SQLALCHEMY_DATABASE_URI"] = "sqlite:///default.db"
db.init_app(app)
Don’t forget about the import:
from flask_sqlalchemy import SQLAlchemyNext, let’s define our database models.
Since we’re building a simple movie watchlist app we’ll only need one model. Define the Movie model like so:
# app.py

class Movie(db.Model):
    id = db.Column(db.Integer, primary_key=True)
    title = db.Column(db.String(128), nullable=False)
    release_date = db.Column(db.Date(), nullable=False)

    is_watched = db.Column(db.Boolean, default=False)
    watched_at = db.Column(db.DateTime, default=None, nullable=True)

    def as_dict(self):
        return {c.name: getattr(self, c.name) for c in self.__table__.columns}

    def __repr__(self):
        return '<Movie %r>' % self.title
To initialize and populate our database we’ll create a simple Python script. Navigate to your project root and create a new file named init_db.py with the following contents:
# init_db.py

from datetime import date

from app import db, app
from app import Movie

with app.app_context():
    db.create_all()

    if Movie.query.count() == 0:
        movies = [
            Movie(title='Fight Club', release_date=date(1999, 9, 15)),
            Movie(title='The Matrix', release_date=date(1999, 3, 31)),
            Movie(title='Donnie Darko', release_date=date(2001, 1, 19)),
            Movie(title='Inception', release_date=date(2010, 7, 16)),
        ]

        for movie in movies:
            db.session.add(movie)

        db.session.commit()
The last thing we have to do is to run the script:
$ (venv) python init_db.pyThis creates the database, database tables, and populates them. The database file will be placed in the instance folder.
API endpoints
Our web app will have the following endpoints:
/returns basic API information/api/returns the list of the movies/api/create/adds a new movie to the watchlist/api/<movie_id>/returns details of a specific movie/api/watch/<movie_id>/marks the movie as seen
Go ahead and define the endpoints at the bottom of app.py:
# app.py

@app.route('/')
def index_view():
    return {
        'name': 'flask-watchlist',
        'description': 'a simple app for tracking the movies you want to watch',
        'version': 1.1,
    }


@app.route('/api/')
def list_view():
    json = [movie.as_dict() for movie in Movie.query.all()]
    return jsonify(json)


@app.route('/api/<int:movie_id>/', methods=['GET', 'DELETE'])
def detail_view(movie_id):
    movie = db.get_or_404(Movie, movie_id)

    if request.method == 'DELETE':
        db.session.delete(movie)
        db.session.commit()

        return {
            'detail': 'Movie has been successfully deleted.'
        }
    else:
        return movie.as_dict()


@app.route('/api/create/', methods=['POST'])
def create_view():
    title = request.form.get('title')
    release_date = request.form.get('release_date', type=float)

    if title is None or release_date is None:
        return {
            'detail': 'Please provide the title and release_date.'
        }, 400

    movie = Movie(title=title, release_date=datetime.fromtimestamp(release_date))
    db.session.add(movie)
    db.session.commit()

    return movie.as_dict()


@app.route('/api/watch/<int:movie_id>/')
def watch_view(movie_id):
    movie = db.get_or_404(Movie, movie_id)

    if movie.is_watched:
        return {
            'detail': 'Movie has already been watched.'
        }, 400

    movie.is_watched = True
    movie.watched_at = datetime.now()
    db.session.commit()

    return movie.as_dict()
Don’t forget about the imports:
from datetime import datetime
from flask import request, jsonify
Great, our app is now more or less complete. Run the development server:
$ (venv) flask runTest if you can fetch the movie list:
$ (venv) curl http://localhost:5000/api/ | jq '.'

[
  {
    "id": 1,
    "title": "Fight Club",
    "release_date": "Wed, 15 Sep 1999 00:00:00 GMT",
    "is_watched": false,
    "watched_at": null
  },
  {
    "id": 2,
    "title": "The Matrix",
    "release_date": "Wed, 31 Mar 1999 00:00:00 GMT",
    "is_watched": false,
    "watched_at": null
  },
  ...
]
Gunicorn
The Flask development server isn’t appropriate for production, so let’s swap it with Gunicorn. Gunicorn or “Green Unicorn” is a production-ready Python WSGI HTTP Server for Unix.
Install it by running:
$ (venv) pip install gunicorn==20.1.0After the package has been installed you can start your WSGI server like so:
$ (venv) gunicorn -w 2 -b 0.0.0.0:5000 app:app

[INFO] Starting gunicorn 20.1.0
[INFO] Listening at: http://0.0.0.0:5000 (1)
[INFO] Using worker: sync
[INFO] Booting worker with pid: 7
[INFO] Booting worker with pid: 8
Keep in mind that this command only works on UNIX-based operating systems.
This will start two Gunicorn workers and expose your app to the internet. To access the app open your favorite web browser and navigate to http://localhost:5000.
requirements.txt
The last thing we need to do before Dockerizing our app is to create a requirements.txt file. The requirements.txt file is used to specify the project’s dependencies.
The easiest way to generate it is by running:
$ (venv) pip freeze > requirements.txtDockerize App
The following steps will require you to have Docker installed. The easiest way to install Docker is by downloading Docker Desktop.
To verify you have Docker installed run:
$ docker --version

Docker version 20.10.22, build 3a2c30b
Dockerfile
To dockerize our application we’ll use a Dockerfile. A Dockerfile is a plain text file that allows us to define the base image, environment, environmental variables, commands, networking settings, volumes, and so on.
Create a Dockerfile in your project root with the following contents:
# syntax=docker/dockerfile:1.4
FROM --platform=$BUILDPLATFORM python:3.10-alpine

# set the working directory
WORKDIR /app

# set environmental variables
ENV PYTHONDONTWRITEBYTECODE 1
ENV PYTHONUNBUFFERED 1

# install the requirements
COPY requirements.txt /app
RUN --mount=type=cache,target=/root/.cache/pip \
    pip3 install -r requirements.txt

# copy the code to the container
COPY . .

# initialize the database (create DB, tables, populate)
RUN python init_db.py

# expose
EXPOSE 5000/tcp

# entrypoint command
CMD ["gunicorn", "-w", "2", "-b", "0.0.0.0:5000", "app:app"]- We used
python:3.10-alpineas the base image. - Setting
PYTHONDONTWRITEBYTECODEto1makes Python no longer write .pyc files to disk. - Setting
PYTHONUNBUFFEREDto1ensures that the Python output streams are sent straight to the terminal.
For more information about writing Dockerfiles take a look at the Dockerfile reference.
.dockerignore
Before Docker builds an image it looks for a .dockerignore file. A .dockerignore file allows us to define which files we don’t want to be included in the image. This can greatly reduce the image size. It works similarly to a .gitignore file.
Create a .dockerignore file in the project root with the following contents:
# .dockerignore

.git/
instance/
__pycache__/
.idea/
Make sure to add any additional directories or files you’d like to exclude.
Build and run the image
Moving along, let’s build and tag our Docker image.
$ docker build -t flask-watchlist:1.0 .
[+] Building 11.1s (15/15) FINISHED
=> [internal] load build definition from Dockerfile 0.0s
=> => transferring dockerfile: 32B 0.0s
=> [internal] load .dockerignore 0.0s
=> => transferring context: 34B 0.0s
=> resolve image config for docker.io/docker/dockerfile:1.4 0.5s
=> CACHED docker-image://docker.io/docker/dockerfile:1.4@sha256:9ba7531a0dbc 0.0s
=> [internal] load build definition from Dockerfile 0.0s
=> [internal] load .dockerignore 0.0s
=> [internal] load metadata for docker.io/library/python:3.10-alpine 0.5s
=> [stage-0 1/6] FROM docker.io/library/python:3.10-alpine@sha256:da5ab5e911253dfb 0.0s
=> [internal] load build context 0.3s
=> => transferring context: 182.45kB 0.2s
=> CACHED [stage-0 2/6] WORKDIR /app 0.0s
=> [stage-0 3/6] COPY requirements.txt /app 0.0s
=> [stage-0 4/6] RUN --mount=type=cache,target=/root/.cache/pip
pip3 install -r requirements.txt 7.2s
=> [stage-0 5/6] COPY . . 0.3s
=> [stage-0 6/6] RUN python init_db.py 1.5s
=> exporting to image 0.3s
=> => exporting layers 0.3s
=> => writing image sha256:2671ccb7546a0594807c721a0600a 0.0s
=> => naming to docker.io/library/flask-watchlist:1.0 If you list the images you should see our new image:
$ docker images

REPOSITORY        TAG       IMAGE ID       CREATED       SIZE
flask-watchlist   1.0       7bce66230eb1   8 hours ago   110MB
Lastly, use the image to spin up a new Docker container:
$ docker run -it -p 5000:5000 flask-watchlist:1.0

[2023-02-02 20:08:57 +0000] [1] [INFO] Starting gunicorn 20.1.0
[2023-02-02 20:08:57 +0000] [1] [INFO] Listening at: http://0.0.0.0:5000 (1)
[2023-02-02 20:08:57 +0000] [1] [INFO] Using worker: sync
[2023-02-02 20:08:57 +0000] [7] [INFO] Booting worker with pid: 7
[2023-02-02 20:08:57 +0000] [8] [INFO] Booting worker with pid: 8
You can use
-dto start the Docker container in detached mode. Meaning that the container runs in the background of your terminal and doesn’t receive input or display output.
Well done, your app is now running in a container! Navigate to http://localhost:5000 and you should get the following response:
{
    "name": "flask-watchlist",
    "description": "a simple app for tracking the movies you want to watch",
    "version": 1
}
GitHub
To deploy the app to Back4app Containers you’ll have to upload your source code to a GitHub repository. Go ahead and create a new repository on GitHub, add the remote, add .gitignore, and commit your code. Once your code is on GitHub move to the next step.
Deploy App to Back4app Containers
The following steps will require you to have a Back4app account. If you already have it log in otherwise go ahead and sign up for the free account.
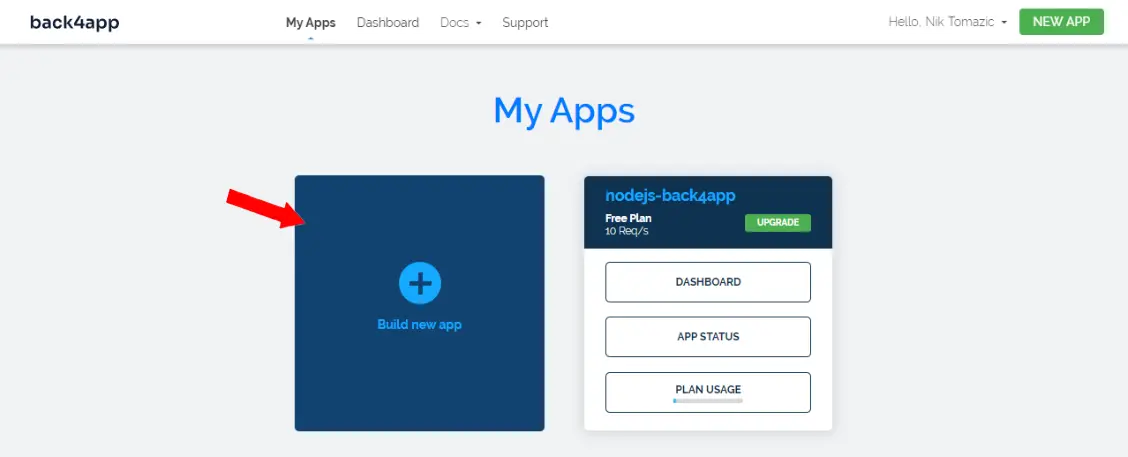
To work with Back4app we first need to create an app. As you log in to your dashboard you’ll see the list of your apps. Click on “Build a new app” to create a new app.
Next, select “Containers as a Service”.
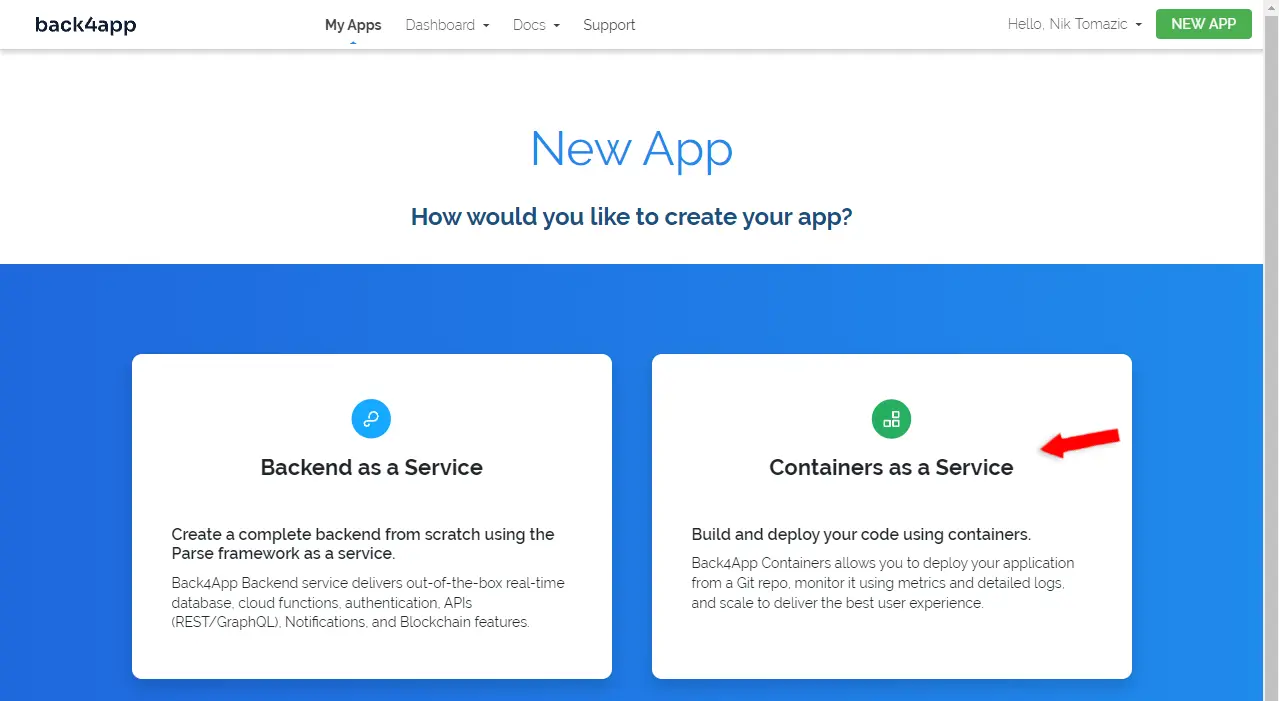
If you haven’t already go ahead and connect your GitHub to Back4app and import the repositories you’d like to deploy. Once your GitHub is connected your repositories will be displayed in the table.
Pick the repository you’d like to deploy by clicking on “Select”.
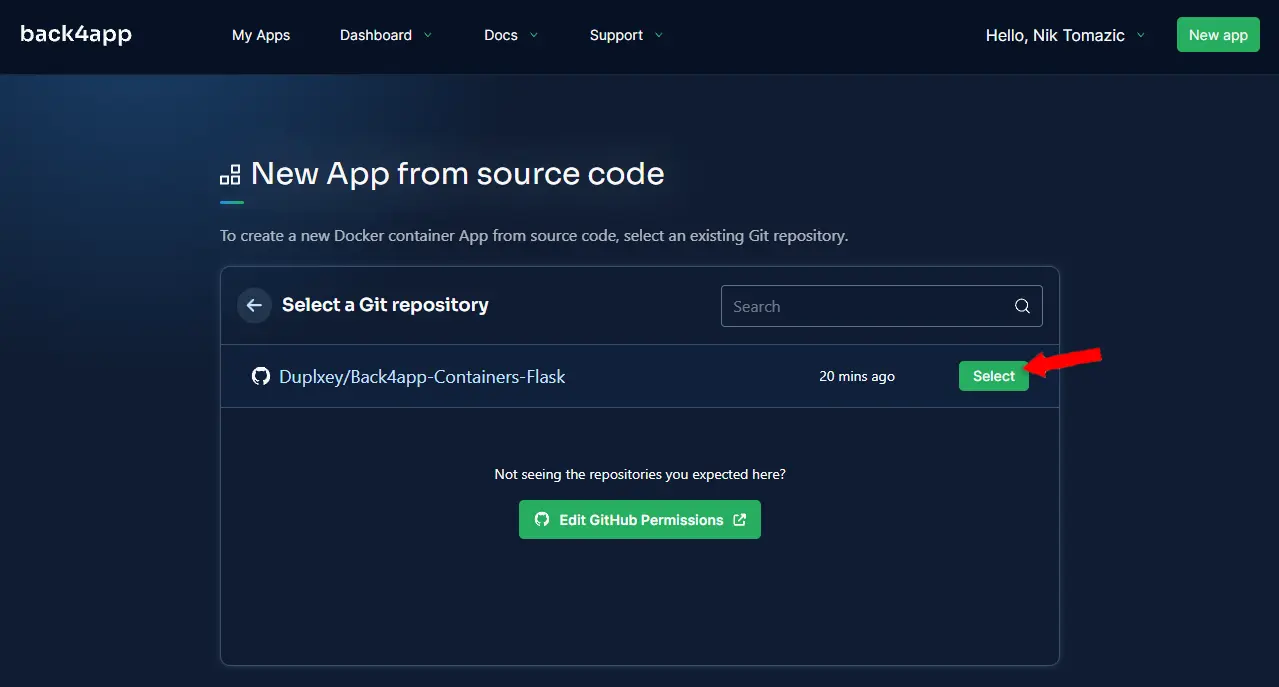
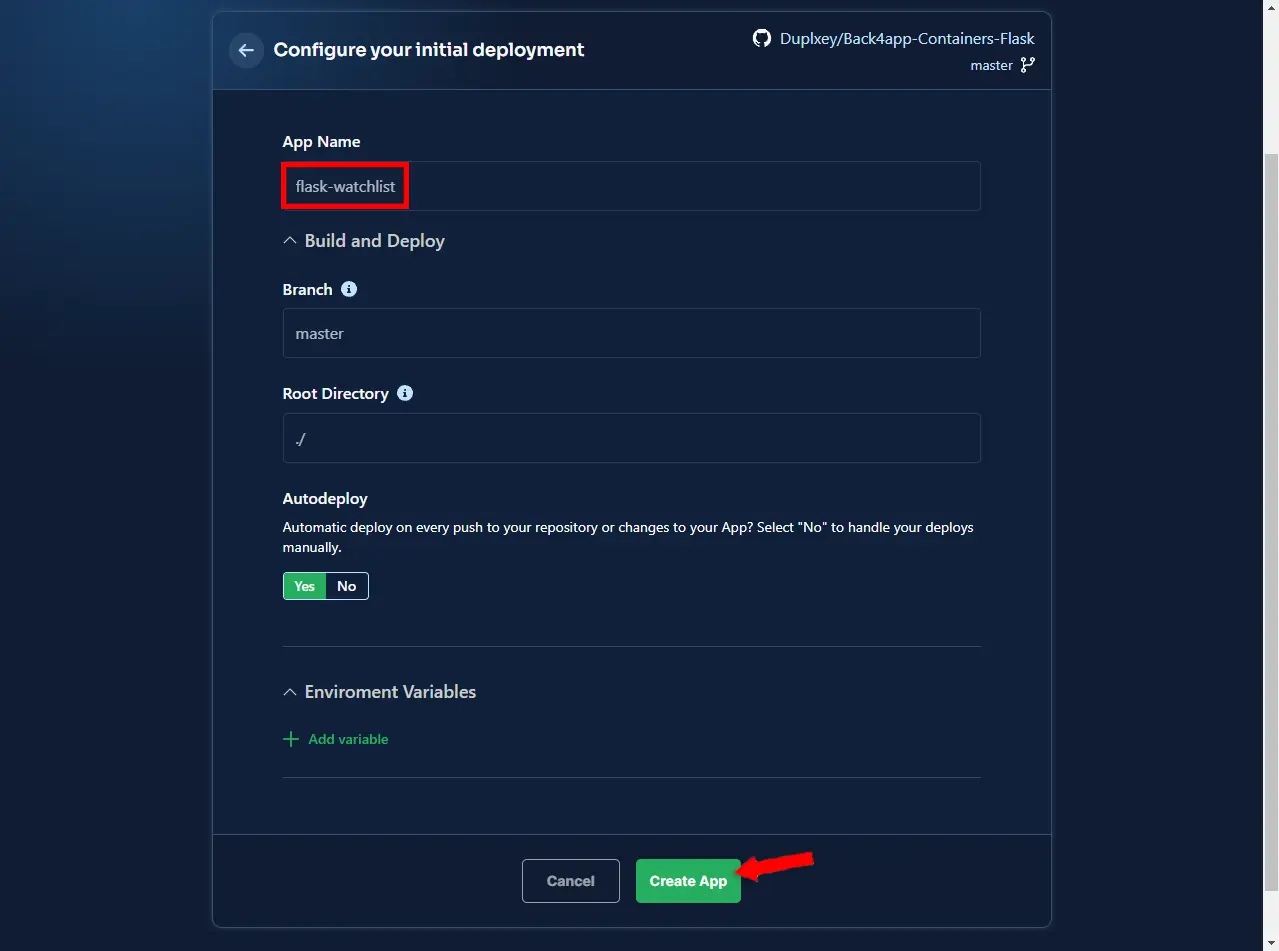
Next, Back4app is going to ask you to configure the environment. Pick an app name, I’ll go with flask-watchlist. Feel free to leave everything else as default.
Lastly, click “Create App” to automatically create the app and deploy it.
You will then be redirected to your app details where you can see the deployment logs.
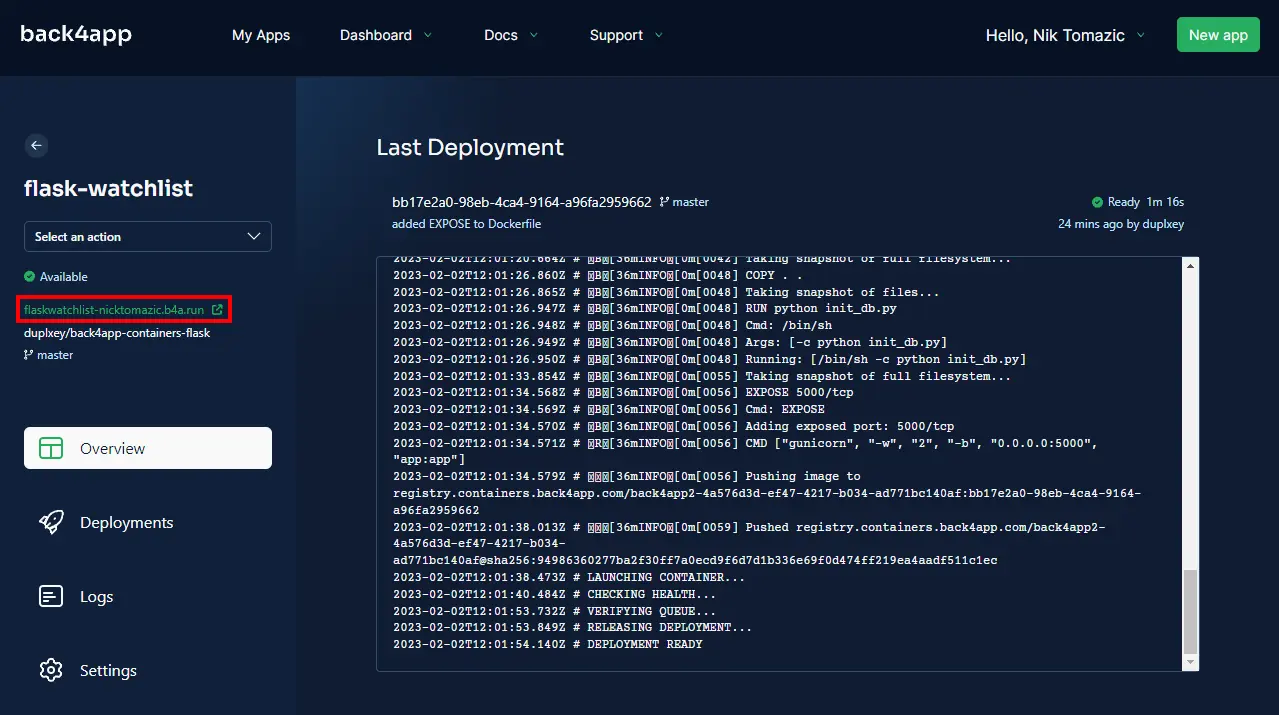
Wait a few minutes for the app to deploy and voila! Your app is now live on Back4app Containers. To see your app in action click the green URL displayed on the left.
Conclusion
Throughout the article we’ve explained what containers are, their benefits and demonstrated how you could implement containers into your workflow. By now you should be able to build your own simple REST API, dockerize it and deploy it to Back4app Containers.
Grab the final source code from the GitHub repo.
Future steps
- You shouldn’t store the database in your image. At the moment each redeploy is going to reset the database. Consider switching to a managed PostgreSQL or MySQL instance.
- Learn about multi-stage builds to optimize your Dockerfiles.
- Read the article Deploying Docker Containers for a step-by-step tutorial
FAQ
What is a container?
A container is a standalone executable package that includes everything needed to run the application. That is code, runtime, libraries, environment variables, and config files.
What are the benefits of using containers?
– Efficiency
– Application isolation
– Separation of responsibility
– Faster application development
What’s the difference between containers and virtual machines?
VMs are an abstraction of physical hardware, while containers are virtualized on the operating system level. VMs offer greater isolation and security, while containers don’t take up much space, and are efficient and scalable.
What is the difference between Docker and Kubernetes?
Docker allows us to package and distribute applications inside containers, while Kubernetes makes it easy for multiple containers to work together.
How to develop an app using container-based architecture?
1. Pick a programming language and code your app.
2. Dockerize your app with a Dockerfile or Docker Compose.
3. Build a Docker image and test it locally.
4. Pick a CaaS like Back4app Containers and push your code to it.
Wait for the service to deploy and that’s it!


