How to deploy a React app with PostgreSQL?
PostgreSQL is an advanced enterprise-ready relational database management system with many use cases. It is currently the second most popular SQL database, right after MySQL.
In this article, we delve into the essence of PostgreSQL, explore the distinctions between SQL and NoSQL databases, and provide a step-by-step guide on deploying a web app backed by PostgreSQL.
Contents
What is PostgreSQL?
PostgreSQL is a free and open-source object-relational database that supports SQL and JSON.
It was initially released in 1996, so it’s considered a mature, robust, and secure relational database management system (RDBMS).
Postgres can be used as a general-purpose transaction database, geospatial database, dynamic web application database, federated database, and more.
Compared to other popular databases such as MySQL, it supports table inheritance, user-defined types, async replication, and multi-version concurrency control (MVCC).
It is known for its performance, scalability, extensibility, fault tolerance, and ACID-compliance.
The RDBMS is supported on most major operating systems, including Windows, Linux, and macOS.
Additionally, it supports most popular programming languages such as Java, Python, C, Go, Perl, and JavaScript.
SQL vs NoSQL databases
Databases can be split into two categories based on their data structure:
- Relational databases (SQL)
- Non-relational databases (NoSQL)
Relational databases (SQL)
Relational databases use SQL or Structured Query Language. SQL is a domain-specific language used for data querying and manipulation.
The language supports simple commands, transactions, and embedded procedures, such as stored functions or views.
SQL databases are based on predefined schemas. They’re composed of tables with a set of columns, each having its own data type. They usually have ACID properties:
- Atomicity
- Consistency
- Isolation
- Durability
SQL databases have been widely used since the 1970s.
Most popular SQL databases are MySQL, PostgreSQL, SQLite, and Oracle Database.
Non-relational databases (NoSQL)
Non-relational databases, or Non-SQL databases, do not follow a strict schema. They’re perfect for storing enormous amounts of unstructured or dynamic data, most commonly JSON.
There are multiple types of NoSQL databases, including:
- Document databases
- Key-value databases
- Graph databases
In recent years, NoSQL databases have become increasingly popular due to the availability of large amounts of unstructured data.
Most used NoSQL databases include Redis, Cassandra, and AWS DynamoDB.
Which is better SQL or NoSQL?
The choice between SQL and NoSQL databases depends on your use case and data.
If you’re dealing with huge amounts of unstructured data, definitely go with NoSQL. On the other hand, if your data is mostly structured, SQL is a better choice.
Another two factors you should consider are performance and scaling. NoSQL databases tend to be faster than SQL databases. SQL databases can only scale vertically, while NoSQL databases can scale horizontally.
Finally, some web frameworks only support SQL databases, while others only support NoSQL.
How to deploy a React app with PostgreSQL?
In this article section, you’ll learn how to deploy a Postgres-backed web application to Back4app.
Prerequisites
- Experience with JavaScript ES6, React, and Next.js
- Basic understanding of Docker, and BaaS & CaaS cloud model
- JavaScript IDE and Docker Desktop installed on your machine
- A free Back4app and GitHub account
What is the Back4app Stack?
Before diving into the deployment process, let’s briefly discuss what solutions Back4app offers.
- Back4app (BaaS) is a fully-fledged backend solution. It includes user management, authentication, real-time databases (NoSQL or PostgreSQL), custom code execution, auto-generated APIs, SDKs, push notifications, and more.
- Back4app Containers (CaaS) is a Docker-powered container management and deployment platform. It allows you to spin up Docker containers in a few clicks!
- Back4app AI-agent is a brand new AI-powered agent. It allows you to perform all cloud-related tasks with the power of conversation. The agent integrates tightly with the other two Back4app solutions.
Throughout the article, we’ll be using Back4app BaaS and Back4app Containers. Nevertheless, you should check out How to use AI for web development? to learn how to leverage AI to speed up your development process.
Project Overview
We’ll be building a simple budget-tracking web application. The web app will allow users to add expenses, remove them, and calculate different statistics (e.g. amount spent, budget percentage).
The app will be split into the backend and the frontend. The backend will be built with Back4app (backed by PostgreSQL), and the frontend will be built with React (using Next.js).
We’ll connect the two using Parse SDK and deploy the frontend to Back4app Containers.
Backend
Let’s start off with the backend.
Create Back4app App
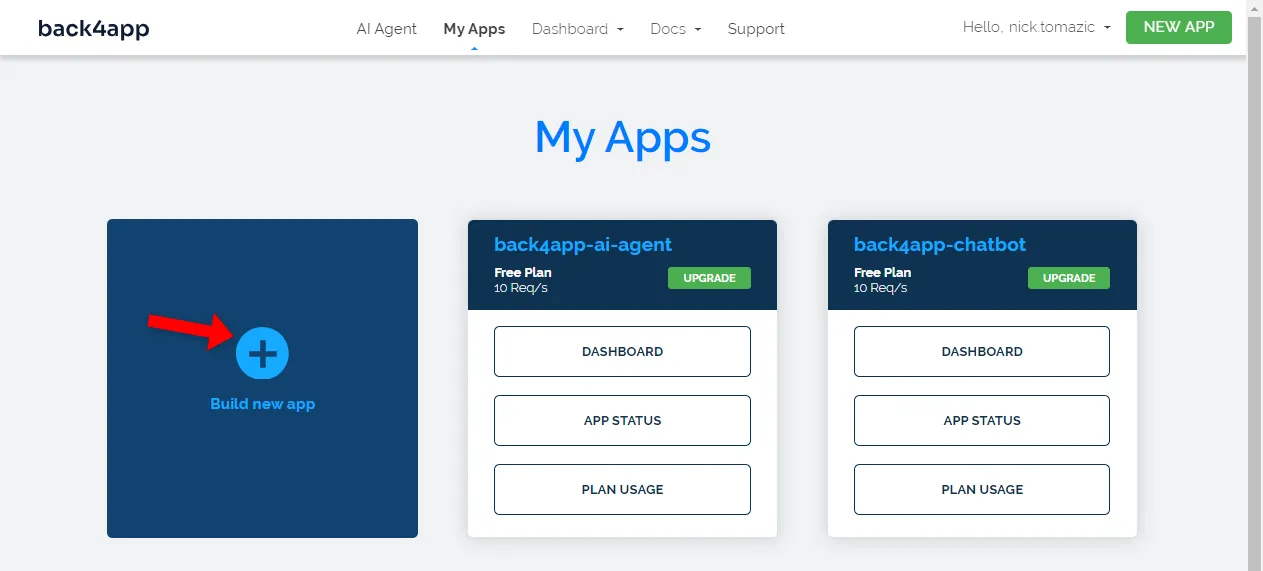
To create a Back4app app, first navigate to your Back4app dashboard and click “Build new app”.
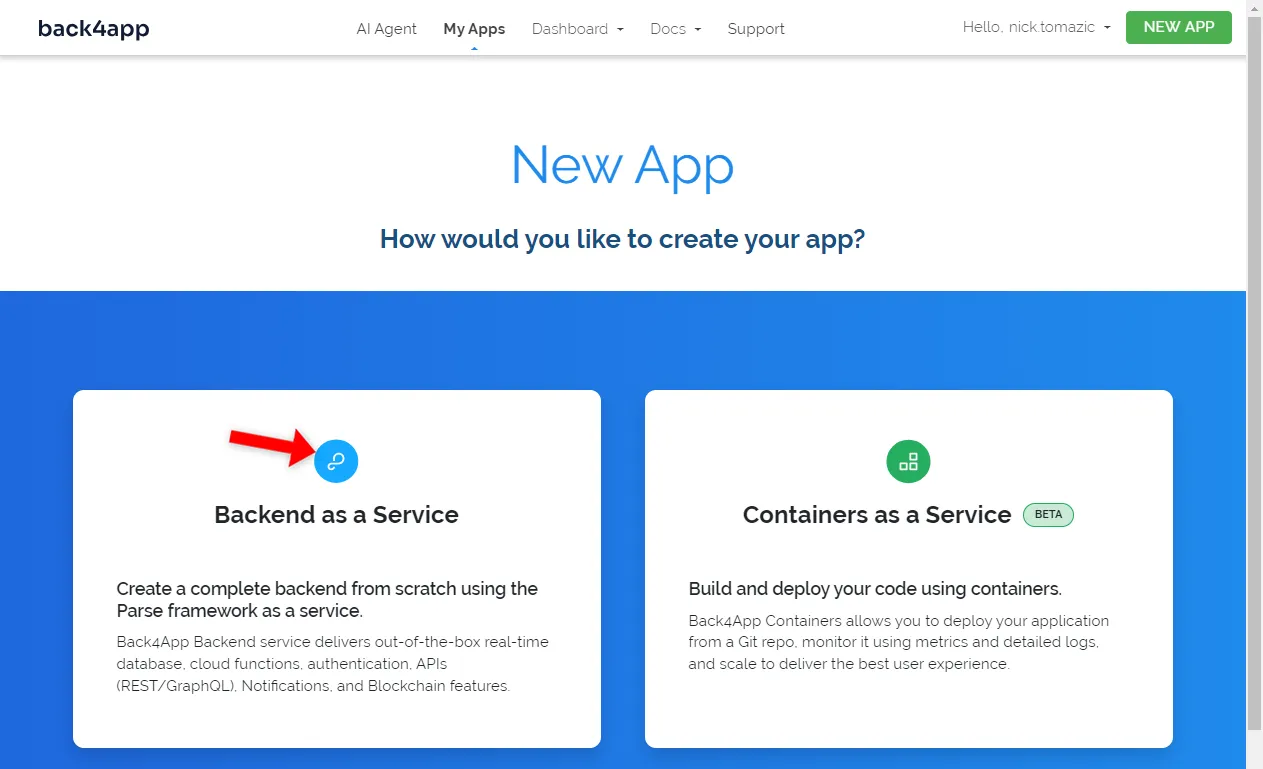
Next, select “Backend as a Service” since we’re building a backend.
Give your application a descriptive name, select “PostgreSQL” as the database, and click “Create”.
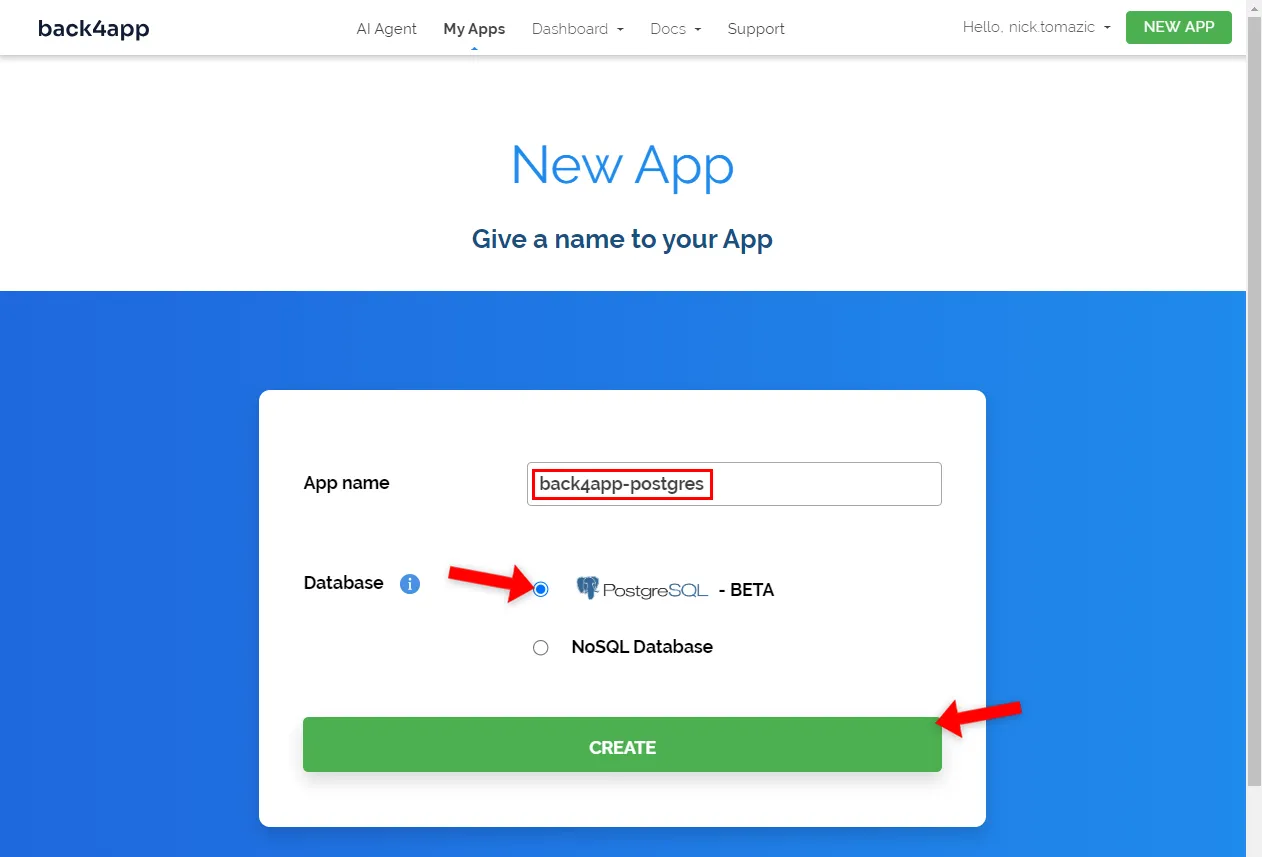
At the time of writing, there’s not much difference between the two database types from the developer’s point of view. The same Parse SDK methods apply to both of them.
Back4app will take a little while to prepare everything required for your application. That includes the database, application layer, auto-scaling, auto-backup, and security settings.
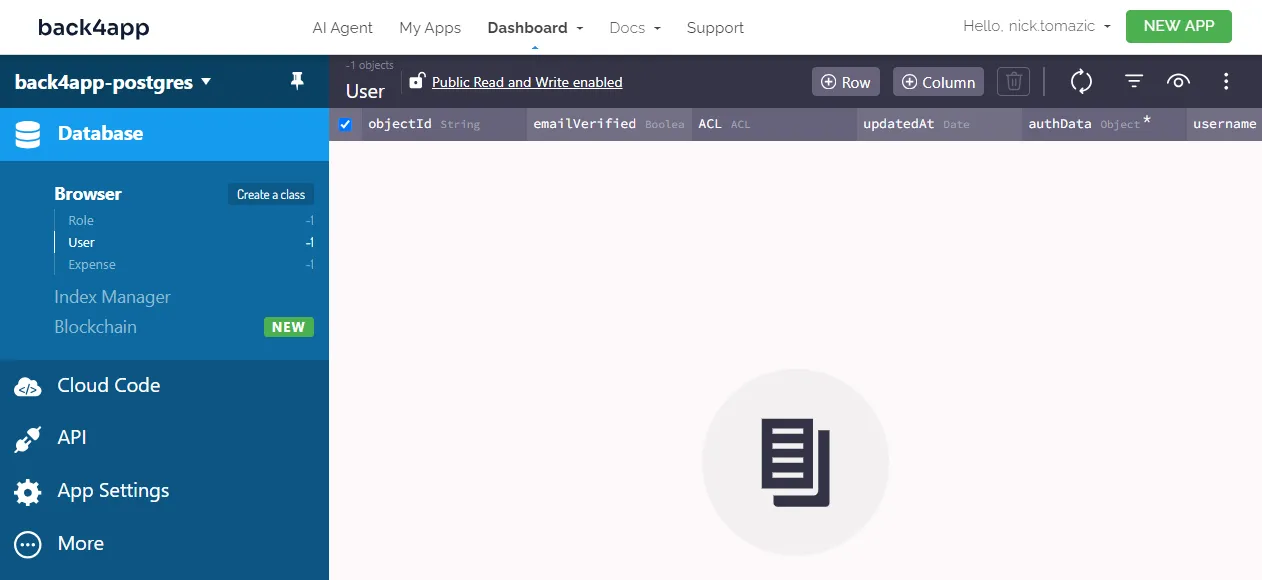
As soon as your app is ready, you’ll be redirected to the app’s real-time database view.
Database Architecture
Moving along, let’s design the database.
Since our app is relatively simple, we’ll only need one class. Let’s call it Expense.
To create a new database class, click “Create a class”, name it Expense, and ensure “Public Read and Write enabled” is checked.
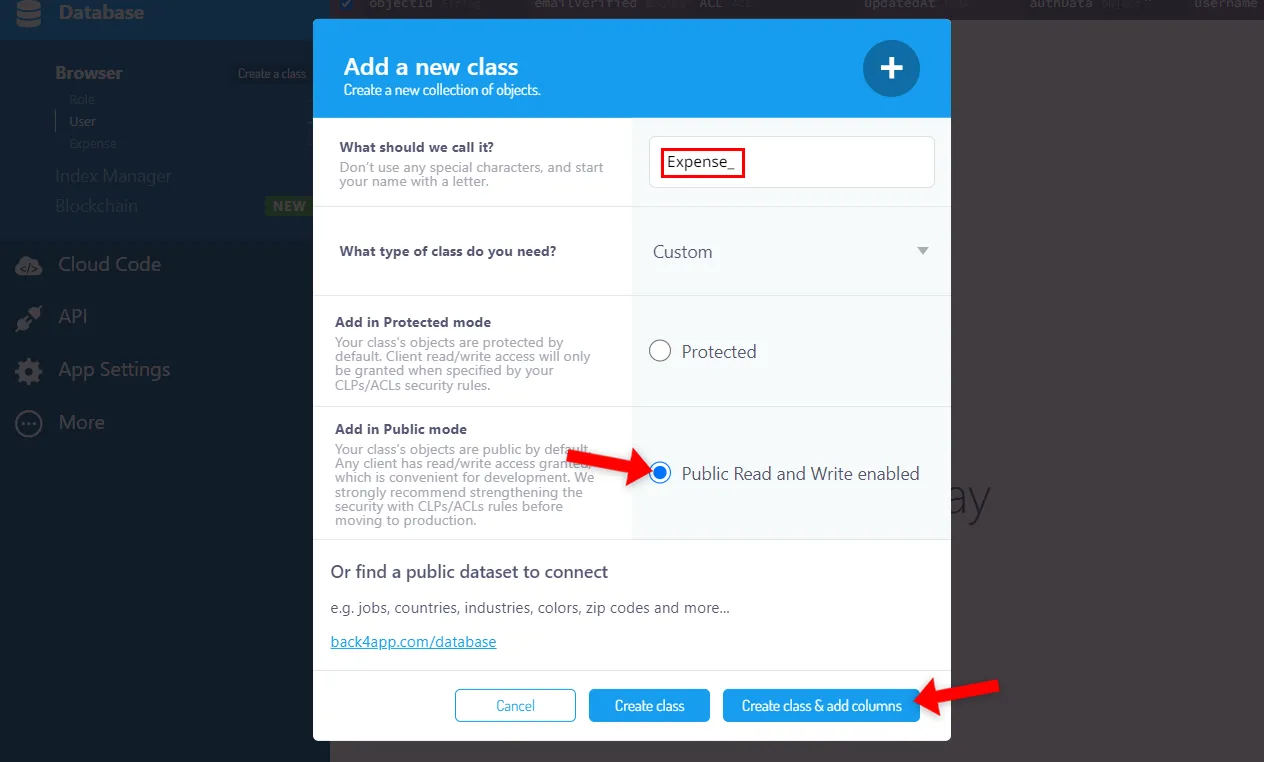
Enabling public read and write is considered bad practice since it allows anyone to perform CRUD operations on your classes. Security is out of the scope of this article. Still, it might be a good idea to review Parse Server Security.
By default, database classes come with the following four fields:
+-----------+------------------------------------------------------------------------+
| Name      | Explanation                                                            |
+-----------+------------------------------------------------------------------------+
| objectId  | Object's unique identifier                                             |
+-----------+------------------------------------------------------------------------+
| updatedAt | Date time of the object's last update.                                 |
+-----------+------------------------------------------------------------------------+
| createdAt | Date time of object's creation.                                        |
+-----------+------------------------------------------------------------------------+
| ACLs      | Allow you to control the access to the object (e.g. read, update).     |
+-----------+------------------------------------------------------------------------+
Take a quick look at them since we’ll use them when building the frontend.
Next, add the following fields to the Expense class:
+-----------+-------------+--------------------+----------+
| Data type | Name        | Default value      | Required |
+-----------+-------------+--------------------+----------+
| String    | name        | <leave blank>      | yes      |
+-----------+-------------+--------------------+----------+
| String    | description | <leave blank>      | no       |
+-----------+-------------+--------------------+----------+
| Number    | price       | 0                  | yes      |
+-----------+-------------+--------------------+----------+
After that, populate the database with some sample data.
Create a few items by providing the names, descriptions, and prices. Alternatively, you can import this data dump.
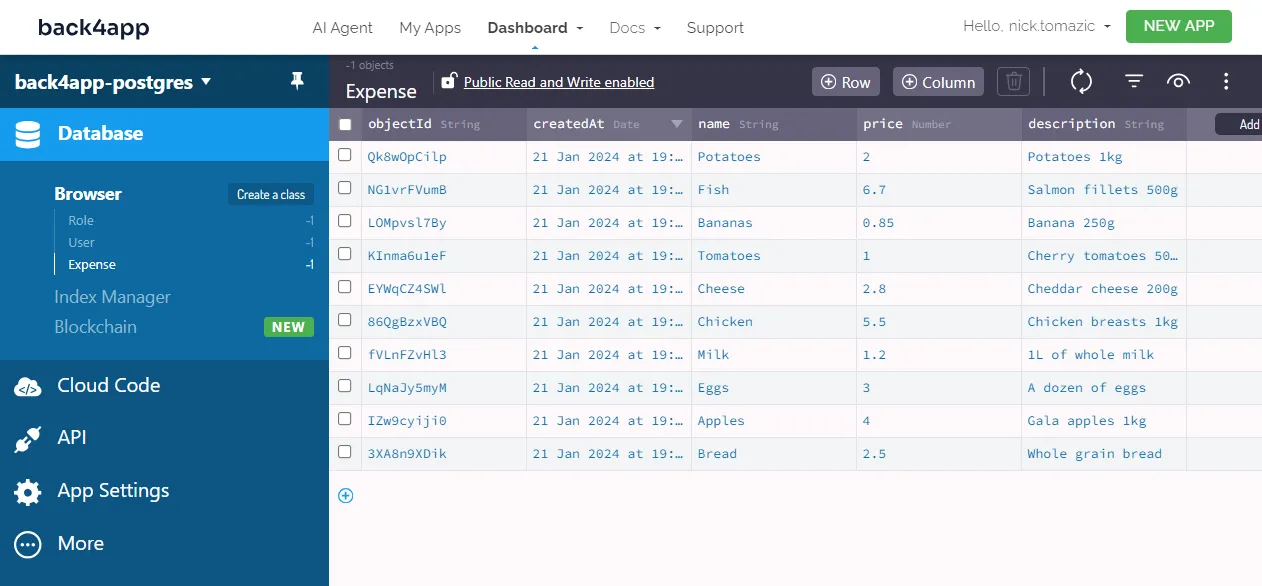
The test data will later allow us to test the backend and frontend.
Cloud Code
Back4app allows you to execute custom JavaScript code via Cloud Code functions. The functions can be scheduled as jobs or invoked by Parse or HTTP requests.
Since they’re operated within a managed environment, that eliminates the necessity to handle and scale your own servers.
To learn more about Functions as a Service (FaaS), check out What are Serverless functions?
We’ll utilize a Cloud Code function to calculate the expense statistics.
To create one, select “Cloud Code > Functions & Web Hosting” on the sidebar. Then open cloud/main.js and paste in the following code:
// cloud/main.js

const totalBudget = 100;

Parse.Cloud.define("getStatistics", async (request) => {
  const query = new Parse.Query("Expense");
  const totalExpenses = await query.count();
  const results = await query.find();

  const totalSpent = results.reduce(
    (sum, expense) => sum + expense.get("price"), 0);
  const spentPercentage = totalSpent > 0 ?
    Math.round((totalSpent / totalBudget) * 100) : 0;

  return {
    totalExpenses,
    totalSpent,
    totalBudget,
    spentPercentage
  };
});- This code defines a new Cloud Code function named
getStatistics. - The function aggregates the data and calculates
totalSpentandspentPercentage.
Lastly, click “Deploy” to deploy the function to the cloud.
And we’re done with the backend. That was easy!
Frontend
In this article section, we’ll implement the app’s frontend.
Create Next App
The easiest way to bootstrap a Next.js app is via create-next-app utility. To use it, open the terminal and run the following command:
$ npx create-next-app@latest back4app-postgres

√ Would you like to use TypeScript? ... No
√ Would you like to use ESLint? ... Yes
√ Would you like to use Tailwind CSS? ... Yes
√ Would you like to use `src/` directory? ... Yes
√ Would you like to use App Router? (recommended) ... Yes
√ Would you like to customize the default import alias (@)? ... No

Creating a new Next.js app in /back4app-postgres.
If you’ve never used the
create-next-apputility, it’ll automatically get installed.
Ensure you enable TailwindCSS since we’ll use it instead of a component library.
Next, clean up the bootstrapped project by first deleting the contents of the public/ folder.
Keeping only the first three lines of src/app/globals.css:
/* app/src/globals.css */
@tailwind base; @tailwind components; @tailwind utilities;
And replacing app/src/globals.css with the following code:
// src/app/page.js
export default function Page() {
  return (
      <p>Back4app rocks!</p>
  );
}
Start the development server:
$ next devOpen your favorite web browser and navigate to http://localhost:3000/. You should see the “Back4app rocks!” message if everything goes well.
Views
The frontend will have the following endpoints:
/displays the table of expenses and expense statistics/add/displays a form for adding a new expense/delete/<objectId>/displays a confirmation for deleting an expense
To implement these endpoints, create the following directory structure:
src/
├── add/
│   └── page.js
└── delete/
    └── [objectId]/
        └── page.js
Additionally, create the components folder with Container.js and Header.js:
src/
└── components/
    ├── Container.js
    └── Header.js
Paste the following in Container.js:
// src/app/components/Container.js

const Container = ({children}) => {
  return (
    <div className="container mx-auto px-4 sm:px-6 lg:px-8">
      {children}
    </div>
  )
}

export default Container;
And do the same for Header.js:
// src/app/components/Header.js

import Container from "@/app/components/Container";
import Link from "next/link";

const Header = () => {
  return (
    <Container>
      <div className="py-4">
        <Link href="/">
          <div
            className="text-2xl font-semibold text-indigo-500 hover:text-indigo-700"
          >
            back4app-postgres
          </div>
        </Link>
      </div>
    </Container>
  )
}

export default Header;
Make use of Container.js and Header.js in layout.js like so:
// src/app/layout.js

"use client";

import {Inter} from "next/font/google";
import "./globals.css";
import Header from "@/app/components/Header";
import Container from "@/app/components/Container";

const inter = Inter({ subsets: ["latin"] });

export default function RootLayout({ children }) {
  return (
    <html lang="en">
      <body className={inter.className}>
        <Header/>
        <Container>
          {children}
        </Container>
      </body>
    </html>
  );
}
Finally, paste the view code into the files accordingly:
Rerun the development server and visit http://localhost:3000 in your browser. You should see something similar to this:

Clicking on the “Add expense” button should redirect you to the expense add form.
Parse SDK
There are multiple ways to connect to a Back4app backend:
- RESTful API
- GraphQL API
- Parse SDK
We’ll go with the latter since it’s the most robust and straightforward setup.
Parse SDK is a toolkit packed with handy tools for querying data, managing it, running Cloud Code functions, and more.
It is available for many programming languages and frameworks, such as JavaScript, PHP, Flutter, and Objective-C.
Start by installing Parse via npm:
$ npm install parseTo use Parse in our React views, we first have to initialize it. But before doing that, we’ll create a React context, allowing us to pass the Parse instance to all our views.
Create a context folder in the src/app folder, and a parseContext.js file in it:
import {createContext} from "react";

const ParseContext = createContext();

export default ParseContext;
Then initialize Parse in layout.js and wrap the entire app with ParseContext.Provider like so:
// src/app/layout.js

import Parse from "parse/dist/parse";
import ParseContext from "@/app/context/parseContext";

Parse.initialize(
  "<your_parse_application_id>",
  "<your_parse_javascript_key>",
);
Parse.serverURL = "https://parseapi.back4app.com/";

export default function RootLayout({ children }) {
  return (
    <ParseContext.Provider value={Parse}>
      <html lang="en">
        // ...
      </html>
    </ParseContext.Provider>
  );
}
Make sure to replace <your_parse_application_id> and <your_parse_javascript_key> with your actual keys. To obtain them, navigate to your Back4app dashboard and select “App Settings > Security & Keys” on the sidebar.
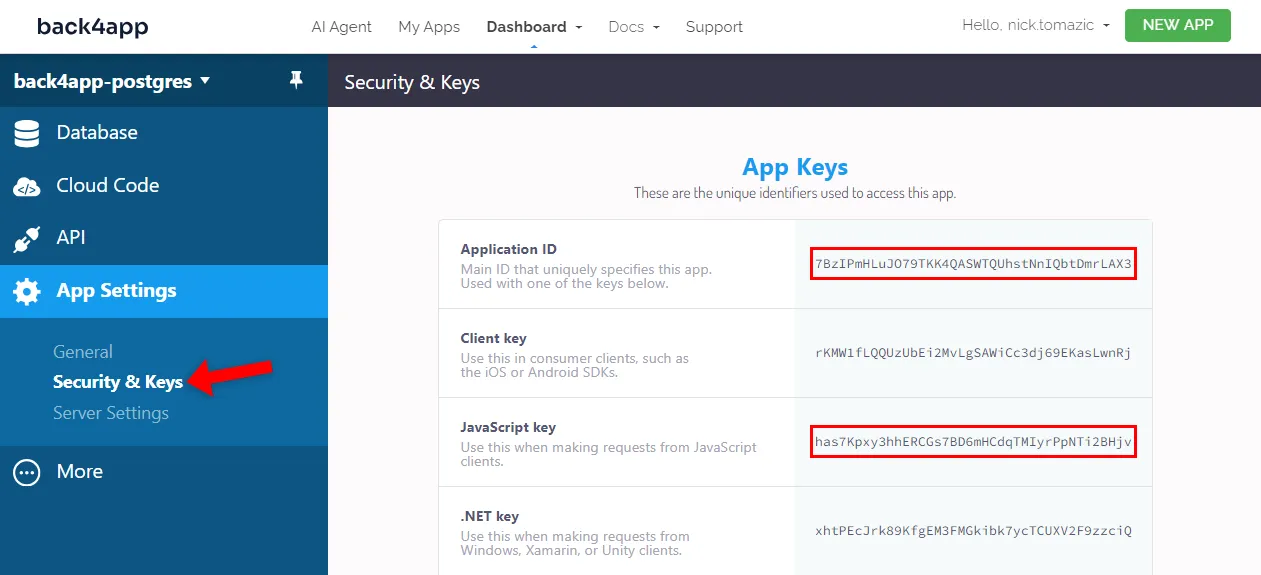
We can now obtain the Parse instance in our views like so:
const parse = useContext(ParseContext);Then, slightly modify the views to invoke Parse methods.
src/app/page.js:
// src/app/page.js

export default function Page() {

  // ...

  const parse = useContext(ParseContext);

  const fetchExpenses = () => {
    const query = new parse.Query("Expense");
    query.find().then((fetchedExpenses) => {
      const expenses = fetchedExpenses.map(expense => ({
        objectId: expense.id,
        name: expense.get("name"),
        description: expense.get("description"),
        price: expense.get("price"),
        createdAt: expense.get("createdAt"),
      }));
      setExpenses(expenses);
      console.log("Expenses fetched successfully.");
    }).catch((error) => {
      console.error("Error while fetching expenses:", error);
    });
  }

  const fetchStatistics = () => {
    parse.Cloud.run("getStatistics").then((statistics) => {
      setStatistics(statistics);
      console.log("Statistics fetched successfully.");
    }).catch((error) => {
      console.error("Error while fetching statistics:", error);
    });
  }

  // ...
}src/app/add/page.js:
// src/app/add/page.js

export default function Page() {

  // ...

  const parse = useContext(ParseContext);

  const onAddClick = () => {
    const Expense = parse.Object.extend("Expense");
    const expense = new Expense();

    expense.set("name", name);
    expense.set("description", description);
    expense.set("price", parseFloat(price));

    expense.save().then((expense) => {
        console.log("Expense created successfully with objectId: ", expense.id);
        router.push("/");
      }, (error) => {
        console.error("Error while creating expense: ", error);
      }
    );
  }

  const onCancelClick = () => {
    router.push("/");
  }

  // ...
}src/app/delete/[objectId]/page.js:
// src/app/delete/[objectId]/page.js

export default function Page() {

  // ...

  const parse = useContext(ParseContext);

  const onDeleteClick = () => {
    const Expense = parse.Object.extend("Expense");
    const query = new parse.Query(Expense);

    query.get(objectId).then((expense) => {
      return expense.destroy();
    }).then((response) => {
      console.log("Expense deleted successfully");
      router.push("/");
    }).catch((error) => {
      console.error("Error while deleting expense: ", error);
    });
  }

  const onCancelClick = () => {
    router.push("/");
  }

  // ...
}
Don’t forget about the imports at the top of the file:
import {useContext} from "react";
import ParseContext from "@/app/context/parseContext";
Great, that’s it.
Your frontend is now connected to the backend. If you visit the app in your browser, you should see that the data gets loaded correctly from the backend. All the changes on the frontend are now reflected in the backend.
Dockerize
Since Back4app Containers is a CaaS platform, your project must be dockerized before deployment. The recommended way of dockerizing your project is via a Dockerfile.
A Dockerfile is a blueprint script providing instructions to create a container image.
Create a Dockerfile in the project root:
# Dockerfile

FROM node:18

WORKDIR /app
COPY package*.json ./

RUN npm ci

COPY . .

RUN npm run build
RUN npm install -g next

EXPOSE 3000

CMD ["next", "start", "-p", "3000"]
This Dockerfile utilizes the node:18-alpine image, establishes the working directory, manages dependencies, copies over the project, and builds the application.
Upon completion, it exposes port 3000 and launches a Next.js server to listen on that port.
Next, create a .dockerignore file to minimize the image’s size:
# .dockerignore

.idea/

node_modules/
.next/
/out/
build/

.vercel
.dockerignore files, work in a similar way as .gitignore files.
Make sure everything works by building and running the image locally:
$ docker build -t back4app-postgres:1.0 .
$ docker run -it -p 3000:3000 back4app-postgres:1.0
Open your web browser and navigate to http://localhost:3000. The web application should still be fully functional.
Push to VCS
To deploy your code to Back4app Containers, you must push it to GitHub.
- Log into your GitHub account.
- Create a new repository.
- Copy the remote origin URL — e.g.
[email protected]:duplxey/repo.git. - Initilize the Git repository:
git init - Add the remote:
git remote add origin <your_remote_origin_url> - Add all the files:
git add . - Create a commit:
git commit -m "project init" - Push the source code:
git push origin main
Open your favorite web browser and ensure all the code is added to the repository.
Deploy Code
Now that the app is dockerized and hosted on GitHub, we can finally deploy it.
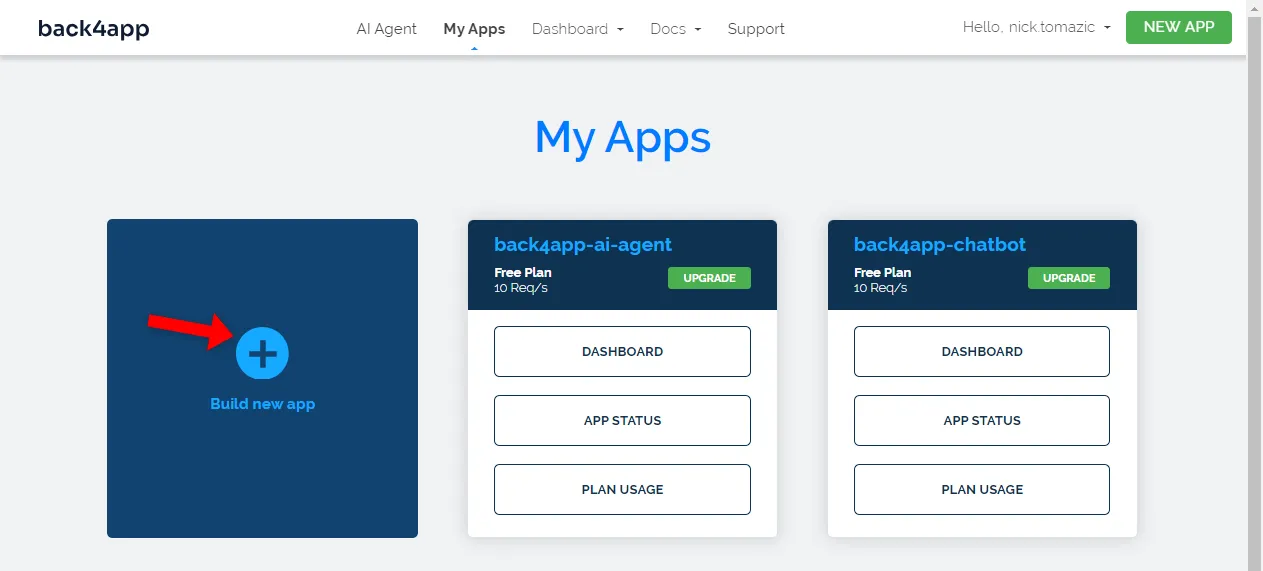
Navigate to your Back4app dashboard and click on the “Build new app” button once again.
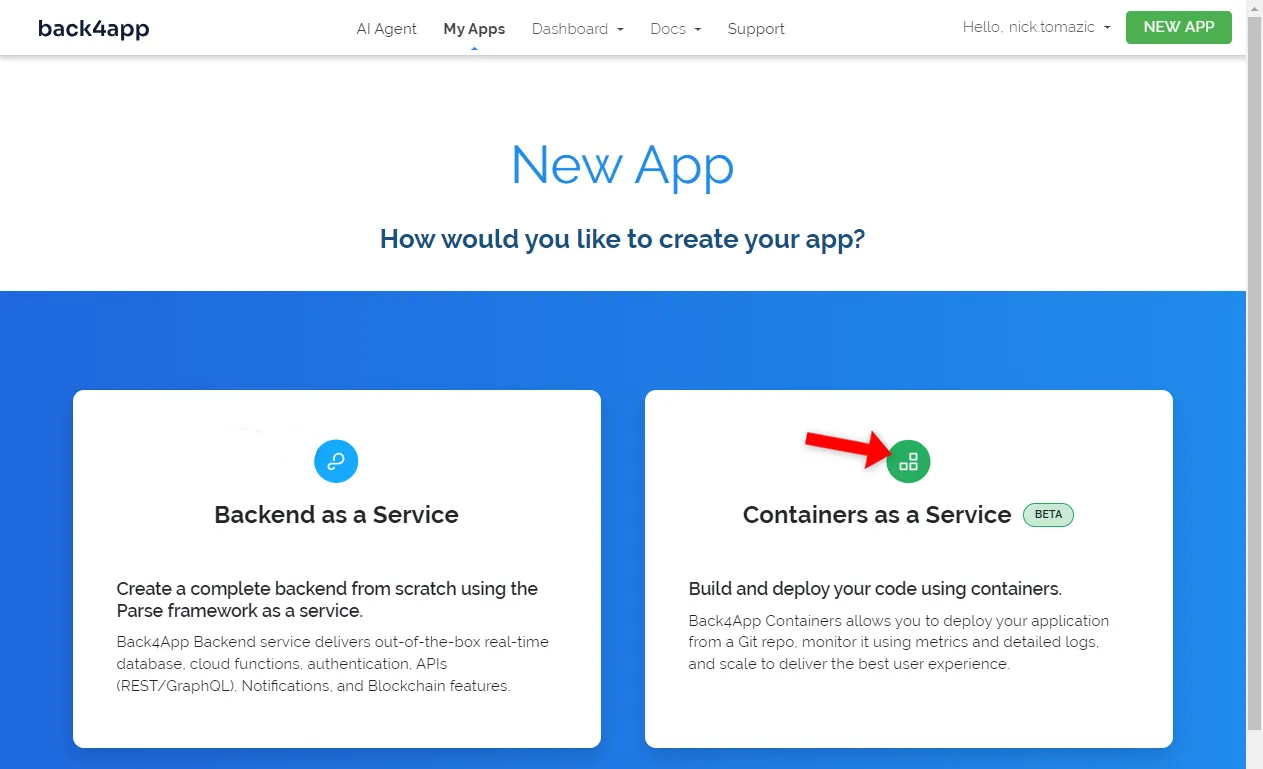
Select “Containers as a Service” since we’re deploying a dockerized application.
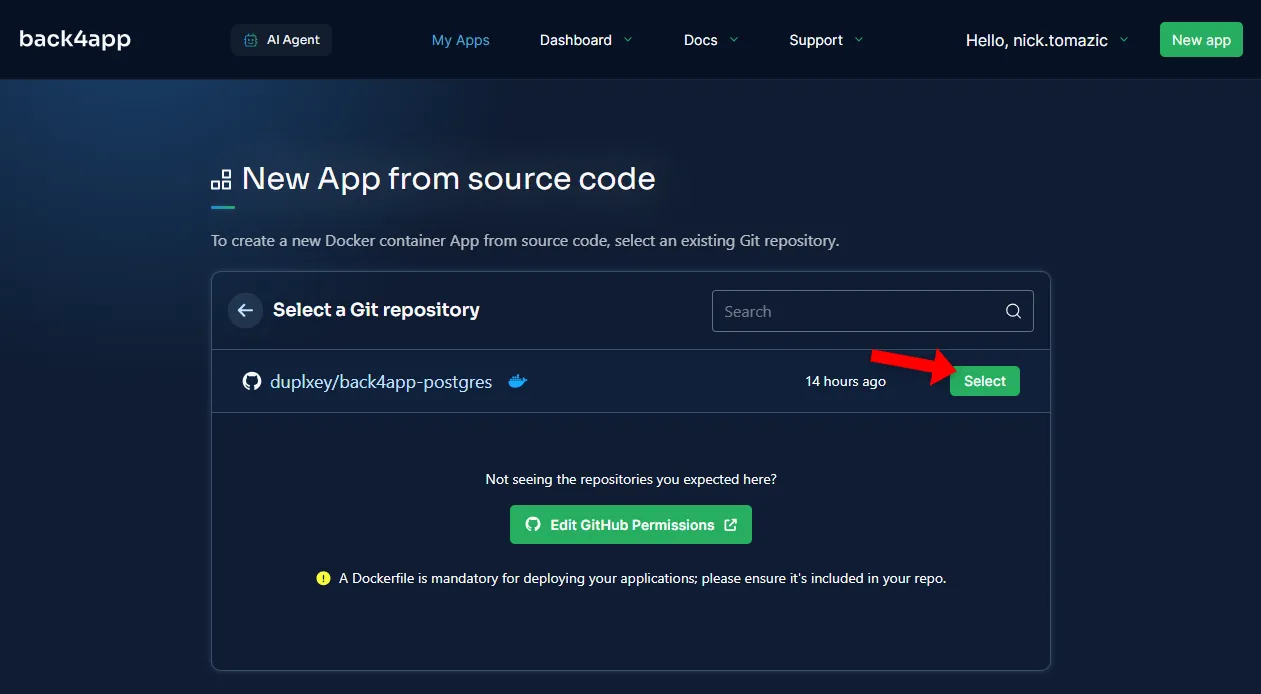
If it’s your first time working with Back4app Containers, you must link your GitHub to your Back4app account.
When picking what repositories Back4app has access to, make sure to allow access to the repository created in the previous step.
Next, “Select” the repository.
Back4app Containers allow you to configure deployment settings such as port, auto-deploy, environmental variables, and health checks.
Since our app is simple, we need to provide a name and can keep everything else as default.
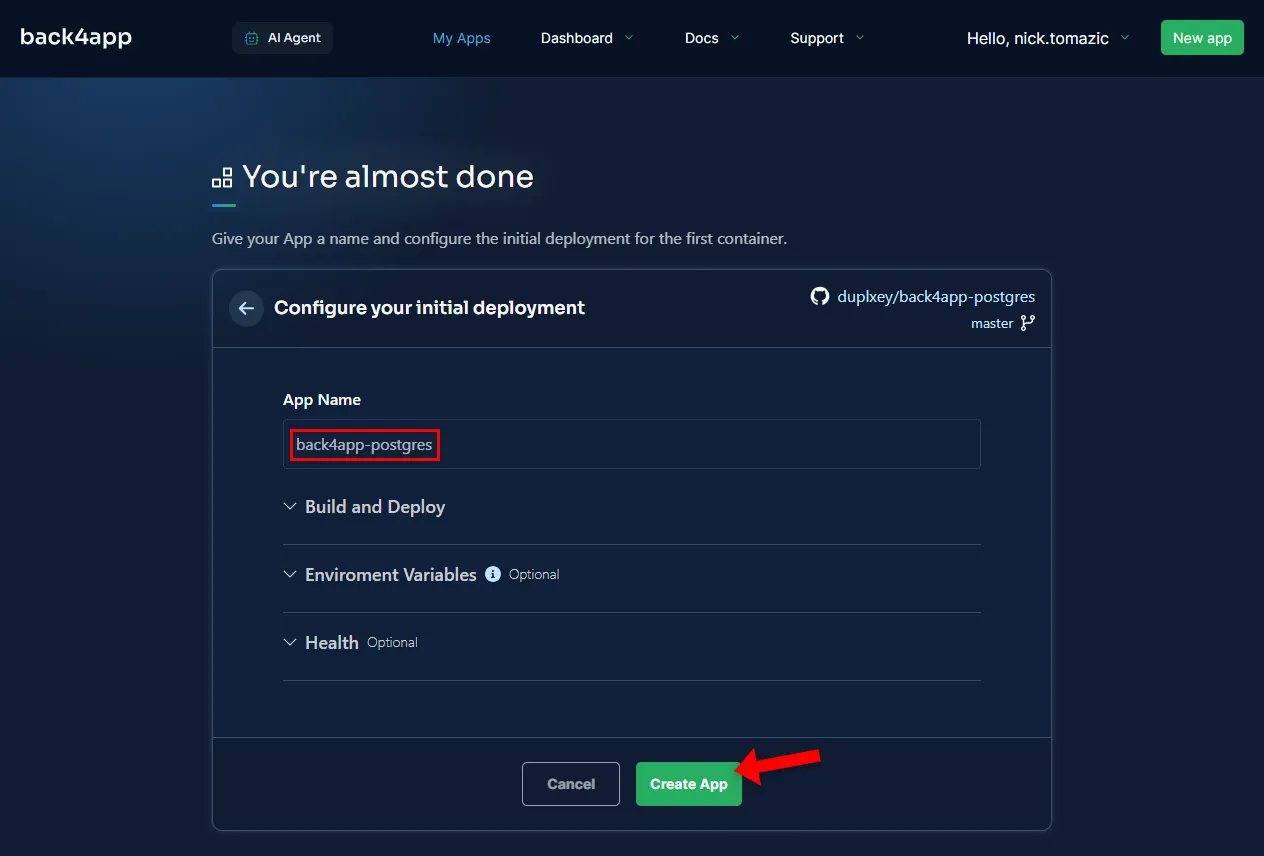
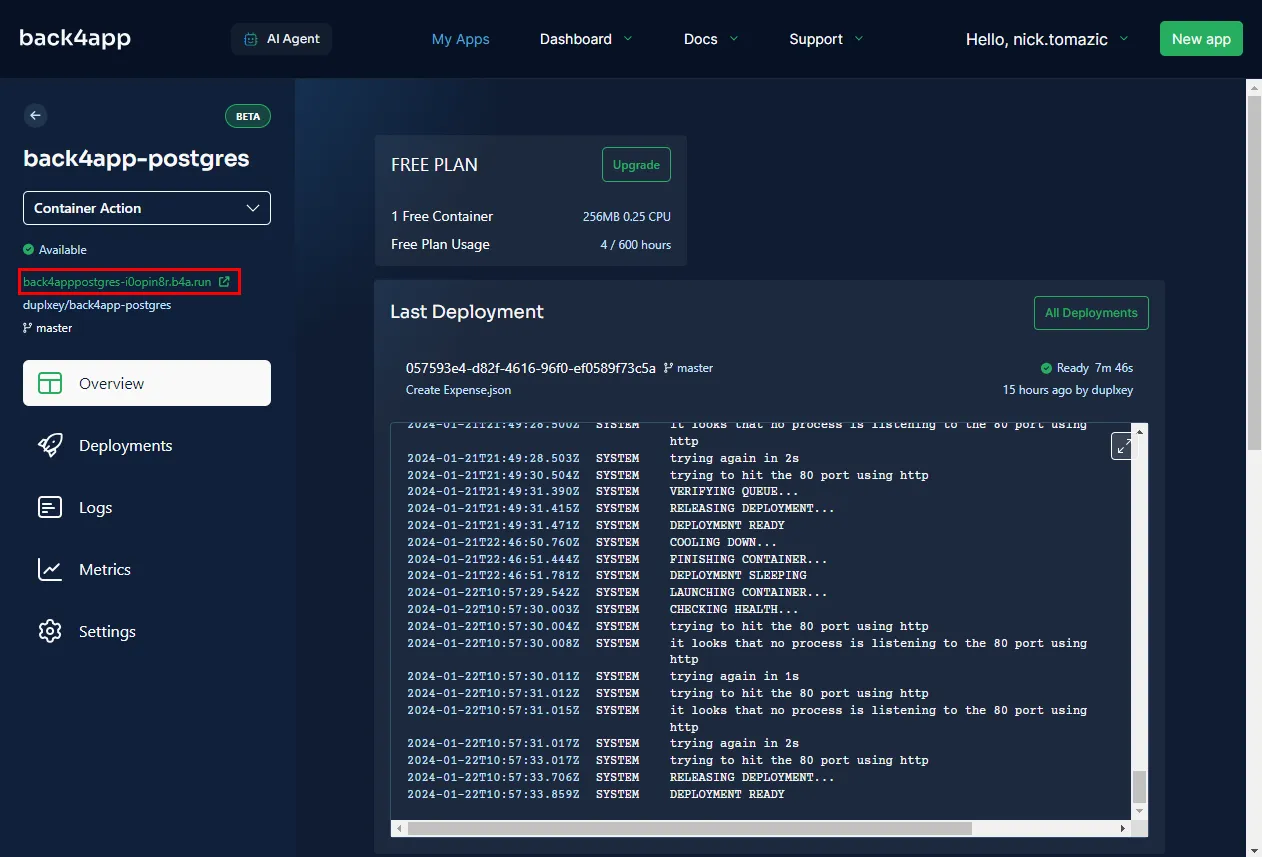
As you click “Create App”, Back4app will pull the code from GitHub, build the Docker image, push it to the container registry, and deploy it.
After a few moments, your app will be available at the URL on the sidebar.
Conclusion
In this article, you’ve learned what PostgreSQL is, the differences between SQL and NoSQL databases, and how to deploy a Postgres-backed web application to Back4app.
To test your understanding, I suggest you implement some of these ideas:
- User authentication
- Instead of having a global budget, make it user based
- Add a custom domain to Back4app Containers app
Get the final source code from back4app-postgres repo.


