How to use AI for web development?

Since the release of ChatGPT, AI tools have garnered significant attention, leading many web developers to incorporate some level of AI into their workflow.
In this article, we’ll explain how using AI in web development could benefit you. On top of that, we’ll look at a practical example of using automating web development with AI technologies.
In our example, we will use the Back4app Agent — an AI-powered DevOps assistant, to build and deploy a web app to Back4app.
Contents
Advantages of using AI in web development
There are many advantages of using AI in web development. Let’s look at some of them.
Automated Code Generation
AI-based tools like ChatGPT, GitHub Copilot, and Back4app Agent can help you greatly accelerate your development process.
They can provide helpful code snippets, code completion, code analysis, automate DevOps, and more.
The main downside of these tools is hallucinations. On top of that, they might introduce faulty or suboptimal code. Make sure to analyze all the code generated by AI tools thoroughly.
Improved Code Testing
Writing code is fun, but writing tests, not so much. Testing is the second AI web application development advantage.
By utilizing AI, you can automatically generate tests based on your source code. This can help you validate your code and make it less error-prone and more reliable.
SEO Optimization
AI tools excel in analyzing and optimizing web content for search engines. They can generate effective keywords, metadata, and tags to enhance online visibility.
Moreover, these tools can adapt to evolving SEO trends and algorithms, ensuring a website remains highly ranked in search engine results.
Content Generation and Curation
AI can be used to generate relevant and engaging content automatically. That can be extremely useful for running a blog or a similar marketing strategy.
Also, these tools can create content that speaks to your readers, making them more interested and likely to take action, like buying a product or signing up.
How to use AI to deploy a web application?
In this section, we’ll explain to integrate AI tools on the development process. We’ll utilize Back4app Agent to build and deploy a full-stack web application.
We’ll try to do everything with the power of conversation and by writing a minimal amount of code.
Prerequisites
- Basic understanding of Back4app
- Experience with JavaScript ES6, React, and Docker
- A Back4app account and access to Back4app Agent
- A GitHub account
What is Back4app Agent?
Back4app Agent is the AutoGPT for developers. It integrates AI-driven development tools with cloud execution, enabling you to perform cloud tasks with the power of conversation.
Back4app Agent is designed to automatically interact with Back4app BaaS and Back4app Containers.
Best of all, Back4app Agent can learn in real-time and optimize itself through direct interaction with cloud environments. It is available on the Back4app Platform and as a ChatGPT plugin.
Keep in mind that Back4app Agent isn’t a magic tool. It might make errors. If that happens, it’ll be up to you to fix them. Additionally, sending the same prompts to Back4app Agent might yield different results.
If you wish to improve your LLM prompts, check out How to create an app using ChatGPT?
Project Overview
Throughout the article, we’ll work on an event management web app and use AI for efficient web app deployment. The app will allow us to manage venues and events. Each event will be happening in a specific venue.
We’ll build the backend using Back4app and then move on to the frontend. The frontend will be made with React, dockerized, and later deployed to Back4app Containers. Finally, to connect the frontend with the backend, we’ll utilize Parse SDK.
I recommend you follow along with the event management web app. The app is designed to give you a solid understanding of the Back4app Platform and how Back4app Agent works in practice.
Backend
In this article section, we’ll build our web app’s backend.
Back4app App
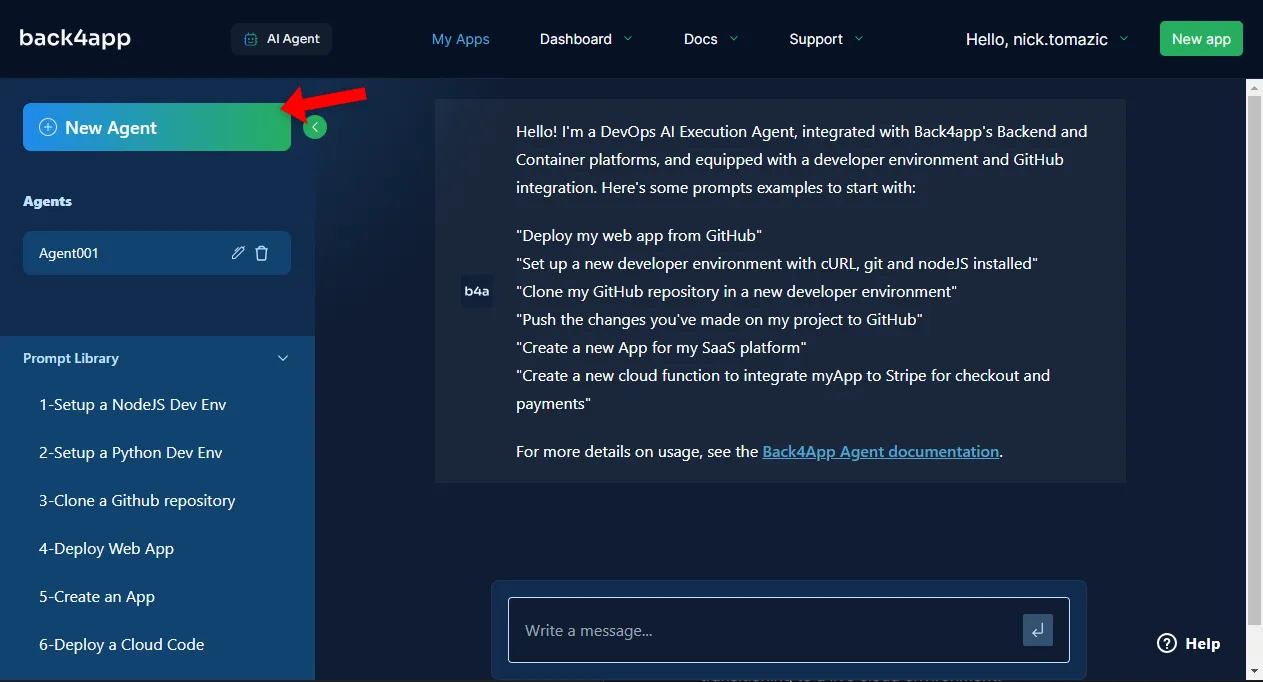
Firstly, open your favorite web browser and navigate to the Back4app Agent page. Create a new agent by clicking on the “New Agent” button.

To deploy a backend to Back4app, you must first create a Back4app application.
Prompt the agent to create a new Back4app application. I’ll name mine “back4app-ai-agent”:
Create a new Back4app app named "back4app-ai-agent".
As you can see, the agent successfully created a Back4app application. It provided us with the “App ID”, “Dashboard URL”, and all the other helpful information we might need.
App Idea and Database
To improve the agent’s responses, we need to give it more context about what we are building.
Go ahead and explain the app idea and the database structure to the agent:
We're building a backend for an event management app. The app will allow us to manage venues and events. Each event will happen in a specific venue. Please create the following database classes:

1. `Venue`: `name`, `location`, `capacity`
2. `Event`: `name`, `description`, `date`, `venue`
The agent successfully created the requested database classes. It automatically determined the relationship between events and venues and gave us a rundown of each database class’s fields.
Next, prompt the agent to populate the database to get some test data to work with later:
Please populate my database with 5 venues and 10 events. Some of the events should be music events.
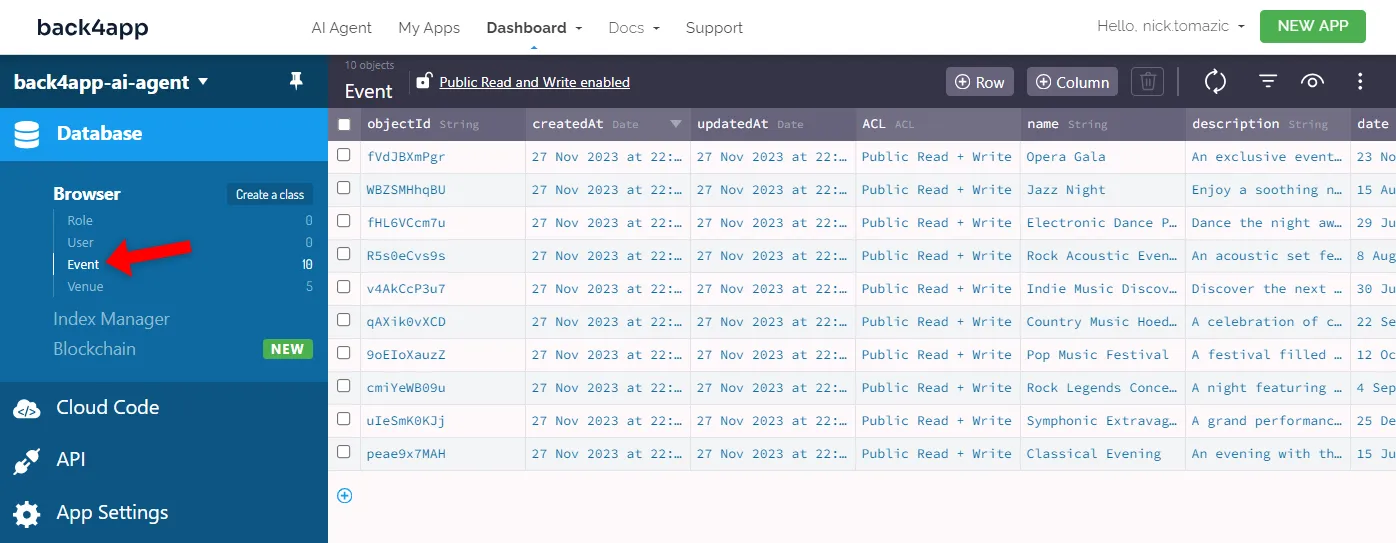
Ensure everything worked by manually checking the database structure and its contents. To do that, open the Back4app dashboard, select your app, and click “Database > Browser” on the sidebar.

The Event and the Venue classes should be in your database, and each should have a few sample rows.
Cloud Code
Back4app Agent is also great at writing custom Cloud Code functions. Suppose we wanted an API endpoint that would return all events in a specific venue.
Ask the agent to create and deploy the just-mentioned function:
Create a Cloud Code function called `eventsByVenue(venueId)` that will allow me to provide a venue ID, and it'll return all the events happening in that venue.
To test it, prompt the agent to generate a cURL command that hits the API endpoint:
Write me a cURL command that hits `eventsByVenue(venueId)` to get all the events of some venue in my database.
Copy the command, replace the placeholders, and run it in your console:
$ curl -X POST \
    -H "X-Parse-Application-Id: <Your-App-Id>" \
    -H "X-Parse-REST-API-Key: <Your-REST-API-Key>" \
    -H "Content-Type: application/json" \
    -d '{"venueId":"<Venue-Object-Id>"}' \
    https://<Your-Parse-Server-Url>/functions/eventsByVenue
You should get a similar response:
{
   "result": [
      {
         "id": "peae9x7MAH",
         "name": "Classical Evening",
         "description": "...",
         "date": "2023-07-15T19:30:00.000Z"
      },
      {
         "id": "uIeSmK0KJj",
         "name": "Symphonic Extravaganza",
         "description": "...",
         "date": "2023-12-25T19:30:00.000Z"
      }
   ]
}
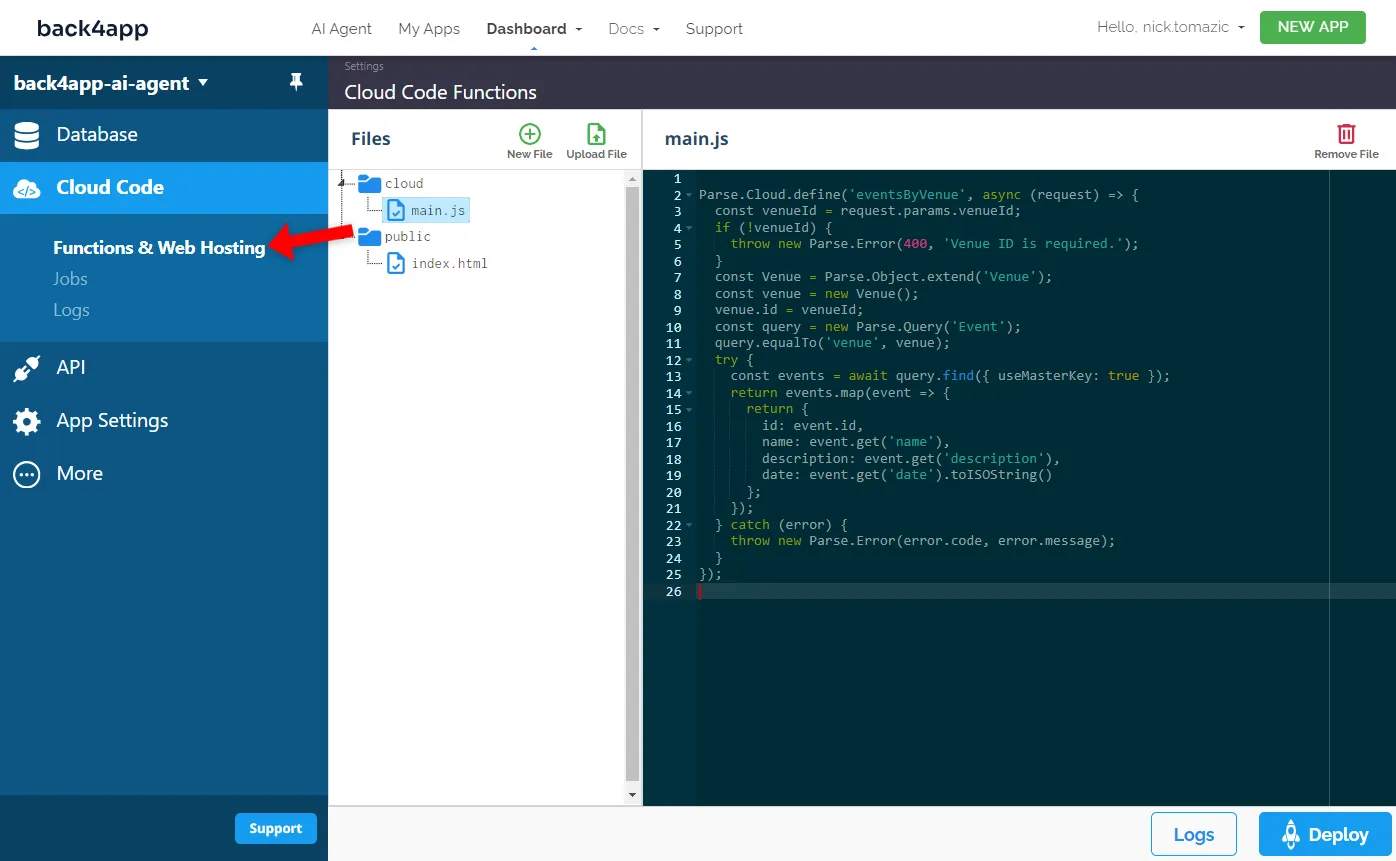
If you’re curious about the code generated in the background, navigate to the Back4app dashboard, select your app, and click “Cloud Code > Functions & Web Hosting” on the sidebar.

Great, that’s it!
We’ve successfully created a fully-fledged backend with zero code. All we had to do was submit a few prompts to the AI agent. It can’t get much easier than this.
Frontend
In this article section, we’ll build and deploy the frontend of our web app.
Project Init
When working with LLMs, it’s wise to ask about general steps first. Once you know the steps, you can ask for further clarification. Let’s try it out.
Explain the frontend idea to the agent and ask for a step-by-step guide:
Describe the steps of building a React application for my backend. I want my app to have three endpoints:

1. `/` displays all the events
2. `/<objectId>/` displays the specific event's details
3. `/venue/<objectId>/` displays all the events in a specific venue

Please use Vite to generate a React application.
The agent responded with a brief list of steps. Let’s perform them.
Bootstrap a new React project using Vite:
$ npm create vite@latest my-app -- --template react
$ cd my-app
Install the dependencies:
$ npm installStart the development server:
$ npm run devOpen your favorite web browser and navigate to http://localhost:5173/. You should be able to see the default Vite landing page.

Routes
As suggested by the AI agent, we’ll use react-router-dom to handle the routing. React Router DOM is an excellent package for handling routing in React applications without refreshing the page.
First, ask for clarification on how to set up and use react-router-dom:
How to install and use `react-router-dom` to implement the previously-mentioned routes?
The agent successfully provided the code with a router that satisfied our requirements. Each route renders a different React component from the components folder (which we’ll create in the next step).
Install the package via NPM:
$ npm install react-router-domNext, replace the contents of your App.jsx with the following:
// src/App.jsx

import {BrowserRouter as Router, Route, Routes} from 'react-router-dom';
import './index.css';

import EventsList from './components/EventList';
import EventDetails from './components/EventDetails';
import EventsByVenue from './components/EventsByVenue';

function App() {
  return (
    <Router>
      <Routes>
        <Route exact path='/' element={<EventsList/>}/>
        <Route path='/:objectId' element={<EventDetails/>}/>
        <Route path="/venue/:venueId" element={<EventsByVenue/>}/>
      </Routes>
    </Router>
  );
}

export default App;
Then, create the following file structure in your src folder:
src/
└── components/
    ├── EventDetails.jsx
    ├── EventList.jsx
    └── EventsByVenue.jsx
Next, put the following into the EventsList.jsx file:
// src/components/EventsList.jsx

import React from 'react';

const EventsList = () => {
  // fetch the events from the backend

  return (
    <div>
      {/* Map through the events data and display them */}
    </div>
  );
};

export default EventsList;
Then the EventDetails.jsx file:
// src/components/EventDetails.jsx

import React from 'react';
import {useParams} from 'react-router-dom';

const EventDetails = () => {
  let {objectId} = useParams();

  // use objectId to fetch data from the backend

  return (
    <div>
      {/* render the specific event details using objectId */}
    </div>
  );
};

export default EventDetail;
And finally the VenueEventsList.jsx file:
// src/components/VenueEventsList.jsx

import React from 'react';
import {useParams} from 'react-router-dom';

const VenueEventsList = () => {
  let {objectId} = useParams();

  // use objectId to fetch data from the backend

  return (
    <div>
      {/* render the events for a specific venue using objectId */}
    </div>
  );
};

export default VenueEventsList;
Start the development server and test if the routes work as expected.
Parse SDK
The easiest way to connect the frontend to a Back4app-based backend is via Parse SDK.
Let’s ask the agent to clarify further how this is done:
How to install and use Parse SDK to connect my frontend with the backend?
The response contains a little error. Instead of index.jsx it should say main.jsx, because we are using a Vite project. Nevertheless, let’s perform the steps.
Install the package:
$ npm install parseNext, slightly modify main.jsx to initialize the Parse instance:
// src/main.jsx

import React from 'react';
import ReactDOM from 'react-dom/client';
import App from './App.jsx';
import './index.css';
import Parse from 'parse';

Parse.initialize(
  '<parse-application-id>',  // replace me with your actual app id
  '<parse-javascript-key>',  // replace me with your actual js key
);
Parse.serverURL = 'https://parseapi.back4app.com/';

ReactDOM.createRoot(document.getElementById('root')).render(
  <React.StrictMode>
    <App/>
  </React.StrictMode>,
);
Restart the development server and navigate to your web app. Open the console and check if there are any errors. No errors indicate that the connection to the backend has been successful.
App Logic
Moving along, prompt the agent to generate the actual app logic:
Write me the code for `EventList.jsx`, `EventDetails.jsx`, and `EventsByVenue.jsx`.
Use Parse to fetch the required information. I want each page to have a `loading`
and `error` state.
The AI agent will provide the code for each of the routes. Here’s an example:
// src/components/EventList.jsx

import {useEffect, useState} from 'react';
import {Link} from 'react-router-dom';
import Parse from 'parse';

const EventsList = () => {

  const [events, setEvents] = useState([]);
  const [loading, setLoading] = useState(true);
  const [error, setError] = useState(null);

  useEffect(() => {
    const eventObject = Parse.Object.extend('Event');
    const query = new Parse.Query(eventObject);

    query.find().then((results) => {
      const eventsData = results.map((event) => ({
        id: event.id,
        ...event.attributes,
      }));
      setEvents(eventsData);
      setLoading(false);
    }, (error) => {
      console.error('Error while fetching events', error);
      setError(error);
      setLoading(false);
    });
  }, []);

  if (loading) return <div>Loading...</div>;
  if (error) return <div>Error: {error}</div>;

  return (
    <div>
      <h1>Event List</h1>
      <p>Here is a list of all the events.</p>
      <ul>
        {events.map((event) => (
          <li key={event.id}>
            <Link to={`/${event.id}`}>
              {event.name}
            </Link>
          </li>
        ))}
      </ul>
    </div>
  );
};

export default EventsList;
Copy the code and paste it in EventsList.jsx. Then change the other two files accordingly:
Once done, your frontend is more or less complete. Start the development server:
$ npm run devOpen your favorite web browser and navigate to http://localhost:5173/. You’ll see that the data is now fetched from the backend. Try clicking around to see if everything works.

Dockerization
We’ll use Back4pp Containers, a free-to-use CaaS platform, to deploy our frontend. As the name suggests, the platform is used for deploying containers; therefore, to deploy our frontend, we must dockerize it first.
Create a Dockerfile file in the project root like so:
# Dockerfile

FROM node:18-alpine3.17 as build

WORKDIR /app
COPY . /app

RUN npm install
RUN npm run build

FROM ubuntu

RUN apt-get update
RUN apt-get install nginx -y

COPY --from=build /app/dist /var/www/html/

EXPOSE 80

CMD ["nginx", "-g", "daemon off;"]
This Dockerfile makes use of multi-stage builds. It comprises two stages, the build and the runner stage.
The build stage copies over the project, installs the dependencies and builds the project. The runner, on the other hand, serves build‘s output with Nginx.
To reduce the image size, we can also define a .dockerignore file:
# .dockerignore

.idea/

node_modules/
out/
build/
Make sure to adapt the .dockerignore file accordingly.
Before deploying a Docker image, it’s wise to test it locally.
Build the Docker image:
$ docker build -t back4app-events:1.0 .Run a container using the newly-created image:
$ docker run -it -p 80:80 back4app-events:1.0Your web app should be accessible at http://localhost/.
Push Code
Back4app Containers is tightly integrated with GitHub. To deploy your code to it, you must first push it to a remote GitHub repository.
Firstly, navigate to GitHub and create a new repository. Take note of the remote URL, e.g.:
[email protected]:<username>/<repository-name>.git

Example:
[email protected]:duplxey/back4app-ai-agent.git
Next, initialize Git, VCS all the files, and commit them:
$ git init
$ git add .
$ git commit -m "project init"
Use the remote from the previous step to push the code:
$ git remote add origin <your_remote_url>
$ git push origin master
Your files should be displayed in the GitHub repo if you’ve done everything correctly.
Deploy Code
Once the code is on GitHub, we can quickly deploy it by prompting the AI agent:
Connect to my "<username>/<repository-name>" repository on GitHub and deploy it to Back4app Containers.
Wait a few minutes for the project to deploy.
Once ready, click on the app’s URL and ensure everything works by testing the app.
Conclusion
In conclusion, we’ve successfully built and deployed a full-stack web application to the Back4app Platform and explained how to incorporate AI into a web development workflow.
Even though we didn’t write much code independently, a lot of technical knowledge was still required.
Back4app Agent, in combination with other AI-based tools like GitHub Copilot, can significantly speed up your development process.
Utilizing them allows you to automate mundane, repetitive tasks and focus on the more exciting things.
Grab the final source code from the back4app-ai-agent GitHub repo.


