How to create an app using ChatGPT?
The image was generated with the help of DALL·E 2.
OpenAI’s ChatGPT has taken the world by storm. Its great ability to “understand” and answer questions has made it useful in a number of fields, especially in software development.
In this article, we will explore what ChatGPT is, how it works, and its potential applications in software development. By the end of this article, you’ll be able to effectively prompt ChatGPT and use it to build simple applications.
Contents
- 1 ChatGPT Overview
- 2 What are the advantages of ChatGPT for software development?
- 3 What are the limitations of ChatGPT?
- 4 How to effectively prompt ChatGPT?
- 5 How to use ChatGPT to create an application?
- 6 Conclusion
- 7 FAQ
- 8 What is ChatGPT?
- 9 What are the advantages of ChatGPT for software development?
- 10 What are the limitations of ChatGPT?
- 11 How to effectively prompt ChatGPT?
- 12 How to use ChatGPT to create an application?
ChatGPT Overview
ChatGPT (Generative Pre-trained Transformer) is an artificial intelligence chatbot developed by OpenAI. It was released in November 2022 and quickly became one of the most popular AI-powered conversational agents.
It was designed to mimic a human conversationalist, but its uses are versatile. It can write and debug computer programs, solve logical problems, express opinions, and even write poems. This makes it useful in a variety of fields such as software development, education, journalism, research, and finance.
The chatbot was trained on a massive amount of data, thus making it able to answer a wide range of prompts and questions. During the training process, ChatGPT leveraged both unsupervised learning as well as supervised learning.
Due to ChatGPT’s popularity a lot of companies launched their own large language model (LLM) chatbots. Google introduced Bard, Meta introduced LLaMA, and there’s a rise of other smaller AI-powered chatbots such as Jasper.ai and Claude.
What are the advantages of ChatGPT for software development?
Faster Development
ChatGPT can help you greatly accelerate your development process by providing quick solutions to problems, suggesting code snippets, and answering technical questions.
Documentation Generation
ChatGPT can be leveraged to automagically generate documentation. All you have to do is copy your code and feed it to ChatGPT. This can save developer teams valuable time and effort that would otherwise be spent manually writing documentation.
Virtual Assistants
The AI chatbot has great natural language processing (NLP) capabilities. That makes it a great base for virtual assistants and customer support agents. A few months ago OpenAI also released ChatGPT API, which is already being used by many tech companies such as Snap Inc., Quizlet, and Instacart.
Learning Tool
Another great thing about ChatGPT is that it can be used as a learning tool. You can ask it to explain concepts, processes, and even translate code from one language/framework to another.
Debugging
ChatGPT can be used to debug your code. It can analyze code, detect logical problems, and offer optimization improvements. Additionally, you can use ChatGPT to summarize long stack traces or explain errors in simple terms.
What are the limitations of ChatGPT?
Hallucinations
ChatGPT sometimes provides plausible-sounding but incorrect or nonsensical information. This behavior is common for LLMs and has been confirmed by ChatGPT’s developer. Hallucinations are especially problematic when people use ChatGPT for learning new concepts.
Biased Responses
During the training process, OpenAI could control what data to feed to ChatGPT and what not. This resulted in ChatGPT being quite biased. On top of that OpenAI decided to block specific content.
Limited Knowledge
ChatGPT 3.5’s knowledge is quite limited. The chatbot has no knowledge of the events that occurred after September 2021. Moreover, ChatGPT 3.5 cannot access the internet.
That means ChatGPT 3.5 can’t be used for brand new programming languages and frameworks.
How to effectively prompt ChatGPT?
Talk to it like you’d talk to a person
As mentioned above ChatGPT is designed to mimic a human conversationalist. So why not use it for what it does best? When prompting ChatGPT talk to it like you’d talk to a person.
Be clear and specific
Your ChatGPT prompts should be as clear and specific as possible. If you want ChatGPT to write you some code tell it what algorithm to use and how you want a specific function implemented. On top of that break down complex requests into multiple prompts.
Tip: Your prompts should either start or end with an action word (e.g. write, explain, summarize).
Provide context
While providing context is important, it’s also important to avoid overwhelming ChatGPT with too much information. Stick to the relevant and important details and avoid including unnecessary information.
Tip: Keep in mind that threads preserve context. If your next prompt is irrelevant to the current thread make sure to start a new thread.
Format your messages
Using proper grammar and spelling can help you ensure the best possible responses. It also helps if you use whitespaces or double quotes to box specific sections of text such as code, data dumps, and so on.
Example prompt:
Explain this code:

for (int i = 0; i < 10; i++) {
  System.out.println("Back4app rocks!");
}
Point out ChatGPT’s mistakes
ChatGPT might introduce bugs and security flaws into your code. When that happens point them out and ask ChatGPT to fix it.
Tip: Reasking the same question or a slightly modified question might result in a better response.
How to use ChatGPT to create an application?
This section of the article looks at how to build a movie watchlist app using React Native for the frontend and Back4app for the backend. Most of the code will be generated by ChatGPT.
Prerequisites
Even though the code will be mostly generated by ChatGPT you should still have:
- Basic understanding of mobile app development
- Experience with JavaScript ES6
- Experience with React Native
- Android Studio and an IDE for JS installed on your local machine
What is Back4app?
Back4app is a great Backend as a Service (BaaS) that offers an ample range of features. It allows developers to quickly build web and mobile applications without worrying about the backend or the underlying infrastructure.
The platform’s core features include:
- Authentication
- Real-time databases
- Cloud Code functions
- File Storage and Blockchain Storage
- Push and email notifications
- GraphQL, REST & SDKs
Back4app follows a simple price model that suits the backend needs of any app. On top of that, they offer a free tier which is great for prototyping and hosting small applications. It includes:
- 25k requests
- 250 MB data storage
- 1 GB transfer
- 1 GB file storage
To learn more about Back4app check out What is Back4app?
Project Introduction
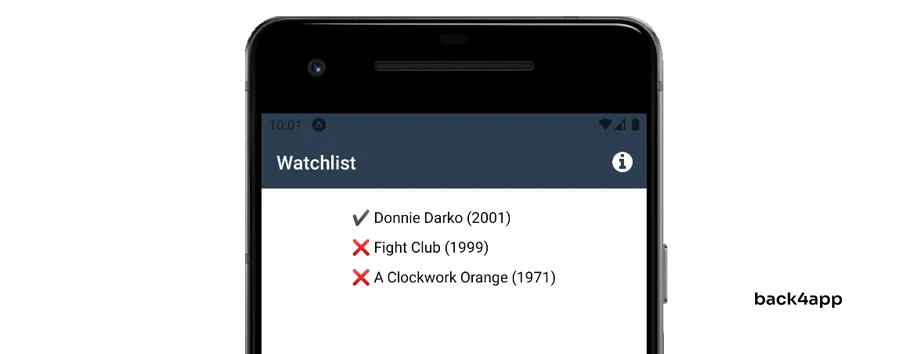
We’ll build a mobile app that serves as a movie watchlist. The app will allow users to add movies to the watchlist and mark them as watched/not watched. The backend will be created with Back4app and we’ll use React Native (with Expo) for the frontend. As mentioned above most of the code will be generated by ChatGPT.
Backend
Before working on our app we need to take care of the backend. The backend will serve as a database that’ll allow us to keep track of the movie watchlist. We’ll build it with Back4app.
There are multiple ways to interact with Back4app:
- Back4app Dashboard (covered in this tutorial)
- Back4app ChatGPT Plugin (covered in this tutorial)
- Back4app CLI (covered here)
We’ll demonstrate how to build the same backend using the dashboard and the ChatGPT plugin.
I recommend the dashboard approach if you’ve never worked with Back4app before. It’ll help you get a feel of how Back4app works and how its dashboard is laid out. Nevertheless, feel free to check out the ChatGPT plugin approach afterward.
Both approaches will require a Back4app account. If you already have it log in otherwise go ahead and sign up for the free account.
Back4app Dashboard
Feel free to skip to the ChatGPT Plugin approach if you’re interested in just that.
Create Back4app App
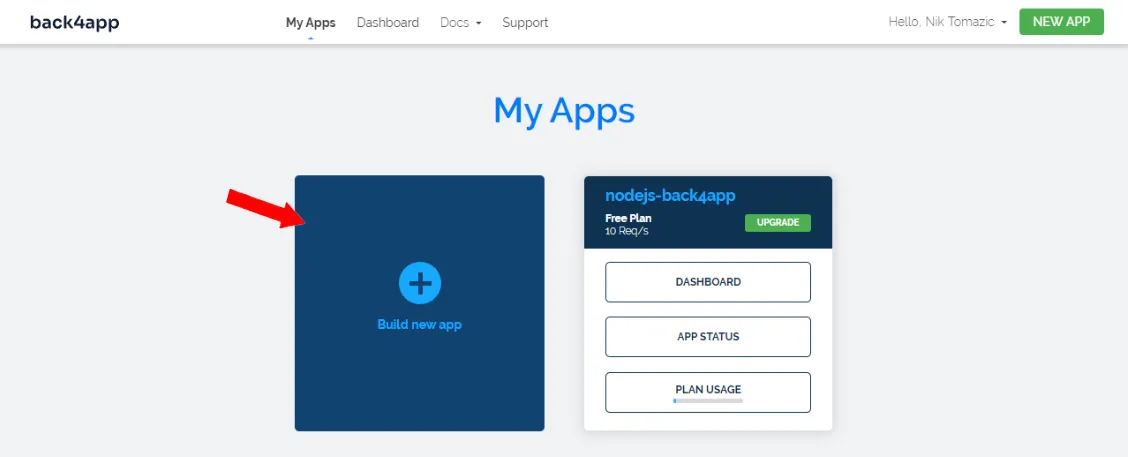
To work with Back4app we first need to create an app. As you log in to your dashboard you’ll see the list of your apps. Click on “Build new app” to start the app creation process.
Select “Backend as a Service (BaaS)” and pick a custom app name. I’ll go with “back4app-chatgpt-app”. Next, select “NoSQL” as the database, and lastly click “Create”.
Back4app is going to take a few moments to prepare everything required for your app like the application layer, database, scaling & security.
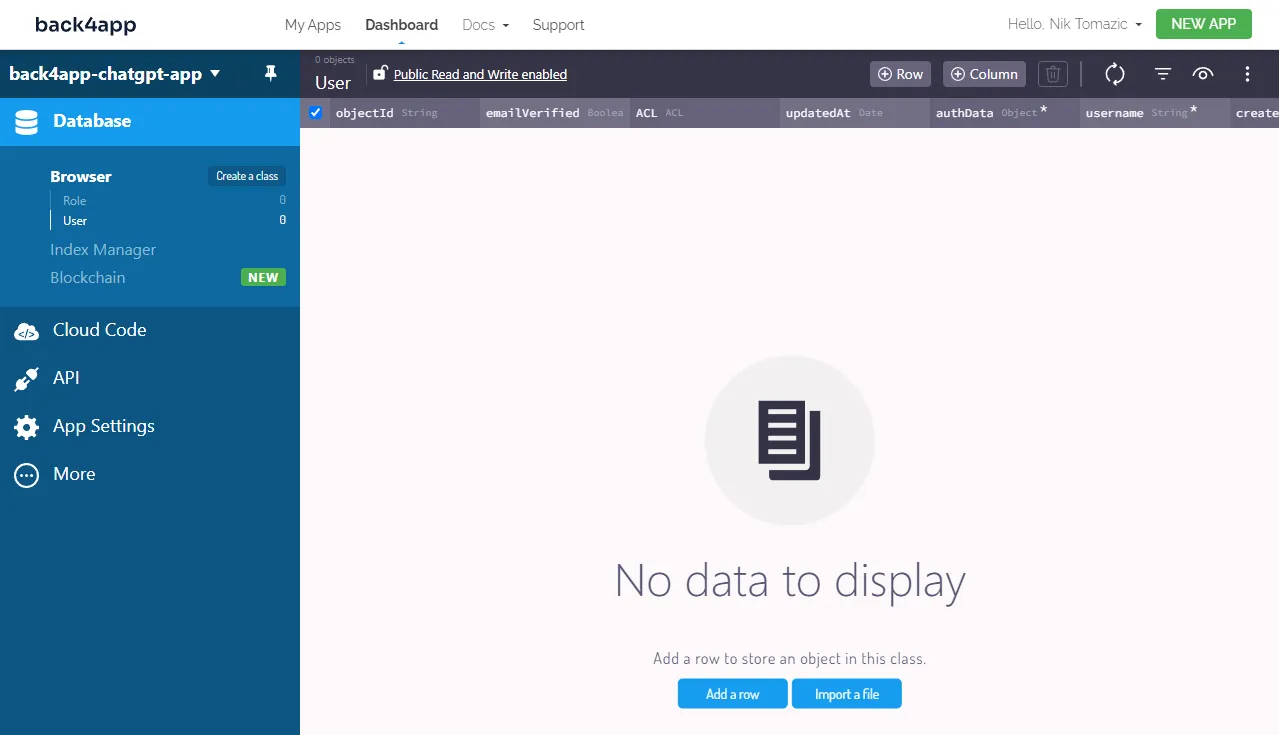
Once your application is ready you will be redirected to your app’s dashboard.
Database
Now let’s define the database classes.
Since we’re building a simple movie watchlist app we’ll only need one class. We can name it Movie. An object instance of a Movie will represent a movie on the watchlist.
To create the Movie class click on “Create a class”, make sure to enable “Public Read and Write” and add the following fields to it:
+---------------------------+-----------------+---------------+----------+
| Data type                 | Name            | Default value | Required |
+---------------------------+-----------------+---------------+----------+
| String                    | name            | <leave blank> | yes      |
+---------------------------+-----------------+---------------+----------+
| Number                    | releaseYear     | <leave blank> | yes      |
+---------------------------+-----------------+---------------+----------+
| Boolean                   | isWatched       | False         | no       |
+---------------------------+-----------------+---------------+----------+
Next, click on the plus button to fill the database with some sample rows. I’ll go with the following:
+--------------------+-------------+-----------+
| name               | releaseYear | isWatched |
+--------------------+-------------+-----------+
| A Clockwork Orange | 1971        | False     |
+--------------------+-------------+-----------+
| Fight Club         | 1999        | False     |
+--------------------+-------------+-----------+
| Donnie Darko       | 2001        | True      |
+--------------------+-------------+-----------+
That’s it for the backend.
In the next article section, we’ll demonstrate how to build the same backend using ChatGPT.
Back4app ChatGPT Plugin
This approach requires access to ChatGPT 4 along with its experimental features. At the time of writing a ChatGPT Plus is required to use GPT-4.
Keep in mind that ChatGPT isn’t a magic tool. It’s a large sophisticated language model that might introduce bugs that you’ll need to fix. On top of that sending the same prompts to ChatGPT will most likely return different responses.
Back4app Plugin Installation
Feel free to skip this section if you already have the Back4app ChatGPT plugin installed.
Once you log into your ChatGPT Plus account you’ll see two models at the top of the page. To use all the advanced features we’ll select “GPT-4” as our model. Then click on your avatar at the bottom left of the page and select “Settings & Betas”.
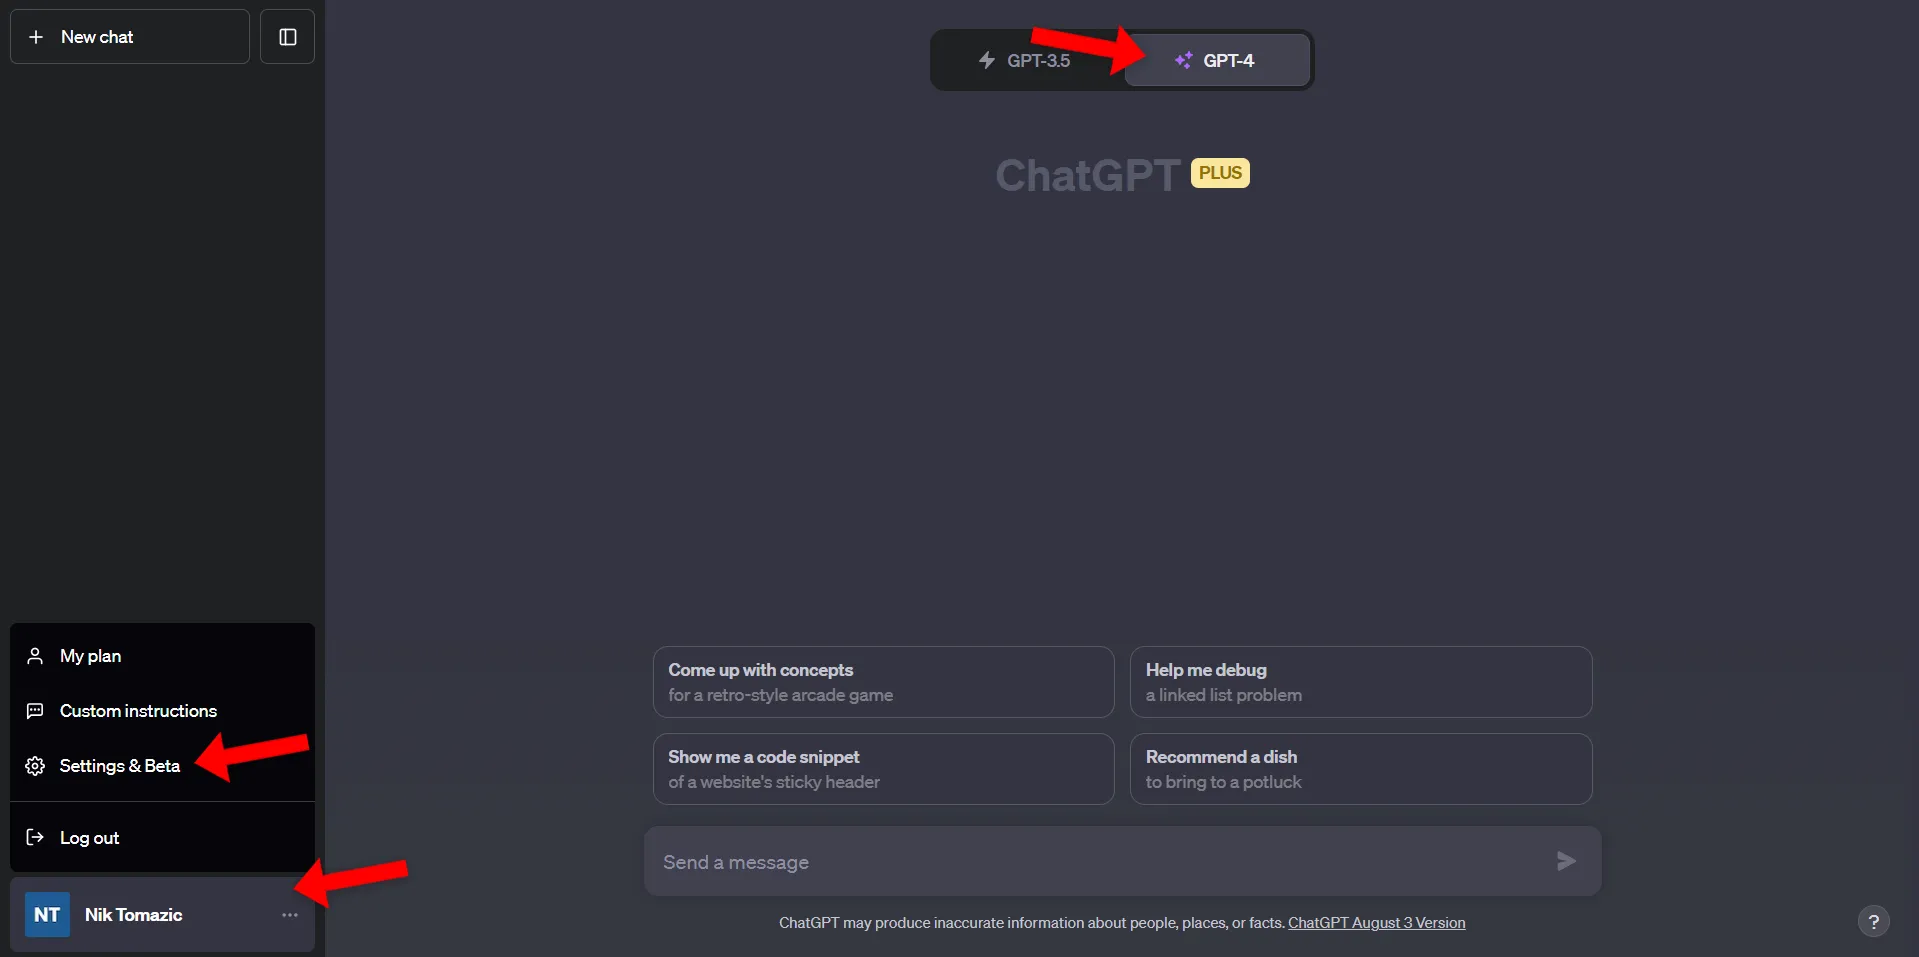
Select “Beta features” on the modal’s sidebar and enable the “Plugins” feature.
After that close the modal click on “GPT-4” and enable the “Plugins” feature for this model.
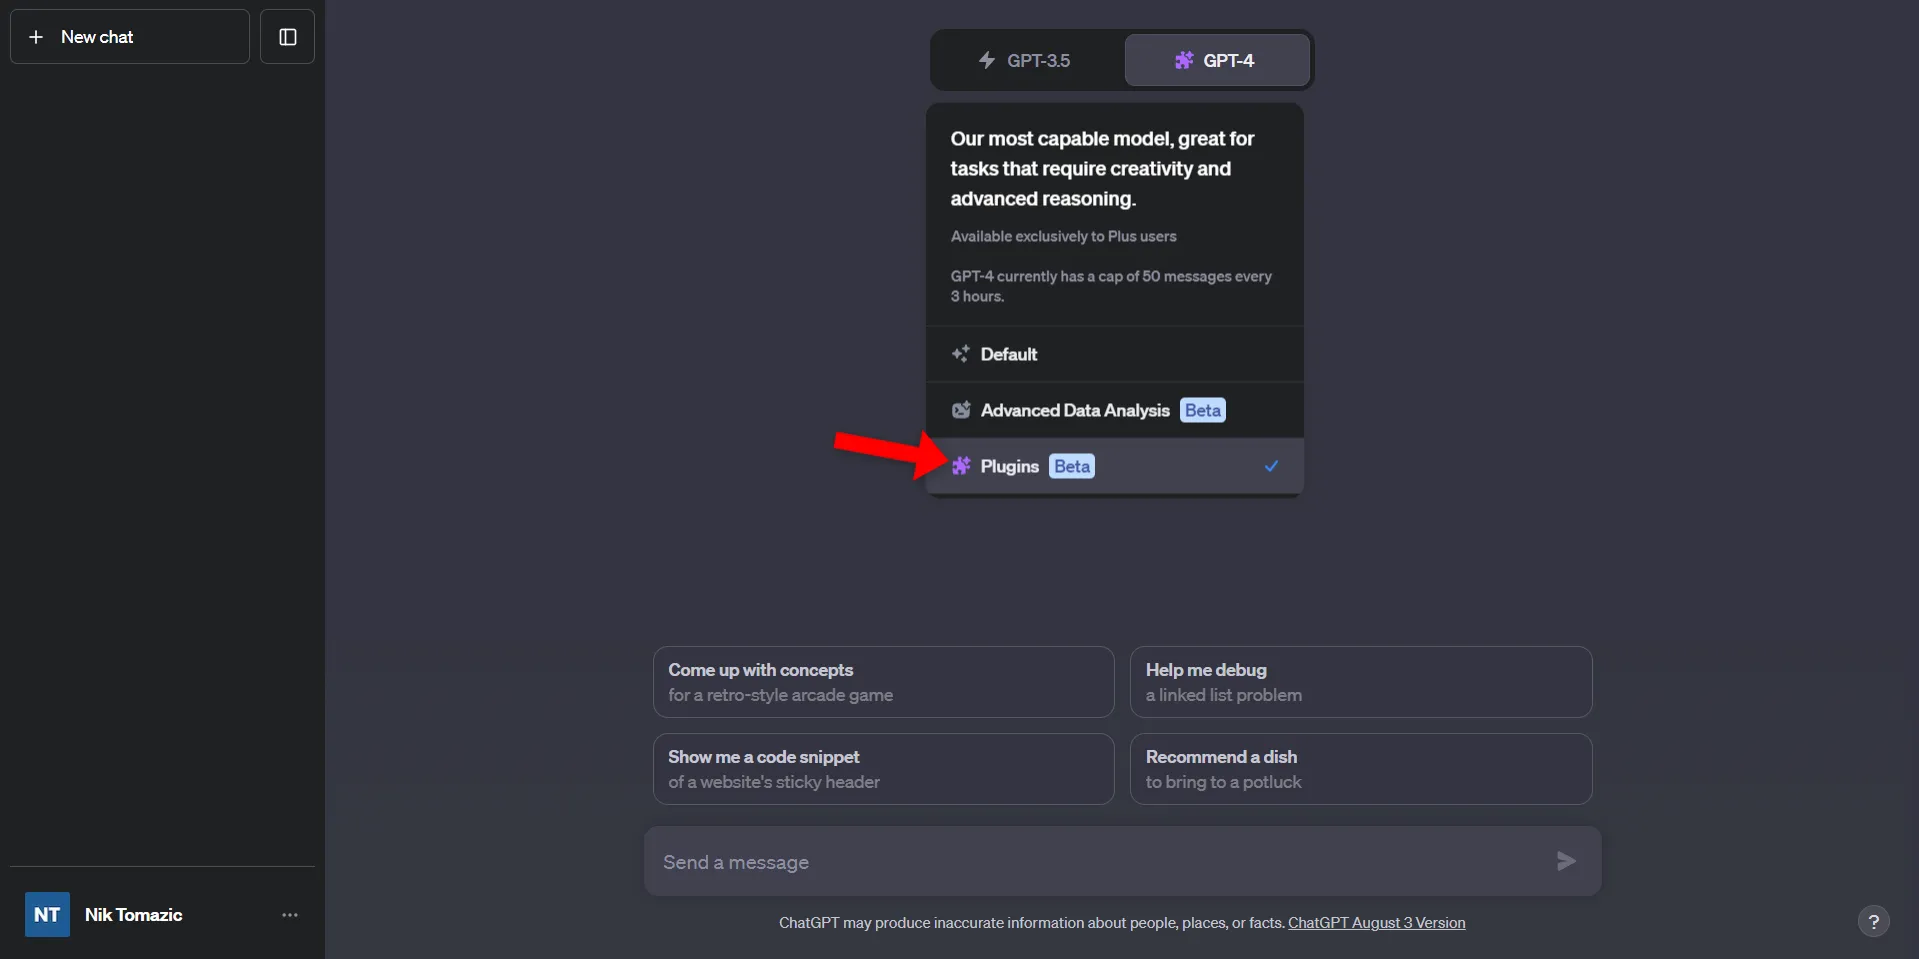
Close the “GPT-4” dropdown and you should see a message saying “No plugins enabled”. Click on it to open the ChatGPT plugin marketplace.
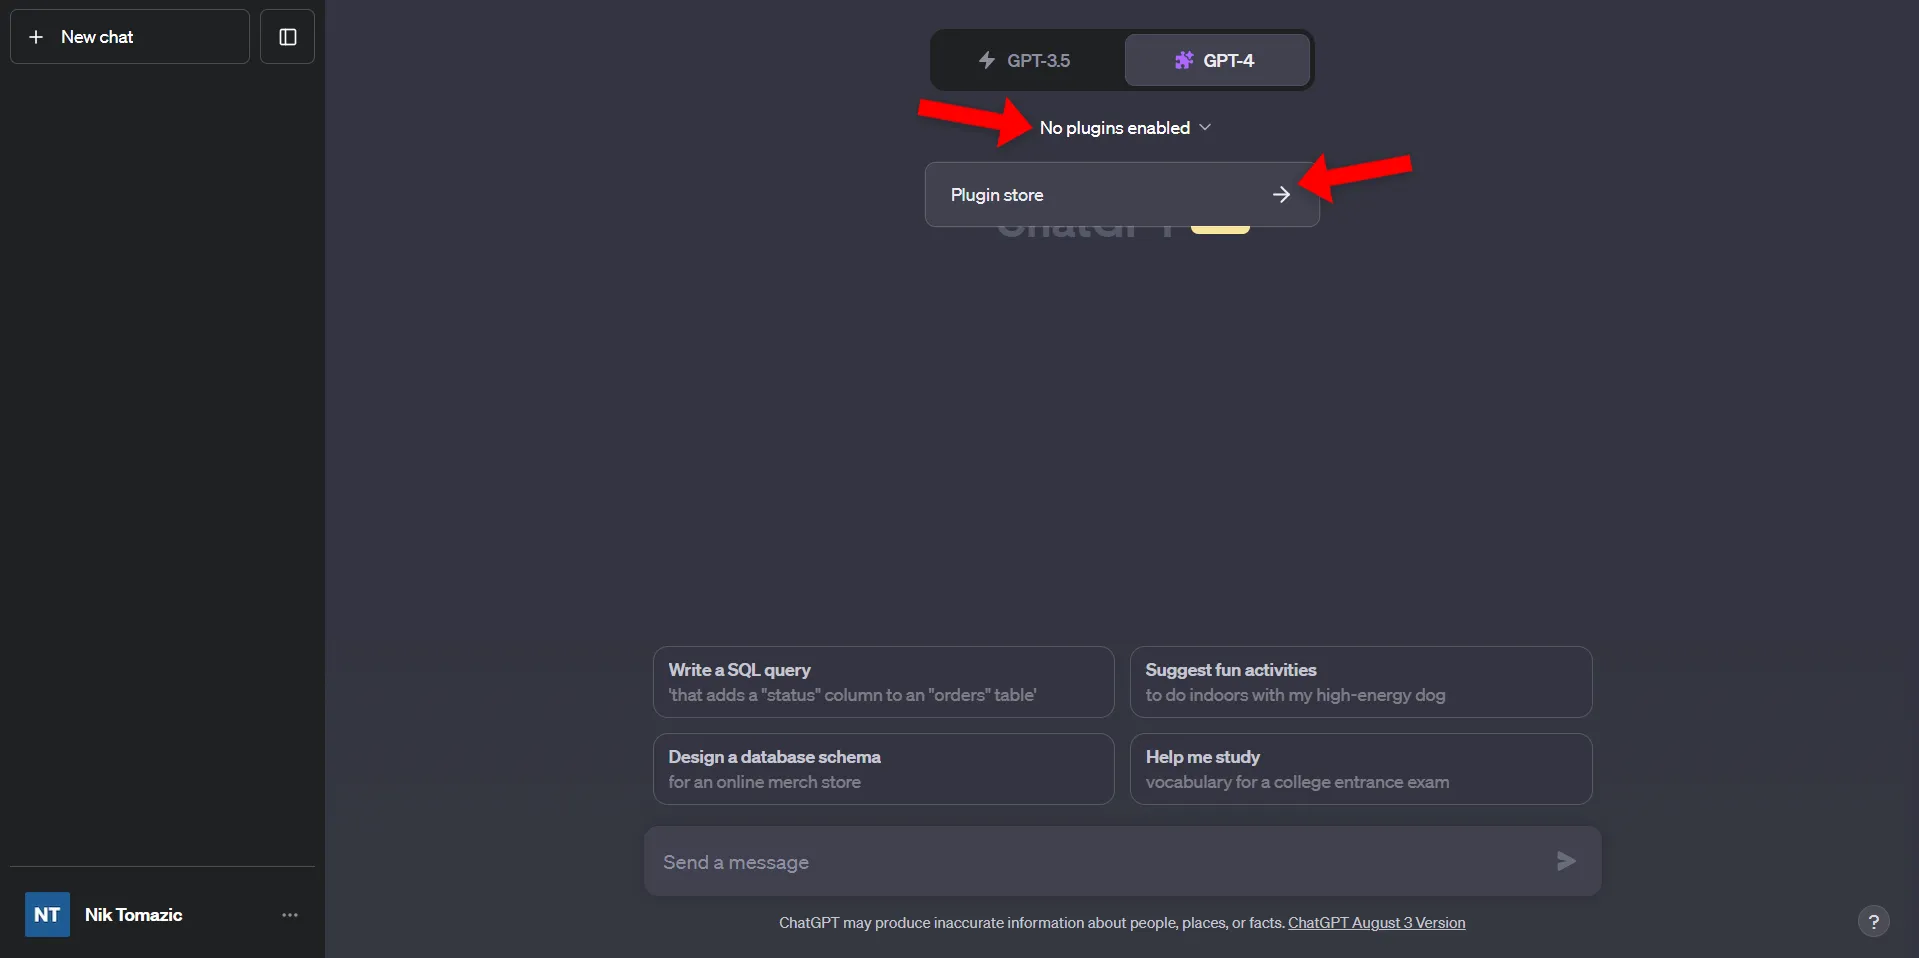
Search for “Back4app”, install it, and make sure to link your Back4app account to it.
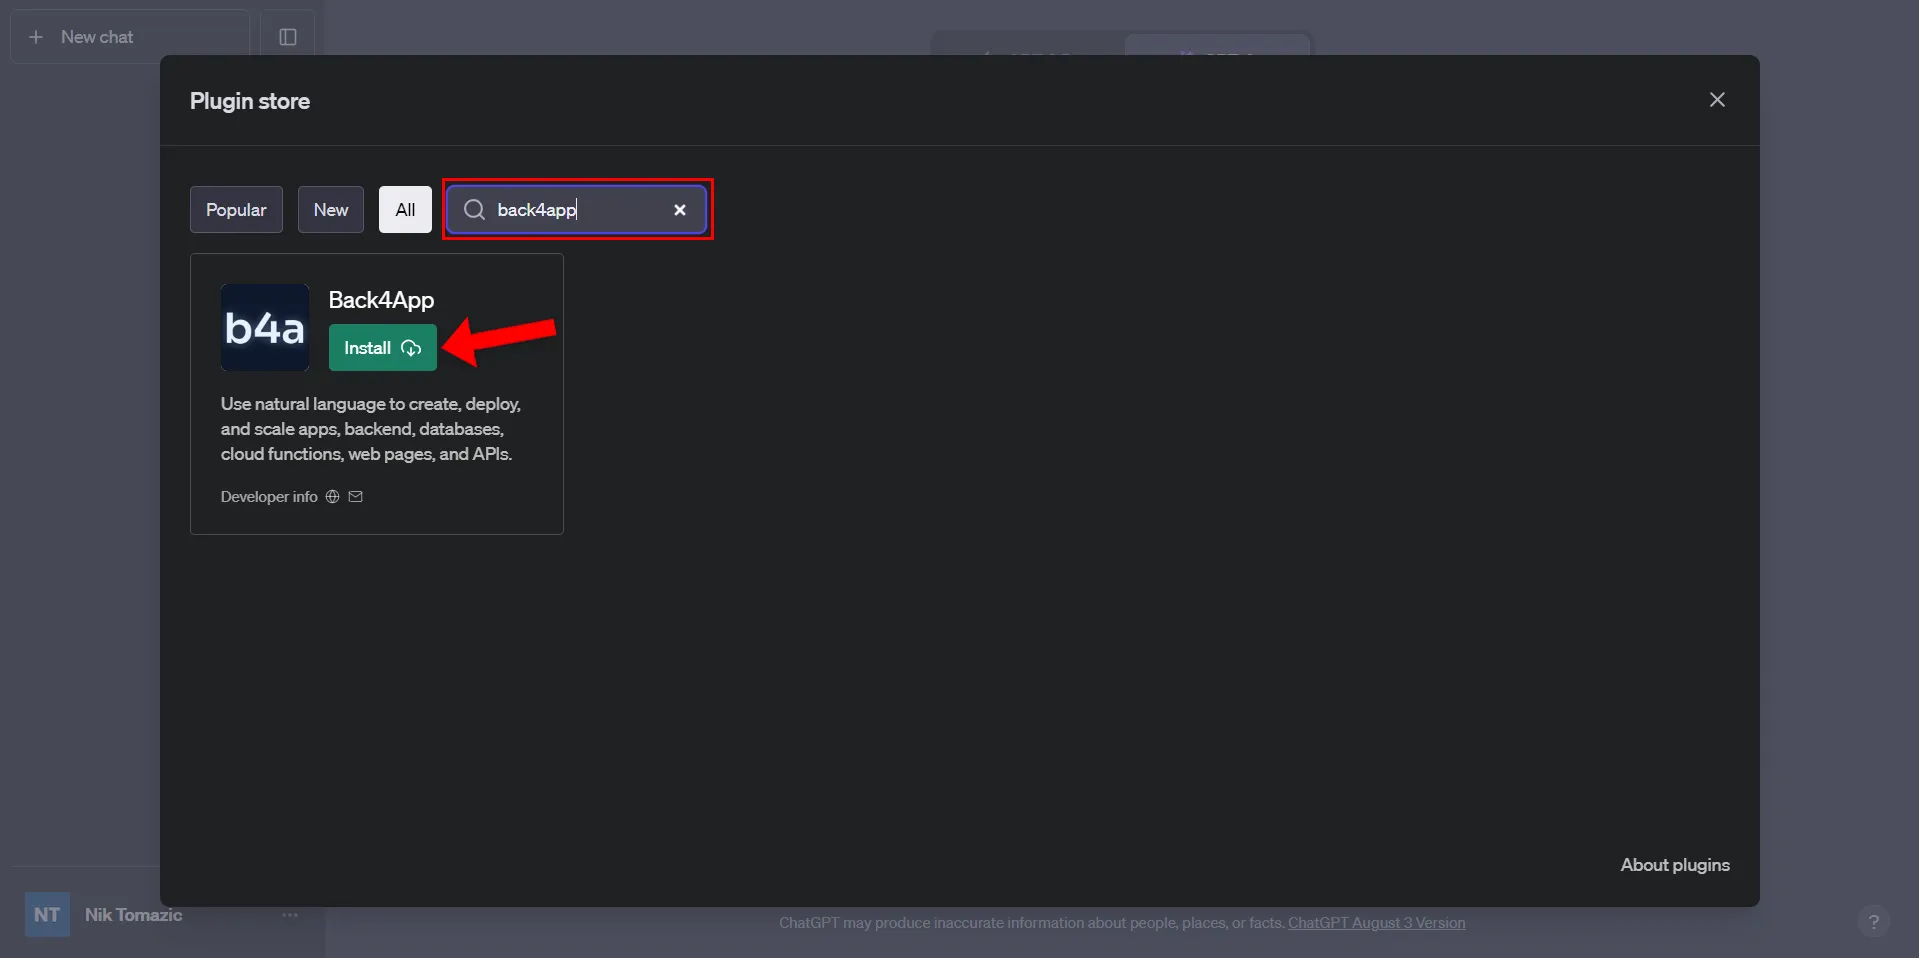
Great, you’ve successfully installed the Back4app plugin. Your ChatGPT should now have the superpowers to communicate with Back4app.
Back4app Plugin Usage
To create a movie watchlist backend with ChatGPT we’ll have to perform similar steps as before. But with this approach, we’ll use natural everyday language instead of clicking through the UIs.
Start by telling ChatGPT to create a new Back4app application:
Create a Back4app application called "back4app-watchlist".
As you can see ChatGPT successfully created a BaaS-based application. The app can be visited by clicking on the “Dashboard URL”. Additionally, ChatGPT provided us with all the information and API keys that we’ll need in future steps.
Next, let’s tell ChatGPT to create the “Movie” database class:
Create a "Movie" database class that will have the following properties:
- name (String, required)
- releaseYear (Integer, required)
- isWatched (Boolean, required, default False)
If you’re unsure what database classes your app requires feel free to explain your app idea to ChatGPT in simple words. ChatGPT will be able to figure out what database classes you need and what fields they should include.
Next, ask ChatGPT to fill the database with some sample movies:
Populate the database with 10 sample movies.
Lastly, ask ChatGPT for the database view link so we can check if everything was successful:
Provide me the link to the "Movie" class.
Clicking on the link should open a new tab with the database view.
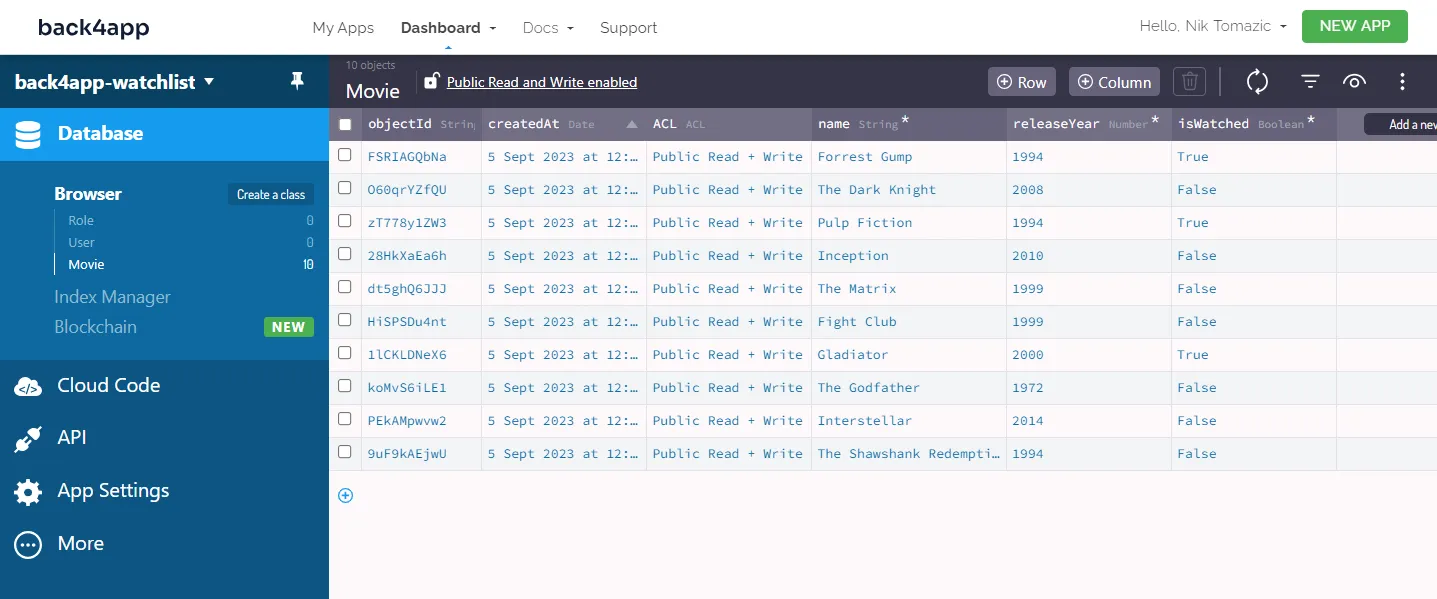
As you can see the “Movie” class has all the requested fields and ChatGPT successfully populated the database.
That’s it.
Frontend (with ChatGPT)
In this section of the article, we’ll prompt ChatGPT to write the frontend code for us.
App Creation Process
Let’s start with explaining our app idea to ChatGPT. In the first prompt, we’ll define the tools we want ChatGPT to use and ask it to explain the app creation process in steps. Additionally, we’ll provide the database schema.
Describe the steps of building a mobile app for a movie watchlist. I want the app to be
written in React Native using Expo. My backend is hosted on Back4app. I only have one
database model named Movie and its structure is the following:

{
   "results":[
      {
         "objectId": "bAhUu5SFZo",
         "name": "Donnie Darko",
         "releaseYear": 2001,
         "isWatched": false,
         "createdAt": "2023-04-11T16:10:44.281Z",
         "updatedAt": "2023-04-11T16:10:44.281Z"
      },
   ]
}
To get the database schema/dump you can use the three dots on the top right of the screen and click on “Export > All rows as JSON”. Back4app is going to send you the export via email.
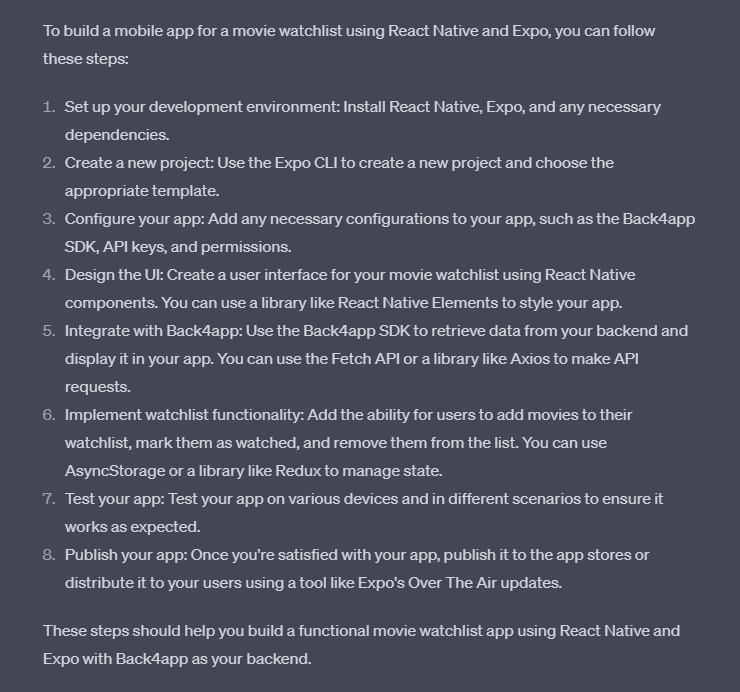
As you can see ChatGPT provided the valid information to create a React Native application. We can now ask for additional information for each step.
Initialize Project
Start by requesting more information about the first two steps:
How to create a React Native project?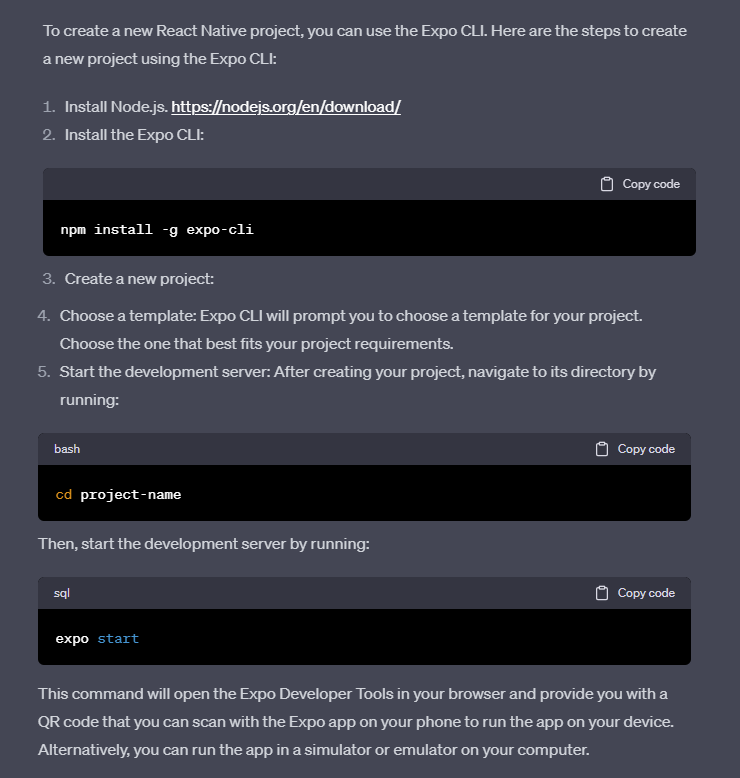
ChatGPT’s response looks good. Go ahead and install Node.js, Expo CLI and create a new project. Regarding the template, I suggest you go with tabs (TypeScript) since it automatically configures React Router, which you’ll most likely use in the future.
After the project has been created I suggest you open it in an IDE and take a look at the directory structure. If it’s your first time working with Expo feel free to ask ChatGPT to explain the directory structure e.g. Describe the Expo directory structure.
Next, follow the ChatGPT instructions to start the Expo server:
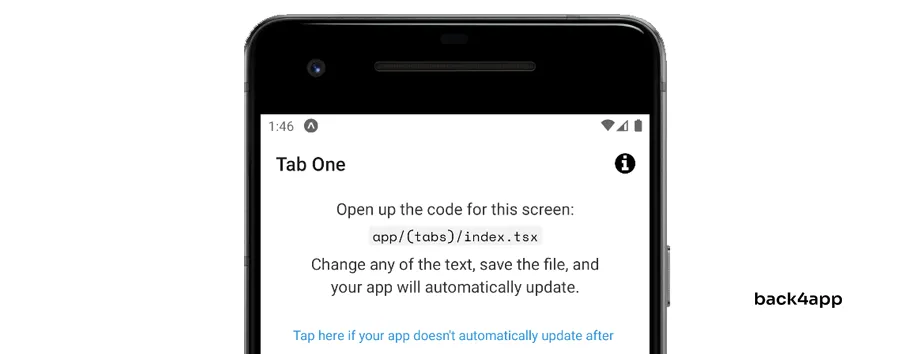
$ expo startOnce the Expo server is running open Android Studio and use VDM to start an emulator. Next, go back to the Expo console and press “A” on your keyboard to open the app in the emulator. You should see the following screen:
Connecting React Native with Back4app
Moving along, let’s ask ChatGPT to explain how to connect a React Native project with Back4app.
How can I configure my Expo app to work with Back4app? I've chosen "tabs (TypeScript)"
as my project template.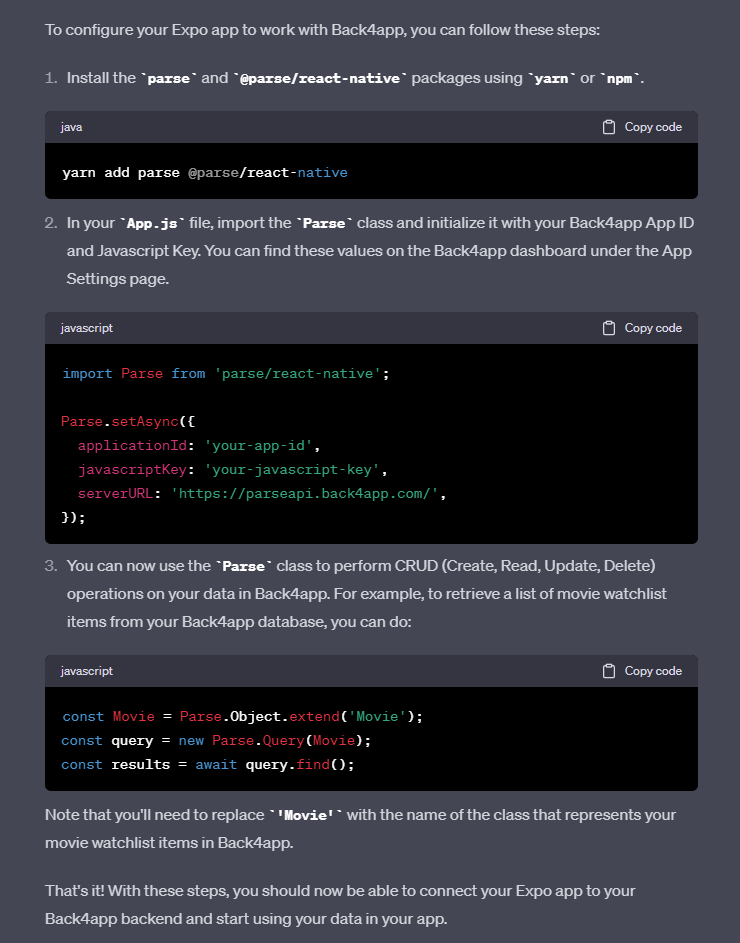
At first glance, the generated steps and code look valid. But if you take a closer look you’ll notice that your project doesn’t even have an App.js or App.ts file. This is because we opted for tabs (TypeScript) instead of the blank template. On top of that ChatGPT is telling us to install the wrong dependencies.
When I was working on this article I tried to explain this to ChatGPT but it didn’t work. At this point, I was stuck and I had to refer to official Back4app documentation. If you follow the official docs you’ll notice that you first have to install the following packages:
yarn add parse @react-native-async-storage/async-storageAnd then navigate to index.ts to initialize Parse:
// index.ts

import 'expo-router/entry';

import Parse from 'parse/react-native.js';
import AsyncStorage from '@react-native-async-storage/async-storage';

Parse.setAsyncStorage(AsyncStorage);
// Make sure to replace the 'APPLICATION_ID' and 'JAVASCRIPT_KEY' with your own keys.
Parse.initialize('YOUR_APPLICATION_ID', 'YOUR_JAVASCRIPT_KEY');
Parse.serverURL = 'https://parseapi.back4app.com/';
Make sure to replace
YOUR_APPLICATION_IDandYOUR_JAVASCRIPT_KEYwith the actual API keys from your Back4app Dashboard “App Settings > Security & Keys”.
To verify the connection has been successful try listing the movies by adding the following code at the bottom of index.ts:
// index.ts

// ...

const Movie = Parse.Object.extend('Movie');
const query = new Parse.Query(Movie);

query.find().then((results) => {
  console.log('Query results:', results);
}).catch((error) => {
  console.error('Error querying database:', error);
});
Refresh the app, open your console and you should see the movie list.
Watchlist Display
Next, ask ChatGPT to write the React code that displays the movies on the watchlist.
Write me the code that I can use in my TabOneScreen to display the list of movies
in the watchlist. I want a tick emoji in front of watched movies and a cross emoji
in front of not yet watched movies.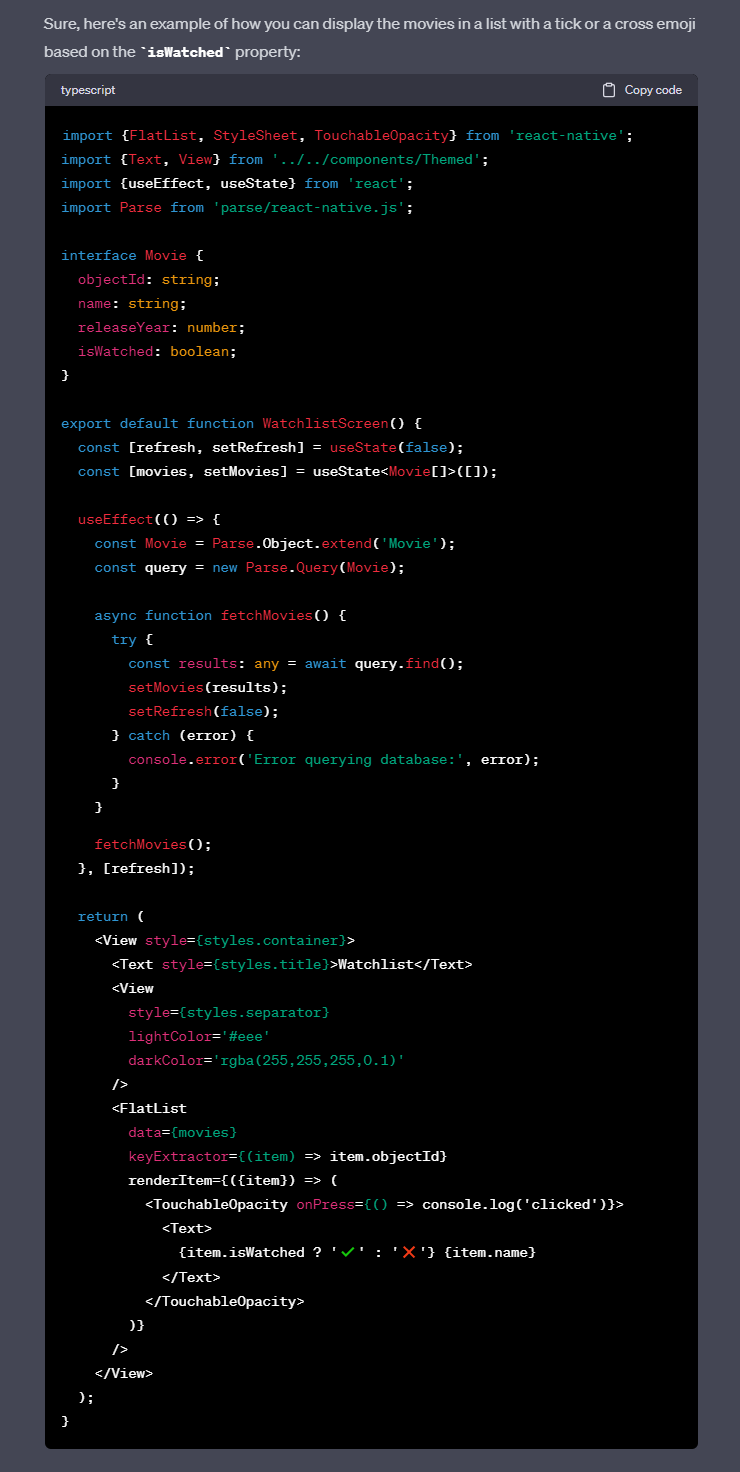
ChatGPT returned a valid-looking code. It utilized useState() to handle the state and created a TypeScript interface for our Movie model. It even prepared the refresh hook which is going to allow us to refresh the movie list. The only two problems I see are that the screen is named WatchlistScreen instead of TabOneScreen and the Movie interface is incomplete. That’s easily fixable though!
Go ahead and replace your app/(tabs)/index.tsx with ChatGPT’s code. Then:
- Replace
WatchlistScreenwithTabOneScreen. - Change the
Movieinterface like so:
interface Movie extends Parse.Object {
  objectId: string;
  name: string;
  releaseYear: number;
  isWatched: boolean;
  createdAt: Date;
  updatedAt: Date;
}
Refresh the app and make sure you can see the movie list.
Watchlist Toggling
One last thing we have to do is to ask ChatGPT to write us a toggleWatched function, which toggles a specific movie’s isWatched property.
Write me a function that toggles specific movie's "isWatched" property.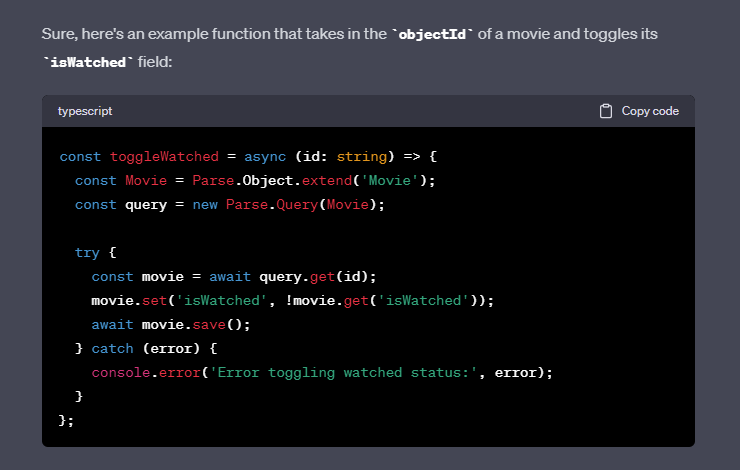
Copy the function into your TabOneScreen and make TouchableOpacity trigger it like so:
// app/(tabs)/index.tsx

export default function TabOneScreen() {

  // ...

  const toggleWatched = async (id: string) => {
    const Movie = Parse.Object.extend('Movie');
    const query = new Parse.Query(Movie);

    try {
      const movie = await query.get(id);
      movie.set('isWatched', !movie.get('isWatched'));
      await movie.save();
      setRefresh(true);
    } catch (error) {
      console.error('Error toggling watched status:', error);
    }
  };

  // ...

  return (
    <View style={styles.container}>
      <Text style={styles.title}>Watchlist</Text>
      <View style={styles.separator} lightColor='#eee' darkColor='rgba(255,255,255,0.1)'/>
      <FlatList
        data={movies}
        keyExtractor={(item) => item.id}
        renderItem={({item}) => (
          <TouchableOpacity onPress={() => toggleWatched(item.id)}>
            <Text>{item.get('isWatched') ? '✔️' : '❌'} {item.get('name')}</Text>
          </TouchableOpacity>
        )}
      />
    </View>
  );
}

// ...
Great, that should be it.
Open the emulator once again and test the app. You should see the list of all the movies and clicking on a specific movie should toggle its isWatched (indicated by the emoji).
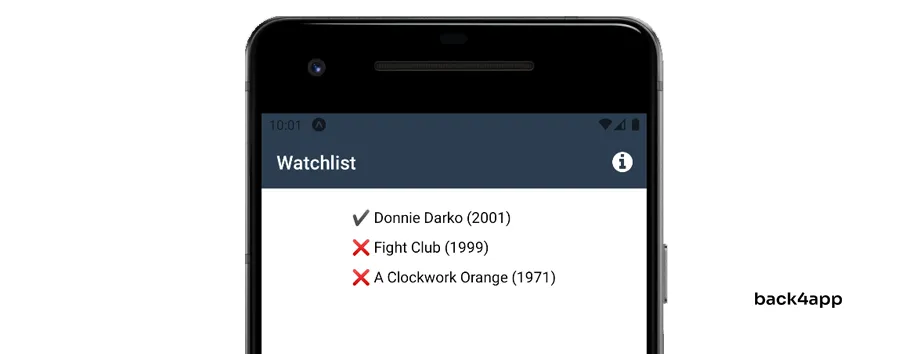
We’ve successfully used ChatGPT to create a simple mobile application. Feel free to play around with ChatGPT to add additional functionalities such as:
- Adding movies via the app
- Deleting movies via the app
- Per-user watchlist
Conclusion
ChatGPT is a great tool that can help you speed up the development process, write documentation and provide useful code snippets. As useful as it is it still has a few flaws. Its biggest two flaws are hallucinations and limited knowledge.
Due to hallucinations, every ChatGPT response needs to be fact-checked and carefully analyzed. This oftentimes results in developers spending more time debugging ChatGPT’s code than they’d need to write it on their own.
In my opinion, AI technology is a bit overhyped at the moment. I don’t think we’re anywhere close to the actual AI or AGI, but we’ll see what the future brings.
The final source code is available on GitHub.
FAQ
What is ChatGPT?
ChatGPT is an artificial intelligence (AI) chatbot developed by OpenAI. ChatGPT can write computer software, solve logical problems, and even create artistic content.
What are the advantages of ChatGPT for software development?
– Faster development
– Great Natural Language Processing (NLP) capabilities
– Generate documentation
– Provide code snippets
What are the limitations of ChatGPT?
– Hallucinations
– Limited knowledge
– Biased responses
– Too wordy
How to effectively prompt ChatGPT?
– Start or end with an action word (e.g. write, explain).
– Talk to ChatGPT like you’d talk to a person.
– Provide context, but only what’s required.
– Reasking a question might result in different answers.
– Use threads to your advantage.
How to use ChatGPT to create an application?
1. Create the application backend using a BaaS solution like Back4app.
2. Explain your app idea to ChatGPT and ask it to explain the app creation process in steps.
3. Ask ChatGPT to explain/clarify each step.
4. Prompt ChatGPT to provide code for the required functionality.
5. Test and debug ChatGPT’s code.


