How to deploy backend and frontend?

The backend of a web application is essentially the behind-the-scenes component that stores data. It’s composed of several elements including an application programming interface (API), a database, and a web server layer.
You have the flexibility to build a backend using a multitude of technologies, like Java, Node.js, or Python.
However, it’s often a smarter choice to get a grip on deploying a backend through managed services, as it can streamline the process and improve efficiency.
Now, let’s talk about the frontend. The frontend, also referred to as the client-side, is the part of the web application that users interact with directly.
It is everything you see and experience directly in your browser or application – the design, look and feel, navigation, and user interface.
Putting a backend and frontend into action, or ‘deploying’ them, is all about getting every piece of the puzzle up and running in the cloud. But it’s not just a matter of turning things on and hoping for the best – you also need to make sure they’re both secure and reliable.
This isn’t an easy task, it’s a bit like a intricate jigsaw puzzle that requires a deep understanding of how to set up both server and client side technologies.
You need to know your way around databases, web servers, and the rules of communication, also known as networking protocols.
All in all, it’s a complicated process, but crucial to make sure your web application runs smoothly.
A good number of managed cloud services out there have made things a lot easier by offering automated deployment options.
Think of it as a way to simplify and speed up the entire deployment process. With these services, you can get your backend up and running with just a few clicks, as easy as pie. But that’s not all they offer.
Many of these cloud services come packed with nifty features like scalability, visibility into your application’s performance (observability), security measures, and more.
All these add-ons work together to help guarantee your application performs at its best once it’s out in the wild.
Contents
What are the cloud models to run a frontend and a backend?
Several cloud service providers, such as Amazon Web Services, Back4App, and Heroku, offer managed solutions for deploying a backend in the cloud.
They all provide varying features and pricing, which depend on the specifics of the application. There are three main types of deployment models these services use: BaaS, PaaS, and IaaS.
BaaS, short for Backend as a Service, is a cloud-based solution that allows developers to deploy their backend.
BaaS platforms automate the deployment process and provide built-in storage, databases, and other services.
This allows developers to concentrate on coding their app’s features, without needing extensive knowledge on how to deploy a backend in the cloud.
From a single interface, developers can easily manage and monitor their applications, databases, storage, and other resources.
BaaS platforms are designed to scale easily, allowing for the management of large amounts of data or workloads without deploying additional servers.
This makes BaaS an attractive choice for businesses that need to scale their applications quickly.
Moreover, BaaS services typically include extra features, such as security, automated backups, and monitoring tools, to help optimize the performance of your application.
PaaS, or Platform as a Service, is another cloud-based deployment solution. Like BaaS, it provides an automated platform for deploying a backend, but without the need to configure the infrastructure components.
PaaS services are often utilized by organizations setting up complex applications with cloud deployment. To ensure optimal performance of applications, PaaS services often provide features like reliability, hardware scaling, monitoring, and security.
They also support popular programming languages and frameworks, such as Python and Node.js, making it easier and faster to deploy a backend.
IaaS, Infrastructure as a Service, is a cloud-based service that provides an automated platform for deploying and managing applications.
It’s an ideal choice for organizations wanting to deploy their backend quickly with minimal effort, as it automates the provisioning of virtual machines, storage, databases, and other resources without needing to set up and configure physical hardware.
IaaS providers also offer APIs and SDKs to easily integrate with third-party services, expanding the functionality of your app with databases, storage services, and authentication providers.
In summary, BaaS, PaaS, and IaaS are the top three cloud options for deploying a backend. Each service offers different features and options that can be tailored to your application.
By choosing the right cloud service, developers can ensure their application runs securely, without the need to manage additional infrastructure components.
Deploying a Frontend and a Backend
Navigating through a sea of choices from different service providers to deploy a backend in the cloud might initially seem like a daunting task.
However, rest assured that the process is simpler than you might expect. Let’s dive into comprehensive guides for Back4App, Heroku, and AWS to help you get started.
Back4App
Back4App help developers build scalable and extensible applications swiftly and efficiently.
Back4App provides automated backend features, including data storage, real-time queries, APIs, authentication, push notifications, and more.
This allows developers to focus on creating the core functionality of their applications without the need to manage the server-side logistics.
One of the significant advantages of Back4App is its compatibility with multiple development platforms, including iOS, Android, JavaScript, Flutter, React Native, and others.
Also, Back4App is based on Parse, a well-known open-source application platform.
This makes it a particularly versatile choice for developers who want to leverage the power of Parse with the convenience of a managed service.
1. Login And Setup
Once you’re signed in to Back4App, you’ll land on the “My Apps” page. Look for the button that says “Build a new app” and give it a click.
This will usher you into the initial setup process, where you’ll need to choose the type of database you want to use and give your application a name.
When you’ve finished this setup, you’ll see a new listing for your fresh application on the “My Apps” page. It’s as simple as that!

2. Database Browser
After you log into Back4App, you’ll find yourself on the “My Apps” page. Keep an eye out for a button labeled “Build a new app” and click on it. This will guide you into the first steps of the setup process.
During this stage, you’ll decide on the kind of database for your app and come up with a name for your application.
When you’ve got all of that sorted out, your brand-new application will pop up on the “My Apps” page. And that’s all there is to it! Easy, right?

3. Authorization and Security
Back4App prioritizes the security of your applications through features ensuring data integrity and authorization.
It utilizes class-level permissions (CLPs) in combination with object-level access control. Think of CLPs as your tool to adjust the level of access different users have over specific classes and objects.
Moreover, Back4App’s authorization features empower you to modify roles for each user. It’s like being able to assign unique backstage passes to every individual.
In addition, you have the flexibility to establish permissions not only for the public but also specifically for your developer team.
Suppose there’s certain data that you want to keep under wraps from the public, you can easily safeguard it using access control lists. So, you’re in control of who sees what, ensuring your app’s data stays secure and confidential.
4. Cloud Code Functions
Cloud Code gives you the ability to execute backend functions using JavaScript. It operates by installing your JavaScript script directly on Back4App’s servers.
Once it’s up and running, your script exists happily within the managed environment provided by Back4App.
To access Cloud Code, simply navigate to the left menu and open the main.js file located in the cloud folder. It’s as easy as pie!

To get started, all you need to do is copy your script into this file and hit the deploy button to make your changes go live.
If you’ve got existing files with JavaScript scripts in them, you’re also free to upload those. And the best part? Apart from JavaScript, Cloud Code functions can support other languages too. So, let’s check out what else you can use:
- PHP
- Android
- Flutter
- iOS
- Unity
- .Net
In addition to the regular functions, Cloud Code also features Cloud Jobs, a handy tool for running lengthy scripts on the fly.
And that’s not all – it offers server logs as well, a super useful feature for developers to troubleshoot and keep track of things. It’s like having your own personal assistant helping you keep things running smoothly!

5. App Settings
Back4App offers an “App Settings” feature which includes App keys. So, if you need to get your hands on these keys, all you need to do is use the Application ID. It’s like having a VIP pass to your application’s settings!
- Client Key
- File Key
- JavaScript Key
- Master Key
- .Net Key
- Webhook Key

Beneath the “App Settings” option, you’ll also discover the “Server Settings” feature. It’s presented in a super user-friendly format and even includes various guides to help you navigate your server settings.
Not only can you learn more about server configurations here, but you can also tweak your server settings to suit your needs. It’s like having your own personal control panel!

6. API and SDK Support
Back4App does more than just provide backend support; it also welcomes third-party services with open arms. Whether you’re using REST or GraphQL APIs, or even Parse SDKs based on your feature needs, Back4App is on board.
This means you can effortlessly plug in all sorts of external functionalities to your app. It’s like expanding your app’s skillset with superpowers!
7. App Status
Back4App elevates your deployment experience. Once your app is up and running, you can keep a close eye on its health and performance, just like a regular check-up. Simply head over to the “My Apps” page and look for the “App Status” button within your app’s instance.
In this section, you can assess a variety of metrics, such as server errors, log issues, and the overall security health of your application.
So, go ahead and kick things off with your App ID and Key. It’s like being your app’s personal fitness trainer!

Heroku
Heroku is like a virtual playground for developers deploy frontend and backend code. It’s a cloud-based platform that allows developers to build, run, and operate applications entirely in the cloud.
With its user-friendly interface, it makes deploying apps a breeze, whether they’re written in Java, Ruby, Python, Node.js, or many other languages.
It’s not just about hosting though, it also provides a suite of tools and services to help manage and scale your application.
It’s as if you’ve got a dedicated team supporting your app’s journey from creation to release, all without you worrying about the nitty-gritty of server management.
1. Getting Started
Getting started with Heroku is a breeze. Just log in or sign up if you’re new to the platform. Once you’re in, you’ll see the dashboard, your control center for everything Heroku.
Look for the “Create new app” option and select it. Then, choose the programming language that suits your project best, and you’re all set to dive into your new app creation journey!

On top of that, you have the option to name your app and detail any other specific requirements you have in mind.
Once you’ve got the basic setup done, Heroku offers you not one, but three different methods to deploy your app. Talk about flexibility!

2. Heroku Git
Heroku Git deployment harnesses the power of a command line interface (CLI). So, whether you’re using a Windows PC or a Mac, just download it from Heroku.
With the CLI in your toolkit, you can set up, manage, and build your application like a pro. It’s like having your own command center at your fingertips!
But there’s more – the CLI even lets you create your project’s Git repository, allowing you to deploy your app as soon as you make a commit. It’s efficient, it’s straightforward, it’s just great!

3. GitHub
If you’re already a GitHub user, then deploying with Heroku is going to feel like a walk in the park. Heroku’s design makes it super easy for GitHub users to understand and execute backend deployment.
It’s a breeze to link Heroku with GitHub, which simplifies your cloud deployment even more. Not only does it enable you to work with diffs and script setups, but it also offers you two distinct experiences when deploying with GitHub.
It’s like having two different roads leading to the same awesome destination!

- Manual deployment is like having the steering wheel in your hands. Whether you’re flying solo or working as a team, you get to pinpoint exactly which branch you want to deploy. It puts you in the driver’s seat, giving you total control over your deployment journey.
- Auto deployment is like setting your project on cruise control. It regularly pushes updates to a specified branch, meaning developers don’t have to be actively involved in the deployment process. It’s like having an autopilot feature for your code, taking care of the heavy lifting while you sit back and focus on crafting brilliant features.
4. Container Registry
Container Registry leans heavily on Heroku’s command line interface, but it’s a total game-changer for Docker-centric applications.
It’s like giving your Docker images a superpower because they’re backed by Heroku’s robust runtime and private spaces.
It’s like the Container Registry was tailor-made to make your Docker-focused projects feel right at home, making the whole process seamless and straightforward.

AWS
AWS (Amazon Web Services) Imagine you had a team of experts to help you with virtually every aspect of your online business. That’s what Amazon Web Services (AWS) is like.
It’s a comprehensive cloud platform from Amazon that provides a suite of over 200 fully integrated services.
From databases, storage, and analytics to machine learning, security, and game development, AWS has got you covered.
It’s like a mega tool-kit designed to help businesses scale and grow without sweating the technical stuff. Picture it as a playground where you can experiment, innovate, and bring your most ambitious projects to life.

1. Account Setup
Kick-starting your journey with AWS is as simple as creating an account. Once you’re signed up and logged in, the path to deploying a backend becomes a lot clearer.
AWS comes packed with a variety of products, each tailored to support backend deployment. Let’s break down the steps you need to follow, one by one, to get you rolling:
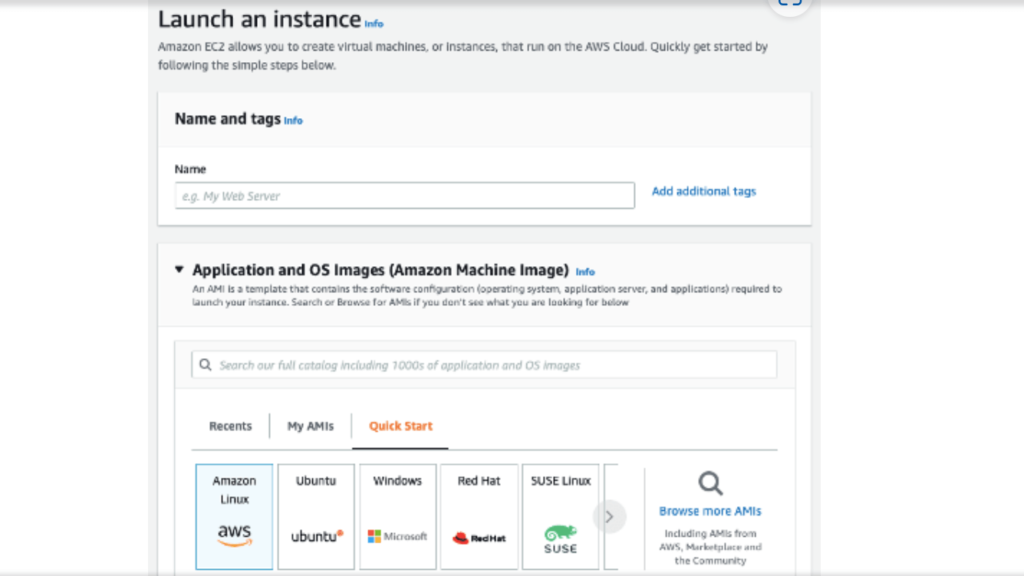
2. EC2 Instance Creation
To build your expandable backend, you can leverage database virtual machines and applications. Crafting your EC2 instances – think of them like customizable building blocks – can unlock a treasure chest of features, such as:
- Compute optimization
- Memory optimization
- Storage optimization
- Computing acceleration
- Horizontal and vertical scaling.
- General purpose instance

Among the available options, you might want to consider the t4g.medium instance. It’s like the workhorse of the AWS stable, built on ARM architecture and designed to handle hefty workloads without burning a hole in your pocket.
To get the ball rolling, head over to the AWS dashboard, find your way to EC2 and then to instances. Here’s where you can set up your new instance.
Just remember, you’ll also need to tune your scaling settings, keep your data in sync, and distribute the workload evenly among your instances. It’s like juggling, but AWS makes it a whole lot easier!
3. Elastic Block Storage Management
EBS volume is necessary to add storage to your services. So, determine the right size to get adequate capacity. Next, choose the right EBS type so your costs stay within your budget.
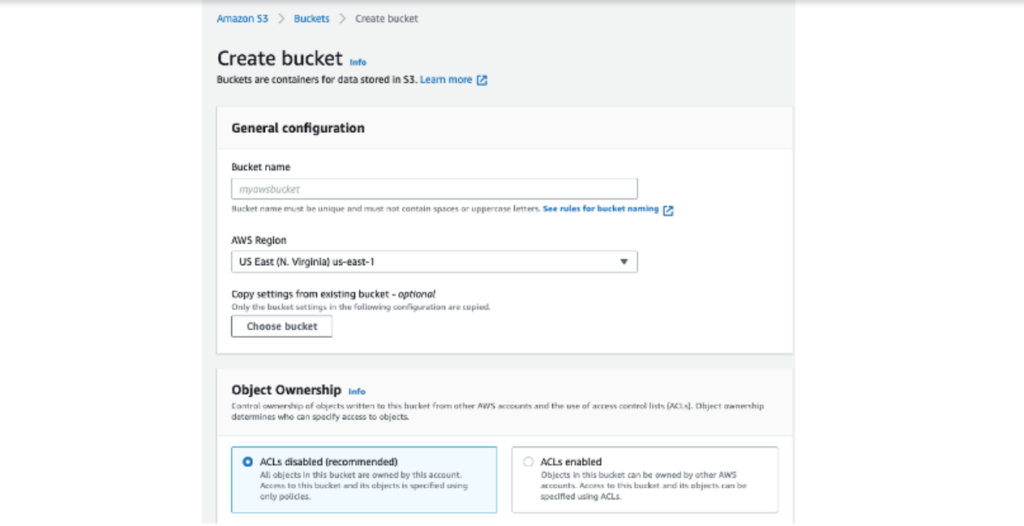
4. Simple Storage Service: S3
Think of EBS volume like the trunk of your car – it’s where you add storage for your services. The trick is to pick the right size so you get just the right amount of capacity, not too little, not too much.
And don’t forget to select the right EBS type, so your storage costs don’t sneak up on you. It’s about balancing your storage needs with your budget in a way that makes sense for your project.
- Create processes.
- Mend access rules
- Setup encryption
- Work on bucket visioning
- Define object ownership.

5. Load Balancers
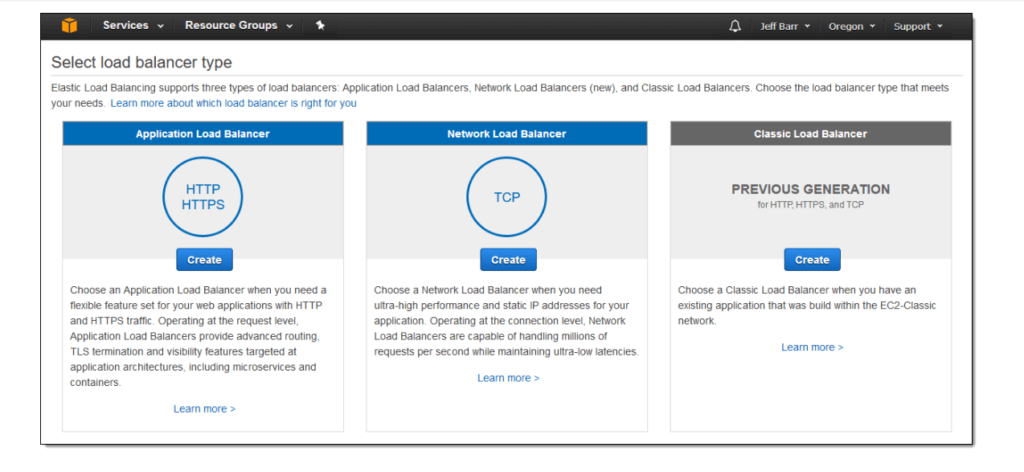
Think of load balancers as traffic cops for your application, directing requests to the right EC2 instance and keeping a watchful eye on their health.
To set one up, head to the EC2 dashboard and look for the load balancing section. There, you can whip up a load balancer and pick the right type for your needs.
The final step is to fine-tune them based on your preferred availability zones, Virtual Private Clouds (VPCs), and the type of IP address. It’s like setting up the perfect traffic system for your app’s data.

6. CloudFront CDN
AWS’s content delivery network, known as CloudFront, is like a highway system for your backend deployment, linking up with S3 buckets and load balancers.
Think of these as hubs of configuration for your targeted groups. The key is to properly set up CloudFront for efficient distribution across your EC2 instances. Once you’ve got this part down, you’re all set and ready to go!
Conclusion
Let’s face it, deploying a frontend and a backend can feel like a mountain of a task. But with the right cloud service at your side, it can be a breeze, not to mention secure.
Whether you opt for Backend as a Service (BaaS), Platform as a Service (PaaS), or Infrastructure as a Service (IaaS), you’re already on a winning path.
These managed services aren’t just time and resource savers; they’re your trusty sidekicks ensuring your applications run without a hitch. So, take a deep breath and dive in – the cloud’s got your back!
What Is a Backend?
The backend is the part of a software system that operates behind the scenes, handling data processing, storage, and server-side operations.
What is a frontend?
The frontend is the part of a software system users directly interact with, encompassing the design, interface, and all client-side operations.


