How to develop a Social Media App?
In this article, we’ll talk about social networks, types of social media apps, their benefits, and must-have features.
On top of that, we’ll look at how to create a social network step by step. We’ll use Back4app on the backend and Next.js on the frontend.
Contents
- 1 What is a social network?
- 2 Types of social media applications
- 3 Benefits of developing a social media app
- 4 Must have features of a social media app
- 5 How to make a social media app?
- 6 Conclusion
- 7 FAQ
- 8 What is a social network?
- 9 What types of social media apps are there?
- 10 What are the benefits of developing a social media app?
- 11 What are the must-have features of a social media app?
- 12 How to develop a social media app?
A social network is a social media app that allows people to connect and interact with one another.
Once two users have connected, they can share their user information, exchange messages, images, share posts, and more.
These days social media apps are highly popular. Almost everyone is signed up for at least one social media app. According to Buffer’s research, the most popular social media platforms are:
- Facebook (2.96 billion MAUs)
- YouTube (2.2 billion MAUs)
- Instagram (2 billion MAUs)
- TikTok (1 billion MAUs)
- Snapchat (500 million MAUs)
MAUs stands for monthly active users. That is the number of unique users interacting with your social media platform monthly.
Even though the social media app market is enormous, developing a social media app is a challenging task.
It’s one of the most complex IT projects you can do. Many companies underestimate how difficult it is to build a social networking app, then fail miserably with huge losses.
As mentioned in the previous section, a social network is just one of the social media app types. The other social media app types are:
- Media-sharing networks (Instagram, TikTok, YouTube)
- Content-sharing networks (Pinterest, Tumblr, Flickr)
- Consumer review networks (Trustpilot, Angi, Choice)
- Blogging and publishing networks (Medium, Twitter)
- Discussion forums (Reddit, Quora, HackerNews)
- Relationship networks (Tinder, Bumble)
Building a social media app offers several benefits. The benefits include ad revenue, monetization, gathering valuable user information, advanced analytics, sponsorships with other companies, and more.
Another great thing about social media apps is their tremendous resell value. If your app is relatively successful (meaning it has a decent user base), you can quickly sell it to another company. For example, Twitter was sold for $44B, and MySpace was sold for $87M.
From the developer’s perspective, building a simple social network allows you to get to know the tools you’re working with and gives you an insight into how difficult it is to build something like this.
Social media applications vary a lot in functionalities. Nevertheless, there are some essential features every successful social media app includes.
User Accounts
All social media apps allow users to create an account. Once users create their accounts, they can add personal information and tailor the app to their needs. For example, they opt into features they like, add their interests, hide specific content, etc.
The best perk of user accounts from the business perspective is that you can build a “user profile”. By a “user profile” I mean that you figure out what a specific user likes and who they interact with and then tailor advertisements accordingly.
Connecting Users
Social media apps allow users to connect, e.g., add someone as a friend, follow them, and subscribe to them. Once two users are connected, their feeds are changed accordingly.
Sharing Content
The point of every social media app is to share content. If your app doesn’t allow users to share content quickly, your app is definitely not going to be successful.
When implementing a social media app, follow the best UI/UX practices. Posting something should be as easy as pressing a button or two.
Search and Discovery
Great search and discovery algorithms are integral parts of every successful social app.
Your social media app should allow users to find the content they’re interested in easily. On top of that, your app should offer a personalized feed and advanced search functionality.
Notifications
You’ll need to consider implementing push notifications to drive engagement and increase app usage.
Push notifications are a powerful communication channel that allows you to notify users when something happens, e.g., their friend posts, there’s an event, they haven’t used the app in a while, and so on.
To learn more about push notifications and how to integrate them into your project, check out What are Push Notifications?
In this tutorial section, we’ll look at how to build a social media app step by step. We’ll use Back4app as the backend and React with the Next.js framework on the frontend.
Prerequisites
Here is the tech stack we will use for this project:
- Experience with JavaScript ES6.
- Experience with React/Next.js and React hooks.
- Basic understanding of Backend as a Service (BaaS).
- Node.js v16+ installed on your local machine and an editor.
What is Back4app?
Back4app is a great low-code backend for building modern web and mobile apps rapidly. It comes with a number of features, including real-time databases, user management, Cloud Code functions, push notifications, social integrations, APIs, SDKs, and more!
Using Back4app, you can outsource most of the backend work and focus on your core business logic and the frontend.
You also won’t have to worry about the underlying infrastructure or app scaling. Back4app will cover all of that. It’s a great option to speed up social media app development.
Back4app offers a free tier which is great for testing and prototyping. As your app scales, you can later upgrade to premium tiers with predictable pricing.
- Extremely easy to use.
- Built-in authentication system (including social auth).
- Push notifications, and easy email sending.
- Scaling capabilities & auto-scaling.
Project Introduction
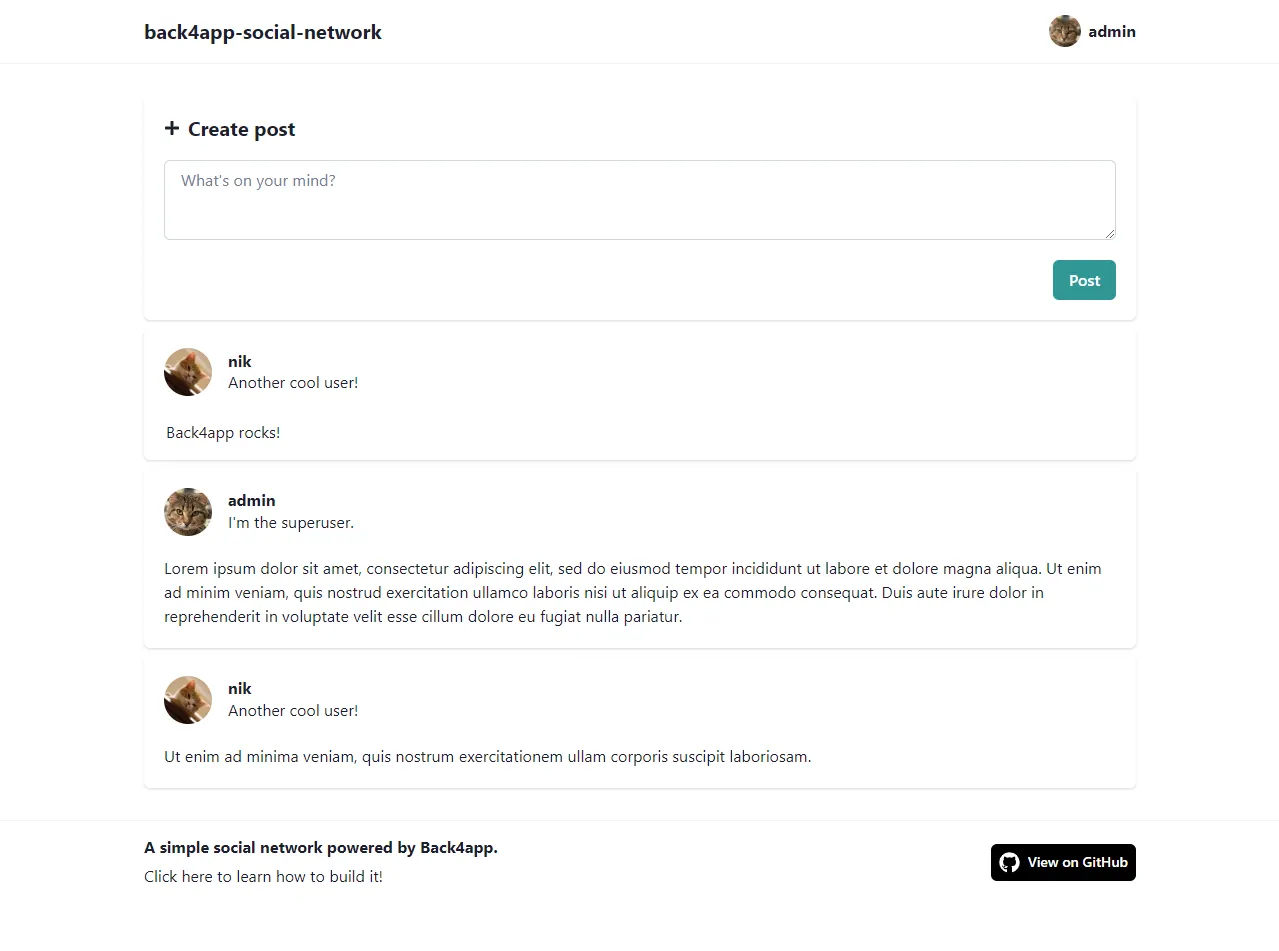
In this article, we’ll be building a simple social network. The implemented social network will allow users to create an account, authenticate themselves, set up a profile, and create posts.
On the backend we’ll use Back4app, and on the frontend we’ll use React with the Next.js framework to create a social media app
We’ll first create a Back4app app, set up the database models, and then move on to the frontend.
On the frontend we’ll have to install Parse SDK, set up authentication, and work on the specific views, e.g. login, sign-up, profile.
The final product will look like this:
Create App
The further steps will require you to have a Back4app account. If you don’t have one yet, go ahead and create one for free.
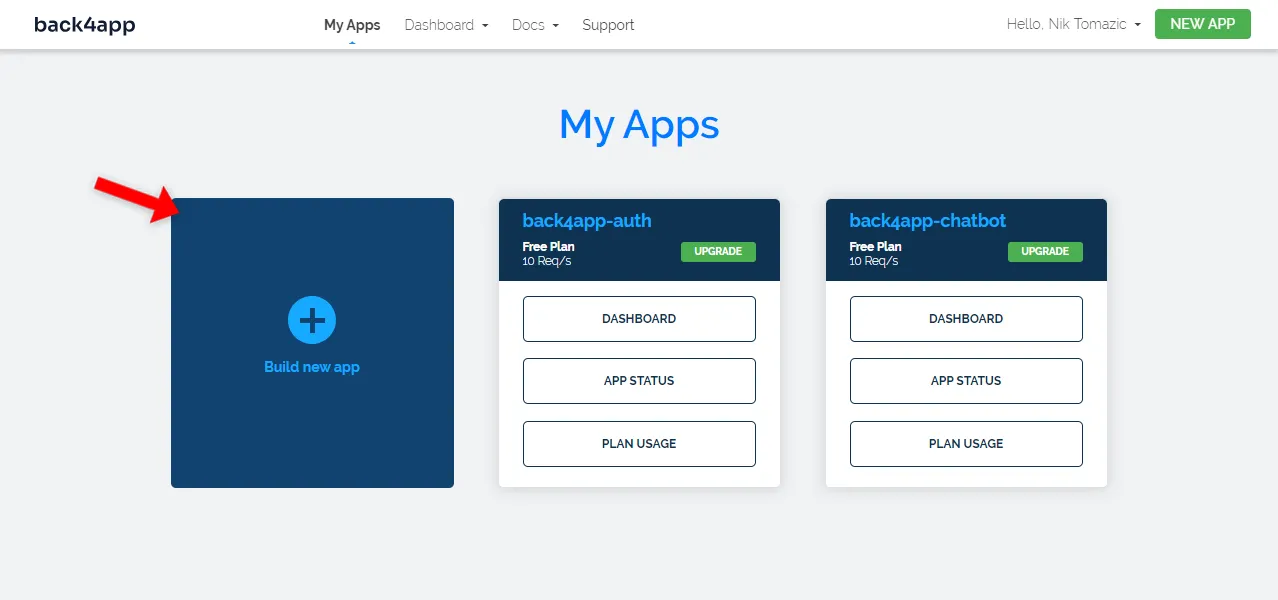
As you log into your Back4app account, you’ll be presented with your app list. Click “Build new app” to begin the app creation process.
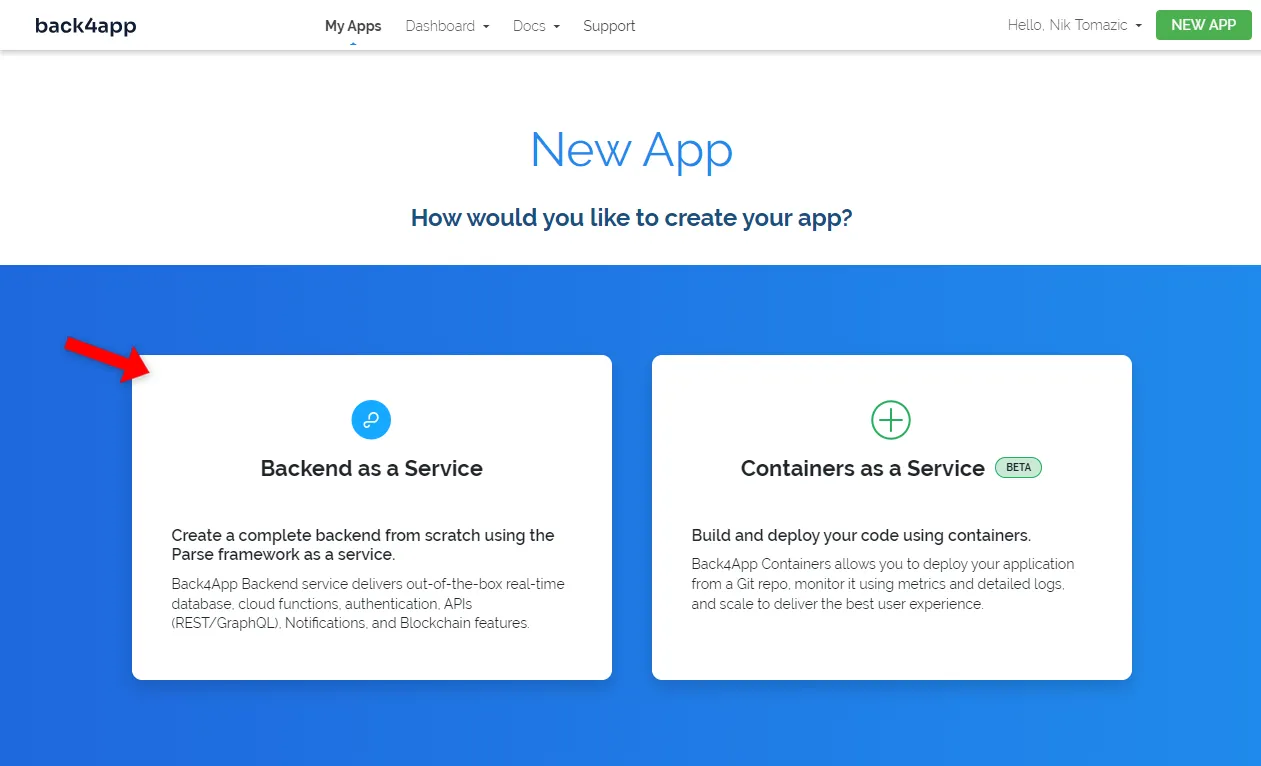
Back4app allows you to create two types of apps:
- Backend as a Service (BaaS)
- Containers as a Service (CaaS)
BaaS is a fully-fledged Parse-powered backend solution, while CaaS is used for deploying containerized applications via Docker.
Since we’re building a social network, we’ll use the “Backend as a Service” option.
Next, give your app a descriptive name, select “NoSQL” as the database, and click “Create”.
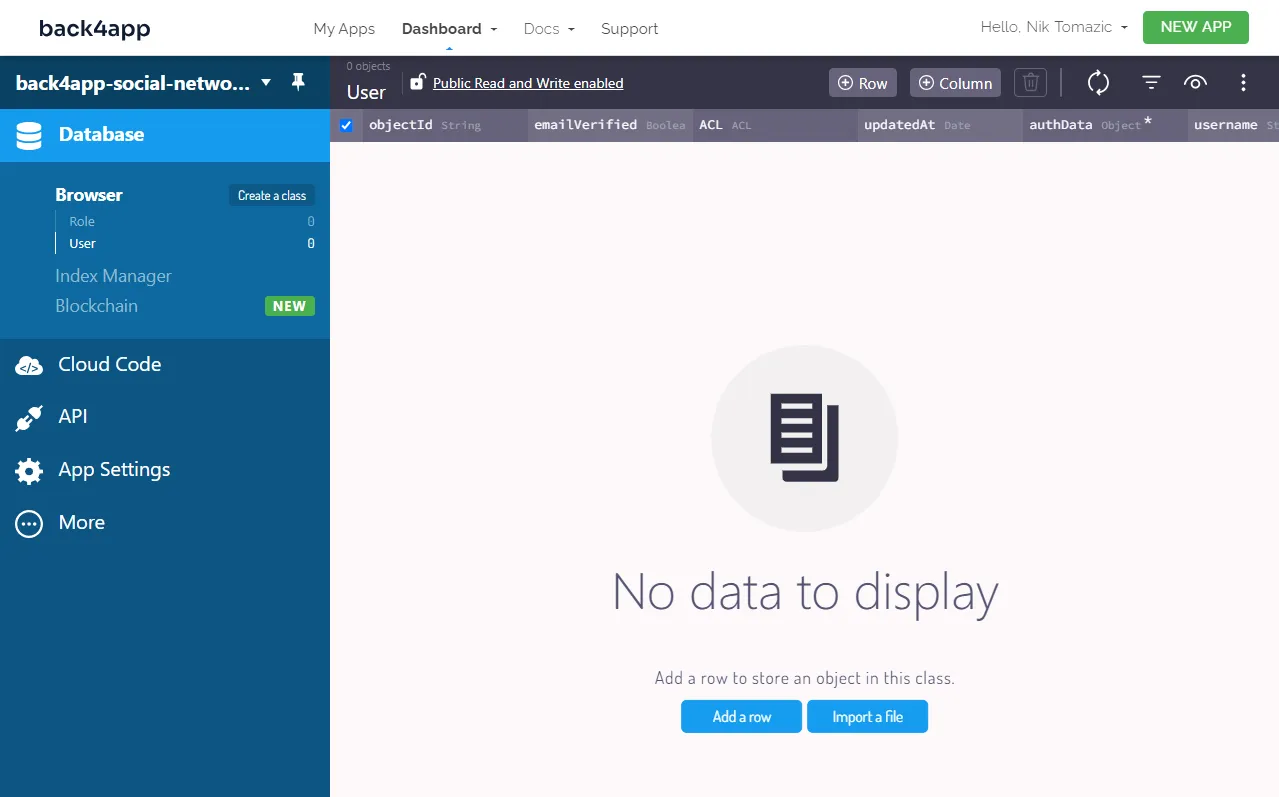
Back4app will take roughly 2 minutes to prepare everything required for your application. Once it’s done, you’ll be redirected to your app’s database view.
Database Classes
Moving along, let’s prepare the database for developing social media applications.
As you might have noticed, two classes are already in the database. The first is called User and the second Role. By default, all Back4app classes come with the following fields:
+-----------+-------------------------------------------------------------------------+
| Name      | Explanation                                                             |
+-----------+-------------------------------------------------------------------------+
| objectId  | Object's unique identifier                                              |
+-----------+-------------------------------------------------------------------------+
| updatedAt | Date time of the object's last update.                                  |
+-----------+-------------------------------------------------------------------------+
| createdAt | Date time of object's creation.                                         |
+-----------+-------------------------------------------------------------------------+
| ACLs      | Allow you to control the access to the object (eg. read, update).       |
+-----------+-------------------------------------------------------------------------+
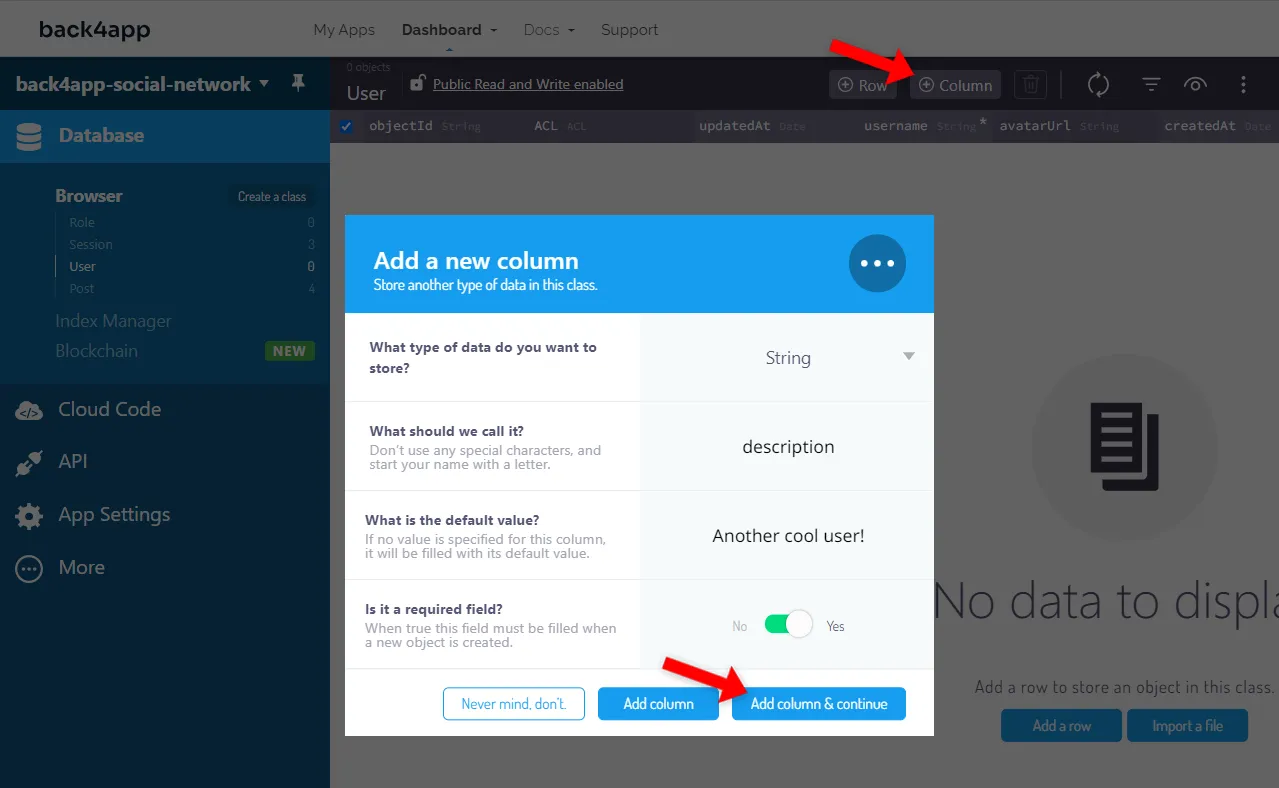
Let’s slightly modify our User class by adding the description and avatarUrl fields. The users will later be able to edit these two fields in their settings.
Click the “+ Column” button at the top right of the screen and add the following two fields:
+-----------+-------------+--------------------+----------+
| Data type | Name        | Default value      | Required |
+-----------+-------------+--------------------+----------+
| String    | description | Another cool user! | yes      |
+-----------+-------------+--------------------+----------+
| String    | avatarUrl   | <some_image_url>   | yes      |
+-----------+-------------+--------------------+----------+
Make sure to replace
<your_image_url>with an actual image url, ending with .png, .jpg, or .jpeg. If you don’t have any ideas, you can use this one.
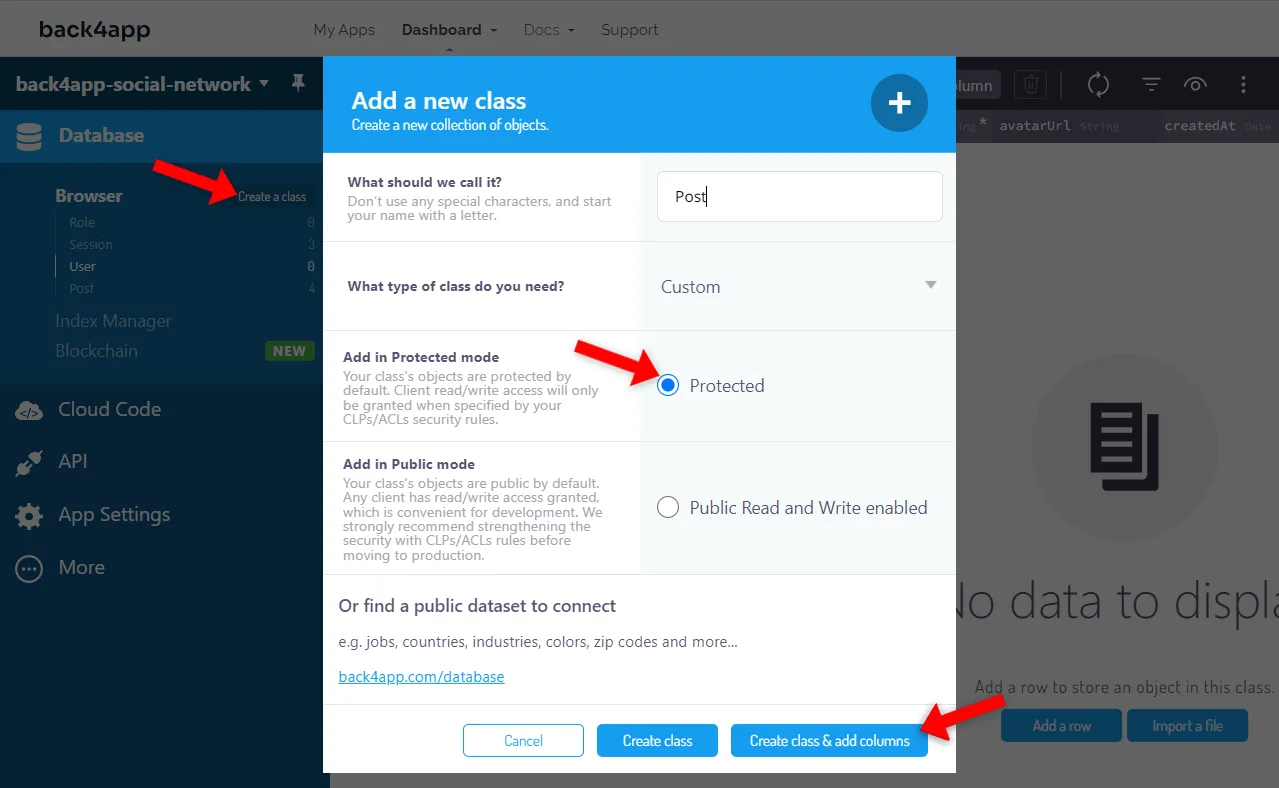
Next, let’s create a class named Post. Each post will have an author and some text content.
Use the “Create a class” button at the top left of the screen to start the class creation process. Call it Post, make it “Protected”, and click “Create class & add columns”.
Then add the following two columns to it:
+-----------------+---------+---------------+----------+
| Data type       | Name    | Default value | Required |
+-----------------+---------+---------------+----------+
| Pointer -> User | author  | <leave blank> | yes      |
+-----------------+---------+---------------+----------+
| String          | content | <leave blank> | yes      |
+-----------------+---------+---------------+----------+
Back4app Database Security
Regarding Back4app database security, there are two ways we can protect the classes & objects. We can choose from the following:
- Class Level Permissions (CLPs)
- Access Control Levels (ACLs)
CLPs focus on defining access restrictions at the class level, allowing for fine-grained control over data access and modification. Conversely, ACLs grant or restrict access to specific objects and are based on user-defined roles or permissions.
To learn more about Parse security, check out the Parse Server Security article.
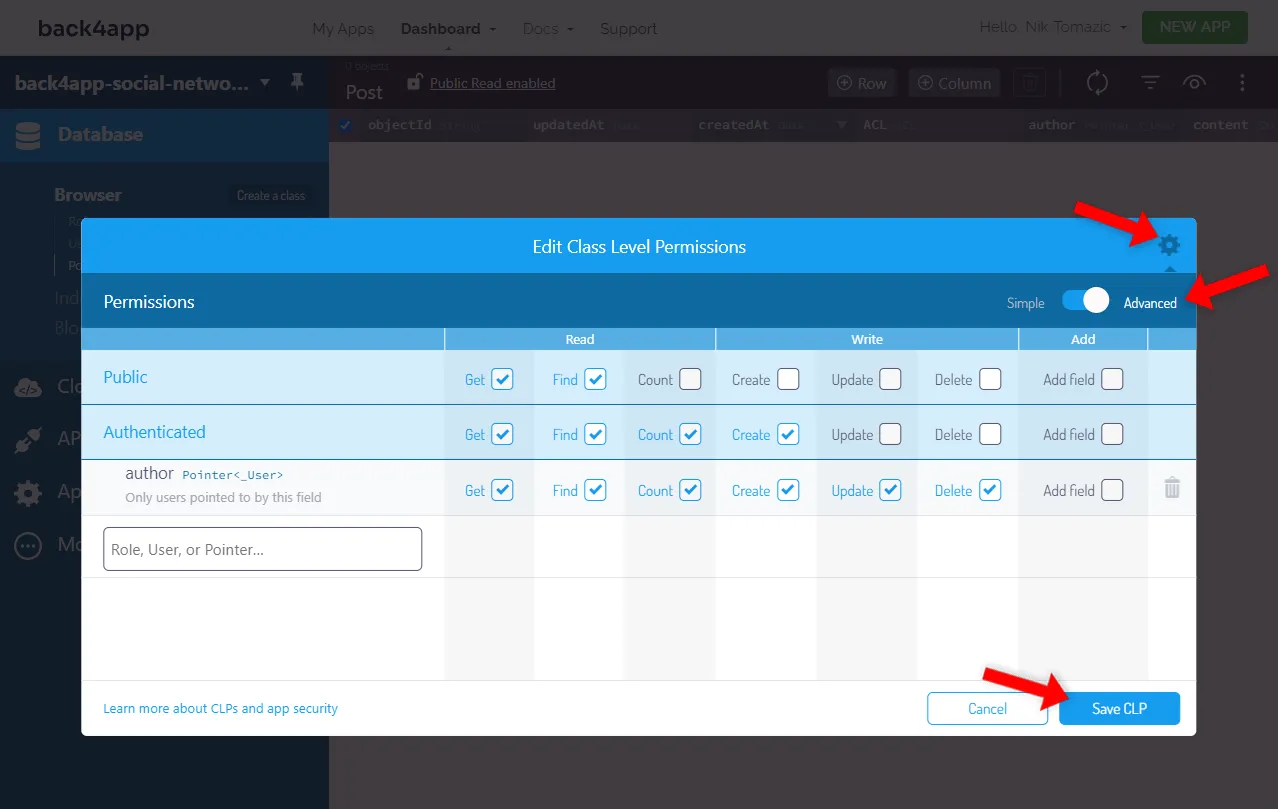
We want only authenticated users to create posts, and only the post author should be able to update and delete them. To achieve that, we’ll set up Post CLPs.
Select the Post class in the sidebar, then use the three dots top right of the screen and “Security > Class Level Permissions”. Set the CLPs like so:
Great, that’s it. Our backend is now done. That wasn’t too difficult.
Code Frontend
In this article section, we’ll work on the frontend part of our social network.
Init Project
Start by using the create-next-app tool to bootstrap a new Next.js project:
$ npx create-next-app@latest back4app-social-network

√ Would you like to use TypeScript? ... No
√ Would you like to use ESLint? ... Yes
√ Would you like to use Tailwind CSS? ... No
√ Would you like to use `src/` directory? ... No
√ Would you like to use App Router? (recommended) ... No
√ Would you like to customize the default import alias? ... No

Created a new Next.js app in ~\back4app-social-network.
The tool will prompt you with a number of questions. I suggest you only enable ESLint, since we won’t be using any of the other offered features, and they’ll make your project more complex.
The default Next.js project comes with some “useless” files and directories. To reduce the project size, go ahead and delete the following:
- pages/api folder
- styles folder
- public/next.svg
- public/vercel.svg
Also, don’t forget to remove the globals.css import from pages/_app.js:
// pages/_app.js

import "@/styles/globals.css";  // remove this line
Then replace the contents of pages/index.js with the following:
// pages/index.js

export default function Home() {
  return (
    <>
      <p>Hello world!</p>
    </>
  );
}
Start the Next development server:
$ next devLastly, open your web browser and navigate to http://localhost:3000. If everything works well, your app should compile, and you should be able to see the “Hello world!” message.
Setup ChakraUI
To speed up the UI-building process, we’ll use ChakraUI. ChakraUI is an excellent React library with prebuilt components, a styled system, specialized hooks, and more.
Go ahead and install it via NPM:
$ npm i @chakra-ui/react @chakra-ui/next-js @emotion/react @emotion/styled framer-motionNext, wrap your Component with a ChakraProvider like so:
// pages/_app.js

import {ChakraProvider} from "@chakra-ui/react";

function MyApp({Component, pageProps}) {
  return (
    <ChakraProvider>
      <Component {...pageProps} />
    </ChakraProvider>
  );
}

export default MyApp;
Don’t forget to import it at the top of the file:
import {ChakraProvider} from "@chakra-ui/react";For Chakra to work correctly, we must include the color mode script. This script ensures the local storage syncing works correctly and removes the “color flashes”.
Modify your pages/_document.js like so:
// pages/_document.js

import { Html, Head, Main, NextScript } from "next/document";
import {ColorModeScript, extendTheme} from "@chakra-ui/react";

export const theme = extendTheme();

export default function Document() {
  return (
    <Html lang="en">
      <Head />
      <body>
        <ColorModeScript initialColorMode={theme}/>
        <Main />
        <NextScript />
      </body>
    </Html>
  );
}
That’s it for the initial Chakra setup.
React Icons
To make our app a bit fancier, we’ll install react-icons. React icons is a library that lets you quickly include popular icons in your project. It comes with Ant, Bootstrap, Heroicons, Font Awesome icons, and more.
Install it by running:
$ npm install react-icons --saveYou can then import any icon and use it like so:
import {FaMusic} from "react-icons/fa";

return (
    <FaMusic/>
);
For the list of icons, check out their official docs.
Layout & Components
Most social networks have a standardized layout. All the pages have the same header at the top and footer at the bottom. Let’s implement our layout.
Start by creating a folder named components in the project root. Then create these files in it:
components/
├── header.js
├── footer.js
└── layout.js
Next, fill the header.js file with the following:
// components/header.js

import NextLink from "next/link";
import {Box, Container, Divider, Heading, HStack, Link} from "@chakra-ui/react";

export default function Header() {
  return (
    <Box py={4}>
      <Container
        maxW="container.lg"
        display="flex"
        alignItems="center"
        justifyContent="space-between"
      >
        <Heading as="h1" size="md">
          <Link as={NextLink} href="/">
            back4app-social-network
          </Link>
        </Heading>
        <HStack spacing="1em">
          <Heading size="sm">
            <Link as={NextLink} href="/login">
              Log in
            </Link>
          </Heading>
          <Heading size="sm">
            <Link as={NextLink} href="/signup">
              Sign up
            </Link>
          </Heading>
        </HStack>
      </Container>
      <Divider my={4}/>
    </Box>
  );
}
Then do the same for the footer.js file:
// components/footer.js

import NextLink from "next/link";
import {Box, Container, Divider, Heading,
  HStack, Link, Tag, Text, VStack} from "@chakra-ui/react";
import {FaGithub} from "react-icons/fa";

export default function Footer() {
  return (
    <Box py={4}>
      <Divider my={4}/>
      <Container
        maxW="container.lg"
        display="flex"
        justifyContent="space-between"
        alignItems="center"
      >
        <VStack alignItems="left">
          <Heading size="sm">
            A simple social network powered by Back4app.
          </Heading>
          <Link
            as={NextLink}
            href="https://blog.back4app.com/how-to-develop-a-social-media-app/"
          >
            Click here to learn how to build it!
          </Link>
        </VStack>
        <Link href="https://github.com/duplxey/back4app-social-network">
          <Tag background="black" color="white" py={2}>
            <HStack>
              <FaGithub size="1.5em"/>
              <Text>View on GitHub</Text>
            </HStack>
          </Tag>
        </Link>
      </Container>
    </Box>
  );
}
There’s not much we can explain here. We used the built-in Chakra components to form a nice header and footer. Since we’re using Next.js, we combined Chakra’s Link with Next’s Link.
Lastly, use the newly created header and footer component to form a layout:
// components/layout.js

import {Container} from "@chakra-ui/react";
import Header from "@/components/header";
import Footer from "@/components/footer";

export default function Layout({children}) {
  return (
    <>
      <Header/>
      <Container maxW="container.lg">
        {children}
      </Container>
      <Footer/>
    </>
  );
}
Then apply the Layout to index.js:
// pages/index.js

import Layout from "@/components/layout";

export default function Home() {
  return (
    <Layout>
      <p>Hello world!</p>
    </Layout>
  );
}
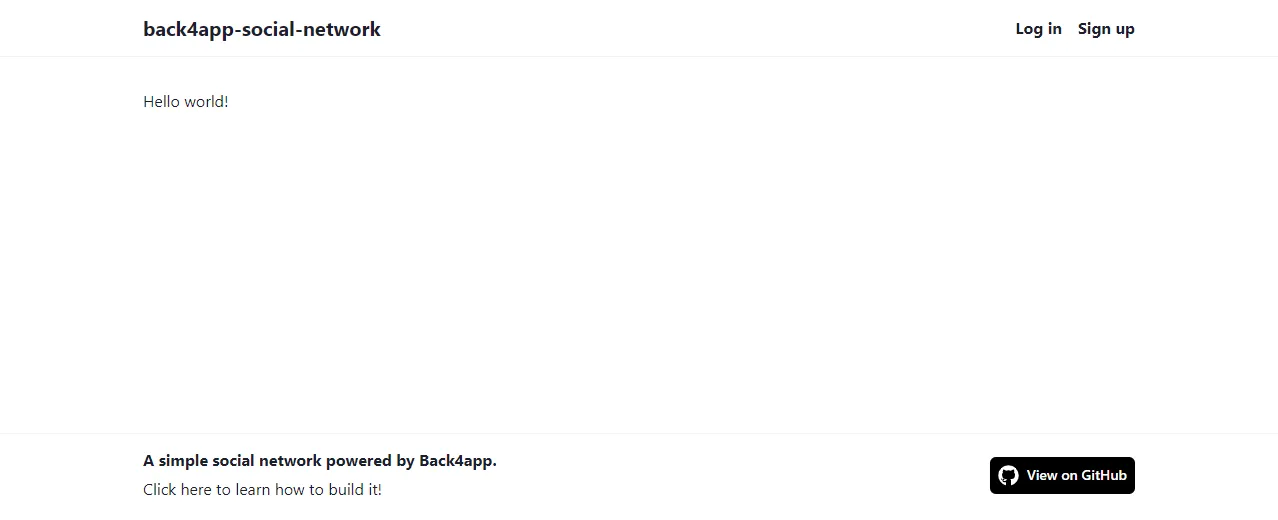
Wait for the Next development server to recompile your code, then visit http://localhost:3000. If everything worked well, you should see that the new layout has been applied.
Setup Parse.js
Start by installing Parse via NPM:
$ npm install parseNext, add the following configuration under the imports of _app.js:
// pages/_app.js

// ...

import Parse from "parse/dist/parse";

const PARSE_APPLICATION_ID = process.env.NEXT_PUBLIC_PARSE_APPLICATION_ID;
const PARSE_JAVASCRIPT_KEY = process.env.NEXT_PUBLIC_PARSE_JAVASCRIPT_KEY;
Parse.initialize(PARSE_APPLICATION_ID, PARSE_JAVASCRIPT_KEY);
Parse.serverURL = "https://parseapi.back4app.com/";

// ...
Instead of hard-coding the credentials, we used environmental variables. With Next.js, you don’t have to configure anything to enable environmental variables. They’re automatically loaded from the .env.local file.
Create .env.local file in the project root with the following contents:
NEXT_PUBLIC_PARSE_APPLICATION_ID=<parse_app_id>
NEXT_PUBLIC_PARSE_JAVASCRIPT_KEY=<parse_javascript_key>
Make sure to replace
<parse_app_id>and<parse_javascript_key>with your actual ID and key. To obtain your credentials navigate to your Back4app app and select “App Settings > Security & Keys” in the sidebar.
Context
Instead of passing the Parse instance through multiple layers of the component hierarchy, we’ll use React context. React context allows you to “teleport” data from one component to another without passing it via props.
First, create a new folder named context with parseContext.js file in it:
// context/parseContext.js

import {createContext} from "react";

const ParseContext = createContext();

export default ParseContext;
Then wrap your Component with ParseContext.Provider and pass the Parse instance to it:
// pages/_app.js

// ...

function MyApp({Component, pageProps}) {
  return (
    <ChakraProvider>
      <ParseContext.Provider value={Parse}>
        <Component {...pageProps} />
      </ParseContext.Provider>
    </ChakraProvider>
  );
}

export default MyApp;
Again, don’t forget about the ParseContext import:
import ParseContext from "@/context/parseContext";We can now obtain the Parse instance via the useContext() hook in our views. Let’s test the Parse connection in index.js.
Replace the contents of pages/index.js with the following:
// pages/index.js

import {useContext} from "react";
import ParseContext from "@/context/parseContext";
import {Button} from "@chakra-ui/react";
import Layout from "@/components/layout";

export default function Home() {

  const parse = useContext(ParseContext);

  async function testConnection() {
    try {
      await new parse.Query("TestClass").first();
      console.log("Connection successful");
    } catch (error) {
      console.error("Connection failed: " + error);
    }
  }

  return (
    <Layout>
      <p>Hello world!</p>
      <Button onClick={() => testConnection()}>Parse.js test</Button>
    </Layout>
  );
}
Wait for the Next development server to recompile and visit http://localhost:3000. Then open the console and click on the “Parse.js test” button. You should get the “Connection successful” message if everything goes well.
Authentication
As mentioned in the “What is Back4app?” section Back4app has a built-in authentication system. Setting up user authentication is as easy as calling a few methods. Even the session storage is automatically handled for you via Parse SDK.
Let’s work on the user authentication forms.
Start by creating a new page named signup.js and put the following inside:
// pages/signup.js

import NextLink from "next/link";
import {useState} from "react";
import {Button, Card, CardBody, CardFooter, CardHeader, FormControl,
    FormLabel, Heading, HStack, Input, Link, Text, VStack,
} from "@chakra-ui/react";
import {FaUserPlus} from "react-icons/fa";
import Layout from "@/components/layout";

export default function SignUp() {

  const [username, setUsername] = useState("");
  const [password, setPassword] = useState("");

  const onSubmit = async (event) => {
    // implement logic
  };

  return (
    <Layout>
      <Card>
        <CardHeader>
          <HStack>
            <FaUserPlus/>
            <Heading as="h2" size="md"> Sign up</Heading>
          </HStack>
        </CardHeader>
        <CardBody py={0}>
          <VStack spacing="1em" alignItems="left">
            <FormControl>
              <FormLabel>Username</FormLabel>
              <Input
                placeholder="Username"
                value={username}
                onChange={(e) => setUsername(e.target.value)}
              />
            </FormControl>
            <FormControl>
              <FormLabel>Password</FormLabel>
              <Input
                type="password"
                placeholder="Password"
                value={password}
                onChange={(e) => setPassword(e.target.value)}
              />
            </FormControl>
          </VStack>
        </CardBody>
        <CardFooter
            w="full"
            display="flex"
            alignItems="center"
            justifyContent="space-between"
        >
          <Text>
            Already have an account?{" "}
            <Link as={NextLink} href="/login">
              Log in
            </Link>
          </Text>
          <Button colorScheme="teal" onClick={onSubmit}>Sign up</Button>
        </CardFooter>
      </Card>
    </Layout>
  );
}
This code creates a new page at /signup and renders the sign-up form. To create an account, users’ll need to enter their username and password.
Then modify the pages/signup.js to include the logic:
// pages/signup.js

// ...

import {useRouter} from "next/router";
import {useContext, useEffect} from "react";
import ParseContext from "@/context/parseContext";

export default function SignUp() {

  const router = useRouter();
  const parse = useContext(ParseContext);

  const [username, setUsername] = useState("");
  const [password, setPassword] = useState("");

  // redirect the user if already logged in
  useEffect(() => {
    (async () => {
      if (parse.User.current() !== null) {
        await router.push("/");
      }
    })();
  }, [router, parse.User]);

  const onSubmit = async (event) => {
    event.preventDefault();

    if (!username || !password) {
      console.error("Please fill out all the fields.");
      return;
    }

    try {
      await parse.User.signUp(username, password).then(() => {
        router.push("/");
        console.log("Successfully signed up.");
      });
    } catch (error) {
      console.error(error.message);
    }
  };

  return (
    // ...
  );
}- If the user is already logged in they’ll now get redirected to
/via Next’suseRouter()hook. - We modified
onSubmit()to invokeUser.signUp(), creating the user session and storing the cookie on the user’s browser.
Do the same for the pages/login.js file. Grab the source code from the GitHub repo.
Great, the authentication system is now more or less done. The last thing we’ll do is to slightly modify header.js to display the logged-in user or login/sign-up links if unauthenticated.
Modify components/header.js like so:
// components/header.js

import NextLink from "next/link";
import {Avatar, Box, Container, Divider, Heading, HStack, Link} from "@chakra-ui/react";
import {useContext, useEffect, useState} from "react";
import ParseContext from "@/context/parseContext";

export default function Header() {

  const parse = useContext(ParseContext);
  const [user, setUser] = useState(null);

  useEffect(() => {
    setUser(parse.User.current());
  }, [parse.User]);

  return (
    <Box py={4}>
      <Container
        maxW="container.lg"
        display="flex"
        alignItems="center"
        justifyContent="space-between"
      >
        <Heading as="h1" size="md">
          <Link as={NextLink} href="/">
            back4app-social-network
          </Link>
        </Heading>
        {user != null ? (
          <HStack>
            <Avatar
              size="sm"
              name={user.attributes.username}
              src={user.attributes.avatarUrl}
            />
            <Heading size="sm">
              <Link as={NextLink} href="/settings">
                {user.attributes.username}
              </Link>
            </Heading>
          </HStack>
        ) : (
          <HStack spacing="1em">
            <Heading size="sm">
              <Link as={NextLink} href="/login">
                Log in
              </Link>
            </Heading>
            <Heading size="sm">
              <Link as={NextLink} href="/signup">
                Sign up
              </Link>
            </Heading>
          </HStack>
        )}
      </Container>
      <Divider my={4}/>
    </Box>
  );
}
Wait for the Next development server to recompile and test the authentication system. Try creating an account and checking if the header changes.
We don’t have the logout functionality yet, so you’ll have to manually delete the cookies if you want to log out.

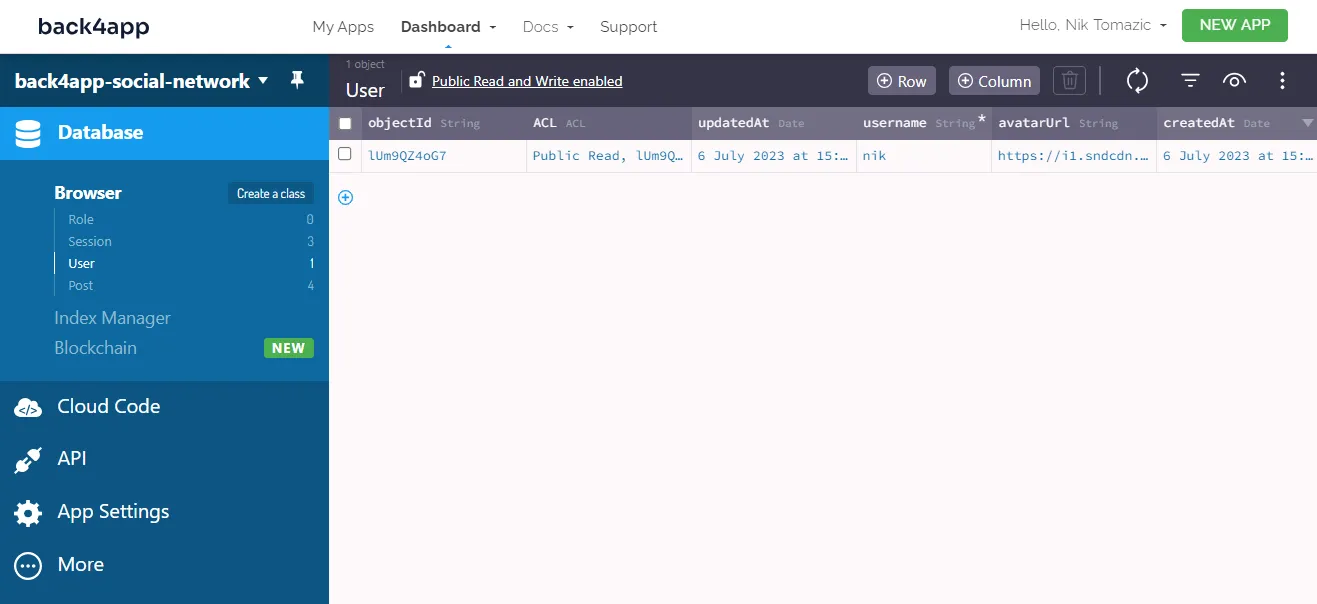
Once you create a user, you can navigate to your Back4app database view and check the User class rows. You’ll see that a new user has been added.
User Settings
Let’s make the description and avatarUrl fields that we added to the User class editable.
Create a new file named settings.js in the pages directory:
// pages/settings.js

import React, {useContext, useEffect, useState} from "react";
import {useRouter} from "next/router";
import {Button, Card, CardBody, CardFooter, CardHeader, FormControl, FormLabel,
  Heading, HStack, Input, VStack} from "@chakra-ui/react";
import {FaCog} from "react-icons/fa";
import ParseContext from "@/context/parseContext";
import Layout from "@/components/layout";

export default function Settings() {

  const router = useRouter();
  const parse = useContext(ParseContext);

  const [description, setDescription] = useState("");
  const [avatarUrl, setAvatarUrl] = useState("");

  useEffect(() => {
    (async () => {
      const user = parse.User.current();

      // redirect the user if not logged in
      if (user === null) {
        await router.push("/");
        return;
      }

      // load data from the database
      setDescription(await user.get("description"));
      setAvatarUrl(await user.get("avatarUrl"));
    })();
  }, [router, parse.User]);

  const onSave = async () => {
    const user = parse.User.current();
    user.set("description", description);
    user.set("avatarUrl", avatarUrl);
    await user.save();

    console.log("Successfully saved settings.");
  };

  const onLogout = async () => {
    await parse.User.logOut();
    await router.push("/");

    console.log("Successfully logged out.");
  };

  return (
    <Layout>
      <Card>
        <CardHeader>
          <HStack>
            <FaCog/>
            <Heading as="h2" size="md"> Settings</Heading>
          </HStack>
        </CardHeader>
        <CardBody py={0}>
          <VStack spacing="1em">
            <FormControl>
              <FormLabel>Description</FormLabel>
              <Input
                placeholder="Description"
                value={description}
                onChange={e => setDescription(e.target.value)}
              />
            </FormControl>
            <FormControl>
              <FormLabel>Avatar URL</FormLabel>
              <Input
                placeholder="Avatar URL"
                value={avatarUrl}
                onChange={e => setAvatarUrl(e.target.value)}
              />
            </FormControl>
          </VStack>
        </CardBody>
        <CardFooter display="flex" justifyContent="right">
          <HStack>
            <Button colorScheme="red" onClick={onLogout}>Log out</Button>
            <Button colorScheme="teal" onClick={onSave}>Save</Button>
          </HStack>
        </CardFooter>
      </Card>
    </Layout>
  );
}- We used React’s
useEffect()hook to redirect the user if they’re not authenticated. On top of that, the hook fetches user’sdescriptionandavatarUrl. - We implemented the
onSave()method, which updates the user’s information with state data. - We implemented the
onLogout()method which invokes Parse’slogOut(). Parse’slogOut()deletes the session from the database and removes the cookie from the user’s browser.
Posts
The last thing we must do before our simple social network is complete is implement posts. We’ve already created the database class. Now all we have to do is to create a form for creating them and fetch them from the database.
First, add a new component called post.js:
// components/post.js

import {Avatar, Box, Card, CardBody, CardHeader, Heading, HStack, Text} from "@chakra-ui/react";

export default function Post(props) {
  return (
    <Card mt={2}>
      <CardHeader pb={0}>
        <HStack spacing="1em">
          <Avatar name={props.author.username} src={props.author.avatarUrl}/>
          <Box>
            <Heading size="sm">{props.author.username}</Heading>
            <Text>{props.author.description}</Text>
          </Box>
        </HStack>
      </CardHeader>
      <CardBody>
        <Text>{props.content}</Text>
      </CardBody>
    </Card>
  );
}
Then modify your index.js like so:
// pages/index.js

import {useContext, useEffect, useState} from "react";
import {Alert, AlertIcon, Button, Card, CardBody, CardFooter,
  CardHeader, Heading, HStack, Textarea} from "@chakra-ui/react";
import {FaPlus} from "react-icons/fa";
import ParseContext from "@/context/parseContext";
import Layout from "@/components/layout";
import Post from "@/components/post";

export default function Home() {

  const parse = useContext(ParseContext);

  const [user, setUser] = useState(null);
  const [postContent, setPostContent] = useState("");
  const [posts, setPosts] = useState([]);

  const onCreatePost = async () => {
      // implement logic
  };

  return (
    <Layout>
      {user ? (
        <Card mb={2}>
          <CardHeader>
            <HStack>
              <FaPlus/>
              <Heading as="h2" size="md"> Create post</Heading>
            </HStack>
          </CardHeader>
          <CardBody py={0}>
            <Textarea
              placeholder="What's on your mind?"
              value={postContent}
              onChange={(event) => setPostContent(event.target.value)}
            />
          </CardBody>
          <CardFooter display="flex" justifyContent="right">
            <Button colorScheme="teal" onClick={onCreatePost}>Post</Button>
          </CardFooter>
        </Card>
      ) : (
        <Alert status="warning" mb={2}>
          <AlertIcon/>
          You need to log in to create posts.
        </Alert>
      )}
      {posts.map(post => (
        <Post
          key={post.id}
          content={post.attributes.content}
          author={{...post.attributes.author.attributes}}
        />
      ))}
    </Layout>
  );
}
Then implement the onCreatePost() like so:
const onCreatePost = async () => {
  if (!user == null) return;

  const post = new parse.Object("Post");
  post.set("content", postContent);
  post.set("author", user);
  await post.save();

  setPostContent("");
  setPosts([post, ...posts]);
};
Lastly, add the useEffect() hook to fetch the posts:
useEffect(() => {
  setUser(parse.User.current());

  (async () => {
    const posts = await new parse.Query("Post")
      .include("author").descending("createdAt").find();
    setPosts(posts);
  })();
}, []);
To learn more about Parse Objects and Queries, check out the official Parse documentation.
Start the Next development server once again:
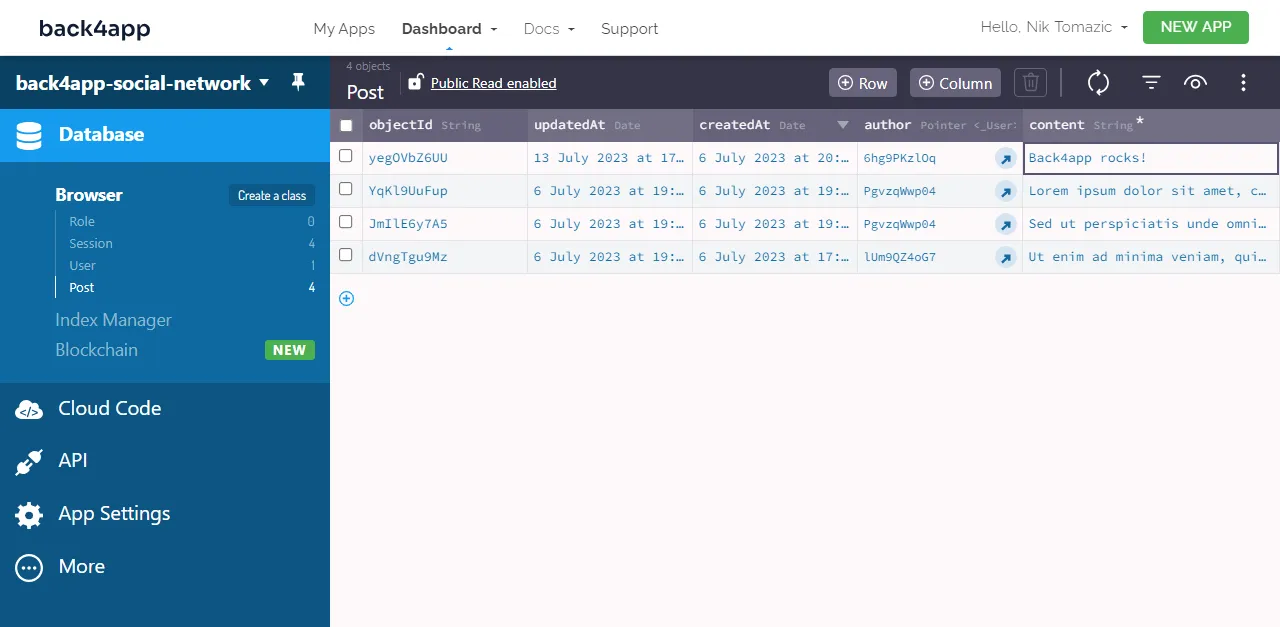
$ next startCreate a few sample posts and refresh the page. If everything works well, the posts should get stored to the database and fetched when you visit the page.
Conclusion
In this article, we’ve successfully built a simple social media app. The app allows users to sign up, authenticate themselves, edit their profiles, and create posts.
By now, you should have a decent understanding of how Back4app works and how to start building your social network.
The project we’ve built in this article could serve as a solid foundation for further development. Test your knowledge by implementing new features, e.g., like/dislike functionality, share functionality, and comments.
The source code is available on back4app-social-network GitHub repository.
Future steps
- Follow this article to deploy your Next.js frontend to Back4app Containers.
- Look into Cloud Code Functions to add advanced functionalities to your backend.
- Enforce user email verification on sign up to combat bots.
FAQ
A social network is a type of a social media app that allows users to connect with one another. Once they’ve connected they can share their user information, exchange messages, and share other content.
– Social networks
– Media and content sharing networks
– Consumer review networks
– Blogging and publishing networks
– Discussion forums
Building a social media app offers a number of benefits. The benefits include ad revenue, monetization, gathering valuable user information, advanced analytics, sponsorships with other companies, and more.
– User Accounts
– Connecting Users
– Sharing Content
– Search and Discovery
– Notifications


