Next JS Backend

Contents
Building awesome apps in the blink of an eye using NextJS and Parse as a Backend
Next.Js has been one of the most beloved tools in the ReactJS ecosystem over the last few years. After the release of Next.js 11, the usage of Next for developers increased significantly, making the community and the React ecosystem stronger.
The benefits of using Next.js
Next is built on top of ReactJS to delight users with a fast application performance while also providing a fantastic developer experience.
For developers to be able to achieve and maintain a high bar of app quality, the framework must participate and do the heavy lifting . . . That means every developer using these frameworks gets all of these solutions baked right into every project they build”
Shubhie Panicker at Next.js Conf
A framework’s primary goal is to shorten the way between a developer and a top-tier application. Vercel’s framework achieves this goal using three main strategies.
Abstracting infrastructure
Paraphrasing Guillermo Rauch, Vercel’s CEO, having an excellent infrastructure won’t give you any competitive advantage over other applications. On the other hand, having a bad one is going to cause you problems.
You will have to do a lot of work to achieve results invisible to the final user. And worse, if you make a mistake along the way, you’ll suffer the consequences of it.
Next.JS lets you skip this liability by using its fine-tuned deploy system, built entirely to support Next and with servers throughout the whole world, to ensure low latency to your users, no matter where they are.
Pre-rendering
Regular ReactJS applications rely on CSR (Client-side rendering)
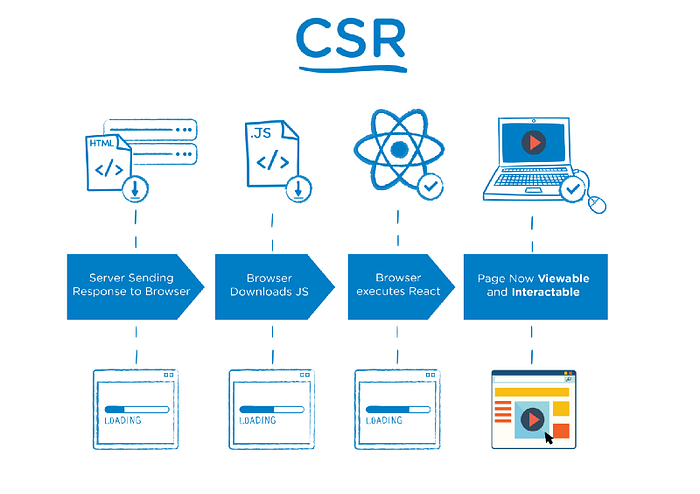
Using CSR, the client has to download all the project’s assets, run them, and then proceed to the necessary API calls for fetching the application’s data. Which, in addition to being a performance bottleneck, generates negative impacts on the page’s SEO.
To make this process smarter, using Next.js, we can pre-render our pages, which usually makes them faster and more SEO friendly. You can use two strategies to implement Next’s pre-rendering: Server-Side Rendering(SSR) or Static Site Generation(SSG).
Server-Side Rendering (SSR)
SSR is meant to be used in pages with dynamic content

When you are using SSR, what happens is, the requested page gets pre-mounted in the server and sent to the client with minimal javascript, enhancing its SEO(it’s now easier to search engine bots to read them) and also it’s faster to load.
Static Site Generation (SSG)
SSG works very similarly to SSR, but instead of generating the requested page at each request, it caches the page, only refreshing its content in a specific interval of time. This mechanism dramatically improves the page’s load speed, but it only indicated for pages with static content (hence the name static site generation)
Specific tooling
Beyond its core advantages, next also ships with various tools that will help make the development process as easy as possible. Let’s highlight some of them:
- Conformance – A system developed to codify best practices in a way that is automated and enforceable. It ensures a consistently high bar for app quality and codebase maintainability.
- Script Optimization – a foundational optimization that enables developers to set the loading priority of third-party scripts to save developer time and improve loading performance.
- Create next app – A simple CLI tool enables you to quickly start building a new Next.js application, with everything set up for you.
Using it with Parse Server
Parse Server is an open-source backend framework. Check the video below where Alex will present you the main components and the Parse ecosystem.
Using Parse Server together with Next.js is a very powerful combination, as both platforms are focused on abstracting as many infrastructure-related tasks as possible to allow you to focus only on critical points of your product, achieving maximum productivity.
Bootstrapping a Parse Server + Next.js application
The first thing you have to do is make sure that Node.js is installed on your computer. Let’s now create the project. Please type the following command in your terminal:
npx create-next-app parse-and-nextAfter creating the project, let’s open it and understand its structure
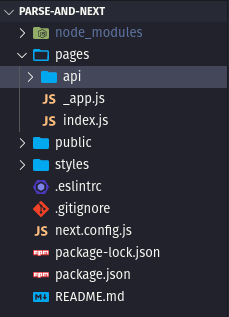
Most folders and files in this project are pretty self-explanatory, and you are probably used to working with them if you are a seasoned developer.
One important thing to know about our project structure is that the pages folder is responsible for the application routing. That means every file (with some exceptions) created inside this folder creates a new route in our app.
Adding Parse to our application
Let’s now install the Parse Javascript SDK to our application. The Parse SDK is the component that allows us to connect on Parse Serve (using the REST API ) and start making requests to our backend. Open your terminal in your project’s folder and type the following command:
npm install parse --saveAfter that, let’s create a new folder in our project, called services. Inside this folder, create a file called parse.js.
Proceed to navigate to your folder, and initialize parse using the following code:
Next.js files are generated using NodeJS and afterward executed in the browser. Since Parse Server relies on some browser-specific APIs, we need to make sure that they will initialize in the browser. Otherwise, you can face the error below.
It looks like you're using the browser version of the SDK in a node.js environment. You should require('parse/node') instead.You might be tempted to just use parse/node instead of parse, but that will cause a similar problem on the node’s side.
To get both the application id and the javascript key, let’s create an app at Back4App and retrieve its keys.
Once you have your keys, we must have a way of using them inside our application. This can be done by editing the next.config.js file.
Now that the keys are available in the project go back to services/parse.js and replace the placeholders with the key’s path. Then proceed to export Parse from this file. The final result should look like this:
Now that Parse is set up inside our application, you can finally use it.
Go to the index.js file, and replace the default application content with some custom logic. Copy and paste the following code inside your project:
In this snippet, we are just enabling the creation and listing of users for this application using simple react concepts and Parse’s SDK to create and list users.
Storing data on parse
Storing data on Parse is built around Parse.Object. Each Parse.Object contains key-value pairs of JSON-compatible data. This data is schemaless, which means that you don’t need to specify ahead of time what keys exist on each Parse.Object
In the following snippet:
we are creating a Parse Object, called Employee, and afterward using the .save method to set its properties, which in our specific case are
- username
- password
Remember, you define the keys and data types of your stored data, so they can be shaped to fit your needs, whatever they might be.
retrieving data on parse
In the getEmployees function
We are simply retrieving all the created employees and extracting the username property from each one of them using Parse’s Query method.
Parse.Query offers us a way to retrieve a list of stored objects. We are using it in its most basic form, but it can also be used to search for data based on conditions. Read more about Parse.Query in the docs
With this code setup, we can run our project. Open your project in a terminal and then type the following command:
npm run devThen open your browser and navigate to
http://localhost:3000/
The final application should look like this:

Final words
Now that we have built a basic application together, you should have the necessary foundations to start a project with this incredible stack.
Make sure to refer to both Next’s and Parse’s documentation if you find yourself stuck along the way
I hope this article has been helpful and wish you a happy coding 🙂
If you want to learn how to deploy and run a Next.JS application using containers, please read the tutorial Deploying Next.JS.