Back4App + Incognia – Protecting app logins
Location data is powerful and it is amazing how many different applications there are: from media, engagement, market research, urban mobility, etc. But have you ever considered how precise location technology can enable new dynamic strategies to make applications more secure while removing friction from the authentication process? It is from the answers to this question that Incognia was created.
Incognia built a location-based identity platform to protect App users and at the same time reduce friction, by removing the need for passwords and other authentication. So far, Incognia was deployed in over 100 million devices and is enabling frictionless authentication for more than 90% of the cases.
Each person has a unique location behavior pattern, like a location fingerprint, that Incognia uses as a private identity to protect user accounts on mobile Apps. Based on the user’s unique location behavior, some locations are highly frequented by that user and device.
The most frequent locations are classified as the user’s trusted locations, which are parts of the user’s routine, such as their home address and work address. Using this information, Incognia can identify low-risk authentication scenarios. When Incognia detects a user is in a trusted location, there is a higher probability of the transaction being legitimate and at lower risk for fraud, offering the opportunity to require less friction.
With this solution, you may make a passwordless authentication for any relevant transaction or logins by matching the users’ historical location with the one from the device currently being used without the need for high friction steps as facial recognition or OTPs.
Protecting app logins
In this how-to, you will learn how to integrate the Incognia Transaction API to improve the recognition of trusted users at login without adding friction to the user experience. You will be able to automatically approve trusted login attempts, trigger step-up authentication, and block suspicious logins.
Requirements
- An Incognia account. Sign up here if you don’t have an account.
- An app with the Incognia SDK initialized. Follow SDK getting started guide for this.
- API credentials to be able to make requests to Incognia APIs.
Step-by-step
- Setting the User ID on the app
In order to verify a login attempt, Incognia needs to link a device and a unique account identifier. The Account ID is used for this purpose.
This association must happen in two moments:
1. Whenever the application initializes
This covers the scenario where the application is updated with the Incognia SDK and the user is already logged in. The Application.onCreate() on Android and the [AppDelegate application:didFinishLaunchingWithOptions:] on iOS are good places to do this.
If the Account Id is not available in those locations, it is important to forward the value to the Incognia SDK as soon as it is available. The important action here is to call setUserId whenever the application initializes so it is guaranteed that we always know that a specific user is associated with a specific device.
2. Whenever the user logs in and out
It is necessary to call the setUserId method when the user finishes the login and clearUserId when the user logs out. This is usually done in the callback of these two actions.
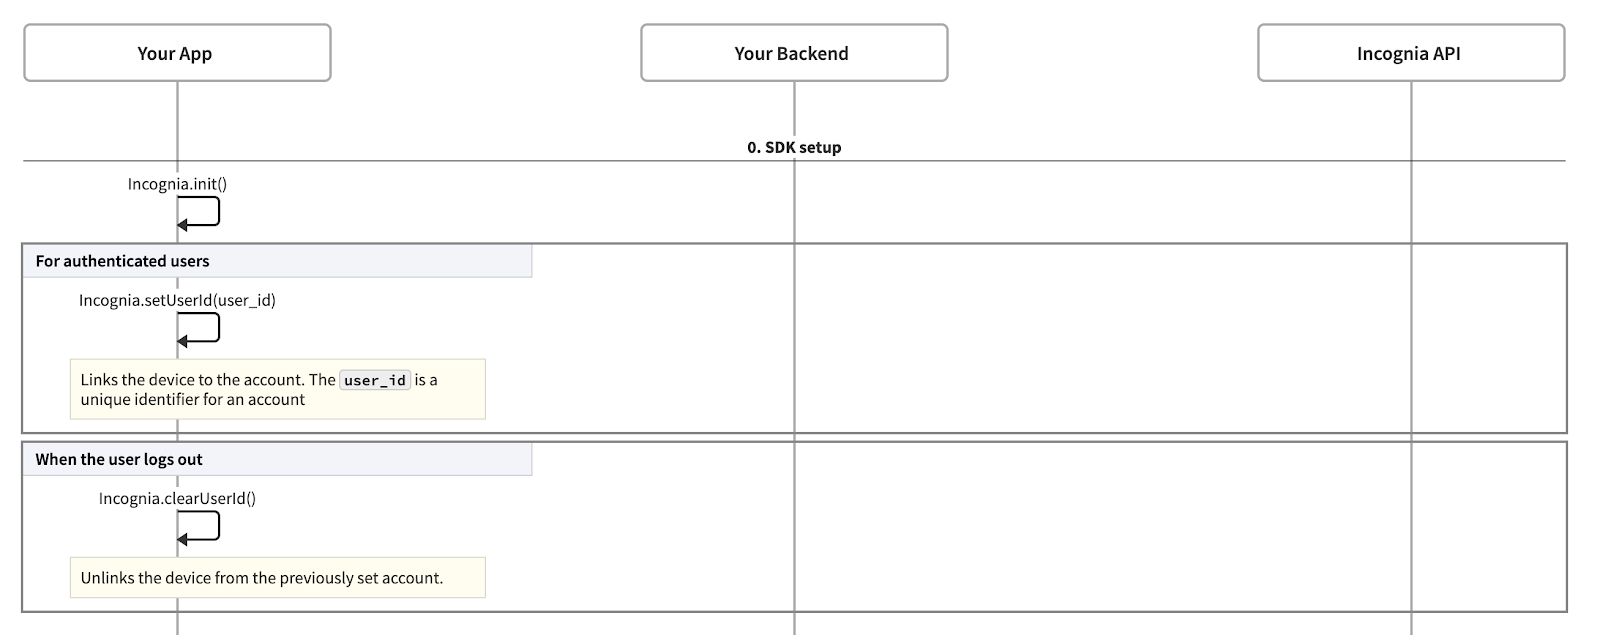
ALERT: While data such as e-mail and phone numbers are examples of identifiers, their use in the SDK is forbidden. Consider using non-personal information, such as UUIDs, and Hashing to securely generate and set the User ID.
- Forwarding the device’s Installation ID to your server
The Incognia SDK collects location and device data to build a behavioral profile for mobile users. This data is tagged with an identifier called Installation ID, which is automatically generated by the SDK.
To verify a login attempt, Incognia needs to receive an Installation ID to identify the device from which the login originates. Since your server will request the Incognia API to assess the risk of this login, it needs to receive this information from your mobile application.
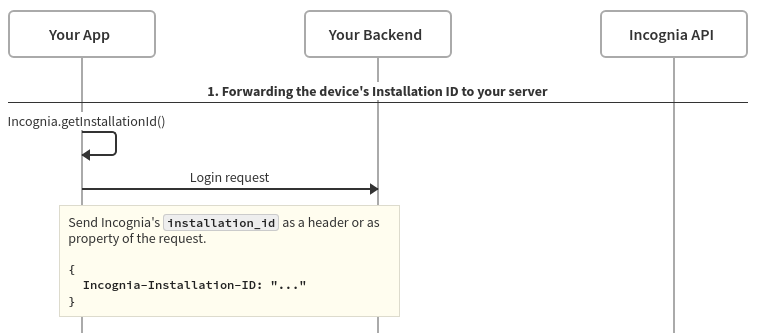
The installation ID can be forwarded to your server in two ways.
- Option 1: Sending the Installation ID as a header
Before sending a login request from your mobile application to your server, call Incognia.getInstallationId and set its value as a header of the request. We encourage you to choose a clear name for this header, like Incognia-Installation-ID, so you can easily identify it on the server-side.
This option has a clear benefit if your application will use more than one Incognia solution because you won’t need to change each request’s properties, like signup, login, payment, password change, etc.
Kotlin
Java
Swift
Objective-C
- Option 2: Sending the Installation ID in the body of the request
Before sending the login request from your mobile application to your server, call Incognia.getInstallationId and send it as additional information about this login. We suggest that you choose a clear name for this property like Incognia-Installation-ID, so you can easily identify it on the server-side.
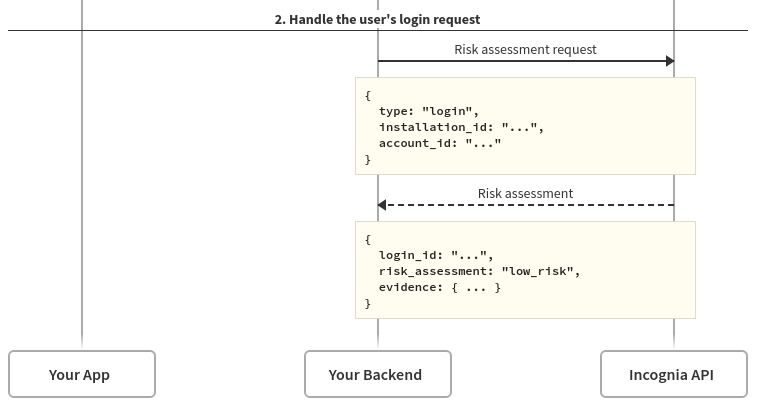
Handling the user’s login request
When your server receives a login request, you can use Incognia intelligence to assess the risk of this login attempt inside this request/response cycle.
To evaluate this login attempt risk, your server will request the Transaction API informing that a login attempt was made alongside its Installation ID and the Account ID of the account that the device is attempting to access.
A sample implementation of a controller/handler
Let’s consider a toy example as back-end with the controller below:
You are required to authenticate when using the Incognia API. For authentication details, see Authenticating in Incognia APIs.
Considering that the authentication logic is implemented, you can add risk assessment requests to your login handler: # incognia/api.rbUsing the Incognia risk assessment
When your server makes a request to the Transaction API endpoint, it will receive a response like the following:
The response contains the id of the created entity (in this case, a login), the risk_assessment provided by Incognia based on device behavior, and evidence that supports this assessment. You can learn more about all the returned data in this article: Understanding risk assessments.
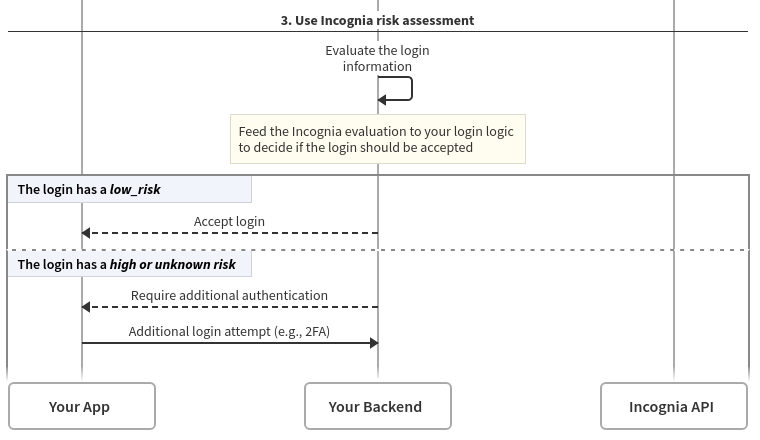
The returned assessment can be used with other risk-related data, such as in a risk engine, to decide if this login should be accepted. Incognia’s risk assessments include:
- high_risk: the login performed by the device may be fraudulent and we advise you to take preventive actions in these scenarios, such as requiring additional step-up authentication or simply blocking this login attempt;
- low_risk: the login performed by the device seems to be safe to accept;
- unknown_risk: we are unable to provide a precise assessment at the time of the request. You should require additional authentication (e.g. 2FA).
Wrapping Up
After these steps, your application is ready to recognize trusted users at login without friction and preventing account takeovers.

