React Backend

Contents
Blazing-fast-building ReactJS applications with Parse as a backend
For the last few years, react has been one of the most beloved front-end frameworks available. Companies and developers all around the world use it to build various types of applications. Some examples are:
- Netflix – The video-streaming giant has been using react since 2015, as described in this article, published in their tech blog
- Facebook – Facebook is react’s very own creator, and has been massively using it throughout the last years. They even explain how React is a major part of facebook’s current architecture in an article written in their tech blog.
and these are only some of the giant companies using react in production. But what exactly is react, and what are the benefits of using it?
React’s perks
According to its documentation:
React is a declarative, efficient, and flexible JavaScript library for building user interfaces. It lets you compose complex UIs from small and isolated pieces of code called “components”. – React.js Docs
Single Page Applications (SPA)
React’s main goal is to simplify the construction of highly interactive applications capable of mimicking native app’s performance and behavior on the web.
This is achieved by creating a Single Page Application. Unlike multiple-page applications, which refresh the page every time it needs new data, single-page applications discreetly request the necessary data through the network and dynamically generate the necessary changes to accommodate the new data, without ever needing to refresh the page.
Reusable code
React is designed to make the programming of user interfaces as efficient as possible, and that is why one of its core pillars is the concept of components.
Components are reusable pieces of code that contain logic, styling, and markup. A component generates a specific structure of your application and expects to receive the information that is going to display
this description sounds too abstract for you? Let’s look at an example:

These are my twitter’s follow suggestions. Notice how similar these 3 suggestions are. The only difference between them is the rendered data, so if you were to reproduce this using react, one possible approach is to create a component responsible for rendering follow suggestions and call it three times, with different data.
This reusability makes your codebase easier to maintain and to keep organized
React is declarative
Being declarative means that you describe how you want your application to behave, instead of being responsible for every needed action. This type of behavior simplifies the construction of highly dynamic interfaces since you don’t have to manually trigger each update on your user interface (UI)
You can tell your components to “pay attention” to a specific piece of data, and then only focus on updating given data, letting react handle the necessary updates.
Using it with Parse Server
Parse Server is an open-source backend framework. Check the video below where Alex will present you the main components and the Parse ecosystem.
Using Parse Server with React js is a very powerful combination since parse is the perfect backend choice to support the high level of interactivity of React applications.
Bootstrapping a Parse Server + ReactJS application
The first thing you have to do is make sure that Node.js is installed on your computer.
After guaranteeing the node’s installation, it’s time to use Create React App to bootstrap our react application
Open a terminal and insert the following command
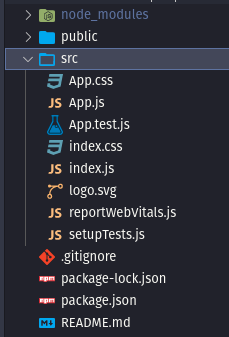
npx create-react-app parse-and-reactAfter the project has been created, its structure should look like this

Adding styles to our application
Replace the content of your App.css file with the following:
Adding Parse to our application
The first thing we’ll do is install Parse’s Javascript SDK into our application. It will be what handling the application’s connection to the Parse Server. Open your terminal in the project’s folder and install the SDK by typing the following command:
npm install parse --saveThen, navigate to the index.js file and add Parse’s initialization code:
To get both the application id and the javascript key, create an application at Back4App and retrieve its keys.
Now that you have your keys, we must have a way of using them inside our application. In a CRA created application, this can be done through an env file
at the project’s root folder, create a file called .env with the following content
Now Our keys are available inside our project. Let’s use them! Go back to services/parse.js and replace the placeholders with the key’s path. Once that is done proceed to export Parse from this file. The final result should look like this:
Now that Parse is set up inside our application, you can finally use it.
Go to the App.js file, and replace the default application content with some custom logic. Copy and paste the following code inside your project:
This code enables the creation and listing of users for our application using simple react concepts and Parse’s SDK to create and list users.
Storing data on parse
The Parse data storing implementation is built around Parse.Object. Each Parse.Object contains key-value pairs of JSON-compatible data. This data is schemaless. In other words, there is no need for defining the properties of your data ahead of time, hence you can define them on the fly
Just like we do in the following snippet of code:
A Parse Object called Employee is created, and afterward using the .save method to set its properties, which in our case are:
- username
- password
Remember, your object’s properties are defined by you, so they can be shaped to fit your needs, whatever they might be.
retrieving data on parse
Inside our data retrieval function (getEmployees):
We retrieve all the created employees and extract their usernames using Parse’s Query method.
Parse.Query offers us a way to retrieve a list of stored objects. We are using it in its most basic form, but it’s also fited for more complex use cases with more sophisticated conditions. Read more about Parse.Query in the its oficial documentation
With this code set up, it’s time to run the project. Open it in a terminal and then type the following command:
npm run startThen open your browser and navigate to
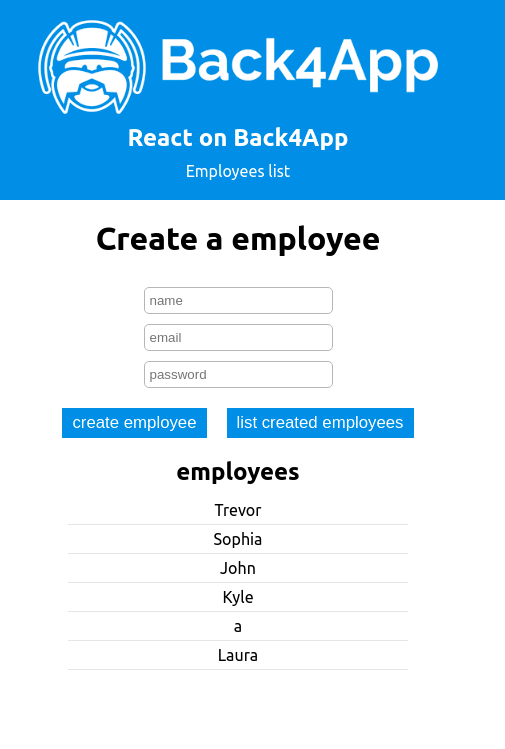
http://localhost:3000The final application will look like this:

Final words
With this basic application finished, you have the necessary foundations to venture into more complex challenges with this stack
Make sure to refer to both React’s and Parse’s documentation if you find yourself stuck along the way
I hope this article has been helpful and wish you a happy coding 🙂


