How to Add Authentication to a React Native App?
Authentication is a core component of almost every app.
This practical article will provide a step-by-step guide getting started with React Native authentication.
On top of that, it’ll describe the basics of authentication, how it compares to authorization, authentication flow, and the benefits of using it.
Contents
- 1 What is Authentication?
- 2 Authentication Flow
- 3 Authentication vs. Authorization
- 4 Benefits of Authentication
- 5 How to add authentication to a React Native app?
- 6 Conclusion
What is Authentication?
Authentication is the process of verifying someone’s identity. Generally speaking, there are three ways of authenticating either with:
- Something you know (e.g. password, PIN)
- Something you have (e.g. mobile phone, keys)
- Something you are (e.g. fingerprint, iris)
Most applications use the first option, but a lot of them combine multiple of them to increase the level of security. This concept is called multi-factor authentication (MFA).
Authentication Flow
The generic authentication flow works like this:
- The user sends their password to the server.
- The server hashes the password and compares it to the password hash in the database.
- If the hashes match, the server creates a session and sends the session token to the user. On the other hand, if the hashes do not match, an error is raised.
- The user then uses the session token with each request. On each request, the server will check if the token is present and valid.
The flow above is so-called token authentication. Other authentication systems include JSON Web Token (JWT), basic access authentication, social login and so on.
Authentication vs. Authorization
Authentication is the act of verifying the identity of a user, while authorization is the act of verifying whether a user has sufficient permissions to perform an action.
The authorization models include mandatory access control (MAC), discretionary access control (DAC), and role-based authorization, among others.
Benefits of Authentication
Let’s look at some benefits of using authentication in your mobile apps.
Security
Authentication can protect your app from unauthorized access and guarantee only legitimate users have access to your service.
This helps prevent data breaches and cyber-attacks and keeps your app environment secure and trustworthy.
Personalization
Authentication allows for a personalized user experience within the app. When users log in, they can access customized settings, preferences, and recommendations tailored to their needs.
This personalization makes the app more engaging and user-friendly. It helps in retaining users by providing a more relevant and enjoyable experience.
Legal Requirements
The laws in some countries require you to verify your users’ identities. An example of this is Know Your Customer (KYC).
Almost all financial apps are required to do it. You must have a proper authentication system to conform to these regulations or protect your users’ personal information.
How to add authentication to a React Native app?
This part of the article will provide a step-by-step guide on adding Back4app authentication to a React Native (Expo) app.
Prerequisites
- Basic understanding of Backend as a Service (BaaS)
- JavaScript IDE, Node.js, and a mobile emulator or a physical device
- Ability to read and write JavaScript code
- Experience with React Native and Expo
- A free Back4app account
What is Back4app?
Back4app is one of the best open-source Backend as a Service (BaaS) solutions. It is a mature and reliable platform that has been around since 2015.
Its main features include real-time databases, Cloud Code functions, automatic RESTful/GraphQL API generation, and more!
Back4app has an easy-to-use and intuitive admin dashboard and a command line interface (CLI) for more advanced users.
It also provides SDKs for the most popular programming languages & frameworks, such as JavaScript, PHP, Flutter, and Dart.
The best part is that Back4app offers a free tier. The free tier is great for testing & prototyping, and it includes the following:
- 25k/monthly requests
- 250 MB data storage
- 1 GB data transfer
- 1 GB file storage
Why use Back4app?
- Supports social authentication
- Provides SDKs for most programming languages & frameworks
- Effortless to setup and use
- Excellent customer support
To learn how Back4app authentication compares to Firebase authentication, check out The Ultimate Guide to React Firebase Authentication.
Project Introduction – Getting started with React Native authentication
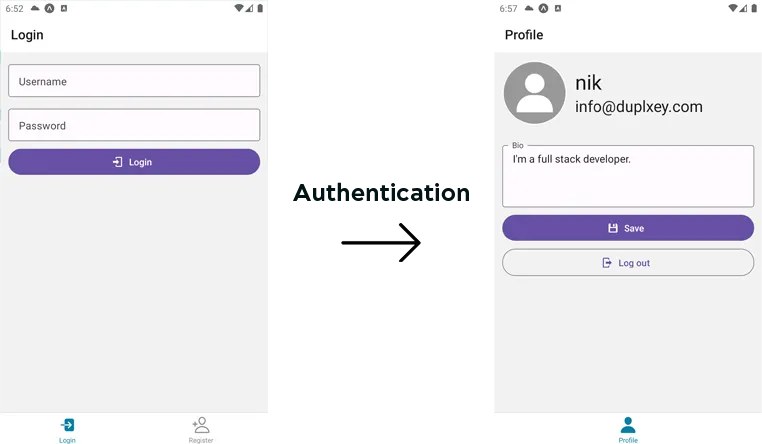
We’ll build a production-ready React Native application that uses Back4app authentication. The app will allow users to register, log in, and manage their profiles.
On top of that, the app will have two tab navigations, one for authenticated users and the other for unauthenticated users.
The final product will look something like this:
Let’s start coding!
Backend (Back4app)
In this section, we’ll create a Back4app app, extend the default user model, and obtain the API keys required to connect to the backend.
Create App
First, log into your Back4app account, or create one if you don’t have it yet.
As you log in, you’ll be redirected to your app list. Click “Build new app” to create a new app.
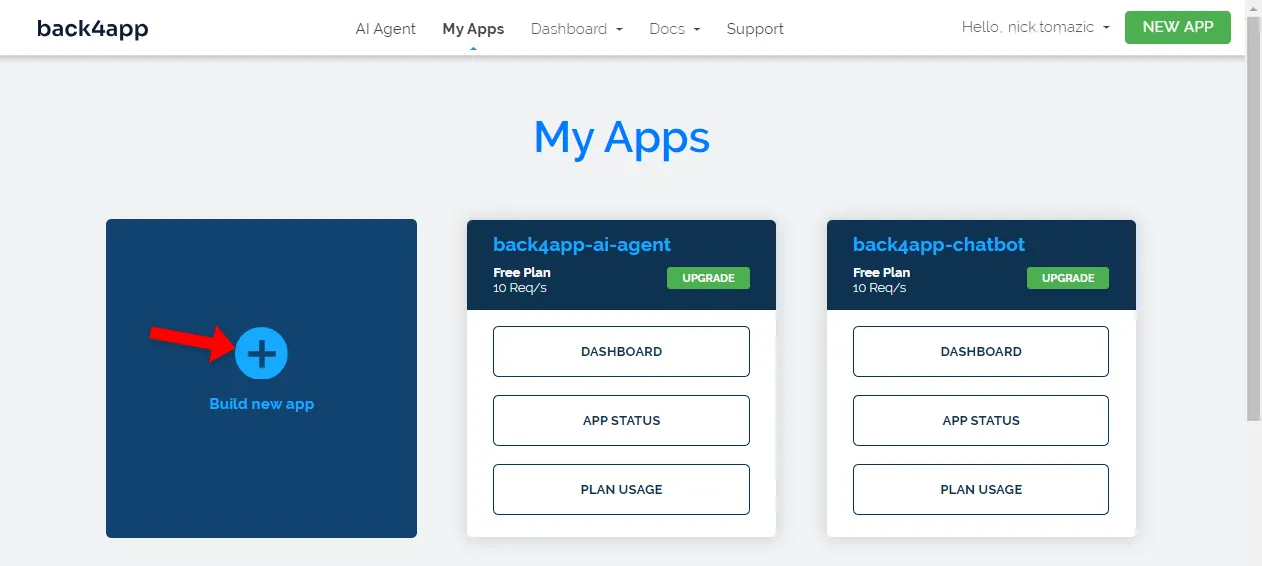
The Back4app platform allows you to deploy two types of apps — either Backend as a Service (BaaS) or Containers as a Service (CaaS). The authentication is included in the BaaS, so select it.
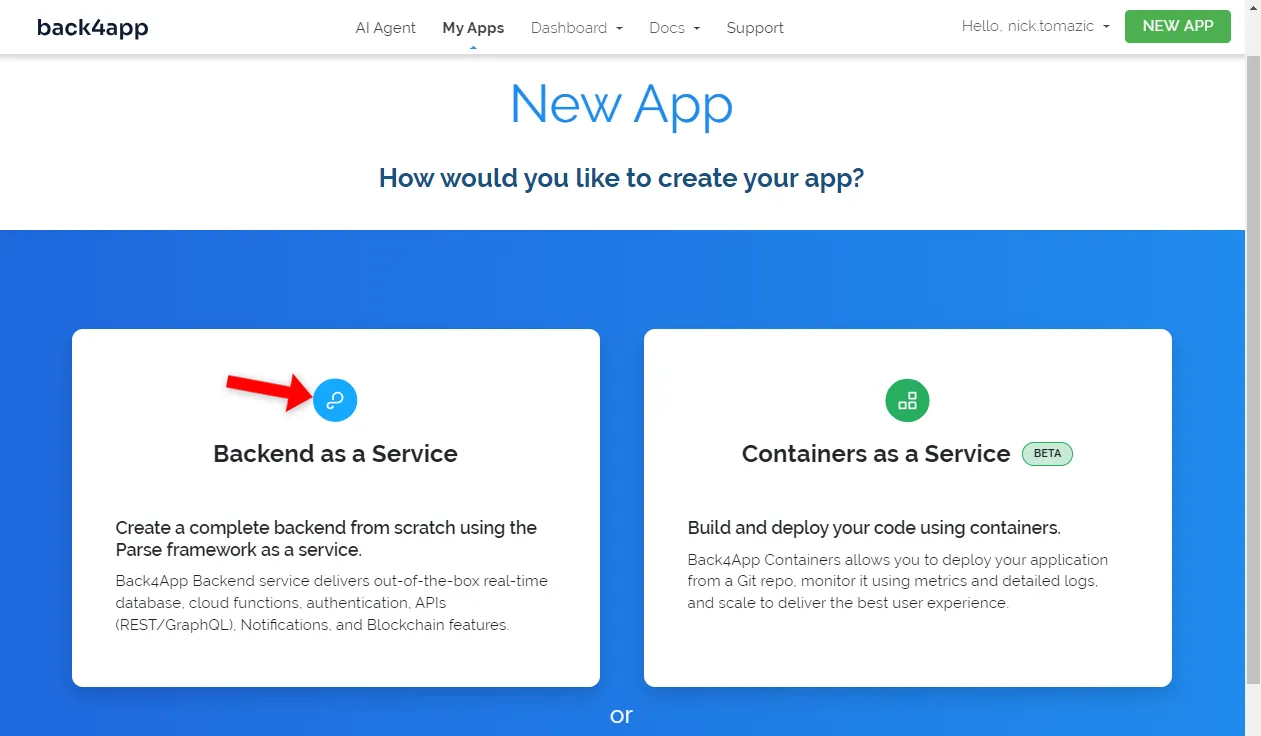
Next, give your app a descriptive name, leave the database as NoSQL, and click “Create”.
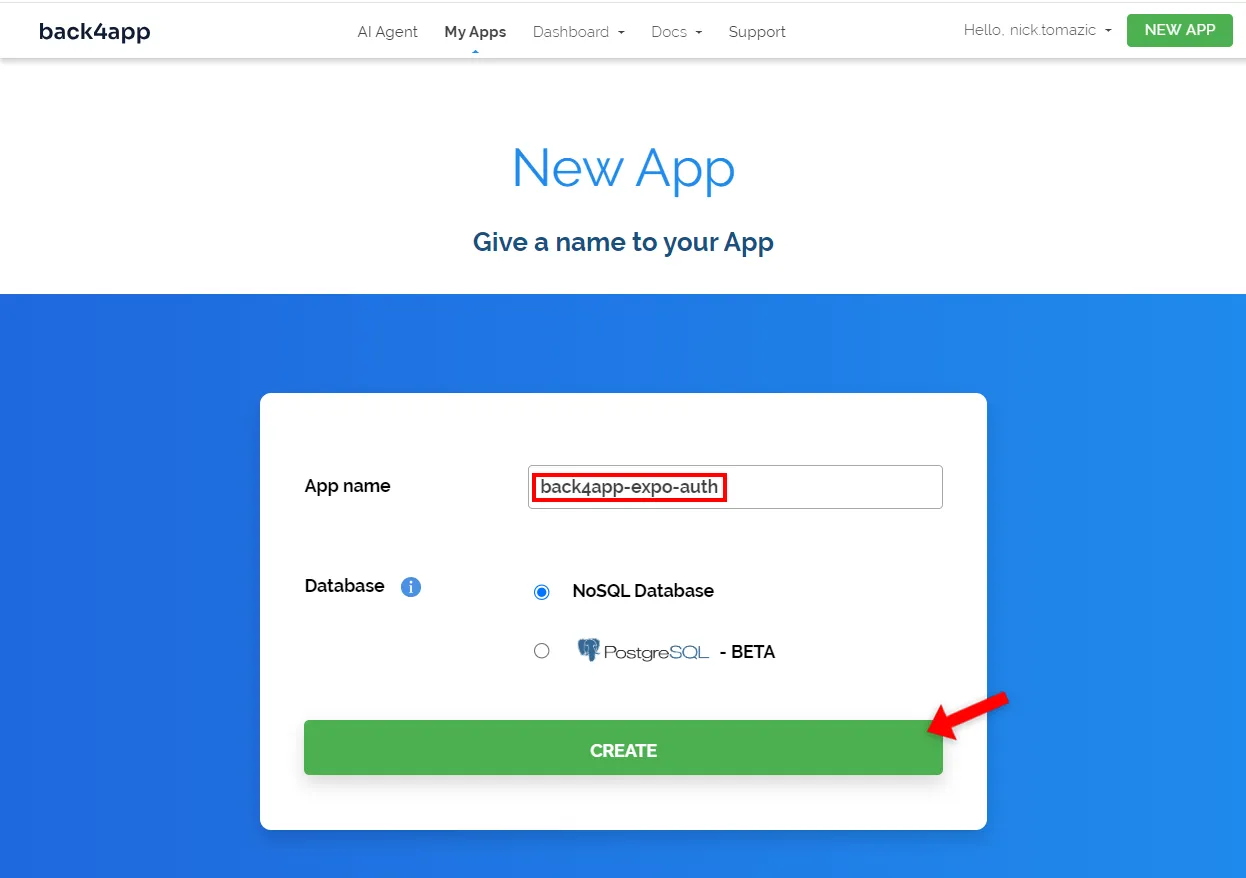
Wait roughly two minutes for the platform to create the app. Back4app will do everything from making the app layer to setting up the database, security, scaling, and more.
Once done, you’ll be redirected to the database interface.
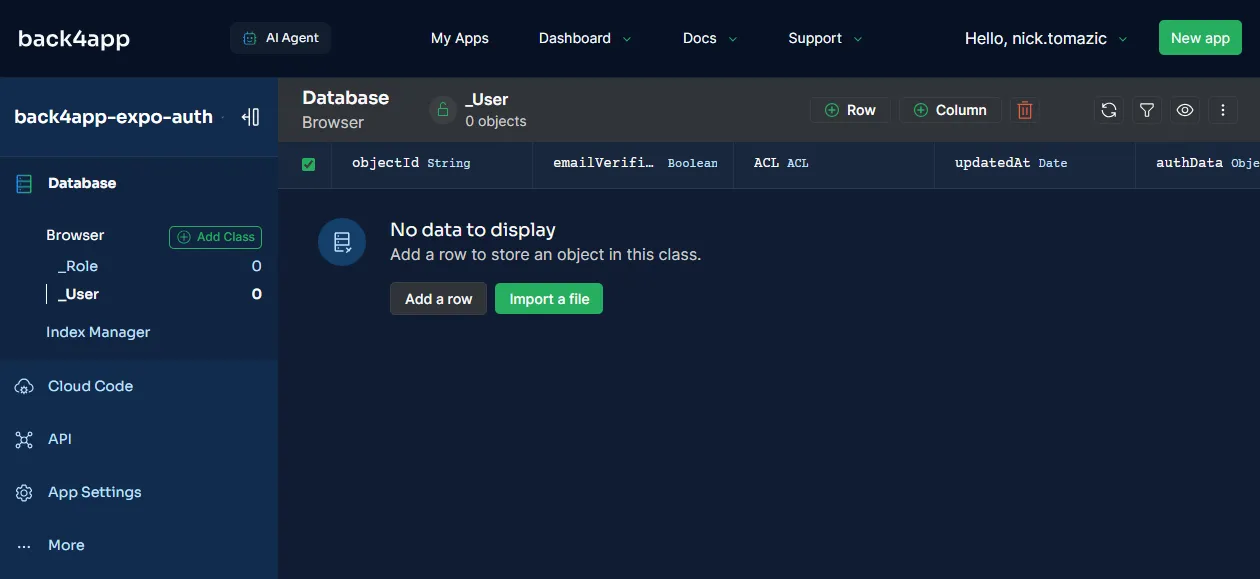
Modify Database
Next, let’s talk about the database classes.
Every Back4app database class comes with the following default fields:
+-----------+------------+-----------------------------------------+
| Data type | Name       | Description                             |
+-----------+------------+-----------------------------------------+
| String    | objectId   | Object's unique identifier              |
+-----------+------------+-----------------------------------------+
| Date      | createdAt  | Date of object creation                 |
+-----------+------------+-----------------------------------------+
| Date      | updatedAt  | Date of object's last update            |
+-----------+------------+-----------------------------------------+
| ACL       | ACL        | Access Control List (security features) |
+-----------+------------+-----------------------------------------+
And then the User class comes with a few additional fields:
+-----------+----------------+--------------------------+----------+
| Data type | Name           | Default value            | Required |
+-----------+----------------+--------------------------+----------+
| String    | username       |                          | yes      |
+-----------+----------------+--------------------------+----------+
| String    | email          |                          | no       |
+-----------+----------------+--------------------------+----------+
| Boolean   | emailVerified  | false                    | no       |
+-----------+----------------+--------------------------+----------+
| String    | password       |                          | yes      |
+-----------+----------------+--------------------------+----------+
| Object*   | authData       | {}                       | yes      |
+-----------+----------------+--------------------------+----------+
The default Back4app user class should be good for most use cases. Nevertheless, extending it is easy. To demonstrate how that’s done, let’s add a biography (bio) field.
First, click the “+ Column” button above the database table.
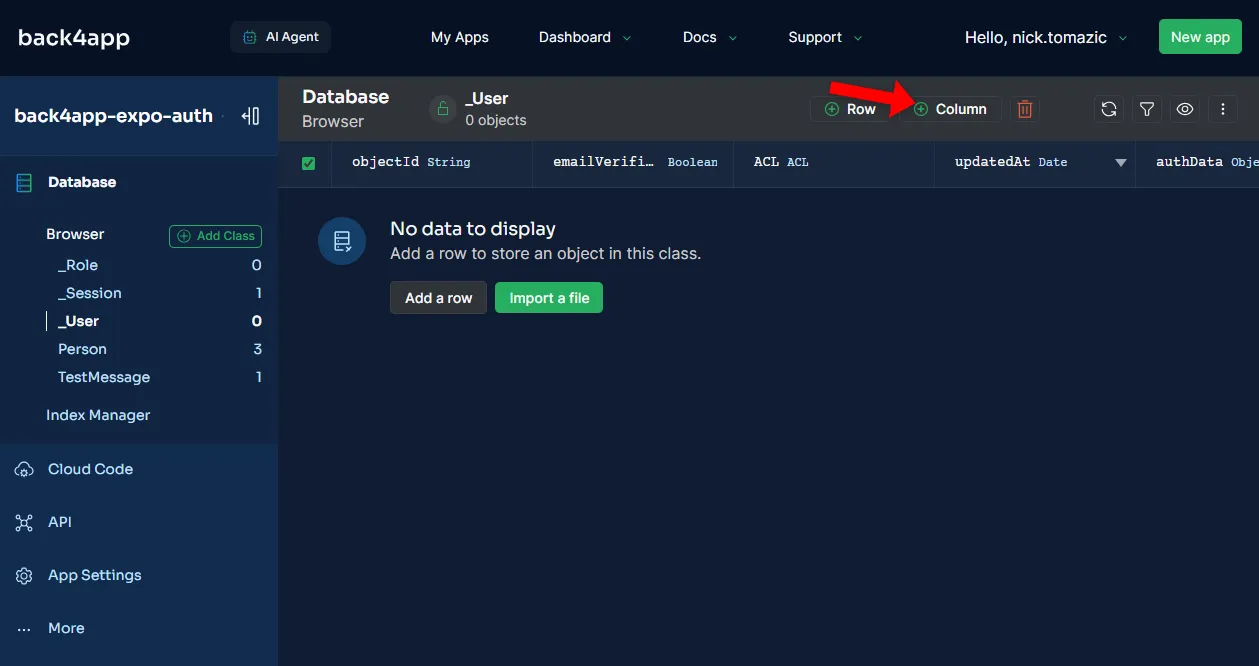
In the column creation form select “String” as the datatype, set the name to bio, make it required, and click “Add”.
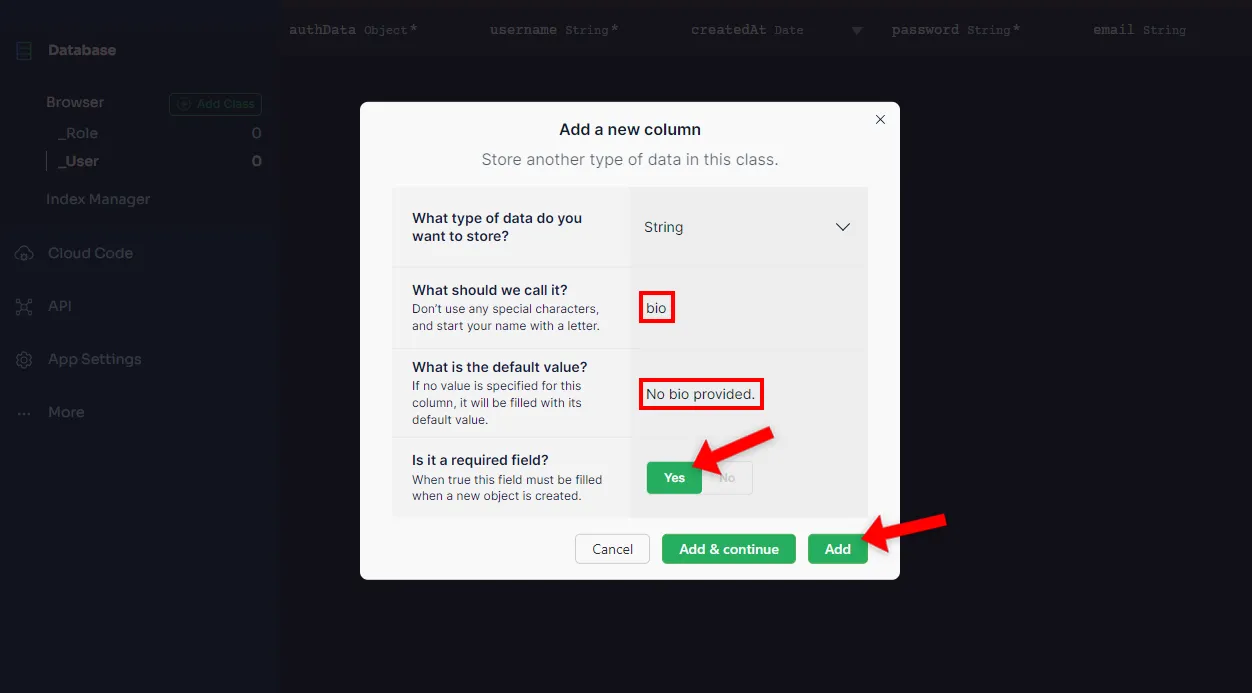
Great, you now know how Back4app database classes work and how to extend the user model.
API Keys
You’ll need to obtain your app’s API keys to connect to the backend from the frontend.
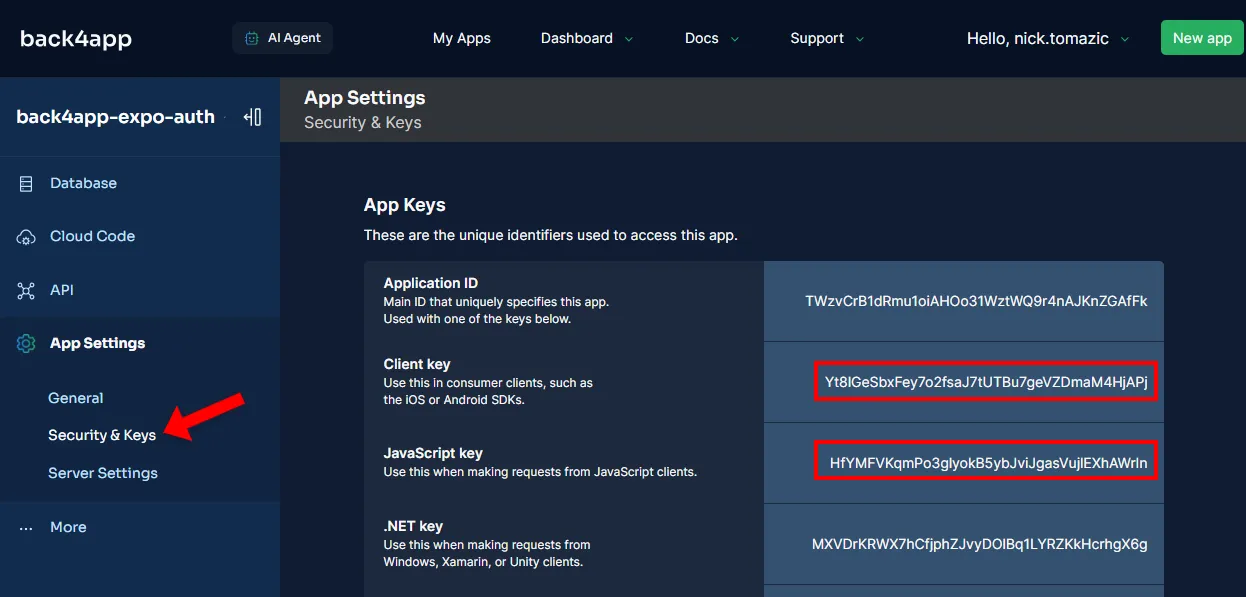
To get them, navigate to your Back4app app and select “Security & Keys” on the sidebar. Take note of the “Client key” and “JavaScript key”.
Great, that’s it from the backend side.
Frontend (React Native)
In this section, we’ll create an Expo app, install a components library, setup navigation, take care of the screens, and lastly connect the frontend with the backend.
Create App
To create a React Native app, we’ll use the create-expo-app utility. This utility simplifies the creation of React Native apps by generating the directory structure, configuring TypeScript, etc.
First, run the following commands:
npx create-expo-app@latest back4app-expo-auth
cd back4app-expo-auth
This command will also install
create-expo-appif you don’t have it yet.
You’ll notice that the bootstraped project has the following directory structure:
back4app-expo-auth/
├── app                 - Layouts, screens
├── assets              - Static assets (e.g. images, videos, fonts)
├── components          - Reusable components used through the app
├── constants           - Static variables & configurations
├── hooks               - Custom React hooks
├── scripts             - Development scripts
├── app.json            - Expo configuration & metadata
├── expo-env.d.ts       - Expo TypeScript declarations
├── ...
Start the development server:
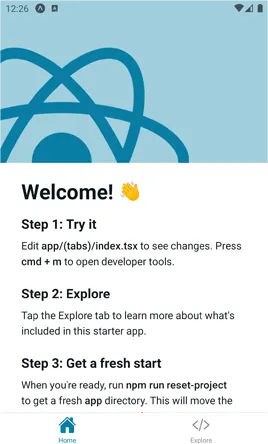
$ npx expo startLastly, press A to open the app on your Android emulator. Alternatively, you can use iOS emulator or a physical iOS device. Once the app opens you should see the default Expo screen.
React Native Paper
To simplify the UI development process, we’ll use React Native Paper.
React Native Paper is an easy to use, high-quality component library for React Native applications. It provides many premade components covering almost every use case.
Start by installing it via NPM:
$ npm install react-native-paper react-native-safe-area-context If you’re building for iOS you’ll also have to link native parts of the library:
npx pod-installNext, configure Babel to not include unused components in production:
// babel.config.js

module.exports = function(api) {
  api.cache(true);
  return {
    presets: ["babel-preset-expo"],
    env: {
      production: {
        plugins: ["react-native-paper/babel"],
      },
    },
  };
};
Then navigate to app/_layout.tsx and wrap the app in PaperProvider like so:
// app/_layout.tsx

// ...

export default function RootLayout() {

  // ...

  return (
    <ThemeProvider value={colorScheme === "dark" ? DarkTheme : DefaultTheme}>
      <PaperProvider>
        <Stack>
          <Stack.Screen name="index" options={{headerShown: false}}/>
          <Stack.Screen name="(auth)" options={{headerShown: false}}/>
          <Stack.Screen name="(tabs)" options={{headerShown: false}}/>
          <Stack.Screen name="+not-found"/>
        </Stack>
      </PaperProvider>
    </ThemeProvider>
  );
}
Don’t forget about the import at the top of the file:
import {PaperProvider} from "react-native-paper";Perfect, we’ve successfully installed the component library.
Container
Another thing we’ll do is create a Container component. This component will be used in all of our screens, and it will add a margin on all sides so the content won’t go to the edge of the screen.
Create a Container.tsx file in the components folder:
// components/Container.tsx

import React from "react";
import {View} from "react-native";

export type ContainerProps = {
  children: React.ReactNode;
}

export function Container({children}: ContainerProps) {
  return (
    <View style={{margin: 12}}>
      {children}
    </View>
  );
}As mentioned in the project introduction, our app will have two navigation tabs.
One is for authenticated users, and the other is for non-authenticated users. The authenticated tab will allow users to manage their profiles and the other one to log in or create an account.
To achieve that, first, create the following directory structure:
app/
├── (auth)/
│   ├── _layout.tsx
│   ├── login.tsx
│   └── register.tsx
├── (tabs)/
│   ├── _layout.tsx
│   └── profile.tsx
├── +html.tsx
├── +not-found.tsx
├── _layout.tsx
└── index.tsx
For more information on Expo Router, check out the official docs.
Expo layouts generally contain a lot of boilerplate code. I don’t want to flood the article with code, so please grab the file contents from GitHub:
Moving along, place the following in index.tsx:
// app/index.tsx

import React, {useEffect} from "react";
import {ActivityIndicator} from "react-native-paper";
import {useRouter} from "expo-router";
import {View} from "react-native";

export default function IndexScreen() {

  const router = useRouter();
  const isAuthenticated = true;

  useEffect(() => {
    setTimeout(() => {
      if (isAuthenticated) {
        router.push("profile");
      } else {
        router.push("login");
      }
    }, 1000);
  }, []);

  return (
    <View style={{
      flex: 1,
      justifyContent: "center",
      alignItems: "center",
    }}>
      <ActivityIndicator
        size="large"
        animating={true}
      />
    </View>
  );
}
The index.tsx file is the app’s entry point. In it, we check if the user is authenticated and then redirect them accordingly. For now, the redirect is based on the isAuthenticated variable.
Then grab the code for the screens:
The screens code is pretty simple. It’s React Native code that uses React Native Paper to create the forms and other UI. It also utilizes basic React hooks such as useState() and useEffect().
Parse SDK
To connect to the backend we’ll use Parse SDK. The SDK offers methods for data storage, manipulation, user authentication, and more features.
First, install it via NPM:
$ npm install parse @react-native-async-storage/async-storage --save
$ npm install --save-dev @types/parse
We also installed the @react-native-async-storage/async-storage package to persist the user session when the app closes. Without it, users would have to authenticate every time they open the application.
Then create an .env file in the project root like so:
EXPO_PUBLIC_APPLICATION_ID=<your-back4app-application-id>
EXPO_PUBLIC_JAVASCRIPT_KEY=<your-back4app-client-key>
Ensure to replace
<your-back4app-application-id>and<your-back4app-client-key>with API keys obtained in the backend section of the article.
Initialize Parse in _layout.tsx like so:
// app/_layout.tsx

// ...
import Parse from "parse/react-native.js";
import AsyncStorage from "@react-native-async-storage/async-storage";
import ParseContext from "@/context/parseContext";

Parse.setAsyncStorage(AsyncStorage);
Parse.initialize(
  process.env.EXPO_PUBLIC_APPLICATION_ID ?? "",
  process.env.EXPO_PUBLIC_JAVASCRIPT_KEY ?? "",
)
Parse.serverURL = "https://parseapi.back4app.com/";

async function testParse() {
  try {
    const testMessage = new Parse.Object("TestMessage");
    testMessage.set("message", "Hello, World!");
    await testMessage.save();
  } catch (error) {
    console.log("Error saving the test message: ", error);
  }
}
testParse().then(() => console.log("Successfully connected to Parse!"));

// ...
We also included the testParse() function, which tests the connection to Back4app by adding a “Hello, world!” message to the database. Ensure the connection works by restarting the Expo server and running the app in the emulator.
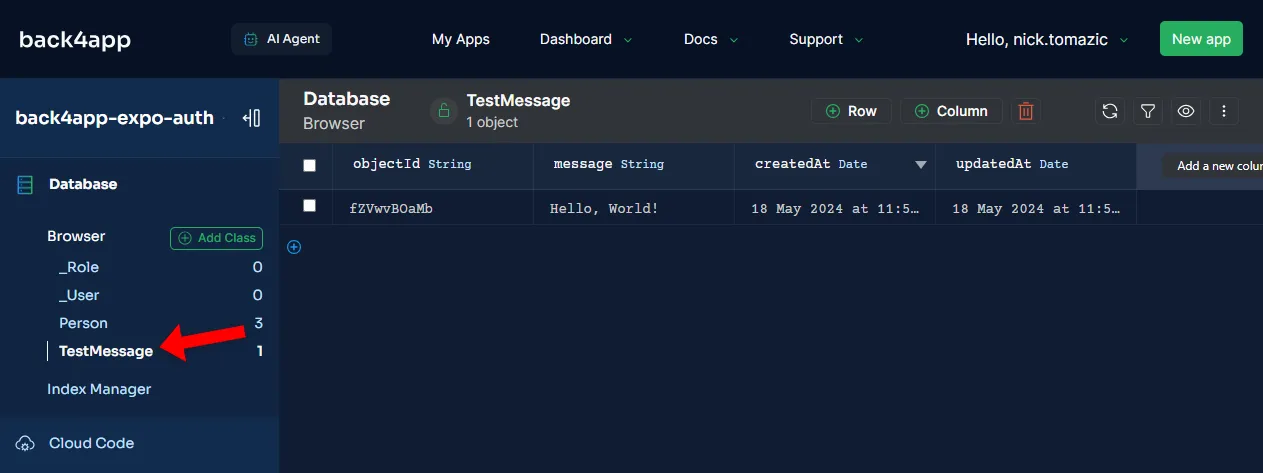
Navigate to your app’s database view and check if you can see the message.
If you get an error saying “Error: crypto.getRandomValues() not supported”. Install the following dependencies:
npm install react-native-get-random-values --save
npm i --save-dev @types/react-native-get-random-values
Then add the import at the top of _layout.tsx (before importing Parse):
import "react-native-get-random-values";Restart the development server; everything should work well.
To have the Parse instance available in all the screens, we’ll pass it using React Context.
First, create a context directory and put the following parseContext.ts file inside:
import {createContext} from "react";

const ParseContext = createContext<typeof Parse | null>(null);

export default ParseContext;
Then wrap the entire app with it while passing the Parse instance:
// app/_layout.tsx

// ...

return (
  <ParseContext.Provider value={Parse}>
    {/* ... */}
  </ParseContext.Provider>
)
Data Retrieval & Manipulation
In this last section, we’ll use Parse SDK to authenticate the user and fetch user information.
Instead of repeating the same code in every screen, we’ll create a useParse hook. This hook will fetch the Parse instance from context, obtain user information, and trigger an update once everything is ready.
Create a new file named useParse.ts in the context folder:
// context/useParse.ts

import {useContext, useEffect, useState} from "react";
import ParseContext from "@/context/parseContext";

export function useParse() {
  const parse = useContext(ParseContext) as typeof Parse;
  const [parseUser, setParseUser] = useState<Parse.User | null>(null);
  const [isParseLoaded, setIsParseLoaded] = useState(false);

  useEffect(() => {
    (async () => {
      try {
        setParseUser(await parse.User.currentAsync());
      } catch (e) {
        console.error(e);
      } finally {
        setIsParseLoaded(true);
      }
    })();

  }, []);

  return {parse, parseUser, isParseLoaded};
}
Then modify index.tsx replacing isAuthenticated with an actual session check:
// app/index.tsx

// ...
import {useParse} from "@/hooks/useParse";

export default function IndexScreen() {

  const router = useRouter();
  const {parse, parseUser, isParseLoaded} = useParse();

  useEffect(() => {
    if (!isParseLoaded) return;
    (async () => {
      if (parseUser) {
        console.log("User is authenticated!");
        console.log(parseUser.toJSON());
        router.replace("/profile");
      } else {
        console.log("User is not authenticated.");
        console.log({});
        router.replace("/(auth)/login");
      }
    })();
  }, [isParseLoaded]);

  return (
    // ...
  );
}
Next, modify login.tsx to log in the user:
// app/(auth)/login.tsx

// ...
import {useParse} from "@/hooks/useParse";

export default function LoginScreen() {

  const router = useRouter();
  const {parse, parseUser, isParseLoaded} = useParse();

  // ...

  const onLogin = async () => {
    // ...
    try {
      await parse.User.logIn(username, password);
      router.push("/(tabs)/profile");
    } catch (error: any) {
      setError(error.message);
    }
  }

  return (
    // ...
  );
}
Then modify the register.tsx similarily to login.tsx, but this time replace the TODO like so:
// app/(auth)/register.tsx

try {
  const user = await parse.User.signUp(username, password, undefined, undefined);
  user.setEmail(email);
  await user.save();
  router.replace("/(tabs)/profile")
} catch (error: any) {
  setError(error.message);
}
Lastly modify profile.tsx to display profile information:
// app/(tabs)/profile.tsx

// ...
import {useParse} from "@/hooks/useParse";

export default function IndexScreen() {

  const router = useRouter();
  const {parse, parseUser, isParseLoaded} = useParse();

  // ...

  useEffect(() => {
    if (!parseUser) return;
    setBio(parseUser.get("bio") || "");
  }, [parseUser]);

  const onSave = async () => {
    if (!parseUser) return;
    parseUser.set("bio", bio);
    try {
      await parseUser.save();
      setSuccess("Bio saved successfully.");
    } catch (error: any) {
      setError(error.message);
    }
  }

  const onLogout = async () => {
    router.replace("/(auth)/login");
    await parse.User.logOut();
  }

  return (
    <Container>
      {!isParseLoaded ? (
        <ActivityIndicator
          size="large"
          animating={true}
        />
      ) : (
        <>
          {/* ... */}
        </>
      )}
    </Container>
  );
}
Remember to change the TODOs in the return call. Use {parseUser!.getUsername()} and {parseUser!.getEmail()}.
At this point, the app should be working fully. Restart the development server and test it by creating an account, logging in, logging out, and changing your bio. Lastly, ensure the changes are reflected in the database.
Conclusion
In conclusion, you now know what authentication is, its benefits, and how it compares to authorization.
Additionally, you’ve learned how to set up Back4app authentication and integrate it with a React Native (Expo-based) application.
Future steps
- Learn about social authentication with Google, Facebook, and Apple
- Look into Back4app Admin App for a fancy real-time administration panel
The final source code is available on GitHub.


