Web Data Scraping using Parse

After we published our open database for Coronavirus COVID-19, which is based on Wikipedia’s data, some people started asking how we collected data in an automated fashion. This article will teach you how to write a data scraper (or data collector, data miner, etc) in Back4app using Cloud Code Functions that will automatically collect content from a given URL, filter the important data and store it in Parse.
Disclaimer: THIS IS IMPORTANT!
Before we proceed to the tutorial, I have to give you a heads up about data ownership, copyright, and other very important things that might become a problem depending on what you’re trying to achieve.
The fact is that NOT all data available on the Internet is “free to copy”. Actually, most websites have a content copy policy, copyright, or something equivalent that basically says it is illegal to copy, replicate, or use its data without explicit authorization.
Be sure to talk to the website owner before doing any data collection, or at the very least read the website terms and conditions. You don’t want a copyright lawsuit just because you didn’t think it would be a problem copying someone else’s work.
So, just be sure to answer all these questions before you scrape anything:
- Is this content copyrighted or legally protected in any way?
- Did you read the terms and conditions of the website?
- Do the terms and conditions explicitly tell you can copy content?
- Do you have an email or some document from the owner explicitly telling you can copy the data?
- Do you foresee any problem if this data is made available publicly?
If you miss the answer for any of those questions, or if that answer points to any kind of issue, it would be better not to proceed at all.
Back4app values the intellectual property rights of others and expects its users to do the same.
As per Back4app’s Copyright Policy, in appropriate circumstances and at its discretion, Back4app can disable and/or terminate the accounts of users who infringe the copyrights of others.
The main objective of this article is to incentivize everyone to collect and then SHARE their databases in our super-awesome Database Hub.
By sharing your data you join our community of collaborative developers who do so, and that brings a lot of good stuff:
- You help other developers to start
- You get to be known in the community
- You can get help from other developers to model/populate your database
- You get lots of eyes on your original model and data, which can track bugs faster and offer solutions
So, without further due, let’s start…
What we will be using
Basically, we will write a Cloud Job, which uses NodeJS syntax and runs automatically at predefined time schedules, to execute our code.
We will also be using 4 NPM modules to facilitate our development:
request, which makes HTTP requestsrequest-promise, which makes HTTP requests asynchronouslycheerio, which parses HTTP contentcheerio-tableparser, which parses HTTP tables easily
So, following our tutorial on how to deploy NPM modules to Back4app, I ended up with this package.json file:
{"dependencies": {"request-promise": "*","request": "*","cheerio": "*","cheerio-tableparser": "*"}}
Our Code
Our job will be called “getStatistics”, so le’ts start coding the job itself, as described in Parse’s documentation:
Parse.Cloud.job("getStatistics", async (request) =>  {

});
And in there let’s instantiate our 3 modules (request-promise already has request implemented, so we don’t need to re-instantiate it).
Let’s also declare our URL, from where we will be retrieving the data.
Parse.Cloud.job("getStatistics", async (request) =>  {
    const rp = require('request-promise');
    const cheerio = require('cheerio');
    const cheerioTableparser = require('cheerio-tableparser');

    const url = 'https://en.wikipedia.org/wiki/2019%E2%80%9320_coronavirus_pandemic_by_country_and_territory'
 })
Now let’s use request-promise (rp) to retrieve the content. Let’s also catch any possible exception, as we don’t want our Job to die on us without at least telling the reason why:
Parse.Cloud.job("getStatistics", async (request) =>  {
    const rp = require('request-promise');
    const cheerio = require('cheerio');
    const cheerioTableparser = require('cheerio-tableparser');

    const url = 'https://en.wikipedia.org/wiki/2019%E2%80%9320_coronavirus_pandemic_by_country_and_territory'

    rp(url)
        .then(async function(html){
            //success!
        })
    .catch(function(err){
        //handle error
    });
});
Now request-promise got our content and passed it on (HTML parameter) to our async function. It is time to load that HTML content in Cheerio:
$ = cheerio.load(html);
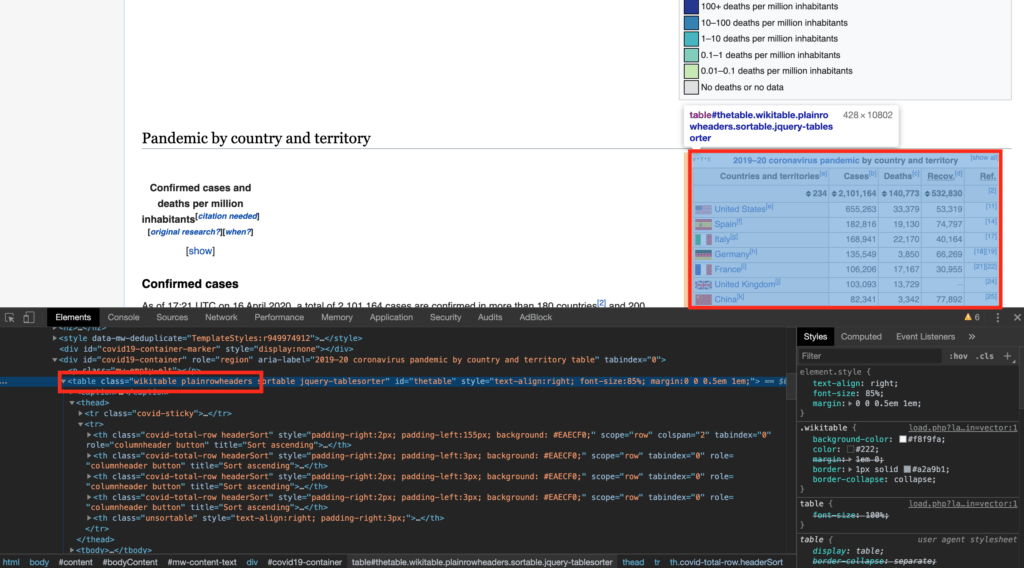
and then use the classes from the table I want to read. You don’t have to tell all classes, but have to tell as many as needed to individually identify the one table you want to scrape.
In my case, two classes were enough: .wikitable and .plainrowheaders will uniquely identify this table and tell Cheerio-Tableparser exactly which table we are looking for.
You can identify which classes the table you are looking for have by using Chrome’s inspect tool:

So our code for that will be:
cheerioTableparser($);
var data = $(".wikitable.plainrowheaders").parsetable(true, true, true);
So far our full code looks like this:
Parse.Cloud.job("getStatistics", async (request) =>  {
    const rp = require('request-promise');
    const cheerio = require('cheerio');
    const cheerioTableparser = require('cheerio-tableparser');

    const url = 'https://en.wikipedia.org/wiki/2019%E2%80%9320_coronavirus_pandemic_by_country_and_territory'

    rp(url)
        .then(async function(html){
            //success!

            $ = cheerio.load(html);

            cheerioTableparser($);
            var data = $(".wikitable.plainrowheaders").parsetable(true, true, true);

        })
    .catch(function(err){
        //handle error
        console.err('ERROR: ' + err)
    });
});
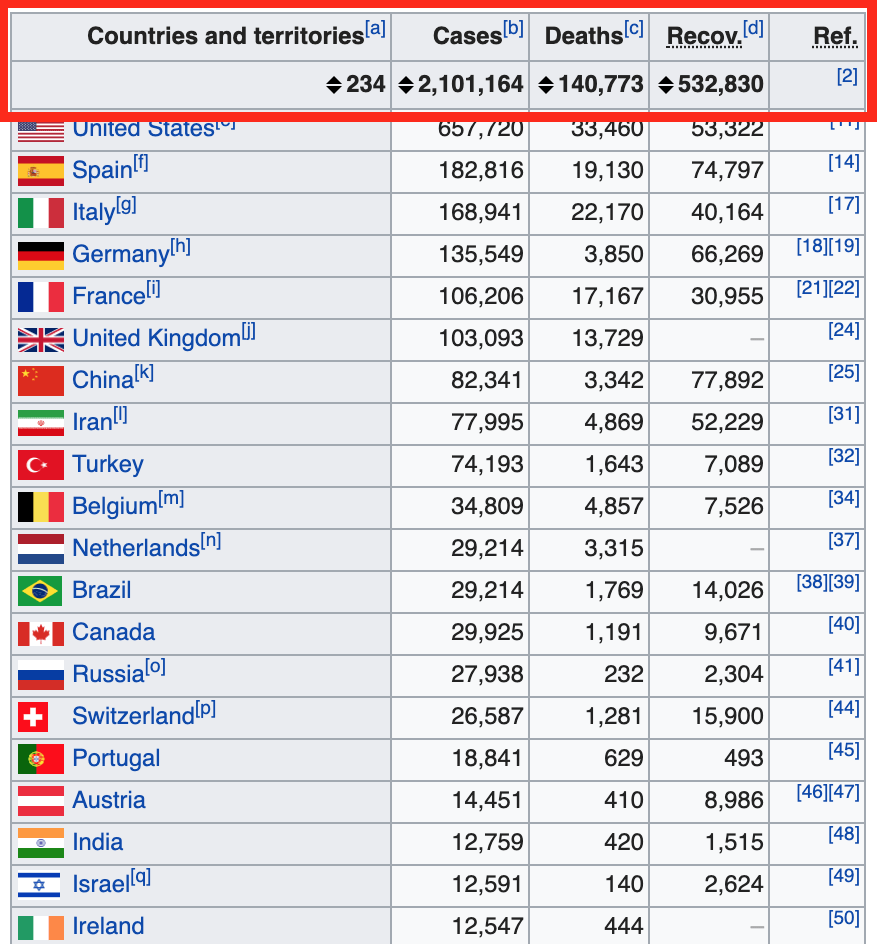
Now we can strip the information we want. I declared variables to hold those values so all of you can understand what I’m doing, but you can access the data directly by its array position:
let names = data[1]
let cases = data[2]
let deaths = data[3]
let recov = data[4]
Now, the next step would be to loop through those arrays populating the data to our class, but at this point is worth mentioning that cheerio-tableparse will also retrieve the rows containing column names, so we will have to exclude the first 2 rows of our arrays: our loop won’t be starting from 0, but from 2 (removing rows 0 and 1)

So our code for instantiating the class and loop through the arrays composing our objects would be like this:
const Covid19Case = Parse.Object.extend("Covid19Case");

for (let i = 2; i < names.length-2 ; i ++){
    let thisCovid19Case = new Covid19Case();

    // Replaces any characters that we do not want such as commas for floating point separator
    let thisName = names[i].replace(/\[.*\]/g, "");
    let thisCases = cases[i].replace(',', '');
    let thisDeaths = deaths[i].replace(',', '');
    let thisRecov = recov[i].replace(',', '');

    // Set the properties
    thisCovid19Case.set('countryName', thisName)
    thisCovid19Case.set('cases', parseInt(thisCases))
    thisCovid19Case.set('deaths', parseInt(thisDeaths))
    thisCovid19Case.set('recovered', parseInt(thisRecov))
    thisCovid19Case.set('date', new Date())

    // Save
    // We need to use the Masterkey if the App is published on the Hub. Otherwise we don't
    await thisCovid19Case.save(null,{useMasterKey:true})
}
Now, let’s take a look at our full code:
Parse.Cloud.job("getStatistics", async (request) =>  {
    const rp = require('request-promise');
    const cheerio = require('cheerio');
    const cheerioTableparser = require('cheerio-tableparser');

    const url = 'https://en.wikipedia.org/wiki/2019%E2%80%9320_coronavirus_pandemic_by_country_and_territory'

    rp(url)
        .then(async function(html){
            //success!

            $ = cheerio.load(html);

            cheerioTableparser($);
            var data = $(".wikitable.plainrowheaders").parsetable(true, true, true);

            let names = data[1]
            let cases = data[2]
            let deaths = data[3]
            let recov = data[4]

            const Covid19Case = Parse.Object.extend("Covid19Case");

            for (let i = 2; i < names.length-2 ; i ++){
                let thisCovid19Case = new Covid19Case();

                // Replaces any characters that we do not want such as commas for floating point separator
                let thisName = names[i].replace(/\[.*\]/g, "");
                let thisCases = cases[i].replace(',', '');
                let thisDeaths = deaths[i].replace(',', '');
                let thisRecov = recov[i].replace(',', '');

                // Set the properties
                thisCovid19Case.set('countryName', thisName)
                thisCovid19Case.set('cases', parseInt(thisCases))
                thisCovid19Case.set('deaths', parseInt(thisDeaths))
                thisCovid19Case.set('recovered', parseInt(thisRecov))
                thisCovid19Case.set('date', new Date())

                // Save
                // We need to use the Masterkey if the App is published on the Hub. Otherwise we don't
                await thisCovid19Case.save(null,{useMasterKey:true})
            }
        })
    .catch(function(err){
        //handle error
        console.err('ERROR: ' + err)
    });
});
Now we just have to schedule the run following this tutorial and wait for the results in our Database Browser.


