How to Deploy a Machine Learning Model?

In recent years, machine learning and artificial intelligence have gained significant popularity. This is likely to be accredited to advancements in natural language processing and recommender systems.
This article introduces machine learning, its applications, deployment options and demonstrates how to deploy a simple machine learning model to Back4app Containers.
Contents
What is Machine Learning?
Machine learning is a subfield of artificial intelligence. At its core, it leverages statistical algorithms to learn from data and make predictions about new, unseen data.
In other words, it gives computers the ability to learn without explicitly being programmed.
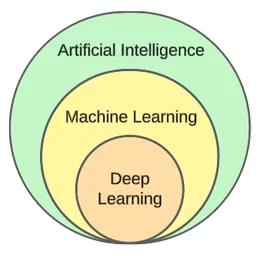
While machine learning and artificial intelligence are often used interchangeably, they’re not the same.
Machine learning focuses on algorithms and data structures, while artificial intelligence is a general attempt to create machines capable of human-like thinking.
Typical machine learning techniques are regression (predicting a continuous value, e.g. a house price) and classification (predicting a class from a finite set of classes, e.g. a movie genre).
Generally speaking, we can split machine learning into three types:
- Supervised learning — algorithms learn using a labelled dataset. Each example in the dataset contains a label (or so-called target variable). The algorithm uses these to predict labels for unseen examples. Supervised learning algorithms include kNN, decision trees, etc.
- Unsupervised learning — algorithms learn without any explicit guidance. It is up to the algorithm to find patterns in the data and make predictions based on them. Example algorithm is k-means clustering.
- Reinforcement learning — algorithms learn through trial and error. They’re typically reward based, and the goal of the algorithm is to maximize the reward. Example: genetic algorithms.
In the practical part of the article, we’ll go through a typical model-building process. We’ll be solving a classification task using supervised learning.
Machine Learning Applications
Let’s look at some real-world machine learning applications!
Recommender Systems
Recommender systems suggest what items (movies, products, etc.) a user should consume. These systems can be either content-based or collaborative-based.
These days recommeder systems are used by almost every company. They allow companies to increase business success, create additional demand, increase user engagement, learn about customers, and more.
Netflix, for example, uses them to recommend movies, Spotify to recommend songs, and YouTube to suggest videos you should watch based on your interests.
Natural Language Processing (NLP)
Natural language processing (NLP) allows computers to process and understand human language. Natural language generation (NLG) enables computers to generate human language.
This technology is used by chatbots, language translation tools, sentiment analysis tools, and more. ChatGPT is one of the most famous examples that leverages NLP and NLG.
Want to learn more about ChatGPT? Check out our other article called How to create an app using ChatGPT?
Computer Vision and Image Recognition
Computer vision gives computers the ability to “see” and “understand” images and videos. It allows them to perform (real-time) segmentation, recognize objects, faces, and even emotions.
This is the technology used by photo apps to tag your friends automatically. Additionally, it is used by surveillance systems to detect suspicious behavior.
Fraud Detection
Businesses employ machine learning to detect suspicious activity in transactions or user behavior. These systems can detect potentially fraudulent acts by studying trends and abnormalities, protecting businesses and customers from fraud and cybercrime.
Self-driving Cars
Autonomous car driving is one of the more complicated machine learning problems. It combines various applications such as computer vision, anomaly detection, behavior prediction, path planning, et cetera.
At the time of writing, we are nowhere close to fully-autonomous cars. The current “self-driving” cars only work well in restricted geographical areas.
Machine Learning Deployment Options
To deploy a machine learning model you usually serve it from a web application. Therefore, the machine learning model deployment options are practically the same as for deploying web applications. Let’s look at them!
On-premises
On-premises deployment entails hosting and managing IT equipment, such as servers and storage devices, on the actual premises of a company.
This traditional strategy necessitates a considerable initial investment in hardware and software and ongoing maintenance and support.
Its pros include a higher level of control & security and more accessible customization. On the other hand, the downsides are the cost, scalability, and maintenance.
Cloud
In contrast, cloud deployment employs third-party services to host infrastructure and applications via the internet.
This model allows users to pay as they go for scalable resources and services, which cloud service providers handle.
Its pros include scalability, ease of use, and no up-front cost. On the other hand, the downsides are a lower level of control, less flexibility, and possible vendor lock-in.
Examples of Cloud-based platforms include:
- Back4app
- Amazon Web Services (AWS)
- Google Cloud Platform (GCP)
- Microsoft Azure
Popular Machine Learning Algorithms
Popular machine learning algorithms are:
- k-Nearest Neighbours (kNN)
- Decision Trees & Random Forests
- Support Vector Machines (SVM)
- Linear Regression
- Naive Bayes
- K-means
In the practical example, we’ll use k-Nearest Neighbours.
How to deploy a machine learning model?
In this article section, we’ll build a machine learning model, serve it with FastAPI, dockerize it, and lastly deploy it to Back4app Containers.
Prerequisites
- Basic knowledge of machine learning
- Experience with Python and FastAPI
- Basic understanding of Docker and the containerization technology
- Git and Docker Desktop installed on your local machine
Project Overview
Before demonstrating how to deploy a machine learning model, we’ll build one. We’ll create a simple kNN classifier using the popular Iris dataset. The purpose of the model will be to predict whether an observation is “setosa”, “versicolour”, or “virginica” based on different features.
We’ll then save the model to a file, load it in FastAPI and serve it via an endpoint. After that, we’ll dockerize the app, push it to GitHub, and deploy it to Back4app Containers.
Create Model
To create the model, we’ll be using Jupyter Notebooks. You can either install Jupyter on your local machine or use Google Colab free of charge.
First create a new Jupyter notebook.
Each code block in this article section represents a Jupyter cell. You can create them from the menu or using the “B” keybind (while in command mode).
Also, don’t forget to run them (either from the menu or by using “ALT + ENTER”).
Add the following imports in the first cell:
import numpy as np
import pandas as pd

from sklearn.datasets import load_iris
from sklearn.model_selection import train_test_split
from sklearn.model_selection import cross_val_score
from sklearn.metrics import accuracy_score

from sklearn.neighbors import KNeighborsClassifier
from sklearn.preprocessing import StandardScaler
from sklearn.pipeline import Pipeline

from joblib import dump
Load Dataset
The Iris dataset is included in Scikit-learn by default. All you have to do is call the load_iris() function and transform the object to a frame.
Create a new cell:
df = load_iris(as_frame=True)["data"]
df["target"] = load_iris(as_frame=True)["target"]
As you load the Iris dataset, it is ordered by the target variable. This isn’t good because our machine learning model might only see some types of examples in the training phase. E.g. only “setosa” and “versicolour”.
To avoid this problem, we can shuffle it:
df = df.sample(frac=1, random_state=42)The
random_stateattribute is used for reproducibility. You can use any number you want.
Explore Dataset
Before creating a model, it’s a good idea to explore what data you’re dealing with. To do that, you can use the built-in Pandas functions, such as head(), describe(), and so on.
# Displays the first five rows of the dataset
df.head(5)

# Generates descriptive statistics
df.describe()
On top of that, you should visualize the dataset to figure out which features separate the examples best and what machine learning algorithm could be useful for your problem.
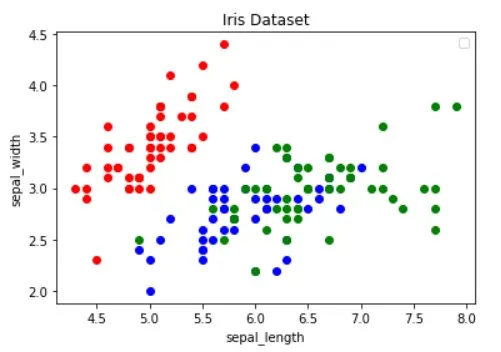
The image above has been borrowed from the Guide to Data Visualization with Python article. Make sure to check it out to learn more about data visualization.
The image shows that the “red” dots are linearly separatable from the other two. The “blue” and the “green” dots, on the other hand, aren’t linearly separatable.
Split Dataset
Moving along, let’s define the features (predictors) and the target variable:
features = [
    "sepal length (cm)", "sepal width (cm)", "petal length (cm)", "petal width (cm)"
]
target = "target"
Then extract them into X (features data) and y (target variable data) and test train split them:
X = df[features].values
y = df[target].values

dev_X, test_X, dev_y, test_y = train_test_split(X, y, test_size=0.25, random_state=42)
By using test_size=0.25, 25% of the dataset is used for testing, while 75% is used for training.
Build Model
Next, create a pipeline that first scales the data and then uses the kNN classifier:
knn = Pipeline(steps=[
    ("scaler", StandardScaler()),
    ("predictor", KNeighborsClassifier()),
])
knn.fit(dev_X, dev_y)
To learn why scaling is essential, check out this article.
Then use 10-fold cross validation and check the validation error:
cross_val_score(knn, dev_X, dev_y, cv=10, scoring="accuracy").mean()

# 0.9363636363636362
Evaluate the model on the test set:
accuracy_score(test_y, knn.predict(test_X))

# 0.9736842105263158
The validation and test accuracy are prety much equal. This indicates that our model isn’t underfitting or overfitting.
Save Model
Lastly, retrain the model using all the data and save it to model.pkl file:
knn.fit(X, y)
dump(knn, "model.pkl")
If you were using Google Colab, download the model.pk file since we’ll need it in the next step.
Serve Model
As mentioned before, we’ll use FastAPI to serve the model.
Go ahead and create a new FastAPI project and replace main.py like so:
# main.py

from fastapi import FastAPI

app = FastAPI()

@app.get("/")
async def root():
    return {
        "name": "back4app-deploy-ml-model",
        "description": "A FastAPI app serving an ML model",
        "version": "1.0.0",
    }
Start the development server:
$ uvicorn app.main:app --reloadNavigate to http://localhost:8000/, and you should get the following response:
{
    "name": "back4app-deploy-ml-model",
    "description": "A FastAPI app serving an ML model",
    "version": "1.0.0"
}
Load Model
Next, let’s load the model and define the model_classes.
First copy model.pkl from the previous step into the root of your project. Then load the model and define the classes right under initializing FastAPI app like so:
# ...

model = load("model.pkl")
model_classes = {
    0: "setosa",
    1: "versicolor",
    2: "virginica",
}

# ...
We’ll use model_classes to translate the target variable from numerical to text.
Load Model
Then create the /predict endpoint, which takes in the features and uses the loaded model to make a prediction:
# main.py

# ...

class Observation(BaseModel):
    """
    A Pydantic model for the observation data.
    This is our ML model's input data.
    """
    sepal_length: float
    sepal_width: float
    petal_length: float
    petal_width: float


@app.post("/predict")
async def predict(observation: Observation):
    predictions = model.predict([[
        observation.sepal_length,
        observation.sepal_width,
        observation.petal_length,
        observation.petal_width,
    ]])
    prediction = predictions[0]
    prediction_class = model_classes[prediction]
    return {
        "prediction": int(prediction),
        "prediction_class": prediction_class,
    }
The endpoint returns the numeric prediction as well as user-friendly test prediction.
Don’t forget about the imports at the top of the file:
from joblib import load
from pydantic import BaseModel
Your final main.py should look like this.
Restart the development server and navigate to http://localhost:8000/docs in your favorite web browser. FastAPI automatically generates interactive documentation for all your endpoints.
Test out the model by submitting a request like this:
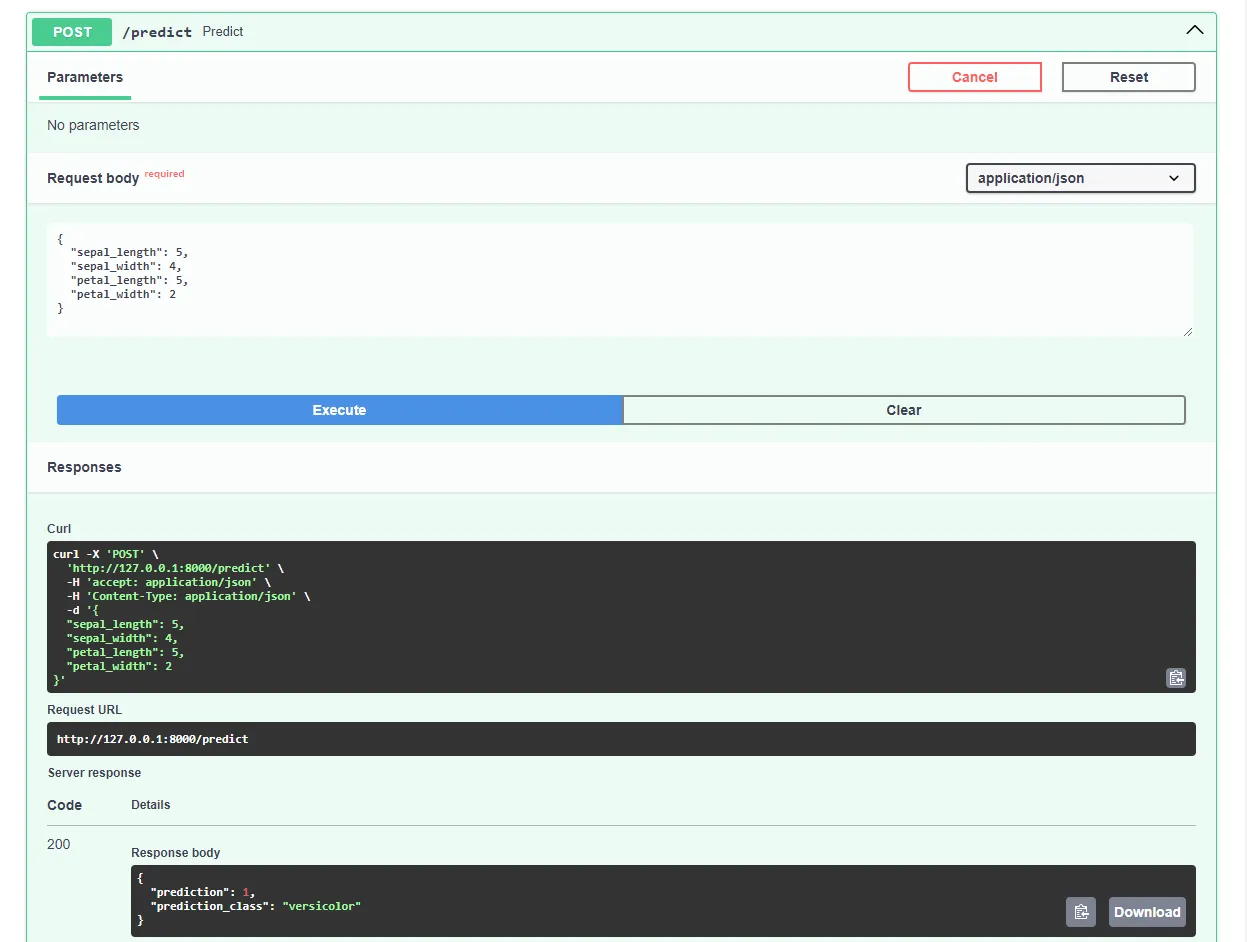
Great, our web app is now fully working!
Dockerize App
In this article section, we’ll dockerize the web application. We’ll create a Dockerfile and configure the .dockerignore file.
Dockerfile
A Dockerfile is a file that contains instructions for Docker Engine to follow to build the image.
These typically include transferring files, defining the base image, configuring the working directory, running custom commands, and more.
Dockerfile commands are usually written in all capital letters and are directly followed by their corresponding arguments.
<COMMAND> <arg1> <arg2> ... <arg_n>

# Example
WORKDIR /app
Visit the Dockerfile reference to find out more about all the instructions.
In project root, create a Dockerfile:
# Dockerfile

# Set the base image
FROM python:3.12.2-alpine3.19

# Install the required dependencies (gcc)
RUN apk add build-base

# Set the working directory
WORKDIR /app

# Confingure Python using environmental variables
ENV PYTHONDONTWRITEBYTECODE 1
ENV PYTHONUNBUFFERED 1

# Copy the requirements file into the image and install them
COPY ./requirements.txt .
RUN pip install --no-cache-dir --upgrade pip
RUN pip install --no-cache-dir --upgrade -r ./requirements.txt

# Copy the source code into the image
COPY . .

# Expose the port
EXPOSE 8000

# Start the Uvicorn server
CMD ["uvicorn", "main:app", "--host", "0.0.0.0", "--port", "8000"]
.dockerignore
When working with Docker, you’ll want to create images that are a small as possible.
One way of reducing the image size is by utilizing a .dockerignore file. This file works similarly to a .gitignore file. It allows you to omit files that don’t need to be included in the image.
In the project root, create a .dockerignore:
.git/
.idea/

__pycache__/
venv/

create_model.ipynb
Ensure you adapt the .dockerignore file according to your project’s requirements (e.g. if you’re using a different IDE).
Build, run, test
Before pushing the image to the cloud, it’s a good idea to test it locally.
To follow along you’ll need Docker Desktop installed on your machine.
Open the terminal and check the currently installed images:
$ docker imagesNext, build the image using the Dockerfile:
$ docker build -t iris-webapp:1.0 .It’ll take quite a while for Docker to build the image. This is mainly because Scikit-learn isn’t optimized for Docker containers. Feel free to take a quick coffee break.
After the command has finished, recheck the images. The newly built image should be there.
Lastly, use the image to create a new container:
$ docker run -p 8000:8000 --name iris-webapp iris-webapp:1.0That’s it!
Your web application is now containerized. It should be accessible at http://localhost:8000/ and work the same way as before.
Push to GitHub
First, navigate to GitHub and create a new repository. Take note of the remote URL since we’ll need it in a later step.
Next, return to your project root.
Before you push the source code to the cloud, make a .gitignore file. A .gitignore file lets you specify which files and directories should be omitted from the version control.
This type of file operates in the same manner as a .dockerignore files.
In the project root, create a .gitignore file:
#.dockerignore

.idea/
__pycache__/
venv/
Open the terminal and run the following command to initialize Git:
$ git initAdd all files to the VCS and commit them:
$ git add .
$ git commit -m "first commit"
Lastly, add the remote GitHub origin using the URL from before and push the source code:
$ git remote add origin <remote_url>
$ git push origin master
Ensure that the remote URL from the preceding step is used in place of
<remote_url>.
That’s it. If you visit the GitHub repository page now, you should see that all of the files have been added.
Deploy App
To deploy an app to Back4app Containers, you must first register or log in (if you already have an account).
When you authenticate with your Back4app account, you will be taken to your app dashboard. To create a new app, click “Build new app”.
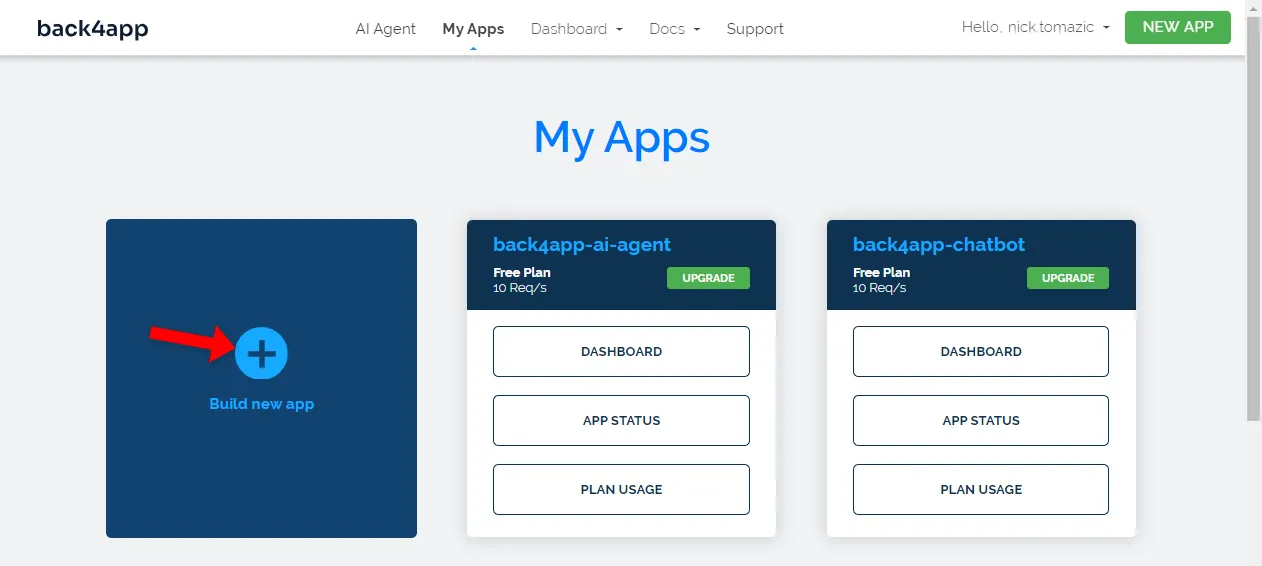
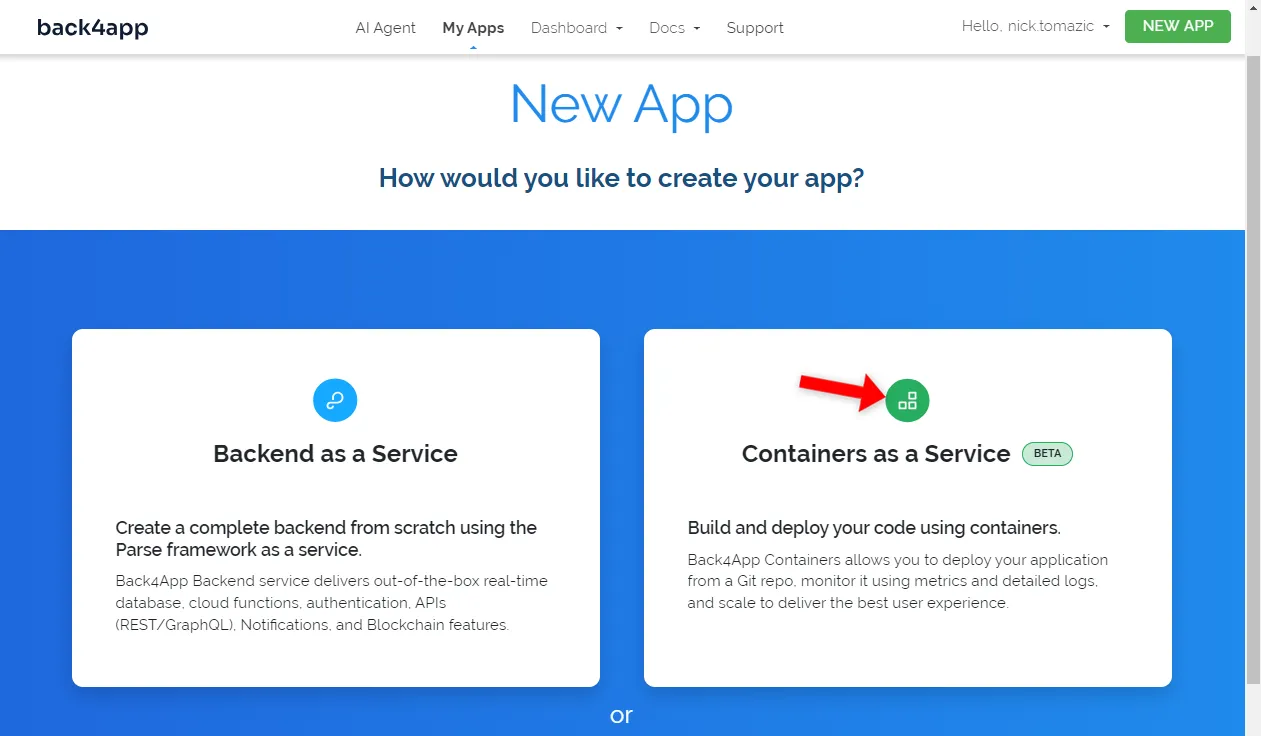
Back4app allows for Backend as a Service and Containers as a Service deployment. Since we’re deploying a containerized app, we’ll go with the latter option.
Next, you’ll have to connect your GitHub account to Back4app. This will allow Back4app to pull source code from your repositories. You can either grant access to all the repositories or pick specific ones.
Once the repositories have been imported, click “Select”.

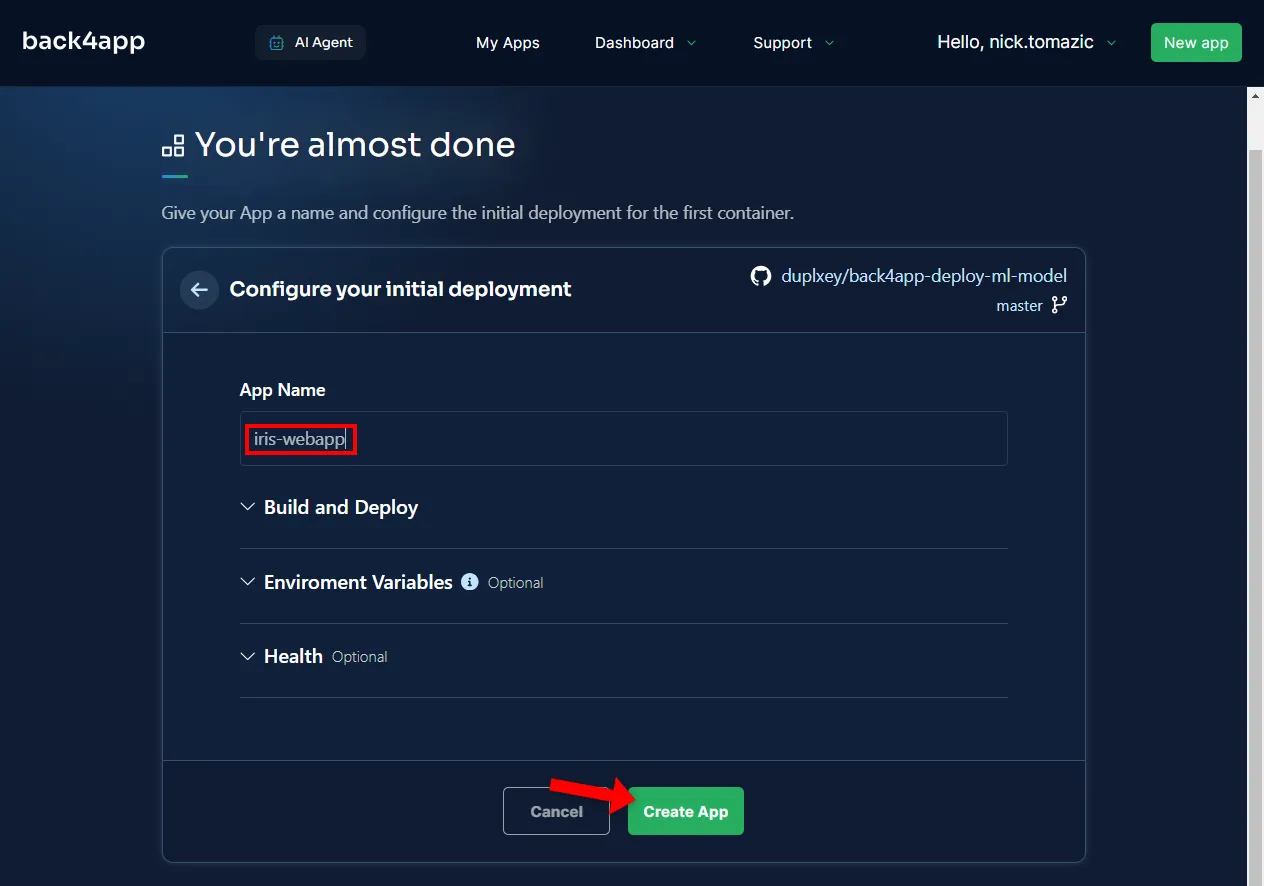
Configuring the environment is unnecessary other than providing a descriptive application name.
Then click “Create”.
Back4app is going to need a few minutes to build the image, push it to the container registry, and spin up a container. Once the deployment has completed, your app’s status should change to “Ready”.
To visit your app, click the URL as indicated in the image below.
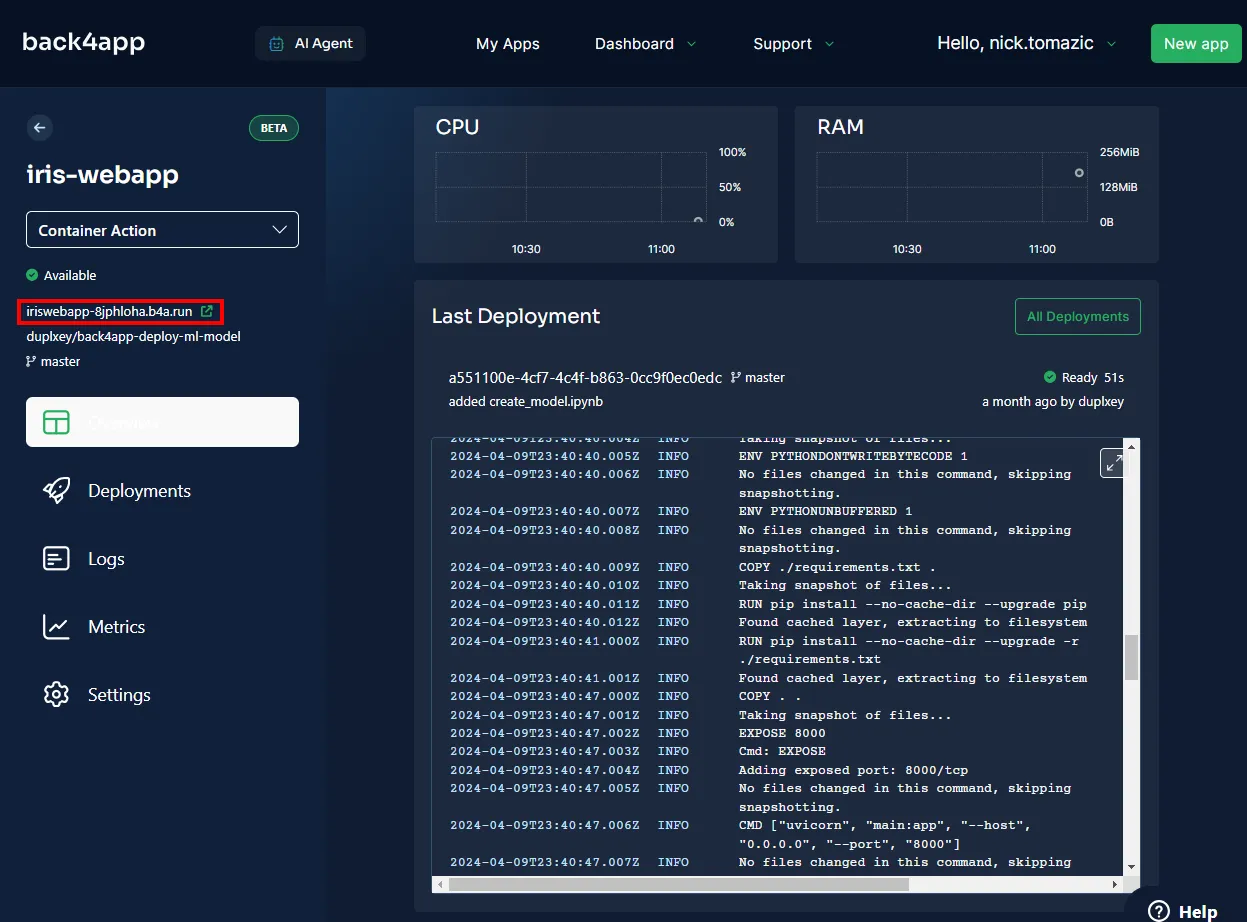
Great, you’ve successfully deployed a machine learning model to Back4app Containers. The web app should work the same way as it did locally. Ensure to test the app once again.
Summary
In this article, you’ve learned the basics of machine learning, its applications, and how to deploy a machine learning model.
You should now be able to create your own simple models, serve them with FastAPI and deploy them to Back4app Containers.
Grab the final source code from back4app-deploy-ml-model GitHub repo.

