Monthly Archives

27 Articles

Running Node.JS Applications in Azure

Are you looking to deploy a Node JS application in Azure? Here is an in-depth tutorial detailing how to build a sample Node JS app, sign in to Visual Studio, deploy to Microsoft Azure App Service, and deploy changes.

What is Node.js?

Node.js is an open source server-side JavaScript runtime environment. Node.js allows you to run JavaScript applications and code outside of a browser, as part of a back-end server.

Node.js is based on a JavaScript engine called V8 that supports many browsers such as Google Chrome, Opera and Microsoft Edge.

It also includes many V8 optimizations that can help you run server-side applications. For example, Node.js adds a Buffer class that allows V8 to handle file uploads on the local file system. This feature makes Node.js suitable for web server-like deployments.

Developing server-side applications with JavaScript lets you create powerful, modular applications. Developing with Node.js has several advantages compared to traditional web languages like PHP:

  • Ability to share logic such as form validation rules between the browser and the server.
  • Native support for JavaScript Object Notation (JSON) data exchange format, which is used by many NoSQL database technologies and many other components in a modern web stack.

What is Azure App Service?

Azure App Service is an HTTP-based service for hosting web applications, REST APIs, and mobile backends. It supports Node.js and other popular web frameworks. It lets you run and scale applications in both Windows- and Linux-based environments.

Azure App Service provides the following key capabilities:

Continuous Integration/Delivery Support

Azure portal provides out-of-the-box continuous integration and deployment via Azure DevOps, GitHub, Bitbucket, FTP, or a local Git repository on your development machine.

You can connect your web application to one of the above sources and App Service will automatically synchronize your code and any code changes to your cloud-based web application.

Built-in Auto Scaling Support

Azure App Service automatically supports Azure auto scaling. It can scale applications vertically (within the same machine) or horizontally (across multiple machines).

You can elastically scale the resources available to the web application, including the number of cores and the amount of RAM available.

Azure App Service Plans

When you use Azure App Service, applications run within an App Service plan, which defines the compute resources it has available and other features such as automation and auto scaling. 

You can configure one or more apps to run on the same compute resource (meaning they share the same App Service plan).

Running multiple applications in the same App Service plan can conserve costs, but gives you less control over resource allocation to each application. 

Azure App Service Cost

You can change the App Service plan of your application at any time. For example, you can decide to move an app to a higher service plan if it needs more resources or improved management features. Use an Azure cost calculator to estimate the total cost of all resources for an application deployment.

Quick Tutorial: Running Node.js Applications in Azure

Prerequisites

Before starting to build a Node.js application in Azure, set up the following:

  • Create a free Azure account and ensure you have at least one active subscription.
  • Install Node.js and npm on your local machine. Verify Node.js is installed by running node –version
  • Install Visual Studio Code with the Azure App Service extension.

Step 1: Create Your Node.js Application

We’ll start by running a simple Node.js application on your local machine:

  1. Create a Node.js application using Express Generator, which comes with Node.js by default:

npx express-generator myExpressApp –view ejs

  1. Change to the directory of the new Express application and install the required NPM packages:

cd myExpressApp && npm install

  1. Start the Node.js server with debug logging:

DEBUG=myexpressapp:* npm start

Navigate to http://localhost:3000. You should see the Express app home screen.

Step 2: Sign Into Visual Studio Code

We’ll need to sign into Visual Studio Code with our Azure credentials to deploy the application:

  1. In the terminal, ensure you’re in the myExpressApp directory, then start Visual Studio Code with the following command:

code .

  1. When Visual Studio Code starts, find the Activity Bar and click the Azure logo.
  2. Expand App Service and click Sign in to Azure…
deploy a Node JS application in Azure

Image Source: Azure

  1. Provide your Azure credentials.

Step 3: Deploy Code to Azure Using Azure App Service

We’ll deploy the application using Azure App Service:

  1. In the App Service explorer, click Deploy to Web App.
deploy a Node JS application in Azure

Image Source: Azure

  1. Select the myExpressApp folder and click Create new Web App. This creates a web application entity in Azure App Service. By default, the app is created in a Linux container.
  2. Type a unique name for the web app.
  3. Select the Node.js version you want to run from the Select a runtime stack drop down.
  4. Under Select a pricing tier, choose Free (F1)
  5. Wait for resources to be provisioned.
  6. A popup appears with the message: Always deploy the workspace “myExpressApp” to <app-name>”? Select Yes to tell Visual Studio Code to always deploy this application to the same App Sevice app.
  7.  When the app finishes deploying, another popup should appear. Click Browse Website, and a browser opens showing the Express app homepage.

Step 4: Deploy Changes

The nice thing about Azure App Service is that it lets you automatically deploy changes to your web applications. Let’s give it a try:

  1. In the application folder on your local machine, edit the file views/index.ejs in a text editor. Find this line:

<p>Welcome to <%= title %></p>

  1. And change it to a unique phrase like:

<p>Welcome to my Node app!</p>

  1. Go back to Visual Studio Code. In the App Service explorer, click the Deploy to Web App icon and click Deploy to confirm.
  2. Wait for the popup notifying that deployment is complete and click Browse Website. You will see the new message in the Express app homepage: “Welcome to my Node app!”

Conclusion

In this article, I explained the basics of Azure App Service and showed how to deploy a Node JS application to the cloud in 4 steps:

  1. Create a sample Node.js application
  2. Sign Into Visual Studio Code with your Azure credentials
  3. Deploy your code to Azure using Azure App Service
  4. Deploy a change and see how it is automatically updated in the cloud

I hope this will be useful as you discover new and innovative deployment options for your Node.js projects.

FAQ

What is Node JS?

Node.js is an open source server-side JavaScript runtime environment.

What is Azure App Service?

Azure App Service is an HTTP-based service for hosting web applications, REST APIs, and mobile backends.

How to run a Node JS application in Azure?

– Create a sample Node.js application
– Sign Into Visual Studio Code with your Azure credentials
– Deploy your code to Azure using Azure App Service
– Deploy a change and see how it is automatically updated in the cloud


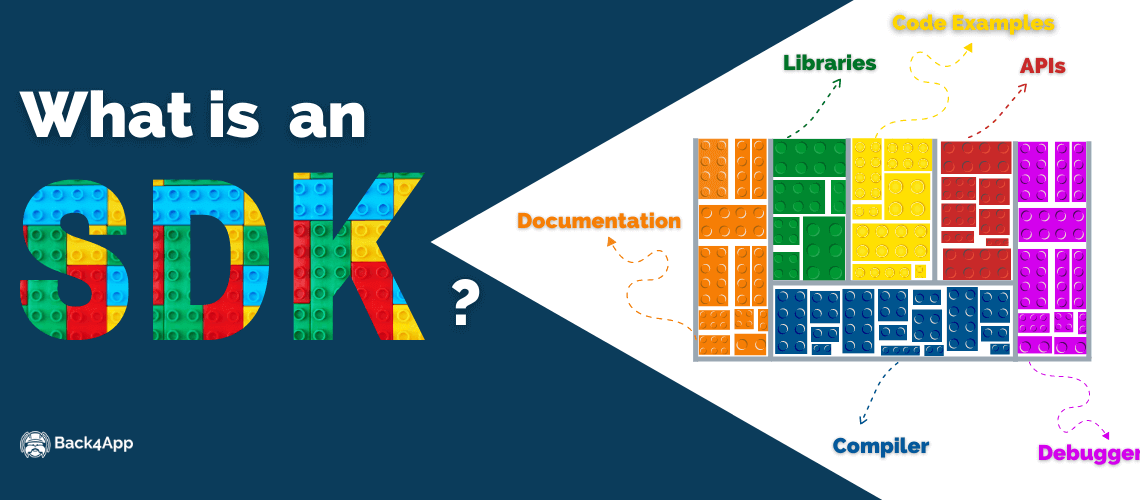
What is an SDK – Software Development Kit?

What is an SDK – Software Development Kit?
What is an SDK?

Are you looking for the meaning of the term SDK? Here is an in-depth analysis of what is an SDK, the advantages of using it for software development, use cases, and examples of how to implement it.

Key Takeaways

  • SDK is a building block to creating an application;
  • An SDK helps developers to accelerate software development;
  • It usually provides code examples, APIs, libraries, etc;
  • SDKs are available for mobile and web applications;
  • SDK is not an API. These are two different concepts.

The 11 Best App Development Ideas For Beginners

Technology has come up with massive development in the industry. We have seen applications for all types of brands, like food delivery apps, fitness apps, social apps, entertainment apps, and many more.

Apps always support business growth as it helps you to connect with your customers easily. You can offer discounts through apps and many freebies for your buyers. It is an opportunity to provide your customers with an interface through which you can achieve your business goals and deliver your message.

But it might not be easy for you to work on app development. Beginners or non-technical users cannot easily work on it. Even developers face tremendous challenges while creating an application.

It requires a lot of technical knowledge and coding. Hence, you definitely need proper guidance regarding it.

This guide is really helpful for every individual who is looking for the best app development ideas and solutions. You can learn from the steps and start building your career in application development. 

How To Make An App: Cost And Time It Requires

Making an app is difficult, but a lot of hard work is required if you have chosen to develop an app. An effort in the right direction and a clear guide can help you to learn how to make an app.

But before digging into the steps you should follow for creating an app, you should go through the answers to the questions in your mind. Individuals who are opting for app development as a career or entrepreneurs looking to develop an app for their business have similar questions.

Let’s first answer the queries to get better and more comprehensive knowledge that will help you understand this guide.

Q1 – What is the best way to build an app?

Building an app is not easy. You have to first decide about your budget, understand your needs, and get to know the type of app you are looking for, the industry you are going to target, and many other factors. 

Back4App is one of the great platforms that allow you to create an app for Android and IOS. It is one of the most reasonable apps and is perfect for non-technical users and beginners. 

Q2 – How long does it take to build an app?

There is no fixed time for building an app. It completely depends on the type of app you are trying to create, its features, and the method you have chosen for the development of the application.

Some of the apps may take a few months to build, but some of the apps take a lot of time, like years, to complete. Six to twelve months is the maximum time it would take to create an application for your business.

Q3 – How much cost is required to build an app?

Building an app can be the cheapest as well as expensive. The rate starts from $2000 to $20,000 and $200,000 or up to $2 million. 

The cost of the app is based on different factors like the type of app you are building, the features you are implementing, the method of development, the platform you choose, and the codebases.

By keeping all this work in mind, the developer will take out the rate and then start creating the app. Also, keep in mind that raising the features, functions, and complexity can increase the rate of your app. 

Q4 – Building an app on iOS or Android?

IOS and Android are both different platforms with different applications. There is a huge difference in the source code of both operating systems.

So, trying building applications on both phones gives you a different experience. This is how you can create two apps at one time with different methods, styles, and experiences, or you can go for a cross-platform app if you would like to create an app for both platforms.

For building an app, Back4App is the perfect platform that allows you to create an app for both IOS and Android. You can create an app without getting into too much coding, and you can launch your app on both platforms.

Steps To Create App In These Few Steps

You might find many ideas for creating apps, of which some of the important ones are listed below. Learn from these steps and see how effectively you can build an app with a fantastic experience on your IOS or Android. 

1.   Identify Your Goals

Before starting any work, it is compulsory to do homework. That means you should be aware of the goals you want to achieve through your mobile application. These goals will help you in your entire process. It is important to paper down your goals and makes a plan of the features and interface of your application. Once you know what your goals are and what you have to achieve, you can easily create a pathway to your app.

To reach your final goal, you need to first divide it into simpler objectives. These objectives will help you to reach your decided goals. You need to work on the smart objectives.

  • Specific
  • Measurable
  • Achievable
  • Realistic 
  • Timely

Also, work on the defined goals so that you know what your purpose is and how you are going to work on it. Again, be clear about what you are looking for and what your motive is. 

2.   Do Market Research 

Once you are done with your goal, then you need to do market research about who is going to work on the goals. While discussing ideas, all seems good and attractive, but you will know the result once you proceed with it.

Without market research, all your hard work, efforts, time, and money will be wasted. So make a list that you have to work on. 

  • Create surveys for the market
  • Conduct interviews
  • Run group that people mostly approach
  • Do research on your competitors

Most importantly, learn how to create an app that improves customer experience.

3.   Set Your App Features

Focusing on your app feature is important. Many people add extra features to their apps, and it may cost them a lot. If you don’t need any feature, then no need to keep it with your application. There are many app features that are important and can improve the user experience and engagement.

  • Push on notifications
  • Community wall 
  • System for menu ordering
  • Booking capabilities
  • GPS
  • Calendars
  • Video image and audio hubs
  • Surveys and questionnaires

Select the feature that you think is important for you considering your goals and your app type. You will definitely get success if you can rightfully analyze the needed features.

4.   Make A Wireframe

Basically, a wireframe is a rough layout of the app for your mobile phone. You can just create it on your board or paper to recognize what you have made and how you can proceed with it.

If you find a bad structure on the wireframe, then you don’t have to worry. Because it is only a rough draft that will let you know what your app will look like. This idea will let you know if your team is on the same page or not and see if your app will work or function effectively or not.

5.   What Is Your Development Method 

Building an app requires different methods, but it is important for you to see what the best approach for you to choose is.

Selecting the right method should be based on your budget, level of your skills, app type, and time to market it. There are different development methods available for mobile apps from which you can choose the most suitable one.

Some of the most popular methods for developing an app are as follows.

  • Agile
  • Waterfall
  • Kanban
  • Scrum

Select any of the four app development methods. Agile is my personal favorite.

6.   Work On Existing Solutions

If you are new to app development and want to know whether you are on the right track or not, you have to start working on existing solutions.

This is one of the great approaches you can go with. At times when you are working on your goal and face any doubt regarding your strategy, then see if the solution you are searching for is available in the market or not. 

Of course, every app needs functionality and to figure out the solutions. You can check infrastructure, hosting, design, analytics, and notifications. You can buy pre-built things before building them from scratch. 

While conducting research for app development of Dissertation Assistance UK, Mrs. Elsa Chris – App Development Head, concluded,

“It is great to leave the difficult process and build only what you need from scratch. Save your time and money, and get your app ready fast. The smart decision is to use built-in features which will save a lot of your time.”

7.   Technical Specifications 

In this stage, you have to bring your wireframes where you have created a rough draft. As you have already done the homework, then it will be easy for you to deal with technical specifications.

The best thing about the technical specification is that it helps in finding out alternative ways to achieve your goals associated with your application. And these alternatives can save your time and money.

You might have heard that user experience is really a must for shaving off the costs and efficiency in work, but the technical specification is still really important for the development of an app.

8.   Work On Measurable Milestones 

Another important idea of app development is to be on track. Working on measurable milestones helps you and your team to track your efforts during the app-making process.

Sometimes working on one big project is better than a lot of small projects. Because many projects require different outlines and you have to start it from the beginning. It may cost a lot and take more time.

For better results, you can implement a project management system for your software developers. And for this, Scrum and Agile development will be effective choices. No matter whatever your decision is and which process you have chosen, tracking your progress will speed up your development.

9.   Create MVP

Whenever you start building an app, it is important to create MVP – a minimum viable product. It helps you to think about your app’s most crucial features. You can say that building an MVP is something very essential for you as a developer.

Of course, you won’t bear any distraction with your app. So, you have to work very consciously when it comes to building an app.

See what function your app actually needs, and then start using it via MVP. Stay away from things that are not necessary as it will waste a lot of time. 

10.   Work On Quality Assurance

Once you are done with MVP and your app is ready to work, it is essential to conduct quality assurance before deployment. The app can be checked on mobile phones, laptops, iPad, or any technology you want. You have to make sure that the app is working both online and offline. 

According to the statement by the research paper writing service

“Developers can pay the experienced app developer to check whether the application is properly created or not. No matter if you are a first-time builder, having a second option will be good to proceed with.”

11.   Deploy 

Finally, it’s time to get your app live and make it available for the actual users of this app. Now it’s your responsibility to check all the important things.

Make sure all the functions are working properly. If you want to market your app, then submit it to app stores. But obviously, it is not easy. You have to read the guidelines to submit your app on the Apple App Store or Android Play Store. 

Conclusion

Building an app is quite challenging for both those who are beginners and those who have tried it multiple times. Educating yourself and learning from the blogs will always be beneficial. Always take advantage of new technology and see how it is working for your growth. 

Here, you will not only find app development ideas, but you will also see how to create an app saving a lot of money within a reasonable time. Keep the steps mentioned above in your mind and make an amazing app for your users to grow well and efficiently.

Author Bio

Claudia Jeffrey is currently working as an Editor at Crowd Writer, where she helps understudies with their academic and professional careers. She is a single mother and loves to travel and explore new places. In her leisure time, you will find her trying new recipes.


Top 10 Svelte Alternatives

This article will explore ten of the best Svelte alternatives. The list includes React, Vue, Elm, Angular, jQuery, etc.

If you are familiar with JavaScript, you may be familiar with Svelte. However, if you are not, let us tell you.

Svelte is a JavaScript-based tool that allows developers to create heavy web applications and UI components.

This JavaScript-based framework uses Typescript and is widely used by developers to build single components for projects.

The main benefit of using Svelte over other JavaScript frameworks, such as React and Vue, is that they do not require runtime overhead.

With Svelte, developers can outline the main framework of their entire application to an existing codebase.

All this makes the app development process easy and saves time. The framework also has numerous small packages that come in handy when developing JavaScript-based apps.

With such versatility and functions, people search for every detail about Svelte. Therefore, today we will discuss it more. 


The Best Five Free Mobile Backend Services

This article will discuss five of the best free mobile backend services, features, and pricing model.

The use of smartphones is increasing. A recent survey report by Statista claims there are 6.5 billion active mobile phone subscribers globally.

The figure will cross 7.6 billion by 2027. So, with this increased usage and demand for mobile phones, the ratio of mobile backend services is also growing.

If we look at the need for Mobile Backend as a Service (MBaaS) solutions, it is also amplifying. Indeed, the cloud MBaaS market will expand up to 5.9 billion USD by 2025, according to a global forecast of MarketsAndMarkets.

Its value was only 2 billion USD in 2020. Although it proves that mobile backend services are significant, but their selection is still a mind-boggling task.

Withal, this guide presents one of the best free mobile app backend services to sort out this problem for mobile backend developers and businesses.


What is PlayFab?

What is PlayFab?
What is PlayFab

Microsoft Azure PlayFab is an ideal server-side platform that many gaming developers use or think of utilizing.

However, if you have also heard about the magical and cost-efficient backend development features of PlayFab but are not aware of all of its aspects in depth. Then you should consider this complete guide about PlayFab, where we are unlocking all of its secrets.

Indeed, this guide presents all of the core features, pricing advantages and alternatives of PlayFab in detail. Moreover, this article will also share the pricing model of PlayFab with developers and gaming businesses.


Xano vs Firebase

This article will explore the differences and similarities between Xano vs Firebase. Xano and Firebase are two of those most amazing platforms, and here we will be comparing them side by side.

In this era of the internet and technology, every business needs an application. However, it is not that easily possible for every business to develop its application.

It is just inefficient for small and medium-sized businesses to build everything from scrap and hire a team of professionals to manage things. To solve this major global problem, many platforms provide application development services.

Stick till the end of this article if you are also having confusion about selecting one of them. By the end of the article, you will know which one brings better value for you.


Top 10 No-Code Backends

This article will explore ten of the best No-Code backends available on the market. The list includes Back4App, Firebase, Xano, Heroku, Airtable, etc.

In recent years, where programming has revolutionized the world, such as industries and household applications, numerous people are now taking the initiative to learn to code. 

However, what about the people that are not made for coding or have minimum interest in it. But still, want to dive deep into the fascinating world of website and mobile development? Luckily for them, there is a solution known as No-Code. 

No Code backends, as the name highlights, refers to those platforms that provide you with numerous visual tools, such as drag and drop tools, ready to use tables, etc.

Using these tools, developers can create stunning and highly efficient backend processes without stressing over hundred lines of code they have to write each time something at the front requires addition. 

Graphical interfaces and many other functionalities, a backend development team can increase their productivity, save time, and focus on other vital aspects, such as the application’s loading speed, UI, etc. 


Top 10 Ember JS Alternatives

This article will cover ten of the best Ember JS Alternatives. The list includes Express JS, Angular JS, Backbone JS, Vue JS, etc.

Initially released in 2011, Ember is now a decade old and has been around for more time than Vue, React, Svelte, and all the other frontend JavaScript frontend frameworks.

While it has hardly been the household name in frontend JavaScript development, it has silently helped several teams ship steadily and sustainably since its release.

Several techniques introduced in Ember and Angular are now widely adopted and accepted as frontend development grows in popularity.

Over the years, however, libraries like React and Vue have taken the core concepts of Ember and improved upon them, becoming more popular as a result.

Ember has been quietly productive, but more organizations are gravitating towards Ember alternatives that are less opinionated and provide other benefits like component reuse, better testing, etc.

In the following post, we take a look at some of the best features of Ember JS and the pros and cons of using this framework in various projects.

Following that, we present a list of the top Ember JS alternatives that can be used in other scenarios. If you are a developer wondering about deploying a JavaScript framework for your upcoming project, the following list should help you make an informed decision about the same.

Keep reading to discover some of the best Ember JS competitors.