The Ultimate Guide to Deploy Docker Apps
Docker has revolutionized the way software is developed, tested, and deployed. It eliminated many of the common problems of software deployment such as compatibility issues and environmental differences between development and production environments.
In this article, we’ll explore the process of deploying a Docker container to a production environment. We’ll talk about containers, Docker, the benefits of using Docker, and its deployment options. Lastly, we’ll demonstrate how to build, dockerize and deploy a Next.js app to Back4app Containers — for absolutely free!
Contents
- 1 What are Containers?
- 2 What is Docker?
- 3 Benefits of using Docker
- 4 Docker and Local Development
- 5 Docker Deployment Options
- 6 Deploy a Docker container to Back4app Containers
- 7 Conclusion
- 8 FAQ
- 9 What is Docker?
- 10 What are the benefits of using Docker?
- 11 What are the deployment options for Docker?
- 12 How to deploy a Docker container to Back4app Containers?
What are Containers?
A container is a standalone executable package that includes everything needed to run an application. That is code, runtime, libraries, environment variables, and config files. The great thing about containers is that they can be deployed anywhere, and are small in size, fast, and efficient.
Benefits of using Containers
Using containers can greatly benefit your business. It can help developers as well as the IT operations team. Some of the benefits of using Docker are:
- Portability: containers can be deployed anywhere!
- Application isolation: containers isolate the app and its dependencies from the host system.
- Separation of responsibility: work is divided between developers and the IT operations team.
- Faster application development: no need to fiddle with local dev environments, CI/CD.
- Easy scaling: containers can easily scale in combination with orchestration software.
For more information on containers take a look at What are Containers in cloud computing?
Containers vs. Virtual Machines
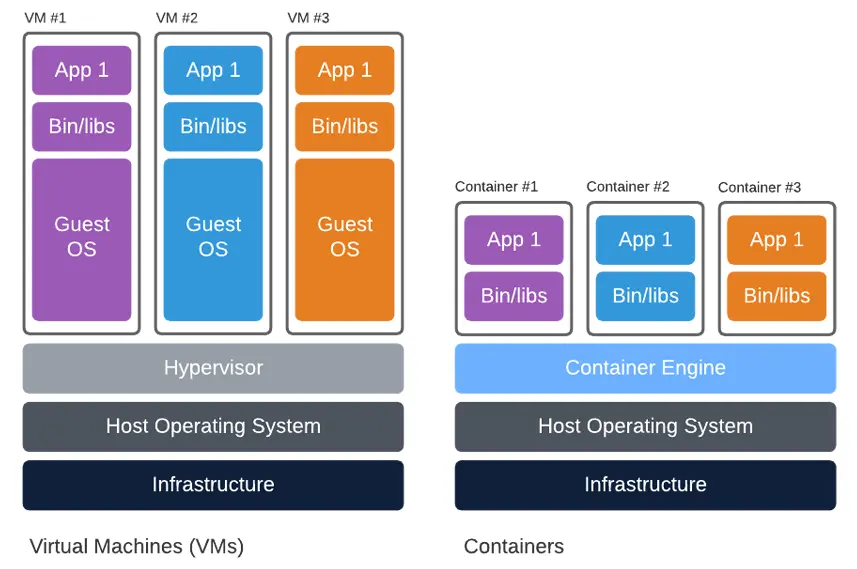
Virtual machines (VMs) are an abstraction of physical hardware, while containers are virtualized on the operating system level. VMs offer greater isolation and security, while containers don’t take up much space, and are more efficient and scalable.
It is possible to combine containers and VMs to get the best of both.
What is Docker?
Docker is a Linux-based open-source tool that allows developers to create, deploy and run applications in lightweight containers. It gives you all the great perks of containerization technology and allows you to code, ship, and deploy your software faster than ever!
It is a stable and battle-tested technology that got released in 2013. Since then it has been adopted by a lot of big companies including Google, AWS, and Microsoft. It is backed by a huge community of developers, which means that you can easily find help if you ever get stuck.
Docker isn’t the only containerization tool on the market, but it is the most popular one. Some of the great alternatives include Podman, LXD, containerd, and Buildah.
Benefits of using Docker
In addition to all the benefits of containerization technology, Docker comes with several other benefits. Let’s look at them.
Lightweight
With its lightweight and speedy nature, Docker offers a practical and budget-friendly substitute for virtual machines. Docker is appropriate for high-density environments and for small and medium deployments where you need to do more with fewer resources.
Version Control
Docker allows for the versioning of applications, making it easy to roll back to a previous version if necessary. This can help to reduce downtime and minimize the impact of issues related to updates or changes to an application.
Improved Collaboration
Docker Hub is a cloud-based repository for storing, sharing, and managing Docker images and there is no need to create a Docker image from scratch. It provides a central location for discovering and sharing popular Docker images, including those created by the Docker community and official images from software vendors. It is closely integrated with Docker CLI and Docker Desktop.
Scalability
Docker provides a scalable architecture that can be used to deploy applications to large-scale distributed systems, such as clusters or cloud platforms. Docker’s ability to handle large numbers of containers and orchestrate them through tools like Docker Swarm or Kubernetes allows for easy scaling up or down based on demand.
Docker and Local Development
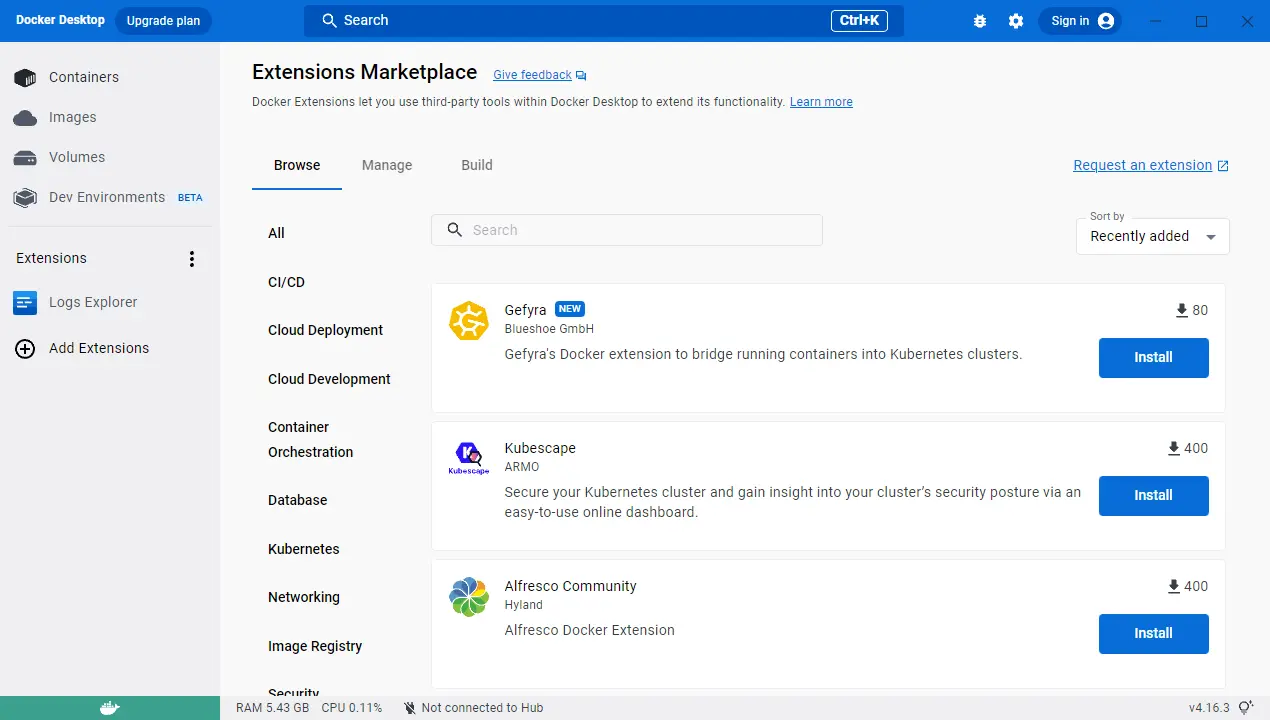
The easiest way to get Docker up and running on your local machine is by installing Docker Desktop. Docker Desktop is an application that provides an easy-to-use GUI and tools required to build, test, and deploy containerized applications on your local machine. It allows you to manage containers, images, and volumes. It has a built-in Docker Engine, Docker CLI, and Docker Compose.
Additionally, it allows you to use Docker Extensions which can help you automate your workflows and tasks. Docker Desktop makes it easy for you to collaborate with other developers and has great built-in Docker Hub support.
Docker Desktop is available on Windows, Mac as well as Linux.
Docker Deployment Options
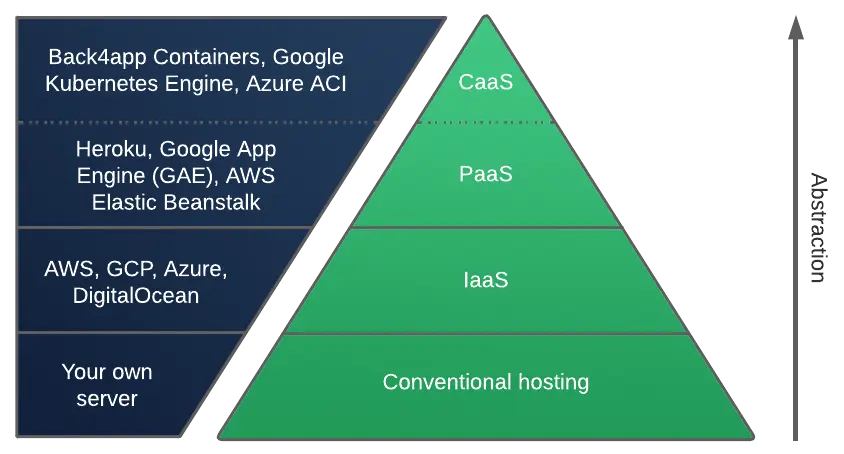
Developing an application with Docker is easy and containers can be deployed to various platforms. We can generally split them into the following groups:
- Conventional hosting
- Infrastructure as a Service (IaaS)
- Platform as a Service (PaaS)
- Container as a Service (CaaS)
Based on their abstraction we can visualize them in a pyramid chart like so:
Let’s analyze each one of them.
Docker and Conventional Hosting
As you might’ve guessed Docker containers can be easily deployed to your own server. To get Docker up and running on your server you’ll have to:
- Install the Docker Engine.
- Build the Docker images (locally) or pull them from a container registry.
- Use the images to spin up containers.
- Set up networking, volumes, firewall et cetera.
If you wish to simplify the deployment process even further you can use Docker Compose. Docker Compose allows you to declare services, networks, and volumes in a single file. Additionally, it is great for multi-container Docker applications.
Docker on IaaS
Infrastructure as a Service (IaaS) is a cloud computing service model that provides computing resources like servers, networking, operating systems, and storage in a virtualized environment. These cloud servers are typically provided to the organization through high-level APIs or advanced dashboards giving the clients complete control over the entire infrastructure.
Docker on IaaS isn’t much different from using your own server. If you opt for this approach you’ll have to follow similar steps as with conventional hosting.
Some of the IaaS providers include AWS, GCP, Azure.
Docker on PaaS
Platform as a Service (PaaS) is a cloud computing service model that provides users with a cloud environment in which they can develop, manage and deliver applications. In addition to providing computer resources, PaaS comes with a lot of prebuilt tools for developing, customizing, and testing applications. Most of the PaaS vendors allow you to get your app up and running in a few clicks!
PaaS platforms that support Docker simplify the deployment process even further. PaaS vendors usually provide great tools that allow you to deploy your Docker application without a hassle.
To learn more about PaaS check out What is PaaS – Platform as a Service?
Docker on CaaS
Container as a Service (CaaS) is a type of Platform as a Service (PaaS) that specifically provides a platform for running and managing containerized applications. It is designed to make it easy to run, manage, and scale Docker containers and microservices in the cloud.
CaaS is the easiest option to use since it’s specialized for containers, and abstracts away the underlying infrastructure, freeing developers from having to manage the underlying servers and networks. Additional features that most CaaS providers include are scaling, load balancing, automatic failover, zero-time deployments, and so on!
Examples of CaaS include Back4app Containers, AWS ECS, Azure ACI and Google GKE.
To learn more about CaaS check out What is CaaS – Container as a Service?
Deploy a Docker container to Back4app Containers
In this section of the article, we’ll code, dockerize and deploy a simple Next.js application to Back4app Containers.
What is Back4app Containers?
Back4app Containers is a free open-source platform for deploying and scaling apps on globally distributed containers. It allows you to focus on your software and ship it faster without needing to worry about DevOps. The platform is closely integrated with GitHub, has a built-in CI/CD system, and allows you to get your app up and running in minutes!
Why use Back4app Containers?
- Integrates well with GitHub
- Zero-downtime deployments
- Easy to use & has a free tier
- Excellent customer support
Project Introduction
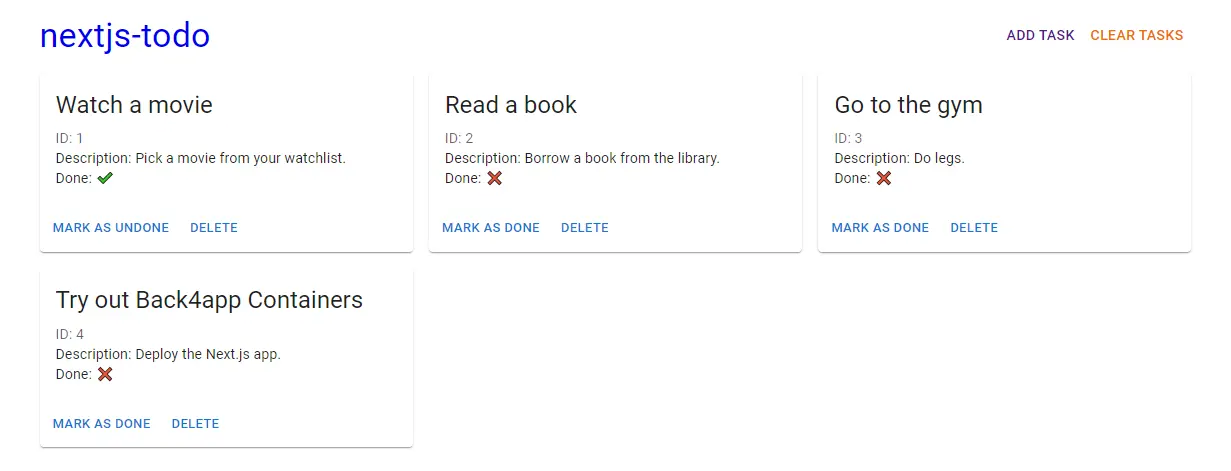
We’ll build a simple TODO web application with persistent storage. The app will allow users to add, remove, and mark tasks as done. We’ll build it with Next.js, React and Zustand for state management and state persistance. Lastly, we’ll dockerize the app and deploy it to Back4app Containers.
The final product is going to look like this:
Prerequisites:
- Experience with JavaScript ES6
- Basic understanding of React and Next.js
- Ability to use Git and GitHub
Code App
Project Initialization
Let’s start by creating a new Next.js project.
The easiest way to bootstrap a Next.js project is by using the create-next-app utility. Open your terminal and run the following command:
$ npx create-next-app@latest

√ What is your project named? ... nextjs-todo
√ Would you like to use TypeScript with this project? ... No
√ Would you like to use ESLint with this project? ... Yes
√ Would you like to use `src/` directory with this project? ... No
√ Would you like to use experimental `app/` directory with this project? ... No
√ What import alias would you like configured? ... @/*

Success! Created a new Next.js app in C:\Users\Nik\WebstormProjects\nextjs-todo.
Next, run the server:
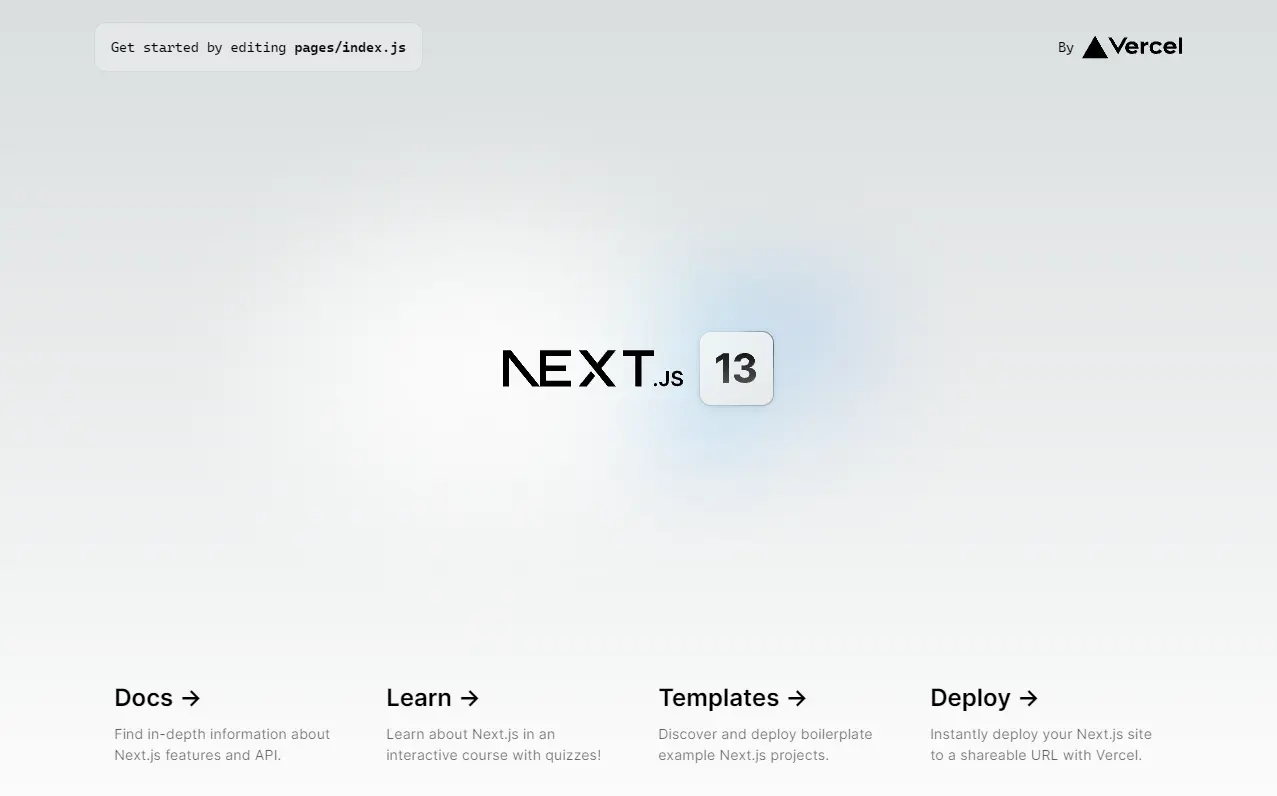
$ npm run devNavigate to http://localhost:3000 and you should see the default Next.js landing page.
Material UI
We can make the UI building process easier with Material UI – a React component library that follows Google’s Material Design. This library provides a varied selection of ready-to-use components, making it simple and efficient to create user interfaces.
Feel free to swap Material UI for a different UI framework like React Bootstrap or Ant Design.
To add Material UI to your project run:
$ npm install @mui/material @emotion/react @emotion/styledMaterial UI uses Roboto font by default. Let’s install it with:
$ npm install @fontsource/robotoNext, navigate to _app.js and add the following imports at the top of the file:
User Interface
Our web application will have the following two pages:
/will display the task list/addwill allow users to add a new task
Let’s start with the index page.
To make our code more organized create a new directory in the project root named components. Within that directory create a new file named Task.js with the following contents:
Next, utilize the newly created component in index.js to display the tasks:
- We used React
useState()hook to create state for tasks. - We populated the
tasksarray with some dummy data. - We used MUI components and the
Taskcomponent to display the tasks (or a message if there aren’t any tasks yet).
Run the development server:
$ npm run devNavigate to http://localhost:3000 and you should see the task list:

Moving along let’s create a page for adding tasks.
Go ahead and create a new file named add.js within the pages directory:
This code displays a simple form that allows users to add new tasks.
Restart the server and navigate to /add or click the “Add task” button at the top right of the screen. You should see something like this:

Great, our UI is now complete. In the next step, we’ll implement the actual logic and state.
State Management
To handle global state we’ll use Zustand — a small, fast, and scalable state management library for React applications.
Start off by installing it via npm:
$ npm install zustandNext, we have to create a store.
To make our code more organized let’s create a dedicated folder named store for the global state. Within that folder create a file named storage.js with the following contents:
- Zustand
create()creates the store. - To save the state to
localStoragewe used thepersist()middleware. tasksis an array containing the user’s tasks.addTask,deleteTask,markTaskAsDoneare methods for manipulating thetasksarray.
The last thing we have to do is to go through all the pages and components that require the global state and bind them.
Start by navigating to index.js and changing it like so:
Don’t forget to add the import at the top of the file:
import useGlobalStore from "@/store/storage";Next, navigate to components/Task.js and change it like so:
Lastly, navigate to pages/add.js and make handleSubmit() submit the task:
Again, don’t forget about the import:
import useGlobalStore from "@/store/storage";Great, our web app now uses Zustand to handle global storage and persists it via localStorage. Feel free to rerun the app and make sure everything works.
Dockerize App
The following steps will require you to have Docker installed. The easiest way to install Docker is by downloading Docker Desktop.
Verify you have Docker running:
$ docker --version

Docker version 20.10.22, build 3a2c30b
Configure Next.js
First, go to your next.config.js and set the output to "standalone" like so:
Changing this setting will create a standalone version of our Next.js app with the next build. A standalone app can be deployed without installing node_modules. The standalone build also comes with a built-in web server.
Dockerfile
To dockerize our application we’ll use a Dockerfile. A Dockerfile is a plain text file that allows us to define the base image, environment, environmental variables, commands, networking settings, volumes, and so on.
Create a Dockerfile in your project root with the following contents:
This Dockerfile takes advantage of multi-stage builds. Multi-stage builds allow us to greatly reduce image size and build our images faster. We created the following three stages:
- The
dependenciesstage copies over the dependency file and installs the dependencies. - The
builderstage copies over the dependencies and builds the project vianpm. - The
runnerstage copies the standalone build and serves it via the standalone server.
Lastly, we exposed a port that Back4app Containers is going to use to map the app.
For more information on using Docker with Next.js take a look at the with-docker repository.
.dockerignore
Before Docker builds an image it looks for a .dockerignore file. A .dockerignore file allows us to define which files we don’t want to be included in the image. This can greatly reduce the image size. It works similarly to a .gitignore file.
Create a .dockerignore file in the project root with the following contents:
Make sure to add any additional directories or files you’d like to exclude.
Build and run the image
Moving along, let’s build and tag our Docker image:
$ docker build -t nextjs-todo:1.0 .If you list your images you should see the new image:
$ docker images

REPOSITORY        TAG       IMAGE ID       CREATED       SIZE
nextjs-todo       1.0       7bce66230eb1   2 hours ago   160MB
Lastly, use the image to spin up a new Docker container:
$ docker run -it -p 3000:3000 -d nextjs-todo:1.0

> [email protected] dev
> next dev

ready - started server on 0.0.0.0:3000, url: http://localhost:3000
You can use
-dto start the Docker container in detached mode. Meaning that the container runs in the background of your terminal and doesn’t receive input or display output.
Well done, your app is now running in a container! Navigate to http://localhost:3000 and you should see your TODO app.
GitHub
To deploy the app to Back4app Containers you’ll have to upload your source code to a GitHub repository. Go ahead and create a new repository on GitHub, add the remote, add .gitignore, and commit your code. Once your code is on GitHub move to the next step.
If you’d just like to test out Back4app Containers feel free to fork the back4app-containers-nextjs repo and deploy that instead.
Deploy Your App to Back4app Containers
The following steps will require you to have a Back4app account. If you already have it log in otherwise go ahead and sign up for the free account.
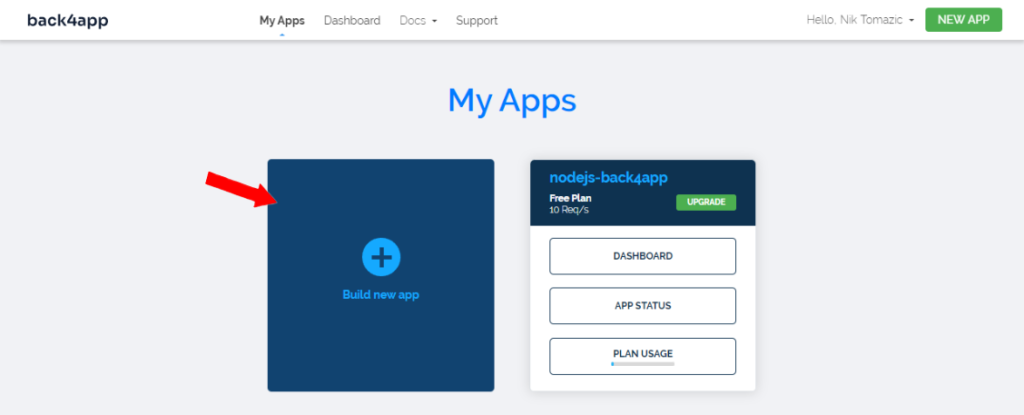
To work with Back4app we first need to create an app. As you log in to your dashboard you’ll see the list of your apps. Click on “Build a new app” to create a new app.
Next, select “Containers as a Service”.
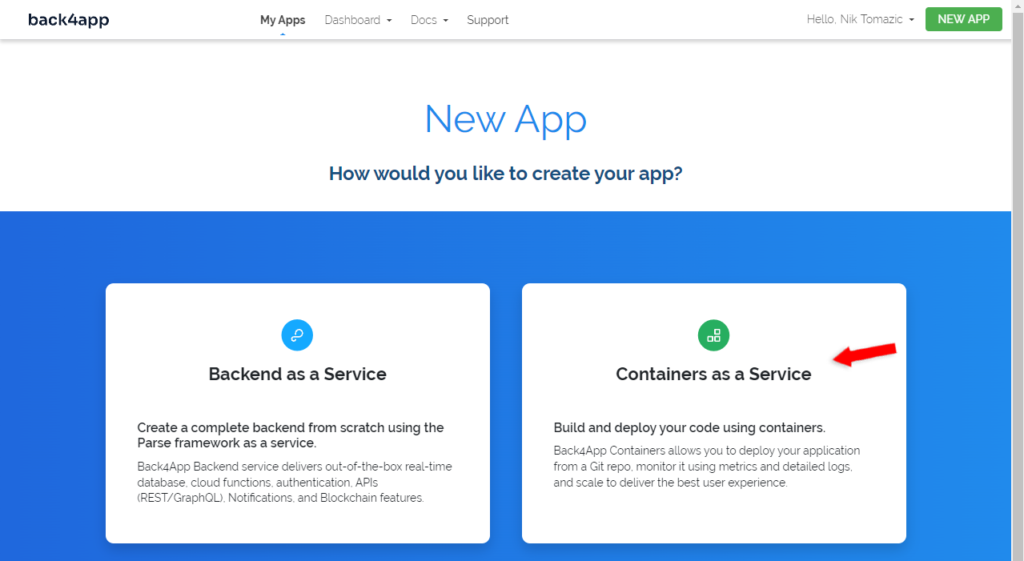
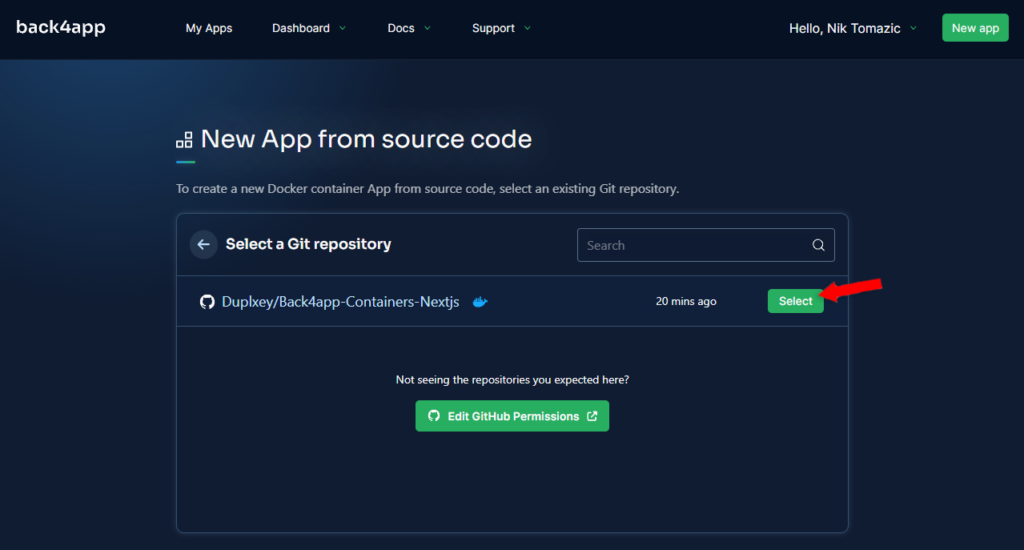
If you haven’t already go ahead and connect your GitHub to Back4app and import the repositories you’d like to deploy. Once your GitHub is connected your repositories will be displayed in the table.
Pick the repository you’d like to deploy by clicking on “Select”.
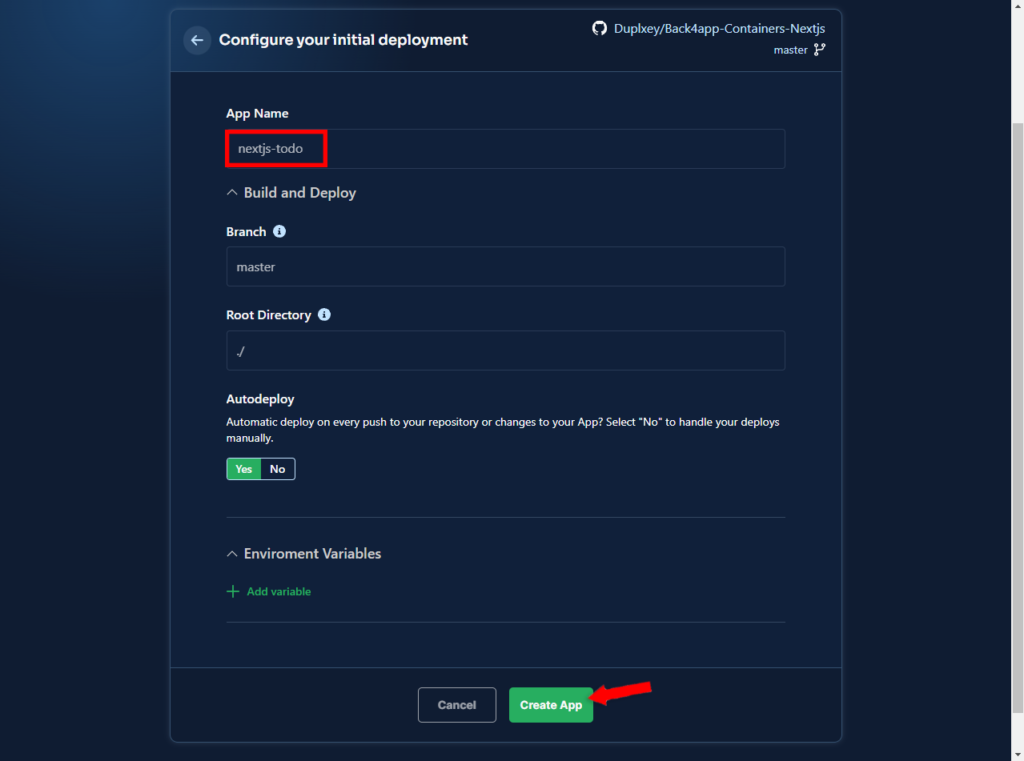
Next, Back4app is going to ask you to configure the environment. Pick an app name, I’ll go with nextjs-todo. Feel free to leave everything else as default.
Lastly, click “Create App” to automatically create the app and deploy it.
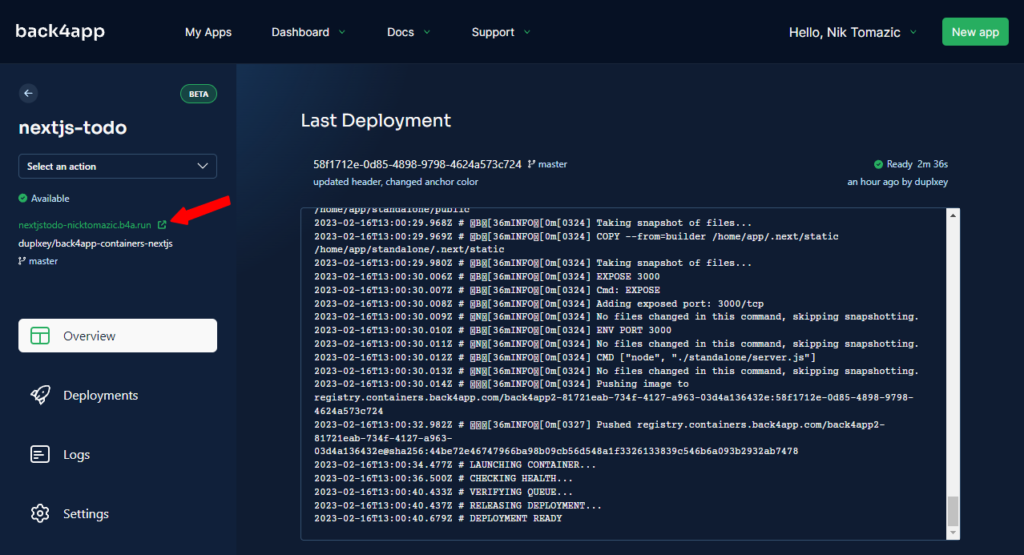
You will then be redirected to your app details where you can see the deployment logs.
Wait a few minutes for the app to deploy and voila! Your app is now live on Back4app Containers. To see your app in action click the green URL displayed on the left.
Conclusion
Throughout the article, we’ve explained what Docker is, its benefits, and how you can integrate it into your workflow. By now you should be able to code, dockerize and deploy your own Next.js applications to Back4app Containers.
The final source code is available on the back4app-containers-nextjs GitHub repository.
FAQ
What is Docker?
Docker is a Linux-based open-source tool that allows developers to create, deploy and run applications in lightweight containers.
What are the benefits of using Docker?
In addition to all the benefits of containerization technology. Docker comes with several other benefits:
– Lightweight
– Version Control
– Improved Collaboration
– Scalability
What are the deployment options for Docker?
– IaaS (AWS, GCP, Azure)
– PaaS (Heroku, Google App Engine, Azure App Service)
– CaaS (Back4app Containers, AWS ECS, Azure ACI)
How to deploy a Docker container to Back4app Containers?
1. Code the application
2. Dockerize the application with a Dockerfile
3. Build the image and test it locally
4. Push the source code to GitHub
5. Link your GitHub with your Back4app account
6. Select the repository and deploy


