What is a Backend Infrastructure?
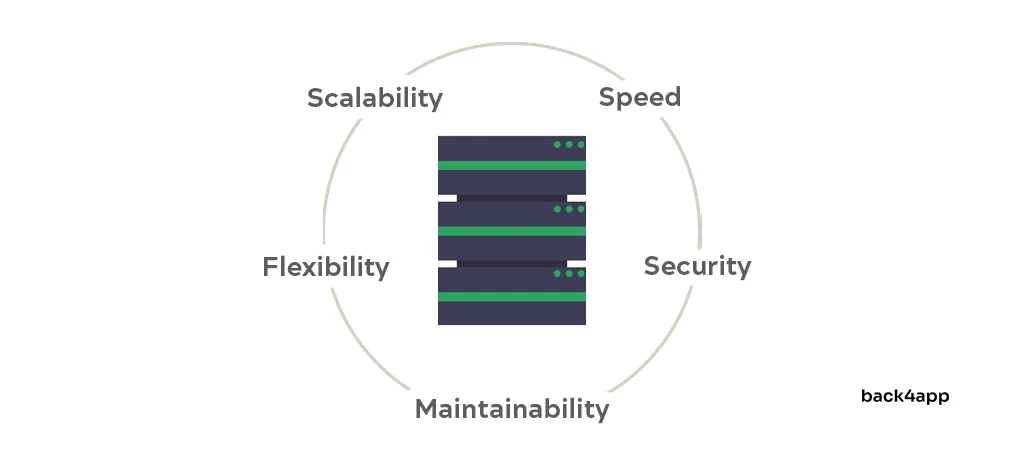
Choosing the proper backend infrastructure is crucial when designing your backend. It can impact your backend’s performance, flexibility, and maintainability, to name a few.
In this article, we’ll explain what backend infrastructure is, explore different types of backend infrastructures, and discuss the essential factors to remember when making your decision.
Additionally, we’ll look at how to create a backend infrastructure using Back4app.
Contents
- 1 Objectives
- 2 What is a backend infrastructure?
- 3 What to consider when choosing a backend infrastructure?
- 4 Types of backend infrastructure
- 5 How to create a backend infrastructure?
- 6 Conclusion
- 7 FAQ
- 8 What does backend infrastructure include?
- 9 How do I choose the right backend infrastructure for my application?
- 10 What is the difference between IaaS, PaaS, BaaS, and CaaS?
- 11 Why is scalability important when designing backend infrastructure?
- 12 How does Back4App simplify backend infrastructure development?
Objectives
By the end of this article, you’ll be able to:
- Explain what backend infrastructure is
- Discuss different types of backend infrastructures (including IaaS, PaaS, and BaaS)
- Pick the proper backend infrastructure for your project
- Build your own backend using Back4app
What is a backend infrastructure?
Backend infrastructure is the combination of software and hardware components supporting a backend system. That includes the servers, containers, networking components, firewall, and other resources. Together, these elements deliver the core backend infrastructure services required for your application to function
The backend infrastructure is responsible for high availability, scaling, load balancing, security, routing, et cetera. The backend infrastructure needs to be designed in such a way to offer a seamless user experience.
What to consider when choosing a backend infrastructure?
Let’s discuss the essential factors to consider when picking a backend infrastructure.
Speed
Speed is one of the critical characteristics of backend infrastructure. Your users want the app to work as smoothly as possible. Because of that, you need to optimize the client side to backend communication.
To mitigate the perception of communication delays, you can use some clever tricks. For example, you can implement skeleton screens, loading bars, and display tips & tricks, on the user interface.
Speed is also one of the most critical factors in SEO.
Flexibility
Flexibility refers to what programming languages, frameworks, and other technologies (e.g., databases) your backend infrastructure supports. When picking a backend infrastructure, ensure to pick something that supports a variety of technologies.
Scalability
You should consider scalability from the moment you start building your app. Think about how your app will be used. Will you have a steady number of users, or will the users spike sometimes?
Your backend infrastructure needs to be built in such a way to accommodate extreme workloads. To minimize the server expenses, your application instances should be created and destroyed on the fly.
Maintainability
Developing and publishing your app is only 80% of the work. After that, you’ll have to invest much time in maintaining your application. Updating your server software and deploying security patches should be as easy as possible.
Opt for a backend infrastructure with a built-in CI/CD system, or implement your own.
DevOps Requirements
Some types of backend infrastructures are more difficult to use. Pick the backend infrastructure you have the time and resources to manage. If you decide to use a lower-level backend infrastructure, like IaaS, you’ll need a specialized DevOps team to manage it.
Security
You’re fully responsible for keeping your users’ data safe. With a rising number of cyberattacks, you must ensure that your backend infrastructure follows the latest security standards.
Use strong auto-generated passwords, set up the firewall, don’t run untrusted software on your servers, perform regular security checks, et cetera.
Types of backend infrastructure
You can use your servers (so-called traditional infrastructure) or leverage cloud infrastructure to deploy your backend.
In the past decade, many companies have shifted towards cloud models because it allows them to save time and money.
Let’s analyze some of the most popular ones.
Infrastructure as a Service or IaaS
Infrastructure as a Service (IaaS) is the least abstracted cloud computing model. In this model, the cloud vendor provides computing resources in a virtualized environment, such as servers, storage, OSes, and networking components.
IaaS has existed since 2010 and is still the most popular cloud computing model. Its pros include great scalability, high-level control, and price efficiency. Conversely, the cons are complex management and higher maintainability costs than other cloud models.
Some of the popular IaaS vendors are:
Platform as a Service or PaaS
Platform as a Service (PaaS) is a cloud computing model offering a user-friendly application development, management, and delivery environment. It includes various built-in app development tools, making it easy to get your app up and running.
PaaS streamlines infrastructure management, providing faster market entry, enhanced security, cost savings, scalability, high availability, and reduced coding. On the other hand, it can tie you to the vendor’s capabilities, pose vendor lock-in risks, and limit flexibility and control.
Examples of PaaS solutions include:
Backend as a Service or BaaS
Backend as a Service (BaaS) automates server side development and cloud infrastructure management. It offers real-time databases, user management, authentication, notifications, social media integrations, and so on.
BaaS frees developers from backend concerns, letting them focus on frontend and core business. BaaS combines IaaS and PaaS benefits with backend abstraction, resulting in faster time to market and cost savings. The downsides are lack of control, risk of a vendor lock-in, and relatively costly.
My personal favorite BaaS platforms are:
Containers as a Service or CaaS
Containers as a Service (CaaS) is a cloud computing model for uploading, building, scaling, and managing containers. CaaS usually includes a container runtime, container registry, automatic scaling functionality, built-in CI/CD system, load balancing & more!
CaaS simplifies container handling, removing concerns about the underlying infrastructure. It encourages agile development, facilitates microservice architecture, and accelerates the creation of highly scalable applications.
CaaS platforms include:
How to create a backend infrastructure?
In this part of the article, we’ll create a backend infrastructure using Back4app.
What is Back4app?
Back4app is an exceptional Backend as a Service (BaaS) platform. It enables you to build backends for web and mobile applications quickly.
The platform is built using open source technologies and has many features. Its features include spreadsheet-like databases, file storage, user management, authentication, auto-generated APIs, notifications, and more!
Back4app can help you significantly accelerate your time to market. By leveraging it, you can focus on the core of your business instead of worrying about the backend or the underlying infrastructure.
You won’t need specialized DevOps engineers, and your maintenance costs will be lower.
The best thing about Back4app is that it comes with a free tier. The free tier is excellent for testing the platform or hosting pet projects. If your app becomes successful, you can upgrade to premium tiers.
To learn more about Back4app, check out What is Back4app?
Project Overview
To showcase how to create a backend, we’ll build a simple e-commerce backend service. The backend will allow us to manage products, categories, and orders.
Our project’s ER diagram will look like this:

We’ll make the backend with a minimal amount of code and demonstrate how it could be used on the client side (via SDKs, REST API, and GraphQL API).
Create App
To follow along, a Back4app account is required. Need one? Sign up for today!
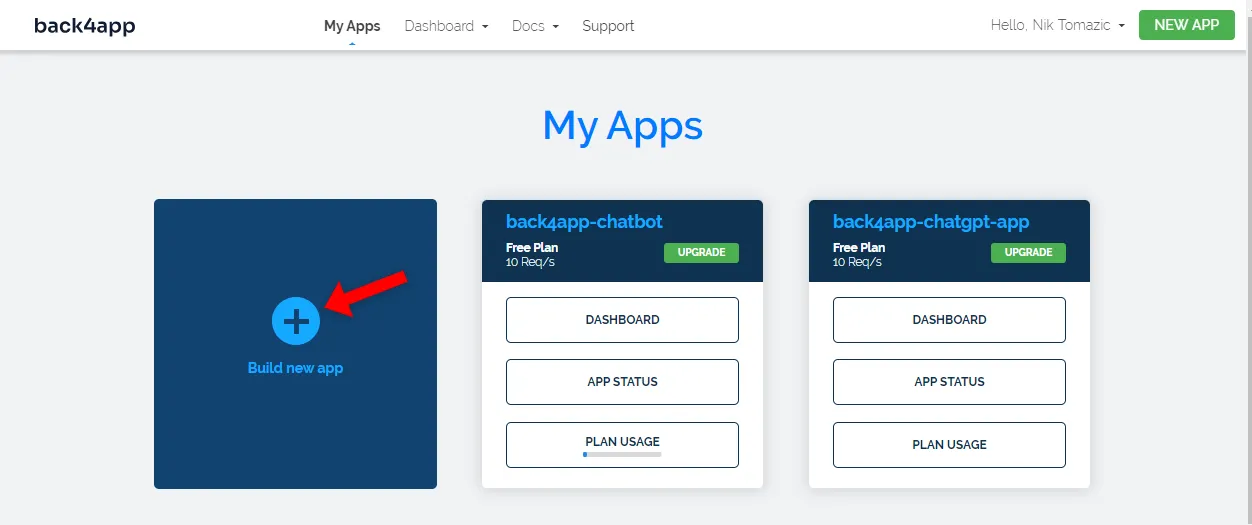
After logging into your Back4app account, you’ll see the list of your apps. Click on the “Build app” button to start the app-building process.
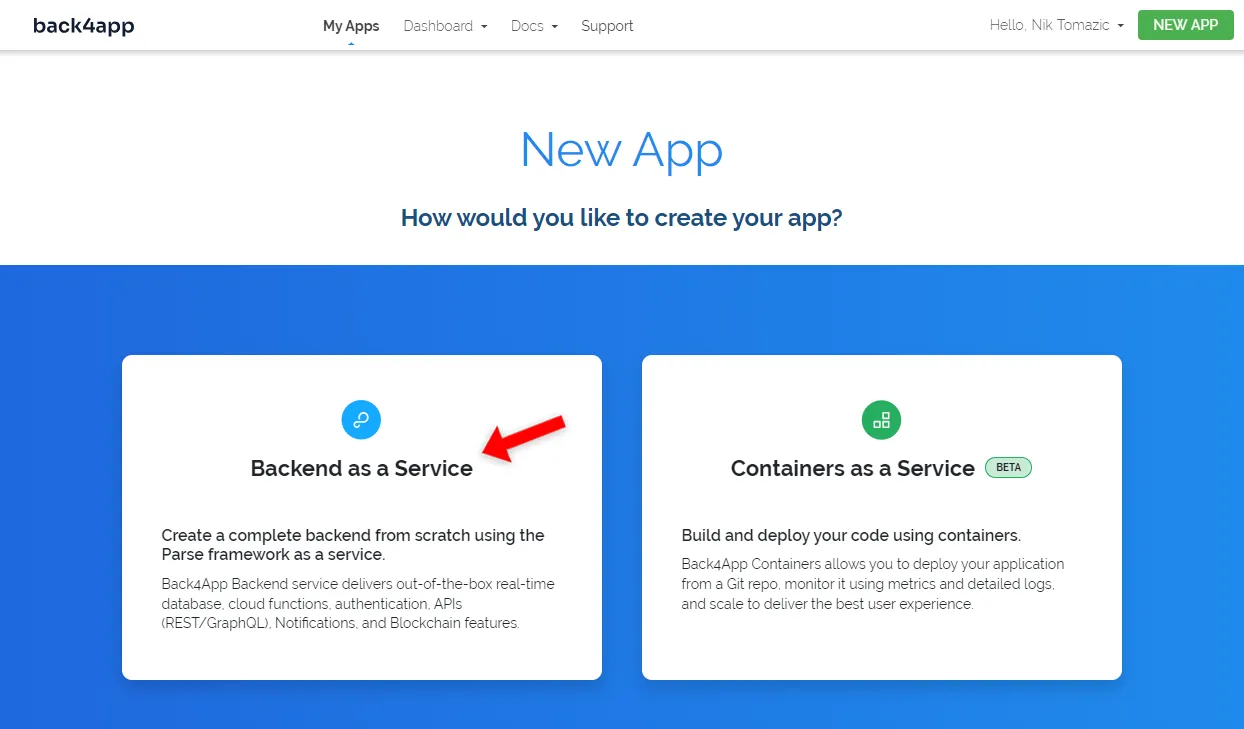
Next, select “BaaS” because we’re setting up a backend.
Pick an app name, choose “NoSQL”, and create the app.
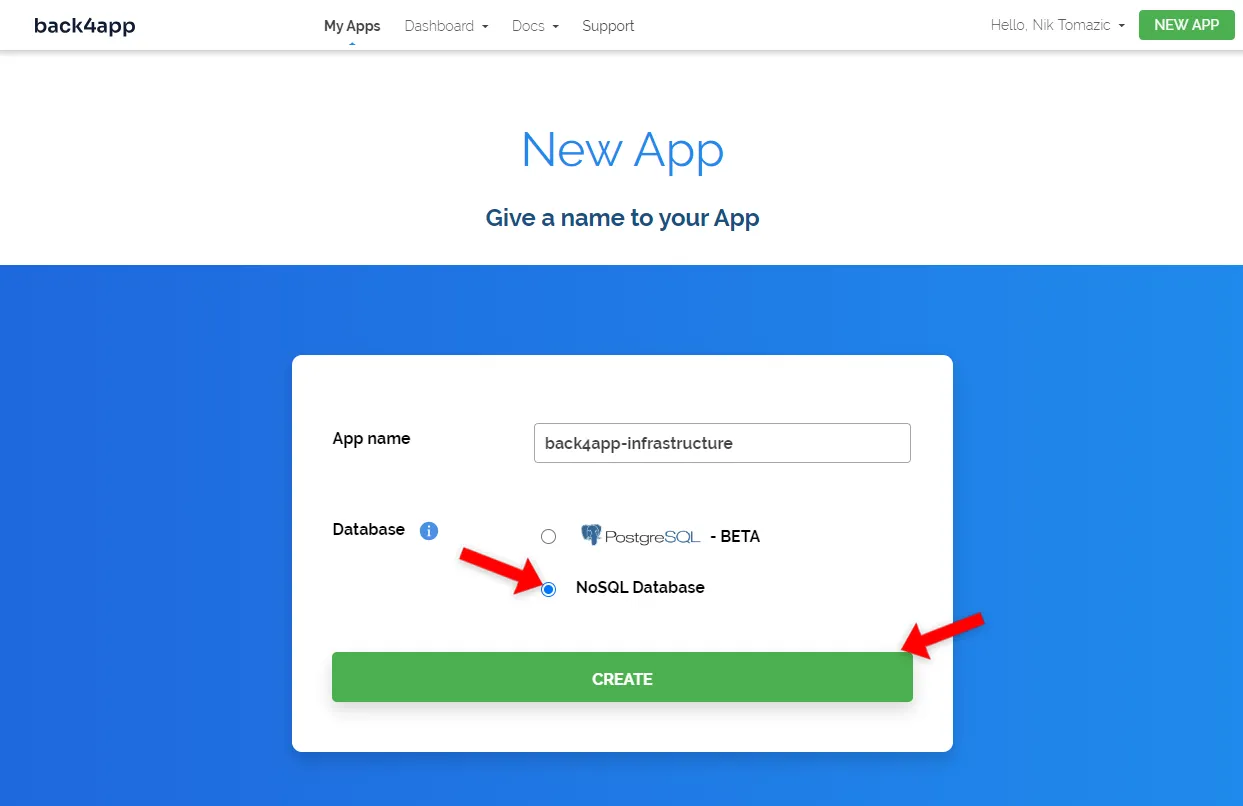
Back4app is going to take some time to set everything up. It’ll handle the application layer, database, backups, scaling, and more.
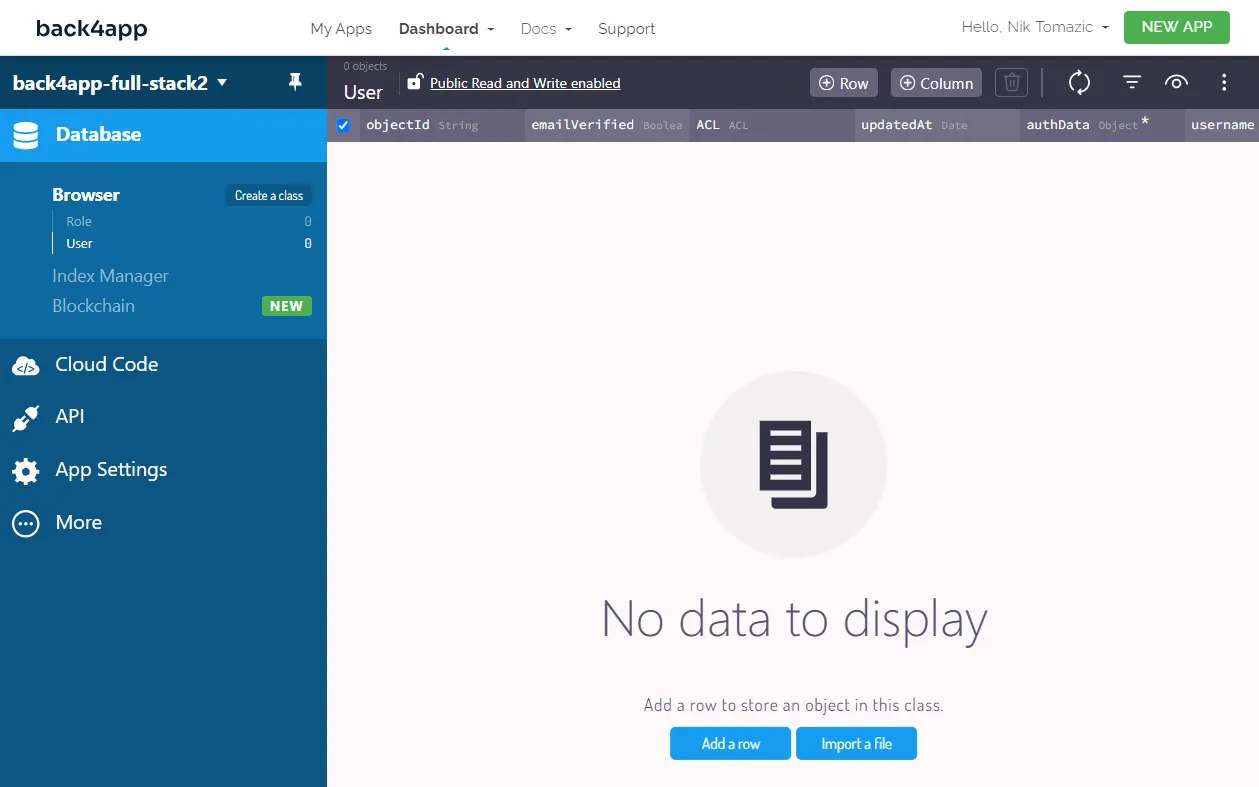
Once the app has been built, you’ll be taken to your app’s real-time database.
Setup the Database
Now that we’ve created our application let’s take care of the database.
We first have to create a class to store data in the database. You can look at classes as tables (SQL terminology) or models (ORM terminology). Each class has the following four fields by default:
+-------------+-------------+------------------------------------------+
| Type        | Name        | Description                              |
+-------------+-------------+------------------------------------------+
| String      | objectId    | Object's unique identifier               |
+-------------+-------------+------------------------------------------+
| Date        | updatedAt   | Date time of the last update             |
+-------------+-------------+------------------------------------------+
| Date        | createdAt   | Date time of creation                    |
+-------------+-------------+------------------------------------------+
| ACL         | ACL         | Access Control List                      |
+-------------+-------------+------------------------------------------+
As mentioned in the project overview, our project will have three classes. Create the first one by clicking the “Create class” button on the sidebar. Name it ProductCategory:
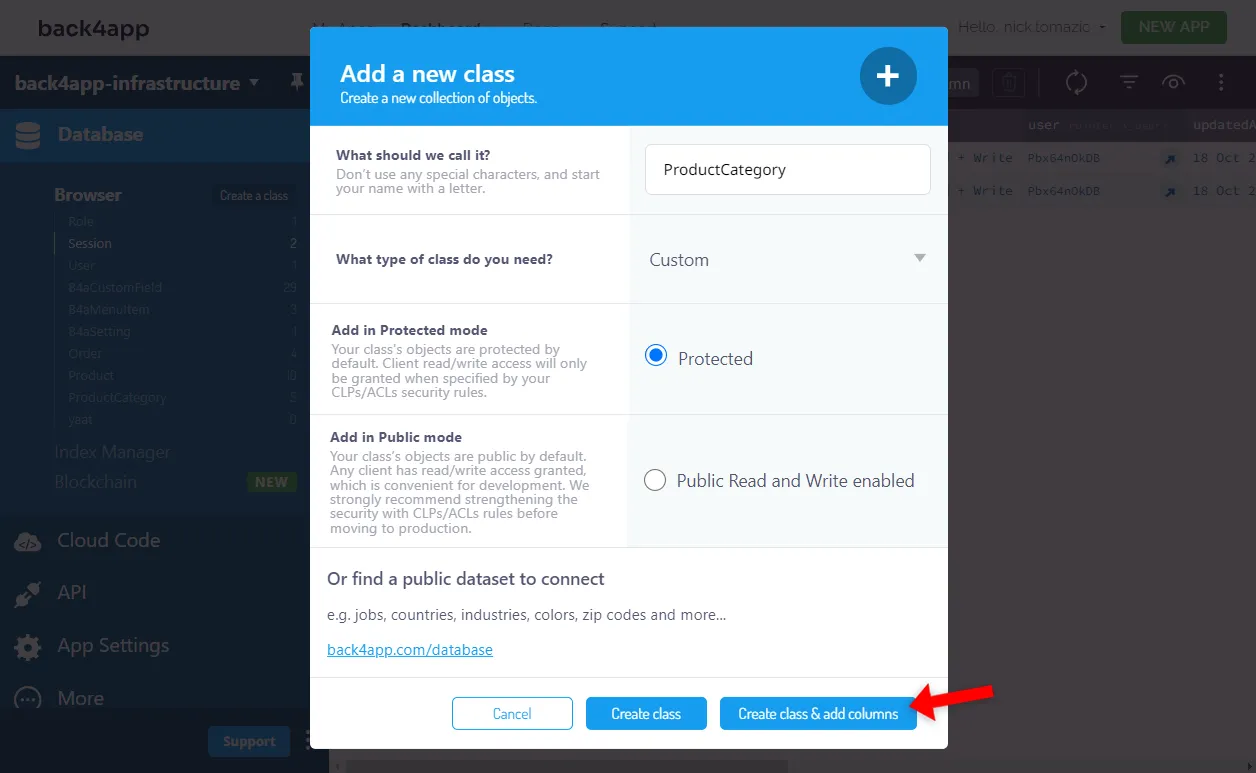
Add the following fields:
+-----------------------------+-------------+---------------+----------+
| Type                        | Name        | Default value | Required |
+-----------------------------+-------------+---------------+----------+
| String                      | name        | <leave blank> | yes      |
+-----------------------------+-------------+---------------+----------+
| String                      | description | <leave blank> | no       |
+-----------------------------+-------------+---------------+----------+
Perform the same steps for the Product class:
+-----------------------------+-------------+---------------+----------+
| Type                        | Name        | Default value | Required |
+-----------------------------+-------------+---------------+----------+
| String                      | name        | <leave blank> | yes      |
+-----------------------------+-------------+---------------+----------+
| String                      | description | <leave blank> | no       |
+-----------------------------+-------------+---------------+----------+
| Relation -> ProductCategory | categories  | <leave blank> | no       |
+-----------------------------+-------------+---------------+----------+
| Number                      | price       | 0             | yes      |
+-----------------------------+-------------+---------------+----------+
We used the
Relationdatatype to handle the many-to-many relationship.
Lastly, create the Order class:
+-----------------------------+------------+---------------+----------+
| Data type                   | Name       | Default value | Required |
+-----------------------------+------------+---------------+----------+
| Pointer -> Product          | product    | <leave blank> | yes      |
+-----------------------------+------------+---------------+----------+
| String                      | cFirstName | <leave blank> | yes      |
+-----------------------------+------------+---------------+----------+
| String                      | cLastName  | <leave blank> | yes      |
+-----------------------------+------------+---------------+----------+
| String                      | cAddress   | <leave blank> | yes      |
+-----------------------------+------------+---------------+----------+
| Number                      | delivered  | false         | yes      |
+-----------------------------+------------+---------------+----------+
We used the
Pointerdatatype to handle the one-to-many relationship.
Once you’re done, you should see the classes on the sidebar.
Populate the database
Moving along, let’s populate the database.
Start by creating a few product categories, products, and orders (in this order). If you’re out of ideas, feel free to import this fixture.
To import a JSON file use the “More option > Import > Class data > Select file”. Ensure to import the JSON files in the following order:
- ProductCategory.json
- Product.json
- _Join꞉categories꞉Product.json
- Order.json
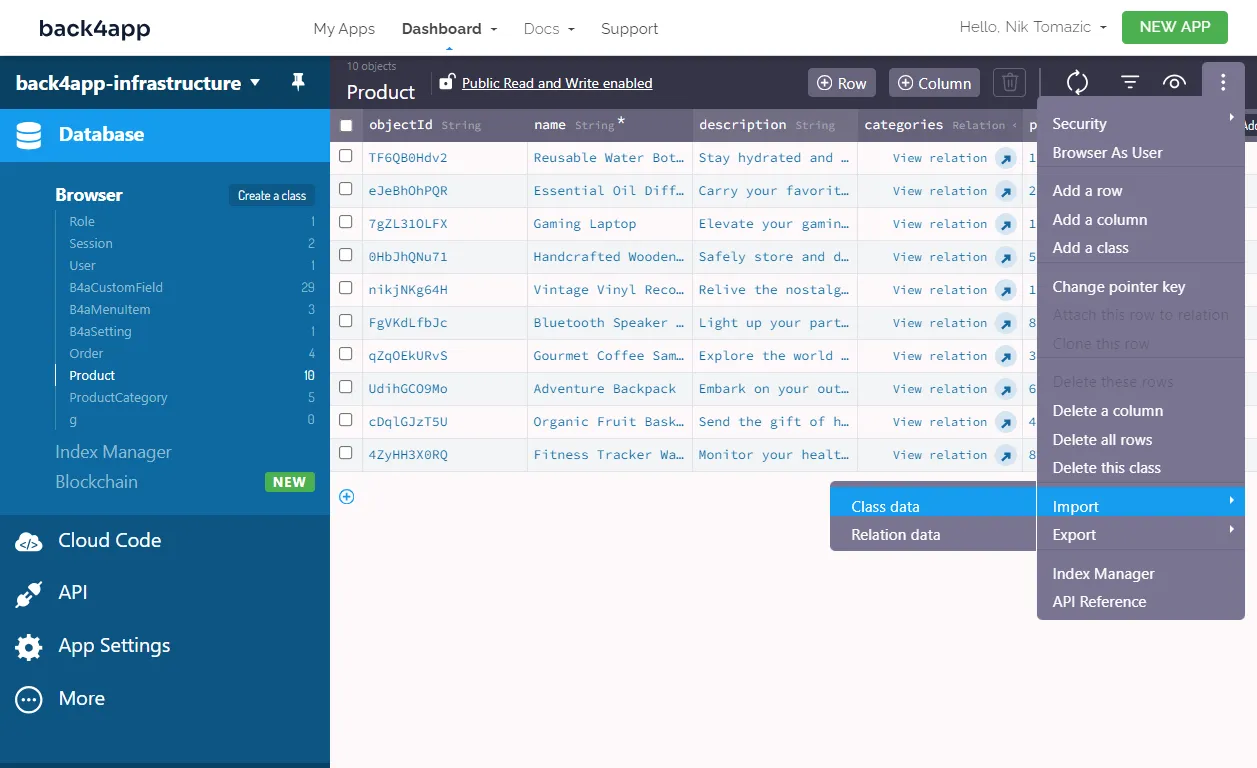
After you’re done, you should have a few products, categories, and orders in your database. This step is required because we’ll need some data to test the backend in the later phase.
Secure the Database
By default, database classes are created in “Protected mode”. While in protected mode, the only way to interact and manage objects is by using the master key. This isn’t optimal because we can’t fetch or manage objects from the client side.
To be able to do that, we have to relax some restrictions. Back4app/Parse comes with two restriction mechanisms:
- Class-level permissions (CLPs)
- Access-level permissions (ACLs)
CLPs allow us to enforce restrictions on the class level, while ACLs allow us to enforce restrictions on the object level. Both mechanisms can restrict a class or object to a specific Role or User.
Select Product class on the sidebar, and click on the “Protected” text at the top of the screen. Then modify the CLPs:
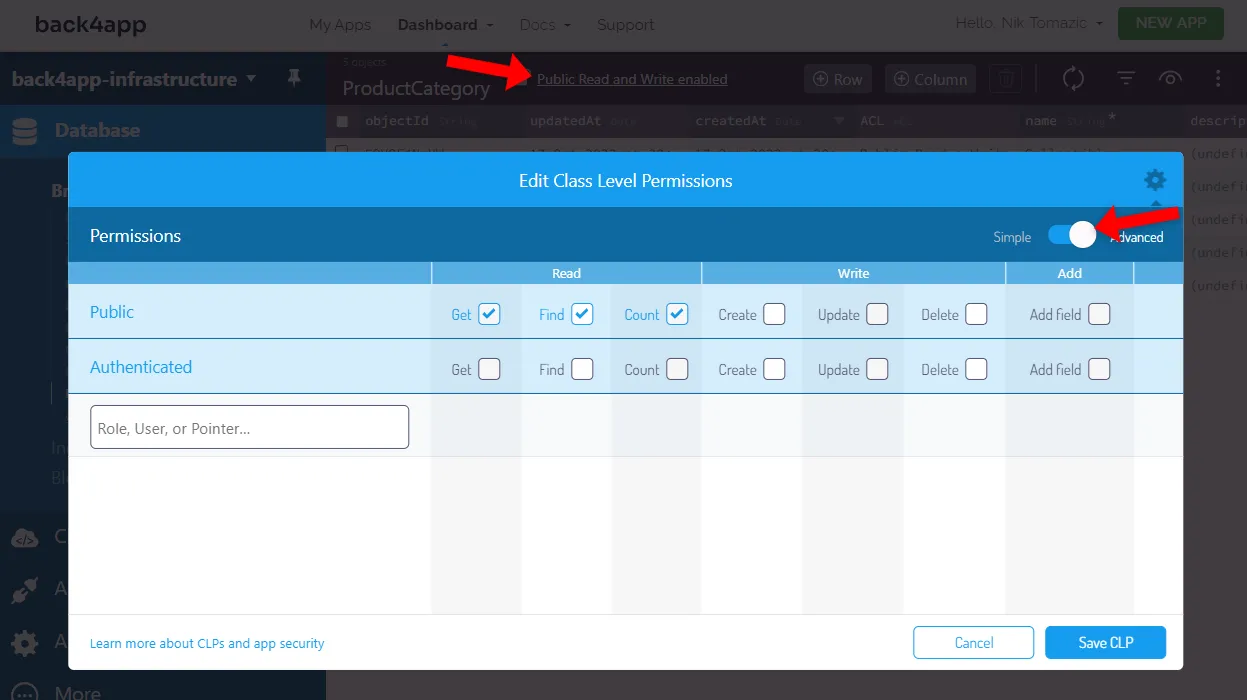
Perform the same steps for the ProductCategory model.
Then update the CLPs for the Order class:
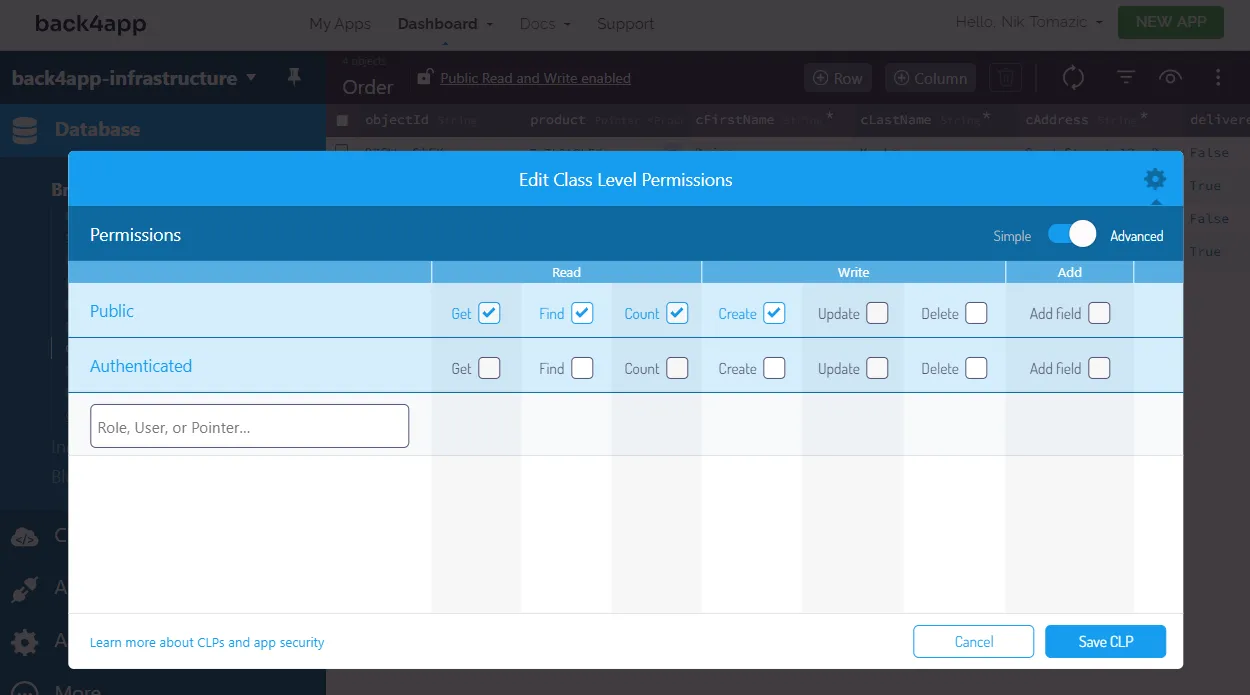
Pay attention to the image. Here, we are also enabling the
Createpermission.
The new CLPs will allow unauthenticated users to fetch, query, and count Products, and ProductCategoryies, but not modify them. The same applies to the Order class, but here, the users can also create new orders.
To learn more, check out our Parse Server Security article.
Admin App
At the moment, the only way to manage objects in your database is by using the database view. While that works for developers, it isn’t intuitive for non-tech users. On top of that, it gives the users too much control and is prone to human errors.
Fortunately, Back4app lets you easily enable the “Admin App” functionality. Admin app is an easy-to-use administration panel tailored to your database classes.
Enable it by first navigating to “More > Admin App” on the sidebar. Then click “Enable”:
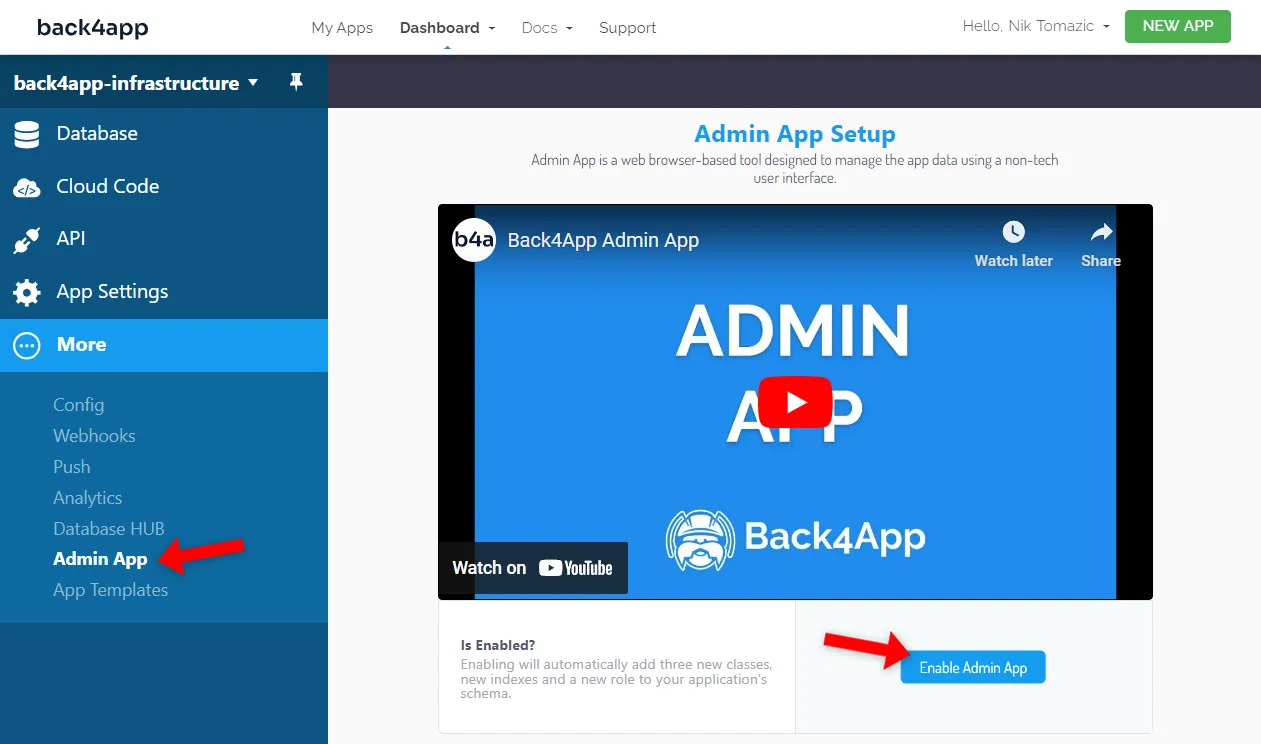
Back4app will prompt you to choose a username, password, and subdomain. I’ve decided to go with the following:
user:        root
pass:        complexpassword123
subdomain:   https://binfra.admin.back4app.com/
Great, that’s all you have to do.
You can access the administration panel by clicking the “Admin App URL”. A new browser window will open by clicking on it, and you’ll be asked to enter your admin credentials. Once logged in, you can create, update, and delete objects.
Try playing around with the dashboard to get used to it.
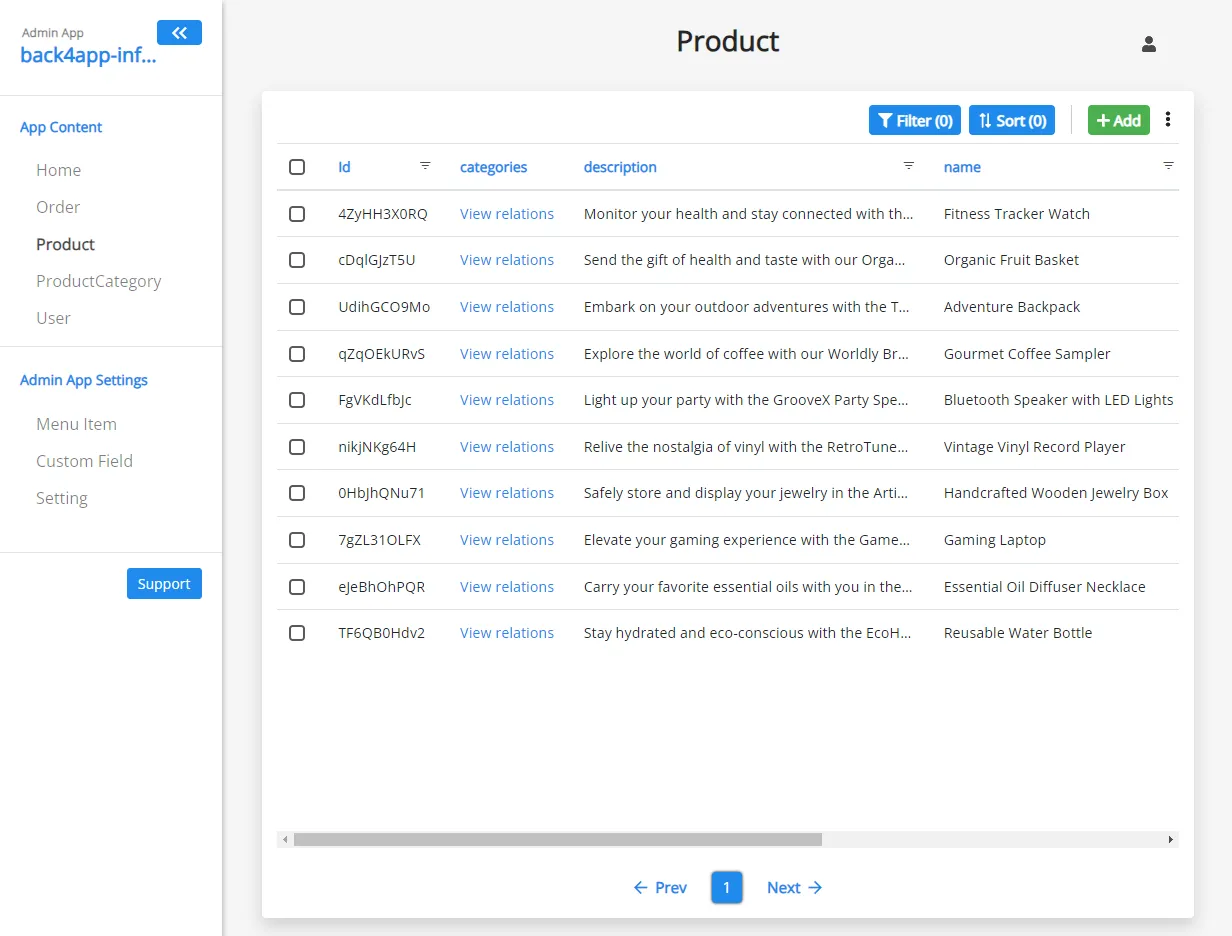
Cloud Code
Back4app allows you to run custom JavaScript code via so-called Cloud Code. With Cloud Code, you can define functions that can be triggered by Parse, HTTP requests, or run periodically. Additionally, Cloud Code can be used to build web applications using Express.
Cloud Code Function
Suppose we wanted a Cloud Code function that calculates the current sales.
First, navigate to “Cloud Code > Function & Web Hosting” on the sidebar. You’ll notice that the Cloud Code view is split into two parts. On the left side, you can see the directory structure and the code on the right.
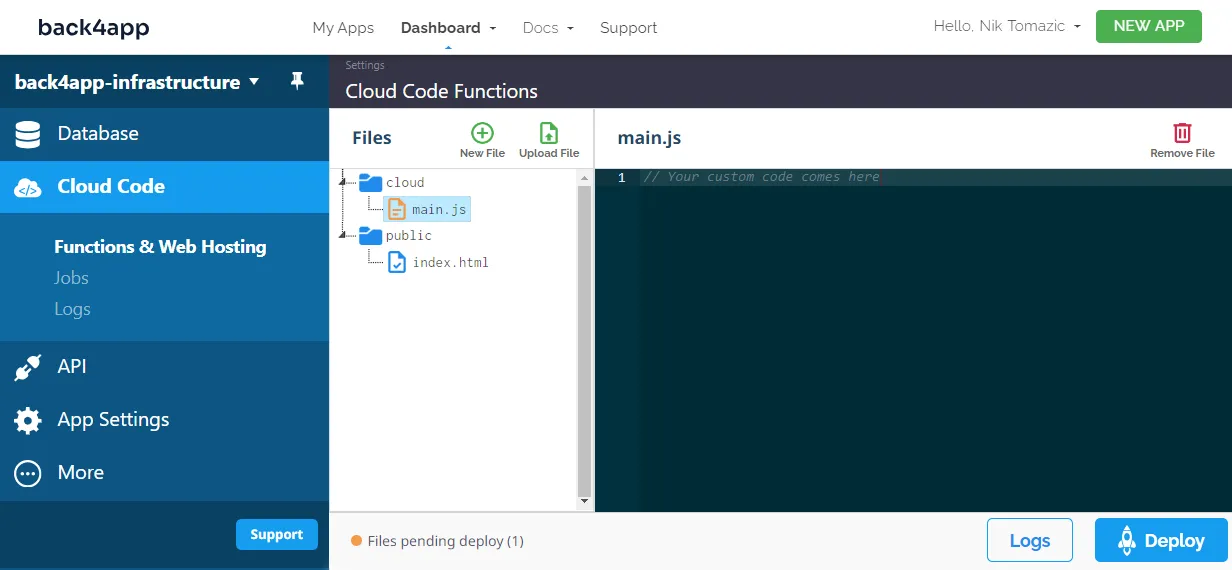
Next, open cloud/main.js and paste in the following code:
// cloud/main.js

Parse.Cloud.define("calculateSales", async (request) => {
  const orderClass = Parse.Object.extend("Order");
  const orderQuery = new Parse.Query(orderClass);
  let sales = 0;

  try {
    const orders = await orderQuery.find();

    for (var i = 0; i < orders.length; i++) {
      let order = orders[i];
      let productId = order.get("product")["id"];

      const productClass = Parse.Object.extend("Product");
      const productQuery = new Parse.Query(productClass);
      const product = await productQuery.get(productId);

      sales += product.get("price");
    }
    return {
      sales: sales,
    };
  } catch (error) {
    console.error("Error calculating the sales: " + error.message);
    return {
      sales: 0,
    }
  }
});

Parse.Cloud.job("printSales", async (request, status) => {
  try {
    const result = await Parse.Cloud.run("calculateSales");
    console.log("Sales: " + result.sales + "$");
  } catch (error) {
    console.error("Error calculating the sales: " + error.message);
  }
});- We defined a Cloud Code function called
calculateSales(). The function loops through all the orders, fetches the corresponding products, and sums up their prices. - We defined a Cloud Code Job called
printSales(), allowing us to run the function from the Parse dashboard and schedule it periodically.
Lastly, click “Deploy” to deploy the Cloud Code.
Make sure the job works by navigating to “Cloud Code > Jobs” on the sidebar and then running the printSales() job. If everything works well, you should see a message saying, e.g., Sales: 1440$ when checking the logs.
Cloud Code Scheduling
To schedule the job, you must navigate to “App Settings > Server Settings” on the sidebar. Scroll down to “Background jobs”, click “Schedule a job”, and fill out the form.
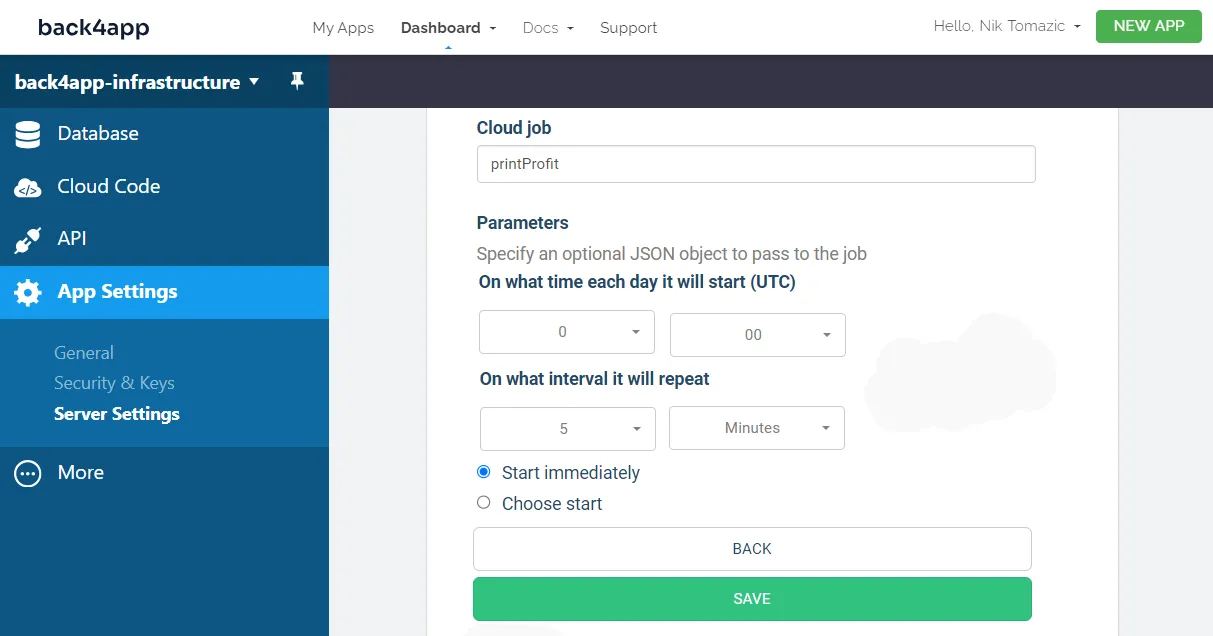
To make sure it works, check the logs once again.
Client Side
There are multiple ways to interact with your Back4app-based backend:
- Parse SDK
- RESTful API (auto-generated)
- GraphQL API (auto-generated)
As a rule of thumb, you should always use Parse SDK if it’s available for your platform. If not, either go with RESTful API or GraphQL API. The choice between the APIs depends on your data.
Learn how to use Parse SDK with various frameworks by checking out the docs.
Nevertheless, let’s test our backend using the built-in REST Console.
Navigate to “API > REST” on the sidebar, and try querying all products by filling out the form:
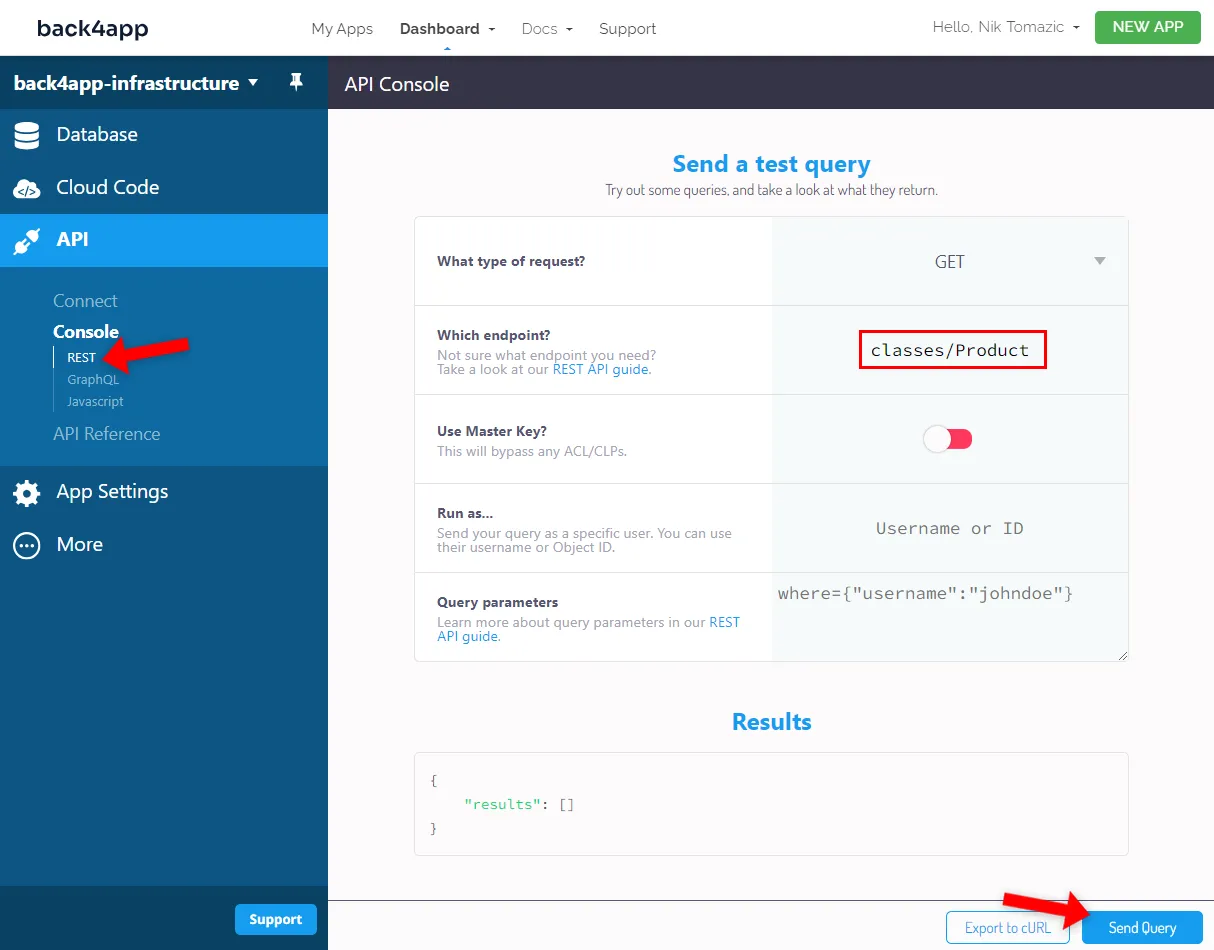
You should get a similar response:
{
    "results": [
        {
            "objectId": "4ZyHH3X0RQ",
            "name": "Fitness Tracker Watch",
            "description": "...",
            "price": 80,
            "createdAt": "2023-10-17T20:03:55.424Z",
            "updatedAt": "2023-10-17T20:24:12.322Z",
            "categories": {
                "__type": "Relation",
                "className": "ProductCategory"
            }
        },
        {
            "objectId": "cDqlGJzT5U",
            "name": "Organic Fruit Basket",
            "description": "...",
            "price": 40,
            "createdAt": "2023-10-17T20:04:10.063Z",
            "updatedAt": "2023-10-17T20:24:00.382Z",
            "categories": {
                "__type": "Relation",
                "className": "ProductCategory"
            }
        },
    // ...
}
Try performing the following queries:
- Fetch all the products that are more expensive than 50
- Fetch all the orders that haven’t been delivered yet
- Create a new product and add a category to it
- Delete an order
Conclusion
In conclusion, you now know what backend infrastructure is, are familiar with various types of backend infrastructures, and know how to pick the proper infrastructure for your project.
On top of that, you’ve learned how to create a backend infrastructure on Back4app. You’ve taken care of the database, database security, custom code, job scheduling, and API testing.
For guidance on creating the client side for a Back4app-based backend, explore our other articles:
- How to host frontend and backend?
- How to develop a social media app?
- How to build a chatbot using React?
Additional article resources are open-sourced on a GitHub repo.
FAQ
What does backend infrastructure include?
Backend infrastructure consists of the servers, containers, networking components, firewalls, and software systems that support an application’s backend. It ensures availability, routing, security, and performance so users can interact with the app smoothly.
How do I choose the right backend infrastructure for my application?
The best backend infrastructure depends on your needs for speed, flexibility, scalability, security, and maintenance. Consider how much traffic you expect, which technologies you need to support, and how much DevOps complexity your team can handle. Services like Back4app are easy to implement and scalable.
What is the difference between IaaS, PaaS, BaaS, and CaaS?
IaaS provides raw compute resources like servers and storage.
PaaS offers a ready-made environment for building and deploying applications.
BaaS manages backend components such as databases, authentication, APIs, and notifications.
CaaS focuses on deploying and scaling containerized applications.
The article explains each model in detail to help you choose the right fit.
Why is scalability important when designing backend infrastructure?
Scalability ensures your application can handle user growth, traffic spikes, and new features without slowing down. Infrastructure that supports automatic scaling—like cloud platforms or container-based systems—helps maintain performance while optimizing costs.
How does Back4App simplify backend infrastructure development?
Back4App provides a managed Backend as a Service (BaaS) built on open-source Parse Server. It includes real-time databases, authentication, auto-generated APIs, cloud code, an admin panel, and built-in scalability. This allows teams to build and manage backend infrastructure with far less DevOps effort.


