How to build a Chatbot in React.js?
In this article, we’ll teach you everything you need to know about chatbots. We’ll look at the benefits of using a chatbot, types of chatbots, no-code chatbot platforms, and custom chatbot solutions. Lastly, we’ll implement our own custom rule-based chatbot with React and Back4app.
Contents
What is a Chatbot?
A chatbot is a computer program designed to simulate a human conversation through voice commands, text messages, or both. It can be as simple as a rule-based bot to an advanced AI-powered chatbot that understands customers’ questions and generates custom responses.
Chatbots have been steadily gaining popularity since the 2010s and are an important part of almost every business. Bots allow businesses to improve their customer service, increase customer engagement, lower costs, improve user experience, and collect customer data.
These days chatbots can be found almost anywhere — on websites, mobile apps, mobile messengers, and so on. You most likely even have a few virtual assistants like Google Assistant, Siri and Bixby installed on your mobile device.
Benefits of a Chatbot
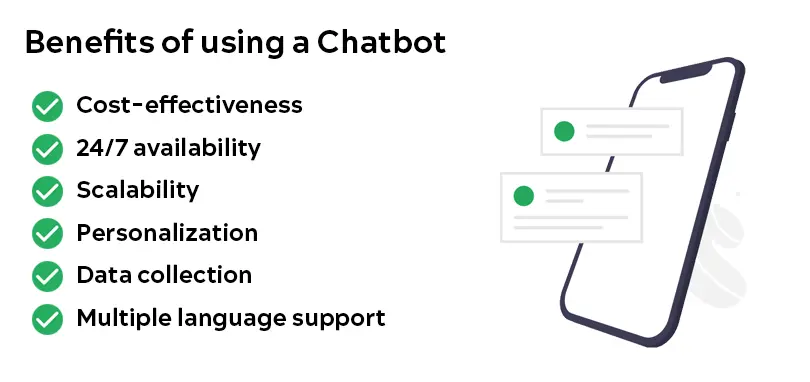
There are many benefits of using a chatbot. Let’s look at some of them.
Cost-effectiveness
Chatbots are great at handling simple tasks. They can be programmed to handle simple queries while redirecting complex queries to a human customer service representative. This way your business can greatly cut labor costs while still being able to offer great customer support.
24/7 availability
Chatbots are convenient for providing customer service and support 24/7, without the need for human operators. This is great if your customers are scattered across different time zones.
Scalability
Bots can handle a high volume of interactions simultaneously. This increases business productivity and eliminates wait times — resulting in more satisfied customers.
Personalization
Digital assistants can be programmed to provide personalized recommendations or responses to users based on their individual characteristics or behavior. This can greatly improve the user experience, increase sales, build trust and even improve customer retention.
Data collection
Chatbots can collect customer data, which can be useful for businesses to improve their products and services. Additionally, AI-based chatbots can learn from their previous conversations and offer better support over time.
Multiple language support
Bots are not limited to a single language. Some of the better bots can recognize in what language a question was asked and respond in that language.
Types of Chatbots
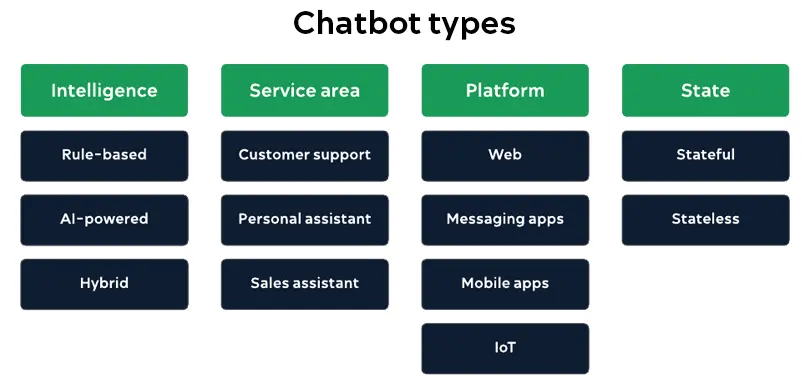
There are several types of chatbots each with their own unique capabilities and uses. We can categorize them based on different properties.
Intelligence
Intelligence determines whether the bot is “smart” or “dumb”. By dumb we are usually referring to rule-based chatbots that have hard-coded rules and cannot answer questions they’ve never seen before. On the other hand, by “smart” we mean AI-powered chatbots that use NLP (Natural Language Processing) and ML (Machine Learning) to understand the customer’s question and generate a custom response. Hybrid chatbots use rule-based functionality as well as AI.
- Rule-based chatbots
- AI-powered chatbots
- Hybrid chatbots
Service area
The service area determines what the chatbot’s purpose is. Some of the common service areas include:
- Customer support
- Personal assistant (Bixby, Alexa, Amazon Echo)
- Virtual sales assistant
Platform
Chatbots can be deployed to various platforms. The choice of where to deploy a chatbot will depend on the specific use case and target audience.
- Web (floating chat bubbles, widgets)
- Messaging platforms (Facebook Messenger, Whatsapp, Viber)
- Mobile apps (Bixby, Siri, Google Assistant)
- IoT devices (smart speakers, smart home devices)
State
There are two chatbot architectures:
- Stateful chatbots
- Stateless chatbots
Stateful chatbots maintain a record of the previous interactions with the user and take it into account when a new question is asked. This is great since it allows them to offer a more personalized experience. They’re generally more sophisticated and more difficult to code.
Stateless chatbots on the other hand don’t take previous interactions into account. They treat each message as an independent request. They’re simpler, can’t provide a personalized experience, and can’t base their answers on the context.
Chatbot Solutions
Chatbot platforms
Low-code or no-code chatbot platforms are solutions that work out of the box. They’re easy to use, don’t require advanced coding skills, and allow you to get your chatbot up and running in no time.
They usually come with a simple-to-use drag-and-drop editor that allows you to define your chatbot’s behavior. They can be easily deployed to different platforms including websites, Facebook Messenger, Slack, Whatsapp, and so on.
They offer a lower level of control and customization than custom bots. The biggest downside of these platforms is vendor lock-in. Once you pick the platform you can’t easily migrate to another one.
A few examples of such platforms are Tidio, Landbot, ChatBot and AgentBot.
Custom bot
Custom bots are highly customizable and flexible solutions that can be tailored to the specific needs of any business. They allow seamless integration with already existing systems and databases.
Since building a chatbot from the ground up is a difficult task you can expect it to take longer and cost more than using a ready-made chatbot platform. If your goal is to create an advanced AI bot, you’ll probably also need a team of specialized developers.
Custom bots can be written in practically any programming language. Most developers opt for Python, Node.js, JavaScript & Java. To simplify the bot creation process even more there are a number of open-source chatbot libraries you can choose from.
How to build a Chatbot?
In this part of the tutorial, we’ll create a custom rule-based chatbot. We’ll use React for the frontend and Back4app for the backend.
What is Back4app?
Back4app is a cloud-hosted backend as a service (BaaS) platform that makes it easy for developers to build and maintain custom mobile applications. It provides an intuitive user interface, a powerful dashboard, and useful tools such as command line interface (CLI), push notifications, analytics, data storage, and more.
They also provide SDKs for all your favorite tools like Flutter, React Native, Node.js, Angular, Android, iOS & more!
Back4app’s key features include:
- Spreadsheet-like interface
- REST and GraphQL Application Programming Interfaces – APIs
- Live Queries
- Authentication (including social authentication)
- Scalable Hosting
- Notifications
For more information, please check out Back4app Features.
Back4app follows a predictable and easy-to-understand pricing model. They offer a generous free plan (no credit card required) that is great for prototyping and testing the platform. It includes:
- 25k API requests
- 250 MB data storage
- 1 GB data transfer
- 1 GB object storage
For more information about Back4app pricing take a look at the Pricing page.
Project Introduction
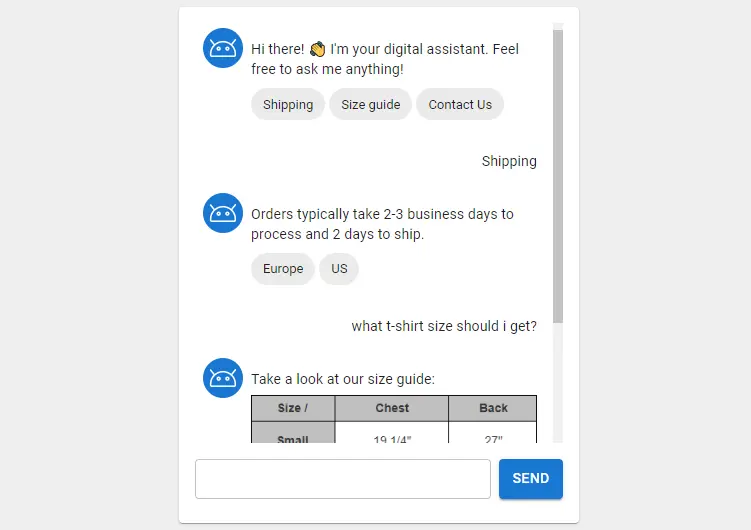
We’ll be building a simple chatbot with predefined requests and responses. The chatbot will be able to respond with text, images and display different options based on the last request. The frontend is going to be built with React and we’ll use Back4app (with Express) for the backend.
Prerequisites:
- Experience with JavaScript
- Experience with React and React Hooks
- Basic understanding of HTTP requests and responses
- Basic understanding of BaaS (Backend as a Service)
We’ll first work on the frontend then the backend and lastly connect the two pieces.
Chatbot Frontend
Create React App
Let’s start by creating a new React app via Create React App:
$ npx create-react-app react-chatbot
$ cd react-chatbot
This will create a React app named react-chatbot and change your working directory.
Next, start the project:
$ npm startLastly, open http://localhost:3000/ to see your web app.
Material UI
To simplify the UI building process we’ll use Material UI — an open-source React component library that implements Google’s Material Design. The component library includes a comprehensive collection of prebuilt components that work out of the box.
Feel free to swap Material UI for a different UI framework like React Bootstrap or Ant Design.
To add Material UI to your project run:
$ npm install @mui/material @emotion/react @emotion/styledMaterial UI uses Roboto font by default. Let’s install it with:
$ npm install @fontsource/robotoNext, navigate to index.js and add the following imports:
// src/index.js

import '@fontsource/roboto/300.css';
import '@fontsource/roboto/400.css';
import '@fontsource/roboto/500.css';
import '@fontsource/roboto/700.css';
User Interface
Navigate to App.js within the src folder and replace its contents with the following:
// src/App.js

import React, {useEffect, useState} from "react";
import {Box, Button, Card, CardContent, Grid, TextField} from "@mui/material";

function App() {

  const messagesListRef = React.createRef();
  const [messageInput, setMessageInput] = useState("");
  const [messages, setMessages] = useState([]);

  const sendMessage = (content) => {
    // add the message to the state
    setMessages([
      ...messages,
      {
        content: content,
        isCustomer: true,
      }
    ]);

    // TODO: post the request to Back4app
  }

  const handleSubmit = (event) => {
    event.preventDefault();

    sendMessage(messageInput);
    setMessageInput("");
  }

  return (
    <Grid
      container
      direction="row"
      justifyContent="center"
      alignItems="center"
    >
      <Card sx={{maxWidth: 420}}>
        <CardContent>
          <Box
            ref={messagesListRef}
            sx={{
              height: 420,
              overflow: "scroll",
              overflowX: "hidden",
            }}
          >
            <Box sx={{m: 1, mr: 2}}>
              {/* TODO: messages will be displayed here */}
            </Box>
          </Box>
          <Box
            component="form"
            sx={{
              mt: 2,
              display: "flex",
              flexFlow: "row",
              gap: 1,
            }}
          >
            <TextField
              variant="outlined"
              size="small"
              value={messageInput}
              onChange={(event) => setMessageInput(event.target.value)}
              fullWidth
            />
            <Button
              variant="contained"
              onClick={handleSubmit}
              type="submit"
            >
              Send
            </Button>
          </Box>
        </CardContent>
      </Card>
    </Grid>
  );
}

export default App;- We defined a simple form with a message input that calls
handleSubmit()on submit. - We used React
useState()hook to handle state.messageInputis the current messagemessagesis the list of messages
handleSubmit()clears the message input and callssendMessage()which appends the message to the state.
Moving along, let’s create a component for displaying the messages.
Create a new folder named components within the src folder and within that folder create a new file named Message.js with the following contents:
// src/components/Message.js

import avatar from "../assets/bot.png";
import {Avatar, Box, Chip, Typography} from "@mui/material";

export default function Message(props) {
  return (
    <div>
      <Box
        sx={{
          my: 2,
          display: "flex",
          flexFlow: "row",
          justifyContent: props.isCustomer ? "right" : "left",
        }}
      >
        {!props.isCustomer && (
          <Avatar sx={{mr: 1, bgcolor: "primary.main"}}>
            <img src={avatar} alt="Chatbot avatar" width={32}/>
          </Avatar>
        )}
        <Box>
          <Typography gutterBottom variant="body2" component="div" sx={{mt: 1.5}}>
            {props.content}
          </Typography>
          {props.image && (
            <img src={props.image} alt="Bot response" style={{width: "100%"}}/>
          )}
          {!props.isCustomer && props.choices && (
            <Box sx={{mt: 1}}>
              {props.choices.map((choice, index) => (
                <Chip
                  key={index}
                  label={choice}
                  onClick={() => props.handleChoice(choice)}
                  sx={{mr: 0.5, mb: 0.5}}
                />
              ))}
            </Box>
          )}
        </Box>
      </Box>
    </div>
  );
}
This component takes a few arbitrary inputs (props) and then displays a message.
content— message contentimage— message imageisCustomer— true if the message is sent by the userchoices— choices the user can pick fromhandleChoice— the function that is called when a choice is selected
Next, create a folder named assets within the src folder and put in an image you’d like your chatbot to use as an avatar. Feel free to use this one.
Make sure to name the avatar image bot.png or change the import in Message.js.
Lastly, to utilize the newly created component replace the TODO in App.js like so:
// App.js

{messages.map((message, index) => (
  <Message
    key={index}
    content={message.content}
    image={message.image}
    isCustomer={message.isCustomer}
    choices={message.choices}
    handleChoice={sendMessage}
  />
))}
Don’t forget to add the import at the top of the file:
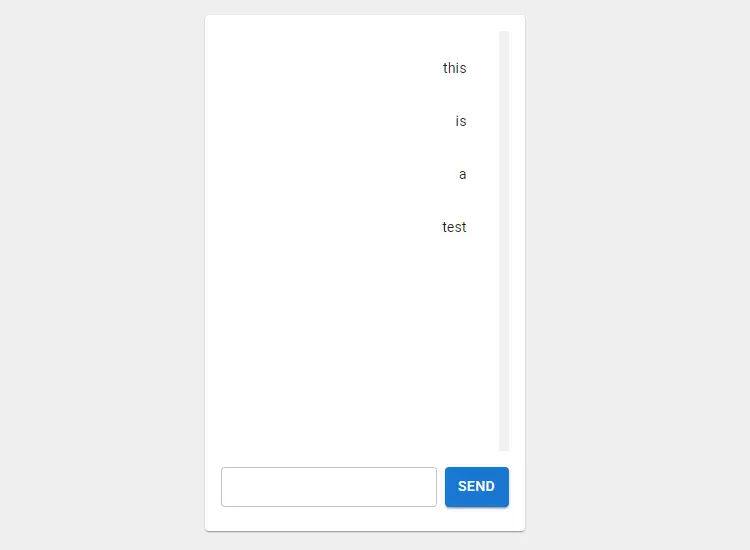
import Message from "./components/Message";To make sure everything works well open your favorite web browser and navigate to http://localhost:3000. Try sending a few messages. If everything works well they should be added to the UI:
Chatbot Backend
Moving along, let’s implement the backend.
Create App
The following steps will require you to have a Back4app account. If you already have it log in otherwise go ahead and sign up for the free account.
To work with Back4app we first need to create an app. As you log in to your dashboard you’ll see the list of your apps. Click on “Build a new app” to create a new app.
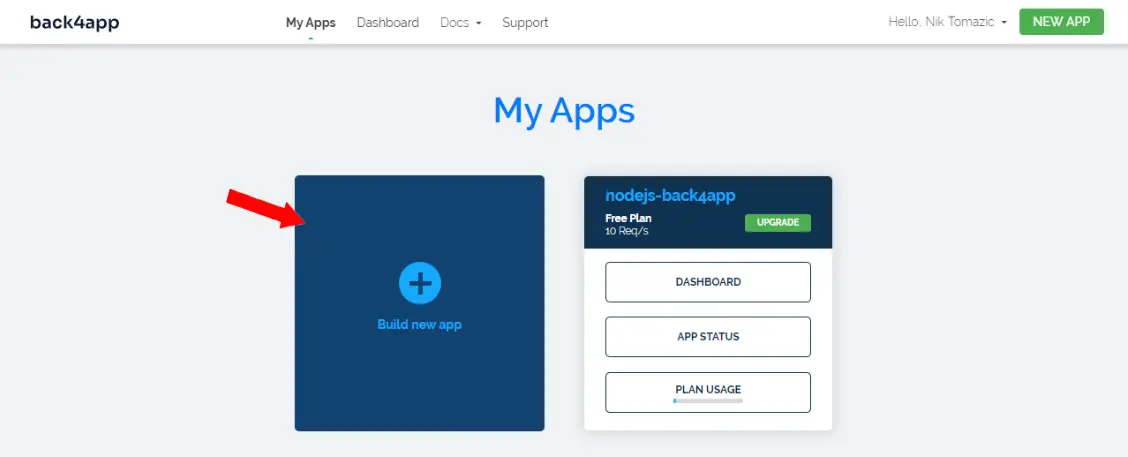
Give it a custom name, pick “NoSQL Database” as your database and then click “Continue”.
Back4app is going to take a few moments to prepare everything required for your app like the database, application layer, scaling, backups & security.
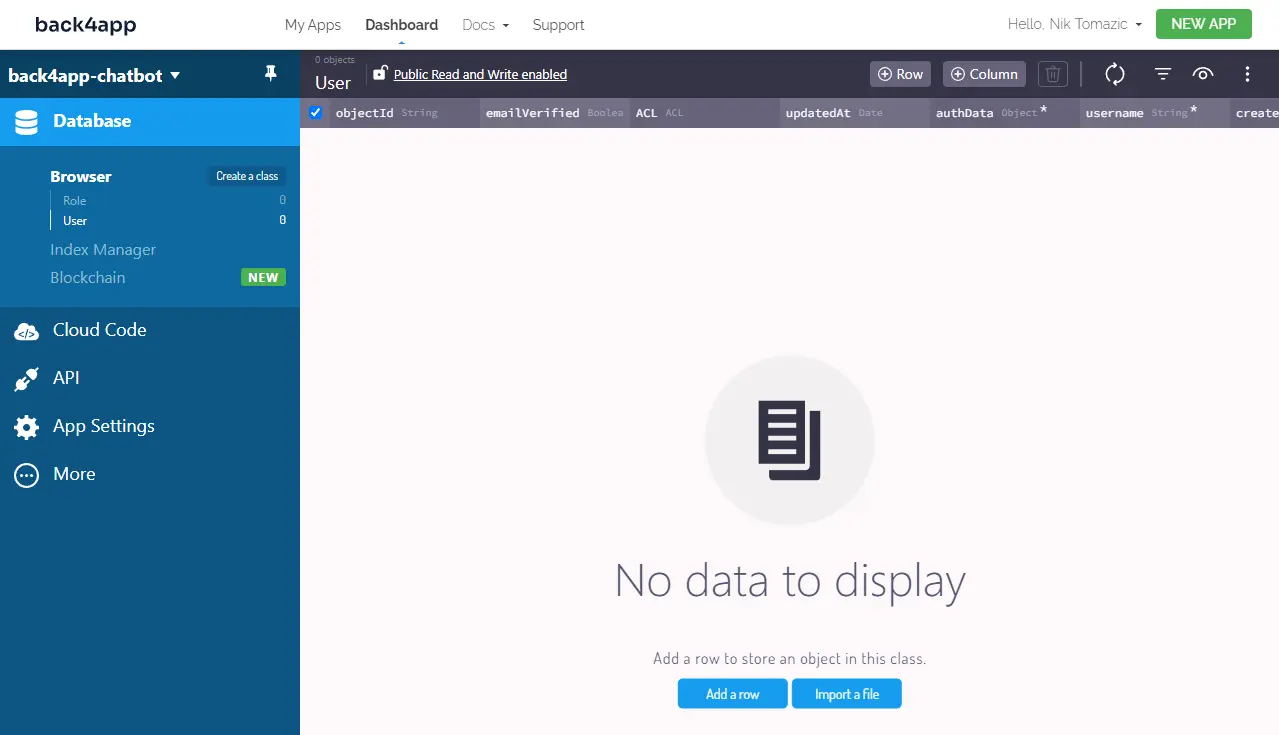
Once your application is ready you will be redirected to your app’s dashboard.
Database
Let’s define the database models for the chatbot.
Navigate to the Back4app dashboard and select “Database” on the left side of the screen. After that click on “Create a class”, name it BotSettings, tick “Public Read and Write Enabled” and click “Create class & add columns”.
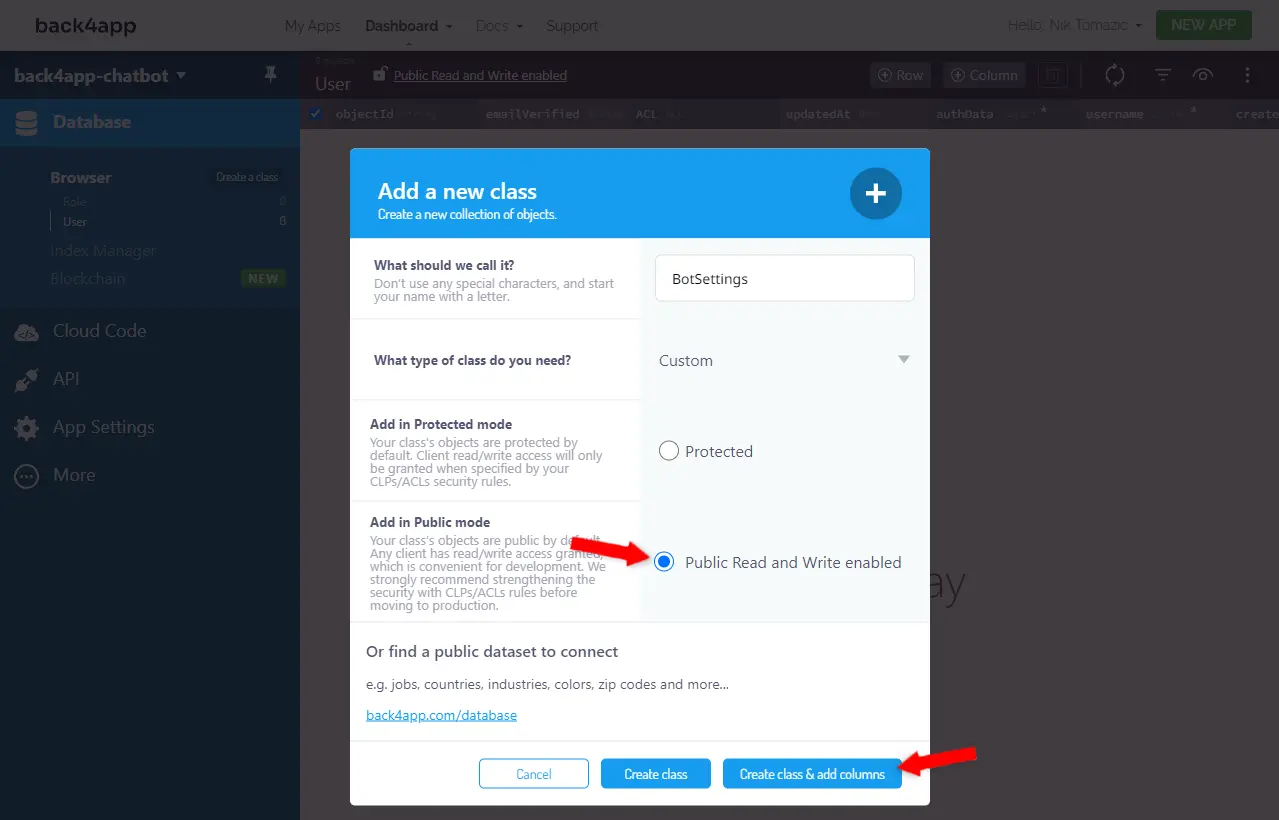
Add the following columns:
+-----------+------------------+---------------+----------+
| Data type | Name             | Default value | Required |
+-----------+------------------+---------------+----------+
| String    | welcomeContent   | <leave blank> | yes      |
+-----------+------------------+---------------+----------+
| Array     | welcomeChoices   | <leave blank> | no       |
+-----------+------------------+---------------+----------+
| String    | responseUnknown  | <leave blank> | yes      |
+-----------+------------------+---------------+----------+welcomeContentis going to be displayed when the user opens the chatwelcomeChoicesare the default choices the user can pick from without entering a messageresponseUnknownis returned if the chatbot cannot find a response to a message
After that create a row with the custom settings. Example:
+----------------+---------------------------+----------------------------------+
| welcomeContent | welcomeChoices            | responseUnknown                  |
+----------------+---------------------------+----------------------------------+
| Hi there!      | ["Shipping","Size guide"] | I don't understand this message. |
+----------------+---------------------------+----------------------------------+
Next, create another class named BotResponse with the following columns:
+-----------+------------------+---------------+----------+
| Data type | Name             | Default value | Required |
+-----------+------------------+---------------+----------+
| String    | requestExact     | <leave blank> | yes      |
+-----------+------------------+---------------+----------+
| Array     | requestKeywords  | <leave blank> | no       |
+-----------+------------------+---------------+----------+
| String    | responseContent  | <leave blank> | yes      |
+-----------+------------------+---------------+----------+
| String    | responseImage    | <leave blank> | no       |
+-----------+------------------+---------------+----------+
| Array     | responseChoices  | <leave blank> | no       |
+-----------+------------------+---------------+----------+
The chatbot is going to use this model to look up the correct response for a specific request. It’s firstly going to check if the message equals to any requestExact column and if not if it contains any requestKeywords. If none of the responses match the request a fallback message is going to be returned.
After you’ve created the model go ahead and create a few responses or import this dataset.
Web Hosting
Since we’re going to create an Express API (using Cloud Code), we need to enable the web hosting for Back4app to host our app and make it publicly accessible to the internet.
To enable the web hosting feature navigate to your Back4app dashboard, select your app, click “App Settings” on the left side of the screen, and then “Server Settings”. Search for “Webhosting and Custom Domains” and click on “Settings” again.
Click “Activate Back4app Hosting” and pick a subdomain name. I’ll use chatbot:
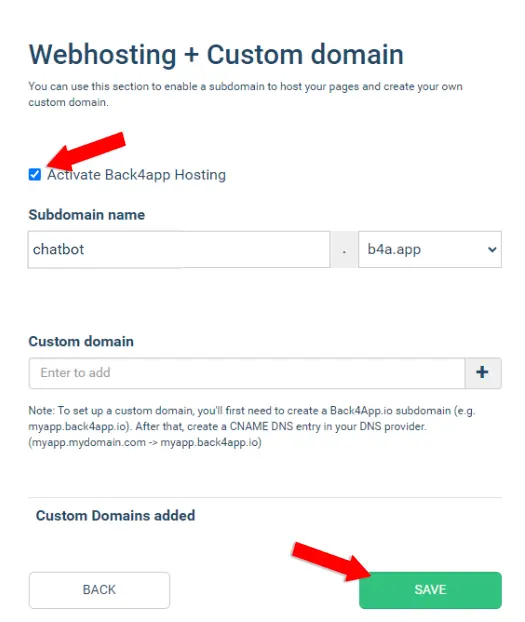
Lastly, click “Save”.
Your app is now going to be accessible at:
https://<your_subdomain>.b4a.app/Express with Cloud Code
In this section of the tutorial, we’ll use Cloud Code and Express to create an API for our frontend to consume. The API is going to have the following endpoints:
/returns the chatbot settings/ask/looks up a request in the database and returns a response
On the right side of the screen select “Cloud Code” > “Functions & Web Hosting” and use the web interface to create the following directory structure:
./
├── cloud/
│   ├── app.js
│   ├── package.json
│   └── routes.js
└── public/
    └── index.html
Put the following contents into package.json:
// cloud/package.json

{
  "dependencies": {
    "body-parser": "*"
  }
}
Back4app uses this file to download modules via npm. We added body-parser since we’ll need it later to parse requests.
Put the following inside app.js to initialize the Express server:
const express = require("express");
const bodyParser = require("body-parser");
const path = require("path");

app.use(bodyParser.json());
app.use(bodyParser.urlencoded({extended: true}));

require("./routes");
Lastly, define the routes within routes.js like so:
app.get("/", async (req, res) => {
  // fetch the settings and the default choices
  const query = new Parse.Query("BotSettings");
  const settings = await query.first();
  res.send({
    content: settings.get('welcomeContent'),
    choices: settings.get('welcomeChoices'),
  });
})

app.post("/ask", async (req, res) => {
  let content = req.body.content.trim().toLowerCase();
  content = content.replace(/[.,?!]/, "");  // remove punctuation

  // check for exact matches
  const exactQuery = new Parse.Query("BotResponse");
  exactQuery.equalTo("requestExact", content);
  const exactResult = await exactQuery.first();

  if (exactResult != null) {
    return res.send({
      content: exactResult.get('responseContent'),
      image: exactResult.get('responseImage'),
      choices: exactResult.get('responseChoices'),
    })
  }

  // split the messsage and check for keyword matches
  const words = content.split(" ");
  for (let i = 0; i < words.length; i++) {
    const keywordQuery = new Parse.Query("BotResponse");
    keywordQuery.equalTo('requestKeywords', words[i]);
    const keywordResult = await keywordQuery.first();

    if (keywordResult != null) {
      return res.send({
        content: keywordResult.get('responseContent'),
        image: keywordResult.get('responseImage'),
        choices: keywordResult.get('responseChoices'),
      })
    }
  }

  // fallback message if the request wasn't understood
  const query = new Parse.Query("BotSettings");
  const settings = await query.first();

  res.send({
    content: settings.get('responseUnknown'),
    choices: settings.get('welcomeChoices'),
  });
})
This code defines the previously mentioned endpoints and chatbot logic to look up the correct responses.
After you’re done click “Deploy” at the bottom right of the screen. If everything goes well you should see a green message saying “Success in deploying your changes!”.
Make sure the API works by sending a GET request to the API index:
$ curl <your_webhost_url>

# Example:
# curl https://chatbot.b4a.app/

{
  "content": "Hi there! 👋 I'm your digital assistant. Feel free to ask me anything!",
  "choices": [
    "Shipping",
    "Size guide",
    "Contact Us"
  ]
}
Connect Frontend with Backend
To make the HTTP request and response handling a little bit easier we’ll install axios — an extensible and simple-to-use promise-based HTTP client for the browser and Node.js.
To install it run:
$ npm install axiosAdd the import at the top of App.js:
import axios from "axios";Next, define the baseURL at the top of App.js like so:
// src/App.js

const baseURL = "https://<url_to_your_web_hosting>/";  // make sure to replace me
We’ll pass baseURL to Axios with each request.
To load the welcome message when the user opens the website we can use the useEffect() hook. Paste in the following code in your App.js:
// src/App.js

useEffect(() => {
  axios.get(baseURL).then(res => {
    setMessages([
      res.data,
    ])
  })
}, []);
This code submits a GET request to our Express API and appends the response to the messages.
The last thing we have to do is to modify sendMessage() to send a POST request to the backend and append the response to the messsages. To do that change sendMessage() like so:
// src/App.js

const sendMessage = (content) => {
  // add the message to the state
  setMessages([
    ...messages,
    {
      content: content,
      isCustomer: true,
    }
  ]);

  // post the request and add the bot response to the state
  axios.post(baseURL + "ask", {
    content: content
  }).then(res => {
    console.log(res);
    setMessages(prevState => [
      ...prevState,
      res.data,
    ]);
  });
}
To improve the UX you can paste in the following code into App.js to automatically scroll down to the bottom with each response:
// src/App.js

useEffect(() => {
  messagesListRef.current.scrollTop = messagesListRef.current.scrollHeight;
}, [messagesListRef, messages]);
Great, that’s it!
Fire up the development server and check if everything works.
Conclusion
It’s no wonder that chatbots are becoming more and more popular. Their awesome perks allow businesses to improve their customer service, increase customer engagement, lower costs et cetera. Experts say that the chatbot era is only beginning and that bots are going to become even more popular in the future!
Throughout the tutorial, we’ve explained what a chatbot is, looked at different chatbot types, chatbot platforms, and taught you how to build your own chatbot. The chatbot we’ve built would work great in a customer support environment for answering simple questions.
Grab the final source code from the GitHub repo.
Future steps:
- Make the bot “smarter” by adding more responses to the database.
- Integrate the chatbot with your website.
- Research how to improve your chatbot by using AI.
FAQ
What is a Chatbot?
A chatbot is a computer program designed to simulate a human conversation through voice commands, text chats, or both.
What are the benefits of using a Chatbot?
– Cost-effectiveness
– 24/7 availability
– Scalability
– Personalization
– Data collection
What types of Chatbots are there?
The chatbots can be categorized based on different properties:
– Intelligence (rule-based chatbots, AI-powered chatbots)
– Service area (customer support, personal assistant)
– Platform (web, mobile apps, messengers)
– State (stateful or stateless)
How to create a Chatbot?
You can either use a chatbot platform like AgentBot, Drift, ProProfs or code it yourself.
How to code a Chatbot?
1. Pick a frontend technology (like JavaScript, React)
2. Code the user interface
3. Pick a backend technology (like Node.js, Python)
4. Code the chatbot logic (you can include AI)
5. Connect the frontend with the backend via REST or WebSockets


