How to build an Astro.js backend?

Astro.js is a static site generator (SSG) and frontend framework for building fast, modern web applications.
It allows you to build fast and lightweight websites by pre-rendering static HTML, CSS, and JavaScript files at build time.
Unlike traditional SSGs, Astro.js also allows you to hydrate your static pages with JavaScript at runtime, giving you the flexibility to create dynamic and interactive websites.
This article provides a comprehensive tutorial on how to build an Astro.js application using Back4app as a Backend as a Service (BaaS).
It will provide an overview of Astro.js, its advantages and limitations, and a step-by-step guide on how to build and host an Astro.js application.
Contents
- 1 Advantages of Astro.js
- 2 Limitations of Astro.js
- 3 Building the Journal Application
- 4 Integrating Back4app With Your Application
- 4.1 Creating a Back4app account
- 4.2 Introducing the Back4app ChatGPT Plugin
- 4.3 Create a Back4app Application With the Plugin
- 4.4 Adding Data to the Back4app Application
- 4.5 Connecting to Back4app
- 4.6 Adding Data to Back4app From the Application
- 4.7 Fetching Data from Back4app
- 4.8 Deleting Data From Back4app
- 5 Testing the Application
- 6 Conclusion
Advantages of Astro.js
Astro.js is powered by several key features that make it a great choice for building modern websites, including:
Island Architecture
Island architecture is a pattern of web architecture that involves breaking down a web page into encapsulated and independent islands of functionality.
Each island can be represented by a single component, a group of components, or even a whole page.
Astro.js extracts your user interface (UI) into smaller, isolated components known as “Astro Islands.” You can use these islands on any page, thus, replacing unused JavaScript with lightweight HTML.
Island architecture has several advantages, including improved performance, increased flexibility, and simplified development.
Minimal JavaScript
Astro takes a “less JavaScript” approach. It only sends JavaScript to the client when it’s necessary for interactivity. This helps reduce the size of the JavaScript bundle and improves load times.
Minimal JavaScript in Astro.js offers several tangible benefits, including improved website performance, better SEO, reduced resource consumption, enhanced security, and a more responsive user experience.
This approach aligns to deliver efficient and performant web applications, making Astro.js a compelling choice for modern web development.
Integration with popular frameworks
You can use Astro.js with various popular JavaScript frameworks, including React, Svelte, Vue, and Lit.
This allows you to choose your preferred tools, reuse existing components and knowledge, tap into established ecosystems, and maintain a smooth development process.
This flexibility and compatibility make Astro.js an attractive choice for various projects.
Optimized Loading
Optimized loading is a core advantage of Astro.js. It fundamentally transforms the way web pages are designed and delivered, focusing on enhancing the user experience and website performance.
Astro optimizes loading and rendering for different devices, including low-powered devices like smartphones. It aims to provide a smooth experience regardless of the user’s device or network conditions.
Limitations of Astro.js
Astro.js possesses some limitations that you should be aware of. Here are some of them:
Ecosystem Compatibility
Astro.js was designed to work with popular frontend frameworks like React, Svelte, and Vue.js. However, its ecosystem is less mature than frameworks like React or Vue, so you might find fewer third-party libraries and components explicitly built for Astro.
Framework Familiarity Requirement
Astro.js allows the use of various frontend frameworks, necessitating familiarity with each chosen framework.
This breadth of knowledge can be overwhelming for developers who specialize in one framework or are new to web development.
Working on a project that requires multiple frameworks will involve maintaining consistency across the various frameworks.
This can be very challenging since different frameworks have their own conventions and best practices, and harmonizing these within a single project can potentially lead to a fragmented code structure.
Optimization Learning
Optimization learning refers to understanding and implementing specific strategies to maximize the performance of web applications built with a framework.
While Astro.js is designed for efficiency and speed, fully leveraging its capabilities requires you to deeply understand its optimization techniques and implement them in the development process. This can be complex and require advanced knowledge.
Building the Journal Application
Following this tutorial, you will build a basic journal application using the Astro.js framework alongside React.js.
The journal application will provide CRUD (create, read, update, delete) functionality and use Back4app for data storage and retrieval.
You can create an Astro.js project by running this command in your terminal:
npm create astro@latest
The command above will generate a basic Astro.js project and guide you through configuring the application, including aspects like TypeScript usage and its strictness level.
To add React.js to your Astro.js project, run this command in your terminal:
npx astro add react
Now, your project is ready. You can start developing the application with your favorite IDE. First, you define your global styles and the layout of the application.
To define your global styles, create a styles folder within the src directory. Inside the styles folder, create a file named global.css and define your global styles there.
Like so:
With the global styles in place, it’s time to define your layout. You’ll find a Layout.astro file within the layouts folder in the src directory.
Replace the existing code in Layout.astro file with the following code block:
The code block above represents the layout component. It imports the global styles, sets up metadata, and provides a placeholder for dynamic content using the slot element.
The main content of the component is an h1 heading with a specific styling defined in the style tag.
To apply the layout and global styles to your pages, import the layout component into the page file and enclose the HTML section within the layout component.
To apply the layout to your homepage, follow the same steps in the index.astro file located in the src/pages directory.
Like so:
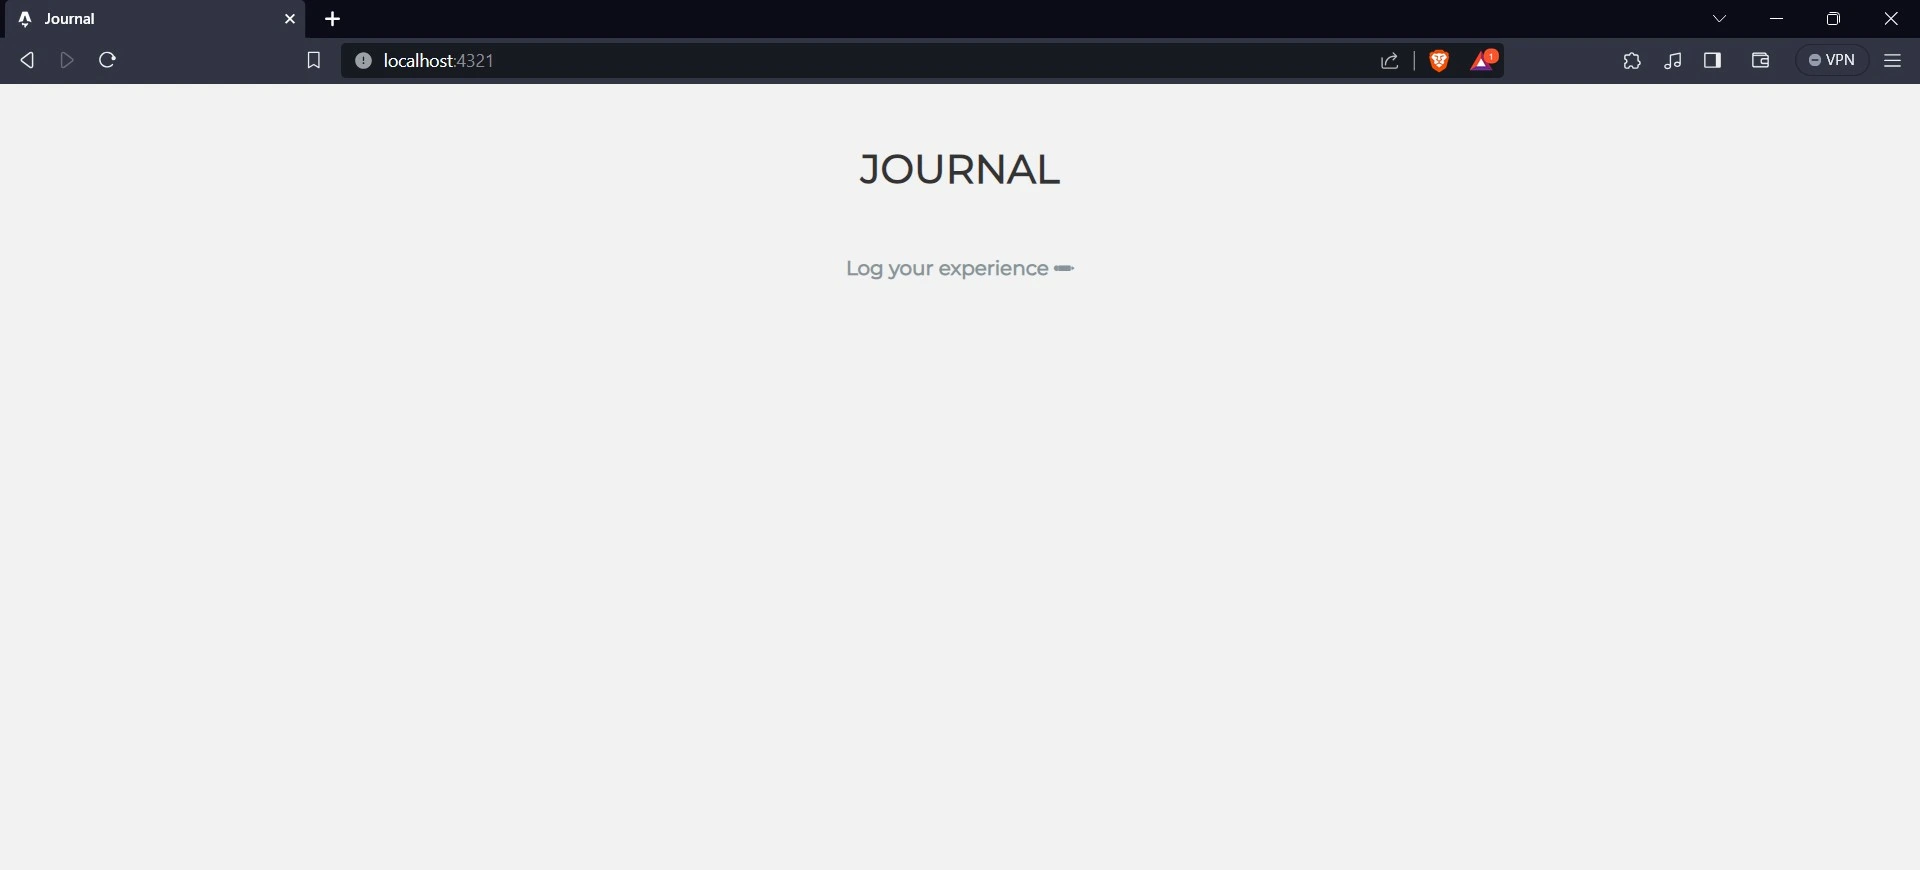
This code block defines the homepage of your application. It defines a navigation menu with a link to the “/journal” page and applies specific styles to center and space the navigation element.
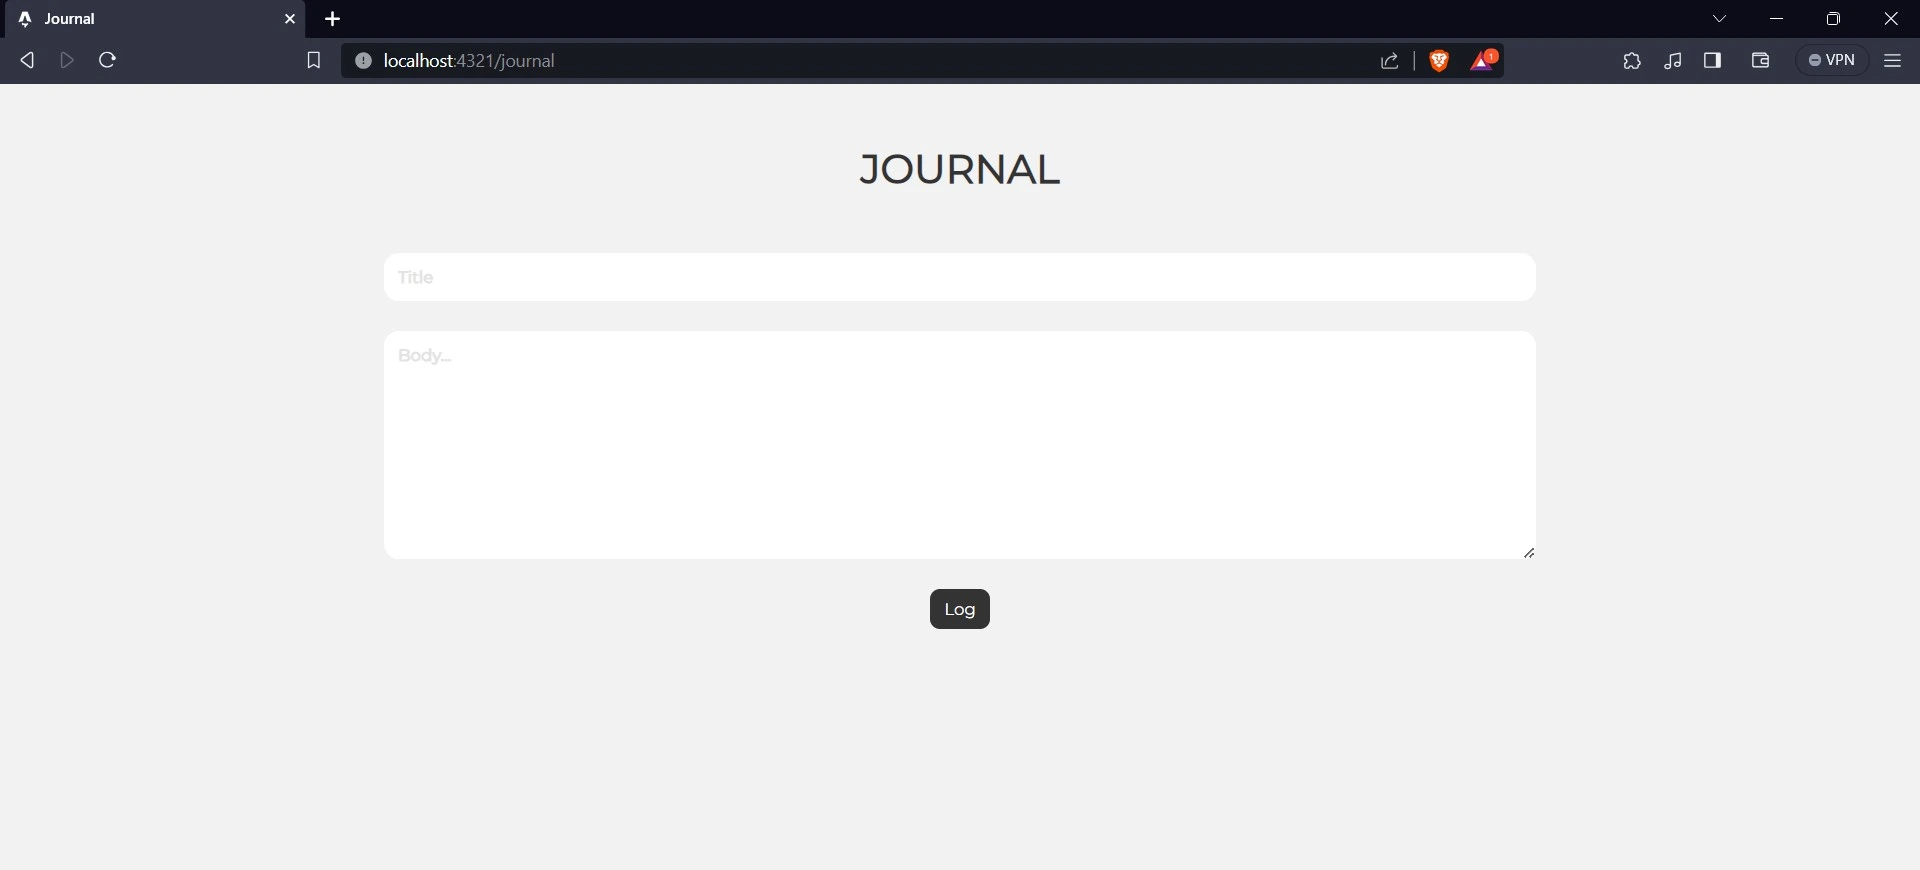
To create the journal page, create a file named journal.astro within the src/pages directory and include the following code block into the file.
The code block above represents the journal page for your application. It imports the layout component and wraps the HTML section to provide a consistent page structure.
The code also defines a form for capturing journal entries, equipped with input fields for the title and body, along with a “Log” button. The CSS styles defined in the style tag control the appearance of the form and its elements.
To launch your application in your web browser, start the application’s development server. Navigate to the project’s directory in your terminal and execute the following command to initiate the development server.
npm run dev
The command above will provide you with the link http://localhost:4321/. Navigate to this link on your web browser to view your application.
The home page should look like this:
To view the journal page, click the navigation link “Log your experience.”
Integrating Back4app With Your Application
Back4App is a cloud-based backend service platform designed to streamline the development, management of applications, and will use Back4app as an Astro.js backend.
Leveraging the open-source Parse Server framework, it provides a robust suite of tools that enable developers to focus on front-end development while simplifying back-end complexities.
At its core, Back4App offers functionalities crucial for modern app development, such as data storage, user authentication, and a real-time database.
This makes it valuable for creating interactive and dynamic user experiences. The platform supports various programming languages and frameworks, catering to diverse development needs.
Creating a Back4app account
To integrate the features Back4app offers in your applications, you need to have a Back4app account. You can create one by following these simple steps:
- Visit Back4app’s website.
- Click on the “Sign up” button.
- Fill out the sign-up form and submit it.
Introducing the Back4app ChatGPT Plugin
Back4app recently introduced its ChatGPT plugin to help developers and non-technical enthusiasts create and interact with Back4app applications.
Using the Back4app ChatGPT plugin, you can convert your conversations into real applications. This means you do not need experience with the Back4app platform before interacting.
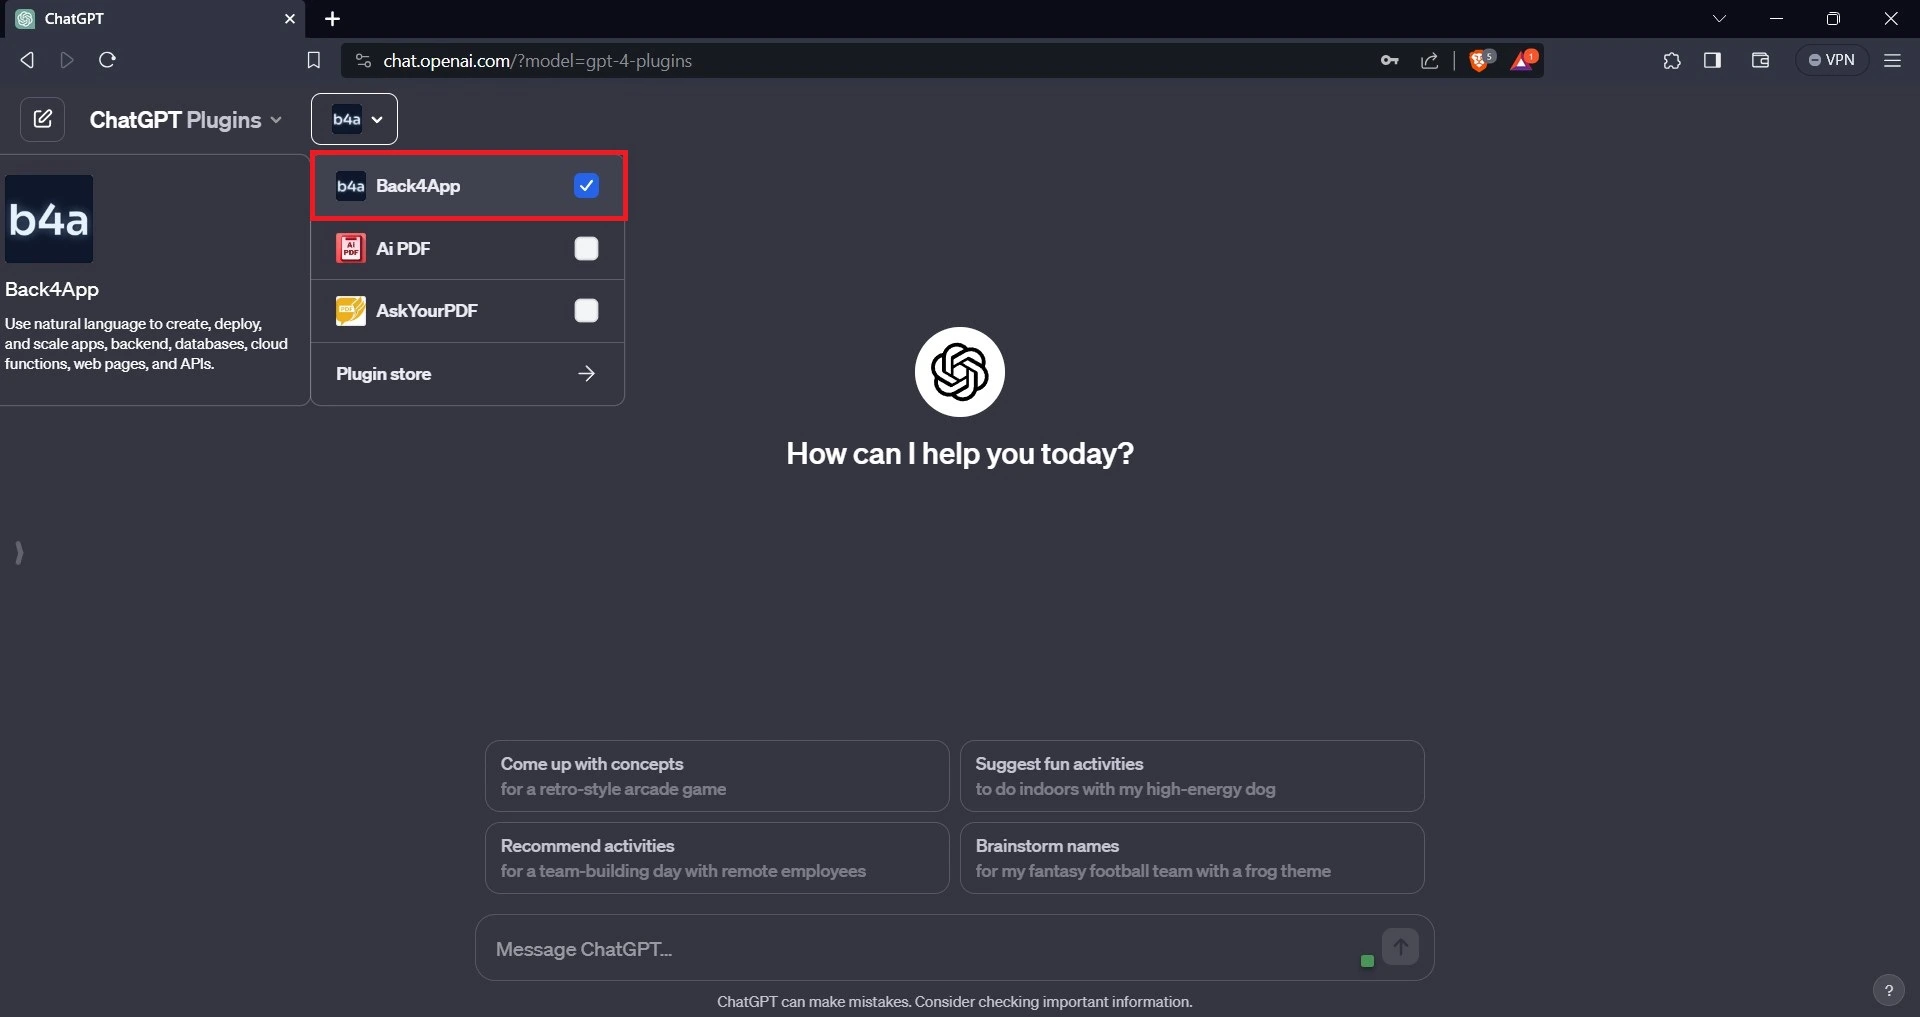
To access ChatGPT plugins, you must subscribe to ChatGPT Plus. Once subscribed, click the “GPT-4” button to reveal a pop-over menu. Select the “Plugins” option to proceed.
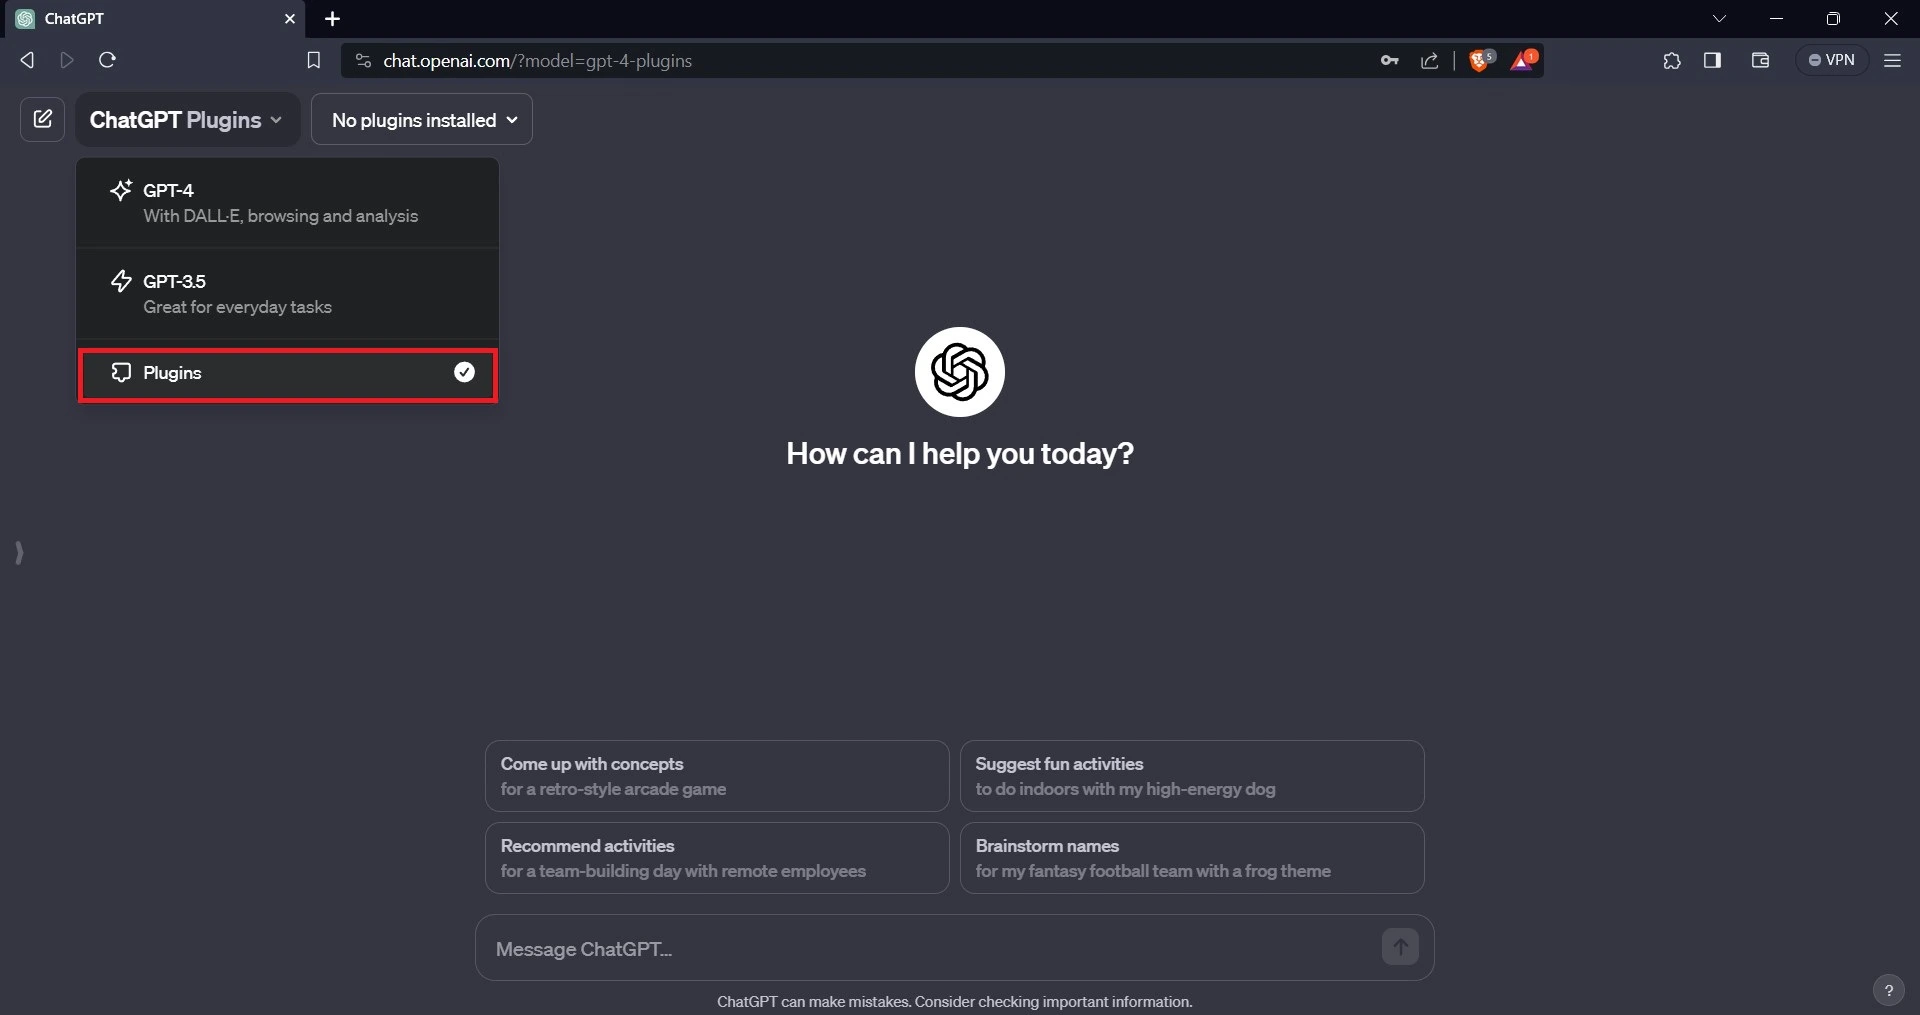
A list of available plugins will appear on your screen. Locate and select the Back4app plugin (Type “Back4app” into the search bar).
Create a Back4app Application With the Plugin
Creating a Back4app application using the Back4app plugin on ChatGPT is a simple task. Inform ChatGPT about the type of application you wish to create, and it will handle the rest.
For example:
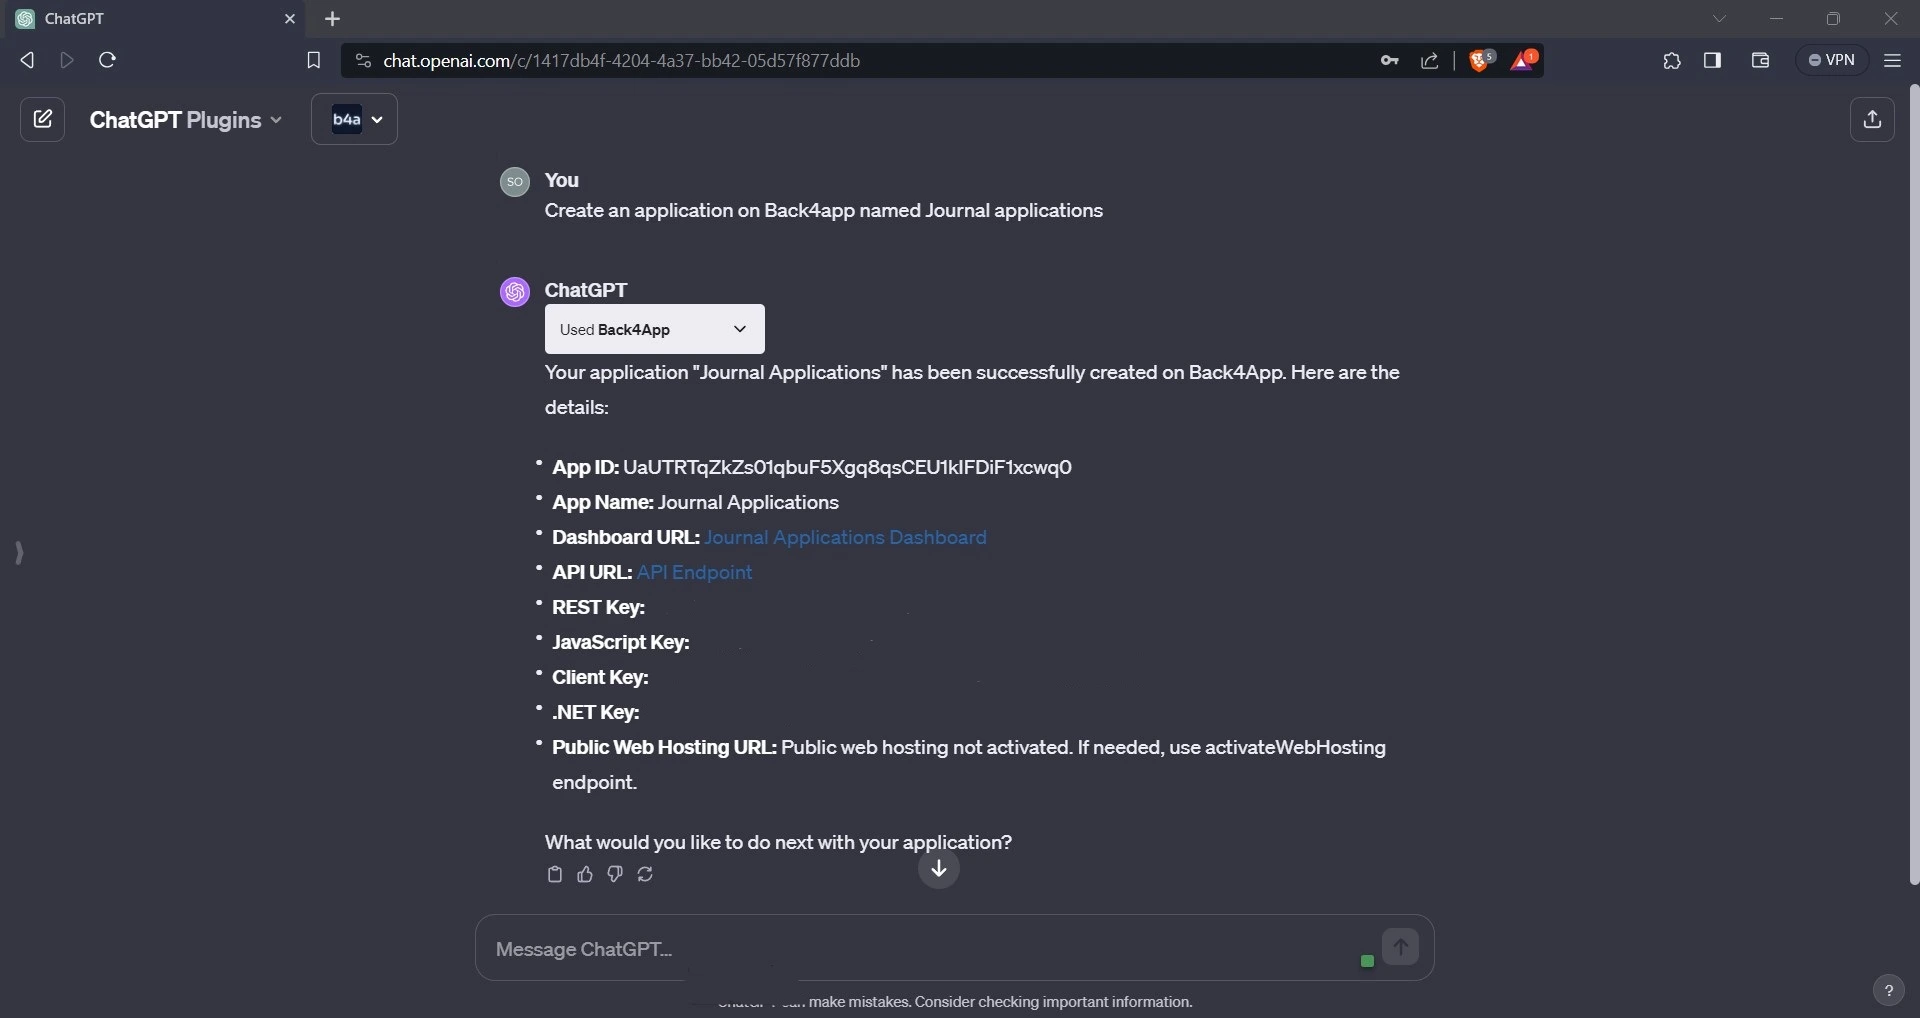
As seen in the image above, the Back4app ChatGPT plugin creates a Back4app application named “Journal application.”
To verify that the Back4app ChatGPT plugin created the application successfully, navigate to the Back4app website, log into your account, and check your apps. You should find an application named “journal application” listed among your applications.
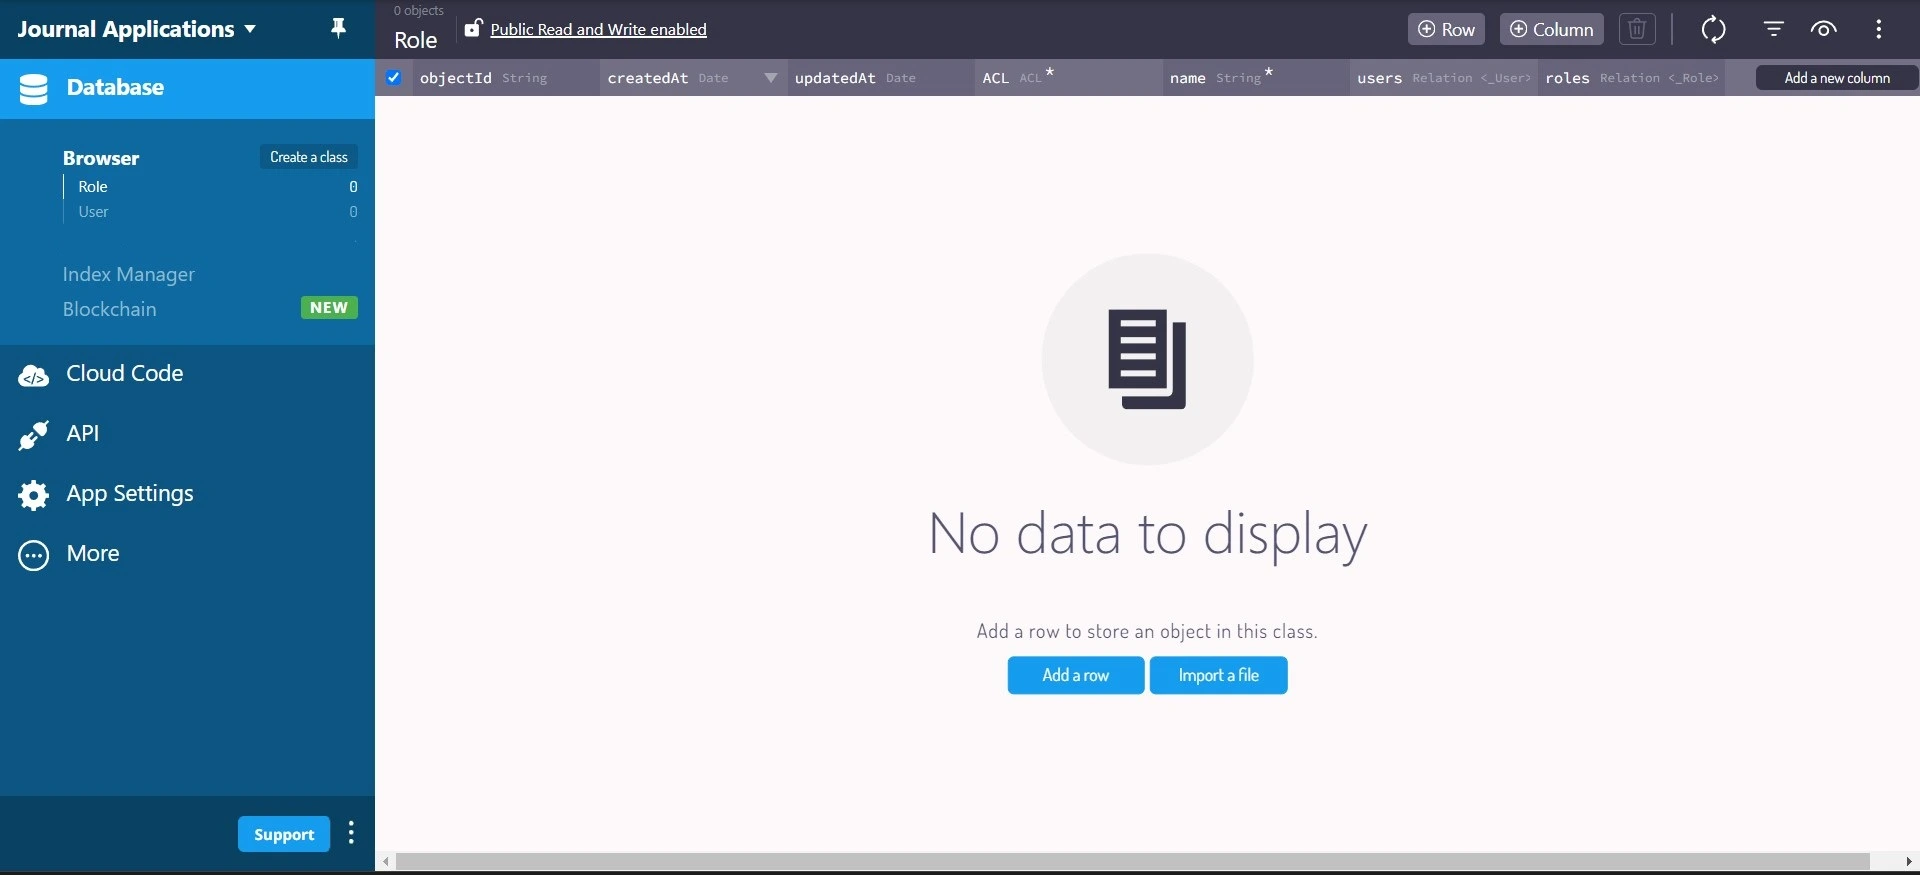
Using the plugin, create a journal class in the journal application.
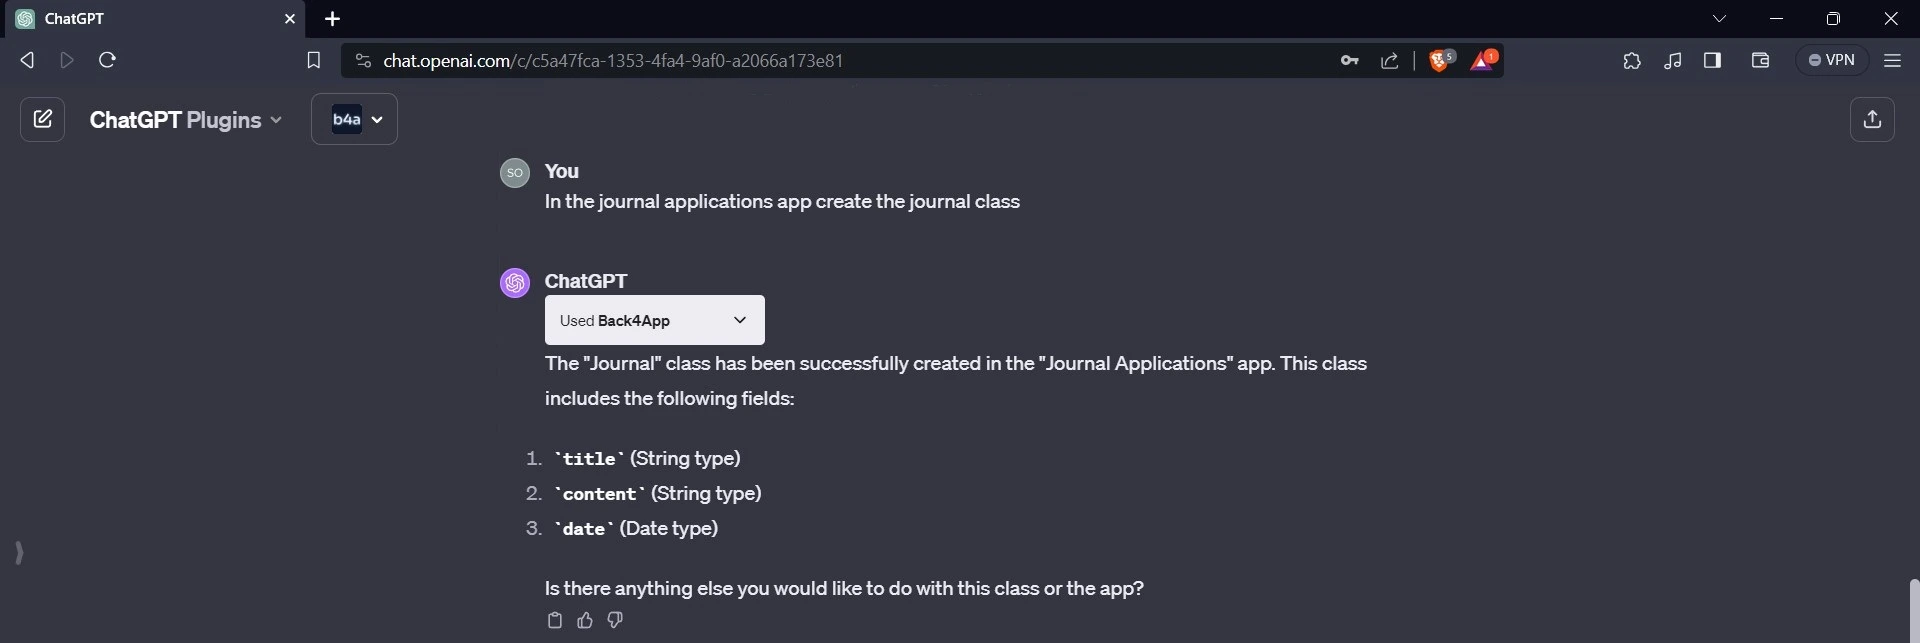
As seen in the image above, the Back4app ChatGPT plugin creates the journal class and adds a title, content, and date field.
Adding Data to the Back4app Application
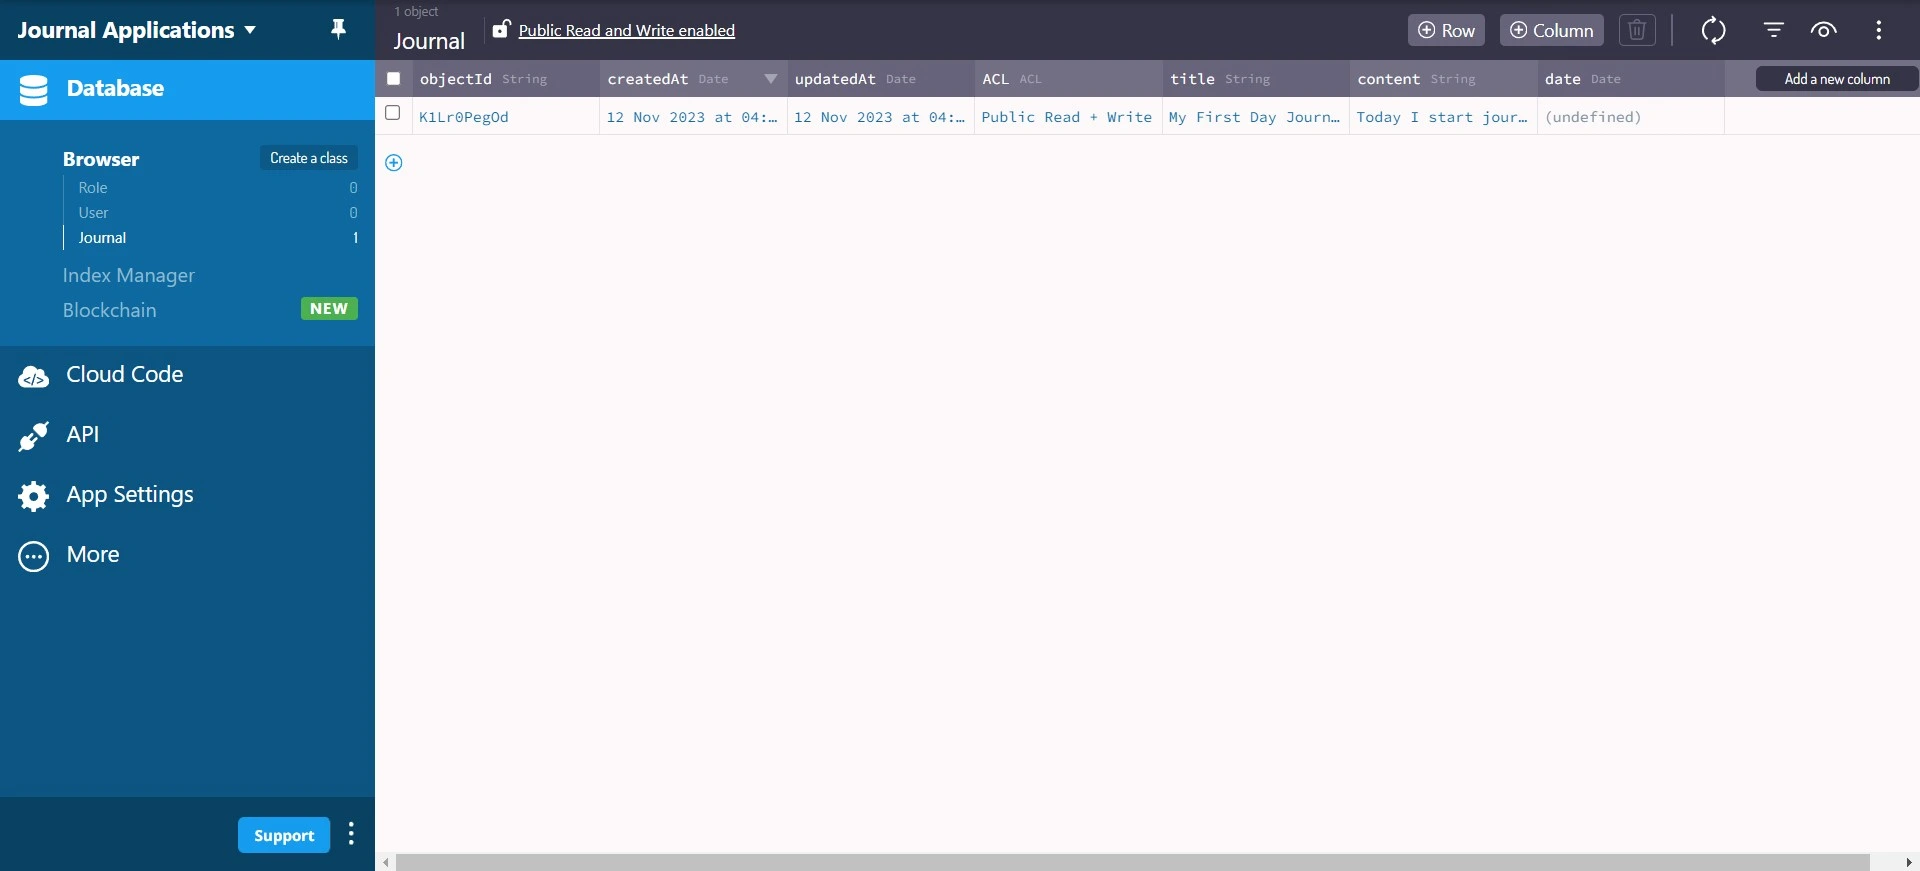
Using the Back4app ChatGPT plugin, you can also add custom data to the application. For example, you can add custom text to the title and content fields.
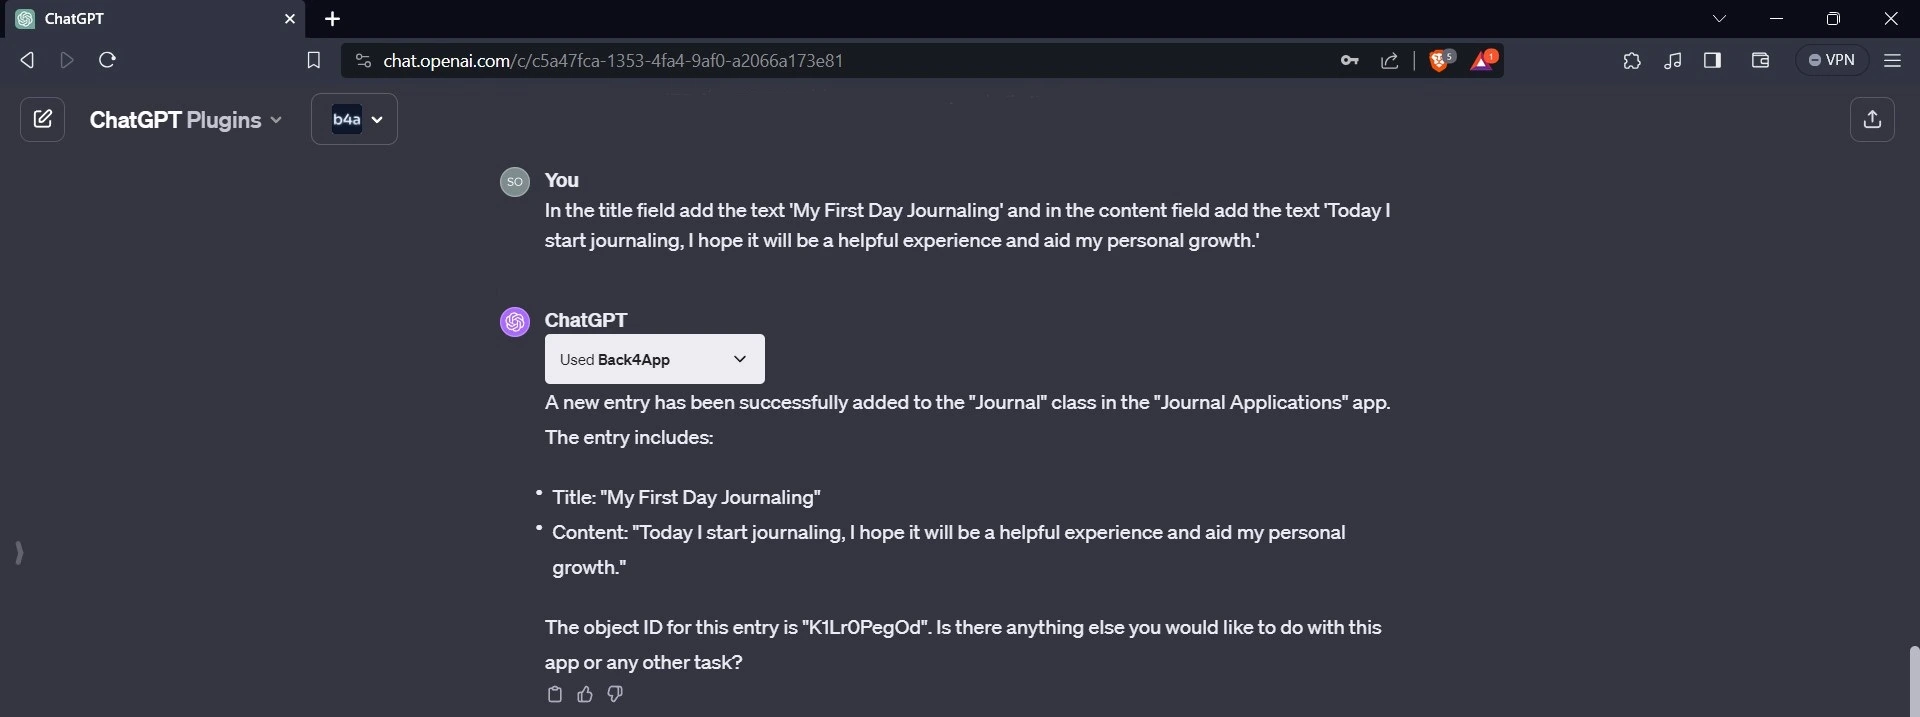
After adding the texts, navigate to the application dashboard, click on the journal class, and confirm that the text was added.
Connecting to Back4app
To connect your journal app to the Back4app application, you need to install the Parse JavaScript SDK in your application.
To do this, run the following command in your terminal:
npm install parse
After installing the Parse JavaScript SDK, you need the Application ID and Javascript KEY credentials.
You can find these credentials in the Security & Keys section on your Back4app app’s dashboard. Store the Application ID and Javascript KEY securely in your application.
Adding Data to Back4app From the Application
Earlier in the article, you learned how to add data to Back4app using the Back4app ChatGPT plugin. To do this using your journal application application, you will utilize the Parse Javascript SDK.
In the journal.astro file, add the code block below:
This code block represents a JavaScript script that integrates with Parse to create and save journal entries. It imports the minified version of Parse from parse/dist/parse.min.js and calls the initialize method.
This method takes the Application_ID and Javascript_KEY credentials as arguments. After calling the initialize method on Parse, set the serverURL property on Parse to https://parseapi.back4app.com/.
The code selects the input, textarea, and button elements from the DOM and assigns them to the title, body, and button variables.
The input field takes the title of the journal entry, and the textarea field takes the body of the journal entry.
The addJournal function contains the logic required to add data to your Back4app database. It creates a new instance of a Journal object, sets its title and content properties to the values of the input and textarea elements, and saves it to Back4app.
With the addEventListener method, the code adds an event listener to the button, ensuring that clicking it triggers the addJournal function.
Fetching Data from Back4app
To fetch data from Back4app to display in your application, you will utilize a React component. Create a Journal.tsx file in the src/components directory. In the file, import and initialize the Parse library.
Like so:
Then, define the JSX elements of the component:
Next, create a journal state and define a function that contains the logic for fetching data from Back4app.
Like so:
With the Parse.Query method, the fetchJournal function uses the Parse SDK to construct a query that retrieves data from the Journal class.
The find method of the query object returns an array containing the query results, and the setJournal function updates the journal state with the retrieved data.
This code uses the useEffect hook to run side effects in the component. It calls fetchJournal to fetch data when the component mounts. Now, in the component, display the content of the journal state.
Like so:
The code block above renders the list of journal entries as a collection of div elements, each with specific content and a dedicated “Delete” button.
It displays the title and content of each journal entry within the h3 and p tag and has a “Delete” button to allow users to remove the entries easily.
To style the JSX elements defined in your journal component, add the following styles to your global.css file:
Now, display the journal component on your home page. To do this, replace the existing code in the index.astro file with the code block below:
This code block imports the journal component and renders it. The client:load directive ensures that the journal component loads immediately on page load, providing a smooth and responsive user experience.
Deleting Data From Back4app
To ensure that your application’s delete button alongside every entry works, you need to define a function that deletes an entry of choice. Using the click event, you will then bind this function to the delete button.
Like so:
The deleteJournal function creates a new instance of a Journal object using the Parse.Object.extend method. After creating the object, it sets the id property of the object to the id parameter passed to the function.
Next, the function calls the asynchronous destroy method of the “Journal” object to delete the journal entry with the given ID from Back4app.
With the filter method, the function filters out the journal entry with the specified id from the journal state, creating a new array that excludes the deleted entry.
Finally, with the setJournal method, the function updates the journal state with this new array.
Now bind the deleteJournal function to the “Delete” button using the click event handler. This will cause your JSX elements in the Journal.tsx file to look like this:
Testing the Application
Now that you are done building the application, it is important that you test it. To do this, navigate to your terminal, run the development server, and view the application on your web browser.
The application should look like this:
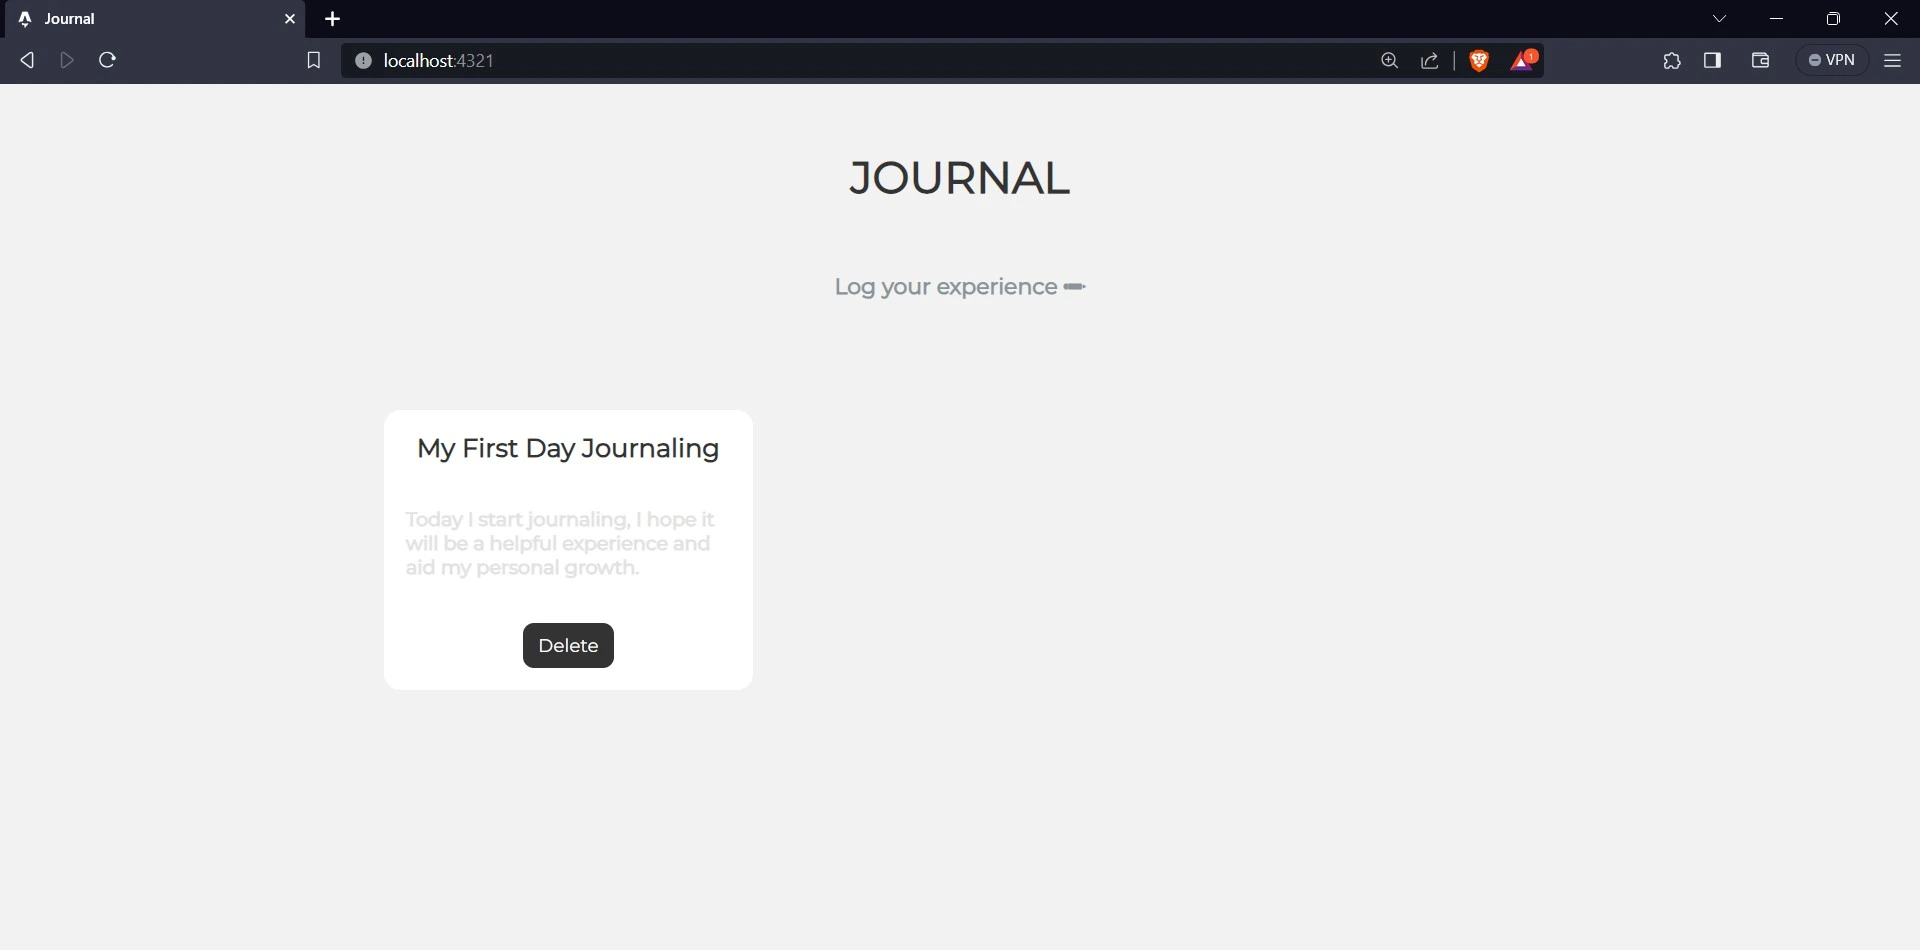
Click on the “Log your experience” to visit the journal page of the application and fill in the input fields.
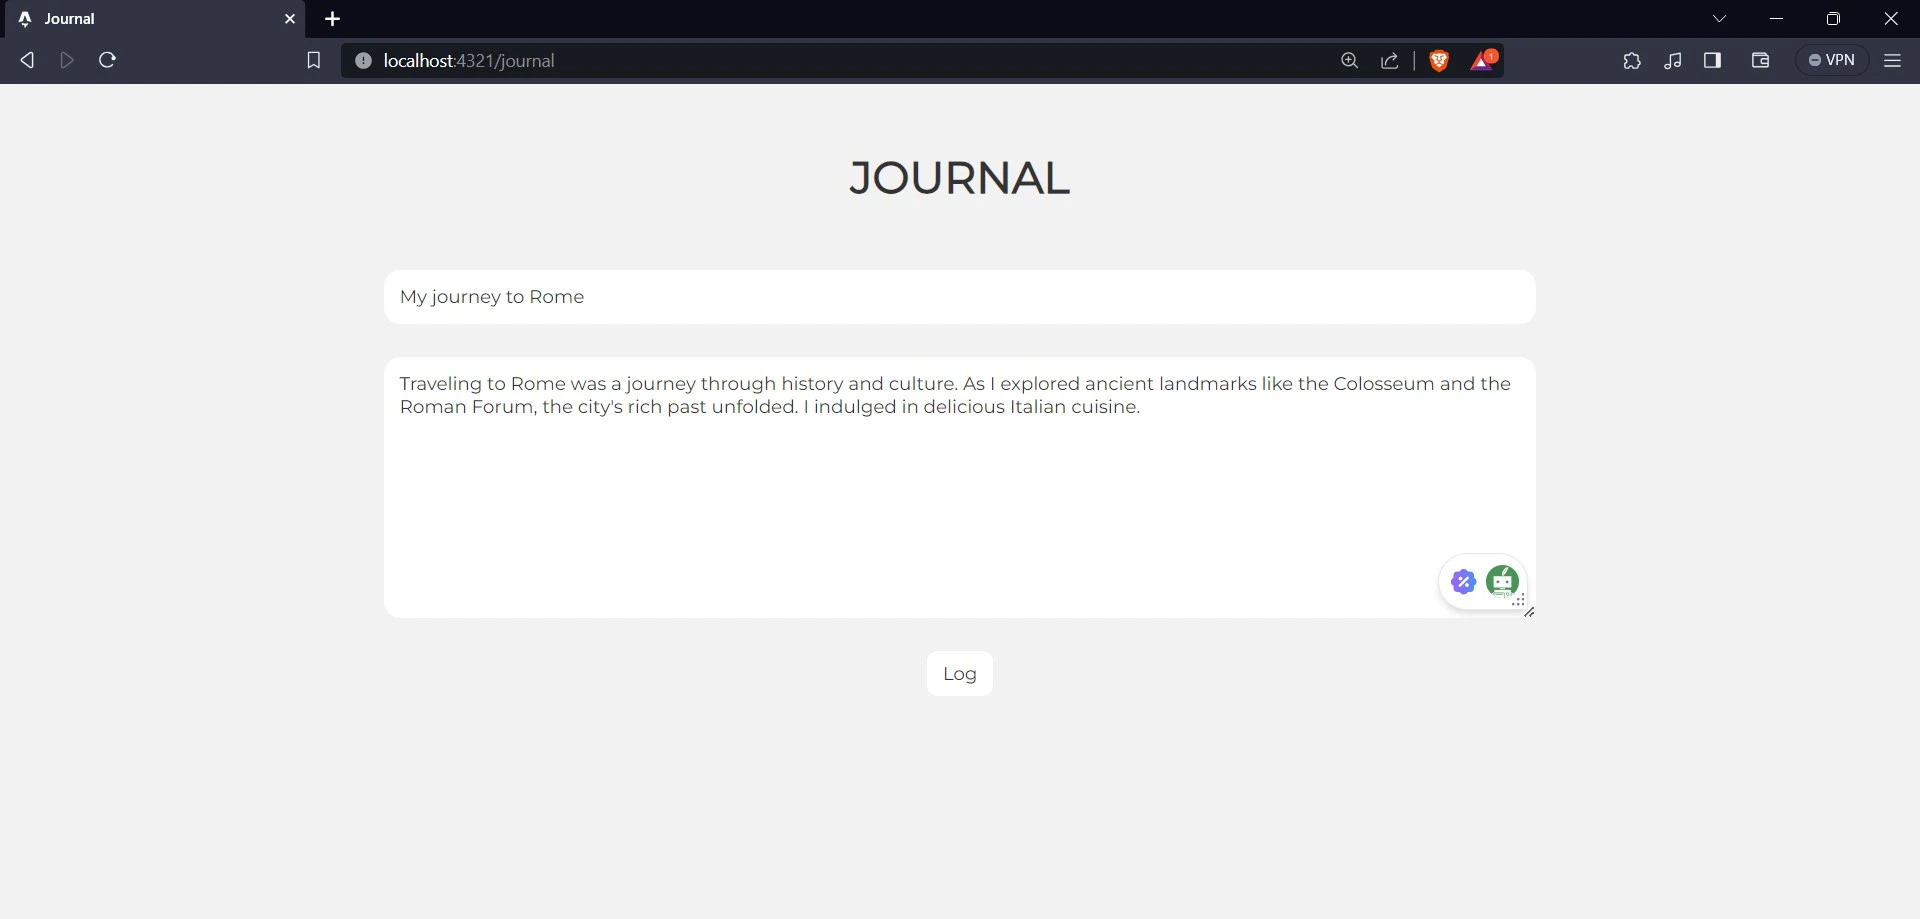
After filling in the input fields, click on log to add the data to your Back4app database. Return to your home page.
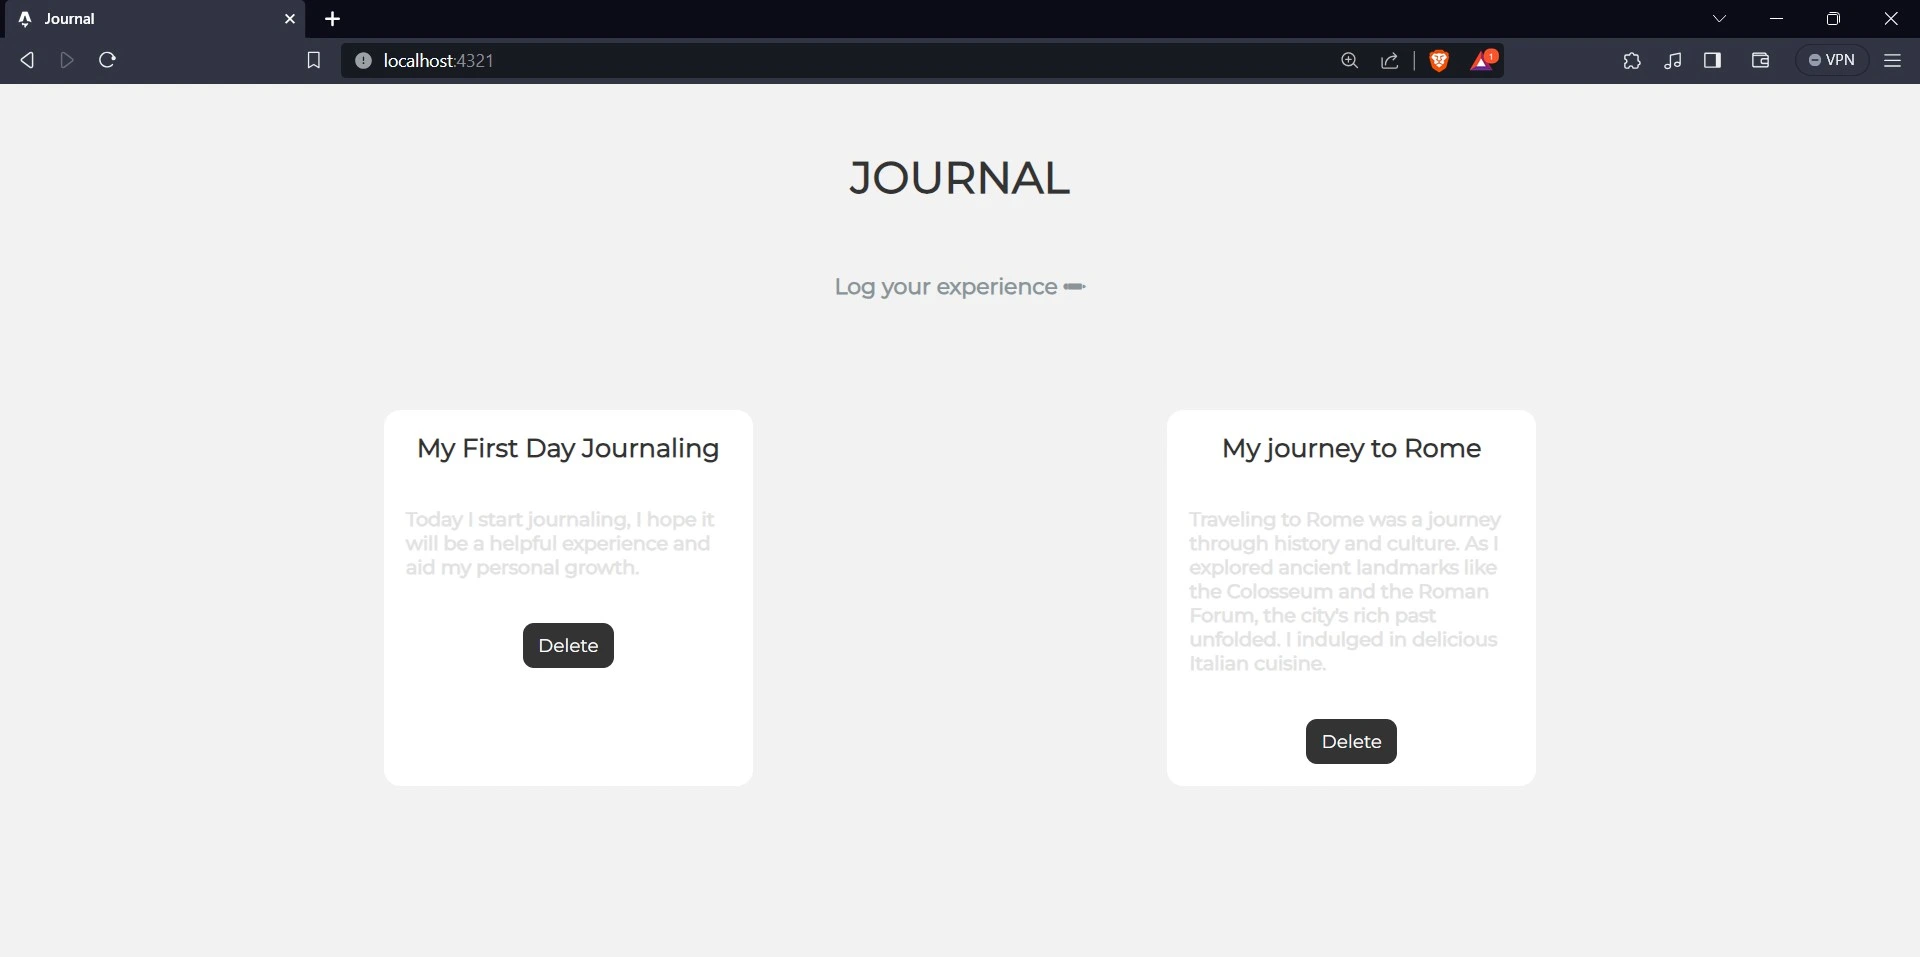
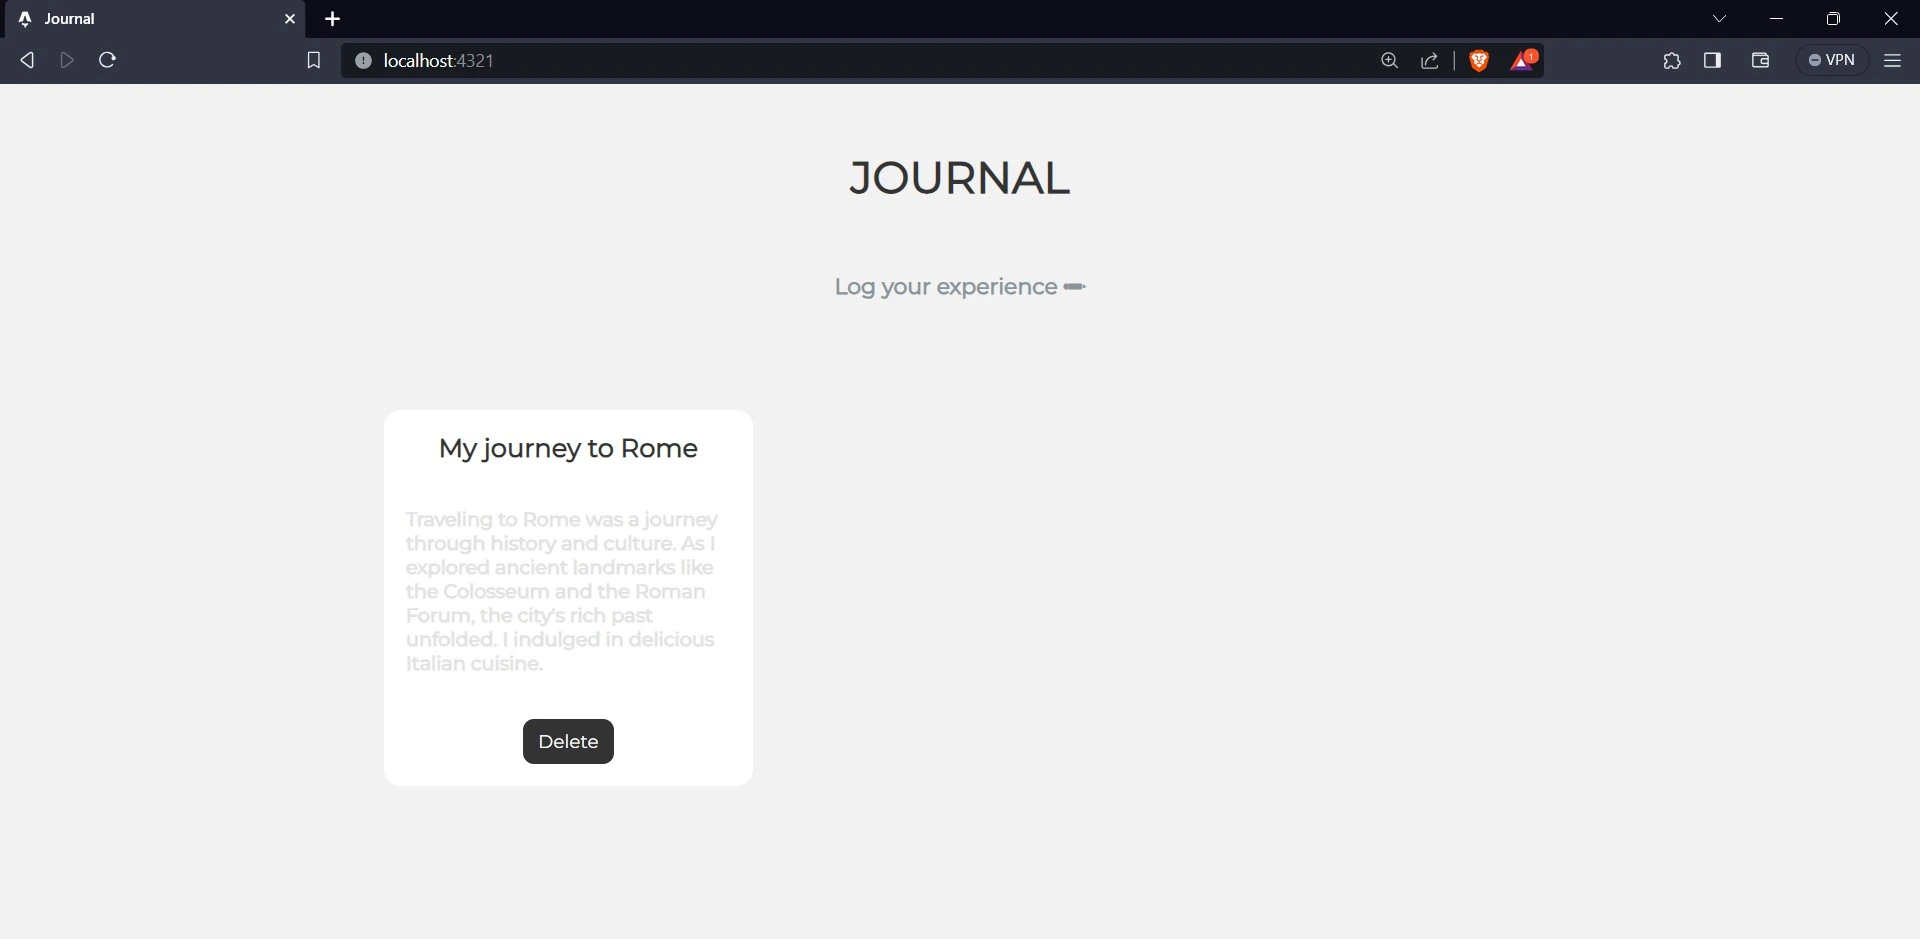
Now, to test if you can delete an entry, click on the delete button of the “My First Day Journaling” entry. Your home page should now look like the image below.
Conclusion
In this article, you delved into the Astro.js framework, learning its advantages and potential drawbacks. You learned how to build an Astro application seamlessly integrated with the React library.
Astro.js is an excellent choice for building various websites, from simple landing pages to complex web applications. It is especially well-suited for websites that need to be fast, lightweight, and scalable.
To know more, please read the tutorial How to create a backend for Astro.js.


