Many tech startups have grown to become global businesses. Since the technology they used for their platform is within your reach, your app can also be the next success story.
What about developing a social network app? Let’s take a look at how you can develop a platform like LinkedIn.
The procedure for creating an app is actually daunting. There are lots of factors that can be discouraging, such as costs, putting the teams together, server issues, projects management hassles, and the likes.
Well, thank goodness that you found this article! This guide will help you avoid lots of headaches and save thousands of dollars while executing your mobile app project.
Before we delve into the detail, let’s take an overview of the LinkedIn platform.
The travel and tourism industry is prospering continually and is showing a steady year-on-year growth around the globe. This boom in tourism can be attributed to the online tourism subsector of the industry.
The ability to book hotel rooms, vacation itineraries, flights, and other services online has made travel preparations simpler than before. Advancements in technology allow tourism companies to serve their clients right in the comfort of their homes.
Booking.com is one of the leading travel fare aggregators in the world. The user base of this platform continues to increase due to its effective management and useful features. That is why app developers are trying to duplicate the success of Booking.com. This article details how to make a hotel app like Booking.com.
Steps involved in creating a hotel app like Booking.com
To simplify the app development process, take a look at the steps mentioned below. Following this procedure helps you develop an application like Booking.com cost-efficiently.
Do not begin coding the app at first
Understand your high-level objectives
Enumerate the features in your application
Choose the perfect OS for the app
Application design
Backend coding
Frontend coding
Landing page creation
Creating an analysis system
App publication
Before you can understand how to make a hotel app similar to Booking.com, you need to know more about this service.
Social networks are more than just “hot”—they are foundational digital infrastructure and an integral part of everyone’s daily life. Do you envision creating the next globally-acclaimed social platform?
In that case, leveraging the proven success and structure of Facebook is a smart place to start. With over 3.05 billion monthly active users as of late 2024, Facebook remains the most successful social network and a powerful blueprint for development.
So, how do you successfully develop a scalable social media app like Facebook?
This article reveals the ten vital lessons I learned from a decade of managing a mobile app development company. As a seasoned founder, I’ll share the crucial details you need to transform your app idea into a reality. Following this proven process will save you significant time and budget on your quest to create a profitable social network.
Ready to start developing your Facebook clone MVP? Dedicate the next 10 minutes to this step-by-step guide. The tips provided here will save you a fortune and fast-track your launch.
Você quer fazer algo ótimo, algo grande, algo único? Apresenta essa idéia incrível para criar o próximo aplicativode táxi …
Como criar um aplicativo como o Uber?
Este artigo fornecerá lições práticas sobre como criar um aplicativo semelhante ao Uber. Leia todos os aspectos cuidadosamente, pois eles economizarão milhares de dólares em horas de engenharia.
O Uber foi uma das primeiras empresas a criar um aplicativo para reservas e viagens de táxi. Essa nova idéia da organização levou muitos outros a desenvolver serviços semelhantes. O principal segredo do sucesso da Uber é sua aplicação conveniente, simples e funcional. Se você quer saber como criar um aplicativo como o Uber, este artigo pode indicar a direção certa. Além disso, lista como outros serviços digitais podem obter com o modelo de negócios da Uber, especificamente a economia compartilhada. Listadas abaixo estão algumas das agendas do artigo.
Mantenha-o simples e comece com um MVP.
Não comece a se desenvolver imediatamente.
Comece com um protótipo funcional primeiro.
Estratégias a serem seguidas ao criar um aplicativo como o Uber.
Aspectos exclusivos e pilhas de tecnologia necessárias para a criação do aplicativo
Painel de administração, aplicativo de driver e funcionalidade de aplicativo de passageiro para aplicativos semelhantes ao Uber.
Como desenvolver um aplicativo como o Uber e manter o orçamento alocado.
Fluxos de receita estabelecidos para essas aplicações de táxi.
Lembre-se de que seu objetivo não deve ser criar um aplicativo que corresponda ao aplicativo da Uber em todos os aspectos.Em vez disso, você deve apresentar recursos exclusivos e idéias úteis, ausentes no produto da Uber.
Do you want to do something remarkable? Something big? Something unique? Have this fantastic idea for the next photo-sharing app but do not know how to implement it? You are on the right article.
How to create an app like Instagram?
If you want to know how to make an app like Instagram, listed below are a few pointers commonly associated with developing a photo-sharing app.
We will share practical lessons that will save you thousands of dollars in development costs. Mobile application development requires considerable forethought and planning. To ensure smooth development, you should focus on the ahead work.
Research the market to determine your target audience.
Start with an MVP.
Finalize the concept of your unique application and focus on how it differs from Instagram.
Study the competing photo-sharing apps.
Define factors, such as the scope, budget, goals, and technologies for the application.
Come up with an eye-catching advertising and promotional strategy early in the app development cycle.
Establish a channel to communicate with app users so that you can receive feedback from them.
Pick a reputed and responsible app development agency to create an Instagram-like photo-sharing application.
Keep in mind that the development procedure involves designing, creating, testing, and launching the program in question.
Monitor the competitors and evolve your application accordingly with bug fixes, updates, and functionalities.
Are you brainstorming on how to build an outstanding project? Do you have an idea for the next billion-dollar messaging app? Perhaps you are considering creating a WhatsApp clone app? You are on the right place and this article will explain how to develop WhatsApp social messaging app clone.
Well, it’s possible to build a robust messaging app like Whatsapp, but you need to follow tried and tested strategies that guarantee success.
How Do you Create a Messaging App Like WhatsApp?
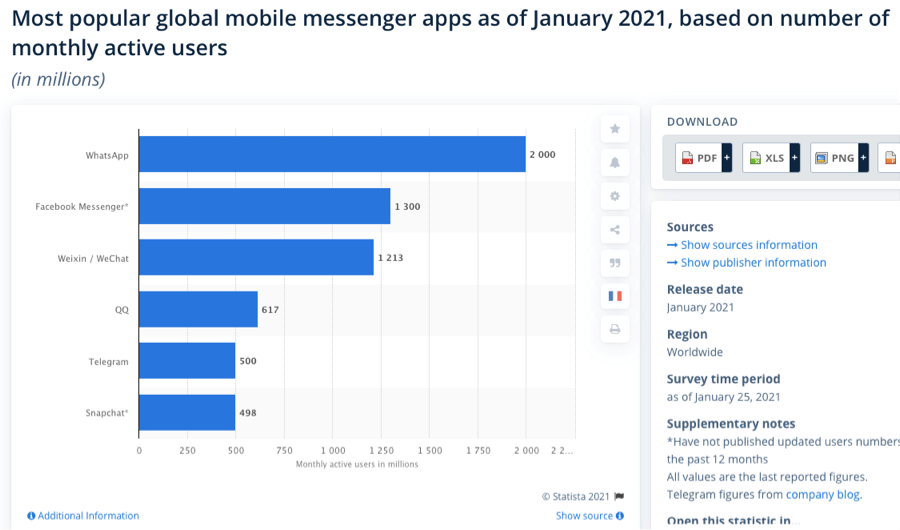
Data from SimilarWeb, an analytics and market intelligence company, shows that apps in the messaging category have the highest number of downloads in over 180 countries. Apptopia ranked Whatsapp as 2nd most downloaded apps of 2020.
A 2020 survey by Statista also showed WhatsApp was installed 600 million times globally and it’s used by about 2 billion peopleuse every month. The statistics authority website forecasts that this number will continue to increase. This means that a third of the global population will be using IM apps by then. Although there are myriads of messaging platforms that compete in the market, WhatsApp is the dominant IM app with more than 2 billion users.
Almost all smartphone users have a messaging app installed on their phones. Although there are myriads of messaging apps out there, new ones are still getting launched on the app store all the time. The reason is simple; the market is massive. You too can cash in on the instant messaging app craze by building an app like WhatsApp.
This article walks you through a step-by-step procedure of creating a chat application like WhatsApp. To achieve this objective, we shall provide a WhatsApp clone template to help you understand how the app works.
Want to know how to make an app like WhatsApp? Continue reading to learn more about how to create a WhatsApp clone app.
This article will explain the advantages of using GraphQL over REST. It provides an overview of GraphQL, the challenges of using REST for specific use cases, and how GraphQL solves these problems.
GraphQL was developed by Facebook and released as an Open Source application in 2012. It functions as a query language designed for APIs. In essence, client applications use it to load data from the server.
It has a reputation for being more efficient than traditional services. To be candid, GraphQL is unique; it is far more efficient than competing programs. That is why many organizations are adopting it for building APIs.
This article will compare and contrast both REST and GraphQL APIs. We will take a closer look at the drawbacks of REST and how GaphQL proffers a solution that enhances efficiency and productivity.
After that, we shall consider the multifaceted benefits that GraphQL offers developers. This article provides valuable information to decide if you need to switch from REST to GaphQL.
À medida que as tecnologias melhoram, a hospedagem na nuvem se torna quase essencial para os desenvolvedores. Esse recurso simplifica o procedimento de implantação de aplicativos e programas, oferecendo maior escalabilidade e escopo. A Digital Ocean e a Heroku são dois dos provedores de serviços de hospedagem em nuvem mais populares do mundo atualmente. Se você estiver com problemas para escolher um, a comparação a seguir pode ajudá-lo a fazer a melhor escolha. Antes de ir para DigitalOcean vs Heroku, você deve primeiro entender o que são esses dois.
Hood.ie is an open-source backend that allows developers to quickly implement features without even needing to code. It is the first-ever offline Javascript backend and is mainly used by mobile application & game developers to make a backend that works without needing to waste dozens of hours into difficult backend coding. There are some alternatives to Hood.ie that might be better than itself in certain scenarios. We have listed five of them:
A hospedagem na Web é um serviço extremamente útil, sem o qual as empresas deixam de tornar seus sites acessíveis através da internet. A Locaweb é um popular provedor de serviços de hospedagem na web que oferece seus produtos a milhares de empresas de TI.
O que é a Locaweb?
A Locaweb fornece serviços de TI a consumidores, empresas de nível médio e pequeno e até empresas corporativas. Com milhares de clientes ativos, é considerado um dos mais importantes provedores de serviços de hospedagem na web no mundo. Se você precisa de serviços de hospedagem de qualidade, a Locaweb oferece uma solução confiável para sua marca. No entanto, além da oportunidade de hospedagem na web, a Locaweb também fornece outros serviços, como registro de domínio, recursos de computação em nuvem e serviços de call center virtual.
Serviços da Locaweb
Para saber mais sobre os tipos de serviços oferecidos pela Locaweb, dê uma olhada abaixo.
Hospedagem na Web – Esta é a principal operação da empresa. A hospedagem na Web da Locaweb inclui o serviço de hospedagem, registro de domínio e todos os outros serviços relacionados.
Serviços de terceirização – também oferece serviços de infraestrutura do Datacenter, que incluem servidores dedicados e computação em nuvem.
Comunicação – A Locaweb fornece serviços de call center virtual juntamente com PABX virtual para empresas que precisam do mesmo.
No entanto, a Locaweb não é o único provedor de serviços de hospedagem no mundo. Muitas empresas estão procurando alternativas da Locaweb. Listadas abaixo estão algumas opções abertas para você: