How to deploy an application to Heroku?

This tutorial covers the deployment process of a Python-based application to Heroku. Reading this article, you can understand Heroku’s core functionalities, Heroku’s app deployment process, and how to deploy an app to Heroku.
On top of that, it provides instructions on deploying the same application to Back4app Containers — a great free alternative to Heroku.
Contents
Goals
By the end of this tutorial, you’ll be able to:
- Understand Heroku & its functionality
- Deploy your applications to Heroku
- Grasp Back4app Containers & its features
- Deploy your apps to Back4app Containers
- Determine which service to use for your app
What is Heroku?
Heroku, established in 2007, is one of the most reliable Platform as a Service (PaaS) platforms. The cloud platform allows you to build, manage, deploy, and scale apps easily.
It natively supports Ruby, Python, Java, Clojure, Node, Scala, Go, and PHP. Nevertheless, it allows you to deploy other programming languages and frameworks via Docker.
Heroku’s main advantages include ease of use, scaling capabilities, security features, add-ons, Heroku CLI, and being developer-centric.
On the other hand, Heroku is often criticized for being expensive, having inadequate regional support, and being behind with the latest development trends.
One of the main reasons Heroku is as popular as it is is due to offering free services in the past. Up to November 2022, you could use Heroku to host your applications and even databases for absolutely free.
They’ve sadly decided to cancel these free services to combat fraud and abuse of the free tier. Despite the recent changes, Heroku remains one of the most popular hosting platforms. Keep reading to learn how to deploy to Heroku.
To learn more about Heroku, check out our other article called What is Heroku?
Project Setup
To demonstrate how to deploy apps to Heroku and Back4app Containers, I’ve prepared a simple web application to instruct you how to deploy a Python app to Heroku. The web app uses the FastAPI framework and serves as a simple URL shortener service. It comes with two endpoints:
/shortenassigns analiasto along_url/<alias>redirects the user to the correspondinglong_url
Feel free to test your understanding by following along with your own project.
Prerequisites
- Basic understanding of Python and Git
- Python 3.9+ installed on your local machine
- Git Bash and Docker Desktop installed and configured
- A personal GitHub account
Clone & Run
Heroku deployment start by forking this repository on GitHub and then cloning the fork to your local machine:
$ git clone <fork_remote_git_url>
$ cd back4app-heroku-deploy
If you do not wish to fork, you can create your repository and push the source code to it.
Create a virtual environment and activate it:
$ python -m venv env && source env/bin/activateNext, install the project requirements:
(env)$ pip install -r requirements.txtLastly, start the development server:
(env)$ python -m uvicorn main:app --reload

INFO:     Will watch for changes in these directories: [...]
INFO:     Uvicorn running on http://127.0.0.1:8000 (Press CTRL+C to quit)
INFO:     Started reloader process [1488] using WatchFiles
INFO:     Started server process [2316]
INFO:     Application startup complete.
Open your favorite web browser and navigate to http://localhost:8000/docs. Use the interactive documentation to test the web application. If you need help formatting requests, check out the test_main.http file.
How to deploy an application to Heroku?
In this section, we’ll deploy an application to Heroku.
The following steps will require a Heroku account. If you don’t have one yet, go ahead and sign up. On top of that, make sure to add payment information to your Heroku account.
If you delete your app right after the tutorial, you shouldn’t be charged anything.
Switch to a new branch called heroku:
$ git checkout -b herokuObjectives
- Install Heroku CLI.
- Create a Heroku app.
- Specify the runtime via runtime.txt.
- Specify the app processes via Procfile.
- Push the source code to Heroku.
Heroku CLI
There are multiple ways to interact with Heroku. You can use the dashboard, Heroku CLI, or the Heroku API.
I prefer Heroku CLI since it’s a powerful tool that allows you to get work done quickly. We’ll use it throughout the tutorial.
First, install Heroku CLI by following the official installation instructions.
After that, ensure the installation was successful by checking the CLI version:
$ heroku --version
heroku/8.4.2 win32-x64 node-v16.19.0
Next, check for CLI updates and authenticate using your Heroku account:
$ heroku update
$ heroku login
When running the second command, a browser window will open. To authenticate yourself, click “Log in” and close the browser window.
Create Heroku App
To deploy to Heroku, you first need to create a Heroku app.
Open the terminal once again, navigate to your local project (e.g., back4app-heroku-deploy folder), and run the following command:
$ heroku create -a <app_name>

Creating ⬢ <app_name>... !
https://<app_name>-31a6fd70e769.herokuapp.com/ |
https://git.heroku.com/<app_name>.git
Make sure to replace
<app_name>with the desired application name.
Next, check if the app was successfully created by listing the apps:
$ heroku apps

=== <email_address> Apps
<app_name>
Then check the app’s details:
$ heroku apps:info <app_name>

=== <app_name>
Auto Cert Mgmt: false
Dynos:
Git URL:        https://git.heroku.com/<app_name>.git
Owner:          <email_address>
Region:         us
Repo Size:      0 B
Slug Size:      0 B
Stack:          heroku-22
Web URL:        https://<app_name>-21de155883d3.herokuapp.com/
As you might know, Heroku is tightly integrated with Git. As you create a Heroku app, a remote Git repository is created to which you can push your source code to deploy it. In our case, the remote Git URL is:
https://git.heroku.com/<app_name>.gitHeroku CLI automatically registers a Git remote when you create an app. Try listing the remotes:
$ git remote -v

heroku  https://git.heroku.com/back4app-url-shortener.git (fetch)
heroku  https://git.heroku.com/back4app-url-shortener.git (push)
origin  [email protected]:duplxey/back4app-heroku-deploy.git (fetch)
origin  [email protected]:duplxey/back4app-heroku-deploy.git (push)
We’ll use the heroku remote in the upcoming section to deploy our source code.
runtime.txt
A runtime.txt file allows you to specify the exact Python version you want Heroku to use. This is important if your project requires a specific Python version to work. At the time of writing, it defaults to python-3.11.5.
To specify the runtime, create a runtime.txt file containing the runtime version. Example:
python-3.11.5For the list of supported Python runtimes, check out Heroku Python Support.
Procfile
A Procfile allows you to define the commands that should be executed to start the application’s processes. We’ll utilize a Procfile to start the Uvicorn web server.
Create a Procfile in the project root with the web process:
web: gunicorn -w 1 -k uvicorn.workers.UvicornWorker main:appWith production apps, you’ll likely want to spawn multiple workers instead of one. Since a database doesn’t back our app (it uses in-memory data), we can’t sync data between multiple worker processes. Therefore we have to use one worker.
Push the changes to your GitHub repository:
$ git add .
$ git commit -m "configured app for heroku"
$ git push origin heroku
Deploy Heroku App
Heroku uses so-called buildpacks to transform applications into units that can be executed on dynos. A buildpack is just a set of specialized scripts for a specific programming language.
As you push your code to Heroku, Heroku automatically detects your project’s programming language and the buildpack required to build it. In the case of Python, it checks if a requirements.txt file is present.
To deploy your app, all you have to do is push the code to the heroku remote:
$ git push heroku heroku:main

Enumerating objects: 5, done.
Counting objects: 100% (5/5), done.
Delta compression using up to 8 threads
Compressing objects: 100% (3/3), done.
Writing objects: 100% (3/3), 318 bytes | 318.00 KiB/s, done.
Total 3 (delta 2), reused 0 (delta 0), pack-reused 0
remote: Updated five paths from 30a4ffb
remote: Compressing source files... done.
remote: Building source:
remote:
remote: -----> Building on the Heroku-22 stack
remote: -----> Using buildpack: heroku/python
remote: -----> Python app detected
remote: -----> Requirements file has been changed, clearing cached dependencies
remote: -----> Installing python-3.11.5
remote: -----> Installing pip 23.2.1, setuptools 68.0.0 and wheel 0.41.0
remote: -----> Installing SQLite3
remote: -----> Installing requirements with pip
remote: -----> Discovering process types
remote:        Procfile declares types -> web
remote:
remote: -----> Compressing...
remote:        Done: 30.6M
remote: -----> Launching...
remote:        Released v5
remote:        https://<app_name>-31a6fd70e769.herokuapp.com/ deployed to Heroku
remote:
remote: Verifying deploy... done.
Heroku automatically selected an appropriate buildscript, installed the requirements, and deployed the application to a dyno.
In case your deployment failed, use Heroku CLI to view the logs:
$ heroku logs --tailNext, check your app’s status:
$ heroku apps:info <app_name>

=== <app_name>
Auto Cert Mgmt: false
Dynos:          web: 1
Git URL:        https://git.heroku.com/<app_name>.git
Owner:          <your_email>
Region:         us
Repo Size:      9 KB
Slug Size:      31 MB
Stack:          heroku-22
Web URL:        https://<app_name>-31a6fd70e769.herokuapp.com/
Try visiting your app in the browser by navigating to the “Web URL”.
That’s it for the Heroku part. The following section will look at deploying the same application to Back4app Containers.
How to deploy an application to Back4app Containers?
In this section, we’ll deploy an application to Back4app Containers.
What is Back4app Containers?
Back4app Containers is a great Containers as a Service (CaaS) platform. It allows you to deploy, manage, and scale apps on globally distributed containers.
The platform is tightly integrated with GitHub and provides a built-in CI/CD system. Its other features include zero down-time deployments, custom domain linking, logging, monitoring, and more.
Best of all, the platform provides a generous free tier. With over 600 free monthly container hours, you can easily prototype and host your pet projects. As your app scales, you can upgrade to premium tiers with predictable pricing.
To learn more about Containers as a Service, check out What is CaaS – Containers as a Service?
Switch to a new branch named back4app based on the master branch:
$ git checkout master && git checkout -b back4appObjectives
- Dockerize the application.
- Connect your GitHub with your Back4app account.
- Import the desired GitHub repo.
- Deploy!
Dockerize
To deploy an app to Back4app Containers, you must first dockerize it.
Dockerizing is the process of building, deploying, and running applications in Docker containers. The easiest way to dockerize an application is via a Dockerfile.
Dockerfile
A Dockerfile is a script containing instructions for creating a Docker container image. You can use this file to define the environment, dependencies, and other commands required to build and run an application.
It has the following syntax:
COMMAND <arg_1> <arg_2> ... <arg_n>Create a Dockerfile in the project root with the following contents:
FROM python:3.9.6-alpine

# Set the working directory
WORKDIR /app

# Set environment variables
ENV PYTHONDONTWRITEBYTECODE 1
ENV PYTHONUNBUFFERED 1

# Copy over the requirements file and install the dependencies
COPY ./requirements.txt .
RUN pip install --no-cache-dir --upgrade -r ./requirements.txt

# Copy over the source code
COPY . .

# Expose the port
EXPOSE 80

CMD ["uvicorn", "main:app", "--host", "0.0.0.0", "--port", "80"]
This Dockerfile is based on the python:3.9.6-alpine image. It first sets the working directory, environment variables, and then handles the requirements. After that, it copies over the source code, exposes port 80, and starts the Uvicorn server on that port.
For deploying other programming languages and frameworks, feel free to grab the Dockerfiles from the Back4app Containers docs.
If you need clarification on how a Dockerfile command works, refer to the Dockerfile reference.
.dockerignore
We can use a .dockerignore file to reduce the Docker image size. These files work similarly to .gitignore files. You must define files and directories you’d like excluded from the image.
In our case, that is the virtual environment, IDE files, and the .git folder.
Create a .dockerignore file like so:
.git/
.idea/
venv/
Feel free to adapt the .dockerignore file according to your project’s needs.
Push the changes to your GitHub repository:
$ git add .
$ git commit -m "configured app for back4app"
$ git push origin back4app
Build, Run & Test
Before pushing your code to the cloud, it’s a good idea to test it locally.
First, build the image and tag it:
$ docker build -t back4app-url-shortener:1.0 .Next, list the images:
$ docker images

REPOSITORY                      TAG            IMAGE ID       CREATED         SIZE
back4app-url-shortener          1.0            1cbe348a04ad   1 minute ago    68.7MB
Run the container using the just-built image:
$ docker run -p 80:80 --name back4app-url-shortener back4app-url-shortener:1.0Argument explanation:
-p 80:80binds port80of the host machine to port80of the container--name back4app-url-shortenernames the container instance
You can use
-dto run the container in detached mode (without occupying the terminal).
Check if the container is running:
$ docker ps

CONTAINER ID   IMAGE                        CREATED    STATUS    PORTS
b3b82313ab65   back4app-url-shortener:1.0   3s ago     1s        0.0.0.0:80->80/tcp
Open your favorite web browser and navigate to http://localhost/docs. You should be able to see the URL shortener service.
Deploy App
The following steps will require a Back4app account. If you don’t have one yet, sign up for a free account. Everything we do in this tutorial will be within the free tier.
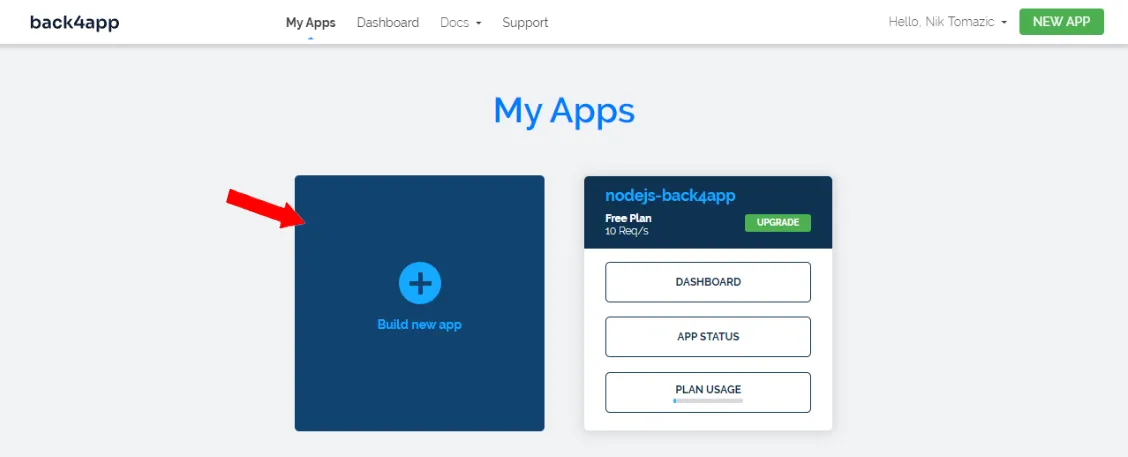
As you log into your Back4app account, you’ll be presented with the app list. Click “Build new app” to start the app-building process.
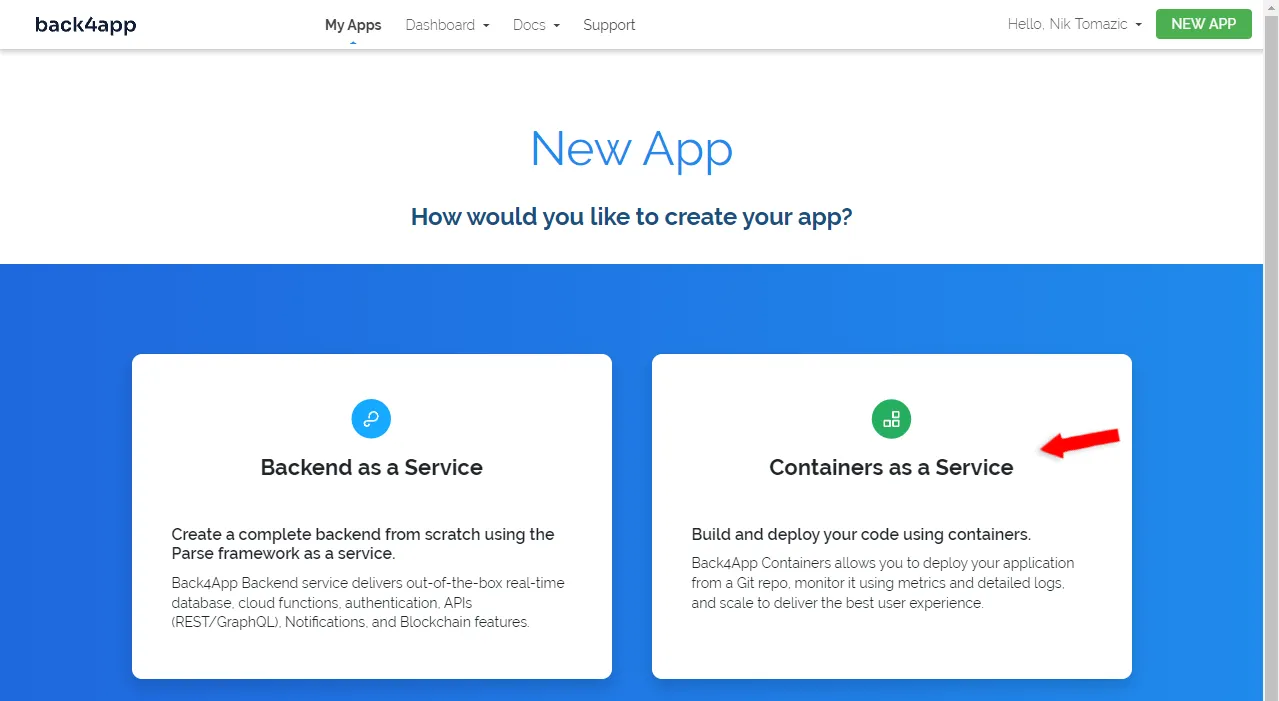
Back4app provides two solutions:
- Backend as a Service (BaaS) — an out-of-the-box backend solution
- Containers as a Service (CaaS) — a Docker-powered containers deployment platform
Since we’re deploying a custom Python app, we’ll go with CaaS. Select “Containers as a Service” on the right side of the screen.
You’ll be asked to link your GitHub account if it’s your first time working with Back4app. On top of that, ensure to import all the repositories you’d like to deploy.
Next, “Select” the GitHub repo you’d like to deploy:

Since we’re deploying a simple app, we don’t have to configure the environment much. All you have to do is set:
- App Name: back4app-url-shortener (you can pick a different name)
- Branch: back4app (your GitHub branch)
Then click “Deploy”.
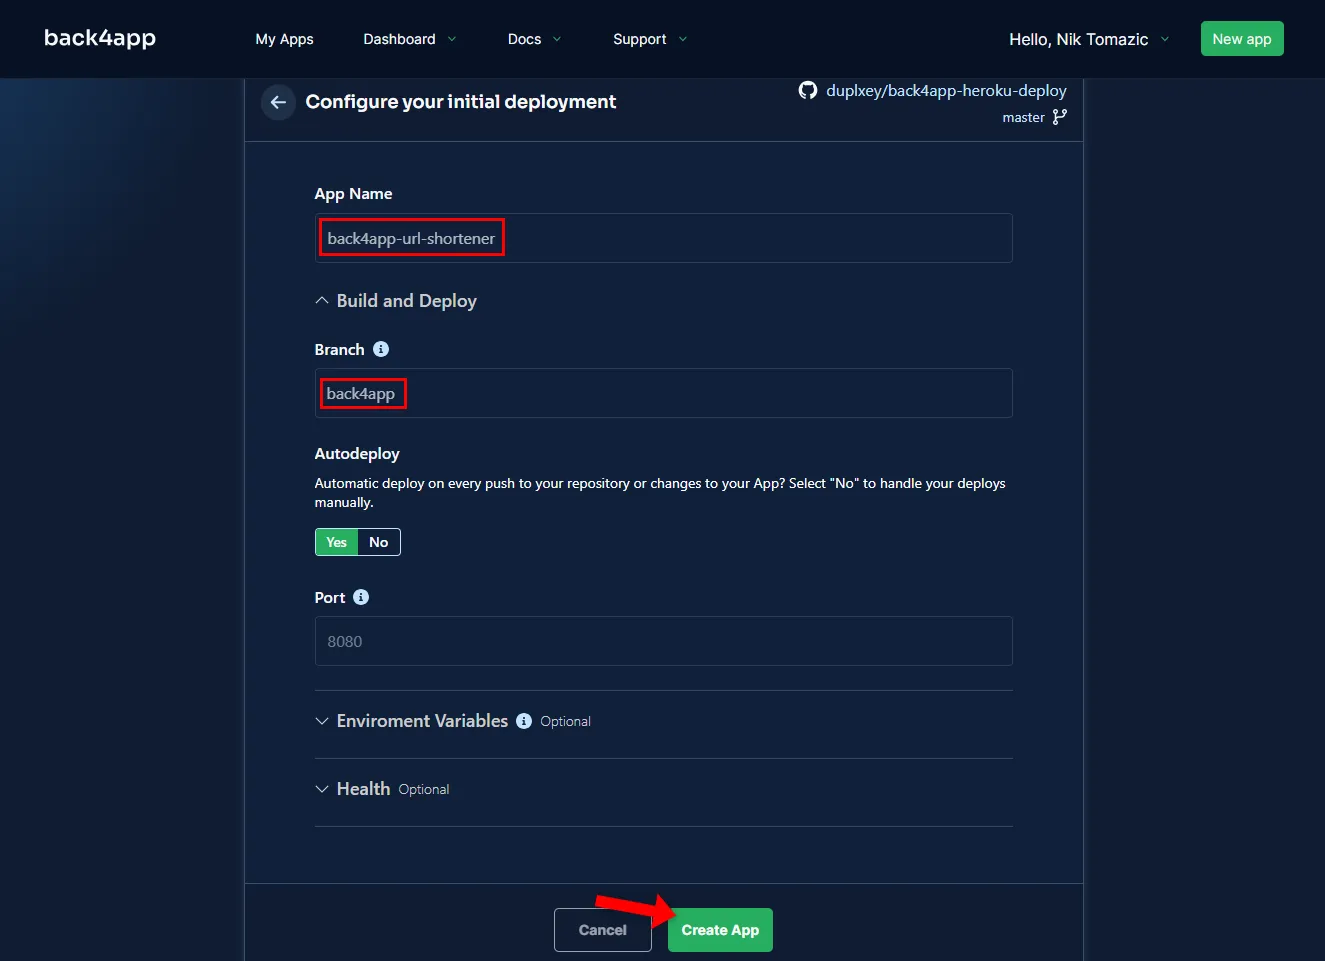
Back4app Containers offers many configuration options, including automatic deploys, port settings, environment variables, and health checks.
Back4app Containers will take a little while to build and deploy your Docker image. Once your app is ready, the app’s status will change to “Available”. To visit your app, click on the link below the status as depicted in the image.
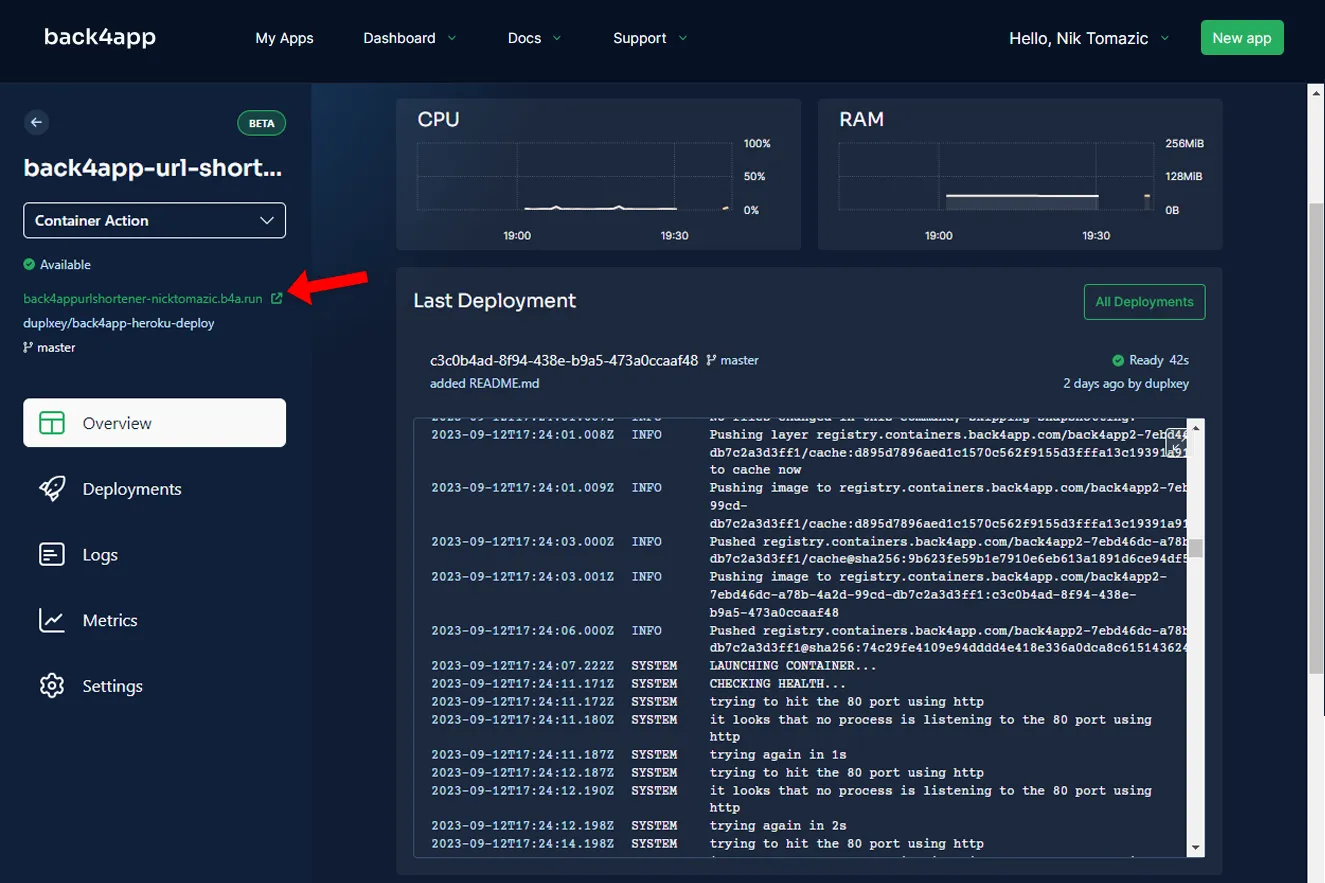
Good job! You’ve successfully deployed a web application to Back4app Containers.
Conclusion
This tutorial taught you how to deploy a simple web application to Heroku and Back4app Containers. Both platforms have pros and cons that you should consider when deploying an application.
As a rule of thumb, I’d go with Back4app Containers for applications that don’t require a database. Back4app Containers will help you save money, and its free tier is more than enough for your pet projects.
Heroku might be better if your app relies on a database or fancy add-ons.
I’ve summarized some of the main platform differences in the table below:
| Heroku | Backapp Containers | |
|---|---|---|
| Cloud model | Platform as a Service (PaaS) | Containers as a Service (CaaS) |
| Build & deploy | Buildpacks | Docker |
| Supported languages | 9 programming languages | Any language or framework |
| Free HTTPS/SSL | ✔️ | ✔️ |
| Custom domains | ✔️ | ✔️ |
| Free tier | ❌ | ✔️ |
| Risk of vendor lock-in | ✔️ | ❌ |
| Managed databases | ✔️ | ❌ |
| Beginner friendly | Yes (requires some DevOps skills) | Yes (requires some Docker skills) |
Feel free to grab the final source code from the GitHub repository.
FAQ
What is Heroku?
Heroku, established in 2007, is one of the pioneering Platform as a Service (PaaS) platforms. It allows you to deploy nine programming languages, including Java, PHP, Python, and Ruby. On top of that, it provides managed databases, add-ons, advanced logging, monitoring, and more.
How to deploy an app to Heroku?
1. Sign up for a Heroku account.
2. Install and configure Heroku CLI.
3. Create a Heroku app.
4. Specify the runtime via runtime.txt.
5. Specify the app processes via Procfile.
6. Push your source code to Heroku.
What is Back4app Containers?
Containers is an excellent Containers as a Service (CaaS) platform. The platform lets you quickly deploy, manage, and scale dockerized applications on globally distributed containers. It has a built-in CI/CD system, supports zero downtime deployments, custom domains & more!
How to deploy an app to Back4app Containers?
1. Sign up for a free Back4app account.
2. Dockerize your application.
3. Push your source code to GitHub.
4. Connect your GitHub with your Back4app account.
5, Import the desired repository & deploy!


