How to build and deploy a Telegram bot?
In this article, you will build a Telegram bot with Node.js and Back4app’s backend-as-a-service. Then, you will deploy it using Back4app containers.
Bots are software that can perform automated repetitive tasks over a network or on a platform. Telegram bots are created using the Telegram bot API and are specifically designed to work on Telegram.
You can design Telegram bots to perform various tasks on Telegram, such as retrieving information like weather updates or news headlines and hosting quizzes for entertainment.
They can also automate tasks like scheduling reminders and perform simple user authentication, among other things.
Contents
Setting Up Your Development Environment
This article features a Telegram bot that enables users to set up automatic weather updates for their favorite city every 6 hours or get instant weather information for any city they choose.
To set up your project directory, run the commands below:
# create your project directory
mkdir telegram-weather-bot

# cd into your project directory
cd telegram-weather-bot

# Initialize npm
npm init -y
The commands above create a telegram-weather-bot directory, move into it, and initialize npm in it.
In your package.json file, add the following start script to run your bot:
"start": "node server.js"
Next, run the command below to install the packages required for this project:
npm install axios node-telegram-bot-api dotenv node-schedule parse
The above command installed the following packages:
- axios: You will use this library to make HTTP requests to a weather API.
- node-telegram-bot-api: This library simplifies interaction with the Telegram Bot API.
- dotenv: This package will help you load environment variables from a .env file.
- node-schedule: You will need this package to schedule tasks and automate your weather updates.
- parse: You will need this package to interact with the Back4app Parse Backend.
Now, you have set up your development environment. Next, you need to create a bot account on Telegram.
Creating Your Telegram Bot Account
A Telegram bot account will serve as your bot’s identity on the Telegram platform. Users will be able to interact with the bot through this account.
To create your Telegram bot, launch the Telegram app, enter “BotFather” in your search bar, and click the verified top result.
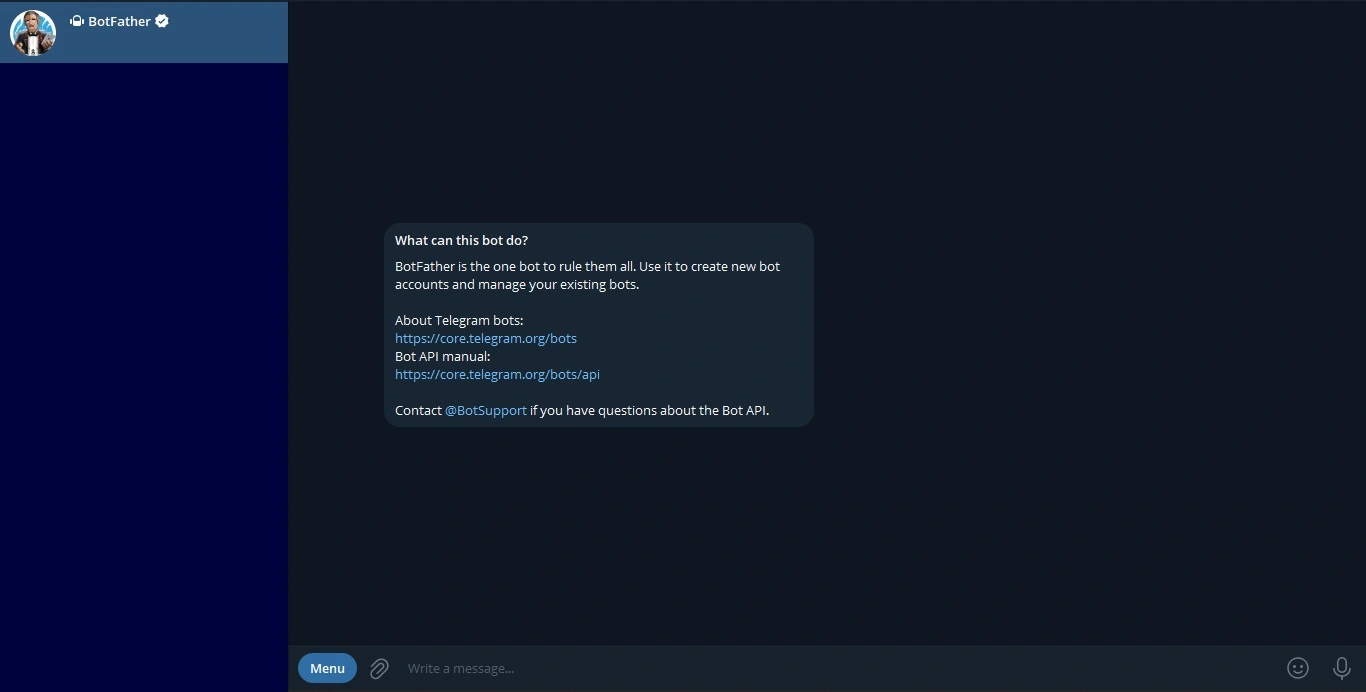
BotFather is a Telegram bot that allows you to develop other bots quickly. Type in the command /newbot to initiate your bot’s creation process. You will provide a name and a unique username for your bot.
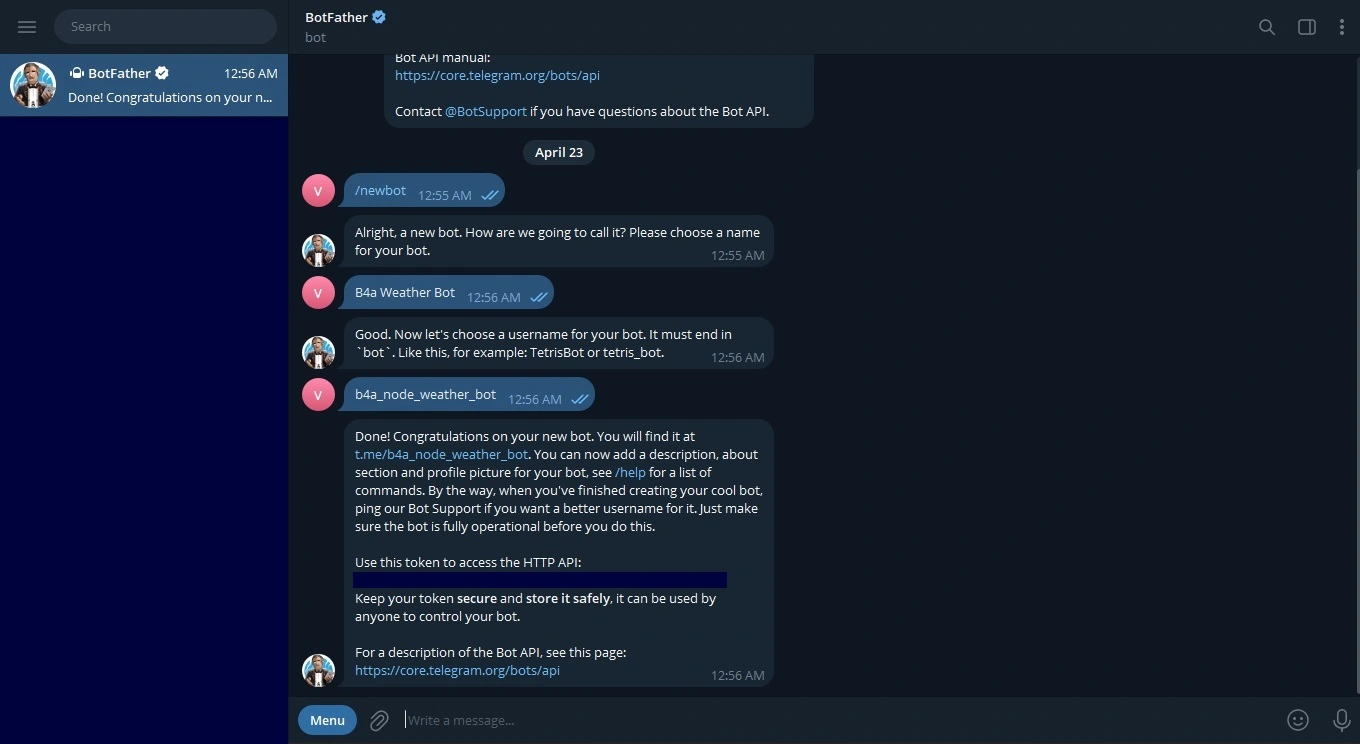
Once you provide your bot’s name and username, BotFather will provide a unique token that allows you to interact with and manage the bot account.
Store your bot token in your project by creating a .env file in the root directory and pasting the bot token in the file. Like so:
TELEGRAM_BOT_TOKEN = <YOUR_BOT_TOKEN>Now that you have your bot token and stored it in your project, you can build your Telegram bot.
Building the Telegram Bot
This section will walk you through creating your Telegram weather bot and integrating the libraries you installed to perform functions like handling the commands, managing user state, and retrieving data from the weather API.
Structure your bot’s directory similarly to the one below to begin the build process:
telegram-weather-bot/
├── node_modules/
├── src/
|   ├── bot.js                    # file for handling bot interaction with the user
|   ├── weather.js                # Module for fetching weather data
|   ├── stateManager.js           # Module for managing user state with Back4App
|   └── cityManager.js            # Manages user city settings and sends weather updates
├── .env
├── package.json
├── server.js                     # Entry point for your application
└── package-lock.json
Getting Weather Information
To get weather information, you will use the OpenWeatherMap API.
Making requests to this API requires an API key. To get this API key, log in to your account (or create one if you don’t have one).
Then, navigate to the “My API Keys” section in your profile and copy your API Key.

Store your OpenWeatherMap’s API key in your .env file:
OPENWEATHERMAP_TOKEN = <YOUR_OPEN_WEATHER_MAP_APIKEY>
Since the bot’s functionality revolves around getting weather information, define a function that will make a GET request to OpenWeatherMap’s API to retrieve weather information with the axios.get method.
Add the code block below to your weather.js file to make a GET request for weather information from the OpenWeatherMap API:
const axios = require('axios');
const apiKey = process.env.OPENWEATHERMAP_TOKEN;

async function getWeather(city) {
  try {
    const url = `https://api.openweathermap.org/data/2.5/weather?q=${city}&appid=${apiKey}&units=metric`;
    const response = await axios.get(url);
    const temp = response.data.main.temp;
    const description = response.data.weather[0].description;
    return `The weather in ${city} is ${temp}°C with ${description}.`;
  } catch (error) {
    console.error('Error fetching weather:', error);
    throw error;
  }
}

module.exports = { getWeather }
The above code block defines a getWeather function that takes a city name as its argument and returns the temperature and weather description from the API’s response.
To provide users with regular weather updates every 6 hours, you will need to implement a scheduler function that will run the getWeather function to return weather updates for a preferred city.
Scheduling Weather Updates
To schedule the job of returning the weather updates for a preferred city, add the code block below in your cityManager.js:
const schedule = require('node-schedule');
const weather = require('./weather');

let userCities = {};

function setCity(chatId, city) {
  userCities[chatId] = city;
}

function init(bot) {
  schedule.scheduleJob('0 */6 * * *', function() {
    for (let chatId in userCities) {
      const city = userCities[chatId];
      weather.getWeather(city).then(response => {
        bot.sendMessage(chatId, response);
      }).catch(error => {
        bot.sendMessage(chatId, "Failed to retrieve weather.");
      });
    }
  });
}

module.exports = { setCity, init };
The code block above creates two functions: setCity and init.
The code block declares a userCities object for tracking cities the bot users are interested in by mapping their Telegram chat IDs to city names using the setCity function.
This function allows your bot to persist user preference on which city they want to receive weather updates for.
The init function in the code block sets up a scheduled task every 6 hours that iterates over all the chat IDs stored in userCities. The init function uses the weather module to fetch the current weather for that city.
Your bot needs to persist the user’s state to keep track of its different users and their preferred cities. You can achieve this using Back4app’s backend as a service.
To make your bot keep track of different users and their preferred cities, store a bot user’s preferred city using Back4app’s backend as a service.
Creating a Back4app Backend
To use Back4app’s backend as a service, you need a Back4app account. If you do not have one, you can sign up for free.
Log in to your account and click the “NEW APP” button in the top right corner. Name your application and click the “CREATE” button.
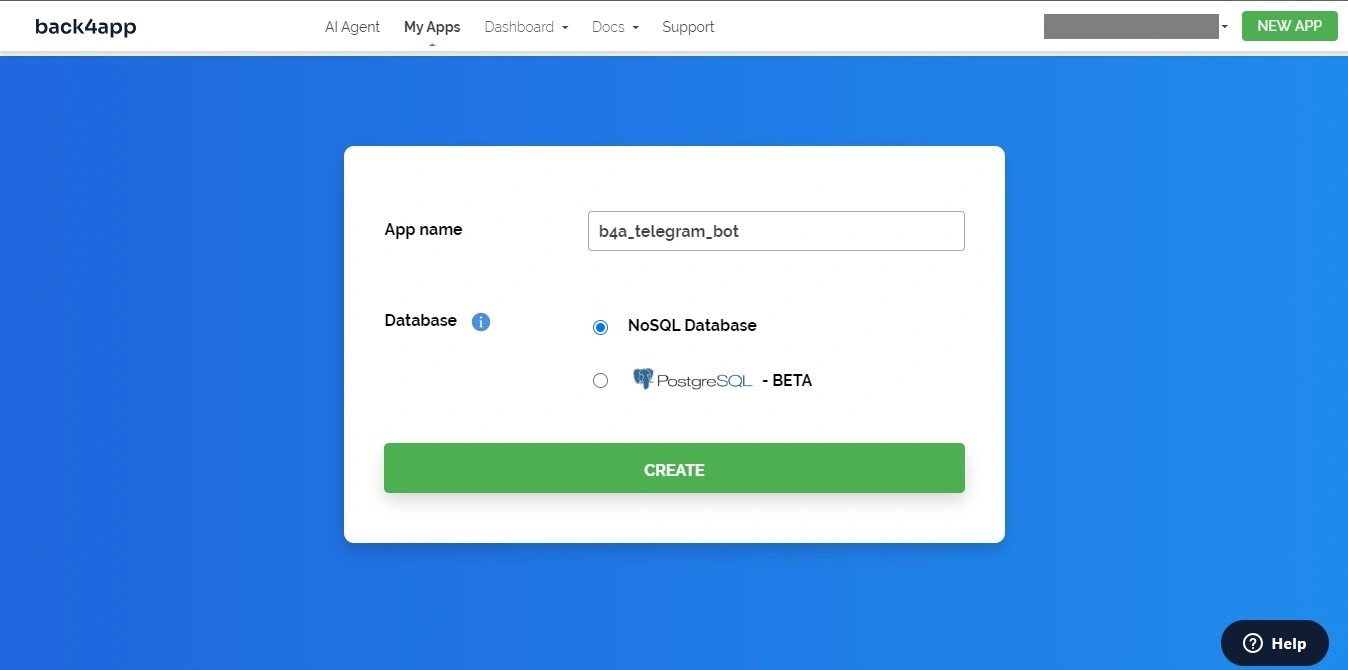
After clicking the “CREATE” button, Back4app will generate your application and direct you to the application dashboard.
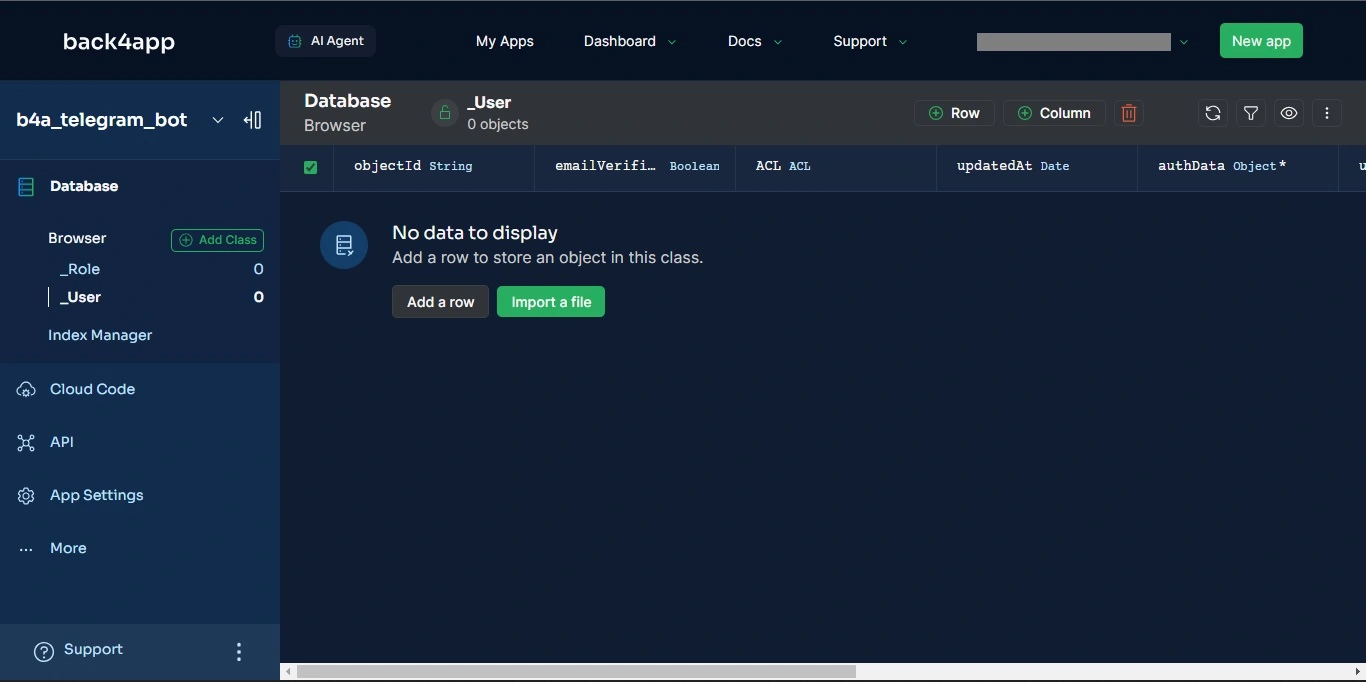
Connecting to your app instance on Back4App from your Node.js project requires you to initialize the parse SDK you installed with your Back4app’s application credentials: Application ID and Javascript KEY.
Get the Application ID and JavaScript Key from Back4app by navigating to the” Security & Keys” section by clicking “App Settings” on the sidebar.

Store them in your .env file. Your current .env file should be similar to the one below:
TELEGRAM_BOT_TOKEN= "<YOUR_TELEGRAM_BOT_TOKEN_HERE>"
OPENWEATHERMAP_TOKEN= "<YOUR_OPENWEATHERMAP_TOKEN_HERE>"
BACK4APP_APP_ID= "<YOUR_BACK4APP_APP_ID_HERE>"
BACK4APP_JAVASCRIPT_KEY= "<YOUR_BACK4APP_JAVASCRIPT_KEY_HERE>"
Next, you need to create a new “UserState” class with two fields: userId (string) and state (object). You will use Back4app’s AI agent to accomplish this task.
To create this class with the respective fields, navigate to the “AI Agent” tab on your screen and give the agent the prompt below:
Create a new class, "UserState," in my Back4app application with the APP ID “<YOUR_BACK4APP_APP_ID_HERE>”. The "UserState" class will have two fields: userId (string) and state (object).You should get a response similar to the image below:
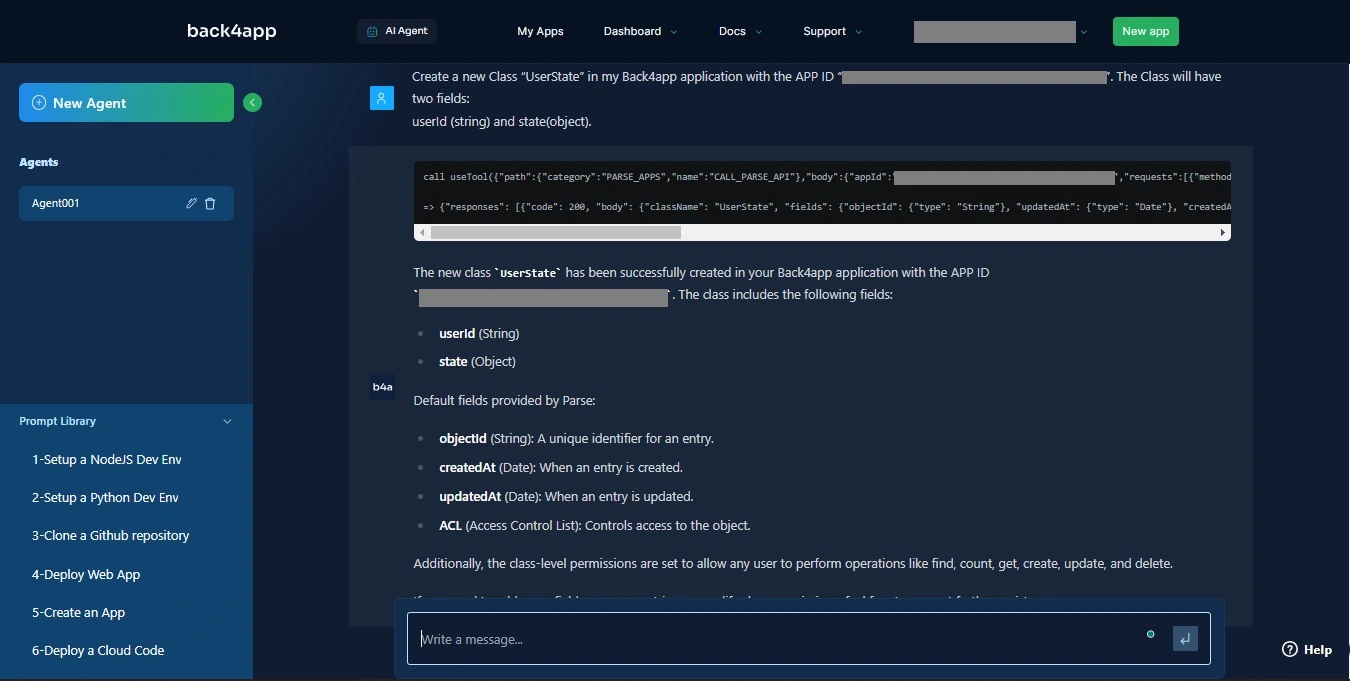
If you check your Back4app dashboard, you should see the UserState class created successfully.
Managing User State in Your Telegram Bot
To manage the flow of interaction between the bot’s user and the bot, you need to define a user state indicating what command the bot expects from the user.
Apart from the /start command, the bot understands two main commands. Each user interaction (including commands) triggers an update to the user’s state, stored along with their chat ID in the UserState class.
This state management allows the bot to remember particular details for each user within a conversation, like their preferred city for weather updates.
To start tracking user states with the UserState class you created in your Back4App database, you need to initialize the Parse SDK with your credentials.
Add the code block below to the stateManager.js to initialize the Parse SDK with the required credentials to connect to the Back4app Parse Backend:
// stateManager.js
const Parse = require('parse/node');

Parse.initialize(
  process.env.BACK4APP_APP_ID,
  process.env.BACK4APP_JAVASCRIPT_KEY
);

Parse.serverURL = '<https://parseapi.back4app.com/>';
Next, define a Parse object in your stateManager.js file to represent the schema of the UserState class in the Back4app Parse backend, allowing your bot to interact with the user’s state stored in the database.
Like so:
// stateManager.js
const UserState = Parse.Object.extend('UserState');
Next, you will need to enable your bot to retrieve a particular user’s current conversation state based on their user ID stored in the database.
To retrieve a user’s state, you will need to run a query on the UserState class with the user’s ID to find the state saved in the database.
Like so:
// stateManager.js
async function getUserState(userId) {
  const query = new Parse.Query(UserState);
  query.equalTo('userId', userId.toString());
  const userState = await query.first();
  return userState ? userState.get('state') : null;
}
The code block above defines a getUserState function that asynchronously fetches the user state data.
The function constructs a query to find the user’s state object based on the argument (userId) and retrieves the user state if found.
After retrieving a user’s state, you will need to enable your bot to update the conversation state associated with that user based on their user ID and the provided state information.
For instance, updating the conversation state will enable the bot to update the preferred city to get regular weather updates.
Like so:
// stateManager.js
async function setUserState(userId, state) {
  const query = new Parse.Query(UserState);
  query.equalTo('userId', userId.toString());
  let userState = await query.first();

  if (!userState) {
    userState = new UserState();
    userState.set('userId', userId.toString());
  }

  userState.set('state', state);
  await userState.save();
}
The function in the above code block constructs a query to find the user state object based on the userId, creates a new UserState object if none exists, sets the state attribute, and saves the object to the database.
Next, define a function to reset a user’s state by adding the following code block below to your stateManager.js file:
// stateManager.js
async function resetUserState(userId) {
  await setUserState(userId, {});
}
The resetUserState function asynchronously sets a user’s state to an empty object {} to reset the user’s state in the database.
Ensure a state object is always present to keep track of your former and new bot user’s actions. Add the following code block below to the stateManager.js file:
// stateManager.js
async function ensureUserState(userId) {
  let state = await getUserState(userId);
  if (!state) {
    await setUserState(userId, {});
  }
}
The code block defines an ensureUserState function that retrieves the state object based on the user ID, making sure that user state data exists for the provided userId in the UserState class on the Back4app Parse backend.
It fetches the user state with the getUserState function and, if no state exists, sets the state to an empty object {} using the setUserState function.
Export all the functions to enable you to make use of them in other Javascript source files:
// stateManager.js
module.exports = {
  getUserState,
  setUserState,
  resetUserState,
  ensureUserState,
};
Handling User Interaction with the Bot
To allow your bot to listen to the start, getWeather, and setCity commands, you will define event listeners to match text to the three commands to run callback functions.
This will allow the bot to perform tasks relating to the commands.
To interact with the Telegram Bot API to enable you to define your bot’s behavior, import the TelegramBot class from the node-telegram-bot-api library and create a new instance of the class:
// bot.js
const TelegramBot = require('node-telegram-bot-api');
const token = process.env.TELEGRAM_BOT_TOKEN;
const bot = new TelegramBot(token, { polling: true });
The code block above creates a new instance of the TelegramBot class with two arguments: the bot token and an object.
The object sets the polling value to true to enable the bot to continuously check for messages and updates from Telegram servers.
Next, import the modules you created in this project. You will use these modules to implement the bot’s functions, such as getting weather updates, setting a preferred city, and managing a user’s state.
Add the following code below to import the necessary modules:
// bot.js
const weather = require('./weather');
const cityManager = require('./cityManager');
const stateManager = require('./stateManager');
The code block above imports the functions you created in all the source files, allowing you to call these functions in your bot.js file.
To set up a command, you use the onText method available to the TelegramBot class. This method sets up a listener to implement a callback function to perform some logic.
Add the code block below to your bot.js file to set up a /start command handler the bot will actively listen for with the onText method:
// bot.js

bot.onText(/\\/start/, async (msg) => {
    const welcomeMessage = "Welcome to the Weather Bot! Use the commands below to interact:\\n" +
    "/setCity - Set your preferred city for weather updates.\\n" +
    "/getWeather - Get instant weather information for any city.\\n";
    await bot.sendMessage(msg.chat.id, welcomeMessage);
    stateManager.ensureUserState(msg.chat.id);
});
The code block above will allow the bot to run a callback function, sending a welcome message to the user that details how the bot works.
The bot sets the initial state of the user with the ensureUserState function, ensuring a clean slate for each user interaction.
Next, add the code block below to your bot.js file to set up a /setCity command handler the bot will actively listen for with the onText method:
// bot.js

bot.onText(/\\/setCity$/, async (msg) => {
    stateManager.setUserState(msg.chat.id, { expect: 'SET_CITY' });
    bot.sendMessage(msg.chat.id, "Which city do you want to set as your preferred city for weather updates?");
});
The code block above allows users to specify their preferred city for weather updates with the “/setCity” command.
Upon receiving this command, the bot updates the user’s state to “SET_CITY” using setUserState function and prompts the user to enter their desired city.
Add the code block below to your bot.js file to set up a /getWeather command handler the bot will actively listen for with the onText method:
// bot.js
bot.onText(/\\/getWeather$/, async (msg) => {
    stateManager.setUserState(msg.chat.id, { expect: 'GET_WEATHER' });
    bot.sendMessage(msg.chat.id, "Which city do you want to get weather information for?");
});
The “/getWeather” command triggers the bot to update the user’s state to “GET_WEATHER” and prompts them to provide a city for which they instantly want weather information.
Handling Incoming Messages
To handle incoming messages for your Telegram bot, you will need to set up an event listener that triggers a callback function whenever the bot receives a new message.
Add the code block below to your bot.js file to set up a message handler to listen to commands and user responses:
// bot.js

// Handle incoming messages
bot.on('message', async (msg) => {
    if (msg.text.startsWith('/')) {
        // If the message is a command, reset the user state
        stateManager.resetUserState(msg.chat.id);
    } else {
        // If it's not a command, check user state
        const state = await stateManager.getUserState(msg.chat.id);
        if (state && state.expect === 'SET_CITY') {
            // If expecting SET_CITY, set city and reset state
            const city = msg.text;
            cityManager.setCity(msg.chat.id, city);
            bot.sendMessage(msg.chat.id, `City set to ${city}. You will receive weather updates every 2 minutes.`);
            stateManager.resetUserState(msg.chat.id);
        } else if (state && state.expect === 'GET_WEATHER') {
            // If expecting GET_WEATHER, get weather and reset state
            const city = msg.text;
            weather.getWeather(city).then(response => {
                bot.sendMessage(msg.chat.id, response);
            }).catch(error => {
                bot.sendMessage(msg.chat.id, "Failed to retrieve weather.");
            });
            stateManager.resetUserState(msg.chat.id);
        }
    }
});

// Initialize the init function from cityManager.js for regular weather updates
cityManager.init(bot);
The code block sets up a general message handler that listens to text messages sent to it and acts as the core of the interaction logic.
If a message starts with a forward slash (“/”), it’s considered a command. In this case, the handler resets the user’s state to ensure a fresh start for the new command.
Otherwise, the handler checks the user’s current state (stateManager.getUserState) to understand their intent.
If the user passes the “/setCity” command, the bot handler uses cityManager.setCity to store their chosen city and confirms the update.
If the user passes the “/getWeather” command, the handler retrieves the weather information for the provided city using the weather.getWeather function and sends the response back to the user.
The code block above then runs the cityManager.init(bot) to run the scheduled task of retrieving weather updates for a preferred city.
Now that you have completed handling your bot’s logic, set up a server to allow it to run when you deploy it to a Back4app container.
Creating an Entry File
You will create an entry file that will initialize the entire bot application. This file will serve two functions.
- The entry file will run the bot’s logic by requiring the JavaScript file that handles how your bot interacts with Telegram’s API and responds to user messages.
- The entry file will also set up a server to allow your bot to run on a Back4app container. Back4app containers require exposed ports for your application’s deployment to be successful.
Navigate to the server.js file within your project directory. This file will handle the creation of the server. Add the code block below into the server.js file:
const http = require('http');
require('./src/bot'); // Import bot logic
const port = 3000;

http
  .createServer((req, res) => {
    res.writeHead(200, { 'Content-Type': 'text/plain' });
    res.end('My Telegram bot is running\\n');
  })
  .listen(port, () => {
    console.log(`Server running on port ${port}`);
  });
The code block above sets up a Telegram bot to run by creating a simple HTTP server. This server acts as an entry point, allowing the bot to function within the container’s environment.
The script imports your bot’s core logic and specifies a Back4app port to allow your bot to deploy on a Back4app container.
After creating the entry file, you can test the Telegram bot locally before deploying it to a Back4app container.
Testing the Telegram Bot
Start your Telegram bot by running the command below:
node server.js
To interact with your bot, open the Telegram app and search for your bot’s name in the search bar. Enter the chat with your bot and send the /start command.
The bot should respond with a welcome message and a list of commands. Send the bot a command.
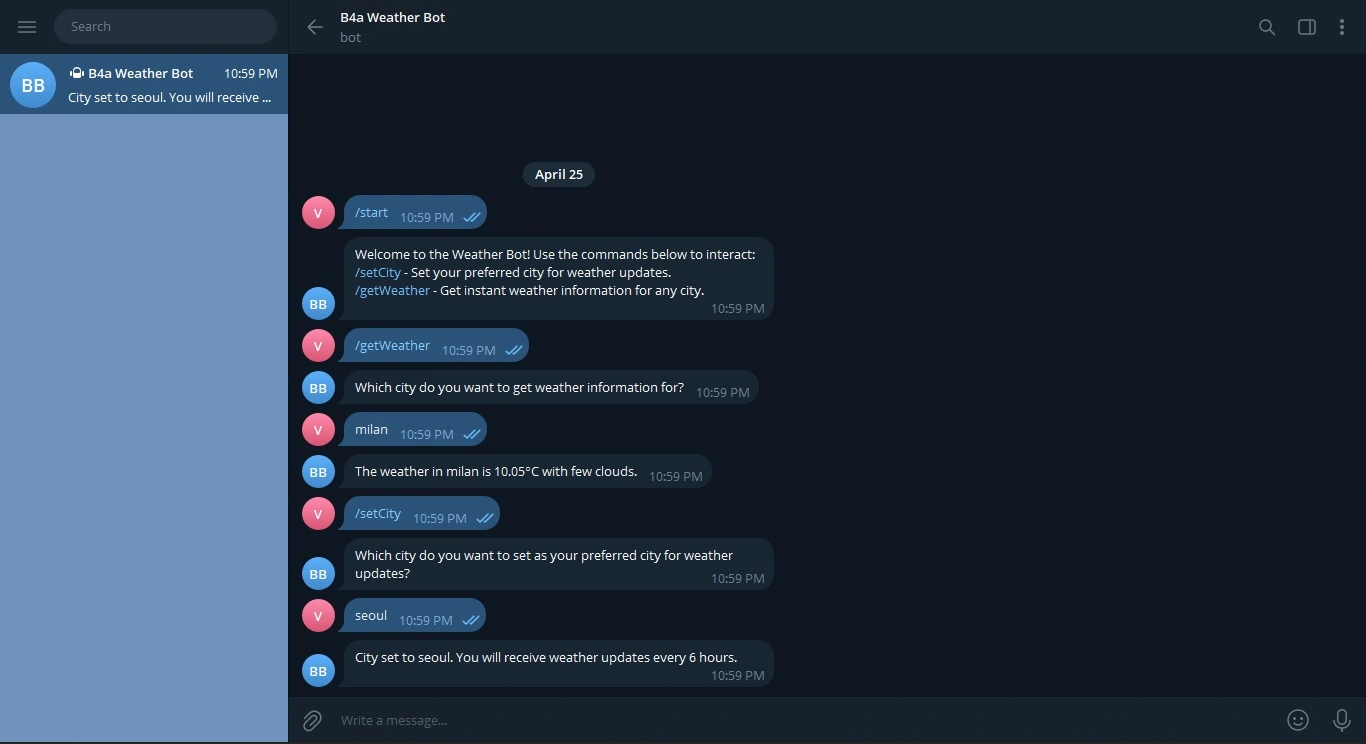
The bot lets you set your preferred city and receive regular weather updates with the /setCity command.
The /getWeather command, as shown in the image above, can instantly get weather information for a particular city.
The bot should behave similarly to what’s shown in the image above, responding to your commands and interacting with you as intended.
Deploying the Telegram Bot to Back4App Containers
After testing your bot and ensuring it works properly, you can deploy it on Back4app containers. To do so, first, you will need to create a Dockerfile for your project.
In your project’s root directory, create a Dockerfile file and add the code block below to it:
# Specify base image
FROM node:18-alpine

# Specify the working directory
WORKDIR /app

# Copy package.json and package-lock.json
COPY package*.json ./

RUN npm install

COPY . .

EXPOSE 3000

# Run the app
CMD ["npm", "start"]
After creating the Dockerfile, push your local repository to GitHub to make it accessible for deployment on Back4app containers.
Next, install the Back4App Containers GitHub App on your GitHub account and give the app the necessary permissions required to access your application’s code repository.
Once you are done with your GitHub configuration, navigate to the Back4app homepage and click the “New App” button at the top right corner of your screen.
This will take you to an initialization screen, where you will need to pick the type of app you want to create. Select the Back4app agent option, as shown in the image below.
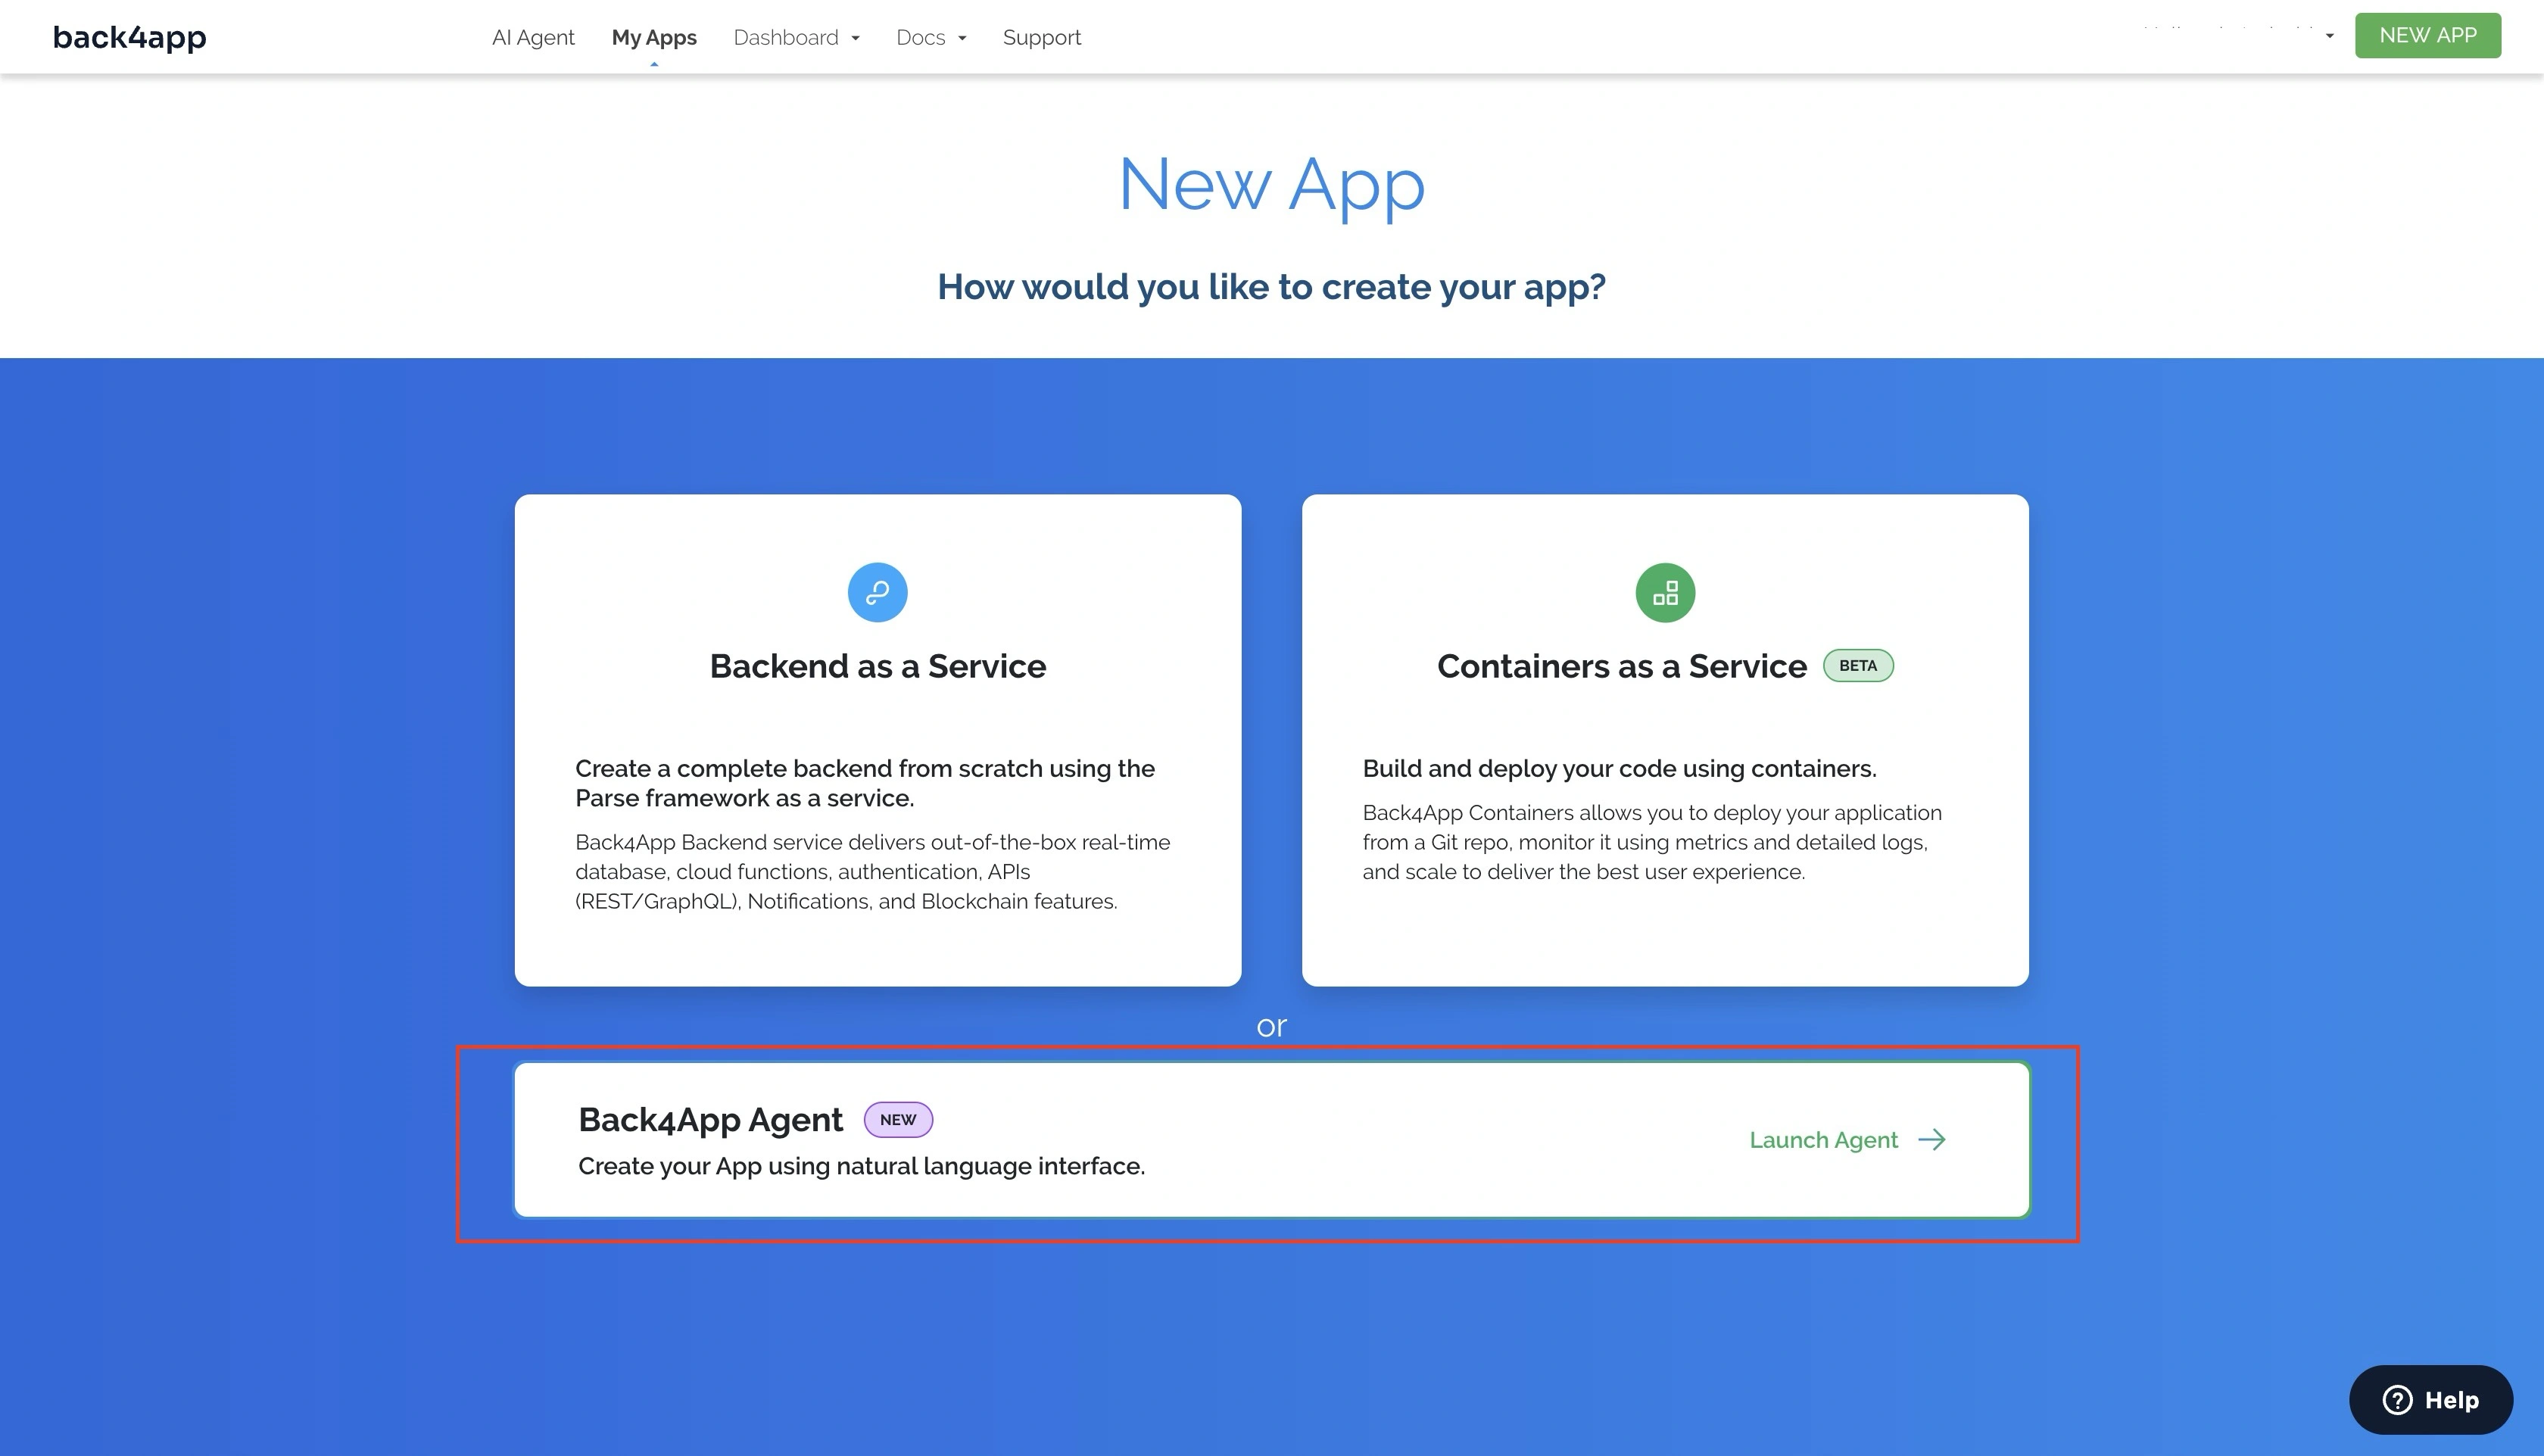
When you select the Back4app Agent option, you will be redirected to the Back4app AI agent page.
Enter the prompt below to deploy your application on Back4app containers:
Deploy my "YOUR_REPOSITORY_URL" repository on GitHub to Back4App Containers.
Here are the required environmental variables:
TELEGRAM_BOT_TOKEN = "TELEGRAM_BOT_TOKEN"
OPENWEATHERMAP_TOKEN = "WEATHER_API_TOKEN"
BACK4APP_APP_ID = "BACK4APP_APP_ID"
BACK4APP_JAVASCRIPT_KEY = "BACK4APP_JAVASCRIPT_KEY"
Replace the placeholders with their actual values. The prompt above will start your deployment process. When completed, the AI agent will respond, indicating success or a pending deployment.
You should get a response similar to the one below:
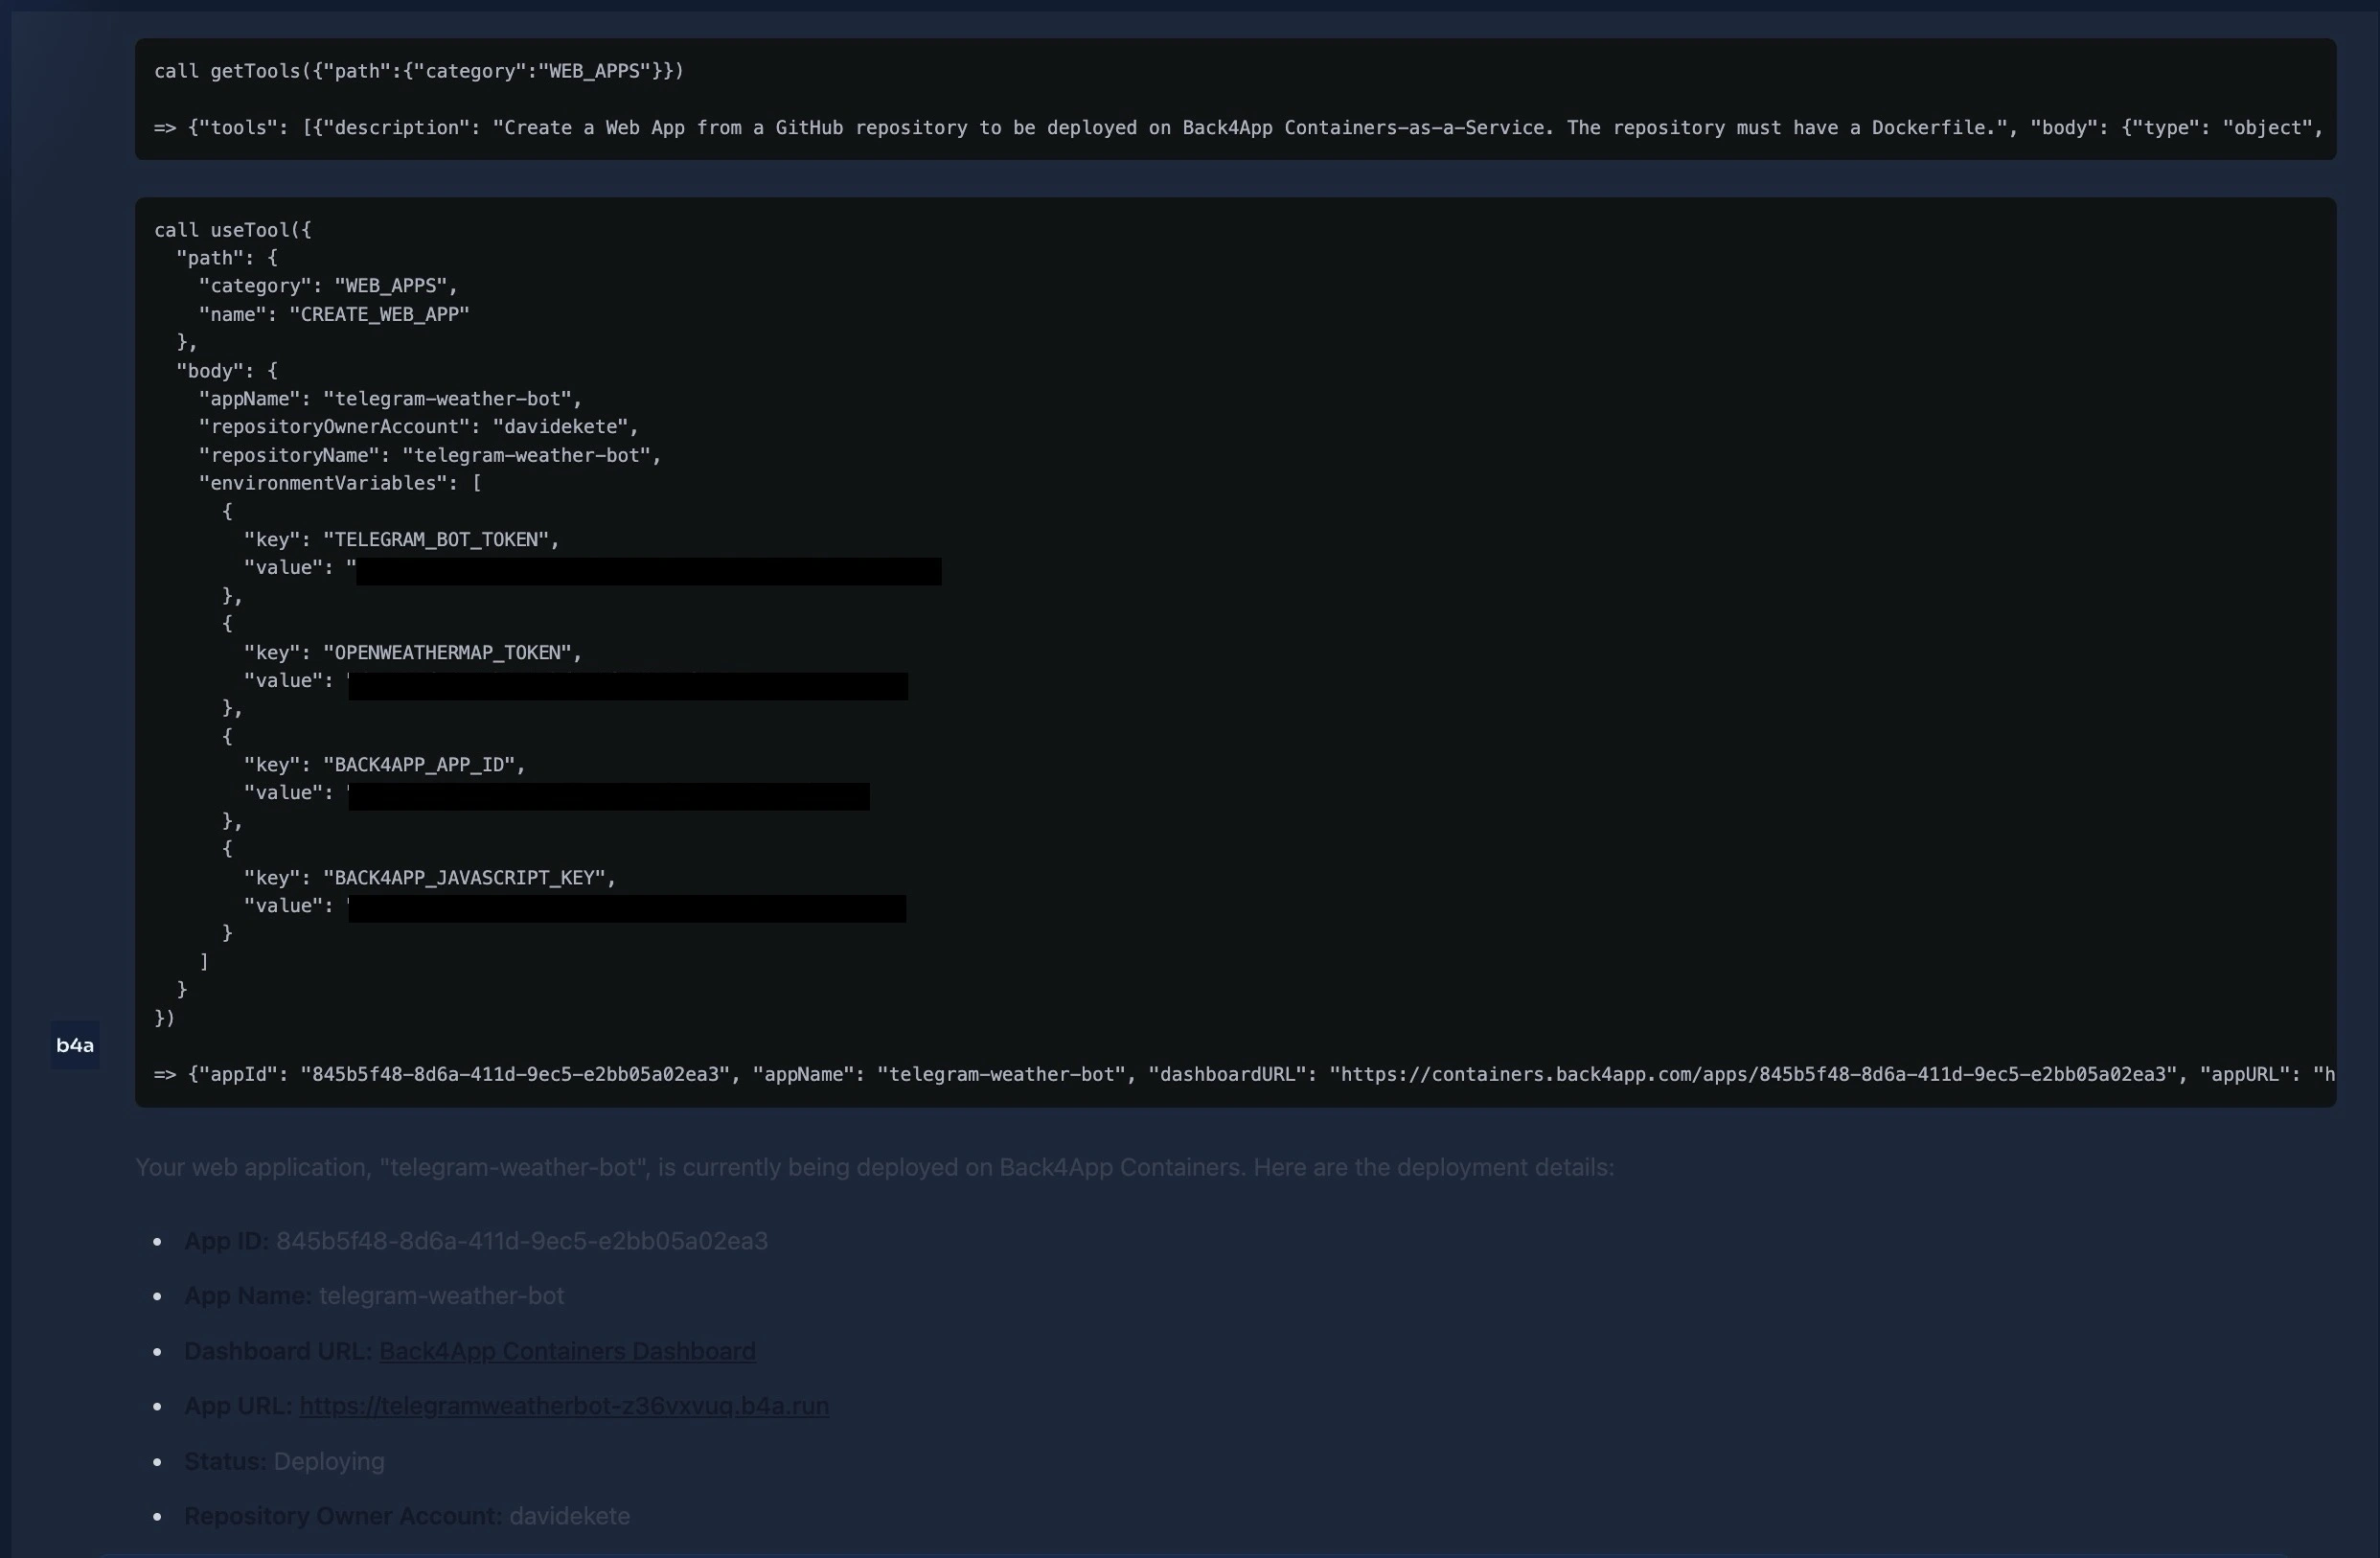
If you get a pending deployment, you can monitor your app’s deployment status on your Back4app container dashboard. Alternatively, you can deploy your application manually on Back4app containers.
Conclusion
In this article, you learned how to create a Telegram bot with Node.js. You explored how to create a Telegram bot account, handle bot commands, and handle user interactions.
You also created a backend for your bot with the help of the Back4app AI agent, which enabled you to manage the user state effectively and store information in conversations, such as the user’s preferred city to receive weather updates regularly.
You can find the full code in this GitHub repository.


