How to create a SvelteKit app? 
SvelteKit is a powerful framework for building web applications that combines the simplicity and performance of the Svelte framework with additional features. It is the official framework for building applications with Svelte.
SvelteKit builds on the principles of Svelte, a component-based framework that compiles your application code into highly efficient JavaScript code during the build process.
SvelteKit takes this a step further by providing a full-fledged application framework that offers features such as routing, server-side rendering (SSR), and code splitting out of the box.
In this article, you will explore SvelteKit and build a basic application using SvelteKit and Back4app.
Contents
- 1 Advantages of SvelteKit
- 2 Limitations of SvelteKit
- 3 Project Introduction
- 4 Building the SvelteKit Application
- 5 Integrating Back4app With Your Application
- 6 Creating a Back4app account
- 7 Introducing the Back4app ChatGPT Plugin
- 8 Create a Back4app Application With the Plugin
- 9 Adding Data to the Back4app Application
- 10 Connecting to Back4app
- 11 Fetching Data From Back4app
- 12 Adding Data to Back4app From the Application
- 13 Deleting Data From Back4app
- 14 Testing the Application
- 15 Conclusion
- 16 FAQ
- 17 What is SvelteKit?
- 18 What is Back4app’s ChatGPT Plugin?
- 19 How to build a SvelteKit application using Back4app as BaaS?
Advantages of SvelteKit
SvelteKit offers several advantages. Here are some of the key advantages of SvelteKit:
Performance
SvelteKit is known for its exceptional performance. It has a small framework size which leads to faster initial page loads. SvelteKit also uses reactive updates, which only update the parts of the DOM that change. This results in a high-performance application that is responsive and smooth to use.
SvelteKit compiles the application code during the build process, resulting in highly optimized and efficient JavaScript code. This approach eliminates the need for a runtime framework, leading to faster load times and improved performance.
Small bundle size
SvelteKit generates small bundle sizes compared to other frameworks. It achieves this by only including the necessary code for each component, resulting in minimal overhead. This is very beneficial for users with slower internet connections or limited bandwidth.
SvelteKit’s small bundle size improves performance and enhances the user experience on mobile devices. It also enables efficient code splitting, and lazy loading, improving the developer’s experience.
Rich component ecosystem
A rich component ecosystem is a significant advantage of SvelteKit. SvelteKit provides developers with a wide range of pre-built and customizable components that can be easily integrated into their applications.
The rich component ecosystem in SvelteKit can accelerate development, improve UI consistency, and promote code reusability. It also enables rapid prototyping and extension with other libraries and tools.
Server-side rendering (SSR)
SvelteKit offers server-side rendering functionality, enabling developers to pre-render pages on the server before delivering them to the client. This approach enhances the speed of initial page loads, optimizes search engine visibility, and elevates the overall user experience.
Server-side rendering in SvelteKit improves the overall performance of the SvelteKit application. It also enables caching, dynamic content, seamless navigation, and code sharing.
Built-in routing
SvelteKit provides a built-in routing system that simplifies the management of application routes. It allows developers to define routes declaratively. Developers can also define routes with parameters to create dynamic pages.
The routing system of SvelteKit offers programmatic navigation. This is where developers can use functions provided by SvelteKit to navigate to different routes programmatically. SvelteKit also provides route guards and middleware functions, allowing developers to implement advanced routing logic.
Limitations of SvelteKit
While SvelteKit offers many advantages, it also has some limitations that developers should be aware of. Here are a few:
Learning Curve
SvelteKit is relatively new compared to other frameworks like React or Angular, so fewer learning resources may be available. SvelteKit introduces some unique concepts and syntax, which can be challenging for new developers.
Developers already familiar with Svelte may find it easier to transition to SvelteKit, but those new to Svelte may need to invest time learning the framework.
Limited Community Support
As SvelteKit is still gaining popularity, community support may not be as extensive as that of other frameworks. SvelteKit’s limited community support can make it difficult for developers to learn, troubleshoot, and find jobs.
However, the community is growing, and there are ways to mitigate the impact of limited support. For example, developers can engage with the existing Svelte community through forums and social media platforms.
Compatibility with Existing Codebases
If you have an existing codebase built with a different framework, migrating it to SvelteKit may require significant effort. SvelteKit follows a different architectural approach, requiring you to rewrite the entire codebase’s logic.
SvelteKit introduces its routing system, which can conflict with the existing codebase routing mechanisms. When migrating to SvelteKit, you may need to learn new concepts and adapt your existing knowledge.
Project Introduction
Following this tutorial, you will build a basic feedback application using the SvelteKit framework. The feedback application will provide CRUD (create, read, update, delete) functionality and use Back4app for data storage.
Building the SvelteKit Application
To create a Sveltekit application, run the following command in your terminal:
npm create svelte@latest feedback-application
Once you run the code above, several prompts will guide you through configuring your application. The prompts will look something like this:
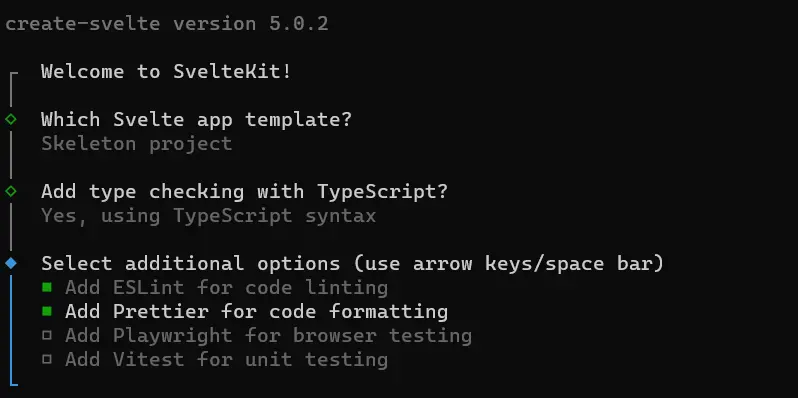
After configuring your application, navigate to the application’s directory and install the necessary dependencies. To do this, run the following code in your terminal:
cd feedback-application
npm install
You have now successfully created the feedback application and installed the necessary dependencies. You will add some Google fonts to your application to improve the application’s appearance. To do this, you need to add the links to the fonts in your app.html file, which is located in the src directory. The links can be found on the Google Fonts website.
The fonts you will use in your application are the Comforter and Montserrat fonts. You can use these fonts in your application by adding the following code to the head tag of your app.html file.
<!-- app.html -->
<link href="<https://fonts.googleapis.com/css2?family=Montserrat&display=swap>" rel="stylesheet">
<link href="<https://fonts.googleapis.com/css2?family=Comforter&display=swap>" rel="stylesheet">
Next, you add some global styles to the application. To do this, navigate to the global.css file in the style folder. You can find the style folder in the src directory.
In the global.css file, write this code:
/* global.css */
*{
    margin: 0;
    padding: 0;
    box-sizing: border-box;
}

body{
    inline-size: 40%;
    margin: auto;
    font-family: 'Montserrat', sans-serif;
    background-color: #f2f2f2;
}

input{
    border: none;
    border-radius: 12px;
    padding: 1rem;
    background-color: #FFFFFF;
    color: #808080;
    inline-size: 100%;
    font-weight: bold;
    font-family: 'Montserrat', sans-serif;
}

button{
    border: none;
    padding: 0.5rem 1rem;
    border-radius: 12px;
    color: #f2f2f2;
    background-color: #333333;
    font-family: 'Montserrat', sans-serif;
}

button:hover{
    background-color: #f2f2f2;
    color: #333333;
}
Next, you create the layout for the application. You define your application’s layout using a +layout.svelte file. The +layout.svelte file is a special file for creating reusable layout components that define the structure of your page layouts. Ensure you create the +layout.svelte file in the src/routes directory.
Define your application’s layout like so:
<!-- +layout.svelte -->
<script>
    import '../style/global.css'
</script>

<header>
    <h1>Feedback App</h1>
</header>
<slot></slot>

<style>

    h1{
        text-align: center;
        padding: 1rem 0;
        font-family: 'Comforter', cursive;
    }

</style>
The code block above imports the global.css file, applying global styles to your application. It also defines a header element. Inside the header element is an h1 element with the text “Feedback App”.
The slot element defines a placeholder for the page content. When you render a page, the application inserts its content into the slot, making it visible within the layout. In the style section of the code block, you style the h1 element.
Now you have defined the styles and layout for your application. Next, you will create your application’s homepage. To do this, write the following code in your +page.svelte file, located in the src/routes directory.
<!-- +page.svelte -->
<script lang="ts">
    let data = {
        feedback: '',
        rating: '',
    }

    const handleClick = (event: any) => {
        data.rating = event.target.value;
    }
</script>

<div class="page">
    <form>
        <input type="text" placeholder="Share your thought" name="feedback" bind:value={data.feedback}/>

        <div class="rating">
            <input type="button" value="1" class="button" on:click={handleClick}>
            <input type="button" value="2" class="button" on:click={handleClick}>
            <input type="button" value="3" class="button" on:click={handleClick}>
            <input type="button" value="4" class="button" on:click={handleClick}>
            <input type="button" value="5" class="button" on:click={handleClick}>
        </div>

        <button>Post</button>
    </form>
</div>

<style>
    form{
        margin-block-start: 1.5rem;
        display: flex;
        flex-direction: column;
        gap: 2rem;
        align-items: center;
    }

    .button{
        border-radius: 100%;
        color: #333333;
        padding: 1rem 1.5rem;
        background-color:#ffffff;
    }

    .button:hover{
        background-color: #333333;
        color: #f2f2f2;
    }

    .rating{
        display: flex;
        gap: 5rem;
    }
</style>
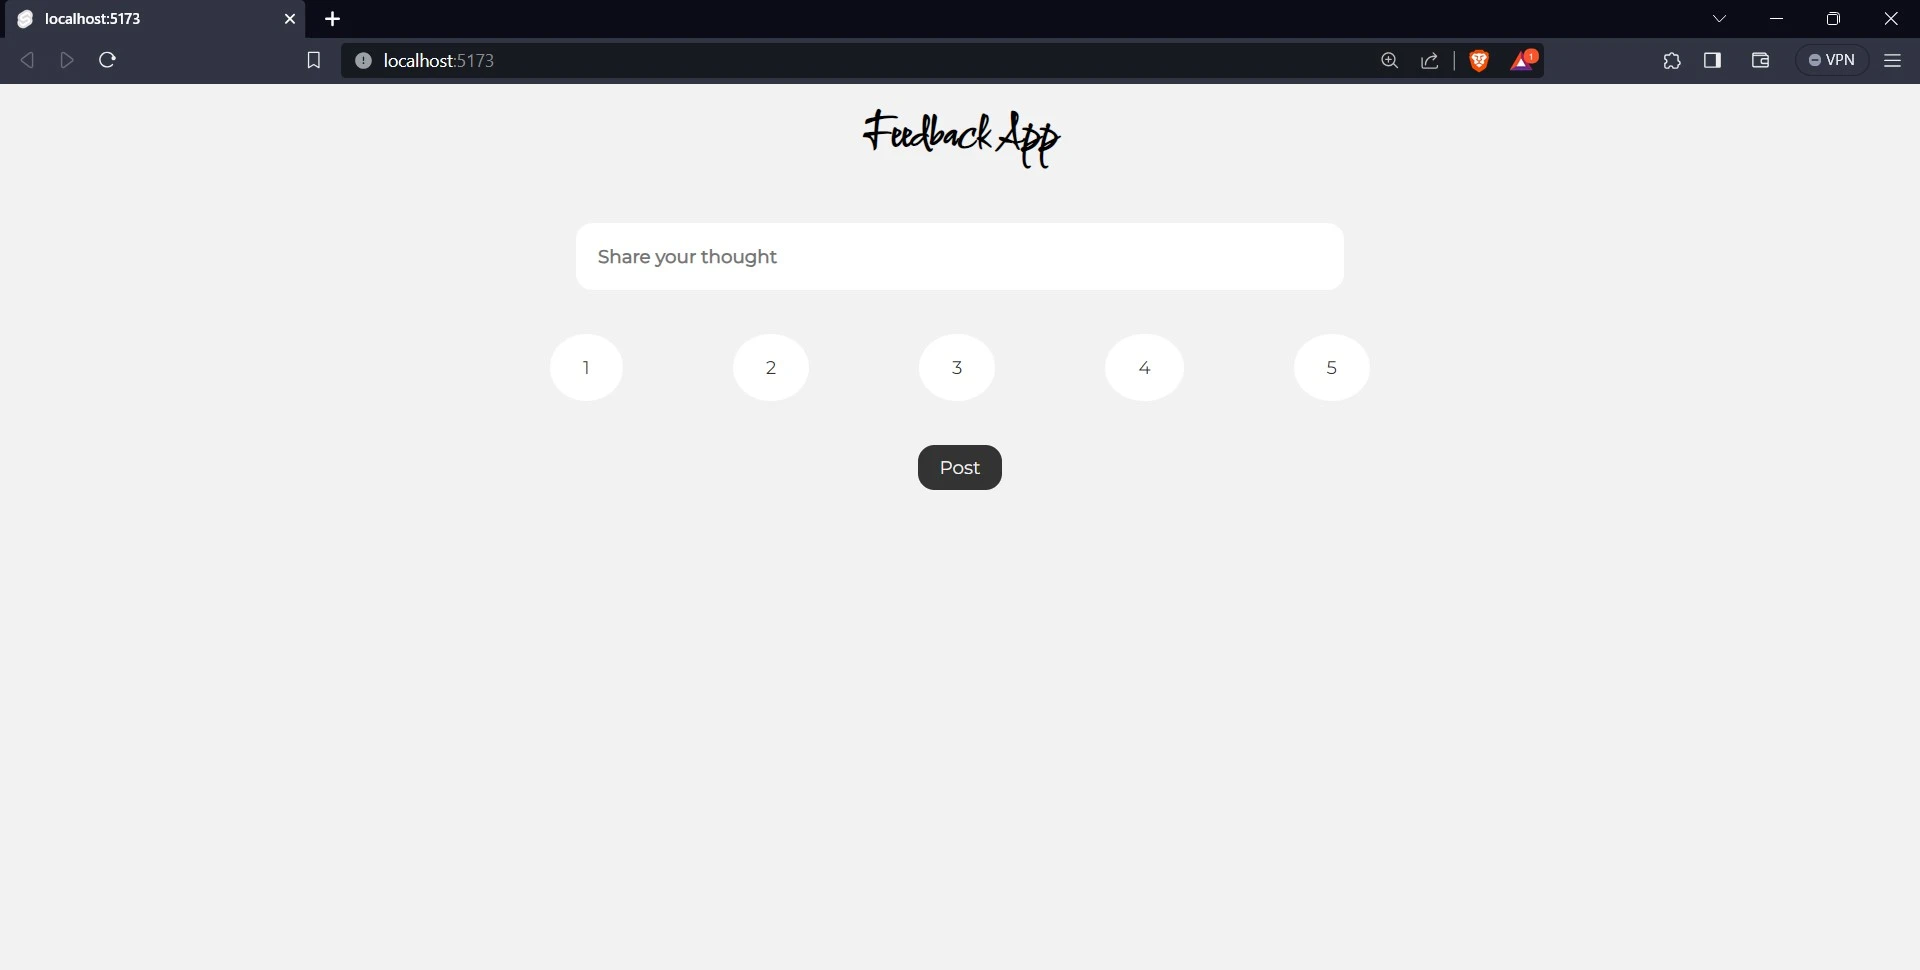
The code block above creates a feedback form with a simple rating system. You can input your thoughts in a text field and rate your experience by clicking on the numbered buttons. The application then stores your input in the data object.
The handleClick function stores your rating in the data.rating property and the bind directive stores your feedback in the data.feedback property. The bind directive allows you to achieve two-way data binding between input values and data in your component.
Now, you can view your application on your web browser. To do this, navigate to your project’s directory in your terminal and run the following command:
npm run dev
Running the command above will provide you with the link http://localhost:5173/. Navigate to this link on your web browser, and you can view your application.
If you have been following the tutorial correctly, your application should look like this:
Integrating Back4app With Your Application
Back4App is a Backend-as-a-Service (BaaS) platform that provides tools and infrastructure for you to build and manage your applications’ backend functionalities. With Back4App, you can focus on building great features for your app without worrying about the complexities of setting up and maintaining a backend server. Back4app offers many great features, including database management, user authentication, API hosting, and so much more.
Creating a Back4app account
Before you can use the great features Back4app offers, you need to have a Back4app account. You can create one by following these simple steps:
- Visit Back4app’s website.
- Click on the “Sign up” button.
- Fill out the sign-up form and submit it.
Introducing the Back4app ChatGPT Plugin
Following the recent trends of using AI to make developers’ lives easier, Back4app has introduced its ChatGPT plugin. This plugin helps developers and non-technical enthusiasts create and interact with Back4app applications.
With the plugin, you can convert your conversations with ChatGPT into real applications. This means that even if you are new to developing or new to using the Back4App platform, you can still create and customize a Back4App application easily.
To be able to use the plugins on ChatGPT, ensure you are subscribed to ChatGPT Plus. After subscribing to ChatGPT Plus, if you are not already subscribed, click on the “GPT-4” button, and a popover with options will appear.
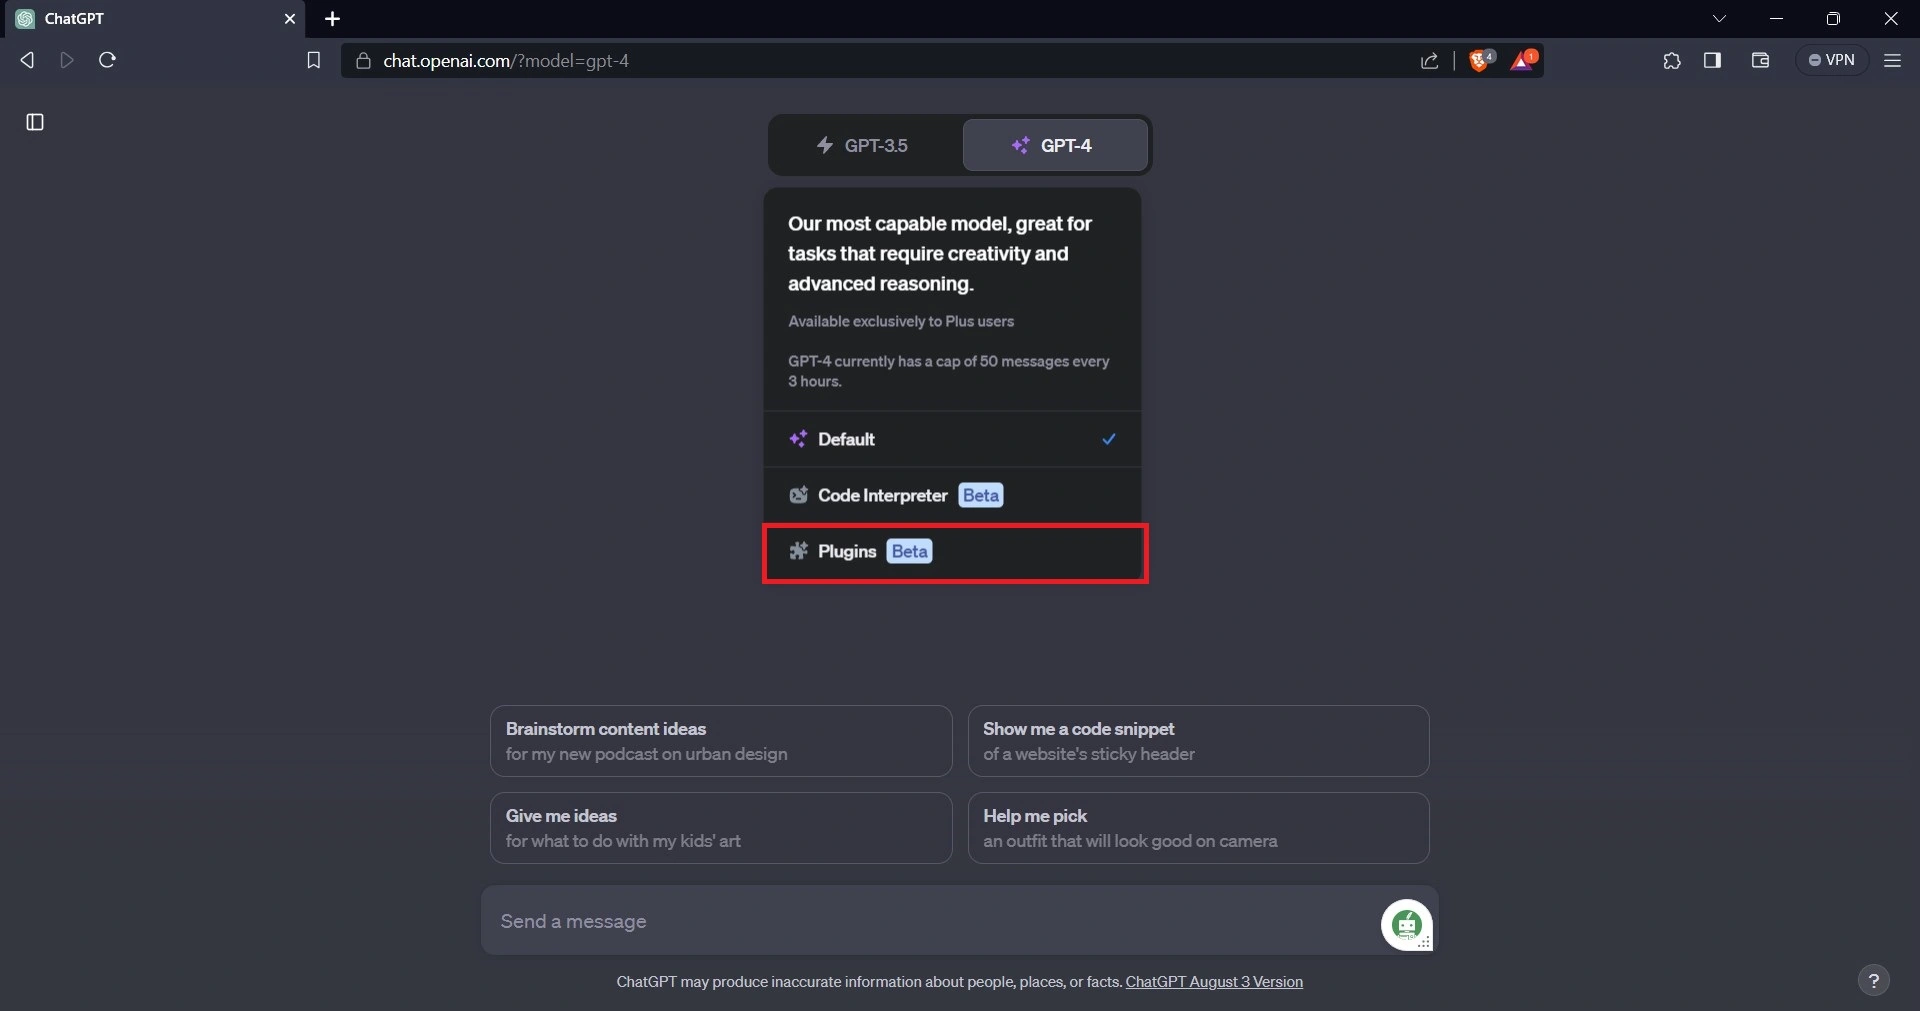
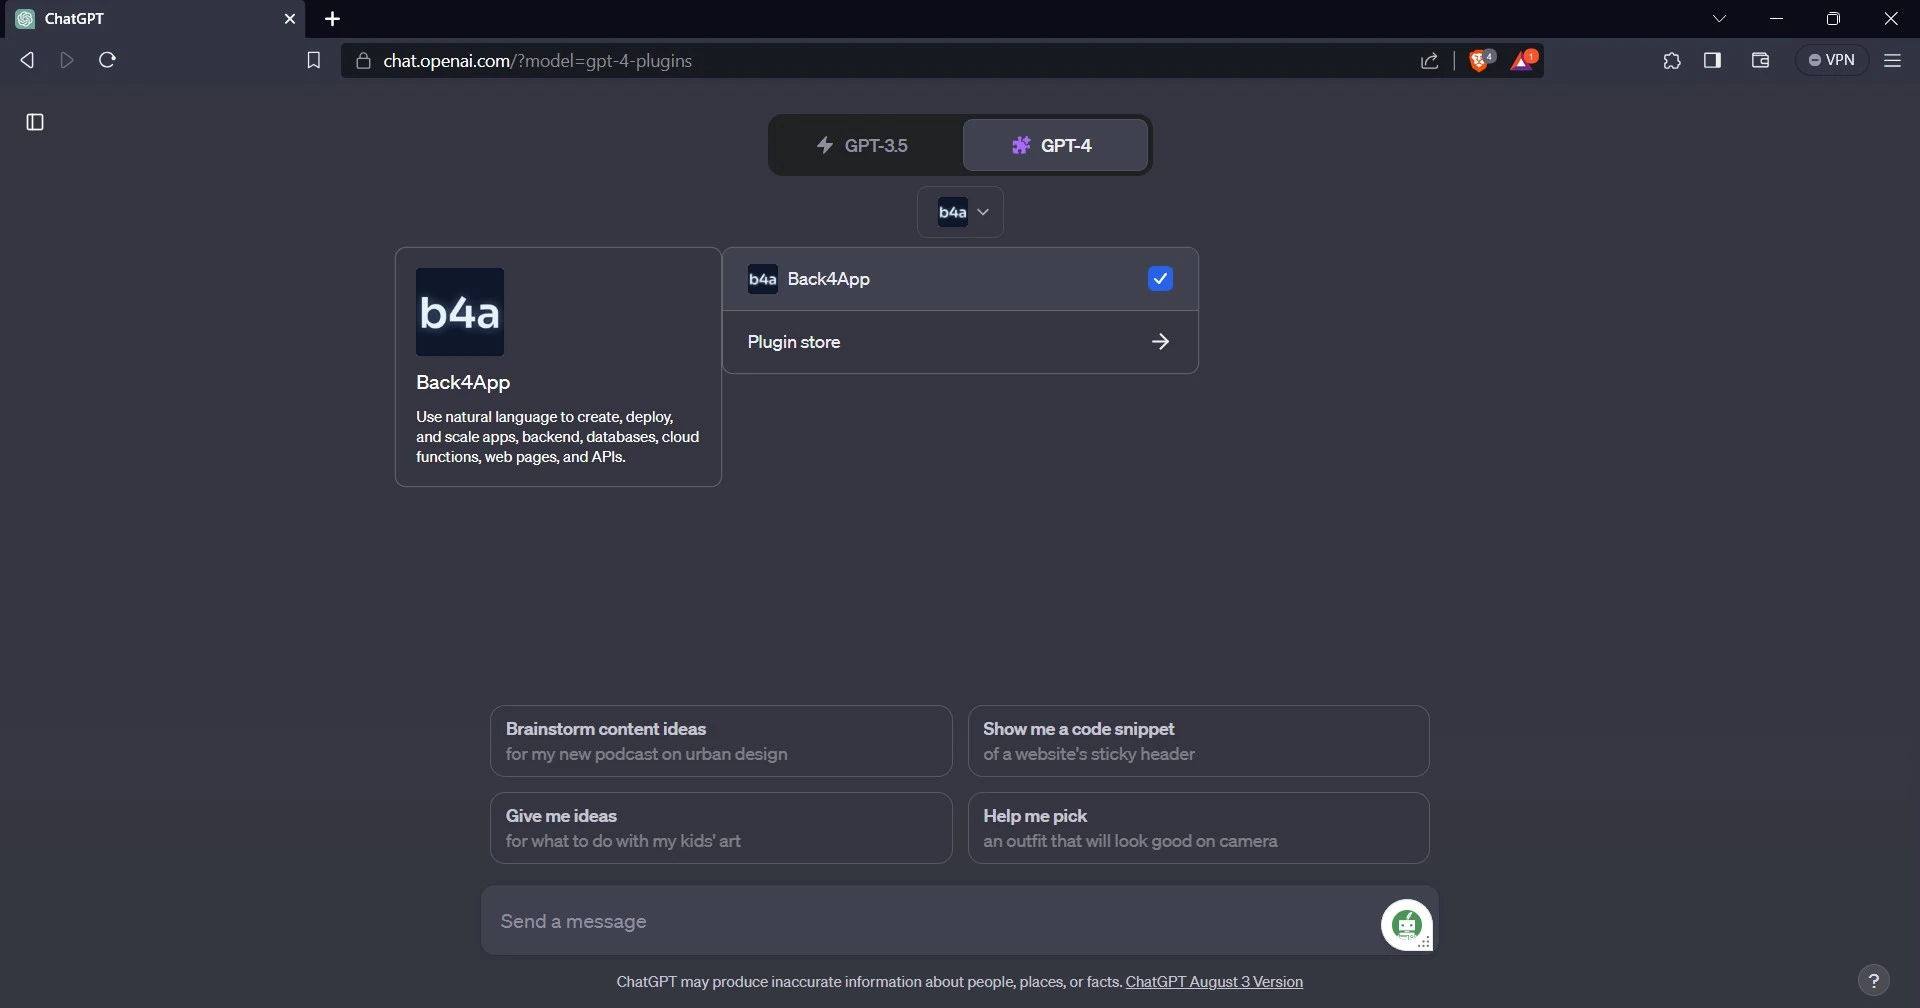
Select the plugins option, then select the Back4app plugin. This will allow you to use the Back4app’s ChatGPT plugin.
Create a Back4app Application With the Plugin
With the Back4app plugin on ChatGPT, creating a Back4app application is easy. Just tell ChatGPT what kind of application you want to create, and it will do the rest.
For example:
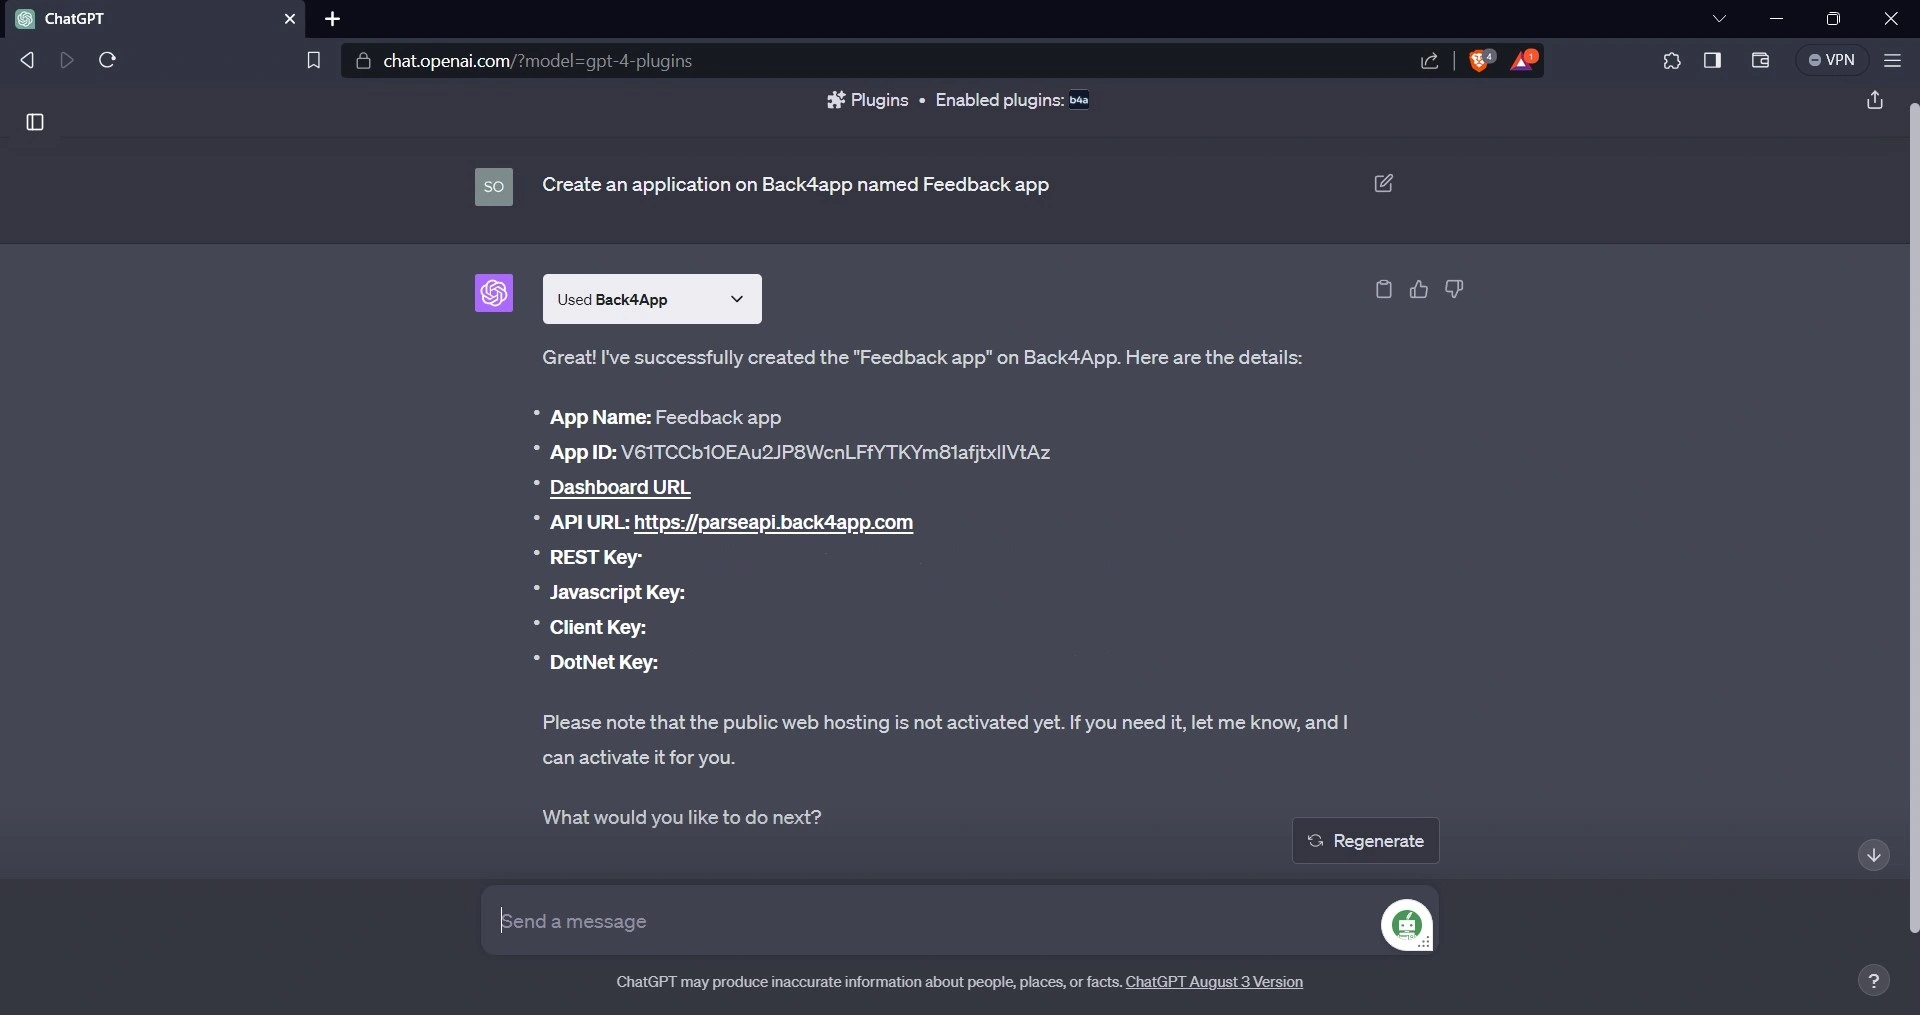
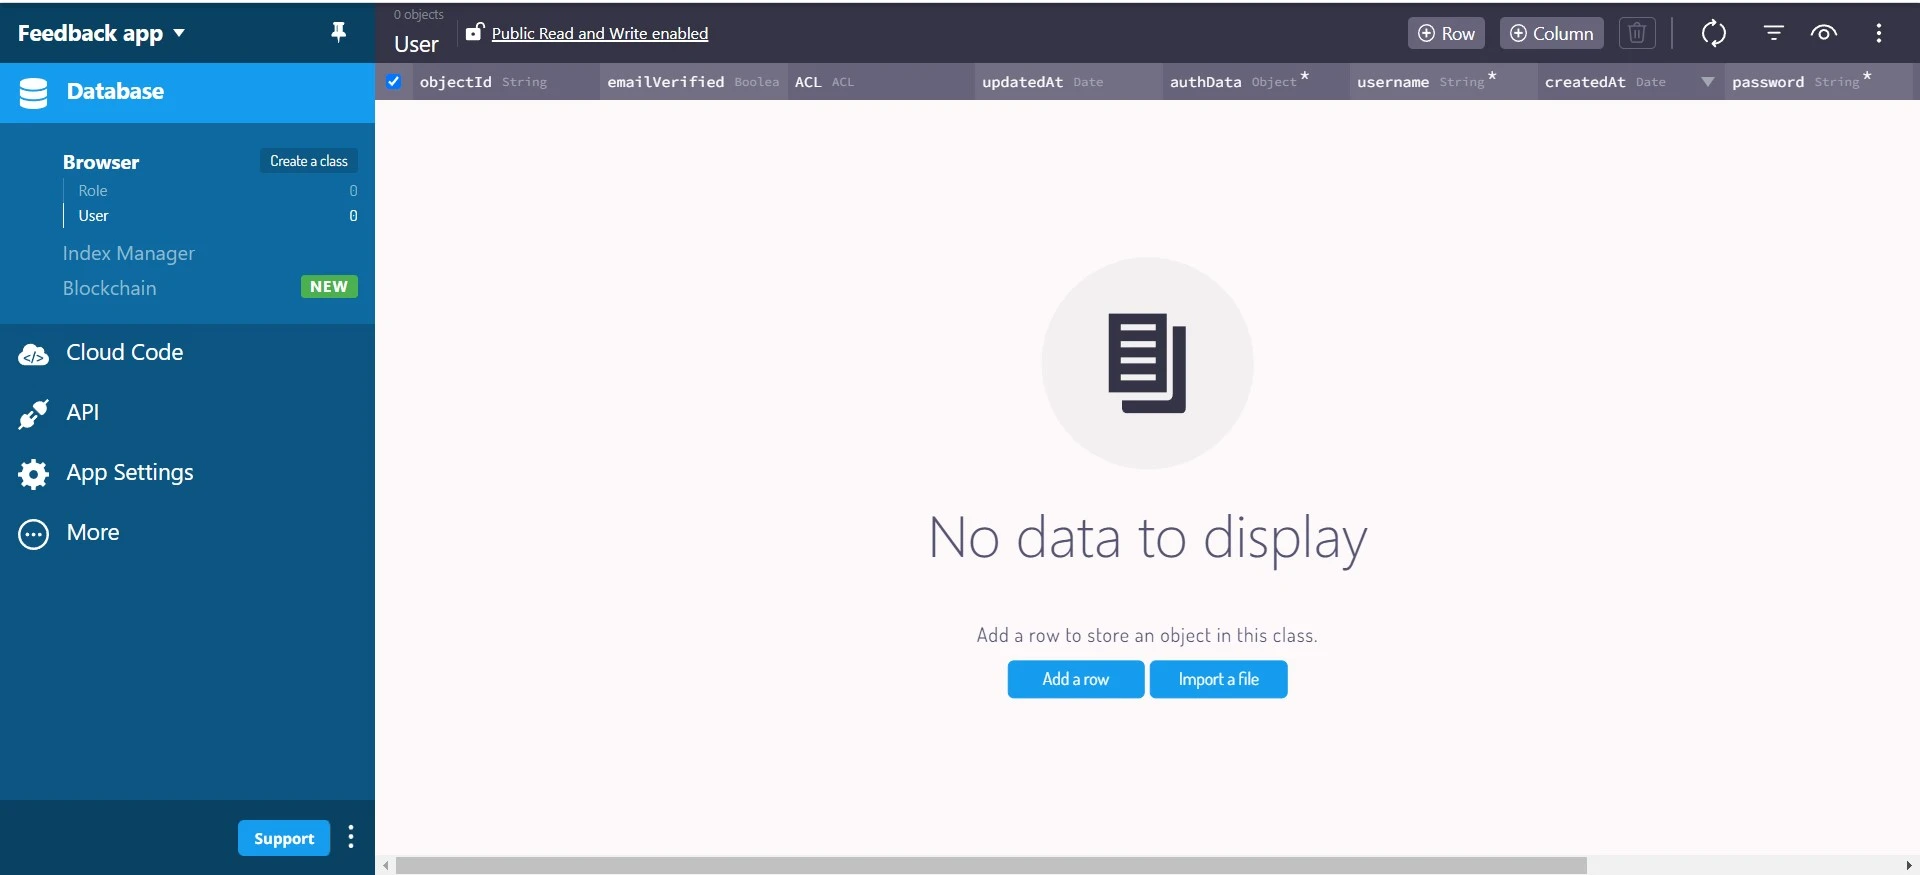
After creating the application, navigate to the Back4app website, log in, and check your apps to confirm that the application was created.
Adding Data to the Back4app Application
You can add data to your application using the Back4app’s ChatGPT plugin. Here, you will ask ChatGPT to create a feedback class in the feedback app and populate it with custom feedback.
Here’s an example of how to do this:
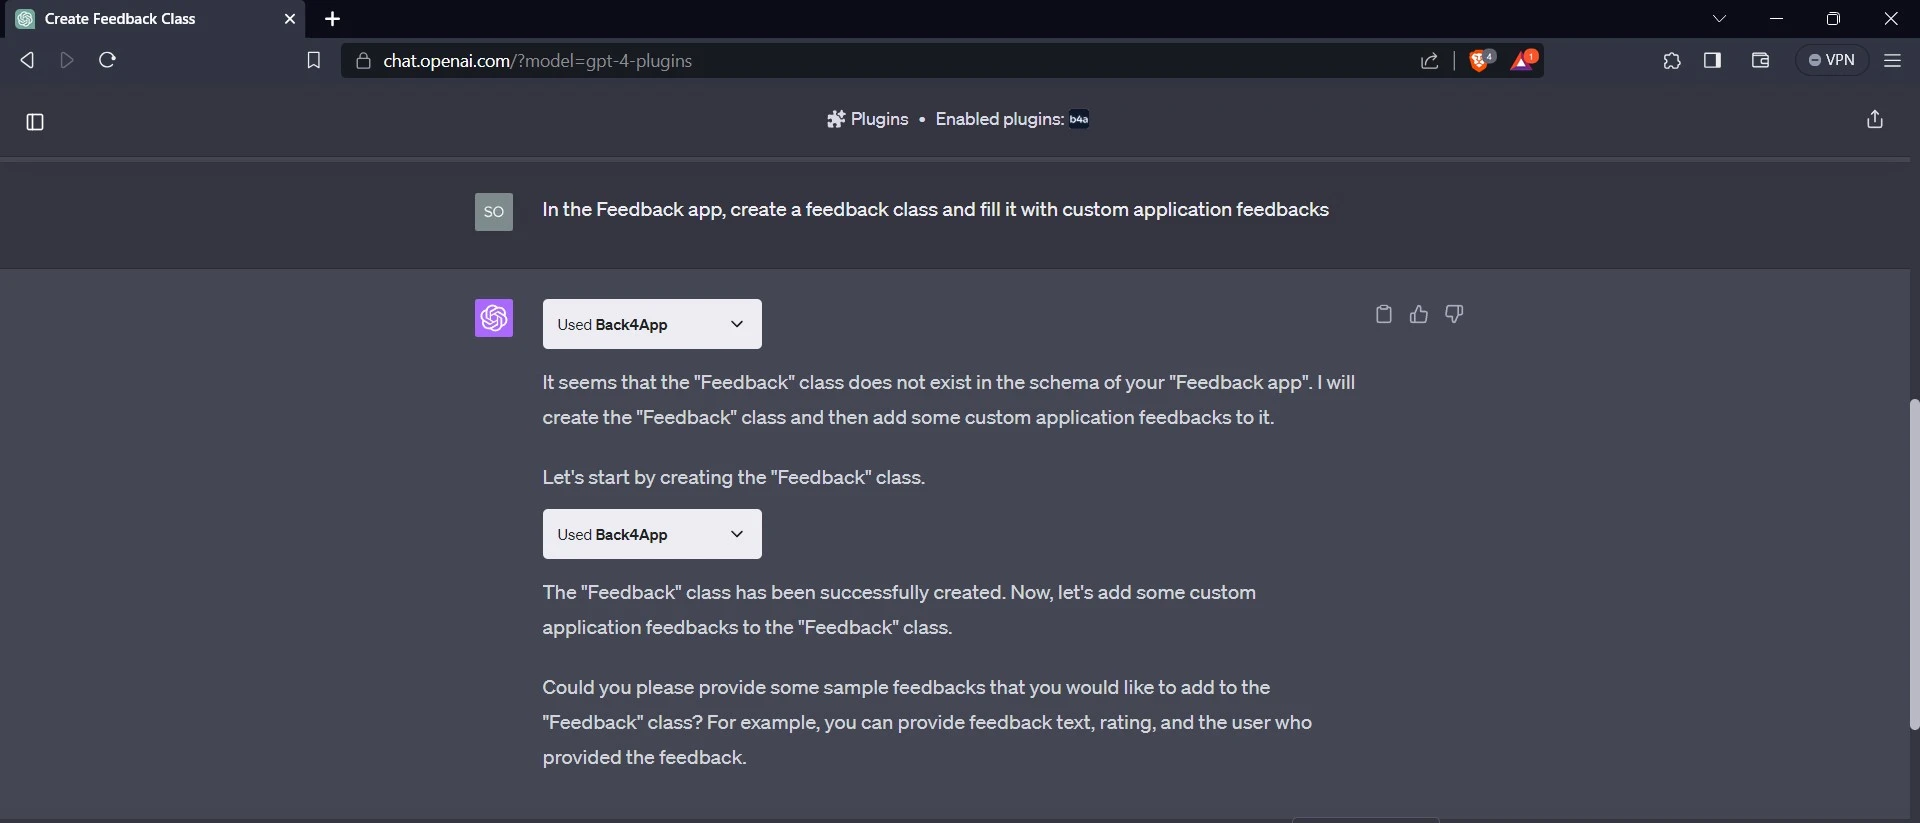
The plugin creates the Feedback class in the application and asks for an example of the custom feedback you want to add.

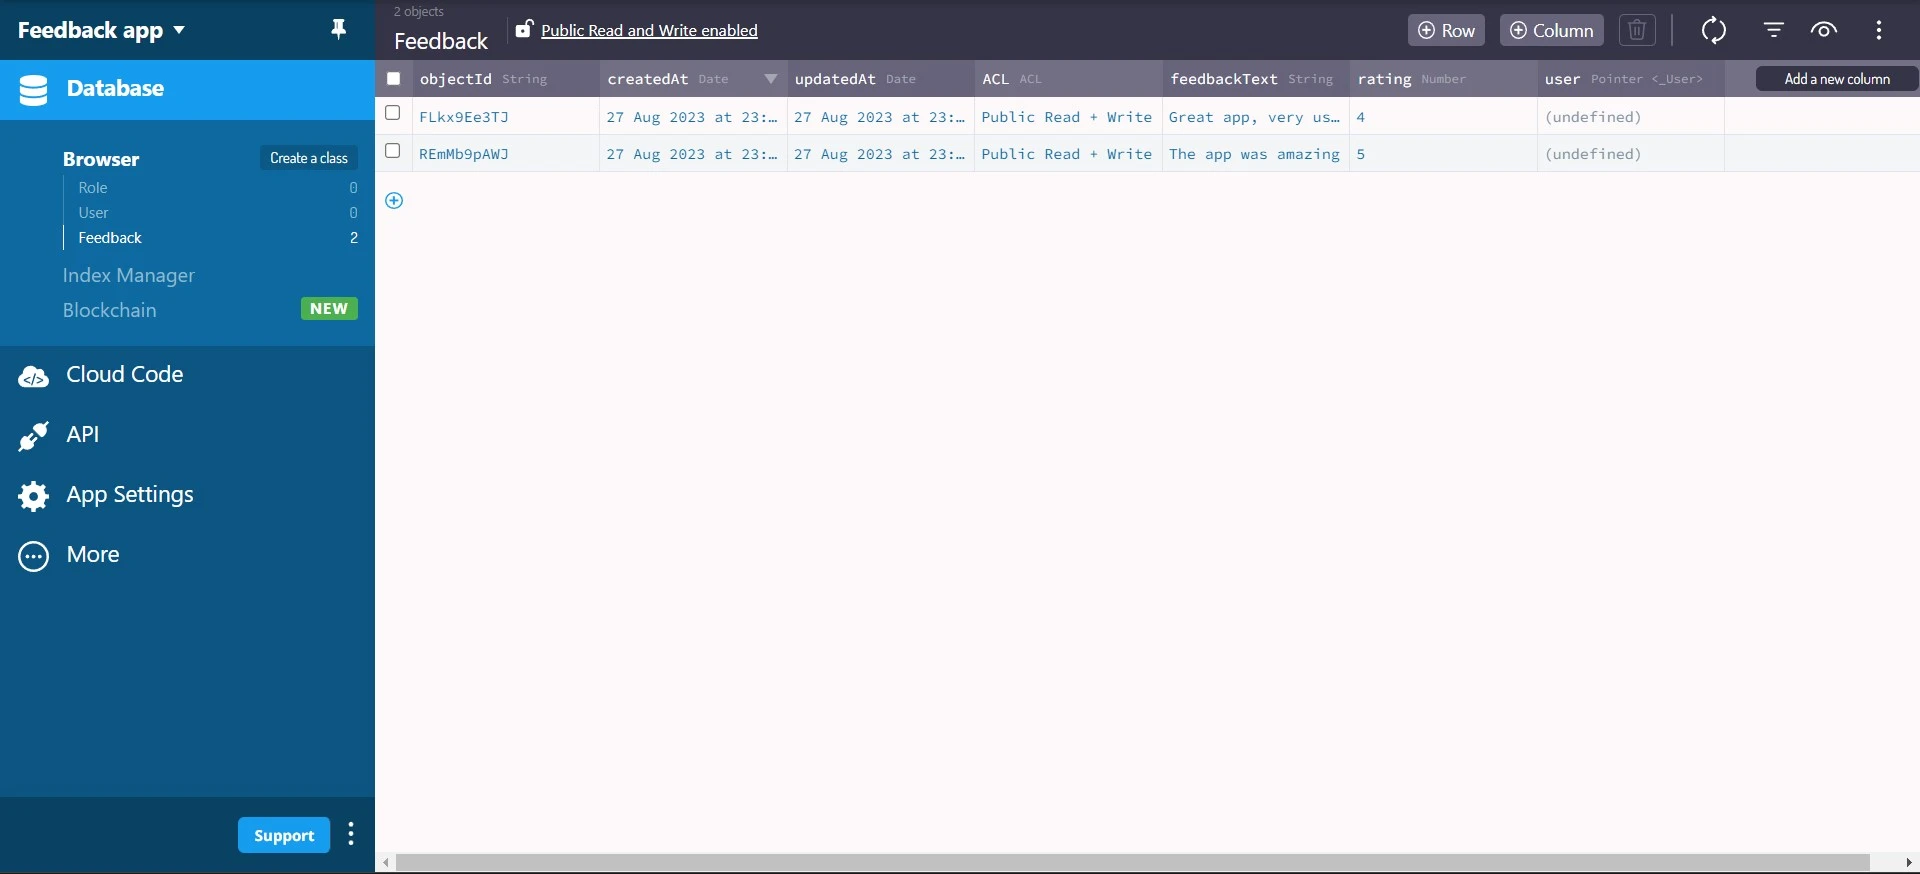
After giving an example of the custom feedback, the plugin generates the feedback and a rating to go along with it in the application. You can add more feedback and ratings to the application by providing them to ChatGPT.
Now, you can confirm that the plugin has generated the feedback class and the custom feedback and ratings in your application.
Connecting to Back4app
The next step is to connect your application to the Back4app application. To do this, you need to install the Parse JavaScript SDK. You can install it by running the following code in your terminal:
npm install parse
Once you are done installing the Parse JavaScript SDK. You will use the Application ID and Javascript KEY credentials. You can find these credentials in the Security & Keys section on your Back4app app’s dashboard. Store the Application ID and Javascript KEY securely in your application.
Import the minified version of Parse from parse into the +page.svelte file in the src directory, and call the initialize method. This method takes the Application ID and Javascript KEY credentials as arguments.
For example:
//+page.svelte
import Parse from 'parse/dist/parse.min.js';
Parse.initialize(APPLICATION_ID, JAVASCRIPT_KEY);
Note that you are to add the code block above within the script tag of the +page.svelte file. After calling the initialize method on Parse, the next step is to set the serverURL property on Parse to https://parseapi.back4app.com/.
Like so:
//+page.svelte
(Parse as any).serverURL = "<https://parseapi.back4app.com/>";
Fetching Data From Back4app
Before displaying the data already on your Back4app application, you will need to fetch the data. To fetch the data, you will create a function fetchFeedbacks. This function will contain the logic that fetches the feedbacks and ratings from your application.
Before creating the function, create a card component. The card component determines the look and feel of your feedbacks. To create the card component, first create a components folder in the src directory. Then, create a card.svelte file in the components folder.
In the card.svelte file, write this code:
<!-- card.svelte -->
<script lang="ts">
	export let feedback: string = '';
	export let rating: number = 0;
</script>

<div class="card">
	 <h5>{feedback}</h5>
	 <p>{rating} ratings</p>
</div>

<style>
	.card{
	    display: flex;
	    justify-content: space-between;
	    padding: 1rem;
	    background-color: #FFFFFF;
	    border-radius: 12px;
	    inline-size: 100%;
	    box-shadow: 0 10px 15px -3px rgb(0 0 0 / 0.1)
	}
</style>
This code defines the card component. In the script tag, the code exports the feedback and rating variables as props. This means that components that import this component can define the values of these props. The code initializes the feedback variable to an empty string and the rating variable to 0.
The div tag represents the main structure of the card component, and the style tag contains CSS styles applied to the card component.
Next, in the script tag of the +page.svelte, import the card component, and create the fetchFeedbacks function.
Like so:
//+page.svelte
import Card from "../components/card.svelte";
import { onMount } from "svelte";

let feedbackData: any = [];

const fetchFeedbacks = async () => {
  try {
    const query = new Parse.Query("Feedback");
    const feedbacks = await query.find();
    feedbackData = feedbacks;
  } catch (error) {
    console.log(error);
  }
};

onMount(fetchFeedbacks);
This code defines the fetchFeedbacks function. It also uses the onMount lifecycle hook to fetch the feedbacks from the database by calling the fetchFeedbacks function.
The fetchFeedbacks function uses the Parse.Query() method to search for a “Feedback” object in your app’s database. It then returns an array of the query results by calling the Parse SDK’s find() method on the result of the Parse.Query() call. Finally, it assigns the array of the results to the feedbackData variable.
Now, in the div tag that contains the HTML elements of the +page.svelte file, you use Svelte’s each block to render the data in the feedbackData array.
For example:
<!-- +page.svelte -->
<div class="feedbacks">
	{#each feedbackData as feedback}
	    <Card feedback={feedback.get('feedbackText')} rating={feedback.get('rating')}/>
	{/each}
</div>
Inside the div tag, the each block iterates over the feedbackData array and assigns each element to the variable feedback. For each feedback in the array, you render the card component. You obtain the values of the feedbackText and rating using the feedback’s get() method. You then pass the values to the feedback and rating props of the card component.
Style the div tag with the class feedbacks by adding the code block below to the style tag in the +page.svelte file:
/* +page.svelte */
.feedbacks{
	display: flex;
	flex-direction: column;
	gap: 2rem;
	margin-block-start: 3rem;
	border: 2px #e2e2e2 solid;
	padding: 2rem;
	border-radius: 7px;
}
Adding Data to Back4app From the Application
Initially, you added data to your Back4app application using Back4app’s ChatGPT plugin, but the users of your application won’t be able to do that. To allow users the ability to add data from your application, you will create a function that adds new feedback and ratings to your Back4app app’s database.
Like so:
// +page.svelte
const handleSubmit = () => {
  try {
    const Feedback = new Parse.Object("Feedback");
    Feedback.set("feedbackText", data.feedback);
    Feedback.set("rating", +data.rating);
    Feedback.save().then(() => {
      console.log("New Feedback added successfully");
    });
  } catch (error) {
    console.log(error);
  }

  fetchFeedbacks();
};
Add the code block above to the script tag of the +page.svelte file. The handleSubmit() function creates a new a new Parse ”Feedback” object and sets its feedbackText and rating properties to the values of the data.feedback and data.rating. It then saves the object to the Parse server using the save() method. Finally, the function calls the fetchFeedbacks() function.
Now bind the handleSubmit function to the form in the +page.svelte file using event binding. You bind the function to the on:submit event so that whenever a user submits the form, the function will run.
<form on:submit={handleSubmit}>
	<input
	type="text"
	placeholder="Share your thought"
	name="feedback"
	bind:value={data.feedback}
	/>

	<div class="rating">
	    <input type="button" value="1" class="button" on:click={handleClick}>
	    <input type="button" value="2" class="button" on:click={handleClick}>
	    <input type="button" value="3" class="button" on:click={handleClick}>
	    <input type="button" value="4" class="button" on:click={handleClick}>
	    <input type="button" value="5" class="button" on:click={handleClick}>
	</div>

	<button>Post</button>
 </form>
Deleting Data From Back4app
You can delete data from Back4app using the destroy method to remove the corresponding record(s) from your database. Create a deleteFeedback function containing the logic for deleting feedbacks from your app’s database based on a given ID.
Before creating the deleteFeedback function, update the card component by adding a deleteFeedback prop and a button element that you bind to the deleteFeedback prop using the on:click event. Replace the code in your card.svelte file with the code block below.
<!-- card.svelte -->
<script lang="ts">
	export let feedback: string = '';
	export let rating: number = 0;
	export let deleteFeedback: any = '';
</script>

<div class="card">
	<div style="display: flex; flex-direction: column; gap: 1rem; ">
	<h5>{feedback}</h5>
	<button on:click={deleteFeedback}>Delete</button>
	</div>
	<p>{rating} ratings</p>
</div>

<style>
	.card{
	  display: flex;
	  justify-content: space-between;
	  padding: 1rem;
	  background-color: #FFFFFF;
	  border-radius: 12px;
	  inline-size: 100%;
	  box-shadow: 0 10px 15px -3px rgb(0 0 0 / 0.1)
	}
</style>
Create the deleteFeedback function in the +page.svelte file:
// +page.svelte
const deleteFeedback = async (id: string) => {
  try {
    const Feedback = Parse.Object.extend("Feedback");
    const feedback = new Feedback();
    feedback.id = id;
    await feedback.destroy();
    const newData = feedbackData.filter((item: any) => item.id !== id);
    feedbackData = newData;
  } catch (error) {
    console.log(error);
  }
};
The deleteFeedback function creates a new “Feedback” object using the Parse.Object.extend method. It then sets the id property of the object to the id parameter passed to the function. Next, it calls the asynchronous destroy method of the “Feedback” object to delete the feedback item with the given ID from Back4app.
The function then filters the feedbackData array using the feedbackData.filter method. It filters out the feedback item with the given id, creating a new array that doesn’t have the deleted feedback item. The function then assigns the new array to feedbackData.
Now pass the deleteFeedback function to the deleteFeedback prop of the card component. This way, whenever a user clicks the button element in the card component, the deleteFeedback function will run.
Like so:
<!-- +page.svelte -->
<div class="feedbacks">
	{#each feedbackData as feedback}
		<Card
		feedback={feedback.get('feedbackText')}
		rating={feedback.get('rating')}
		deleteFeedback={() => deleteFeedback(feedback.id)}
		/>
	{/each}
</div>
Testing the Application
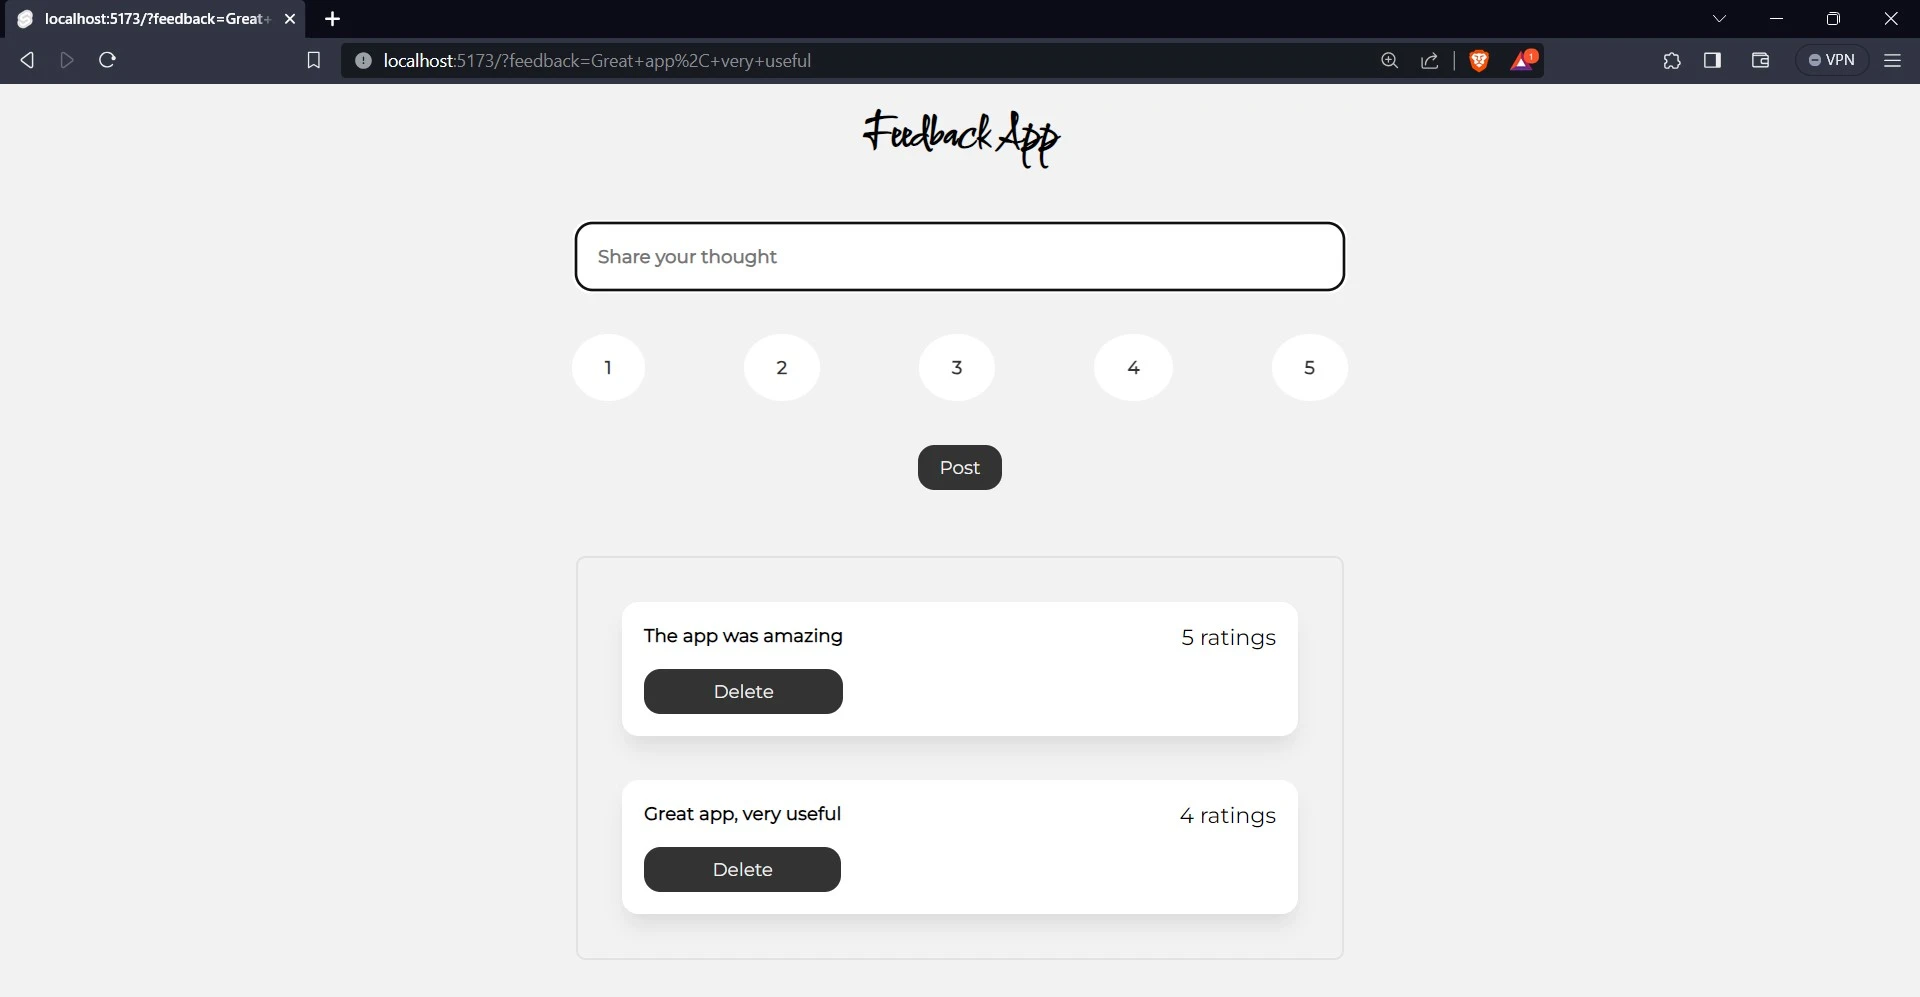
You have finished building the application; the next step is testing it. To test the application, navigate to the applications directory on your terminal and run the development server.
After running the development server, open your browser and go to the following link: http://localhost:5173/. The application should look like the image below.
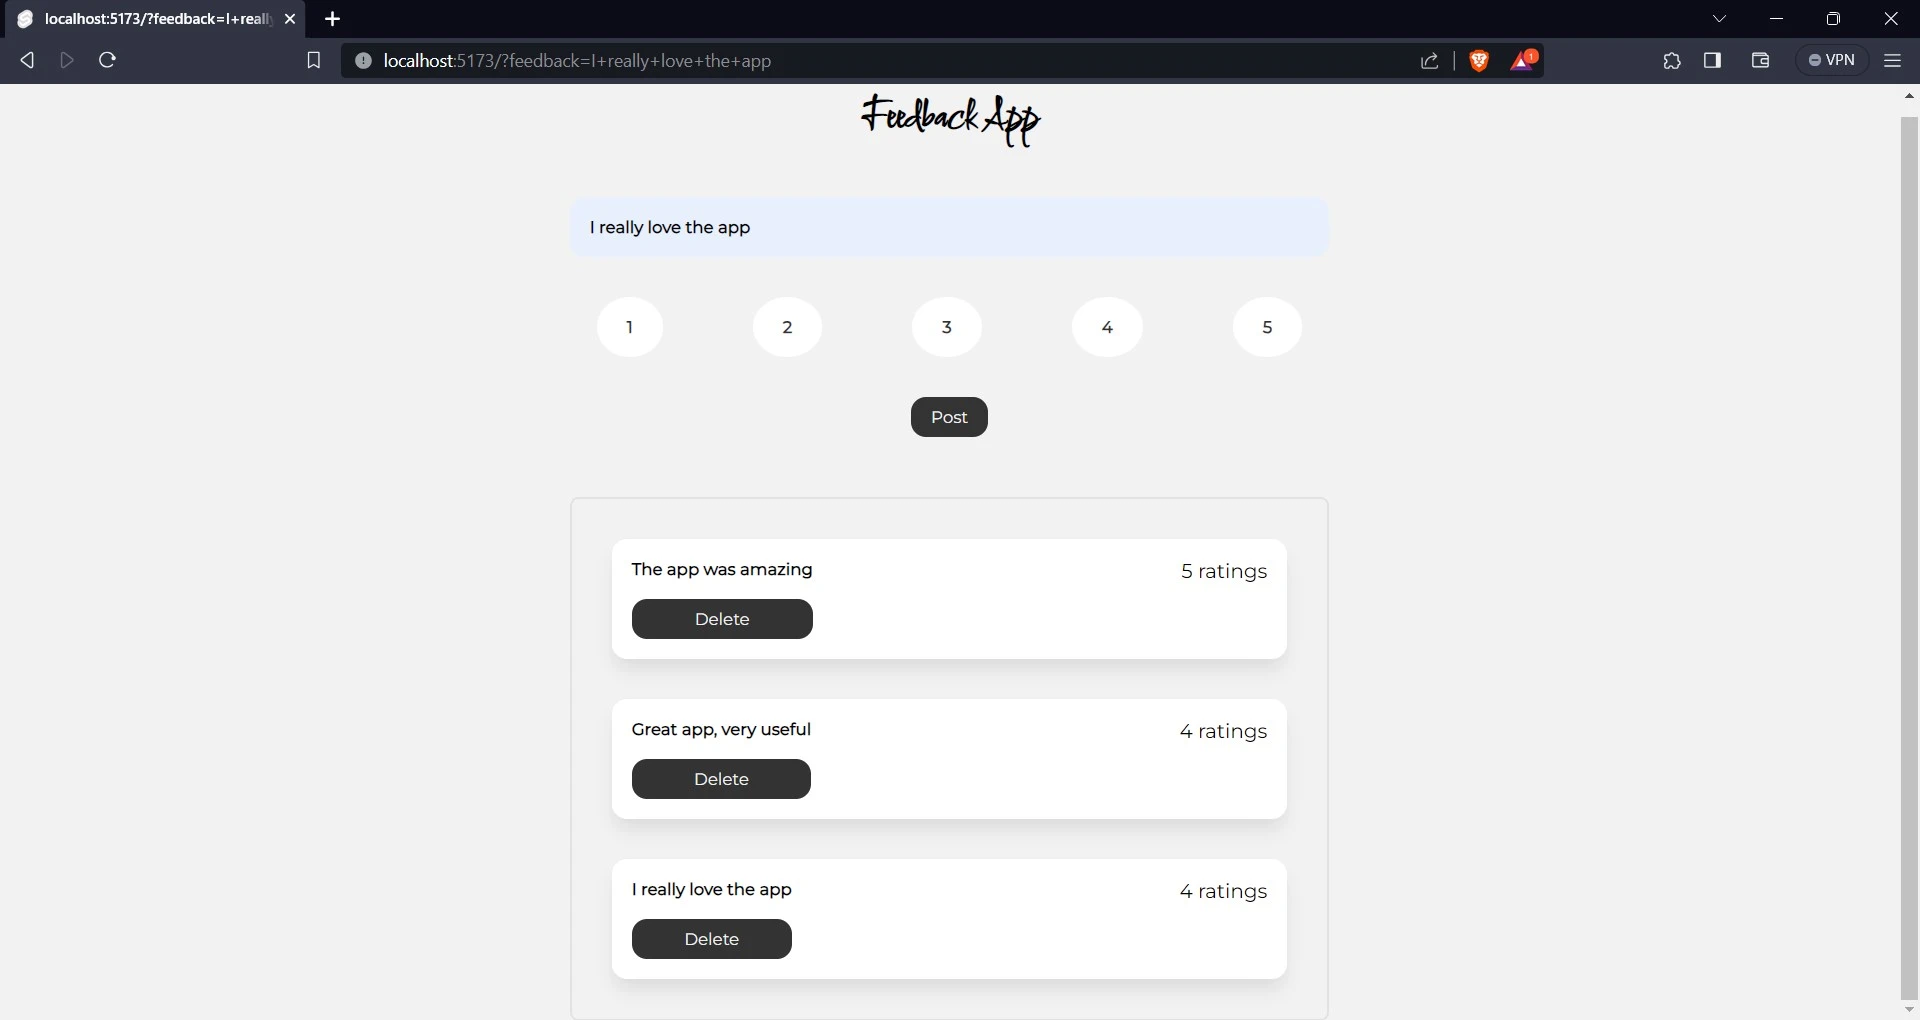
To add a feedback, write “I really love the app” in the input field, then click the button with the text “4” to rate it. Finally, click “Post” to submit your feedback.
To confirm that you have added a new feedback, a new card will appear below the previous cards with the text “I really love the app” and a rating of 4. You can also navigate to your application’s dashboard on Back4app to confirm.
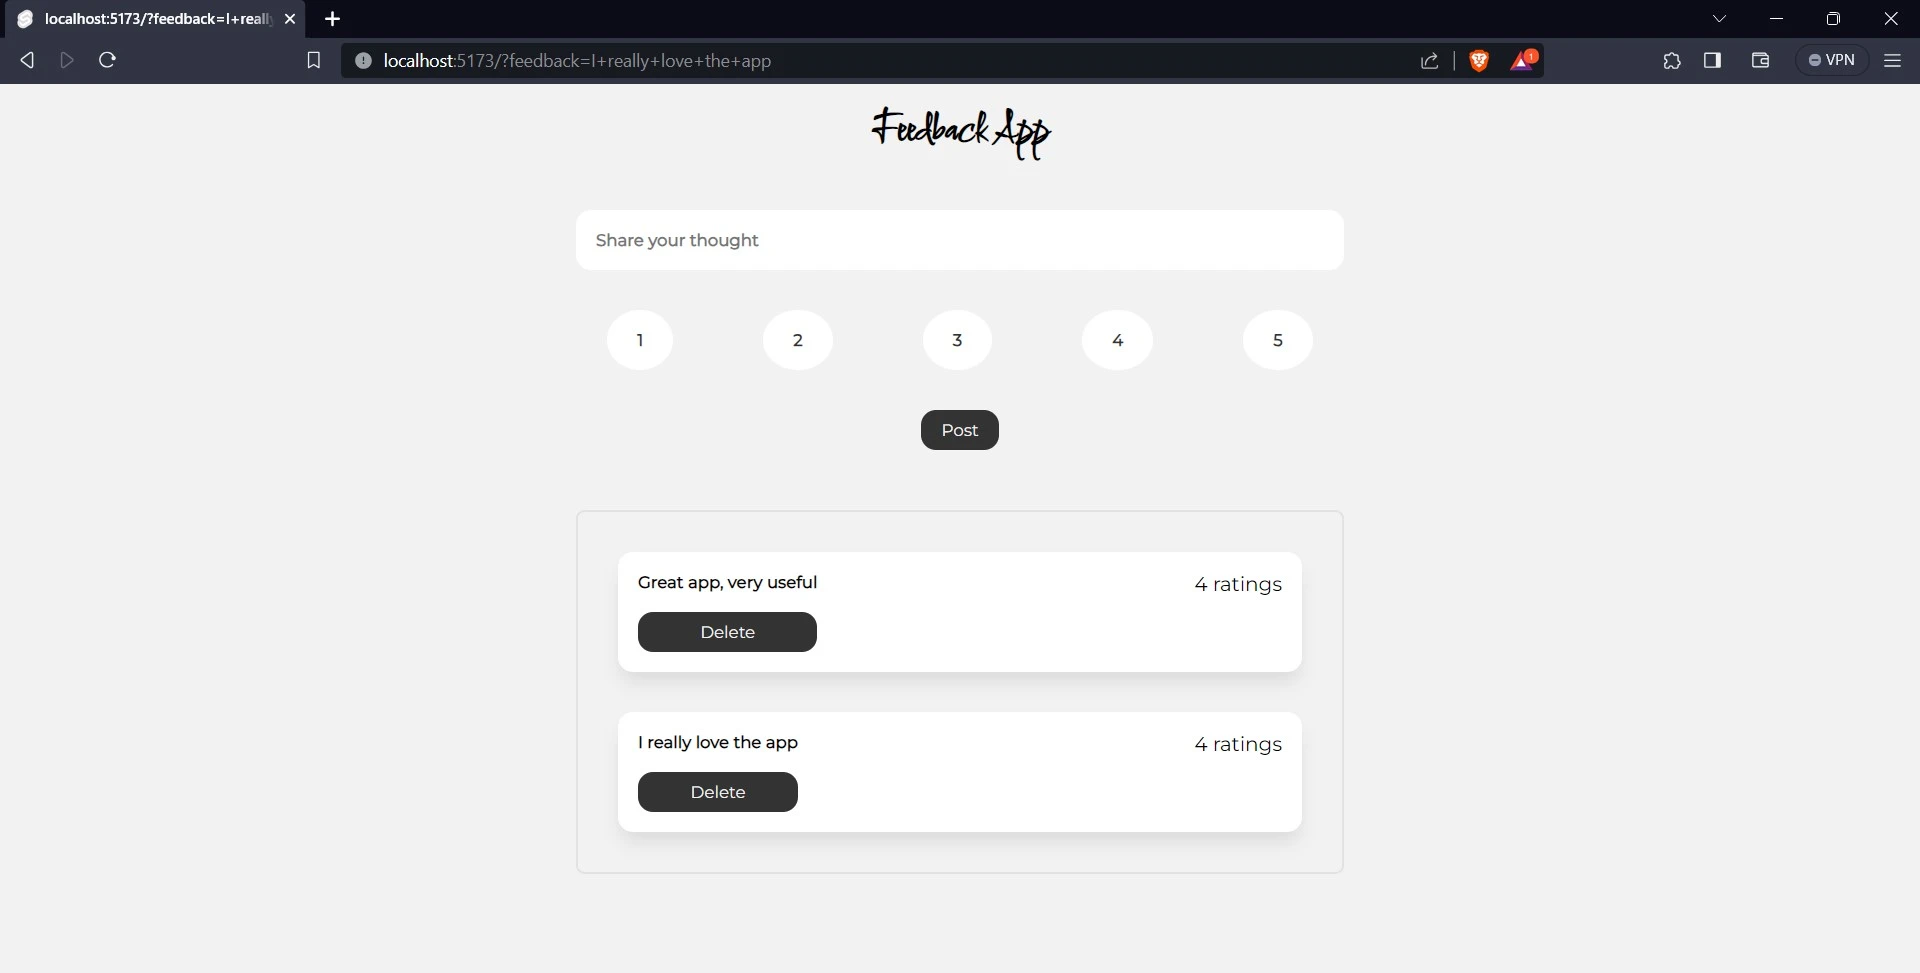
To delete a feedback just click on the delete button. To confirm this, delete the “The app was amazing” feedback.
Conclusion
SvelteKit is a framework for developing robust, performant web applications using Svelte. It is a meta-framework, which means that it provides a set of tools and abstractions that can be used to build any type of web application.
Integrating SvelteKit with Back4app allows developers to focus on developing their front-end applications while Back4app takes care of the backend. Back4app reduces the complexity of backend development, making it easier for developers to create full-stack web applications.
FAQ
What is SvelteKit?
SvelteKit is a meta-framework built on top of Svelte that provides basic functionality like routing and server-side rendering (SSR). SvelteKit includes a number of other features, such as a built-in state management system, a CLI tool, and a devtools extension. For developers looking to build fast and lightweight applications, SvelteKit is an excellent choice.
What is Back4app’s ChatGPT Plugin?
Back4app’s ChatGPT Plugin is a plugin on ChatGPT introduced by Back4app. This plugin is a tool that uses your conversations with ChatGPT to create and manage your applications on Back4app. The plugin was created to make it easier for developers and non-technical users to manage their Back4app applications.
How to build a SvelteKit application using Back4app as BaaS?
SvelteKit is a popular framework that enables developers to build server-side rendering applications. Back4app, on the other hand, is a robust backend-as-a-service (BaaS) platform that provides a scalable and flexible environment for deploying applications.
To build a SvelteKit application using Back4app as BaaS, follow these simple steps:
– Create a SvelteKit application
– Set Up Your Back4app Account
– Create a Back4app application
– Connect the SvelteKit application to the Back4app application
– Add the CRUD functionality to the SvelteKit application
– Deploy the application


