How To Deploy a SvelteKit Application?
In this article, you will build a basic quote generator application using SvelteKit and host it using Back4app Containers.
SvelteKit is a modern web application framework that builds upon the principles of the Svelte JavaScript framework. It offers developers an efficient and elegant way to create web applications with a focus on simplicity and performance.
In 2020, SvelteKit was created by Rich Harris, the creator of Svelte, and in October 2022, Rich Harris and his team joined Vercel.
When deploying a SvelteKit application, it is helpful to use the Back4app Containers. Back4app Containers is a platform that allows developers to deploy and manage containerized applications on Back4app’s infrastructure.
It is a cloud-based service that provides a simple and scalable way to run containerized applications in production.
Contents
- 1 What is SvelteKit?
- 2 Advantages of SvelteKit
- 3 Limitations of SvelteKit
- 4 SvelteKit Deployment Options
- 5 Infrastructure as a Service (IaaS)
- 6 Container as a Service (CaaS)
- 7 Deployment Process
- 8 What Are Back4app Containers?
- 9 Project Introduction
- 10 Building Your Application
- 11 Dockerize Your Application
- 12 Deploying Your Application
- 13 Conclusion
- 14 FAQ
- 15 What Is SvelteKit?
- 16 How To Deploy a SvelteKit Application?
What is SvelteKit?
SvelteKit is a web framework for building performant and robust web applications. It is built on top of Svelte, a lightweight and reactive JavaScript framework.
SvelteKit provides a number of features that make it easy to develop and deploy web applications, including server-side rendering (SSR), static site generation (SSG), client-side routing, etc.
It also offers many benefits, such as simplicity, flexibility, scalability, performance, etc. Keep reading to learn how to deploy SvelteKit app.
Advantages of SvelteKit
Here are some of the advantages of using the SvelteKit framework:
Easy Learning Curve
When choosing a front-end framework for web development, one of the critical factors to consider is the learning curve associated with that framework.
A steep learning curve can discourage you from adopting a framework, while a gentle one can make it more accessible and appealing.
SvelteKit has a gentle learning curve, especially if you are familiar with HTML, CSS, and JavaScript. Its syntax is straightforward and intuitive, making it easy to understand and build web applications.
TypeScript Support
TypeScript is a statically typed superset of JavaScript that has gained popularity in the world of web development. It brings strong typing, code clarity, and better tooling to JavaScript projects.
SvelteKit has excellent TypeScript support, enabling you to write type-safe code and catch potential errors during development. This improves code quality, maintainability, and collaboration within development teams.
File-Based Routing
File-based routing is a modern web development feature that makes it easy to organize and manage routes in your application. It works by using file management to determine routes instead of using a third-party library.
SvelteKit uses a file-based routing system. You organize your application’s routes by creating files and folders, making managing your project’s structure easy.
Community and Ecosystem
In the realm of web development, having a strong and supportive community, along with a thriving ecosystem, is a significant advantage.
SvelteKit benefits from the broader Svelte ecosystem, which includes a growing community, a rich collection of reusable components and libraries, and extensive documentation.
Limitations of SvelteKit
While SvelteKit is a powerful framework for building efficient web applications, it has some limitations that you should keep in mind. These limitations include:
Server-Side Rendering (SSR) Limitations
Server-side rendering (SSR) is a technique that allows web applications to render content on the server and send pre-rendered HTML to the client. SSR has several advantages, including improved SEO, faster initial page loads, and better performance on low-end devices.
SvelteKit supports server-side rendering. However, it lacks some advanced SSR features that are available in other frameworks, such as fine-grained control over server-side rendering or support for streaming SSR.
Limited Tooling
As a relatively new framework, SvelteKit’s tooling is still evolving, and it may not have the same level of maturity and feature set as other frameworks.
This means there may be some variability in the development setup and tooling choices among different SvelteKit projects. It can result in fewer options for tasks like code linting, testing, or build optimization.
Limited Ecosystem
A limited ecosystem is one of the limitations of SvelteKit, and it can impact the development experience and choices available to you. Compared to more established frameworks, SvelteKit has a smaller ecosystem of libraries, tools, and plugins.
This means you may need to build certain functionalities from scratch or rely on community-supported solutions. It’s important to consider the current state of the SvelteKit ecosystem when deciding whether to use it for a project.
Community Size
Community size can significantly impact the development experience and support available for a particular framework.
Although the SvelteKit community is growing rapidly, it is still smaller than communities around other major frameworks such as React and Vue.js.
This can mean fewer readily available resources, slower adoption of new features, fewer learning resources, and potentially longer response times for community support.
SvelteKit Deployment Options
You can deploy SvelteKit applications on various platforms, including Infrastructure as a Service (IaaS) and Container as a Service (CaaS).
Infrastructure as a Service (IaaS)
Infrastructure as a Service (IaaS) platforms are cloud computing services that provide virtualized computing resources over the internet. These resources include virtual machines, storage, networking, and other fundamental components.
IaaS platforms offer a flexible and scalable way to access and manage your IT infrastructure without investing in and maintaining physical hardware.
They also provide managed services, backup and disaster recovery, security and compliance, and cost efficiency following a pay-as-you-go pricing model.
Some examples of IaaS platforms you can use to deploy SvelteKit applications include:
- Amazon Web Services (AWS)
- Microsoft Azure
- Google Cloud Platform (GCP)
Container as a Service (CaaS)
Container as a Service (CaaS) platforms, also known as Container Management Platforms or Container Orchestration Platforms, are cloud-based services that simplify containerized applications’ deployment, scaling, management, and orchestration.
These platforms are designed to streamline the containerization process and provide a comprehensive solution for container management, allowing you to focus on developing your applications without the complexities of managing infrastructure.
You can deploy your SvelteKit applications using CaaS platforms. Some of these platforms include:
- Docker
- Kubernetes
- Back4App
Note that these are other deployment options available for SvelteKit applications. The best platform for your application will depend on your specific needs, including performance, scalability, and cost considerations.
Deployment Process
Using the Back4app CaaS platform, deploying a SvelteKit application is an easy and streamlined process that offers many benefits.• Back4app’s CaaS handles the underlying infrastructure, so you can focus on building your applications.
What Are Back4app Containers?
Back4App Containers, AKA “Back4App CaaS” (Containers as a Service), is a feature provided by Back4App that allows developers to deploy and manage Docker containers in the cloud environment provided by Back4App.
It is a managed container hosting solution that simplifies the deployment and management of Docker containers in the cloud.
Back4app Containers offer scalability, flexibility, and integration with other Back4App services, making them suitable for a wide range of applications and services.
It’s an excellent choice for those who want to leverage containerization for their projects while minimizing the complexity of infrastructure management.
Project Introduction
In this tutorial, you’ll build a simple quote generator app with SvelteKit, using a quote API to fetch random quotes to display.
To create a SvelteKit application, run the following command in your terminal:
npm create svelte@latest quote-generator
Once you run the command, configure your SvelteKit project using the prompts displayed on the terminal.
For example:
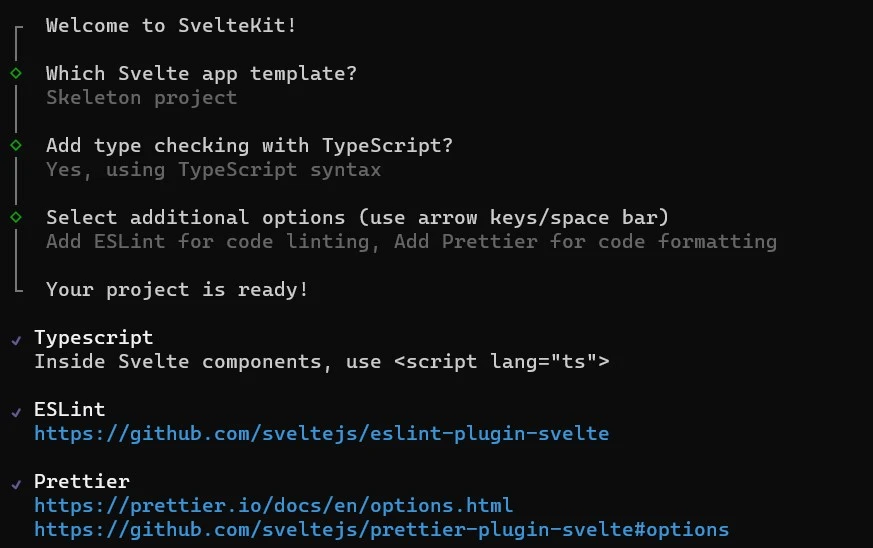
As seen in the image above, the quote generator project will use the TypeScript syntax, ESLint for code linting, and Prettier for code formatting.
Now on your terminal, switch your current directory to the project’s directory and install the necessary dependencies. To do this, run the following commands in your terminal:
cd quote-generator
npm install
After installing the necessary dependencies, open the project on your favorite IDE and begin building the application.
Building Your Application
When building your application, the first thing you do is define the application’s global styles and layout. To define the global styles for your application, create a styles folder in the src directory and add a global.css file to the folder.
In the global.css file, write the following lines of code:
/*global.css*/
@import url('<https://fonts.googleapis.com/css2?family=Montserrat&display=swap>');

*{
    margin: 0;
    padding: 0;
    box-sizing: border-box;
}

body{
    inline-size: 100%;
    block-size: 100vh;
    display: flex;
    align-items: center;
    justify-content: center;
    background-color: #36454F;
    font-size: 15px;
    color: #FFFFF0;
    font-family: 'Montserrat', sans-serif;
}

button{
    background-color: #333333;
    color: #e2e2e2;
    border-radius: 12px;
    padding: 0.7rem 2rem;
    border: none;
    font-family: 'Montserrat', sans-serif;
}

button:hover{
    background-color:  #28282B;
    color: #333333;
}
The code block above sets up some basic styles for your application. It imports the Montserrat font from Google Fonts.
It also applies the default styles for all elements, centers content on the body, and styles the button element in their default and hover states.
Once you are done defining the global styles for your application, you must apply the styles to the application.
To do this, you need the layout route. SvelteKit provides a +layout.svelte file to help you define layouts in your application. You can define the layout of your application by adding the +layout.svelte file to the src/routes directory.
In the +layout.svelte file, import your global.css file to apply your global styles to the app.
Like so:
<!--+layout.svelte-->
<script lang="ts">
    import '../styles/global.css'
</script>

<slot></slot>
The slot element creates a space for the application to insert page content. When you render a page, the application fills the slot element with the page’s content, making it visible within the layout.
In the src/lib directory of your project, create a Card.svelte file. This is the Card component you will use to render the data fetched from the quote API.
The Card component should look like this:
<!-- Card.svelte -->
<script lang="ts">
    export let author: string = "";
    export let content: string = "";
</script>

<main>
    <h4>{author}</h4>
    <p>{content}</p>
</main>

<style>
    main{
        inline-size: 80%;
        padding: 3rem;
        border-radius: 12px;
        display: flex;
        flex-direction: column;
        gap: 1rem;
        background-color: #f2f2f2;
        color: #36454F;
    }
</style>
In the script tag of the Card component, there are two props defined, the author and content props. They are both of type string with initial values of empty strings.
The main element defines the component’s template. The template includes an h4 element that displays the value of the author property and a p element that displays the value of the content property. Lastly, the style tag contains CSS properties and values that style the component.
Now, import and render the Card component in the +page.svelte file. This is the home route that displays when you render your application.
In the +page.svelte file, you will fetch the data from the quote API and pass it to the Card component using its props.
Like so:
<!-- +page.svelte -->
<script lang="ts">
    import Card from "$lib/Card.svelte";
    import Icon from '@iconify/svelte';
    import { onMount } from "svelte";

    let quote: any = {};

    const fetchQuote = async () => {
        const response = await fetch('<https://api.quotable.io/random>');
        const data = await response.json();
        quote = data;
    }

    onMount( fetchQuote );
</script>

<main>
   <h1>Quote Generator</h1>
    <Card author={quote.author} content={quote.content}/>
   <div>
        <button on:click={fetchQuote}>
            <Icon icon="subway:random" color="#FFF" />
        </button>
    </div>
</main>

<style>
    main{
        display: flex;
        flex-direction: column;
        gap: 0.8rem;
        align-items: center;
    }

    h1{
        margin-block-end: 0.8rem;
    }
</style>
The code block above fetches data from the quote API with the fetchQuote function and then assigns the fetched data to the quote variable.
Passing the fetchQuote function to the onMount hook ensures that it runs when the component mounts(i.e, the component’s initial render).
The Card component accepts the author and content properties’ values from the quote object and displays them. Clicking the button triggers the fetchQuote function to fetch another random quote to display.
The code block above uses an Icon component from the @iconify/svelte package. To use this component, you must first install the @iconify/svelte package by running the following command in your project’s directory on your terminal:
npm install --save-dev @iconify/svelte
After installing the @iconify/svelte package, run your app on the development server to see the application. You can do this by running the following command on your terminal:
npm run dev
Running the command above will start the development server on http://localhost:5173/. Open the link in your web browser to see your app.
The application should look like this:

Dockerize Your Application
Before you can deploy your application on the Back4app CaaS platform, you must dockerize it first. To dockerize a SvelteKit application, you first need to install Svelte’s node adapter.
You can install the node adapter by running the following command in your terminal:
npm i -D @sveltejs/adapter-node
Running this command installs the @sveltejs/adapter-node package as a development dependency in your SvelteKit project. You use this adapter when you want to deploy your SvelteKit application in a Node.js environment.
Once you are done installing the package, replace the first line of code in your svelte.config.js file with the code below:
import adapter from '@sveltejs/adapter-node';
The next step is to create a .dockerignore file in your project’s root directory. In the .dockerignore file, specify the files and directories that should be excluded when building the Docker image.
Like so:
node_modules
.svelte-kit
build
public
After specifying the files and directories that should be excluded. Create a Docker file named Dockerfile in the project’s root directory.
In the Dockerfile, add these lines of code:
FROM node:18-alpine as build
WORKDIR /app
COPY ./package*.json ./
RUN npm install
COPY . .
RUN npm run build

FROM node:18-alpine AS production
COPY --from=build /app/build .
COPY --from=build /app/package.json .
COPY --from=build /app/package-lock.json .
RUN npm ci --omit dev
EXPOSE 3000
CMD ["node", "."]
This Dockerfile causes a multi-stage build, where the first stage builds the application and the second stage creates a smaller production image with only the necessary dependencies.
Now, you can build your application’s docker image by running the following command in your terminal:
docker build -t quote-generator .
Deploying Your Application
Once you have dockerized your application and pushed it to a GitHub repository, you can deploy it on Back4app. To do this, create a Back4app account if you don’t have one already.
To create a Back4app account, follow these steps:
- Visit Back4app’s website.
- Click on the “Sign up” button.
- Fill out the sign-up form and submit it.
After creating your Back4app account, log into your account on the Back4app website & create a new app. You can do this by clicking on the “New App” button in the screen’s top right corner.
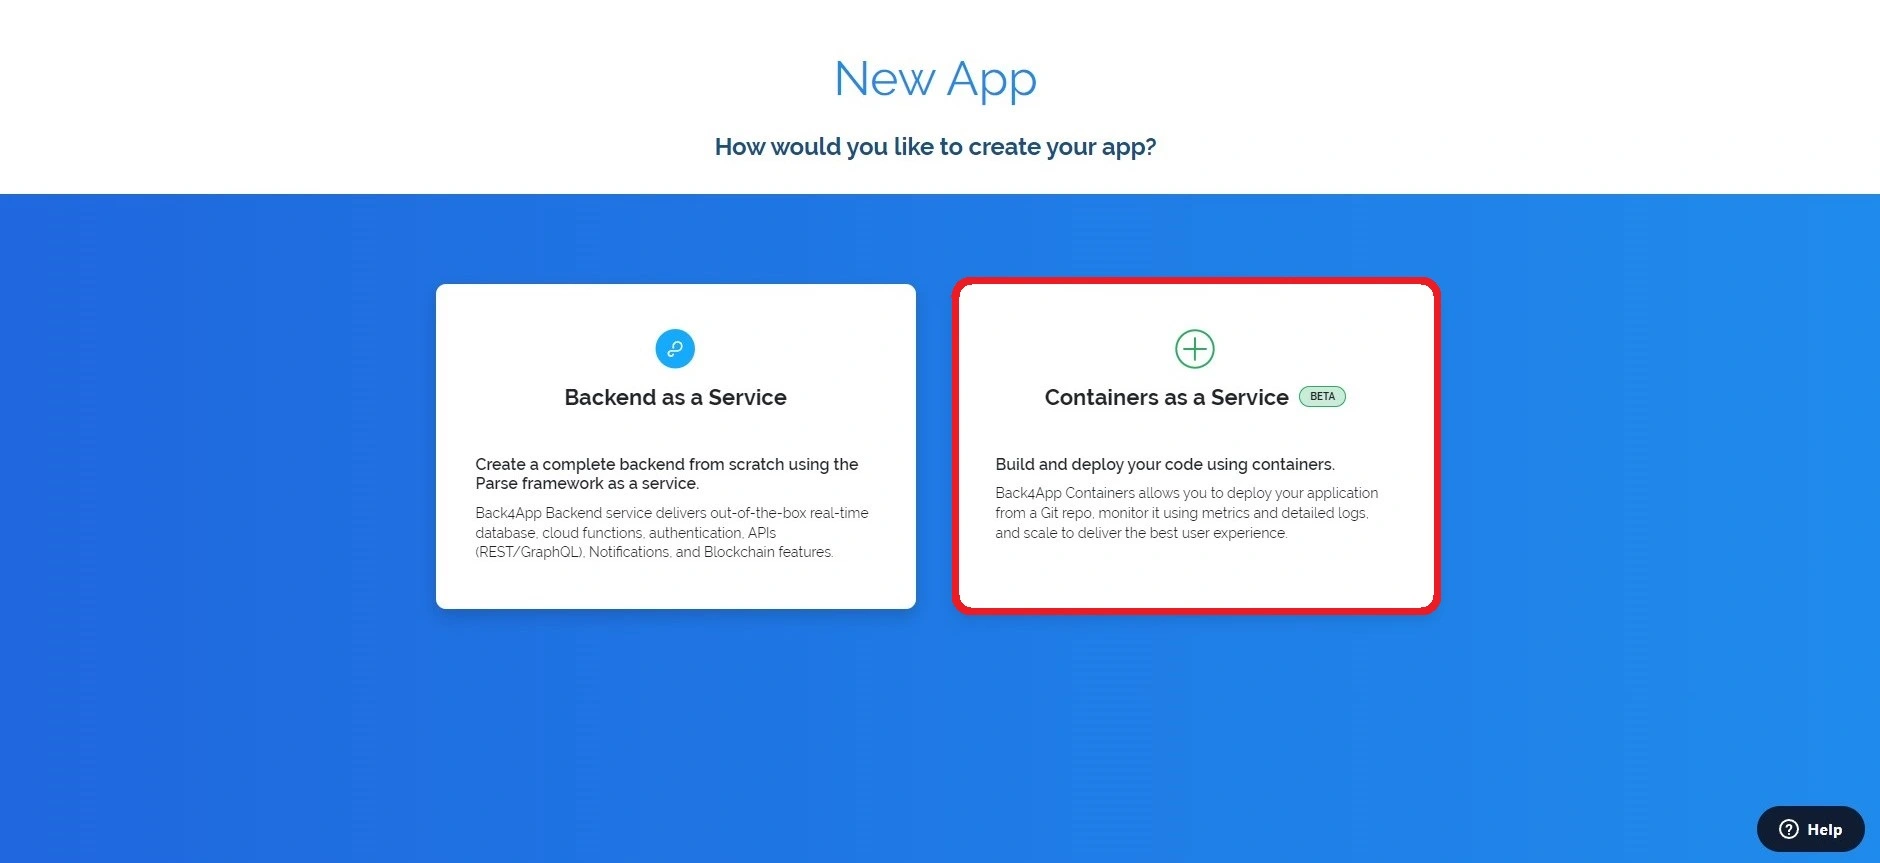
Select the Container as a Service option. After selecting this option, the website will redirect you to a different page where you would link your GitHub account to Back4app.
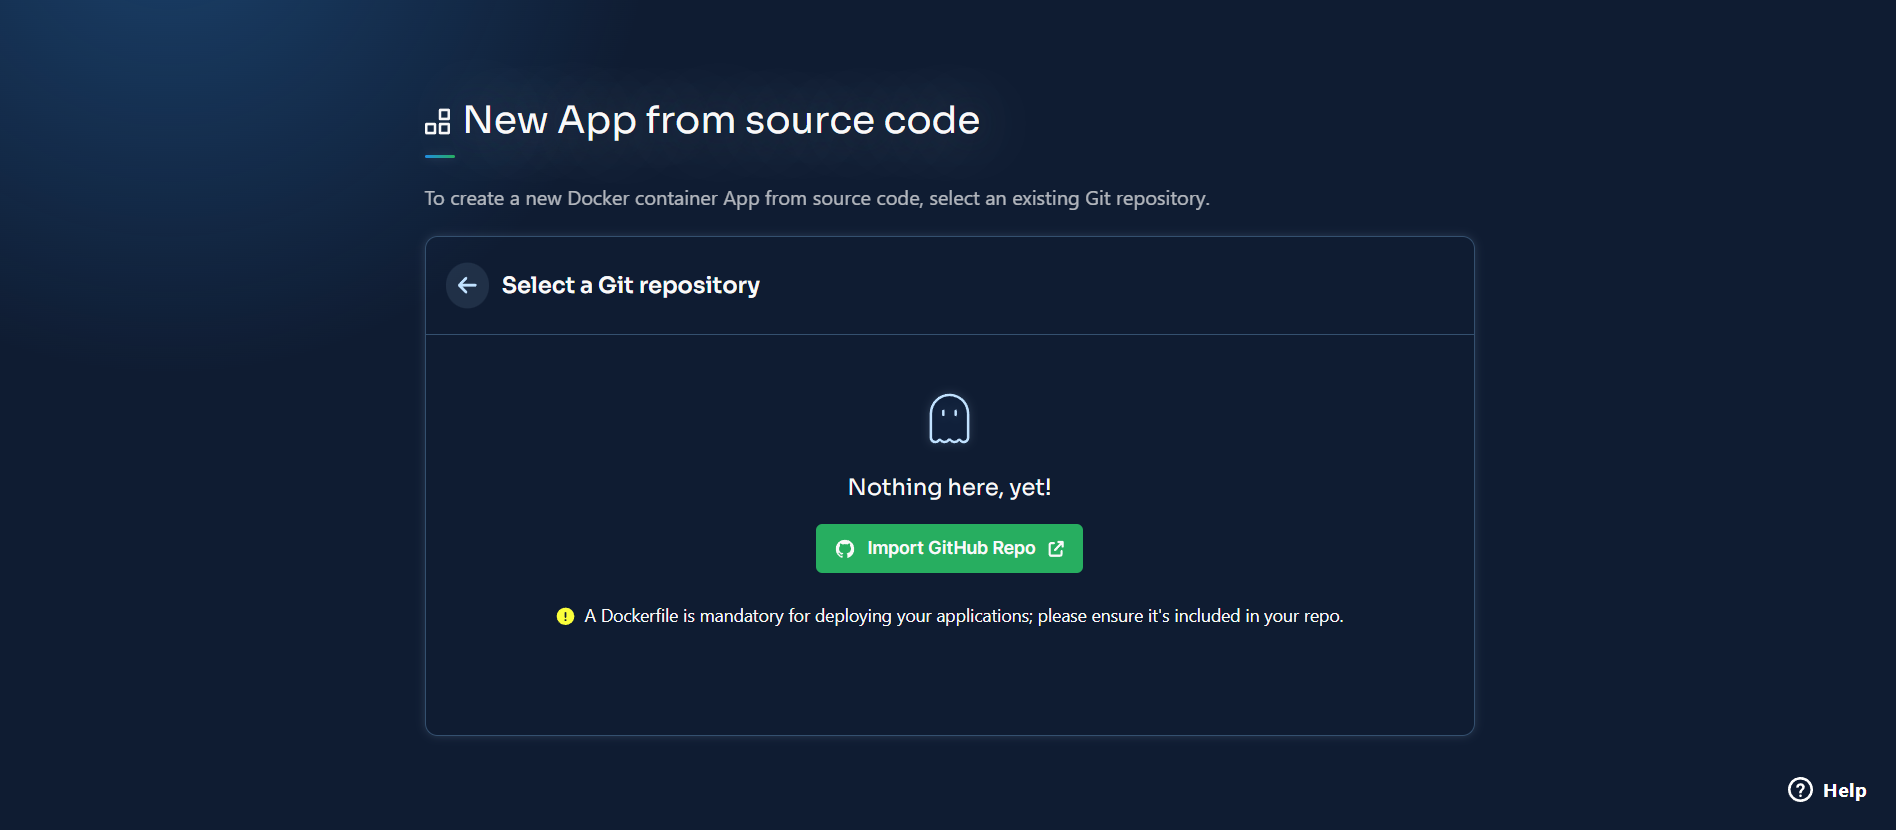
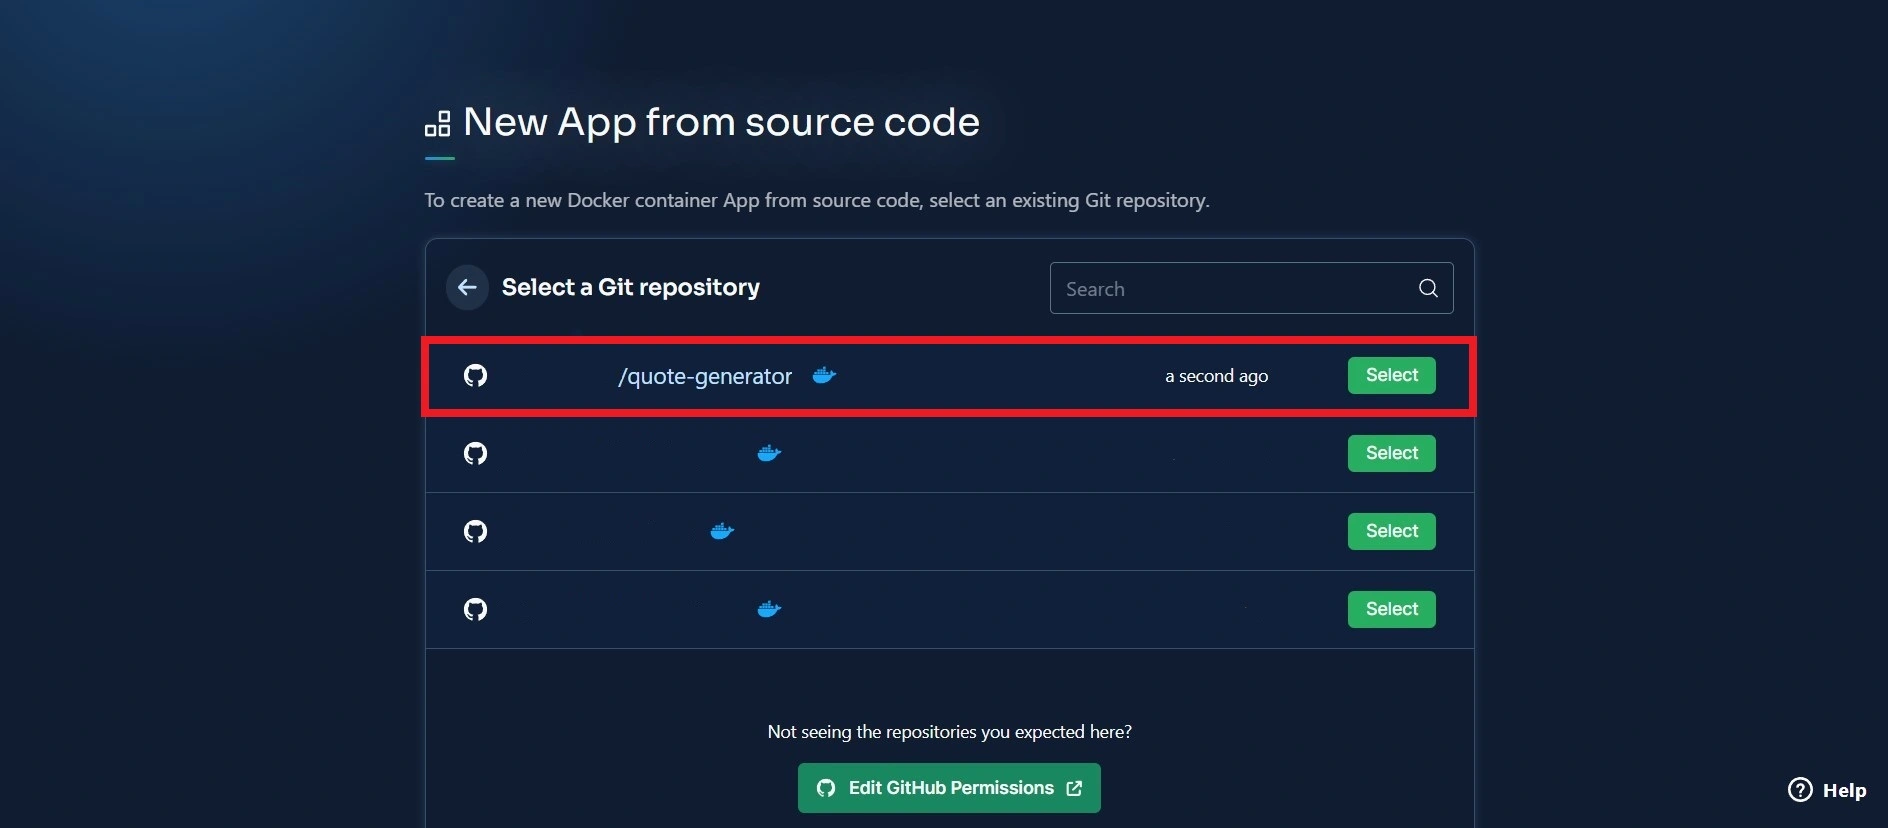
Once you have linked your GitHub account to Back4app, select your application’s repository for deployment.
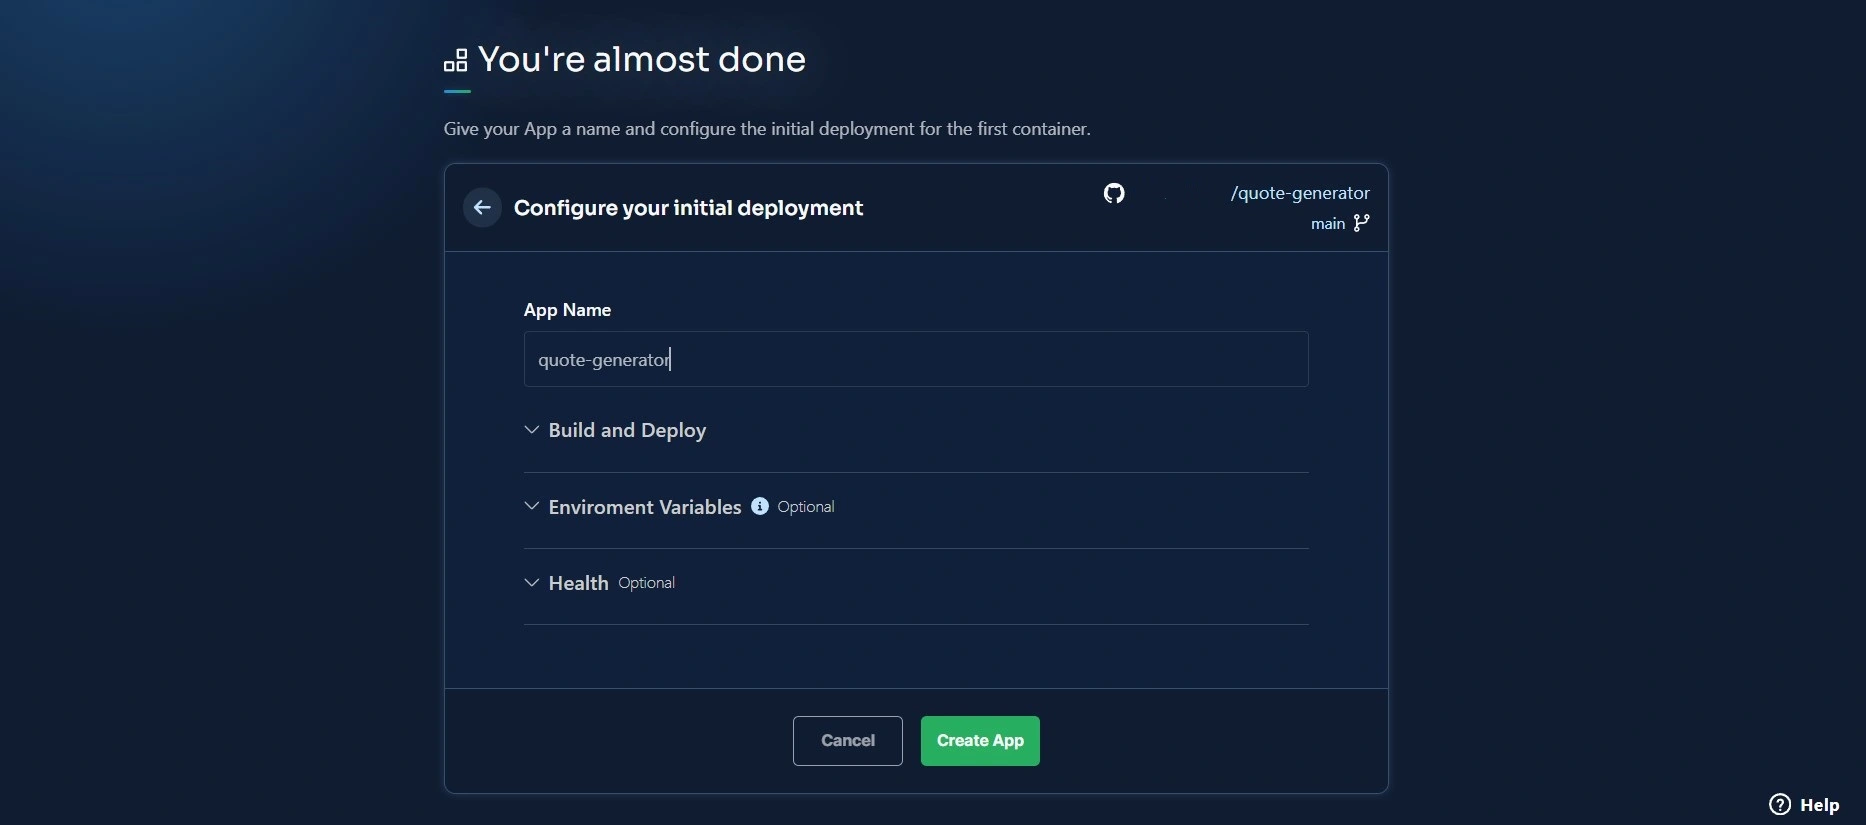
Give your application a name and configure its initial deployment before finally deploying the application.
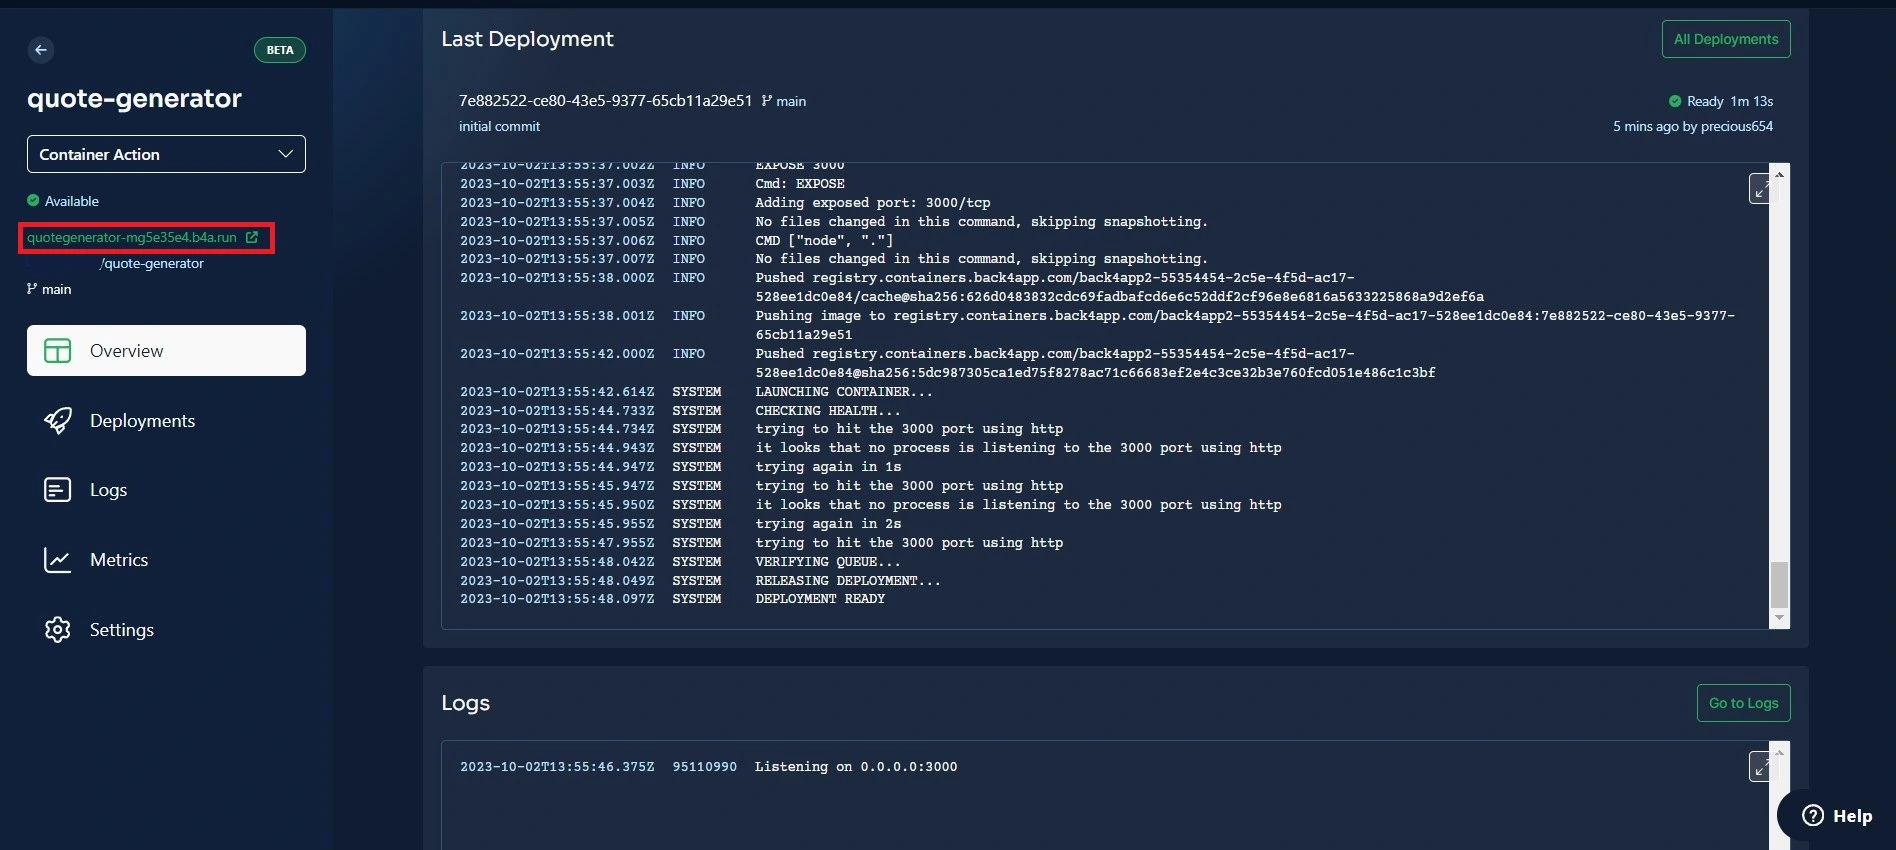
Upon the application’s successful deployment, Back4app will provide you with a link to access the application on your web browser.
Conclusion
In conclusion, deploying a SvelteKit application using Back4pp’s CaaS platform simplifies development. The process is simple.
It involves creating your application, dockerizing the application, pushing the application to a GitHub repository, and finally deploying the application.
When considering deploying your SvelteKit applications, the Back4app CaaS. platform provides a scalable and cost-effective solution.
If you liked this article, you may also enjoy reading the article How to build a SvelteKit app using ChatGPT.
FAQ
What Is SvelteKit?
SvelteKit is a modern web development framework that combines the speed and simplicity of Svelte with the power of a full-stack framework. It makes it easy to build fast, reliable, and scalable web applications. SvelteKit offers several features, including, server-side rendering, static site generation, file-based routing, etc.
How To Deploy a SvelteKit Application?
SvelteKit is a popular framework that helps developers build server-side rendering applications using Svelte. Back4app is a powerful BaaS platform that offers both Backend-as-a-Service (BaaS) and Container-as-a-Service (CaaS) options, providing a scalable and flexible environment for deploying applications.
To deploy a SvelteKit application on Back4app’s CaaS platform., follow these simple steps:
– Create a SvelteKit application
– Dockerize the application
– Push the application to a GitHub repository
– Set Up Your Back4app Account
– Create a Back4app application
– Link your GitHub account to the Back4app application
– Select the application’s repository
– Deploy the application


